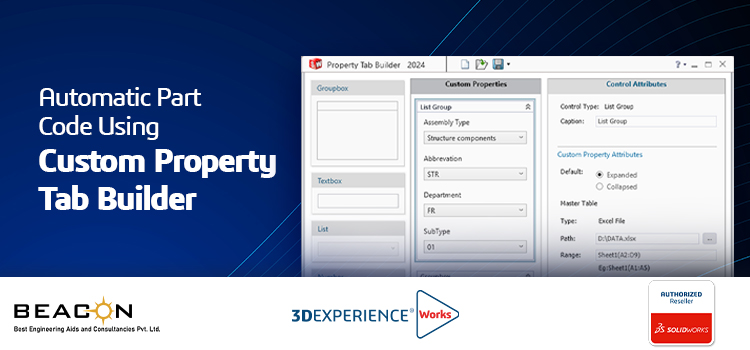


The problem statement emphasizes the requirement for user-created parts to be saved using organization-generated predefined naming conventions. These naming conventions result from a combination of inputs, originating from either user-defined values or pre-established defaults. Now, let’s delve into how this can be achieved using SOLIDWORKS.
Setting up the predefined structure of code
To embark on our journey, the initial phase involves establishing a standardized structure for the code or formula that will underpin the entire process. The specifics of this structure may vary depending on the organization and the intricacy of the code. Within this procedural framework, we’ll employ a logic that comprehensively encompasses various scenarios, leaving no space unexplored. This strategic approach ensures thorough coverage throughout the process.
The part number schema will look something like this: XXX.XX.XX.X.XX
The first 3 sections are dependent on each other. Like every assembly type has already assigned to a particular department and the depending on subtypes are also assigned.
Creating the Excel sheet for the dependable
As per the data gathered from the organizational structure, we can proceed with the making of the excel sheet. We have the data in the following format.
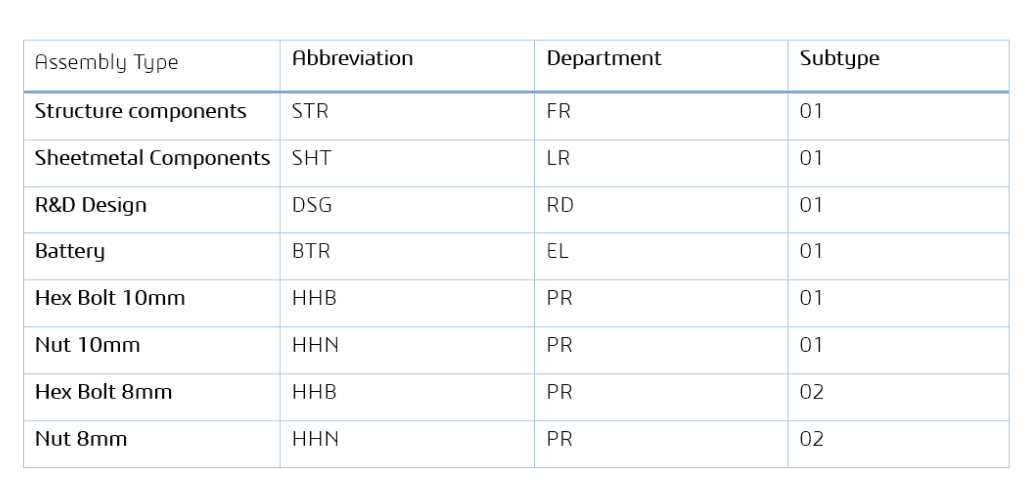
The data can be huge but let’s use this for the first 3 parts. Save the data in the excel file. And head towards the Custom Property Tab Builder.
Creating the tabs in property tab builder
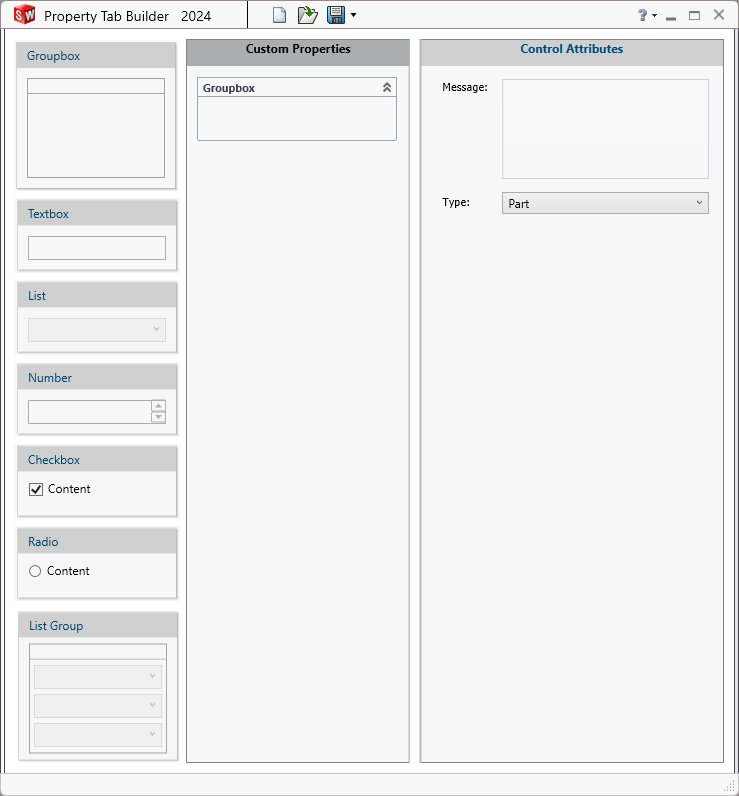
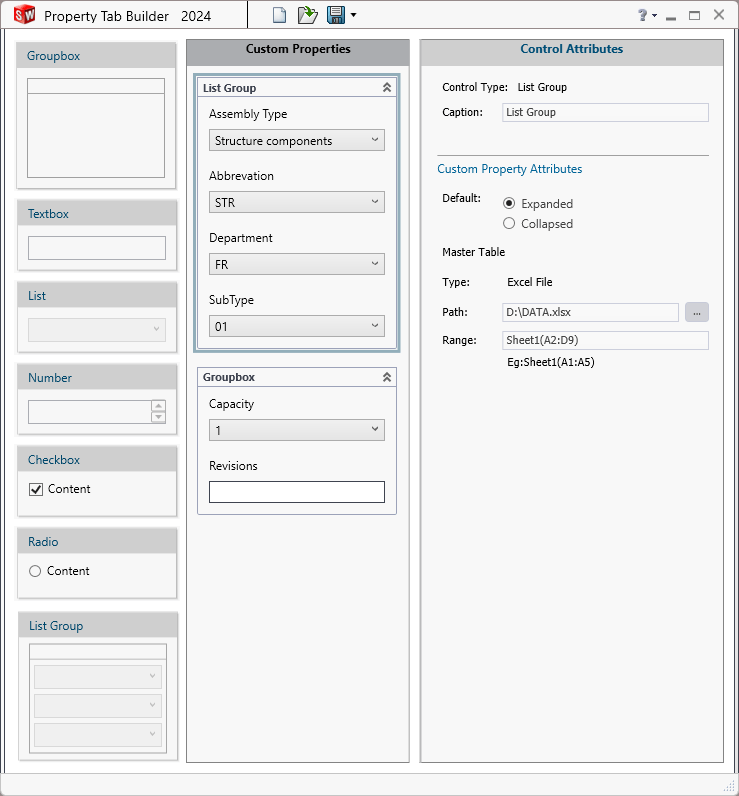
In the Custom Property Tab Builder, Let’s build the tabs and the associated values.
First open the custom property tab builder.
⦁ Assigning the Excel Data in the list Format:
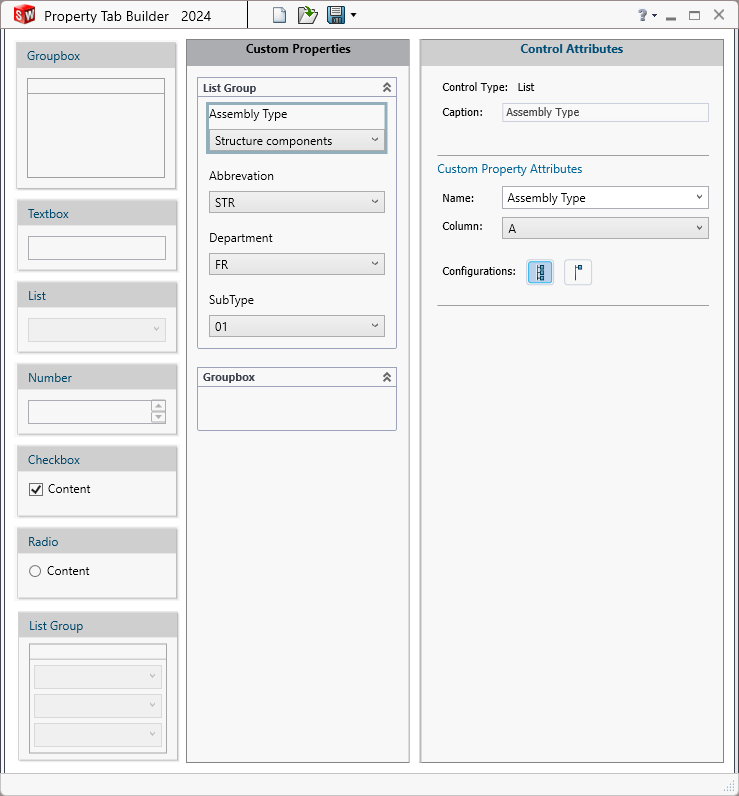
Make your SolidWorks design work easier by adding a “List Group” above the “Groupbox.” This helps make things look better and keeps your project organized. First, change the properties to fit your project. Then, add your Excel file data and make sure to start from the second row, with the headers in the first row (like A2:D9). Since you have four columns of data, drag, and drop new lists into the “List Group” to match. Set up the columns in order, from the first to the last. Keep everything consistent across all configurations, so your design works well. (Click on this ![]() Icon to apply it to all configurations)
Icon to apply it to all configurations)
⦁ Adding remaining file properties:
The capacity can be added by simply inserting the list and filling it up with the needed capacity values, such as 1, 2, 3, or 4. Next, include a Textbox in the same group. This allows users to manually input revisions, providing flexibility and customization options for your project. With this straightforward approach, you enhance the capacity of your project and empower users to easily manage, and update revisions as needed.
After making all the changes your tab will look like the following.
Now save it to the custom property template location and open a new part.
Assigning Custom Properties Through Tab Builder
After opening of the part, Now we can open the custom properties in the task pane by selecting this icon ![]() . Now press F5 in the window and select the template we just saved.
. Now press F5 in the window and select the template we just saved.
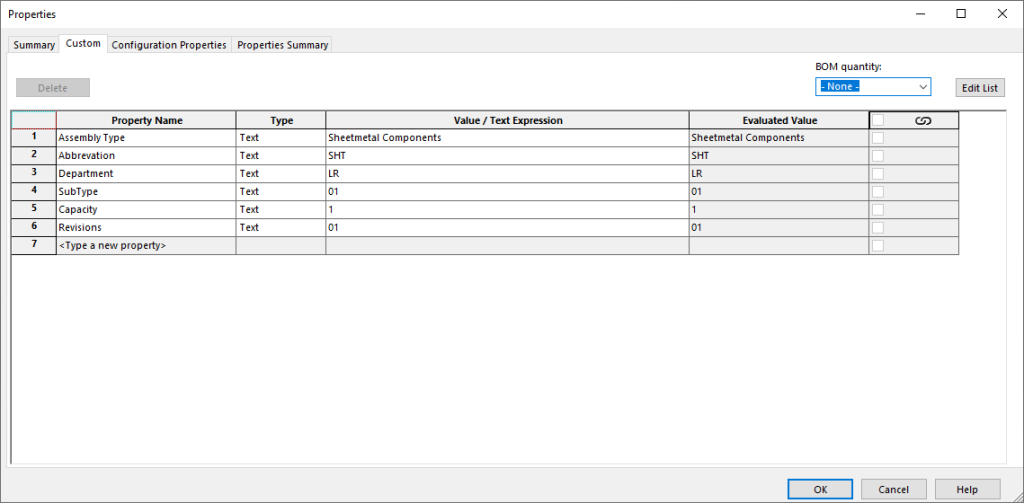
You will see a form we just created which can be filled as per the requirements of the part file. After clicking apply, the custom properties will be applied to the file which can be viewed in the file properties. If we do all the above steps correctly. Our file properties should look something like this:
Creating the code in custom property.
Add the new property by typing “Formula” as name in the latest row. And use the expression ($PRP:”property name”) to link the custom property to the formula.
Now use the same expression again and again to link all the properties in correct order. So that the evaluated value of the property will look like the code we want. If we take look at the formula which evaluates the code we are generating will look something like this: ($PRP:”Abbrevation”$PRP:”SubType”$PRP:”Department”$PRP:”Capacity”$PRP:”Revisions”).
And the Code will be evaluated to: SHT01LR101
This is how we can generate the code we required.
Assigning the code to the file name
After successfully creating the code, add the another property which will only reflect the same code by using the expression $PRP:”Formula” and rename the property to Part Number.
Save the current opened part file to rename the file. Then run the following macro file which will rename the part file with the custom property “Part Number”
Option Explicit
Sub RenamePartBasedOnCustomProperty()
‘ Declare variables
Dim swApp As Object
Dim swModel As Object
Dim swCustPropMgr As Object
Dim swNewModel As Object
Dim propName As String
Dim propValue As String
Dim propEvaluatedValue As String
Dim newPartName As String
‘ Initialize SolidWorks
Set swApp = Application.SldWorks
Set swModel = swApp.ActiveDoc
‘ Check if a document is open
If swModel Is Nothing Then
MsgBox “Please open a SolidWorks part document first.”, vbExclamation
Exit Sub
End If
‘ Specify the custom property to use for renaming
propName = “Part Number”
‘ Get the custom property manager
Set swCustPropMgr = swModel.Extension.CustomPropertyManager(“”)
‘ Check if the custom property exists
If Not swCustPropMgr Is Nothing Then
‘ Get the custom property value
propValue = swCustPropMgr.Get(propName)
If Not IsEmpty(propValue) Then
‘ Validate and clean the custom property value for use in a file name
propValue = CleanFileName(propValue)
‘ Get the evaluated value of the custom property
propEvaluatedValue = swModel.GetCustomInfoValue(“”, propName)
‘ Get the full path of the part using a workaround
Dim modelPath As String
modelPath = swModel.GetPathName
If modelPath = “” Then
‘ If the part is not saved, prompt user to save
MsgBox “Please save the part before renaming.”, vbExclamation
Exit Sub
End If
‘ Generate the new part name using the evaluated custom property value
newPartName = Left(modelPath, InStrRev(modelPath, “\”)) & propEvaluatedValue & “.SLDPRT” ‘ You can adjust the file extension if needed
‘ Save the part with the new name using SaveAs3
swModel.SaveAs3 newPartName, 0, 0
‘ Close the original part without saving changes
swApp.CloseDoc modelPath
‘ Open the new part to refresh the SolidWorks model
Set swNewModel = swApp.OpenDoc(newPartName, swDocPART)
‘ Set the custom property in the new part
Dim swNewCustPropMgr As Object
Set swNewCustPropMgr = swNewModel.Extension.CustomPropertyManager(“”)
swNewCustPropMgr.Set propName, propEvaluatedValue
‘ Save the new part to retain the custom property
swNewModel.Save
MsgBox “Part successfully renamed to: ” & propEvaluatedValue, vbInformation
Else
MsgBox “Custom property ‘Description’ is empty.”, vbExclamation
End If
Else
MsgBox “Custom property manager not found.”, vbExclamation
End If
End Sub
Function CleanFileName(value As String) As String
‘ Replace invalid characters in a file name with underscores
Dim invalidChars As String
Dim i As Integer
invalidChars = “\/:*?””<>|”
For i = 1 To Len(invalidChars)
value = Replace(value, Mid(invalidChars, i, 1), “_”)
Next i
CleanFileName = value
End Function
And with this your File will be renamed with the part code successfully.
Tip: You can save the part as template to save the formula in the template. Just make sure you delete the values in the custom properties and then save it as a template.
We Urge You To Call Us For Any Doubts & Clarifications That You May Have. We Are Eager to Talk To You
Call Us: +91 7406663589
 (No Ratings Yet)
#365/8, Ground Floor, "Hasmitha Avenue", 16th Main, 4th T Block East, Jayanagar, 4th T Block East, Pattabhirama Nagar, Jayanagar, Bengaluru, Karnataka 560041
Rated 4.7/5 with a total of 62 reviews
"CARAX" Building 4th Floor, 105/1/1/4, Next to Radha Hotel, Pune-Mumbai Xpress Way,Baner,Pune 411045
Rated 4.7/5 with a total of 17 reviews
1002, LODHA Supremus, I-Think Techno Campus,Kanjurmarg EAST - MUMBAI, MH, India – 400042.
Rated 5/5 with a total of 51 reviews
508, Shiti Ratna Complex, Panchwati Cross Road, Ahmedabad-380006
Rated 4.1/5 with a total of 7 reviews
Kanda's Villa, II Floor, AE Block,3362 R, 8th Street, Anna Nagar, Chennai, Tamil Nadu 600040
Rated 4.6/5 with a total of 16 reviews
Flat no F1, first floor, Nakhate corner, Eknath rang mandir road,New Usmanpura, Aurangabad, 431005.
A-101, 1st Floor, The Hub Complex, opp. Shete Hospital, Mahatma Nagar, Parijat Nagar, Nashik, Maharashtra 422005.
Level 7, Octave 3B Salarpuria Sattva Knowledge City, Inorbit Mall Road, Raidurg Village, Hi-tech City, Hyderabad, Telangana - 500081, India

pin up giris https://azerbaijancuisine.com/# pin up 360
pin up
mexican drugstore online purple pharmacy mexico price list mexican rx online
medicine in mexico pharmacies mexican pharmacy northern doctors medicine in mexico pharmacies
buying from online mexican pharmacy mexican pharmacy northern doctors best online pharmacies in mexico
mexican online pharmacies prescription drugs mexican pharmacy northern doctors mexican pharmaceuticals online
reputable mexican pharmacies online: mexican pharmacy northern doctors – mexican drugstore online
https://northern-doctors.org/# п»їbest mexican online pharmacies
https://northern-doctors.org/# mexican rx online
medicine in mexico pharmacies: mexican northern doctors – mexican border pharmacies shipping to usa
https://northern-doctors.org/# mexico drug stores pharmacies
mexico drug stores pharmacies: mexican pharmacy online – best online pharmacies in mexico
http://northern-doctors.org/# mexican pharmaceuticals online
reputable mexican pharmacies online: mexican pharmacy – mexican border pharmacies shipping to usa
mexico drug stores pharmacies mexican northern doctors buying prescription drugs in mexico
buying prescription drugs in mexico online: mexican pharmacy online – mexico pharmacies prescription drugs
https://northern-doctors.org/# mexican online pharmacies prescription drugs
buying from online mexican pharmacy: northern doctors pharmacy – mexico pharmacies prescription drugs
mexico pharmacy: best online pharmacies in mexico – buying from online mexican pharmacy
http://northern-doctors.org/# medication from mexico pharmacy
mexico drug stores pharmacies: Mexico pharmacy that ship to usa – mexican online pharmacies prescription drugs
http://northern-doctors.org/# mexico pharmacies prescription drugs
buying prescription drugs in mexico online: mexican northern doctors – mexico drug stores pharmacies
mexican rx online: northern doctors – mexican border pharmacies shipping to usa
mexican rx online mexican pharmacy online mexican mail order pharmacies
https://northern-doctors.org/# pharmacies in mexico that ship to usa
mexico pharmacies prescription drugs: northern doctors – purple pharmacy mexico price list
mexican pharmacy: mexican pharmacy – mexican border pharmacies shipping to usa
https://northern-doctors.org/# mexican mail order pharmacies
mexico pharmacies prescription drugs: mexican pharmacy northern doctors – medicine in mexico pharmacies
https://northern-doctors.org/# buying from online mexican pharmacy
mexican pharmacy: northern doctors – pharmacies in mexico that ship to usa
mexican mail order pharmacies: Mexico pharmacy that ship to usa – mexican pharmacy
https://northern-doctors.org/# п»їbest mexican online pharmacies
mexican mail order pharmacies Mexico pharmacy that ship to usa mexico pharmacies prescription drugs
mexican rx online: northern doctors – mexican mail order pharmacies
http://cmqpharma.com/# mexican mail order pharmacies
buying prescription drugs in mexico online
mexican pharmacy online mexican pharmacy buying prescription drugs in mexico online
mexican mail order pharmacies cmq mexican pharmacy online medicine in mexico pharmacies
mexican pharmaceuticals online mexican online pharmacy medicine in mexico pharmacies
mexico pharmacies prescription drugs: cmq pharma mexican pharmacy – mexican mail order pharmacies
mexican rx online cmq pharma mexican pharmacy purple pharmacy mexico price list
buying from online mexican pharmacy mexican online pharmacy mexican pharmacy
mexico pharmacies prescription drugs
https://cmqpharma.online/# medicine in mexico pharmacies
mexican border pharmacies shipping to usa
mexican border pharmacies shipping to usa mexico pharmacy mexican online pharmacies prescription drugs
mexican pharmacy mexican online pharmacy mexican border pharmacies shipping to usa
medicine in mexico pharmacies buying prescription drugs in mexico online medication from mexico pharmacy
pharmacies in mexico that ship to usa cmqpharma.com п»їbest mexican online pharmacies
mexico drug stores pharmacies mexican pharmaceuticals online mexican online pharmacies prescription drugs
http://foruspharma.com/# mexican online pharmacies prescription drugs
http://foruspharma.com/# buying from online mexican pharmacy
reputable mexican pharmacies online buying prescription drugs in mexico mexican border pharmacies shipping to usa
https://foruspharma.com/# buying prescription drugs in mexico online
can i get generic clomid pills: cost cheap clomid now – can i order cheap clomid without a prescription
doxyhexal: doxycycline antibiotics – doxycycline uk cost
amoxicillin canada price: amoxicillin 500mg buy online uk – amoxicillin 500
purchase amoxicillin online without prescription: how to get amoxicillin over the counter – amoxicillin 500 mg brand name
paxlovid india: paxlovid india – paxlovid cost without insurance
cost cheap clomid price: get generic clomid no prescription – can i purchase cheap clomid no prescription
п»їpaxlovid: Paxlovid over the counter – paxlovid for sale
cipro 500mg best prices: buy generic ciprofloxacin – buy cipro no rx
https://mexicandeliverypharma.online/# reputable mexican pharmacies online
buying prescription drugs in mexico online mexican pharmaceuticals online mexico drug stores pharmacies
mexican drugstore online: buying prescription drugs in mexico online – mexico pharmacies prescription drugs
buying prescription drugs in mexico online: reputable mexican pharmacies online – mexico drug stores pharmacies
mexico drug stores pharmacies: mexico drug stores pharmacies – mexico drug stores pharmacies
mexican mail order pharmacies: reputable mexican pharmacies online – mexico drug stores pharmacies
https://mexicandeliverypharma.online/# medicine in mexico pharmacies
mexico drug stores pharmacies: п»їbest mexican online pharmacies – best online pharmacies in mexico
buying prescription drugs in mexico online: reputable mexican pharmacies online – п»їbest mexican online pharmacies
https://mexicandeliverypharma.online/# buying prescription drugs in mexico
mexican mail order pharmacies: medicine in mexico pharmacies – mexico pharmacies prescription drugs
mexican mail order pharmacies п»їbest mexican online pharmacies medication from mexico pharmacy
mexican mail order pharmacies: mexican mail order pharmacies – buying prescription drugs in mexico online
mexican pharmaceuticals online: mexican online pharmacies prescription drugs – mexico drug stores pharmacies
mexican online pharmacies prescription drugs: п»їbest mexican online pharmacies – mexico drug stores pharmacies
purple pharmacy mexico price list mexico drug stores pharmacies п»їbest mexican online pharmacies
https://mexicandeliverypharma.com/# buying prescription drugs in mexico
pharmacies in mexico that ship to usa: buying prescription drugs in mexico – medicine in mexico pharmacies
mexican mail order pharmacies: п»їbest mexican online pharmacies – medication from mexico pharmacy
pharmacies in mexico that ship to usa: mexico drug stores pharmacies – mexican border pharmacies shipping to usa
pharmacies in mexico that ship to usa mexico drug stores pharmacies purple pharmacy mexico price list
п»їbest mexican online pharmacies: medicine in mexico pharmacies – pharmacies in mexico that ship to usa
buying from online mexican pharmacy: purple pharmacy mexico price list – mexican rx online
buying prescription drugs in mexico: medication from mexico pharmacy – mexican mail order pharmacies
buying prescription drugs in mexico online mexico drug stores pharmacies mexican border pharmacies shipping to usa
medication from mexico pharmacy: mexican border pharmacies shipping to usa – mexican rx online
mexico drug stores pharmacies: mexican mail order pharmacies – п»їbest mexican online pharmacies
pharmacies in mexico that ship to usa: mexico pharmacies prescription drugs – mexican border pharmacies shipping to usa
mexican online pharmacies prescription drugs: purple pharmacy mexico price list – buying from online mexican pharmacy
reputable mexican pharmacies online: buying prescription drugs in mexico – medication from mexico pharmacy
mexican mail order pharmacies: buying prescription drugs in mexico online – mexican mail order pharmacies
п»їbest mexican online pharmacies mexican rx online medication from mexico pharmacy
medicine in mexico pharmacies: mexican drugstore online – mexico drug stores pharmacies
best online pharmacies in mexico: medication from mexico pharmacy – mexican border pharmacies shipping to usa
buying prescription drugs in mexico online: mexico drug stores pharmacies – mexican rx online
mexico drug stores pharmacies medicine in mexico pharmacies mexican mail order pharmacies
п»їbest mexican online pharmacies: best online pharmacies in mexico – best online pharmacies in mexico
medication from mexico pharmacy: medication from mexico pharmacy – medication from mexico pharmacy
reputable mexican pharmacies online: mexico drug stores pharmacies – mexico drug stores pharmacies
mexican online pharmacies prescription drugs mexico drug stores pharmacies pharmacies in mexico that ship to usa
pharmacies in mexico that ship to usa: buying from online mexican pharmacy – medication from mexico pharmacy
buying from online mexican pharmacy: buying from online mexican pharmacy – mexican drugstore online
pharmacies in mexico that ship to usa: mexico drug stores pharmacies – mexican mail order pharmacies
purple pharmacy mexico price list mexico drug stores pharmacies mexican online pharmacies prescription drugs
medication from mexico pharmacy: mexican drugstore online – medication from mexico pharmacy
mexican online pharmacies prescription drugs: buying prescription drugs in mexico – best online pharmacies in mexico
mexico pharmacies prescription drugs: best online pharmacies in mexico – purple pharmacy mexico price list
mexico drug stores pharmacies medicine in mexico pharmacies reputable mexican pharmacies online
mexico pharmacies prescription drugs: mexico drug stores pharmacies – mexican border pharmacies shipping to usa
mexico drug stores pharmacies: mexican rx online – buying from online mexican pharmacy
mexico drug stores pharmacies: buying prescription drugs in mexico online – buying from online mexican pharmacy
mexico pharmacy mexico drug stores pharmacies mexican online pharmacies prescription drugs
п»їbest mexican online pharmacies: pharmacies in mexico that ship to usa – buying prescription drugs in mexico online
mexico drug stores pharmacies: mexican drugstore online – mexico drug stores pharmacies
purple pharmacy mexico price list: mexico drug stores pharmacies – mexican online pharmacies prescription drugs
buying prescription drugs in mexico medicine in mexico pharmacies mexican pharmaceuticals online
mexico pharmacies prescription drugs: purple pharmacy mexico price list – mexico pharmacies prescription drugs
reputable mexican pharmacies online: medicine in mexico pharmacies – best online pharmacies in mexico
best online pharmacies in mexico: mexican border pharmacies shipping to usa – medication from mexico pharmacy
medicine in mexico pharmacies: buying prescription drugs in mexico online – pharmacies in mexico that ship to usa
mexico drug stores pharmacies: mexico pharmacies prescription drugs – medication from mexico pharmacy
mexican mail order pharmacies: buying prescription drugs in mexico – mexican border pharmacies shipping to usa
mexican online pharmacies prescription drugs: buying from online mexican pharmacy – п»їbest mexican online pharmacies
purple pharmacy mexico price list: best online pharmacies in mexico – mexican border pharmacies shipping to usa
medication from mexico pharmacy: medication from mexico pharmacy – reputable mexican pharmacies online
mexican mail order pharmacies: mexico drug stores pharmacies – buying prescription drugs in mexico
mexico drug stores pharmacies: mexican drugstore online – mexican online pharmacies prescription drugs
п»їbest mexican online pharmacies: buying from online mexican pharmacy – mexico drug stores pharmacies
buying cheap propecia without a prescription order generic propecia without insurance propecia medication
п»їcytotec pills online: buy misoprostol over the counter – buy misoprostol over the counter
https://zithromaxbestprice.pro/# buy zithromax no prescription
https://nolvadexbestprice.pro/# nolvadex price
prednisone 10mg buy online prednisone 10 prednisone 10mg tablet cost
order generic propecia for sale: propecia without prescription – propecia medication
http://propeciabestprice.pro/# propecia price
http://prednisonebestprice.pro/# over the counter prednisone cream
tamoxifen bone density tamoxifen bone pain nolvadex online
tamoxifen breast cancer prevention: tamoxifen pill – tamoxifen rash pictures
http://nolvadexbestprice.pro/# tamoxifen generic
http://zithromaxbestprice.pro/# zithromax for sale usa
cost of cheap propecia without a prescription cost of cheap propecia prices cost of cheap propecia price
propecia no prescription: buy generic propecia without prescription – buy propecia
order cytotec online: buy cytotec pills online cheap – cytotec pills buy online
order cheap propecia pills: cost propecia for sale – buy cheap propecia prices
http://nolvadexbestprice.pro/# does tamoxifen cause menopause
cytotec pills buy online: cytotec abortion pill – cytotec pills buy online
zithromax 500mg: zithromax cost – zithromax prescription
https://prednisonebestprice.pro/# prednisone 50 mg tablet canada
buy nolvadex online: lexapro and tamoxifen – hysterectomy after breast cancer tamoxifen
propecia prices: cost of cheap propecia prices – get generic propecia tablets
zithromax online no prescription: zithromax 1000 mg pills – zithromax online
https://cytotecbestprice.pro/# buy cytotec over the counter
http://viagragenerico.site/# viagra online consegna rapida
farmacie online affidabili: avanafil generico – Farmacie on line spedizione gratuita
farmacia online senza ricetta: Cialis generico 20 mg 8 compresse prezzo – farmacie online affidabili
farmaci senza ricetta elenco: Farmacia online piu conveniente – Farmacia online piГ№ conveniente
comprare farmaci online con ricetta: kamagra gel – acquisto farmaci con ricetta
https://kamagrait.pro/# Farmacia online piГ№ conveniente
migliori farmacie online 2024: Farmacie che vendono Cialis senza ricetta – farmacia online
viagra prezzo farmacia 2023: viagra senza ricetta – viagra acquisto in contrassegno in italia
farmacia online senza ricetta: Farmacia online piu conveniente – acquisto farmaci con ricetta
comprare farmaci online con ricetta: Tadalafil generico migliore – comprare farmaci online con ricetta
http://farmait.store/# farmacia online
п»їFarmacia online migliore: Avanafil compresse – farmacia online senza ricetta
Farmacia online piГ№ conveniente: kamagra gel prezzo – farmacie online autorizzate elenco
https://tadalafil.auction/# cialis dapoxetine europe
cialis with dapoxetine or viagra with dapoxetine better: cialis without a doctor prescription – cialis canadian
viagra from canada: Buy Viagra online in USA – viagra without a doctor prescription usa
https://tadalafil.auction/# buy cheap cialis online with mastercard
cialis online paypal: cialis daily use side effects – order cialis in australia
http://sildenafil.llc/# viagra without a doctor prescription usa
https://indiapharmacy.shop/# best online pharmacy india
online erectile dysfunction pills
http://indiapharmacy.shop/# indian pharmacies safe
ed medicines: ed prescriptions online – online erectile dysfunction medication
http://edpillpharmacy.store/# how to get ed meds online
ed medications cost
https://indiapharmacy.shop/# mail order pharmacy india
purple pharmacy mexico price list: Best pharmacy in Mexico – reputable mexican pharmacies online
http://edpillpharmacy.store/# erectile dysfunction medication online
ed medicines
top 10 online pharmacy in india: Indian pharmacy online – indian pharmacy paypal
http://indiapharmacy.shop/# indian pharmacies safe
ed medications cost: edmeds – edmeds
buy ed pills online: Cheapest online ED treatment – what is the cheapest ed medication
http://mexicopharmacy.win/# pharmacies in mexico that ship to usa
cheapest online pharmacy india: Top mail order pharmacies – cheapest online pharmacy india
medicine in mexico pharmacies: Mexico pharmacy online – mexican rx online
http://indiapharmacy.shop/# world pharmacy india
indianpharmacy com: Online pharmacy – indian pharmacy
http://mexicopharmacy.win/# mexican border pharmacies shipping to usa
mail order pharmacy india: Online pharmacy USA – best india pharmacy
best india pharmacy: Indian pharmacy international shipping – top 10 online pharmacy in india
https://mexicopharmacy.win/# buying from online mexican pharmacy
mexico drug stores pharmacies: Certified Mexican pharmacy – mexico drug stores pharmacies
https://edpillpharmacy.store/# cheapest ed meds
cheapest erectile dysfunction pills: Best ED meds online – ed drugs online
medication from mexico pharmacy: mexican pharmacy – mexico drug stores pharmacies
http://edpillpharmacy.store/# order ed pills
medicine in mexico pharmacies: mexico pharmacy win – best online pharmacies in mexico
online pharmacy india: Online medicine home delivery – indian pharmacy online
affordable ed medication: Best ED meds online – buy erectile dysfunction pills online
indian pharmacy paypal: Indian pharmacy international shipping – best online pharmacy india
buy erectile dysfunction pills: Cheapest online ED treatment – best online ed meds
buy medicines online in india: mail order pharmacy india – online pharmacy india
Abortion pills online http://tamoxifen.bid/# cost of tamoxifen
generic lasix
http://furosemide.win/# lasix online
nolvadex pct buy tamoxifen online nolvadex pct
best price for lipitor: Lipitor 10 mg price – lipitor 4
buy cytotec online fast delivery https://tamoxifen.bid/# tamoxifen endometriosis
generic lasix
buy cytotec over the counter cytotec best price cytotec abortion pill
http://lipitor.guru/# lipitor 80 mg
buy cytotec https://lipitor.guru/# lipitor 40 mg
lasix 100mg
https://lipitor.guru/# generic cost of lipitor
buy cytotec online https://tamoxifen.bid/# tamoxifen benefits
lasix generic name
alternatives to tamoxifen how to lose weight on tamoxifen tamoxifen alternatives premenopausal
https://cytotec.pro/# buy cytotec
buy cytotec in usa: buy misoprostol over the counter – buy cytotec online
buy cytotec online https://cytotec.pro/# buy misoprostol over the counter
lasix 20 mg
buy lasix online: lasix for sale – lasix 100mg
https://lisinopril.guru/# lisinopril mexico
buy misoprostol over the counter https://lisinopril.guru/# lisinopril capsule
lasix 20 mg
buy cytotec pills online cheap: buy cytotec online – buy cytotec over the counter
buy cytotec pills online cheap: Misoprostol price in pharmacy – order cytotec online
https://lisinopril.guru/# zestoretic 20 25
buy cytotec over the counter http://lisinopril.guru/# lisinopril tablet 40 mg
lasix furosemide 40 mg
buy cytotec over the counter: cytotec best price – Misoprostol 200 mg buy online
buy cheap lisinopril 40mg: Lisinopril online prescription – lisinopril 5 mg medicine
cytotec abortion pill https://lipitor.guru/# generic lipitor 10mg
furosemida
tamoxifen cancer: Purchase Nolvadex Online – tamoxifen alternatives
Misoprostol 200 mg buy online: buy misoprostol over the counter – order cytotec online
Misoprostol 200 mg buy online http://cytotec.pro/# buy cytotec online
lasix medication
tamoxifen skin changes: buy tamoxifen online – liquid tamoxifen
lasix 40 mg: furosemide online – lasix 100 mg tablet
buy lasix online: furosemide online – lasix side effects
canada drug pharmacy adderall canadian pharmacy canadian pharmacy ed medications
online canadian pharmacy: canadian pharmacy uk delivery – canadian neighbor pharmacy
http://easyrxindia.com/# indian pharmacy
https://easyrxcanada.online/# pharmacies in canada that ship to the us
buying from online mexican pharmacy mexican online pharmacies prescription drugs purple pharmacy mexico price list
https://easyrxcanada.online/# canadian pharmacy reviews
http://easyrxindia.com/# buy medicines online in india
indian pharmacy online best india pharmacy best india pharmacy
canadian pharmacy online: canadian pharmacy – rate canadian pharmacies
buying prescription drugs in mexico online: purple pharmacy mexico price list – mexican online pharmacies prescription drugs
http://mexstarpharma.com/# mexico drug stores pharmacies
top 10 online pharmacy in india: indian pharmacy online – india pharmacy mail order
http://easyrxcanada.com/# pharmacy in canada
https://easyrxcanada.com/# safe canadian pharmacies
buying prescription drugs in mexico: mexican online pharmacies prescription drugs – mexico drug stores pharmacies
canadian drug: canadian pharmacy online – my canadian pharmacy rx
http://easyrxindia.com/# best india pharmacy
indian pharmacy: top 10 pharmacies in india – online pharmacy india
http://mexstarpharma.com/# purple pharmacy mexico price list
en cok kazandiran slot siteleri: yeni slot siteleri – slot siteleri guvenilir
https://denemebonusuverensiteler.win/# bahis siteleri
guvenilir slot siteleri 2024: guvenilir slot siteleri – en guvenilir slot siteleri
slot siteleri bonus veren: en cok kazandiran slot siteleri – slot oyun siteleri
deneme bonusu: bonus veren siteler – bonus veren siteler
https://slotsiteleri.bid/# en yeni slot siteleri
en iyi slot siteleri 2024: bonus veren slot siteleri – deneme veren slot siteleri
https://denemebonusuverensiteler.win/# deneme bonusu veren siteler
yasal slot siteleri: casino slot siteleri – slot kumar siteleri
I relish, lead to I found just what I used to be looking for. You have ended my four day long hunt! God Bless you man. Have a great day. Bye
http://slotsiteleri.bid/# deneme bonusu veren siteler
slot kumar siteleri: slot siteleri 2024 – slot siteleri guvenilir
How do you start a website for a clothing company?
http://sweetbonanza.network/# sweet bonanza nas?l oynan?r
en iyi slot siteler: canl? slot siteleri – guvenilir slot siteleri 2024
http://slotsiteleri.bid/# en iyi slot siteleri 2024
пин ап казино вход: pin up – пин ап зеркало
пинап казино пинап казино pin up казино
вавада зеркало: вавада – vavada казино
https://pin-up.diy/# pin up казино
пинап казино: пин ап зеркало – пин ап казино
pin up казино: пин ап казино – пин ап зеркало
https://1win.directory/# 1win официальный сайт
1хбет официальный сайт: 1xbet официальный сайт мобильная версия – 1xbet
пин ап казино вход: pin up казино – пин ап казино вход
http://1xbet.contact/# 1хбет
vavada зеркало: vavada казино – vavada casino
пин ап зеркало: пин ап – пин ап казино вход
http://pin-up.diy/# пин ап казино
pin up: пинап казино – пин ап
казино вавада: vavada – vavada online casino
https://easydrugrx.com/# pharmacy one rx
giant eagle pharmacy augmentin
pharmacy dispensing clozaril: animal pharmacy online – best online pharmacy buy accutane
https://onlineph24.com/# atarax online pharmacy
mexican online mail order pharmacy
drug price: pharmacy book store – narcotics online pharmacy
https://drstore24.com/# kroger pharmacy simvastatin
gabapentin amneal pharmacy
buy isotretinoin online pharmacy: bactrim pharmacy – omeprazole pharmacy
https://onlineph24.com/# xenical online pharmacy
zyban online pharmacy
ivermectin online pharmacy: fincar uk pharmacy – tretinoin cream online pharmacy
Pamelor: Diamox – hair loss
Doxycycline: australia online pharmacy – online pharmacy australia free delivery
asda pharmacy mefloquine: metoprolol mexican pharmacy – reliable rx pharmacy
viagra utah pharmacy: real pharmacy rx generic viagra – steroids online pharmacy
Online medicine home delivery: top 10 pharmacies in india – cheapest online pharmacy india
http://indianpharmacy.company/# online pharmacy india
medication from mexico pharmacy п»їbest mexican online pharmacies best online pharmacies in mexico
mexican pharmaceuticals online: medication from mexico pharmacy – medication from mexico pharmacy
order medicine online: viagra from boots pharmacy – first medicine online pharmacy store reviews
http://pharmbig24.com/# Malegra FXT
Online medicine home delivery: indianpharmacy com – cheapest online pharmacy india
indian pharmacy online: reputable indian pharmacies – indian pharmacies safe
cialis discount pharmacy generic accutane online pharmacy Sumycin
tadalafil online us pharmacy: online pharmacies uk – online pharmacy tamoxifen
https://mexicopharmacy.cheap/# mexico drug stores pharmacies
texas rx pharmacy: cialis online pharmacy scams – pharmacy cialis online
indian pharmacy paypal Online medicine home delivery Online medicine home delivery
reputable mexican pharmacies online: mexico pharmacies prescription drugs – mexican mail order pharmacies
п»їlegitimate online pharmacies india reputable indian online pharmacy mail order pharmacy india
india pharmacy mail order: mail order pharmacy india – mail order pharmacy india
http://pharmbig24.com/# anti fungal
mexican border pharmacies shipping to usa: mexican mail order pharmacies – mexico drug stores pharmacies
best online pharmacies in mexico mexican mail order pharmacies mexican rx online
kaiser online pharmacy: actos online pharmacy – roadrunner pharmacy
buy prescription drugs from india: reputable indian pharmacies – п»їlegitimate online pharmacies india
https://mexicopharmacy.cheap/# п»їbest mexican online pharmacies
pharmacy selling cytotec levitra pharmacy online pharmacy usa viagra
I was very happy to find this net-site.I wished to thanks to your time for this glorious learn!! I undoubtedly having fun with every little little bit of it and I have you bookmarked to check out new stuff you blog post.
reputable indian online pharmacy: mail order pharmacy india – buy prescription drugs from india
medicine in mexico pharmacies: mexican mail order pharmacies – medicine in mexico pharmacies
https://mexicopharmacy.cheap/# medicine in mexico pharmacies
indian pharmacy reputable indian pharmacies Online medicine home delivery
best online pharmacy india: world pharmacy india – Online medicine home delivery
mexican rx online mexico drug stores pharmacies medication from mexico pharmacy
buying prescription drugs in mexico: mexican drugstore online – pharmacies in mexico that ship to usa
mexico drug stores pharmacies: buying prescription drugs in mexico online – mexican drugstore online
https://pharmbig24.com/# online pharmacy pyridium
mexican border pharmacies shipping to usa buying from online mexican pharmacy purple pharmacy mexico price list
online order medicine: us online pharmacy cialis – bupropion hcl xl global pharmacy
cheap online pharmacy viagra: pharmacy choice cetirizine – synthroid target pharmacy
https://mexicopharmacy.cheap/# mexico pharmacies prescription drugs
medication from mexico pharmacy purple pharmacy mexico price list best online pharmacies in mexico
buy medicines online in india: buy medicines online in india – online shopping pharmacy india
best online propecia pharmacy: central rx pharmacy – online pharmacy pain meds
india pharmacy pharmacy website india india online pharmacy
indian pharmacy paypal: best india pharmacy – indian pharmacy paypal
buying prescription drugs in mexico online mexican pharmaceuticals online purple pharmacy mexico price list
top 10 pharmacies in india: pharmacy website india – india pharmacy mail order
п»їbest mexican online pharmacies: mexican rx online – mexican rx online
starzbet giris starzbet giris straz bet
http://casibom.auction/# casibom guncel giris
casibom 158 giris casibom guncel giris casibom giris adresi
https://casibom.auction/# casibom giris
https://starzbet.shop/# starz bet giris
betine guncel giris betine betine promosyon kodu
betine promosyon kodu 2024 betine com guncel giris betine com guncel giris
https://gatesofolympusoyna.online/# gates of olympus slot
farmacias online seguras en espaГ±a: farmacia en casa online descuento – farmacias online seguras en espaГ±a
farmacia online envГo gratis precio cialis en farmacia con receta farmacia en casa online descuento
https://sildenafilo.men/# sildenafilo cinfa 100 mg precio farmacia
farmacias online baratas
viagra entrega inmediata: comprar viagra contrareembolso 48 horas – se puede comprar viagra sin receta
https://tadalafilo.bid/# farmacia barata
comprar viagra en espaГ±a envio urgente contrareembolso: venta de viagra a domicilio – sildenafilo 100mg sin receta
https://sildenafilo.men/# se puede comprar sildenafil sin receta
farmacias online seguras: comprar cialis online sin receta – farmacias online seguras en espaГ±a
https://sildenafilo.men/# viagra para hombre precio farmacias
farmacias online seguras en espaГ±a
https://tadalafilo.bid/# farmacias online seguras
farmacias direct: farmacias online seguras – п»їfarmacia online espaГ±a
http://tadalafilo.bid/# farmacias online seguras en espaГ±a
farmacia online barata y fiable
https://tadalafilo.bid/# farmacia online madrid
farmacia barata: Cialis precio – farmacias direct
farmacias direct: comprar cialis online seguro – farmacia online madrid
https://tadalafilo.bid/# farmacias online seguras
http://farmaciaeu.com/# farmacia online barcelona
farmacia online espaГ±a envГo internacional
farmacia online piГ№ conveniente: Farmacia online piГ№ conveniente – comprare farmaci online con ricetta
alternativa al viagra senza ricetta in farmacia acquisto viagra viagra 50 mg prezzo in farmacia
Farmacie online sicure Farmacia online piu conveniente farmacie online autorizzate elenco
viagra originale in 24 ore contrassegno: viagra prezzo – viagra prezzo farmacia 2023
farmaci senza ricetta elenco: Farmacia online migliore – top farmacia online
https://farmaciait.men/# farmacie online autorizzate elenco
Farmacie online sicure
Farmacia online miglior prezzo Farmacie on line spedizione gratuita farmacie online sicure
migliori farmacie online 2024 Farmacia online piu conveniente farmacie online affidabili
farmacia online senza ricetta: Farmacie che vendono Cialis senza ricetta – farmacia online
viagra subito: acquisto viagra – le migliori pillole per l’erezione
farmacie online affidabili: Farmacia online migliore – farmacie online sicure
viagra generico sandoz acquisto viagra pillole per erezione immediata
cialis farmacia senza ricetta viagra senza ricetta alternativa al viagra senza ricetta in farmacia
https://farmaciait.men/# farmacia online
farmacie online autorizzate elenco
п»їFarmacia online migliore: BRUFEN 600 bustine prezzo – acquisto farmaci con ricetta
Farmacie online sicure: Brufen 600 senza ricetta – farmacia online
migliori farmacie online 2024 Farmacia online migliore farmaci senza ricetta elenco
top farmacia online Farmacie on line spedizione gratuita п»їFarmacia online migliore
https://sildenafilit.pro/# pillole per erezione immediata
top farmacia online
farmacia online senza ricetta: Cialis generico farmacia – farmacia online
Farmacia online miglior prezzo Cialis generico 5 mg prezzo farmacia online piГ№ conveniente
pillole per erezione immediata: viagra senza ricetta – alternativa al viagra senza ricetta in farmacia
п»їFarmacia online migliore Farmacie on line spedizione gratuita comprare farmaci online con ricetta
acquistare farmaci senza ricetta: Cialis generico controindicazioni – migliori farmacie online 2024
https://tadalafilit.com/# acquistare farmaci senza ricetta
top farmacia online
comprare farmaci online all’estero Tadalafil generico migliore acquisto farmaci con ricetta
viagra originale in 24 ore contrassegno viagra alternativa al viagra senza ricetta in farmacia
farmacie online sicure: Ibuprofene 600 generico prezzo – farmacie online sicure
acquisto farmaci con ricetta: Farmacie che vendono Cialis senza ricetta – acquistare farmaci senza ricetta
https://brufen.pro/# BRUFEN 600 mg 30 compresse prezzo
farmaci senza ricetta elenco
farmacie online autorizzate elenco Farmacia online piu conveniente Farmacia online miglior prezzo
comprare farmaci online con ricetta Cialis generico 5 mg prezzo Farmacie on line spedizione gratuita
alternativa al viagra senza ricetta in farmacia: viagra generico – viagra pfizer 25mg prezzo
alternativa al viagra senza ricetta in farmacia: viagra originale recensioni – pillole per erezione immediata
http://tadalafilit.com/# Farmacia online miglior prezzo
top farmacia online
farmaci senza ricetta elenco farmaci senza ricetta elenco farmacia online senza ricetta
acquistare farmaci senza ricetta Brufen 600 senza ricetta farmacia online
farmacia senza ricetta recensioni: viagra online siti sicuri – pillole per erezioni fortissime
https://rybelsus.tech/# Rybelsus 7mg
prednisone tablets india: prednisone 5 mg cheapest – prednisone 12 tablets price
prednisone 500 mg tablet: prednisone price south africa – prednisone 20mg price
prednisone 30 mg: prednisone tablets india – 40 mg daily prednisone
ventolin online Ventolin inhaler best price ventolin coupon
ventolin prescription uk: Ventolin inhaler price – ventolin 2mg tab
steroids prednisone for sale: prednisone without prescription – prednisone brand name canada
https://rybelsus.tech/# rybelsus
prednisone in india: can you buy prednisone over the counter in canada – buy prednisone no prescription
prednisone 50mg cost: 2.5 mg prednisone daily – prednisone online pharmacy
buy ventolin in mexico: Buy Albuterol for nebulizer online – ventolin price in india
http://gabapentin.site/# how much is generic neurontin
buy prednisone online without a script: how much is prednisone 10 mg – prednisone canada
prednisone prescription for sale: prednisone 60 mg price – purchase prednisone canada
rybelsus generic: cheap Rybelsus 14 mg – Buy semaglutide pills
Rybelsus 7mg: rybelsus cost – Buy compounded semaglutide online
rybelsus: buy rybelsus – Buy semaglutide pills
https://gabapentin.site/# how to get neurontin
neurontin: neurontin prescription online – generic neurontin cost
http://mexicanpharma.icu/# medication from mexico pharmacy
pharmacies in mexico that ship to usa pharmacies in mexico that ship to usa buying prescription drugs in mexico
world pharmacy india: online shopping pharmacy india – reputable indian online pharmacy
certified canadian pharmacy: Pharmacies in Canada that ship to the US – recommended canadian pharmacies
https://indiadrugs.pro/# п»їlegitimate online pharmacies india
mexico drug stores pharmacies medication from mexico mexico pharmacies prescription drugs
Online medicine order: online Indian pharmacy – pharmacy website india
https://mexicanpharma.icu/# purple pharmacy mexico price list
canada pharmacy online: canadian drug – online canadian pharmacy
cheap canadian pharmacy Canadian Pharmacy onlinecanadianpharmacy
https://mexicanpharma.icu/# best online pharmacies in mexico
Your article helped me a lot, is there any more related content? Thanks!
buying from online mexican pharmacy https://mexicanpharma.icu/# pharmacies in mexico that ship to usa
medicine in mexico pharmacies
http://mexicanpharma.icu/# medicine in mexico pharmacies
top online pharmacy india online Indian pharmacy Online medicine order
https://indiadrugs.pro/# buy prescription drugs from india
It’s in point of fact a nice and helpful piece of information. I’m glad that you just shared this useful information with us. Please keep us up to date like this. Thanks for sharing.
reputable canadian pharmacy Canadian Pharmacy canadian pharmacy store
https://mexicanpharma.icu/# best online pharmacies in mexico
Wow! This can be one particular of the most helpful blogs We have ever arrive across on this subject. Actually Magnificent. I’m also a specialist in this topic so I can understand your hard work.
http://pharmaciepascher.pro/# pharmacie en ligne france livraison internationale
pharmacie en ligne avec ordonnance: Acheter Cialis 20 mg pas cher – vente de mГ©dicament en ligne
mexico drug stores pharmacies: buying prescription drugs in mexico – mexico pharmacies prescription drugs
mexico pharmacies prescription drugs
Viagra homme prix en pharmacie sans ordonnance Viagra prix Viagra pas cher inde
acheter mГ©dicament en ligne sans ordonnance: Cialis generique prix – acheter mГ©dicament en ligne sans ordonnance
https://vgrsansordonnance.com/# Viagra pas cher paris
pharmacie en ligne: pharmacie en ligne pas cher – pharmacie en ligne sans ordonnance
pharmacie en ligne Medicaments en ligne livres en 24h Pharmacie Internationale en ligne
Viagra homme sans ordonnance belgique: Sildenafil Viagra – Viagra pas cher paris
pharmacie en ligne pas cher: pharmacie en ligne – Achat mГ©dicament en ligne fiable
Prix du Viagra en pharmacie en France Meilleur Viagra sans ordonnance 24h Viagra pas cher inde
Pharmacie Internationale en ligne: cialis sans ordonnance – trouver un mГ©dicament en pharmacie
https://vgrsansordonnance.com/# SildГ©nafil 100mg pharmacie en ligne
Very excellent info can be found on web blog.
pharmacie en ligne france livraison internationale: pharmacie en ligne france fiable – trouver un mГ©dicament en pharmacie
Pharmacie Internationale en ligne pharmacie en ligne п»їpharmacie en ligne france
Viagra femme sans ordonnance 24h: viagra sans ordonnance – Viagra 100mg prix
Hi there, You’ve performed a great job. I’ll certainly digg it and for my part suggest to my friends. I’m confident they will be benefited from this website.
https://rybelsus.shop/# semaglutide tablets
ozempic coupon: Ozempic without insurance – buy ozempic pills online
buy ozempic pills online ozempic generic ozempic online
Ozempic without insurance: buy ozempic – ozempic
https://rybelsus.shop/# rybelsus price
https://ozempic.art/# buy ozempic pills online
rybelsus cost cheapest rybelsus pills buy rybelsus online
rybelsus pill: semaglutide cost – rybelsus coupon
ozempic cost: ozempic generic – buy ozempic pills online
https://ozempic.art/# ozempic online
ozempic online: ozempic online – Ozempic without insurance
cheapest rybelsus pills semaglutide online rybelsus pill
ozempic coupon: ozempic cost – ozempic generic
https://ozempic.art/# buy cheap ozempic
https://ozempic.art/# ozempic cost
buy rybelsus online: rybelsus coupon – rybelsus coupon
semaglutide tablets rybelsus coupon rybelsus cost
semaglutide cost: semaglutide online – buy rybelsus online
https://ozempic.art/# ozempic cost
ozempic cost: buy ozempic pills online – Ozempic without insurance
https://ozempic.art/# ozempic coupon
ozempic online ozempic generic buy cheap ozempic
rybelsus pill: rybelsus price – rybelsus cost
rybelsus price cheapest rybelsus pills buy semaglutide online
ozempic coupon: buy cheap ozempic – ozempic generic
http://ozempic.art/# ozempic coupon
rybelsus cost: rybelsus coupon – rybelsus price
rybelsus pill: rybelsus coupon – buy semaglutide online
buy cheap ozempic ozempic cost ozempic
https://ozempic.art/# buy ozempic pills online
http://ozempic.art/# buy ozempic
Ozempic without insurance: buy ozempic – ozempic online
semaglutide tablets: semaglutide cost – buy semaglutide online
http://rybelsus.shop/# rybelsus pill
ozempic: ozempic generic – ozempic cost
buy ozempic Ozempic without insurance ozempic coupon
http://ozempic.art/# buy ozempic pills online
ozempic online: Ozempic without insurance – ozempic
http://rybelsus.shop/# semaglutide cost
buy ozempic ozempic online ozempic online
http://rybelsus.shop/# rybelsus cost
http://rybelsus.shop/# rybelsus coupon
rybelsus price rybelsus price rybelsus cost
https://rybelsus.shop/# rybelsus pill
ozempic cost ozempic coupon buy cheap ozempic
https://rybelsus.shop/# buy semaglutide online
pin up kz: пин ап – пинап кз
pin up: pinup azerbaycan – pin-up casino giris
пин ап официальный сайт пинап казино пин ап казино
пин ап зеркало: пин ап зеркало – пин ап вход
пин ап казино: pin up – пинап казино
https://pinupru.site/# пин ап вход
pin up casino pin up giris pin up casino
pinup az: pin up azerbaijan – pin up 306
пин ап https://pinupkz.tech/# пин ап
пин ап 634
pin-up bonanza: pin up casino guncel giris – pin up casino giris
пин ап казино зеркало: пин ап казино – pin up казино
pin up казино пинап казино pin up
pin up 306: pin up azerbaijan – pin up az
пин ап официальный сайт пин ап официальный сайт pin up казино
пин ап http://pinupaz.bid/# pin-up kazino
пин ап кз
pinup azerbaycan: pin up casino – pin up az
https://pinupru.site/# пин ап зеркало
пин ап казино онлайн https://pinupaz.bid/# pin up 306
пин ап
пин ап казино: пин ап казино зеркало – пинап казино
пин ап зеркало pin up казино пин ап зеркало
http://pinupaz.bid/# pin-up kazino
pin up казино https://pinupru.site/# пинап казино
pin up казино
пинап казино: пинап кз – пинап кз
пин ап 634 https://pinupru.site/# pin up
pin up
http://pinupaz.bid/# pinup azerbaycan
пинап казино: пинап казино – пин ап вход
pin up aviator pin up giris pin-up bonanza
http://amoxil.llc/# buying amoxicillin in mexico
amoxicillin 500mg capsule: amoxicillin cheapest price – amoxicillin 500 mg tablet price
buy ivermectin buy stromectol online ivermectin 0.2mg
http://semaglutide.win/# rybelsus
stromectol usa: stromectol for sale – where can i buy stromectol
https://zithromax.company/# purchase zithromax z-pak
https://zithromax.company/# zithromax 500 mg lowest price drugstore online
rybelsus Semaglutide pharmacy price order Rybelsus for weight loss
amoxicillin 500 mg: Amoxicillin For sale – amoxicillin without rx
https://zithromax.company/# buy generic zithromax no prescription
https://amoxil.llc/# amoxicillin 250 mg
zithromax generic price
https://amoxil.llc/# where can i buy amoxicillin over the counter
buy zithromax online buy zithromax z-pak online can i buy zithromax over the counter
http://semaglutide.win/# rybelsus cost
buy zithromax without prescription online: zithromax online usa no prescription – zithromax tablets for sale
http://semaglutide.win/# rybelsus price
amoxicillin 500 mg for sale amoxicillin cheapest price can i buy amoxicillin over the counter
https://gabapentin.auction/# generic neurontin 600 mg
neurontin for sale: gabapentin best price – neurontin online
http://gabapentin.auction/# discount neurontin
buy ivermectin nz stromectol best price ivermectin cost australia
semaglutide: order Rybelsus for weight loss – buy semaglutide online
https://gabapentin.auction/# how much is neurontin
https://semaglutide.win/# semaglutide
generic zithromax over the counter generic zithromax zithromax
https://semaglutide.win/# buy rybelsus
ivermectin cost australia: stromectol best price – minocycline uses
Hey there are using WordPress for your blog platform? I’m new to the blog world but I’m trying to get started and set up my own. Do you need any html coding expertise to make your own blog? Any help would be greatly appreciated!
neurontin 600mg buy gabapentin where to buy neurontin
https://gabapentin.auction/# neurontin 100 mg
http://semaglutide.win/# buy rybelsus
ivermectin 1% cream generic: cheapest stromectol – ivermectin 1% cream generic
http://amoxil.llc/# prescription for amoxicillin
can you buy zithromax over the counter buy zithromax z-pak online zithromax drug
https://amoxil.llc/# amoxicillin medicine
zithromax cost canada: order zithromax – purchase zithromax online
rybelsus price semaglutide rybelsus price
https://amoxil.llc/# buy cheap amoxicillin online
zithromax coupon
can you buy amoxicillin over the counter in canada: Amoxicillin For sale – where to buy amoxicillin over the counter
https://gabapentin.auction/# neurontin price south africa
https://zithromax.company/# zithromax online
Semaglutide pharmacy price: rybelsus generic – buy semaglutide online
zithromax capsules price generic zithromax zithromax for sale us
https://stromectol.agency/# minocycline foam
https://amoxil.llc/# where can you buy amoxicillin over the counter
rexall pharmacy amoxicillin 500mg: over the counter amoxicillin – amoxicillin 500 mg purchase without prescription
rybelsus price Rybelsus 7mg Buy semaglutide pills
erectal disfunction: prescription drugs – ed meds online pharmacy
mexican pharmaceuticals online: mexico drug stores pharmacies – п»їbest mexican online pharmacies
erectional dysfunction ed tablets new erectile dysfunction treatment
dysfunction erectile: ed medication – new erectile dysfunction treatment
buy prescription drugs online: ed drugs online – ed pills comparison
https://drugs24.pro/# cheapest ed pills online
top online pharmacy india
mail order pharmacy india buy medicines online in india pharmacy website india
cheapest online pharmacy india: buy medicines online in india – top 10 pharmacies in india
п»їbest mexican online pharmacies: mexican pharmaceuticals online – mexico pharmacies prescription drugs
top 10 pharmacies in india cheapest online pharmacy india india online pharmacy
https://drugs24.pro/# drug prices comparison
top online pharmacy india
buying from online mexican pharmacy: mexico pharmacies prescription drugs – buying prescription drugs in mexico
indian pharmacies safe indianpharmacy com india online pharmacy
how to overcome ed naturally: male erection pills – treatment with drugs
http://mexicanpharm24.pro/# buying from online mexican pharmacy
indian pharmacy
best online drugstore: ed vacuum pumps – shots for ed
mexican drugstore online mexico drug stores pharmacies medication from mexico pharmacy
mexican rx online: mexican drugstore online – medication from mexico pharmacy
Your place is valueble for me. Thanks!…
best online pharmacies in mexico: medicine in mexico pharmacies – buying prescription drugs in mexico
indian pharmacy paypal india online pharmacy world pharmacy india
http://indianpharmdelivery.com/# Online medicine home delivery
buy medicines online in india
pharmacy website india: world pharmacy india – indian pharmacy online
prescription meds without the prescriptions ed medications over the counter pet meds without vet prescription
https://indianpharmdelivery.com/# pharmacy website india
best online pharmacy india
online shopping pharmacy india buy medicines online in india Online medicine order
http://stromectol1st.shop/# order stromectol online
erectile dysfunction treatments
order Rybelsus rybelsus price buy semaglutide online
paxlovid covid: paxlovid shop – paxlovid generic
cost of stromectol: cheapest stromectol – stromectol how much it cost
http://stromectol1st.shop/# stromectol tab price
mail order pharmacy india
https://rybelsus.icu/# cheaper
treatment of ed
buy stromectol uk: stromectol 1st shop – purchase stromectol
Plavix generic price: best price on generic – antiplatelet drug
buy paxlovid online paxlovid 1st paxlovid price
https://paxlovid1st.shop/# paxlovid generic
errectile disfunction
https://stromectol1st.shop/# ivermectin 50mg/ml
п»їlegitimate online pharmacies india
п»їpaxlovid: check this – п»їpaxlovid
more: rybelsus price – rybelsus
https://clopidogrel.pro/# generic plavix
vitamins for ed
cheaper more rybelsus.icu
rybelsus.icu: semaglutide – more
https://stromectol1st.shop/# minocycline 50 mg tablet
online pharmacy india
rybelsus price: rybelsus price – buy semaglutide online
buy rybelsus rybelsus cost rybelsus cost
https://clopidogrel.pro/# Cost of Plavix without insurance
errection problems
buy clopidogrel online: check clopidogrel pro – Cost of Plavix without insurance
https://rybelsus.icu/# rybelsus price
best erection pills
paxlovid covid best price on pills paxlovid cost without insurance
http://stromectol1st.shop/# minocycline 50 mg without a doctor
indianpharmacy com
paxlovid india: buy here – paxlovid covid
buy minocycline: stromectol 1st – minocycline 100 mg pills
http://rybelsus.icu/# rybelsus cost
supplements for ed
ivermectin 10 ml buy stromectol canada п»їwhere to buy stromectol online
minocycline 100mg tablets for human: minocycline 100 mg for sale – minocycline 100 mg pills
http://stromectol1st.shop/# stromectol 6 mg tablet
india pharmacy
stromectol online: stromectol shop – cost of ivermectin 1% cream
https://clopidogrel.pro/# antiplatelet drug
online meds for ed
paxlovid covid paxlovid price paxlovid generic
Buy semaglutide: rybelsus price – buy rybelsus
paxlovid covid: best price on pills – paxlovid covid
Paxlovid buy online check this п»їpaxlovid
http://stromectol1st.shop/# minocycline 50 mg without a doctor
indianpharmacy com
Cost of Plavix without insurance: check clopidogrel pro – buy clopidogrel bisulfate
stromectol 6 mg tablet: ivermectin cost uk – ivermectin 5 mg
buy plavix clopidogrel buy clopidogrel bisulfate
Appreciate it for helping out, fantastic information. “If you would convince a man that he does wrong, do right. Men will believe what they see.” by Henry David Thoreau.
http://stromectol1st.shop/# minocycline 50 mg tablets for human
mail order pharmacy india
generic plavix: clopidogrel pills – generic plavix
minocycline 100 mg tablets online: cheapest stromectol – ivermectin 4000
paxlovid india shop п»їpaxlovid
ivermectin over the counter canada: stromectol 1st shop – how much does ivermectin cost
canl? casino: en iyi casino siteleri – slot casino siteleri
1xbet скачать 1хбет 1xbet официальный сайт
1xbet официальный сайт: 1xbet – 1xbet скачать
https://1winrussia.online/# 1xbet официальный сайт
пин ап
canl? casino siteleri: casino siteleri – casino sitesi
пин ап зеркало: пин ап зеркало – пин ап вход
пинап казино: pin up kz – пинап кз
пинап кз: пин ап – пинап казино
slot casino siteleri casino siteleri casino oyunlar?
1хставка: 1xbet зеркало – 1хставка
https://1winrussia.online/# 1xbet
пинап кз
пин ап официальный сайт: пин ап – пин ап официальный сайт
пинап казино: пин ап казино вход – пин ап
https://1wintr.fun/# dunyan?n en iyi casino siteleri
пин ап кз
pin up: пинап – пинап казино
1xbet: 1xbet официальный сайт – 1xbet официальный сайт
пинап зеркало: пин ап официальный сайт – пин ап зеркало
pin up 306: pin up azerbaycan – pin-up
guvenilir casino siteleri: en iyi casino siteleri – slot casino siteleri
пинап: пин ап – пин ап
1xbet: 1xbet зеркало – 1xbet зеркало
1хставка: 1xbet скачать – 1xbet скачать
canl? casino cazino dunyan?n en iyi casino siteleri
https://1winindia.tech/# пин ап кз
pin up kz
пин ап официальный сайт: пин ап вход – пин ап зеркало
пин ап: пин ап – пинап зеркало
1хбет: 1хставка – 1xbet скачать
pin-up casino giris: pin up casino – pin up casino
http://1winrussia.online/# 1хбет
пин ап казино
пин ап: пин ап – pin up
pin-up casino giris: pin-up casino giris – pin-up casino giris
pin up: пинап казино – пинап
h?zl? casino: slot casino siteleri – casino siteleri
http://1winindia.tech/# пин ап кз
пин ап казино
пин ап кз pin up kz пин ап
pin up kz: пинап кз – пин ап казино вход
пин ап официальный сайт: пин ап официальный сайт – пин ап зеркало
https://1winbrasil.win/# pin up casino
pin up kz
canl? casino: casino siteleri – canl? casino siteleri
пинап зеркало: пин ап зеркало – пин ап официальный сайт
http://drugs1st.store/# erectional dysfunction
generic ed drugs: male enhancement – online ed pills
male erectile dysfunction buy online drugs online drugs
https://drugs1st.store/# prescription drugs online without doctor
Online medicine home delivery: india online pharmacy – Online medicine home delivery
reputable mexican pharmacies online: mexican mail order pharmacies – buying prescription drugs in mexico online
buying prescription drugs in mexico pharmacies in mexico that ship to usa mexican mail order pharmacies
http://indianpharm1st.com/# india online pharmacy
п»їlegitimate online pharmacies india: buy prescription drugs from india – indianpharmacy com
indianpharmacy com: india online pharmacy – online pharmacy india
world pharmacy india: top 10 online pharmacy in india – indian pharmacy
http://indianpharm1st.com/# reputable indian online pharmacy
indian pharmacy online: top online pharmacy india – reputable indian pharmacies
over the counter ed drugs: mens ed – ed drugs list
best online pharmacies in mexico mexican online pharmacies prescription drugs mexican online pharmacies prescription drugs
http://indianpharm1st.com/# india pharmacy mail order
mexico pharmacies prescription drugs: mexican mail order pharmacies – mexico drug stores pharmacies
mexican rx online: medication from mexico pharmacy – п»їbest mexican online pharmacies
prescription drugs without prior prescription: ed aids – canadian pharmacy
http://indianpharm1st.com/# best india pharmacy
mail order pharmacy india world pharmacy india reputable indian pharmacies
best online pharmacy india: Online medicine order – cheapest online pharmacy india
reputable indian pharmacies: indian pharmacy paypal – indianpharmacy com
https://pinup-az.bid/# pinup az
pin up 306: pin-up – pin up casino
Официальный Сайт пин ап пинап казино
http://pinupzerkalo.fun/# пин ап вход
pinup bet and casino
пинко пинап казино пинап казино
sweetbonanzatr.pro: sweet bonanza oyna – sweet bonanza oyna
пинап: пин ап казино – pin up kz
https://pinup-az.bid/# pinup-az bid
pin up casino
pin up casino: pin up casino – pinup-az bid
пинко: пинко – бонусы пин ап
пин ап вход пин ап вход пин ап зеркало
pin up kz: Пин Ап Казахстан – пины
http://pinupzerkalo.fun/# пин ап вход
pin up zerkalo
http://sweetbonanzatr.pro/# sweet bonanza
пинко: pinco – бонусы пин ап
pin-up: pin up 306 – pin up 306
https://pinup-az.bid/# pinup az
pin up casino
sweetbonanzatr.pro sweet bonanza oyna sweetbonanzatr.pro
пин ап казино: пин ап казино онлайн – пины
пин ап вход: pinco – пинап казино
http://pinupzerkalo.fun/# pinco
pin up azerbaycan: pin up 306 – pinup
http://pinup-az.bid/# pin up
pinup bet and casino
pinup az: pin-up – pinup-az bid
sweet bonanza sweet bonanza tr sweetbonanzatrpro
sweet bonanza: sweet bonanza nas?l oynan?r – sweetbonanzatr.pro
http://pinup-az.bid/# pin-up casino giris
pin up win
https://pinup-az.bid/# pinup-az bid
pinup az: pin-up casino giris – pin up azerbaycan
пинап: Пин Ап Казахстан – pin up kz
pinco: бонусы пин ап – пинап казино
https://pinup-az.bid/# pin-up casino giris
pin up win
sweet bonanza oyna sweet bonanza oyna sweet bonanza tr
paxlovid price: paxlovid store – paxlovid store
https://paxlovid1st.store/# cheapest paxlovid
https://paxlovid1st.store/# cheapest paxlovid
cheapest: find bets price – good price
paxlovid store: cheapest paxlovid – paxlovid price
http://paxlovid1st.store/# see a healthcare provider
see a healthcare provider: Visit store – paxlovid1st
http://paxlovid1st.store/# see a healthcare provider
Pills Paxlovid: paxlovid price – see a healthcare provider
see a healthcare provider: cheapest paxlovid – Visit store
semaglutide: Regenerative Medicine – Rybelsus
http://semaglutide.ink/# Patient Portal
amoxil price: cheap – cheap
paxlovid price: paxlovid1st – cheapest paxlovid
licensed gabapentin: licensed gabapentin – buy gabapentin
https://semaglutide.ink/# Specialists
ed trial pack http://mexicanpharm24.cheap/# mexican online pharmacies prescription drugs
top online pharmacy india Indian pharmacy international shipping reputable indian online pharmacy
drugs causing ed: low cost prescription – ed natural treatment
canadian drugs online: buy drugs – discount prescription drugs
comparison of ed drugs affordable medication best online canadian pharmacy
https://indianpharm24.pro/# india pharmacy mail order
real cialis without a doctor’s prescription
buying from online mexican pharmacy mexico pharmacy cheap mexican border pharmacies shipping to usa
online drugstore http://pharm24.pro/# buy prescription drugs
mexico drug stores pharmacies: mexican drugs – mexican border pharmacies shipping to usa
prescription drugs without doctor approval cheap pharmacy canadian drugstore online
cheap pills online: cheap pharmacy online – online drug store
https://mexicanpharm24.cheap/# mexico pharmacies prescription drugs
male ed drugs
best online drugstore http://pharm24.pro/# treatment for ed
mexico drug stores pharmacies Legit online Mexican pharmacy reputable mexican pharmacies online
pharmacies in mexico that ship to usa: mexican pharm 24 – buying prescription drugs in mexico online
world pharmacy india India pharmacy delivery indian pharmacies safe
http://indianpharm24.pro/# best online pharmacy india
drug prices
mens erections https://mexicanpharm24.cheap/# purple pharmacy mexico price list
buying prescription drugs in mexico online: Legit online Mexican pharmacy – medicine in mexico pharmacies
india pharmacy: India pharmacy delivery – buy prescription drugs from india
buying prescription drugs in mexico online Mexican pharmacy ship US buying from online mexican pharmacy
https://mexicanpharm24.cheap/# mexican mail order pharmacies
cvs prescription prices without insurance
india pharmacy mail order Indian pharmacy international shipping indian pharmacy paypal
ed cures that actually work http://indianpharm24.pro/# india pharmacy
best online canadian pharmacy: cheaper medications – viagra without a doctor prescription
canadian pharmacy online cheap pharmacy online fast ed meds online
medicine in mexico pharmacies: Mexican pharmacy ship US – medication from mexico pharmacy
best india pharmacy Pharmacies in India that ship to USA indianpharmacy com
http://mexicanpharm24.cheap/# best online pharmacies in mexico
ed online pharmacy
ed drugs compared https://pharm24.pro/# medication for ed dysfunction
ed treatment pills: cheap drugs online – cheap ed pills
https://mexicanpharm24.cheap/# mexican drugstore online
erectile dysfunction
ed treatment natural https://mexicanpharm24.cheap/# buying from online mexican pharmacy
buy prescription drugs from india: Pharmacies in India that ship to USA – Online medicine home delivery
pharmacy website india: India pharmacy international – indian pharmacies safe
http://indianpharm24.pro/# best india pharmacy
ed help
carprofen without vet prescription https://mexicanpharm24.cheap/# buying from online mexican pharmacy
tadalafil without a doctor’s prescription: low cost pharmacy – buy drug online
drug medication: cheap drugs online – reasons for ed
matadorbet giris matadorbet matadorbet giris
http://casinositeleri.win/# Casino Siteleri
deneme bonusu veren siteler betturkey
matadorbet giris: matadorbet giris – matadorbet bid
deneme bonusu veren siteler 2024 https://denemebonusuverensiteler.top/# deneme bonusu veren siteler yeni
slot oyunlar? puf noktalar?: en cok kazand?ran slot oyunlar? – en cok kazand?ran slot oyunlar?
Casino Siteleri guvenilir casino siteleri Casino Siteleri
denemebonusuverensiteler.top http://matadorbet.bid/# matadorbet bid
slot oyunlar?: slot siteleri – en kazancl? slot oyunlar?
Casino Siteleri: guvenilir casino siteleri – Canl? Casino Siteleri
guvenilir casino siteleri Casino Siteleri guvenilir casino siteleri
http://ultrabet-tr.online/# ultrabet giris
deneme bonusu veren siteler betturkey betturkey.com
deneme bonusu veren siteler yerliarama.org: deneme bonusu veren yeni siteler – deneme bonusu veren siteler betturkey
ultrabet yeni giris 1125 ultrabet ultrabet yeni giris 1125
matadorbet: matadorbet giris – matadorbet.bid
deneme bonusu veren siteler yeni https://ultrabet-tr.online/# ultrabet giris
casino siteleri win: casino siteleri win – Canl? Casino Siteleri
ultrabet yeni giris 1125 ultrabet tr online ultrabet tr online
matadorbet giris: matadorbet bid – matadorbet.bid
deneme bonusu veren siteler betturkey: deneme bonusu veren siteler – deneme bonusu veren siteler yerliarama.org
ultrabet yeni giris 1125 ultrabet giris ultrabet guncel
deneme bonusu veren siteler mycbet.com http://slot-tr.online/# en cok kazand?ran slot oyunlar?
matadorbet.bid: matadorbet bid – matadorbet bid
Casino Siteleri casino siteleri win Casino Siteleri
casino siteleri win: Casino Siteleri – Casino Siteleri
slot oyunlar?: az parayla cok kazandiran slot oyunlar? – en kazancl? slot oyunlar?
deneme bonusu veren siteler http://denemebonusuverensiteler.top/# deneme bonusu veren siteler yerliarama.org
deneme bonusu veren siteler betturkey deneme bonusu veren siteler deneme bonusu veren siteler
furosemide fur pharm lasix buy furosemide online
https://gabapharm.com/# buy Gabapentin GabaPharm
http://kampharm.shop/# kamagra oral jelly
semaglutide buy rybelsus rybpharm rybpharm rybelsus
ere pharm: erepharm.com – best ed pill ere pharm
https://gabapharm.com/# gabapentin GabaPharm
buy rybelsus canada rybpharm canada rybpharm rybelsus
ed pills: buy ed pills – erepharm.com
http://rybpharm.com/# buy rybelsus
buy lasix fur pharm furpharm furosemide fur pharm
https://kampharm.shop/# Kamagra Kam Pharm
http://furpharm.com/# buy lasix fur pharm
ED meds online with insurance ED pills non prescription ed pills
cheapest lasix: lasix – cheapest lasix
http://erepharm.com/# buy ed pills
http://furpharm.com/# buy furosemide online
furpharm buy lasix fur pharm buy lasix fur pharm
buy gabapentin: buy gabapentin – GabaPharm
https://rybpharm.com/# rybpharm rybelsus
gabapentin buy gabapentin online GabaPharm Gabapentin
https://furpharm.com/# furosemide furpharm.com
buy gabapentin online: buy gabapentin india – Buy gabapentin for humans
gabapentin GabaPharm Buy gabapentin for humans gabapentin
gabapentin GabaPharm: cheapest Gabapentin GabaPharm – cheapest Gabapentin GabaPharm
https://furpharm.com/# cheapest lasix
http://kampharm.shop/# kamagra
ere pharm ED meds online ere pharm
buy rybelsus canada: buy rybelsus online usa – buy rybelsus
buy lasix fur pharm: fur pharm – furosemide furpharm.com
http://indianpharmacyeasy.com/# best online pharmacy india
https://canadiandrugsgate.com/# erectile dysfunction pills
mexico pharmacies prescription drugs: medicines mexico rx online – buying prescription drugs in mexico online
errection problem cure: canadian pharmacy drugs gate – ed devices
http://mexicanpharmgate.com/# reputable mexican pharmacies online
india pharmacy Best online Indian pharmacy indian pharmacy paypal
https://canadiandrugsgate.com/# mens erections
What is Copyright Violation: copyrighted content detected, How do i remove it?
http://indianpharmacyeasy.com/# reputable indian online pharmacy
cheapest online pharmacy india: Online medicine home delivery – cheapest online pharmacy india
best online pharmacy india: Best online Indian pharmacy – world pharmacy india
http://indianpharmacyeasy.com/# best india pharmacy
http://indianpharmacyeasy.com/# indian pharmacy
new ed drugs canadian drugs gate online ed drugs
erection pills: Canadian pharmacy online – best ed pill
https://mexicanpharmgate.com/# best online pharmacies in mexico
mexico drug stores pharmacies: mexicanpharmgate.com – buying prescription drugs in mexico online
http://canadiandrugsgate.com/# pain meds online without doctor prescription
mexican border pharmacies shipping to usa: Mexican Pharm Gate – mexican drugstore online
ed products Canadian pharmacy online ed treatment drugs
https://indianpharmacyeasy.com/# mail order pharmacy india
buy prescription drugs online: Canada pharmacy – ed aids
indianpharmacy com: Online Indian pharmacy – mail order pharmacy india
https://canadiandrugsgate.com/# errectile dysfunction
mexican online pharmacies prescription drugs mexican pharmacy online pharmacies in mexico that ship to usa
best ed pills online http://canadiandrugsgate.com/# home remedies for erectile dysfunction
cheap drugs online
prednisone 50 mg coupon: order Prednisone – can i buy prednisone over the counter in usa
generic amoxicillin 500mg Amoxicillin Com Pharm buy amoxil
amoxicillin azithromycin http://prednisoneraypharm.com/# prednisone 300mg
purchase prednisone: prednisoneraypharm – prednisone pharmacy prices
can i order cheap clomid without a prescription: can i buy generic clomid without insurance – get cheap clomid online
prednisone 20mg for sale prednisone 20mg buy online can you buy prednisone over the counter
buy amoxicillin 500mg canada http://prednisoneraypharm.com/# compare prednisone prices
generic prednisone otc: buy prednisone without a prescription best price – prednisone 20mg prices
buy dapoxetine online: Priligy tablets – buy priligy max pharm
can you buy amoxicillin over the counter in canada: amoxil – where to buy amoxicillin pharmacy
rx clomid buy clomid where to get generic clomid
generic for amoxicillin https://priligymaxpharm.com/# buy dapoxetine online
priligy: buy priligy – cheap priligy
dapoxetine online: buy dapoxetine online – buy priligy
cheap generic prednisone: raypharm – prednisone without a prescription
order clomid tablets buy clomid where to get cheap clomid without dr prescription
where can i buy generic clomid without dr prescription: rex pharm – order cheap clomid now
buying amoxicillin online: amoxicillin no prescription – where to buy amoxicillin pharmacy
how to get cheap clomid price: cheap clomid – where can i buy cheap clomid without prescription
priligy maxpharm: dapoxetine online – max pharm
amoxicillin 500mg cost: Amoxicillin Com Pharm – amoxicillin 500mg capsule
priligy max pharm: priligy max pharm – dapoxetine price
amoxicillin canada price: amoxil – amoxicillin 500mg tablets price in india
generic amoxicillin cost: cheap amoxil – cost of amoxicillin 875 mg
priligy max pharm: priligy maxpharm – buy priligy max pharm
zestril 5mg price in india buy Lisinopril 1st cheapest Lisinopril
buy cytotec over the counter: Abortion pills online – buy cytotec over the counter
purple pharmacy mexico price list https://mexicanpharmgate.com/ best online pharmacies in mexico
how to get amoxicillin over the counter: amoxil – buy amoxicillin online cheap
stromectol for humans: buy Stromectol – ivermectin usa
https://plavixclo.com/# Cost of Plavix on Medicare
Cost of Plavix without insurance buy Plavix Clo buy Clopidogrel over the counter
prednisone 10 mg tablets: buy prednisone – can you buy prednisone over the counter in usa
Misoprostol 200 mg buy online: cheapest cytotec – buy cytotec over the counter
can you purchase amoxicillin online: Amoxicillin buy online – amoxicillin brand name
https://cytpremium.com/# cytotec online
buy clopidogrel bisulfate PlavixClo Best Price plavix medication
I like this site so much, saved to fav. “To hold a pen is to be at war.” by Francois Marie Arouet Voltaire.
ivermectin 8000 mcg: Ivermectin iver fast – cheap stromectol
can i order cheap clomid without rx: buy clomid – can you get clomid for sale
http://cytpremium.com/# buy cytotec in usa
buy plavix: PlavixClo – Cost of Plavix on Medicare
buy Lisinopril 1st lisinopril cost us buy Lisinopril online
amoxicillin without prescription: amoxil – generic amoxicillin cost
http://plavixclo.com/# buy clopidogrel bisulfate
cheapest Lisinopril: Lisinopril 1st – buy Lisinopril online
how to buy clomid price: buy clomid – buy generic clomid without prescription
вавада казино vavada kazi vavada kazi
pinup kazi: pinup-kazi.ru – pinup-kazi.ru
пин ап казино онлайн: pinup-kazi.kz – pinup kazi
pinup-kazi.ru: пин ап казино официальный сайт – пин ап вход
пин ап казино онлайн: пин ап кз – пин ап кз
http://vavada-kazi.ru/# казино вавада
вавада казино зеркало вавада казино вавада казино зеркало
пин ап казино онлайн: пинап казино – пин ап казино онлайн
vavada-kazi.ru: вавада онлайн казино – казино вавада
pinup-kazi.kz: пинап казино – пин ап кз
пинап казино: пин ап казино – pin up казино
vavada-kazi.ru vavada kazi казино вавада
вавада казино зеркало: vavada-kazi.ru – vavada-kazi.ru
пин ап казино онлайн: pinup kazi – пинап казино
пин ап вход: pinup kazi – pinup kazi
https://pinup-kazi.ru/# пинап казино
pinup kazi: пин ап вход – пин ап казино официальный сайт
pinup-kazi.kz: pinup-kazi.kz – пин ап казино онлайн
пин ап кз: pin up казино – пин ап кз
reputable mexican pharmacies online Mexican Pharm mexican rx online
purple pharmacy mexico price list: MexicanPharmEasy – mexican online pharmacies prescription drugs
indianpharmacy com: indian pharm – india online pharmacy
male erectile dysfunction: canadian pharm 1st – comfortis without vet prescription
which ed drug is best https://canadianpharm1st.com/# ed cure
top 10 pharmacies in india: indian pharm star – top 10 pharmacies in india
ways to treat erectile dysfunction: canada pharmacy online – cheapest ed pills online
buy prescription drugs from canada cheap: canadian pharmacy – erection problems
mexican mail order pharmacies: Pharm Easy – reputable mexican pharmacies online
mexican drugstore online mexican pharm easy п»їbest mexican online pharmacies
top ed drugs: canadianpharm1st.com – how can i order prescription drugs without a doctor
pharmacy website india: indian pharmacy – top 10 pharmacies in india
online pharmacy india: indian pharmacy – best online pharmacy india
reputable mexican pharmacies online Pharm Easy п»їbest mexican online pharmacies
reputable indian pharmacies: indian pharmacy – cheapest online pharmacy india
best canadian pharmacy online https://mexicanpharmeasy.com/# mexican border pharmacies shipping to usa
mexico drug stores pharmacies: mexican pharmacy – mexican pharmaceuticals online
ed treatment drugs: canada pharmacy online – online ed drugs
indianpharmacy com IndianPharmStar indianpharmacy com
canadian drugs online https://indianpharmstar.com/# cheapest online pharmacy india
buying from online mexican pharmacy: mexican pharm easy – mexican mail order pharmacies
buy prescription drugs without doctor: canada pharmacy online – drug medication
mexican pharmaceuticals online: mexican pharmacy – best online pharmacies in mexico
medicine in mexico pharmacies: Mexican Pharm – mexico drug stores pharmacies
indianpharmacy com indian pharmacy buy medicines online in india
cialis without a doctor’s prescription http://canadianpharm1st.com/# pain meds without written prescription
indian pharmacy online: indian pharm – п»їlegitimate online pharmacies india
buy prescription drugs from india: indian pharm star – online pharmacy india
indian pharmacies safe: indian pharmacy – mail order pharmacy india
natural treatments for ed https://mexicanpharmeasy.com/# mexican mail order pharmacies
mexico pharmacies prescription drugs mexicanpharmeasy.com mexico pharmacies prescription drugs
drugs online: canadian pharm – mens ed pills
best online pharmacies in mexico: MexicanPharmEasy – buying from online mexican pharmacy
mens erections https://canadianpharm1st.com/# male ed pills
medication from mexico pharmacy: mexican pharmacy – buying prescription drugs in mexico
medication from mexico pharmacy mexican pharm easy purple pharmacy mexico price list
pain meds online without doctor prescription: canadianpharm1st.com – foods for ed
pharmacies in mexico that ship to usa: mexican pharmacy – pharmacies in mexico that ship to usa
п»їlegitimate online pharmacies india: indian pharm – top 10 online pharmacy in india
ed clinics https://mexicanpharmeasy.com/# pharmacies in mexico that ship to usa
minocycline 50 mg tabs: Ivermectin Pharm – Ivermectin Pharm Store
http://gabapentinpharm.com/# neurontin prescription cost
ivermectin 500ml: Ivermectin Pharm – stromectol coronavirus
buy rybelsus Buy compounded semaglutide online semaglutide
Gabapentin Pharm: gabapentin – Gabapentin Pharm
AmoxilPharm: amoxicillin capsules 250mg – AmoxilPharm
https://paxlovid.ink/# paxlovid india
cheap Rybelsus 14 mg: rybelsus – semaglutide pharm
semaglutide: rybelsus price – semaglutide
https://amoxilpharm.store/# amoxicillin 250 mg capsule
where can i get amoxicillin: AmoxilPharm – Amoxil Pharm Store
Paxlovid over the counter: paxlovid covid – paxlovid generic
Gabapentin Pharm: neurontin cost – Gabapentin Pharm
Ivermectin Pharm Store: Ivermectin Pharm – Ivermectin Pharm Store
Paxlovid.ink paxlovid price Paxlovid.ink
http://amoxilpharm.store/# amoxicillin capsules 250mg
semaglutide: cheap Rybelsus 14 mg – cheap Rybelsus 14 mg
paxlovid buy: Paxlovid.ink – Paxlovid.ink
amoxicillin 500mg buy online canada: Amoxil Pharm Store – Amoxil Pharm Store
http://ivermectinpharm.store/# Ivermectin Pharm Store
Paxlovid.ink: paxlovid covid – Paxlovid.ink
https://amoxilpharm.store/# AmoxilPharm
Ivermectin Pharm: can you buy stromectol over the counter – Ivermectin Pharm
zithromax 500 tablet: where can i buy zithromax capsules – where can i get zithromax
cheap clomid pills: can i buy cheap clomid no prescription – buying generic clomid without dr prescription
https://cytotec.top/# buy cytotec pills online cheap
how to get zithromax zithromax 500 tablet zithromax cost australia
how to get generic clomid without a prescription: where can i get cheap clomid no prescription – order cheap clomid without dr prescription
http://azithromycinus.com/# buy generic zithromax no prescription
buy cipro without rx purchase cipro buy cipro cheap
buy cytotec over the counter: buy cytotec pills online cheap – cytotec pills buy online
https://azithromycinus.com/# where can i buy zithromax capsules
zithromax 1000 mg online: buy zithromax 500mg online – zithromax for sale 500 mg
clomid pills: order cheap clomid no prescription – where to buy generic clomid no prescription
lisinopril without rx: lisinopril 5 mg over the counter – zestril pill
buy cytotec buy cytotec Abortion pills online
https://ciprofloxacin.cheap/# buy cipro online usa
40 mg lisinopril: lisinopril 10mg daily – lisinopril 10 12.5 mg
cytotec abortion pill buy misoprostol over the counter cytotec online
https://ciprofloxacin.cheap/# buy cipro without rx
can i order generic clomid online: how to get clomid without prescription – where can i buy generic clomid
https://clomid.store/# clomid buy
cipro 500mg best prices buy generic ciprofloxacin cipro 500mg best prices
п»їcytotec pills online: Abortion pills online – buy cytotec
clomid price: clomid pill – can you get generic clomid online
https://ciprofloxacin.cheap/# buy cipro cheap
zithromax online paypal zithromax 250 mg australia order zithromax over the counter
Misoprostol 200 mg buy online: order cytotec online – buy cytotec pills
http://ciprofloxacin.cheap/# antibiotics cipro
how can i get clomid for sale: generic clomid online – how can i get cheap clomid price
403053 567362I just added this webpage to my feed reader, wonderful stuff. Cannot get enough! 777017
purchase cipro where can i buy cipro online buy ciprofloxacin
п»їcytotec pills online: buy cytotec – Misoprostol 200 mg buy online
https://clomid.store/# can i order generic clomid for sale
prinzide zestoretic: where can i order lisinopril online – lisinopril 19 mg
ciprofloxacin 500 mg tablet price: purchase cipro – buy cipro cheap
price of lisinopril lisinopril 3.125 prinivil drug cost
Magnificent site. Lots of useful info here. I am sending it to a few pals ans also sharing in delicious. And certainly, thank you for your sweat!
order clomid without a prescription: clomid order – where to get cheap clomid without a prescription
http://lisinoprilus.com/# lisinopril 25 mg
lisinopril 20 mg best price lisinopril 60 mg lisinopril 10 12.5 mg tablets
zestril 10 mg online: zestoretic medication – lisinopril 40 mg brand name
where to buy clomid tablets: how to buy cheap clomid now – can i get generic clomid online
https://azithromycinus.com/# zithromax 500
lisinopril 2.5 mg medicine: lisinopril 20 mg uk – lisinopril 3.125
buy cheap generic zithromax: where to get zithromax – zithromax 500mg over the counter
https://lisinoprilus.com/# zestril 30mg generic
buy cipro online ciprofloxacin order online buy cipro online usa
can you buy clomid: order generic clomid pill – how to get clomid without prescription
https://lisinoprilus.com/# generic lisinopril 3973
clomid how to buy generic clomid no prescription where to get clomid without dr prescription
can i buy generic clomid online: can i purchase generic clomid without prescription – how to get generic clomid online
google viagra dosage recommendations: drugs1st – drugs1st
ed pills for sale: mens ed – online drugstore
https://semaglutidetablets.store/# semaglutide tablets for weight loss
https://cenforce.icu/# cenforce
http://kamagra.men/# Kamagra 100mg
Cenforce 100mg tablets for sale: Cenforce 150 mg online – cenforce.icu
buy cenforce Purchase Cenforce Online cenforce for sale
Kamagra 100mg price: п»їkamagra – Kamagra Oral Jelly
http://edpills.men/# ed rx online
https://cenforce.icu/# buy cenforce
cheap semaglutide pills: semaglutide tablets price – semaglutide tablets price
http://cenforce.icu/# Purchase Cenforce Online
https://edpills.men/# п»їed pills online
canadian drugs online: drugs1st – cheap ed medication
drugs1st: drugs1st – drugs1st
https://semaglutidetablets.store/# semaglutide best price
http://cenforce.icu/# cenforce
https://cenforce.icu/# cenforce for sale
semaglutide best price: semaglutide tablets – semaglutide tablets
cenforce.icu order cenforce cheapest cenforce
super kamagra: cheap kamagra – super kamagra
https://edpills.men/# online ed medicine
https://kamagra.men/# Kamagra 100mg price
where can i buy erectile dysfunction pills: ed treatments online – ed drugs online
https://edpills.men/# pills for ed online
betboo plus: casino slot siteleri – gore siteler
http://pinup2025.com/# pinup2025.com
пин ап казино зеркало: pinup 2025 – pinup2025.com
https://pinup2025.com/# pinup 2025
orisbet giriЕџ: pronet giriЕџ – bet siteleri bonus
pinup 2025: пин ап зеркало – пин ап
en cok kazand?ran slot oyunlar? slot oyunlar? slot siteleri
http://slottr.top/# slot oyunlar?
https://slottr.top/# slot tr online
пин ап зеркало пин ап казино pinup2025.com
betler: kazino online – 30 tl bonus veren bahis siteleri
https://slottr.top/# en cok kazand?ran slot oyunlar?
slot siteleri: en kazancl? slot oyunlar? – slot siteleri
en kazancl? slot oyunlar? slot siteleri en cok kazand?ran slot oyunlar?
yasal casino siteleri: curacao lisans siteleri – yeni bahis siteleri deneme bonusu
http://pinup2025.com/# пин ап
https://slottr.top/# slot tr online
slot tr online: slot tr online – en cok kazand?ran slot oyunlar?
пин ап казино pinup2025.com пин ап зеркало
http://slottr.top/# slot siteleri
https://pinup2025.com/# пин ап
canli oyun slot oyunlarД± isimleri en gГјvenilir bahis
пин ап казино: пинап казино – pinup 2025
gГјvenilir deneme bonusu veren siteler: en gГјvenilir casino siteleri – hangi bahis siteleri bonus veriyor?
pinup 2025 пин ап вход пин ап вход
slot siteleri: en kazancl? slot oyunlar? – az parayla cok kazandiran slot oyunlar?
https://pinup2025.com/# pinup 2025
https://casinositeleri2025.pro/# gГјvenilir siteler
пин ап казино зеркало пин ап казино пин ап вход
пин ап казино зеркало: пин ап казино официальный сайт – пин ап казино зеркало
пин ап казино официальный сайт: pinup 2025 – пин ап вход
http://pinup2025.com/# пин ап казино
пин ап казино: пинап казино – пин ап казино официальный сайт
https://slottr.top/# en kazancl? slot oyunlar?
https://casinositeleri2025.pro/# bilinmeyen siteler
gГјvenilir bahis siteleri 2025: en Г§ok freespin veren slot 2025 – deneme veren siteler
http://slottr.top/# slot oyunlar? puf noktalar?
100 tl bonus veren bahis siteleri popГјler bahis siteleri yeni siteler bahis
slot oyunlar? puf noktalar?: az parayla cok kazandiran slot oyunlar? – az parayla cok kazandiran slot oyunlar?
http://casinositeleri2025.pro/# tГјrkiye yasal bahis siteleri
https://slottr.top/# slot oyunlar? puf noktalar?
yeni gГјncel deneme bonusu veren siteler canlД± bahis oyunlarД± tl casino
slot oyunlar?: en cok kazand?ran slot oyunlar? – slot tr online
bet siteleri bonus: 30 tl bonus veren bahis siteleri – casino slot siteleri
http://pinup2025.com/# пин ап казино зеркало
medicine in mexico pharmacies: Mexican pharmacies that ship to the United States – medication from mexico pharmacy
website: Canada Pharmacy online reviews – ed problems treatment
https://canadianpharmi.com/# ed meds online canada
https://indiapharmi.com/# online pharmacy india
mexican drugstore online Mexican pharmacy ship to usa mexico pharmacies prescription drugs
http://canadianpharmi.com/# best drugs for erectile dysfunction
world pharmacy india: Online India pharmacy – indian pharmacy
mexican border pharmacies shipping to usa: Purple pharmacy online ordering – medication from mexico pharmacy
https://canadianpharmi.com/# generic viagra without a doctor prescription
http://mexicanpharmi.com/# mexico drug stores pharmacies
sildenafil without a doctor’s prescription: Canada Pharmacy online reviews – erectile dysfunction cure
https://mexicanpharmi.com/# buying prescription drugs in mexico
homeopathic remedies for ed Canadian pharmacy prices natural ed remedies
http://mexicanpharmi.com/# medication from mexico pharmacy
pharmacy website india: Best Indian pharmacy – indian pharmacies safe
medication from mexico pharmacy: Cheapest online pharmacy – buying prescription drugs in mexico online
https://indiapharmi.com/# best online pharmacy india
medication from mexico pharmacy Online Mexican pharmacy reputable mexican pharmacies online
medicine in mexico pharmacies: Online Mexican pharmacy – mexico drug stores pharmacies
https://mexicanpharmi.com/# buying from online mexican pharmacy
https://indiapharmi.com/# Online medicine home delivery
medication from mexico pharmacy: Cheapest online pharmacy – mexico pharmacies prescription drugs
top 10 online pharmacy in india Online medicine home delivery world pharmacy india
https://mexicanpharmi.com/# mexican mail order pharmacies
buy medicines online in india: Online medicine home delivery – world pharmacy india
http://mexicanpharmi.com/# mexican online pharmacies prescription drugs
medications list Cheapest drug prices Canada male ed drugs
http://mexicanpharmi.com/# medicine in mexico pharmacies
mexican border pharmacies shipping to usa: Legit online Mexican pharmacy – mexico drug stores pharmacies
https://indiapharmi.com/# online shopping pharmacy india
ed medication: canadian pharmi – buy ed drugs online
india pharmacy indian pharmacy india pharmacy mail order
where buy generic clomid prices: cost of clomid for sale – get clomid
buy cipro online without prescription: CiPharmDelivery – ciprofloxacin order online
https://prednibest.com/# average cost of prednisone 20 mg
http://amoxstar.com/# where can i buy amoxicillin online
cipro ci pharm delivery ciprofloxacin 500 mg tablet price
http://amoxstar.com/# amoxicillin without prescription
antibiotics cipro: ci pharm delivery – purchase cipro
https://prednibest.com/# order prednisone on line
buy cipro online usa buy cipro online canada antibiotics cipro
http://prednibest.com/# prednisone 10mg prices
clomid generic cost of clomid without dr prescription where buy generic clomid online
can i get clomid: where to get clomid no prescription – cost of clomid pills
ciprofloxacin over the counter: CiPharmDelivery – antibiotics cipro
http://prednibest.com/# buy prednisone canada
http://cipharmdelivery.com/# ciprofloxacin over the counter
where can i buy generic clomid without a prescription where can i buy generic clomid pill can i order cheap clomid prices
buy cipro cheap: ci pharm delivery – cipro pharmacy
prednisone 2.5 mg cost: prednisone 10mg buy online – prednisone 20mg online pharmacy
http://amoxstar.com/# how to get amoxicillin over the counter
buy cipro cheap cipro for sale ciprofloxacin order online
can you get generic clomid: order clomid without dr prescription – can i buy generic clomid without insurance
https://cipharmdelivery.com/# buy cipro online
purchase amoxicillin online can you buy amoxicillin uk where to buy amoxicillin over the counter
buy cipro online canada: ci pharm delivery – cipro ciprofloxacin
clomid without dr prescription: buying clomid without rx – cost of clomid without insurance
http://cipharmdelivery.com/# buy cipro online
get cheap clomid without a prescription can i purchase clomid price can i get clomid without rx
can you buy amoxicillin over the counter: amoxicillin over the counter in canada – buy amoxicillin 500mg
http://cipharmdelivery.com/# ciprofloxacin over the counter
amoxicillin 500mg buy online canada: buy cheap amoxicillin online – where can you get amoxicillin
cipro online no prescription in the usa п»їcipro generic cipro online no prescription in the usa
how to buy cheap clomid now: how can i get clomid without a prescription – can i buy clomid prices
http://prednibest.com/# prednisone 3 tablets daily
amoxicillin 500mg over the counter buy amoxicillin online with paypal buy amoxicillin online with paypal
amoxicillin over the counter in canada: amoxicillin without a prescription – how much is amoxicillin
where to get amoxicillin over the counter: Amox Star – buy amoxicillin online uk
https://amoxstar.com/# medicine amoxicillin 500
buy cipro no rx buy ciprofloxacin buy ciprofloxacin over the counter
http://prednibest.com/# 40 mg daily prednisone
ciprofloxacin 500 mg tablet price: purchase cipro – buy cipro no rx
prednisone canada prices: online order prednisone 10mg – prednisone uk
п»їcipro generic cipro ciprofloxacin over the counter
https://amoxstar.com/# buy amoxicillin 500mg usa
1 mg prednisone daily: PredniBest – prednisone in canada
5 mg prednisone daily Predni Best medicine prednisone 10mg
prednisone pack: Predni Best – how to get prednisone without a prescription
http://prednibest.com/# generic prednisone 10mg
can i buy clomid without a prescription: get cheap clomid no prescription – how can i get cheap clomid for sale
prednisone 1 mg tablet Predni Best 40 mg daily prednisone
can i purchase clomid tablets: clomidonpharm – order clomid without rx
generic clomid: clomidonpharm – where can i buy cheap clomid
http://prednibest.com/# prednisone 10 mg daily
prednisone 300mg: order prednisone with mastercard debit – 200 mg prednisone daily
So he added Sasquatch into the mix along with a quirky group of British explorers. Guests have complimented these explorers year after year, and they are a fantastic addition to our cast and crew.
https://www.oneidauniversity.com/
I just wanted to write a simple comment so as to say thanks to you for all the fantastic pointers you are showing at this site. My rather long internet look up has finally been rewarded with good information to share with my good friends.
https://www.charlestonstateuniversity.com/
pinup 2025 gramster.ru пин ап казино зеркало
пин ап казино официальный сайт: gramster.ru – пинап казино
https://gramster.ru/# pinup 2025
https://gramster.ru/# пинап казино
http://gramster.ru/# gramster.ru
http://gramster.ru/# пин ап зеркало
пин ап вход Gramster gramster.ru
http://gramster.ru/# пинап казино
http://gramster.ru/# пин ап казино
http://gramster.ru/# пин ап вход
https://gramster.ru/# пин ап
пинап казино Gramster пин ап казино
пин ап казино: gramster.ru – пинап казино
http://gramster.ru/# пинап казино
http://gramster.ru/# pinup 2025
gramster.ru gramster пин ап казино официальный сайт
пин ап казино зеркало: gramster – пин ап вход
https://gramster.ru/# pinup 2025
http://gramster.ru/# gramster.ru
pinup 2025: gramster – пинап казино
https://gramster.ru/# gramster.ru
http://gramster.ru/# пин ап казино официальный сайт
пин ап казино зеркало: gramster.ru – пин ап казино
http://gramster.ru/# пин ап казино зеркало
pinup 2025 gramster.ru pinup 2025
http://gramster.ru/# пин ап казино официальный сайт
пин ап казино gramster pinup 2025
https://gramster.ru/# пин ап зеркало
https://gramster.ru/# пин ап казино зеркало
https://gramster.ru/# gramster.ru
http://gramster.ru/# пин ап казино официальный сайт
http://gramster.ru/# пин ап казино зеркало
https://gramster.ru/# пин ап казино официальный сайт
пин ап казино зеркало gramster пин ап зеркало
http://gramster.ru/# пин ап
https://gramster.ru/# пин ап вход
https://gramster.ru/# пин ап зеркало
http://gramster.ru/# gramster.ru
gramster.ru gramster.ru пин ап казино зеркало
https://canadianpharmacy.win/# ed meds online canada
http://canadianpharmacy.win/# reputable canadian pharmacy
canadian drug prices: best canadian online pharmacy – best canadian online pharmacy
https://indianpharmacy.win/# cheapest online pharmacy india
https://mexicanpharmacy.store/# mexico pharmacies prescription drugs
medication canadian pharmacy canadian pharmacy no scripts real canadian pharmacy
http://canadianpharmacy.win/# my canadian pharmacy reviews
mexican pharmaceuticals online: mexico pharmacies prescription drugs – mexico drug stores pharmacies
https://canadianpharmacy.win/# canadian pharmacy ltd
http://indianpharmacy.win/# online shopping pharmacy india
http://mexicanpharmacy.store/# medication from mexico pharmacy
http://indianpharmacy.win/# india online pharmacy
purple pharmacy mexico price list: pharmacies in mexico that ship to usa – mexico pharmacies prescription drugs
п»їbest mexican online pharmacies buying prescription drugs in mexico mexican mail order pharmacies
https://canadianpharmacy.win/# canadian pharmacy world
http://canadianpharmacy.win/# online pharmacy canada
https://indianpharmacy.win/# Online medicine home delivery
Online medicine home delivery: reputable indian online pharmacy – best india pharmacy
https://mexicanpharmacy.store/# mexican rx online
https://canadianpharmacy.win/# recommended canadian pharmacies
https://canadianpharmacy.win/# canadian family pharmacy
Online medicine order reputable indian online pharmacy buy medicines online in india
http://canadianpharmacy.win/# canadian pharmacy 365
india pharmacy mail order: india pharmacy – mail order pharmacy india
https://canadianpharmacy.win/# legal to buy prescription drugs from canada
http://mexicanpharmacy.store/# buying prescription drugs in mexico online
https://canadianpharmacy.win/# adderall canadian pharmacy
http://canadianpharmacy.win/# canadian family pharmacy
Online medicine home delivery: india pharmacy mail order – best india pharmacy
indianpharmacy com india online pharmacy buy medicines online in india
http://mexicanpharmacy.store/# medication from mexico pharmacy
http://indianpharmacy.win/# Online medicine order
https://mexicanpharmacy.store/# mexican border pharmacies shipping to usa
best online pharmacies in mexico: reputable mexican pharmacies online – mexican mail order pharmacies
https://indianpharmacy.win/# best india pharmacy
https://mexicanpharmacy.store/# mexican online pharmacies prescription drugs
india pharmacy Online medicine order reputable indian pharmacies
http://canadianpharmacy.win/# 77 canadian pharmacy
https://indianpharmacy.win/# indian pharmacy paypal
top 10 pharmacies in india: mail order pharmacy india – reputable indian pharmacies
https://mexicanpharmacy.store/# mexico drug stores pharmacies
https://canadianpharmacy.win/# canadian pharmacy 24
http://canadianpharmacy.win/# best canadian pharmacy
best online pharmacies in mexico mexican border pharmacies shipping to usa mexico drug stores pharmacies
indian pharmacy online: online pharmacy india – online pharmacy india
http://canadianpharmacy.win/# canadian pharmacy scam
http://indianpharmacy.win/# indian pharmacy online
http://mexicanpharmacy.store/# mexican online pharmacies prescription drugs
https://canadianpharmacy.win/# online canadian pharmacy
india pharmacy: Online medicine home delivery – indian pharmacy
http://indianpharmacy.win/# top online pharmacy india
best online pharmacies in mexico mexican border pharmacies shipping to usa pharmacies in mexico that ship to usa
http://mexicanpharmacy.store/# mexico drug stores pharmacies
https://mexicanpharmacy.store/# medication from mexico pharmacy
https://canadianpharmacy.win/# cross border pharmacy canada
pharmacy website india: online pharmacy india – top online pharmacy india
http://mexicanpharmacy.store/# medication from mexico pharmacy
http://canadianpharmacy.win/# reliable canadian pharmacy reviews
http://indianpharmacy.win/# best online pharmacy india
rate canadian pharmacies best canadian online pharmacy canadian pharmacy meds
indian pharmacies safe: indian pharmacy paypal – online shopping pharmacy india
https://maxpillsformen.com/# Generic Cialis without a doctor prescription
Cialis over the counter: Generic Cialis without a doctor prescription – Cialis over the counter
http://maxpillsformen.com/# Cheap Cialis
http://fastpillseasy.com/# where to buy erectile dysfunction pills
viagra without prescription: buy Viagra online – best price for viagra 100mg
Cheap Cialis MaxPillsForMen cialis for sale
http://fastpillseasy.com/# where can i buy erectile dysfunction pills
Generic Cialis without a doctor prescription: Generic Cialis without a doctor prescription – Generic Cialis without a doctor prescription
cheapest cialis: MaxPillsForMen.com – buy cialis pill
Cheap Cialis Max Pills For Men Buy Tadalafil 10mg
http://fastpillseasy.com/# cheap boner pills
http://fastpillsformen.com/# generic sildenafil
ed treatments online: FastPillsEasy – low cost ed meds
ed rx online fast pills easy ed prescriptions online
ed online prescription: online ed medicine – buy erectile dysfunction pills online
http://maxpillsformen.com/# Buy Tadalafil 20mg
Order Viagra 50 mg online buy viagra online cheap viagra
https://fastpillsformen.com/# buy viagra here
erectile dysfunction online prescription: FastPillsEasy – online erectile dysfunction medication
https://fastpillsformen.com/# Cheap Viagra 100mg
Buy Cialis online: Generic Cialis without a doctor prescription – cheapest cialis
http://fastpillsformen.com/# cheapest viagra
Generic Cialis without a doctor prescription Cialis over the counter Tadalafil Tablet
ed online pharmacy: fast pills easy – buy ed meds online
http://fastpillsformen.com/# Buy generic 100mg Viagra online
https://fastpillsformen.com/# viagra canada
п»їcialis generic: Generic Cialis without a doctor prescription – п»їcialis generic
cheapest cialis: buy cialis online – Buy Tadalafil 5mg
https://fastpillsformen.com/# Viagra without a doctor prescription Canada
ed medicines FastPillsEasy ed online pharmacy
viagra without prescription: buy viagra online – Viagra online price
https://fastpillsformen.com/# order viagra
http://fastpillseasy.com/# online ed pills
Generic Tadalafil 20mg price: MaxPillsForMen.com – Generic Tadalafil 20mg price
https://fastpillsformen.com/# sildenafil over the counter
erectile dysfunction medications online fast pills easy ed medications cost
viagra without prescription: buy viagra online – cheap viagra
https://fastpillseasy.com/# cheap erection pills
http://maxpillsformen.com/# Generic Cialis without a doctor prescription
Buy Cialis online MaxPillsForMen.com Cialis over the counter
http://maxpillsformen.com/# Cialis without a doctor prescription
ed medicines: fast pills easy – ed treatment online
https://fastpillseasy.com/# cheap ed pills
http://fastpillseasy.com/# low cost ed meds
п»їed pills online erectile dysfunction drugs online cheapest ed meds
https://fastpillseasy.com/# low cost ed pills
Buy generic 100mg Viagra online: Fast Pills For Men – Cheapest Sildenafil online
http://fastpillsformen.com/# Sildenafil Citrate Tablets 100mg
online erectile dysfunction medication: erectile dysfunction medication online – get ed meds online
generic sildenafil: cheap viagra – Cheap Viagra 100mg
http://maxpillsformen.com/# Cialis over the counter
Buy Cialis online Max Pills For Men Tadalafil price
erectile dysfunction medications online: cheap cialis – affordable ed medication
cheapest ed medication: fast pills easy – discount ed meds
http://maxpillsformen.com/# Tadalafil price
п»їcialis generic MaxPillsForMen.com buy cialis pill
https://maxpillsformen.com/# Generic Cialis price
cialis for sale: MaxPillsForMen – Buy Tadalafil 10mg
Cialis over the counter: Generic Cialis without a doctor prescription – п»їcialis generic
Viagra without a doctor prescription Canada Viagra online price Cheapest Sildenafil online
https://casinositeleri25.com/# guvenilir casino siteleri
slot oyunlar? puf noktalar?: slot casino siteleri – slot siteleri
https://casinositeleri25.com/# en guvenilir casino siteleri
guvenilir slot siteleri slot oyunlar? puf noktalar? slot casino siteleri
http://slotsiteleri25.com/# slot oyunlar?
CEO Kasi Viswanathan on reactions of IPL 2023 win IPL 2023: The Board of Control for Cricket in India (BCCI) officially announced the IPL 2023 Schedule on 17th February 2023. The IPL 2023 schedule informs that the matches will be played in the home and away format where all the teams will play 7 home games and 7 away games in the league stage. The 16th edition of the Indian Premier League IPL 2023 is scheduled to have 70 league-stage matches and will be played across 12 venues over 52 days. Calling all music lovers! Watch your favourite artists, live – at festivals, club shows, gigs or concerts. Paytm Insider has the best curated music events, across genres: rock, metal, EDM, pop, fusion, hip-hop, jazz, classical, Bollywood and world, at some of the best live music venues in the country. Paytm Insider hosts several top properties, including Bacardi NH7 Weekender, Timeout, SulaFest, Mood Indigo, Gaana Crossblade Music Festival, Locals DISTRICT, Lager n Barrel, MPower Fest. Also look forward to superstars like Arijit Singh & AR Rahman hosting their tours here.
https://seeyoudirectory.com/listings12921575/juventus-fc-transfer-news
“The Grand Final appointments are also a fantastic showcase of Football Queensland’s referee pathway and its demonstrated success, with FQ Referee Academy graduate and Townsville match official Page Malau-Aduli appointed as the referee for the Maccas® FQPL 1 Women Grand Final for the first time. * After his record 26th World Cup match, at the fifth and final time of asking, the 35-year-old Lionel Messi finally claimed the trophy that he and his nation demanded, lifting him up alongside Diego Maradona after the country’s first football God carried them to their emotional second triumph in 1986 following their first in 1978. The final of the 2026 FIFA World Cup will take place on Sunday, July 19, 2026. The MetLife Stadium in New York New Jersey is the intended stadium and host city for the final match of the 2026 FIFA men’s soccer World Cup in North America. The World Cup football in North America has three hosts: the USA, Canada, and Mexico. Their United 2026 Bid has been awarded at the 68th FIFA Congress in Moscow, on June 13, 2018, beating out Morocco (134 to 65 votes). The 2026 World Cup final is therefore expected to take place at the MetLife Stadium in East Rutherford, just outside New York City, according to the United 2026 bid.
deneme bonusu veren siteler yeni: yat?r?ms?z deneme bonusu veren siteler – deneme bonusu veren siteler
en kazancl? slot oyunlar?: slot oyunlar? puf noktalar? – en cok kazand?ran slot oyunlar?
https://sweetbonanza25.com/# sweet bonanza oyna
http://casinositeleri25.com/# Deneme Bonusu Veren Siteler
sweet bonanza guncel sweet bonanza kazanma saatleri sweet bonanza kazanma saatleri
https://denemebonusuverensiteler25.com/# deneme bonusu veren yeni siteler
Deneme Bonusu Veren Siteler: canl? casino siteleri – casino bahis siteleri
https://casinositeleri25.com/# Deneme Bonusu Veren Siteler
denemebonusuverensiteler25 deneme bonusu veren siteler denemebonusuverensiteler25
guvenilir slot siteleri: slot oyunlar? – slot oyunlar? puf noktalar?
http://slotsiteleri25.com/# slot casino siteleri
deneme bonusu veren siteler yeni: denemebonusuverensiteler25 – deneme bonusu veren siteler yeni
sweet bonanza slot sweet bonanza slot sweet bonanza
deneme bonusu veren siteler: deneme bonusu veren siteler yeni – deneme bonusu veren siteler yeni
https://denemebonusuverensiteler25.com/# yat?r?ms?z deneme bonusu veren siteler
yat?r?ms?z deneme bonusu veren siteler: deneme bonusu veren siteler – yeni deneme bonusu veren siteler
sweet bonanza kazanma saatleri sweet bonanza sweet bonanza oyna
https://sweetbonanza25.com/# sweet bonanza kazanma saatleri
deneme bonusu veren siteler yeni: deneme bonusu veren yeni siteler – yat?r?ms?z deneme bonusu veren siteler
yat?r?ms?z deneme bonusu veren siteler: denemebonusuverensiteler25 – deneme bonusu veren siteler
guvenilir casino siteleri guvenilir casino siteleri Canl? Casino Siteleri
Very neat post.Really thank you! Cool.
sweet bonanza slot: sweet bonanza oyna – sweet bonanza yorumlar
en cok kazand?ran slot oyunlar? az parayla cok kazandiran slot oyunlar? en kazancl? slot oyunlar?
https://slotsiteleri25.com/# en cok kazand?ran slot oyunlar?
deneme bonusu veren siteler: yeni deneme bonusu veren siteler – deneme bonusu veren siteler
slot oyunlar? puf noktalar?: slot casino siteleri – en kazancl? slot oyunlar?
iddaa siteleri
yat?r?ms?z deneme bonusu veren siteler deneme bonusu veren siteler deneme bonusu veren siteler
yeni deneme bonusu veren siteler: deneme bonusu veren yeni siteler – deneme bonusu veren siteler
http://sweetbonanza25.com/# sweet bonanza guncel
slot oyunlar?: slot oyunlar? – slot casino siteleri
slot oyunlar? slot siteleri slot oyunlar? puf noktalar?
casino Еџans oyunlarД±: casino bahis siteleri – guvenilir casino siteleri
Hi there, the whole thing is going sound here and ofcourse every one issharing facts, that’s really good, keep up writing.
https://denemebonusuverensiteler25.com/# denemebonusuverensiteler25
yat?r?ms?z deneme bonusu veren siteler deneme bonusu veren siteler deneme bonusu veren siteler
deneme bonusu veren siteler: denemebonusuverensiteler25 – denemebonusuverensiteler25
sweet bonanza slot: sweet bonanza slot – sweet bonanza giris
Уперед мультфільм Уперед мультфільм 2021 безкоштовно Уперед мультик 2021 року
sweet bonanza giris sweet bonanza giris sweet bonanza kazanma saatleri
deneme bonusu veren siteler: denemebonusuverensiteler25 – yat?r?ms?z deneme bonusu veren siteler
https://casinositeleri25.com/# Casino Siteleri
slot casino siteleri: slot oyunlar? – slot oyunlar?
guvenilir casino siteleri Casino Siteleri Deneme Bonusu Veren Siteler
guvenilir casino siteleri: casino bahis siteleri – Casino Siteleri
yeni deneme bonusu veren siteler deneme bonusu veren siteler deneme bonusu veren yeni siteler
https://slotsiteleri25.com/# en cok kazand?ran slot oyunlar?
en kazancl? slot oyunlar?: slot siteleri – guvenilir slot siteleri
en kazancl? slot oyunlar?: slot siteleri – az parayla cok kazandiran slot oyunlar?
Your point of view caught my eye and was very interesting. Thanks. I have a question for you.
Hey! I’m at work surfing around your blog from my New Flow XL Ingredients iphone 3gs!Just wanted to say I love reading your blog and look forward to all your posts!Keep up the outstanding work!
canadian pharmacy tampa: Canadian Md Pharm – canadian drug
top 10 pharmacies in india: indian pharmacy – Indian pharmacy international shipping
best online canadian pharmacy canada discount pharmacy canadian pharmacy near me
canada drugs reviews https://canadianmdpharm.shop/# canadian pharmacy reviews
indian pharmacies safe
Best online Indian pharmacy: indian pharmacy – Indian Cert Pharm
Now I am going away to do my breakfast, afterward having my breakfast coming yet again toread other news.Review my blog: shihan.com.ru
best canadian online pharmacy https://mexicaneasypharm.com/# pharmacies in mexico that ship to usa
best india pharmacy
mexico drug stores pharmacies: Mexican Easy Pharm – mexican drugstore online
Indian pharmacy international shipping indianpharmacy com Best online Indian pharmacy
Mexican Easy Pharm: Mexican Easy Pharm – Mexican Easy Pharm
Mexican Easy Pharm: pharmacies in mexico that ship to usa – best online pharmacies in mexico
Online medicine: indian pharmacy – india pharmacy
https://indiancertpharm.shop/# Indian pharmacy that ships to usa
pharmacy rx world canada
canadian valley pharmacy: CanadianMdPharm – my canadian pharmacy review
Looking forward to reading more. Great article.Really looking forward to read more. Really Cool.
Indian pharmacy that ships to usa Indian Cert Pharm IndianCertPharm
Major thankies for the blog post.Really thank you! Want more.
wow, awesome blog post.Much thanks again. Awesome.
mexico drug stores pharmacies: Mexican Easy Pharm – buying prescription drugs in mexico online
canada drugs reviews https://indiancertpharm.com/# indian pharmacy
indianpharmacy com
Online pharmacy: Best online Indian pharmacy – Indian Cert Pharm
Appreciate you sharing, great article post. Much obliged.
my canadian pharmacy rx: Canadian Md Pharm – canadian pharmacy world reviews
Mexican Easy Pharm mexico drug stores pharmacies Mexican Easy Pharm
Mexican Easy Pharm: mexico pharmacies prescription drugs – Mexican Easy Pharm
canadian online drugstore https://canadianmdpharm.shop/# trustworthy canadian pharmacy
india online pharmacy
Best Indian pharmacy: Indian pharmacy international shipping – best india pharmacy
Indian pharmacy international shipping: indian pharmacy – Online medicine
legit canadian pharmacy: CanadianMdPharm – legitimate canadian pharmacies
canadian pharmacy Canadian Md Pharm best canadian online pharmacy
Indian pharmacy that ships to usa: Indian Cert Pharm – Indian pharmacy that ships to usa
legit canadian online pharmacy: Canadian Md Pharm – canadian pharmacy uk delivery
Say, you got a nice article post.Much thanks again. Want more.
Indian pharmacy international shipping: Best online Indian pharmacy – Online medicine
Mexican Easy Pharm: mexico pharmacies prescription drugs – mexican drugstore online
canadian pharmacy world reviews canadian drug reliable canadian pharmacy
canadian pharmacy online ship to usa https://mexicaneasypharm.shop/# mexico pharmacies prescription drugs
indian pharmacies safe
best rated canadian pharmacy: CanadianMdPharm – canada pharmacy reviews
canadian pharmacy meds reviews: Canadian Md Pharm – my canadian pharmacy review
Thanks again for the post.Thanks Again. Will read on…
canada pharmacy 24h: Canadian Md Pharm – cheapest pharmacy canada
canadian pharmacy world: CanadianMdPharm – best canadian online pharmacy reviews
https://mexicaneasypharm.shop/# mexico pharmacies prescription drugs
legal canadian pharmacy online
I really enjoy the blog post.Thanks Again. Awesome.
Mexican Easy Pharm: Mexican Easy Pharm – Mexican Easy Pharm
indian pharmacy: indian pharmacy – Indian Cert Pharm
Thanks again for the blog.Really looking forward to read more. Want more.
reputable mexican pharmacies online: mexico drug stores pharmacies – п»їbest mexican online pharmacies
escrow pharmacy canada: Canadian Md Pharm – canadian pharmacy phone number
mexican online pharmacies prescription drugs: mexican border pharmacies shipping to usa – purple pharmacy mexico price list
Indian pharmacy international shipping: world pharmacy india – Best online Indian pharmacy
Indian Cert Pharm: indian pharmacy – Indian Cert Pharm
safe online pharmacies in canada https://canadianmdpharm.com/# canada drugstore pharmacy rx
indian pharmacies safe
Mexican Easy Pharm: Mexican Easy Pharm – mexico drug stores pharmacies
Mexican Easy Pharm: purple pharmacy mexico price list – Mexican Easy Pharm
https://mexicaneasypharm.shop/# п»їbest mexican online pharmacies
canadapharmacyonline
canada drugs online review: Canadian Md Pharm – online pharmacy canada
Woh I enjoy your posts, saved to my bookmarks!Also visit my blog post … grazebo.com
canadian pharmacy tampa: Canadian Md Pharm – canadian pharmacy 365
Online pharmacy: Online medicine – Online pharmacy
Mexican Easy Pharm: Mexican Easy Pharm – Mexican Easy Pharm
Mexican Easy Pharm: mexican rx online – Mexican Easy Pharm
Indian Cert Pharm: Online pharmacy – Online pharmacy
Indian Cert Pharm: Best Indian pharmacy – Indian Cert Pharm
canada online pharmacy: CanadianMdPharm – canada pharmacy 24h
reputable canadian online pharmacies: best canadian pharmacy online – ordering drugs from canada
canadian pharmacy in canada: drugs from canada – canadian pharmacy sarasota
Indian Cert Pharm: Indian Cert Pharm – Indian pharmacy international shipping
https://canadianmdpharm.online/# legit canadian pharmacy online
canada discount pharmacy
indian pharmacy: Indian pharmacy international shipping – Best online Indian pharmacy
Indian pharmacy that ships to usa: Best Indian pharmacy – Indian Cert Pharm
safe canadian pharmacy CanadianMdPharm cross border pharmacy canada
Indian Cert Pharm: Indian Cert Pharm – Online medicine
my canadian pharmacy reviews: CanadianMdPharm – canadian pharmacy oxycodone
onlinecanadianpharmacy: CanadianMdPharm – buying drugs from canada
top 10 online pharmacy in india: Indian pharmacy international shipping – Best Indian pharmacy
pharmacies in mexico that ship to usa https://mexicaneasypharm.com/# Mexican Easy Pharm
mexican mail order pharmacies
canada discount pharmacy CanadianMdPharm canada drugs online
Fastidious replies in return of this question with genuine argumentsand describing everything on the topic of that.
mexican online pharmacies prescription drugs https://mexicaneasypharm.com/# best online pharmacies in mexico
mexican rx online
Indian Cert Pharm: Indian Cert Pharm – Online medicine order
Mexican Easy Pharm: Mexican Easy Pharm – Mexican Easy Pharm
This here is an excellent blog post. You got a friend in me. I’ll be back to enjoy more.
3 car garage with apartment plans altitude apartments atlanta southfork apartments
I am now not certain the place you’re getting your information, but good topic.I must spend a while learning much more or working out more.Thank you for excellent information I used to be looking for this info for my mission.
mexico drug stores pharmacies https://mexicaneasypharm.com/# Mexican Easy Pharm
mexican drugstore online
https://indiancertpharm.com/# indian pharmacy
canadianpharmacyworld com
mexican online pharmacies prescription drugs mexican border pharmacies shipping to usa Mexican Easy Pharm
canadian pharmacy world: canadian pharmacy meds – safe canadian pharmacy
Amazing things here. I’m very happy to peer your post.Thank you a lot and I’m taking a look forward to contact you.Will you kindly drop me a e-mail?
최저가격보장강남가라오케강남가라오케가격정보
최저가격보장강남가라오케강남가라오케가격정보
최저가격보장사라있네가라오케사라있네가격정보
최저가격보장선릉셔츠룸선릉셔츠룸가격정보
최저가격보장강남가라오케강남가라오케가격정보
최저가격보장강남셔츠룸강남셔츠룸가격정보
최저가격보장CNN셔츠룸씨엔엔셔츠룸가격정보
DapPharm: DapPharm – buy priligy
Kama Pharm Kama Pharm super kamagra
Kama Pharm: Kama Pharm – Kama Pharm
https://dappharm.shop/# cheap priligy
Kamagra Oral Jelly
https://semapharm24.com/# buy rybelsus online
prednisone 40 mg tablet
buy cytotec online: buy cytotec over the counter – cytotec pills buy online
super kamagra: Kama Pharm – Kama Pharm
https://semapharm24.com/# SemaPharm24
super kamagra
Pred Pharm prednisone 20 tablet buy prednisone without a prescription best price
CytPharm: CytPharm – Cytotec 200mcg price
https://dappharm.com/# priligy
prednisone 40 mg price
Kamagra Oral Jelly: Kamagra tablets – Kamagra tablets
https://kamapharm.shop/# Kama Pharm
sildenafil oral jelly 100mg kamagra
semaglutide tablets: semaglutide tablets price – buy rybelsus online
buying prednisone on line: PredPharm – Pred Pharm
Kamagra 100mg buy Kamagra super kamagra
https://predpharm.shop/# prednisone uk
prednisone 10 mg canada
http://semapharm24.com/# rybelsus semaglutide tablets
Kamagra 100mg price
PredPharm: Pred Pharm – prednisone medication
semaglutide tablets for weight loss: cheap semaglutide pills – Sema Pharm 24
http://dappharm.com/# cheap priligy
Kamagra Oral Jelly
http://cytpharm.com/# buy cytotec in usa
buy prednisone 50 mg
semaglutide best price Sema Pharm 24 semaglutide best price
cheap kamagra: Kama Pharm – buy kamagra online usa
semaglutide tablets: generic rybelsus tabs – cheap semaglutide pills
https://predpharm.com/# PredPharm
buy kamagra online usa
PredPharm: buying prednisone mexico – 50mg prednisone tablet
dapoxetine price: priligy – buy priligy
buy cytotec online CytPharm CytPharm
https://kamapharm.com/# Kama Pharm
prednisone 20 mg tablet
https://semapharm24.com/# semaglutide tablets for weight loss
buy kamagra online usa
semaglutide tablets for weight loss: buy semaglutide – semaglutide tablets price
semaglutide tablets for weight loss: semaglutide tablets price – Sema Pharm 24
http://dappharm.com/# priligy
sildenafil oral jelly 100mg kamagra
sildenafil oral jelly 100mg kamagra Kamagra 100mg price super kamagra
Pred Pharm: prednisone pack – Pred Pharm
Kama Pharm: buy Kamagra – Kama Pharm
http://dappharm.com/# cheap priligy
5 mg prednisone tablets
https://predpharm.com/# Pred Pharm
sildenafil oral jelly 100mg kamagra
Kamagra tablets: п»їkamagra – super kamagra
dapoxetine price: buy priligy – Priligy tablets
https://predpharm.com/# prednisone 500 mg tablet
super kamagra
Sema Pharm 24 Sema Pharm 24 Sema Pharm 24
http://predpharm.com/# prednisolone prednisone
prednisone 20mg tab price
Kama Pharm: Kama Pharm – Kama Pharm
25 mg prednisone: Pred Pharm – Pred Pharm
buy cytotec over the counter: buy cytotec online – buy cytotec online
buy prednisone without prescription paypal: can i buy prednisone online in uk – prednisone 10mg tablets
https://cytpharm.com/# buy misoprostol over the counter
prednisone 20 mg tablets
http://dappharm.com/# Priligy tablets
Kamagra 100mg price
buy semaglutide SemaPharm24 Sema Pharm 24
order cytotec online: buy cytotec in usa – Misoprostol 200 mg buy online
It is really a nice and useful piece of info. I am glad that you just shared this helpful information with us. Please stay us informed like this. Thanks for sharing.
Pred Pharm: Pred Pharm – prednisone 50 mg tablet cost
https://semapharm24.com/# Sema Pharm 24
Kamagra 100mg
Kamagra 100mg price: п»їkamagra – buy kamagra online usa
https://dappharm.com/# dap pharm
prednisone 10 mg over the counter
Cyt Pharm: Cyt Pharm – buy cytotec
dapoxetine online buy dapoxetine online dapoxetine price
https://semapharm24.shop/# semaglutide tablets
п»їkamagra
Pred Pharm: prednisone 20 mg purchase – Pred Pharm
Cyt Pharm: buy cytotec in usa – CytPharm
https://semapharm24.com/# SemaPharm24
cheap kamagra
https://dappharm.shop/# DapPharm
can you buy prednisone without a prescription
SemaPharm24: cheap semaglutide pills – SemaPharm24
semaglutide tablets price buy semaglutide SemaPharm24
SemaPharm24: Sema Pharm 24 – Sema Pharm 24
semaglutide tablets price: buy semaglutide – rybelsus semaglutide tablets
dapoxetine price: buy dapoxetine online – dapoxetine price
It’s an awesome piece of writing designed for all the internet people; they will getbenefit from it I am sure.
https://dappharm.shop/# cheap priligy
10 mg prednisone tablets
buy cytotec online: buy cytotec online – cytotec pills buy online
Cytotec 200mcg price cytotec pills buy online buy cytotec online
CytPharm: buy cytotec pills online cheap – п»їcytotec pills online
prednisone 5 mg tablet without a prescription: PredPharm – prednisone 60 mg tablet
https://kamapharm.com/# Kama Pharm
buy Kamagra
https://semapharm24.com/# semaglutide tablets
by prednisone w not prescription
Kamagra 100mg price: Kama Pharm – super kamagra
order prednisone 100g online without prescription: PredPharm – Pred Pharm
buy misoprostol over the counter: CytPharm – buy cytotec online
https://dappharm.shop/# priligy
prednisone for sale without a prescription
PredPharm: Pred Pharm – PredPharm
prednisone 20 Pred Pharm prednisone 40 mg price
https://kamapharm.com/# sildenafil oral jelly 100mg kamagra
Kamagra tablets
rybelsus semaglutide tablets: semaglutide tablets store – generic rybelsus tabs
Pred Pharm: PredPharm – where can i buy prednisone
https://cytpharm.com/# buy cytotec
prednisone 10mg buy online
Kama Pharm: Kama Pharm – Kama Pharm
semaglutide tablets price: semaglutide tablets for weight loss – buy semaglutide
Farmacia online piГ№ conveniente: Cialis generico prezzo – migliori farmacie online 2024
farmacie online sicure Farm Tadal Italy farmacia online piГ№ conveniente
Thanks for sharing your thoughts on slot online.Regards
http://farmabrufen.com/# Farma Brufen
comprare farmaci online con ricetta
viagra originale recensioni: FarmaSildItaly – viagra generico sandoz
farmacia online
comprare farmaci online all’estero: farmacie online autorizzate elenco – farmacia online
Howdy! I simply want to give you a big thumbs up for your excellent information you have got here on this post. I am returning to your blog for more soon.
top farmacia online: Ibuprofene 600 prezzo senza ricetta – farmacie online affidabili
Farmacie on line spedizione gratuita
http://farmabrufen.com/# BRUFEN prezzo
comprare farmaci online all’estero
п»їFarmacia online migliore Farma Prodotti farmacie online sicure
stromectol nz ivermectin for humans – stromectol online pharmacy
http://farmabrufen.com/# FarmaBrufen
comprare farmaci online con ricetta
migliori farmacie online 2024: farmaci senza ricetta elenco – top farmacia online
comprare farmaci online con ricetta
viagra naturale: FarmaSildItaly – farmacia senza ricetta recensioni
farmaci senza ricetta elenco BRUFEN prezzo farmacie online affidabili
http://farmatadalitaly.com/# farmacia online
acquistare farmaci senza ricetta
farmacia online senza ricetta: BRUFEN prezzo – acquistare farmaci senza ricetta
Farmacia online piГ№ conveniente
http://farmasilditaly.com/# viagra online spedizione gratuita
farmacie online affidabili
top farmacia online: BRUFEN prezzo – acquisto farmaci con ricetta
miglior sito dove acquistare viagra: Viagra – viagra acquisto in contrassegno in italia
Farmacie on line spedizione gratuita
https://farmabrufen.com/# Brufen senza ricetta
farmacie online affidabili
https://farmatadalitaly.shop/# comprare farmaci online con ricetta
acquistare farmaci senza ricetta
comprare farmaci online all’estero: Farma Prodotti – migliori farmacie online 2024
Farmacie on line spedizione gratuita top farmacia online comprare farmaci online con ricetta
viagra originale in 24 ore contrassegno: viagra ordine telefonico – le migliori pillole per l’erezione
Farmacia online miglior prezzo
farmacie online affidabili: Brufen senza ricetta – migliori farmacie online 2024
alternativa al viagra senza ricetta in farmacia: Farma Sild Italy – miglior sito dove acquistare viagra
comprare farmaci online con ricetta
http://farmaprodotti.com/# acquisto farmaci con ricetta
farmacia online
farmaci senza ricetta elenco Cialis generico comprare farmaci online all’estero
viagra cosa serve: Farma Sild Italy – miglior sito per comprare viagra online
п»їFarmacia online migliore: Farma Brufen – Farmacie on line spedizione gratuita
acquistare farmaci senza ricetta
https://farmasilditaly.com/# esiste il viagra generico in farmacia
acquistare farmaci senza ricetta
viagra online in 2 giorni: Viagra – viagra prezzo farmacia 2023
586640 520914Beneficial info and excellent style you got here! I want to thank you for sharing your concepts and putting the time into the stuff you publish! Wonderful function! 112207
kamagra senza ricetta in farmacia: Viagra – viagra originale in 24 ore contrassegno
farmacia online
http://farmasilditaly.com/# gel per erezione in farmacia
top farmacia online
comprare farmaci online all’estero FarmTadalItaly acquisto farmaci con ricetta
farmacia online senza ricetta: BRUFEN prezzo – acquisto farmaci con ricetta
Thanks so much for the post. Want more.
Farmacie on line spedizione gratuita: BRUFEN 600 acquisto online – farmacia online senza ricetta
farmacia online senza ricetta
http://farmabrufen.com/# Brufen senza ricetta
acquistare farmaci senza ricetta
п»їFarmacia online migliore: BRUFEN prezzo – migliori farmacie online 2024
farmaci senza ricetta elenco: Cialis generico prezzo – п»їFarmacia online migliore
Farmacia online piГ№ conveniente
http://farmabrufen.com/# Farma Brufen
migliori farmacie online 2024
viagra generico sandoz acquisto viagra viagra online spedizione gratuita