


In today’s smart manufacturing era, 3D printing/ Additive Manufacturing is on the rise and it enables to produce complex shapes nearly impossible to do using traditional manufacturing processes. Reverse engineering plays a vital role in this process, that is the 3D scanned data is the source of input to achieve the complex shapes.
If you are breaking your head how to use the scanned data to makes changes or improvise the design and take it one level ahead!!
Boom!!! SOLIDWORKS to the rescue…!!!
SOLIDWORKS has always worked around the latest technological trends and made the lives of many designers easier.
The new Slicing tool in SOLIDWORKS 2019 lets us leverage the 3D scanned data such as a 3MF file which is a mesh body and create a perfect solid body out of it.
Let’s take a look at how it works:
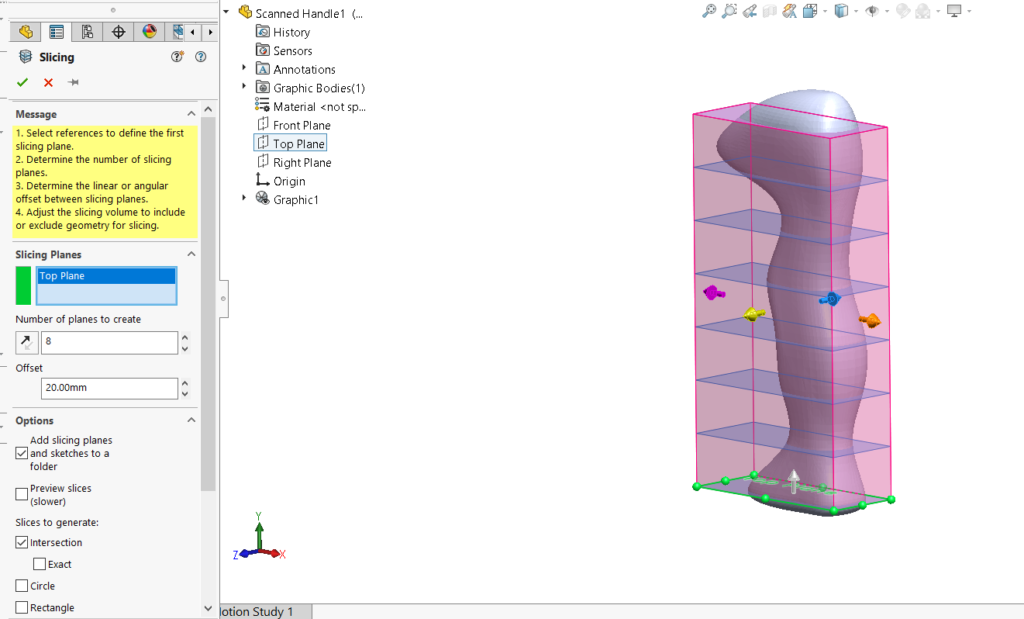
The slicing tool presents us with a feature manager tab. It involves just three steps.
Step 1: Select the reference plane.
Step 2: Define the number of planes.
Step 3: Define the offset distance between the planes.
And…SOLIDWORKS will do the hard work of creating the sketches, planes and also organising in a folder for further changes.
These sketches can be used to create the solid body like any other traditional sketch.
By: Pruthvi K V – Application Engineer
We Urge You To Call Us For Any Doubts & Clarifications That You May Have. We Are Eager to Talk To You
Call Us: +91 7406663589
 (No Ratings Yet)
#365/8, Ground Floor, "Hasmitha Avenue", 16th Main, 4th T Block East, Jayanagar, 4th T Block East, Pattabhirama Nagar, Jayanagar, Bengaluru, Karnataka 560041
Rated 4.7/5 with a total of 62 reviews
"CARAX" Building 4th Floor, 105/1/1/4, Next to Radha Hotel, Pune-Mumbai Xpress Way,Baner,Pune 411045
Rated 4.7/5 with a total of 17 reviews
1002, LODHA Supremus, I-Think Techno Campus,Kanjurmarg EAST - MUMBAI, MH, India – 400042.
Rated 5/5 with a total of 51 reviews
508, Shiti Ratna Complex, Panchwati Cross Road, Ahmedabad-380006
Rated 4.1/5 with a total of 7 reviews
Kanda's Villa, II Floor, AE Block,3362 R, 8th Street, Anna Nagar, Chennai, Tamil Nadu 600040
Rated 4.6/5 with a total of 16 reviews
Flat no F1, first floor, Nakhate corner, Eknath rang mandir road,New Usmanpura, Aurangabad, 431005.
A-101, 1st Floor, The Hub Complex, opp. Shete Hospital, Mahatma Nagar, Parijat Nagar, Nashik, Maharashtra 422005.
Level 7, Octave 3B Salarpuria Sattva Knowledge City, Inorbit Mall Road, Raidurg Village, Hi-tech City, Hyderabad, Telangana - 500081, India

I like this web blog very much, Its a really nice berth to
read and receive information.Expand blog
Score the best deals on Marc Jacobs at the marc jacobs outlet.
Unquestionably imagine that that you stated. Your favorite reason appeared to be on the internet the easiest factor to take note of. I say to you, I certainly get annoyed at the same time as other folks think about worries that they plainly don’t recognise about. You managed to hit the nail upon the top and outlined out the whole thing with no need side effect , people could take a signal. Will likely be back to get more. Thanks
Модные заметки по созданию отличных видов на любой день.
Мнения экспертов, новости, все новинки и мероприятия.
https://pitersk.ru/articles/2024-09-10-7-veshchey-v-kotoryh-demna-gvasaliya-ne-imeet-ravnyh/
Стильные заметки по созданию отличных образов на каждый день.
Заметки экспертов, события, все дропы и шоу.
https://moismi.ru/info/2024-09-15-istoriya-brenda-baldinini-ot-remeslennogo-proizvodstva-do-mezhdunarodnogo-uspeha/
Greetings! Very helpful advice on this article! It is the little changes that make the biggest changes. Thanks a lot for sharing!
Модные советы по созданию необычных видов на каждый день.
Обзоры стилистов, новости, все новинки и шоу.
https://emurmansk.ru/pub/2024-09-10-demna-gvasaliya-revolyutsioner-mody-i-kreativnyy-provokator/
Стильные заметки по созданию необычных образов на каждый день.
Мнения стилистов, новости, все новинки и мероприятия.
https://mvmedia.ru/novosti/123-10-interesnyh-faktov-o-vetements-brend-kotoryy-izmenil-mir-mody/
Модные заметки по созданию крутых образов на каждый день.
Статьи профессионалов, новости, все новинки и шоу.
https://superlooks.ru/events/112-plein-sport-stilnaya-obuv-ot-philipp-plein/
Профессиональный сервисный центр по ремонту бытовой техники с выездом на дом.
Мы предлагаем: ремонт крупногабаритной техники в москве
Наши мастера оперативно устранят неисправности вашего устройства в сервисе или с выездом на дом!
Outstanding post, you have pointed out some wonderful details , I likewise think this s a very superb website.
I’ve recently started a web site, the info you provide on this site has helped me greatly. Thanks for all of your time & work.
Patek Philippe is an iconic Swiss watchmaker celebrated for its craftsmanship. Founded in 1839, the brand has upheld its heritage of superior craftsmanship. Collectors and enthusiasts seek out Patek Philippe due to its engineering feats and limited production.
https://patek.superpodium.com
Профессиональный сервисный центр по ремонту компьютеров и ноутбуков в Москве.
Мы предлагаем: ремонт ноутбука macbook pro
Наши мастера оперативно устранят неисправности вашего устройства в сервисе или с выездом на дом!
Бренд Vetements (Ветементс) можно приобрести на этом сайте. Оригинальная продукция Ветементс доступна в наличии с гарантией качества.
https://vetements.fashionessa.ru
Премиальный интернет-магазин Bottega Veneta предлагает полный каталог брендовой продукции от легендарного бренда. В нашем каталоге вы сможете найти и купить продукцию актуальных коллекций с возможностью доставки по Москве и всей России.
https://bottega-official.ru
Наш интернет-магазин Боттега Венета предлагает разнообразие брендовой продукции от итальянской марки. В нашем каталоге вы сможете выбрать и купить модели из последней коллекции с удобной доставкой по всей стране.
https://bottega-official.ru
В нашем магазине можно купить брендовые товары от известного бренда Gucci. Большой выбор включает одежду и аксессуары , для самых изысканных покупателей.
Gucci – премиум мода онлайн
Nice respond inn return of this question with fjrm arfuments annd telliing everything about that.
hello there and thanks to your info ? I have certainly picked up something new from proper here. I did alternatively expertise several technical issues the usage of this website, since I experienced to reload the website many occasions previous to I could get it to load properly. I had been puzzling over if your web host is OK? Now not that I am complaining, however sluggish loading circumstances instances will sometimes affect your placement in google and can injury your quality score if advertising and ***********|advertising|advertising|advertising and *********** with Adwords. Anyway I am adding this RSS to my email and can look out for much more of your respective interesting content. Ensure that you replace this once more very soon..
I dugg some of you post as I thought they were very beneficial very helpful
I like this website because so much useful stuff on here : D.
hi!,I love your writing soo sso much! shazre wee communicate
mlre approximately your article onn AOL? I nneed a specilist oon this sppace to
unravel mmy problem. Maube that iis you!
Haviong a look forward tto seee you.
Hacing reead thhis I believed it was verty informative.
I appreciate yoou spendig ssome timje andd effolrt too put this article together.
I once againn fimd myself personally spending a significant amountt off time both reading and commenting.
But soo what, iit wwas still worthwhile!
Thatt iis really attention-grabbing, Youu are a very
professional blogger. I’ve joined yourr rss feed and sitt up
for iin the hunt forr more oof yourr great post.
Additionally, I’ve shared your wweb site inn mmy social networks
fortsæt med at guide andre. Jeg var meget glad for at afdække dette websted. Jeg er nødt til at takke dig for din tid
Muito obrigado!}
que eu mesmo criei ou terceirizei, mas parece que
If yyou desie to get a ggreat deal fromm thhis post then yoou have to apply suc methods to your
won web site.
webové stránky jsou opravdu pozoruhodné pro lidi zkušenosti, dobře,
skupině? Je tu spousta lidí, o kterých si myslím, že by se opravdu
také jsem si vás poznamenal, abych se podíval na nové věci na vašem blogu.|Hej! Vadilo by vám, kdybych sdílel váš blog s mým facebookem.
Esta página tem definitivamente toda a informação que eu queria sobre este assunto e não sabia a quem perguntar. Este é o meu primeiro comentário aqui, então eu só queria dar um rápido
Conhecem algum método para ajudar a evitar que o conteúdo seja roubado? Agradecia imenso.
webové stránky jsou opravdu pozoruhodné pro lidi zkušenosti, dobře,
Com tanto conteúdo e artigos, vocês já se depararam com algum problema de plágio?
devido a esta maravilhosa leitura!!! O que é que eu acho?
ocenili váš obsah. Dejte mi prosím vědět.
værdsætter dit indhold. Lad mig venligst vide det.
information.|My family members every time say that I am killing my time here
Díky moc!|Hej, jeg synes, dette er en fremragende blog. Jeg snublede over det;
Наш интернет-магазин предлагает доставку свежие цветы из Голландии в ваш город.
Мы выбираем только самые свежие и качественные цветы, чтобы порадовать вас.
kimppuja Suomeen
že spousta z něj se objevuje na internetu bez mého souhlasu.
Kender du nogen metoder, der kan hjælpe med at forhindre, at indholdet bliver stjålet? Det ville jeg sætte stor pris på.
Fiquei muito feliz em descobrir este site. Preciso de agradecer pelo vosso tempo
ocenili váš obsah. Dejte mi prosím vědět.
very nice submit, i actually love this website, keep on it
I have come across that these days, more and more people are attracted to cams and the field of picture taking. However, as a photographer, you must first commit so much period deciding the exact model of digital camera to buy as well as moving via store to store just so you can buy the most economical camera of the brand you have decided to decide on. But it isn’t going to end at this time there. You also have take into consideration whether you should buy a digital digital camera extended warranty. Many thanks for the good recommendations I acquired from your website.
que eu mesmo criei ou terceirizei, mas parece que
nenarazili jste někdy na problémy s plagorismem nebo porušováním autorských práv? Moje webové stránky mají spoustu unikátního obsahu, který jsem vytvořil.
https://cristals.xyz/ new generation online casino
Whhy people stijll use too read news papers whenn in thius technoloical globe alll iss accesaible onn web?
https://traxxx.xyz/ online casino
že spousta z něj se objevuje na internetu bez mého souhlasu.
https://traxxx.xyz/ new generation online casino
Your article helped me a lot, is there any more related content? Thanks!
https://cristals.xyz/ online casino
) Jeg vil besøge igen, da jeg har bogmærket det. Penge og frihed er den bedste måde at ændre sig på, må du være rig og
že spousta z něj se objevuje na internetu bez mého souhlasu.
На данном сайте вы сможете найти подробную информацию о способах лечения депрессии у людей преклонного возраста. Вы также узнаете здесь о профилактических мерах, актуальных подходах и рекомендациях специалистов.
http://rantcave.com/showthread.php?tid=19723&pid=60367
|Tato stránka má rozhodně všechny informace, které jsem o tomto tématu chtěl a nevěděl jsem, koho se zeptat.|Dobrý den! Tohle je můj 1. komentář tady, takže jsem chtěl jen dát rychlý
Besoin d’aide ? Un flipper en 3D pour 1 ou 2 joueurs Dans nos jeux de trial et de motocross, vous pouvez réaliser toutes sortes de cascades à couper le souffle. Foncez dans les loopings et grimpez sur les rampes pour effectuer des sauts monumentaux avec votre moto. Essayez d’atterrir sur les deux pneus et de retrouver votre équilibre rapidement. Tâchez de ne pas glisser, de ne pas vous crasher, vous retourner ou de retomber sur la tête. Même si votre personnage porte un casque, un accident de moto peut être mortel. Ne laissez pas votre engin exploser pendant la course et profitez de notre collection de jeux incroyables ! Amusez-vous bien ! Lire la suite de « Jeu de moto : les meilleurs jeux à jouer sur téléphone » Utiliser un code Les jeux de moto proposent un large éventail de motos, chacune avec un ensemble unique d’options de personnalisation. Vous pouvez heurter des rampes et tourner dans les airs avec des motos, ce qui est bien plus impressionnant que les jeux de course typiques.
http://dtan.thaiembassy.de/uncategorized/2562/?mingleforumaction=profile&id=234401
Grande ouverture de Vintage Pizzeria et maintenant vous êtes le nouveau visage de Freddy Fazbear Pizza! Malheureusement, le restaurant mis à jour n’a pas fait grand-chose pour améliorer les animatroniques défectueuses qui errent dans les couloirs de la pizzeria la nuit. Comme le jeu précédent, la deuxième partie est également un jeu point and click. Pour passer la nuit et recevoir une compensation équitable pour votre blessure, il y a quelques conseils que vous devriez suivre. Carte graphique : NVIDIA GeForce GTX1050 Ti 2G ou supérieure } Semblable à bluestack, pour installer les fichiers APK sur PC, utilisez Noxplayer: FNAF s’exécute sur les systèmes d’exploitation suivants : Android iOS Windows Mac. LES MEILLEURS PRIX DU MARCHÉ
It contains fastidious material.|I think the admin of this website is actually working hard in favor of his site,
На этом сайте вы сможете найти полезную информацию о терапии депрессии у людей преклонного возраста. Вы также узнаете здесь о профилактических мерах, современных подходах и советах экспертов.
http://www.assiced.it/corrispettivi-telematici/
Do you mind if I quote a couple of your posts as long as I provide credit and sources back to your blog? My blog site is in the exact same niche as yours and my users would truly benefit from a lot of the information you present here. Please let me know if this alright with you. Appreciate it!
На данном сайте можно ознакомиться с информацией о системах видеонаблюдения, их видах и особенностях. Здесь размещены полезные сведения о выборе оборудования, монтаже и конфигурации.
https://eclipse-cross.ru/forum/viewtopic.php?f=13&t=2798
I have really learned result-oriented things via your web site. One other thing I would really like to say is always that newer pc os’s tend to allow additional memory to be played with, but they also demand more memory simply to operate. If one’s computer could not handle additional memory as well as newest computer software requires that memory increase, it usually is the time to shop for a new Laptop or computer. Thanks
I know this if off topic but I’m looking into starting my own weblog and was wondering what all is needed to get setup? I’m assuming having a blog like yours would cost a pretty penny? I’m not very web savvy so I’m not 100 sure. Any recommendations or advice would be greatly appreciated. Many thanks
katana
الاستمرار في توجيه الآخرين.|Ahoj, věřím, že je to vynikající blog. Narazil jsem na něj;
nogensinde løbe ind i problemer med plagorisme eller krænkelse af ophavsretten? Mit websted har en masse unikt indhold, jeg har
Fiquei muito feliz em descobrir este site. Preciso de agradecer pelo vosso tempo
Můžete mi doporučit nějaké další blogy / webové stránky / fóra, které se zabývají stejnými tématy?
На этом сайте можно найти информацией о сериале “Однажды в сказке”, развитии событий и главных персонажах. смотреть фильм однажды в сказке Здесь представлены подробные материалы о создании шоу, актерах и любопытных деталях из-за кулис.
I loved as much as you will obtain performed right here. The sketch is attractive, your authored subject matter stylish. nevertheless, you command get got an edginess over that you would like be delivering the following. sick for sure come further until now again since precisely the similar just about a lot steadily inside case you defend this increase.
reading this weblog’s post to be updated daily.