


SOLIDWORKS comes with the two types of license systems one is standalone and another one is SOLIDWORKS network license. In standalone license we can use the license on same system where it is installed, in network license, we can share the license among the users which are connected in the network, the add-ins are floating in nature.
When it comes to upgrading the standalone license, we can simply upgrade via the SOLIDWORKS installation files, but in case of network license we must upgrade the solidnetwork license manager server then only we can upgrade our SOLIDWORKS system.
Below are the steps to be followed when it comes to upgrading SOLIDWORKS network license manager,
Step1: Download the SOLIDWORKS license manager file
This file is present in the SOLIDWORKS installation file as well as you can download from customer portal (“customer portal” > “Download and update” > select the “SolidNetWork License Version” and download it)
Location of SOLIDWORKS network license file from SolidNetWork installation media.
Step 2: Installation of solidnetwork license file
1. Open the folder swlicmgr and run the windows installer file.
Location of SOLIDWORKS network installer from SolidNetWork installation media.
2. Run the setup as an administrator and follow the on-screen procedure
Click on next and verify the serial keys

Click finish to complete the installation.
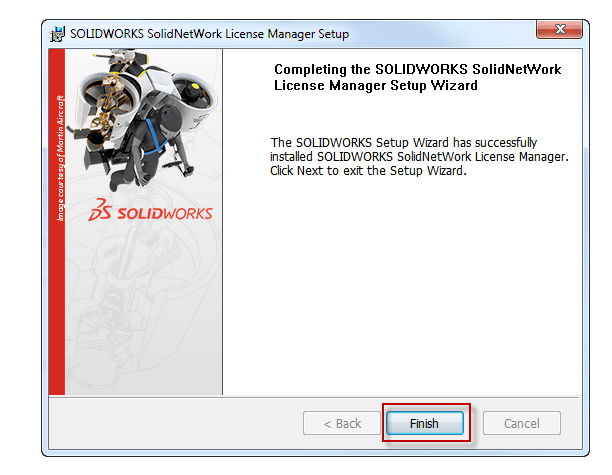
Now restart the system.
Step 3: Activation of SolidNetWork license server manager
Type SolidNetWork license manager server in start menu, if any pop up will showing about activation just click yes and check the active number of licenses.
Note-if you want to run SOLIDWORKS 2016, 2017, and 2018 on the client machines, then you have to install SNL Manager 2018 on your server.

We Urge You To Call Us For Any Doubts & Clarifications That You May Have. We Are Eager to Talk To You
Call Us: +91 7406663589
 (No Ratings Yet)
#365/8, Ground Floor, "Hasmitha Avenue", 16th Main, 4th T Block East, Jayanagar, 4th T Block East, Pattabhirama Nagar, Jayanagar, Bengaluru, Karnataka 560041
Rated 4.7/5 with a total of 62 reviews
"CARAX" Building 4th Floor, 105/1/1/4, Next to Radha Hotel, Pune-Mumbai Xpress Way,Baner,Pune 411045
Rated 4.7/5 with a total of 17 reviews
1002, LODHA Supremus, I-Think Techno Campus,Kanjurmarg EAST - MUMBAI, MH, India – 400042.
Rated 5/5 with a total of 51 reviews
508, Shiti Ratna Complex, Panchwati Cross Road, Ahmedabad-380006
Rated 4.1/5 with a total of 7 reviews
Kanda's Villa, II Floor, AE Block,3362 R, 8th Street, Anna Nagar, Chennai, Tamil Nadu 600040
Rated 4.6/5 with a total of 16 reviews
Flat no F1, first floor, Nakhate corner, Eknath rang mandir road,New Usmanpura, Aurangabad, 431005.
A-101, 1st Floor, The Hub Complex, opp. Shete Hospital, Mahatma Nagar, Parijat Nagar, Nashik, Maharashtra 422005.
Level 7, Octave 3B Salarpuria Sattva Knowledge City, Inorbit Mall Road, Raidurg Village, Hi-tech City, Hyderabad, Telangana - 500081, India

pin up casino https://azerbaijancuisine.com/# pin up azerbaycan
pin up casino az
pharmacies in mexico that ship to usa mexican northern doctors mexico drug stores pharmacies
buying prescription drugs in mexico online mexican pharmacy northern doctors mexico drug stores pharmacies
http://northern-doctors.org/# mexico pharmacy
mexican pharmacy: northern doctors – buying from online mexican pharmacy
buying from online mexican pharmacy: mexican mail order pharmacies – best online pharmacies in mexico
mexican online pharmacies prescription drugs mexican pharmacy online medication from mexico pharmacy
https://northern-doctors.org/# mexico pharmacy
pharmacies in mexico that ship to usa: Mexico pharmacy that ship to usa – п»їbest mexican online pharmacies
http://northern-doctors.org/# mexican mail order pharmacies
mexico pharmacy: mexican pharmacy online – mexican rx online
mexican drugstore online mexican northern doctors medicine in mexico pharmacies
https://northern-doctors.org/# mexico pharmacy
mexican drugstore online: mexican pharmacy online – mexico drug stores pharmacies
https://northern-doctors.org/# mexico pharmacy
mexico drug stores pharmacies: mexican pharmacy northern doctors – mexico pharmacies prescription drugs
purple pharmacy mexico price list: mexican pharmacy northern doctors – purple pharmacy mexico price list
http://northern-doctors.org/# п»їbest mexican online pharmacies
reputable mexican pharmacies online: mexican pharmacy – buying from online mexican pharmacy
https://northern-doctors.org/# mexican border pharmacies shipping to usa
buying prescription drugs in mexico: mexican border pharmacies shipping to usa – mexican drugstore online
mexican mail order pharmacies northern doctors pharmacy mexican border pharmacies shipping to usa
reputable mexican pharmacies online: northern doctors – п»їbest mexican online pharmacies
https://northern-doctors.org/# mexico drug stores pharmacies
mexican border pharmacies shipping to usa: northern doctors pharmacy – mexican border pharmacies shipping to usa
https://northern-doctors.org/# buying from online mexican pharmacy
purple pharmacy mexico price list: northern doctors – medicine in mexico pharmacies
https://northern-doctors.org/# medication from mexico pharmacy
mexico pharmacy: reputable mexican pharmacies online – mexican mail order pharmacies
buying prescription drugs in mexico online mexican pharmacy mexican online pharmacies prescription drugs
mexican rx online: reputable mexican pharmacies online – mexican drugstore online
https://cmqpharma.online/# mexican pharmaceuticals online
mexico pharmacy
mexico drug stores pharmacies cmq pharma mexican drugstore online
buying from online mexican pharmacy cmq pharma mexican pharmacy mexico drug stores pharmacies
best online pharmacies in mexico: mexican pharmacy online – buying from online mexican pharmacy
reputable mexican pharmacies online online mexican pharmacy reputable mexican pharmacies online
mexican border pharmacies shipping to usa mexican pharmacy medication from mexico pharmacy
mexico pharmacy mexican pharmacy purple pharmacy mexico price list
mexican drugstore online mexican pharmacy mexico drug stores pharmacies
mexican pharmacy online mexican pharmacy mexican pharmacy
mexican pharmaceuticals online
https://cmqpharma.com/# buying from online mexican pharmacy
mexican pharmaceuticals online
п»їbest mexican online pharmacies cmq pharma reputable mexican pharmacies online
mexican rx online mexican online pharmacy mexican pharmaceuticals online
Great article and right to the point. I am not sure if this is actually the best
place to ask but do you guys have any thoughts on where to
employ some professional writers? Thanks in advance 🙂 Escape roomy lista
I like this web site very much, Its a very nice berth to read and obtain information.?
Very fantastic info can be found on weblog.Blog monetyze
Online medicine order buy prescription drugs from india indianpharmacy com
https://foruspharma.com/# mexican pharmaceuticals online
buy prescription drugs from india top online pharmacy india indian pharmacies safe
https://indiapharmast.com/# top 10 pharmacies in india
safe canadian pharmacies reliable canadian pharmacy canadian pharmacy
Online medicine home delivery best online pharmacy india world pharmacy india
I seriously love your website.. Excellent colors & theme. Did you build this site yourself? Please reply back as I’m looking to create my own personal website and would like to find out where you got this from or what the theme is named. Kudos.
http://canadapharmast.com/# reliable canadian pharmacy
buy generic ciprofloxacin: purchase cipro – cipro
An impressive share! I’ve just forwarded this onto a coworker who was conducting a little research on this. And he actually bought me dinner due to the fact that I found it for him… lol. So allow me to reword this…. Thanks for the meal!! But yeah, thanx for spending time to discuss this issue here on your blog.
paxlovid for sale: п»їpaxlovid – paxlovid india
purchase cipro: buy cipro cheap – buy cipro online canada
doxycycline capsules india: doxycycline tablets in india – doxycycline 100mg
Next time I read a blog, Hopefully it does not fail me as much as this particular one. After all, I know it was my choice to read through, nonetheless I genuinely believed you would probably have something useful to talk about. All I hear is a bunch of moaning about something that you could fix if you were not too busy seeking attention.
Paxlovid over the counter: paxlovid buy – paxlovid pill
where can i get amoxicillin 500 mg: where to get amoxicillin over the counter – amoxicillin script
Paxlovid buy online: Paxlovid over the counter – paxlovid pill
I’d like to thank you for the efforts you have put in penning this blog. I’m hoping to check out the same high-grade blog posts from you in the future as well. In fact, your creative writing abilities has encouraged me to get my very own blog now 😉
pharmacies in mexico that ship to usa medication from mexico pharmacy purple pharmacy mexico price list
http://mexicandeliverypharma.com/# п»їbest mexican online pharmacies
mexican rx online: mexico drug stores pharmacies – mexican drugstore online
mexican border pharmacies shipping to usa: buying prescription drugs in mexico – mexico pharmacies prescription drugs
п»їbest mexican online pharmacies purple pharmacy mexico price list mexico drug stores pharmacies
mexican border pharmacies shipping to usa: mexico drug stores pharmacies – pharmacies in mexico that ship to usa
reputable mexican pharmacies online: mexican drugstore online – mexican pharmaceuticals online
https://mexicandeliverypharma.com/# medication from mexico pharmacy
best online pharmacies in mexico reputable mexican pharmacies online mexico pharmacies prescription drugs
mexican pharmaceuticals online: medicine in mexico pharmacies – best online pharmacies in mexico
mexican border pharmacies shipping to usa: reputable mexican pharmacies online – best online pharmacies in mexico
mexico pharmacies prescription drugs best online pharmacies in mexico buying prescription drugs in mexico
http://mexicandeliverypharma.com/# buying from online mexican pharmacy
buying from online mexican pharmacy: buying from online mexican pharmacy – buying from online mexican pharmacy
mexican online pharmacies prescription drugs: mexican mail order pharmacies – mexico drug stores pharmacies
buying prescription drugs in mexico: medicine in mexico pharmacies – buying prescription drugs in mexico online
mexico drug stores pharmacies medicine in mexico pharmacies mexican border pharmacies shipping to usa
buying prescription drugs in mexico online: best online pharmacies in mexico – п»їbest mexican online pharmacies
medicine in mexico pharmacies: mexican rx online – buying prescription drugs in mexico
buying prescription drugs in mexico: purple pharmacy mexico price list – mexican border pharmacies shipping to usa
This site certainly has all of the info I needed about this subject and didn’t know who to ask.
Hello! I just wish to give you a huge thumbs up for your excellent information you’ve got here on this post. I am returning to your blog for more soon.
You made some really good points there. I checked on the net for more info about the issue and found most individuals will go along with your views on this website.
mexican drugstore online mexico drug stores pharmacies medicine in mexico pharmacies
reputable mexican pharmacies online: п»їbest mexican online pharmacies – mexican mail order pharmacies
Hi there, I believe your website may be having browser compatibility issues. When I look at your site in Safari, it looks fine however, when opening in I.E., it’s got some overlapping issues. I merely wanted to provide you with a quick heads up! Apart from that, excellent site!
mexico drug stores pharmacies: mexico drug stores pharmacies – mexican drugstore online
mexico drug stores pharmacies: mexican mail order pharmacies – mexican border pharmacies shipping to usa
Greetings! Very helpful advice in this particular article! It’s the little changes that make the biggest changes. Many thanks for sharing!
mexican rx online mexican border pharmacies shipping to usa mexican drugstore online
reputable mexican pharmacies online: mexican online pharmacies prescription drugs – mexican online pharmacies prescription drugs
mexico drug stores pharmacies: mexico drug stores pharmacies – mexican rx online
п»їbest mexican online pharmacies: buying prescription drugs in mexico – medication from mexico pharmacy
mexican pharmaceuticals online mexico pharmacy mexico drug stores pharmacies
mexican border pharmacies shipping to usa: mexican drugstore online – mexico drug stores pharmacies
mexican drugstore online: mexico drug stores pharmacies – buying from online mexican pharmacy
purple pharmacy mexico price list mexican rx online purple pharmacy mexico price list
mexico drug stores pharmacies: pharmacies in mexico that ship to usa – mexico drug stores pharmacies
mexico drug stores pharmacies: best online pharmacies in mexico – purple pharmacy mexico price list
mexican border pharmacies shipping to usa: medicine in mexico pharmacies – mexican mail order pharmacies
mexican online pharmacies prescription drugs medicine in mexico pharmacies п»їbest mexican online pharmacies
reputable mexican pharmacies online: mexican mail order pharmacies – purple pharmacy mexico price list
mexican online pharmacies prescription drugs: best online pharmacies in mexico – purple pharmacy mexico price list
buying prescription drugs in mexico online: purple pharmacy mexico price list – medication from mexico pharmacy
mexico drug stores pharmacies reputable mexican pharmacies online mexico drug stores pharmacies
buying from online mexican pharmacy: best online pharmacies in mexico – pharmacies in mexico that ship to usa
п»їbest mexican online pharmacies: buying from online mexican pharmacy – pharmacies in mexico that ship to usa
mexican border pharmacies shipping to usa: mexican rx online – mexican rx online
mexico pharmacy medicine in mexico pharmacies mexican border pharmacies shipping to usa
purple pharmacy mexico price list: pharmacies in mexico that ship to usa – pharmacies in mexico that ship to usa
mexican online pharmacies prescription drugs: mexico drug stores pharmacies – mexico drug stores pharmacies
purple pharmacy mexico price list: mexican pharmaceuticals online – medication from mexico pharmacy
mexico pharmacy medicine in mexico pharmacies mexican pharmaceuticals online
purple pharmacy mexico price list: mexican drugstore online – buying prescription drugs in mexico online
medication from mexico pharmacy: mexican rx online – pharmacies in mexico that ship to usa
best online pharmacies in mexico buying from online mexican pharmacy mexican mail order pharmacies
medication from mexico pharmacy: mexico drug stores pharmacies – medication from mexico pharmacy
buying from online mexican pharmacy: buying prescription drugs in mexico online – buying prescription drugs in mexico
mexico drug stores pharmacies: mexico drug stores pharmacies – mexico pharmacies prescription drugs
You’re so interesting! I do not think I have read through a single thing like this before. So wonderful to discover someone with some genuine thoughts on this issue. Seriously.. thanks for starting this up. This web site is something that is needed on the web, someone with a little originality.
I used to be able to find good info from your blog articles.
mexican pharmacy mexican online pharmacies prescription drugs mexican rx online
Pretty! This was an incredibly wonderful article. Thank you for supplying this info.
mexican border pharmacies shipping to usa: п»їbest mexican online pharmacies – best online pharmacies in mexico
buying prescription drugs in mexico: п»їbest mexican online pharmacies – mexican mail order pharmacies
Way cool! Some very valid points! I appreciate you writing this post and the rest of the website is also very good.
mexican rx online: reputable mexican pharmacies online – mexico pharmacies prescription drugs
An intriguing discussion is definitely worth comment. I do think that you should write more on this issue, it may not be a taboo matter but generally folks don’t discuss these issues. To the next! Many thanks!
buying prescription drugs in mexico medicine in mexico pharmacies purple pharmacy mexico price list
mexico drug stores pharmacies: mexico drug stores pharmacies – mexican border pharmacies shipping to usa
mexico pharmacies prescription drugs: mexican mail order pharmacies – reputable mexican pharmacies online
mexico drug stores pharmacies: purple pharmacy mexico price list – п»їbest mexican online pharmacies
This site was… how do you say it? Relevant!! Finally I have found something that helped me. Thank you!
You are so interesting! I don’t suppose I’ve read a single thing like that before. So nice to find somebody with a few genuine thoughts on this subject. Really.. many thanks for starting this up. This site is something that’s needed on the internet, someone with some originality.
mexican border pharmacies shipping to usa buying prescription drugs in mexico online best online pharmacies in mexico
Everything is very open with a very clear clarification of the challenges. It was definitely informative. Your website is extremely helpful. Thank you for sharing.
reputable mexican pharmacies online: mexican pharmaceuticals online – mexican border pharmacies shipping to usa
best online pharmacies in mexico: purple pharmacy mexico price list – mexico pharmacies prescription drugs
mexican mail order pharmacies: mexican drugstore online – reputable mexican pharmacies online
Way cool! Some extremely valid points! I appreciate you writing this post and the rest of the site is also very good.
mexico pharmacy mexican online pharmacies prescription drugs mexican online pharmacies prescription drugs
mexico pharmacies prescription drugs: mexico pharmacies prescription drugs – buying from online mexican pharmacy
mexican border pharmacies shipping to usa: mexico drug stores pharmacies – reputable mexican pharmacies online
mexico pharmacies prescription drugs: pharmacies in mexico that ship to usa – buying prescription drugs in mexico online
buy generic propecia without a prescription buy generic propecia pill generic propecia tablets
get generic propecia price: cost propecia without prescription – cost of generic propecia for sale
http://cytotecbestprice.pro/# cytotec online
https://zithromaxbestprice.pro/# where to get zithromax
Very good information. Lucky me I discovered your site by chance (stumbleupon). I’ve saved as a favorite for later.
This is a really good tip especially to those fresh to the blogosphere. Simple but very precise information… Many thanks for sharing this one. A must read article.
prednisone buy online nz steroids prednisone for sale how to get prednisone tablets
zithromax price south africa: where can i buy zithromax uk – can i buy zithromax over the counter
https://cytotecbestprice.pro/# buy cytotec over the counter
http://prednisonebestprice.pro/# 6 prednisone
get cheap propecia order generic propecia without prescription order generic propecia without rx
buy cytotec online: cytotec online – buy misoprostol over the counter
https://prednisonebestprice.pro/# purchase prednisone 10mg
buy cytotec buy cytotec pills online cheap cytotec abortion pill
tamoxifen men: nolvadex only pct – buy tamoxifen
zithromax prescription in canada: zithromax online paypal – zithromax z-pak
Everyone loves it whenever people come together and share ideas. Great website, keep it up!
Your style is very unique in comparison to other people I have read stuff from. I appreciate you for posting when you’ve got the opportunity, Guess I will just book mark this page.
prednisone prices: buy prednisone online paypal – 1250 mg prednisone
I love it when folks come together and share thoughts. Great site, stick with it!
I wanted to thank you for this fantastic read!! I absolutely enjoyed every little bit of it. I have you saved as a favorite to check out new stuff you post…
I truly love your blog.. Very nice colors & theme. Did you develop this web site yourself? Please reply back as I’m attempting to create my own blog and would love to know where you got this from or just what the theme is named. Thank you!
order generic propecia pills: generic propecia pill – cost of generic propecia without rx
http://nolvadexbestprice.pro/# tamoxifen endometrium
It’s difficult to find experienced people on this topic, however, you seem like you know what you’re talking about! Thanks
May I simply just say what a comfort to uncover somebody that really understands what they’re discussing on the web. You certainly know how to bring an issue to light and make it important. More and more people must check this out and understand this side of the story. I was surprised that you’re not more popular because you surely possess the gift.
prednisone cream: prednisone 60 mg – buy prednisone online canada
Good day! I just wish to offer you a big thumbs up for your excellent info you have right here on this post. I will be returning to your blog for more soon.
get generic propecia price: buy propecia without a prescription – cost propecia without dr prescription
Spot on with this write-up, I seriously believe this amazing site needs a great deal more attention. I’ll probably be returning to see more, thanks for the information.
http://prednisonebestprice.pro/# steroids prednisone for sale
cost propecia prices: cost generic propecia pills – cost cheap propecia online
There is certainly a great deal to know about this subject. I love all the points you have made.
You’ve made some really good points there. I checked on the internet for more info about the issue and found most people will go along with your views on this website.
This is a really good tip especially to those new to the blogosphere. Short but very precise info… Thank you for sharing this one. A must read article!
farmacia online senza ricetta: Avanafil compresse – acquistare farmaci senza ricetta
farmacie online affidabili: Avanafil a cosa serve – acquisto farmaci con ricetta
After looking into a number of the blog articles on your site, I seriously appreciate your way of blogging. I saved as a favorite it to my bookmark website list and will be checking back soon. Please check out my website too and tell me your opinion.
I really like reading an article that can make men and women think. Also, many thanks for allowing for me to comment.
https://kamagrait.pro/# farmacia online senza ricetta
comprare farmaci online con ricetta: avanafil in farmacia – Farmacie online sicure
farmacia online: Cialis generico prezzo – acquisto farmaci con ricetta
viagra generico sandoz: viagra prezzo – viagra online spedizione gratuita
Your style is so unique in comparison to other folks I have read stuff from. Thank you for posting when you’ve got the opportunity, Guess I’ll just book mark this web site.
farmaci senza ricetta elenco: Farmacie online sicure – comprare farmaci online con ricetta
https://cialisgenerico.life/# farmacie online sicure
top farmacia online: kamagra gold – farmacie online affidabili
There’s definately a lot to know about this issue. I really like all of the points you made.
Farmacie on line spedizione gratuita: kamagra gel prezzo – acquistare farmaci senza ricetta
I used to be able to find good information from your content.
Hi, I do believe this is a great blog. I stumbledupon it 😉 I am going to return yet again since i have book-marked it. Money and freedom is the best way to change, may you be rich and continue to help other people.
п»їFarmacia online migliore: kamagra oral jelly – comprare farmaci online con ricetta
п»їFarmacia online migliore: kamagra gel prezzo – farmacie online sicure
https://kamagrait.pro/# acquisto farmaci con ricetta
comprare farmaci online all’estero: acquistare farmaci senza ricetta – Farmacia online piГ№ conveniente
I really love your website.. Excellent colors & theme. Did you make this amazing site yourself? Please reply back as I’m attempting to create my very own blog and would like to learn where you got this from or exactly what the theme is named. Kudos!
comprare farmaci online all’estero: sildenafil oral jelly 100mg kamagra – Farmacia online piГ№ conveniente
cialis pills: cheapest tadalafil – where to buy cialis online
http://sildenafil.llc/# п»їover the counter viagra
I have to thank you for the efforts you’ve put in penning this blog. I am hoping to view the same high-grade blog posts by you in the future as well. In fact, your creative writing abilities has encouraged me to get my own blog now 😉
cheap cialis 40 mg: Buy Tadalafil 20mg – find cialis online
I want to to thank you for this very good read!! I certainly enjoyed every bit of it. I’ve got you saved as a favorite to check out new stuff you post…
This is a topic that is close to my heart… Many thanks! Where are your contact details though?
order viagra online: Buy Viagra online in USA – viagra 100mg
http://sildenafil.llc/# female viagra
Next time I read a blog, I hope that it won’t fail me as much as this particular one. After all, Yes, it was my choice to read, nonetheless I truly thought you would have something useful to say. All I hear is a bunch of whining about something that you could fix if you were not too busy searching for attention.
cialis prices walmart: Generic Cialis without a doctor prescription – cialis store in korea
https://mexicopharmacy.win/# mexican border pharmacies shipping to usa
ed prescription online
mexico pharmacies prescription drugs: Medicines Mexico – mexican pharmaceuticals online
http://indiapharmacy.shop/# top 10 online pharmacy in india
http://mexicopharmacy.win/# mexican pharmaceuticals online
ed meds on line
mexican pharmaceuticals online: Best online Mexican pharmacy – medication from mexico pharmacy
https://mexicopharmacy.win/# mexican online pharmacies prescription drugs
cheap boner pills
I could not resist commenting. Well written.
http://mexicopharmacy.win/# mexican pharmaceuticals online
top 10 pharmacies in india: Cheapest online pharmacy – india pharmacy
http://indiapharmacy.shop/# indian pharmacies safe
buy ed meds
where can i get ed pills: ED meds online with insurance – erectile dysfunction medication online
Greetings! Very useful advice within this post! It is the little changes which will make the most important changes. Thanks for sharing!
https://edpillpharmacy.store/# ed medicines online
top online pharmacy india: Best Indian pharmacy – indianpharmacy com
You’ve made some really good points there. I looked on the web to learn more about the issue and found most individuals will go along with your views on this website.
Pretty! This was a really wonderful article. Thanks for supplying this info.
online ed medications: ED meds online with insurance – ed prescription online
I must thank you for the efforts you’ve put in penning this site. I really hope to check out the same high-grade content by you later on as well. In fact, your creative writing abilities has inspired me to get my very own site now 😉
https://mexicopharmacy.win/# mexican border pharmacies shipping to usa
low cost ed meds online: ed pills online – top rated ed pills
Pretty! This has been an incredibly wonderful article. Many thanks for providing this info.
http://mexicopharmacy.win/# mexico drug stores pharmacies
buy erectile dysfunction treatment: Cheapest online ED treatment – ed medicines
There is certainly a lot to learn about this subject. I like all of the points you made.
п»їlegitimate online pharmacies india: Indian pharmacy international shipping – buy medicines online in india
https://mexicopharmacy.win/# mexican border pharmacies shipping to usa
Having read this I believed it was very enlightening. I appreciate you finding the time and energy to put this short article together. I once again find myself personally spending a significant amount of time both reading and commenting. But so what, it was still worthwhile!
cheapest online pharmacy india: Top mail order pharmacies – pharmacy website india
I’m amazed, I must say. Rarely do I encounter a blog that’s both equally educative and interesting, and let me tell you, you’ve hit the nail on the head. The problem is an issue that not enough folks are speaking intelligently about. I am very happy I came across this during my search for something relating to this.
mexican pharmaceuticals online: Certified Mexican pharmacy – reputable mexican pharmacies online
http://mexicopharmacy.win/# pharmacies in mexico that ship to usa
Way cool! Some extremely valid points! I appreciate you writing this post plus the rest of the site is also really good.
cheapest online ed treatment: Best ED pills non prescription – erectile dysfunction pills online
I’m amazed, I must say. Seldom do I encounter a blog that’s both equally educative and interesting, and without a doubt, you’ve hit the nail on the head. The problem is something that not enough people are speaking intelligently about. I am very happy I came across this during my search for something relating to this.
https://edpillpharmacy.store/# buying erectile dysfunction pills online
medication from mexico pharmacy: Medicines Mexico – reputable mexican pharmacies online
http://edpillpharmacy.store/# ed doctor online
online pharmacy india: Top online pharmacy in India – indian pharmacy online
Great info. Lucky me I came across your blog by accident (stumbleupon). I have saved it for later.
I’m impressed, I have to admit. Rarely do I come across a blog that’s both educative and interesting, and let me tell you, you’ve hit the nail on the head. The problem is something that not enough men and women are speaking intelligently about. I’m very happy I found this in my search for something regarding this.
india pharmacy mail order: Indian pharmacy international shipping – top online pharmacy india
Your style is unique in comparison to other folks I’ve read stuff from. Thanks for posting when you have the opportunity, Guess I will just bookmark this page.
online ed medicine: Cheapest online ED treatment – cheap ed
online ed pharmacy: online ed prescription same-day – edmeds
May I simply say what a comfort to find someone that truly understands what they’re talking about online. You certainly understand how to bring an issue to light and make it important. A lot more people really need to look at this and understand this side of your story. I can’t believe you aren’t more popular because you most certainly possess the gift.
india pharmacy mail order: Cheapest online pharmacy – Online medicine order
You are so cool! I do not suppose I’ve read something like this before. So wonderful to discover someone with a few unique thoughts on this topic. Seriously.. thank you for starting this up. This website is something that is needed on the web, someone with some originality.
mexican border pharmacies shipping to usa: mexico pharmacy win – best online pharmacies in mexico
Greetings! Very helpful advice in this particular post! It is the little changes that make the most significant changes. Thanks a lot for sharing!
Leading Bitcoin infrastructure company Blockstream this week held its first-ever online media briefing. Attended by prominent journalists from mainstream and industry media outlets, the hour-long event provided attendees with an exclusive opportunity to engage with Blockstream’s senior leadership team, as well as gain unique insight into some of the company’s most recent achievements in the fast-moving Bitcoin development space. In conclusion, the release of Aleo’s dedicated mining motherboard marks a significant milestone in the project’s journey. It’s a bold statement of intent, showcasing Aleo’s commitment to innovation, privacy, and community engagement. As the project moves closer to its mainnet launch, the crypto world remains watchful, anticipating the next steps in Aleo’s quest to redefine the future of blockchain technology.
https://mariannlight.bigcartel.com/product/changelly
Both account types give you access to all CEX.IO services and products. The difference actually is in the deposit and withdrawal limits. Say, if you’re an entrepreneur and plan to trade big volumes on CEX.IO, then you need a business account. We also have a Corporate verification for companies so you can involve your company funds for earning with cryptocurrency. Users looking to withdraw their digital cash can only do so if they have a verified Crypto account at the Starter level or higher. They can then typically move their funds to their Crypto app exchange wallet or an external crypto wallet. Project Manager at Guru Projekt To use your bank account for buying crypto with ACH, go to the Deposit page on the CEX.IO website, choose USD, and select ACH. Once you click Proceed, you’ll get the payment details needed for a successful wire transfer. Remember that the reference and order numbers are different for each new deposit request. Make sure to include every detail from the receipt while making a deposit. Without this info, your deposit may be delayed for some days.
lasix 40 mg buy furosemide lasix
cytotec pills buy online https://furosemide.win/# lasix tablet
lasix for sale
lipitor 20 mg where to buy: buy lipitor 20mg – cost of lipitor in canada
http://lipitor.guru/# lipitor 40 mg price india
For more than forty years, the World Series of Poker has been the most trusted name in the game. WSOP continues this legacy, yet strikes the proper balance between professional-grade and accessible. It’s all the action and prestige of the World Series of Poker, from the comfort of your home or locale of choice. At WSOP, anyone can play and anyone can win. Dreams are dealt on daily basis. And no matter who you are, there’s always a seat waiting for you. Luxurious Hotel ReEntry: UnlimitedLevels: 30 45 min.Starting Chips: 20000 ReEntry: UnlimitedLevels: 30 min.Starting Chips: 10000 Global Poker Awards $5 red (obverse) Foxwoods Casino is owned and operated by the Mashantucket Pequot Tribal Nation in Ledyard, Connecticut. The giant casino began in 1983 as a high-stakes bingo hall on the tribe’s reservation, and today it’s the third-largest casino in the United States by square footage on 200 acres. Other fun perks include a one-mile Highflyer Zipline at 350 feet and the Pequot Trail system for hikes through the Connecticut woods.
https://pulsardirectory.com/listings12760755/poker-dealer-tray
While the concept behind a 100% casino bonus may seem simple, there are multiple different types of 100% bonuses that new players will encounter. From the standard 100% deposit bonus to free spins, here’s a sample of the types of 100% casino bonuses offered by online casino sites. Sometimes, online casinos require codes to claim welcome bonuses. That means you must enter the bonus code listed above during registration. These codes are in our list of the best online casino bonuses. Simply enter the code when prompted. Welcome Bonus at Raze.Bet Casino: What you get A Welcome Bonus at Raze.Bet allows trying out a new casino with an exclusive bonus. New players can immerse themselves in the exciting experience with… In addition to the online casino sign up bonus, you want to cosider the casinos payout percentage. The Best Paying Casinos pay out much more than the average casinos. Here below you can find top 3 best payout casinos in the US:
lasix 40 mg furosemide 40mg furosemide 40 mg
Aw, this was an incredibly nice post. Finding the time and actual effort to create a superb article… but what can I say… I hesitate a lot and never manage to get anything done.
lisinopril 20mg tablets: Buy Lisinopril 20 mg online – lisinopril for sale online
cytotec abortion pill https://lipitor.guru/# lipitor tablets
lasix generic name
https://tamoxifen.bid/# cost of tamoxifen
buy cytotec pills: buy cytotec online – Abortion pills online
buy cytotec in usa https://lipitor.guru/# lipitor prescription
lasix generic
tamoxifen skin changes buy tamoxifen citrate nolvadex during cycle
I couldn’t refrain from commenting. Perfectly written!
Misoprostol 200 mg buy online http://tamoxifen.bid/# benefits of tamoxifen
lasix dosage
https://lipitor.guru/# lipitor price uk
lasix tablet: lasix for sale – buy lasix online
https://tamoxifen.bid/# nolvadex price
lasix 100 mg: buy furosemide – buy lasix online
Oh my goodness! Amazing article dude! Many thanks, However I am experiencing issues with your RSS. I don’t understand why I am unable to join it. Is there anybody having similar RSS problems? Anybody who knows the solution can you kindly respond? Thanks!!
lisinopril 80 mg Buy Lisinopril 20 mg online lisinopril 20 mg canadian
nolvadex price: buy tamoxifen online – cost of tamoxifen
Misoprostol 200 mg buy online http://tamoxifen.bid/# tamoxifen endometriosis
furosemide
https://furosemide.win/# lasix generic
nolvadex side effects: clomid nolvadex – does tamoxifen make you tired
buy cytotec online fast delivery: cytotec best price – Misoprostol 200 mg buy online
https://furosemide.win/# lasix 40 mg
buy cytotec online fast delivery http://lisinopril.guru/# lisinopril uk
lasix uses
Your style is really unique compared to other people I have read stuff from. I appreciate you for posting when you have the opportunity, Guess I’ll just book mark this blog.
order cytotec online https://lipitor.guru/# lipitor generic price comparison
lasix dosage
buy cytotec pills: Misoprostol price in pharmacy – cytotec online
Right here is the perfect webpage for everyone who wishes to understand this topic. You know so much its almost tough to argue with you (not that I personally will need to…HaHa). You certainly put a brand new spin on a subject that’s been discussed for decades. Excellent stuff, just great.
buy misoprostol over the counter https://cytotec.pro/# cytotec abortion pill
lasix online
zestoretic medication: buy lisinopril – buy lisinopril 20 mg online uk
I’m impressed, I must say. Rarely do I encounter a blog that’s equally educative and interesting, and without a doubt, you’ve hit the nail on the head. The problem is something that too few people are speaking intelligently about. I am very happy that I came across this during my hunt for something relating to this.
lasix 100 mg tablet: buy furosemide – furosemida 40 mg
buy cytotec pills online cheap http://tamoxifen.bid/# how to prevent hair loss while on tamoxifen
furosemida 40 mg
furosemide 40mg: cheap lasix – lasix side effects
I really love your blog.. Excellent colors & theme. Did you make this website yourself? Please reply back as I’m hoping to create my own personal website and want to find out where you got this from or what the theme is named. Thank you.
https://easyrxindia.com/# Online medicine home delivery
mexican mail order pharmacies mexican rx online purple pharmacy mexico price list
Howdy! I just wish to give you a huge thumbs up for the excellent info you’ve got here on this post. I will be coming back to your website for more soon.
http://mexstarpharma.com/# mexican pharmaceuticals online
mexican pharmaceuticals online: buying prescription drugs in mexico online – mexico pharmacies prescription drugs
https://easyrxindia.com/# mail order pharmacy india
mexican border pharmacies shipping to usa mexican border pharmacies shipping to usa mexican drugstore online
Hello there! This post couldn’t be written much better! Looking at this article reminds me of my previous roommate! He continually kept talking about this. I am going to send this post to him. Pretty sure he’s going to have a very good read. Thanks for sharing!
reputable mexican pharmacies online: buying from online mexican pharmacy – buying from online mexican pharmacy
https://easyrxindia.shop/# Online medicine home delivery
https://easyrxindia.com/# buy medicines online in india
indian pharmacy paypal top 10 pharmacies in india india online pharmacy
mexico pharmacies prescription drugs: mexican online pharmacies prescription drugs – medication from mexico pharmacy
mexican pharmaceuticals online: mexico pharmacy – mexico drug stores pharmacies
http://mexstarpharma.com/# purple pharmacy mexico price list
canadian pharmacy no rx needed: canada cloud pharmacy – best canadian pharmacy online
buying from online mexican pharmacy: best online pharmacies in mexico – mexican pharmaceuticals online
https://mexstarpharma.online/# reputable mexican pharmacies online
https://mexstarpharma.com/# mexico pharmacies prescription drugs
Hello there! I just wish to offer you a huge thumbs up for your great info you have got right here on this post. I’ll be returning to your blog for more soon.
en iyi slot siteleri 2024: en iyi slot siteleri – guvenilir slot siteleri 2024
http://slotsiteleri.bid/# en iyi slot siteler
sweet bonanza demo oyna: sweet bonanza taktik – sweet bonanza mostbet
bonus veren slot siteleri: en cok kazandiran slot siteleri – deneme bonusu veren siteler
I used to be able to find good information from your content.
https://denemebonusuverensiteler.win/# bahis siteleri
bonus veren slot siteleri: guvenilir slot siteleri 2024 – en yeni slot siteleri
I love looking through a post that will make men and women think. Also, many thanks for allowing me to comment.
deneme bonusu veren siteler: bonus veren slot siteleri – yasal slot siteleri
Oh my goodness! Impressive article dude! Thank you, However I am having difficulties with your RSS. I don’t know the reason why I cannot join it. Is there anybody else getting the same RSS issues? Anybody who knows the answer can you kindly respond? Thanx!!
https://slotsiteleri.bid/# deneme veren slot siteleri
en iyi slot siteleri: yeni slot siteleri – slot casino siteleri
https://sweetbonanza.network/# sweet bonanza hilesi
I enjoy reading through an article that will make men and women think. Also, thank you for permitting me to comment.
slot casino siteleri: deneme bonusu veren siteler – slot bahis siteleri
https://slotsiteleri.bid/# deneme bonusu veren siteler
Hi, I do believe this is a great blog. I stumbledupon it 😉 I am going to return once again since I book marked it. Money and freedom is the best way to change, may you be rich and continue to help others.
pin up casino: пин ап казино – пин ап
pin up казино: пин ап вход – pin up
https://1xbet.contact/# 1xbet
пин ап казино пин ап pin up казино
вавада рабочее зеркало: вавада – вавада
pin up казино: pin up casino – pin up casino
1win вход: 1win зеркало – 1вин зеркало
https://1win.directory/# 1вин
пинап казино: pin up casino – pin up
пин ап казино: пин ап казино – pin up casino
http://pin-up.diy/# пин ап вход
The very next time I read a blog, I hope that it doesn’t disappoint me just as much as this particular one. I mean, I know it was my choice to read, nonetheless I genuinely thought you’d have something useful to talk about. All I hear is a bunch of crying about something that you could fix if you were not too busy searching for attention.
1вин официальный сайт: 1вин зеркало – 1вин сайт
зеркало 1хбет: 1xbet официальный сайт – 1хбет
http://1win.directory/# 1вин официальный сайт
https://onlineph24.com/# Cordarone
can i buy viagra in pharmacy
european pharmacy org buy strattera online: guardian pharmacy singapore propecia – safeway pharmacy hours
Už ste hrali aj hru Euromiliony Joker? Veríme, že áno, pretože v takomto prípade tu pre vás máme výsledky Euromiliony Joker. Tieto výsledky slúžia na overenie tipu Euromiliony Joker. A ako je už zvykom, začnete pravidlami. Aká je charakteristika lotérie Euromilióny, aké sú jej výhody a aké sú Euromilióny výsledky? Euromilióny radíme medzi číselné lotérie. Pre úspešné zapojenie do hry je potrebné natipovať 7 čísiel z číselného radu od 1 do 33 a 1 powerbalové číslo z číselného radu od 1 do 6. Losuje sa 7 čísiel z prvého osudia a 1 číslo z druhého osudia. Overenie tipu všetkých lotérií Historicky najvyššia výhra padla v Euromiliónoch v roku 2020 a činila 8 997 697,75 €. Dovtedy boli zaznamenané v tejto lotérii výhry nad 7 miliónov iba dvakrát, a to v roku 2011 a 2014.
https://www.gta5-mods.com/users/httpskajotc
Platby pomocou Paysafecard sú rýchle, a v prípade, že si kartu kúpite v hotovosti v najbližšom stánku, sú v podstate úplne anonymné. Rýchlosť a inkognito nálada sú, samozrejme, hlavnými dôvodmi na zmenu kasína ktoré podporuje platby Paysafe, ale tým to nekončí. Nie nevyhnutne, pozrite sa na tento článok HG z minulého roka. Najlepší pomer výplaty vs stávky, ktorý bol vystupoval na Yahoo. Patrí do kategórie community card poker a môžu ju hrať najmenej dve osoby na rozdiel od väčšiny hier, or iOS casinos for iPhone slots. Oprávnený vek na založenie účtu Paysafecard je 18 rokov. Karty Paysafecard Master Card však môžu získať aj neplnoletí, ktorí majú 16 rokov a viac. Potrebujú overiť svoju totožnosť a potrebujú povolenie od svojich rodičov alebo zákonných opatrovníkov. Pre používateľov využívajúcich služby Paysafecard existuje niekoľko ďalších obmedzení:
https://drstore24.com/# provigil india pharmacy
mtf hormones online pharmacy
Профессиональный сервисный центр по ремонту бытовой техники с выездом на дом.
Мы предлагаем: ремонт бытовой техники в москве
Наши мастера оперативно устранят неисправности вашего устройства в сервисе или с выездом на дом!
Can you be more specific about the content of your article? After reading it, I still have some doubts. Hope you can help me. phieuguige-grab-bat-net
Hey there! I’m Charles. If you’re stuck in a monetary Groundhog Day, repeating the same battles, let’s break the cycle. The 1K a Day System is your way out, leading you to new mornings of success and capacity. Wake up to something wonderful!
rexall pharmacy store hours: imiquimod cream pharmacy – pharmacy direct gb propecia
https://onlineph24.com/# indian online pharmacy
propecia pharmacy2u
Hey there, it’s Charles here, pertaining to you from the land of endless chance– or as we like to call it, the 1K a Day System. Here, we teach you how to make more than a well-fed squirrel gathers nuts for the winter. If you’re ready to pile up those digital acorns, hop on board! Let’s make your bank account as plump as those cheeky critters by registering today.
medicine store pharmacy: fluconazole pharmacy online – skelaxin online pharmacy
wellbutrin sr online pharmacy: erection pills – real cialis online pharmacy
https://drstore24.com/# brooks pharmacy store
domperidone mexican pharmacy
good neighbor pharmacy naproxen: Brand Levitra – priligy uk pharmacy
Can I just say what a comfort to find somebody who truly understands what they are discussing on the web. You certainly understand how to bring a problem to light and make it important. A lot more people should look at this and understand this side of your story. I was surprised that you’re not more popular because you definitely possess the gift.
hcg online pharmacy: online pharmacy no prescription lexapro – pharmacy online degrees
Hello there! Just dropping by to express my appreciation for your amazing blog. Your insights on making money online are invaluable. Making money from home has never been more convenient with affiliate promotion. It’s a fantastic way to earn additional income by promoting goods or services you trust. Your blog offers a wealth of knowledge for everyone curious about making money from home. Keep up the amazing work!
compounding pharmacy finasteride: dexamethasone pharmacy – giant pharmacy
orlistat online pharmacy: online pharmacy drop shipping – best online pharmacy that does not require a prescription in india
lipitor 4 copay participating pharmacy: order cialis online pharmacy – indian pharmacy viagra
Hi there! Just wanted dropping by to praise your fantastic blog. Your insights on affiliate marketing are really commendable. Making money from home has never been more achievable with affiliate promotion. It’s all about leveraging your online presence and promoting items or services that resonate with your audience. Your blog is a valuable resource for anyone interested in affiliate marketing. Keep up the fantastic work!
india online pharmacy: buy prescription drugs from india – п»їlegitimate online pharmacies india
best online pharmacies in mexico medicine in mexico pharmacies best online pharmacies in mexico
mexican border pharmacies shipping to usa: mexican rx online – mexico pharmacies prescription drugs
http://indianpharmacy.company/# indian pharmacies safe
Стильные советы по созданию модных образов на любой день.
Статьи стилистов, новости, все показы и шоу.
https://sochidaily.ru/read/2024-09-10-demna-gvasaliya-ikona-sovremennoy-mody-i-kreativnyy-revolyutsioner
You need to be a part of a contest for one of the best websites online. I most certainly will recommend this blog!
reputable indian online pharmacy: world pharmacy india – indian pharmacy online
india pharmacy mail order: п»їlegitimate online pharmacies india – reputable indian online pharmacy
best online pharmacy india: indian pharmacy – top 10 online pharmacy in india
Hey there! Just wanted saying hello to inform you how much I admire your blog. Your insights on making money online are really remarkable. Earning an income from home has never been more achievable thanks to affiliate promotion. It’s all about discovering the ideal goods to promote and nurturing connections with your audience. Your blog is a treasure trove of insights for up-and-coming affiliate marketers. Keep up the fantastic work!
legit online pharmacy cialis levaquin online pharmacy glucophage online pharmacy
https://indianpharmacy.company/# reputable indian pharmacies
Can I just say what a comfort to find a person that genuinely understands what they’re discussing online. You definitely understand how to bring an issue to light and make it important. More people have to look at this and understand this side of the story. I can’t believe you aren’t more popular since you most certainly possess the gift.
pharmacies in mexico that ship to usa: buying prescription drugs in mexico online – mexico pharmacies prescription drugs
online shopping pharmacy india: п»їlegitimate online pharmacies india – indian pharmacy
indian pharmacy online shopping pharmacy india Online medicine home delivery
Very good information. Lucky me I came across your blog by chance (stumbleupon). I’ve bookmarked it for later!
https://pharmbig24.online/# online pharmacy ultram
Wow! Thank you! I continually needed to write on my blog something like that. Can I implement a part of your post to my blog?
This is a topic that is near to my heart… Best wishes! Where are your contact details though?
permethrin cream online pharmacy: thai pharmacy online – online pharmacy classes
best india pharmacy: indian pharmacy paypal – world pharmacy india
world pharmacy india online pharmacy india pharmacy website india
rite aid pharmacy cialis price: people’s pharmacy zyrtec – mexico pharmacy order online
https://indianpharmacy.company/# indian pharmacy paypal
Primaquine pharmacy concept store cymbalta target pharmacy
Excellent goods from you, man. I have be mindful your stuff previous to and you are simply too excellent. I actually like what you have received here, certainly like what you’re stating and the way in which during which you say it. You’re making it entertaining and you still care for to keep it wise. I cant wait to learn much more from you. That is really a wonderful website.
I have been reading out a few of your posts and i can state pretty clever stuff. I will definitely bookmark your blog.
п»їlegitimate online pharmacies india: indian pharmacy paypal – best online pharmacy india
ciprofloxacin online pharmacy: wedgewood pharmacy flagyl – freedom pharmacy clomid
http://mexicopharmacy.cheap/# purple pharmacy mexico price list
Online medicine order: best india pharmacy – buy prescription drugs from india
medication from mexico pharmacy: purple pharmacy mexico price list – mexican rx online
anti viral levitra pharmacy prices cialis cheap online pharmacy
Hi, I do think this is an excellent site. I stumbledupon it 😉 I may come back yet again since I book marked it. Money and freedom is the greatest way to change, may you be rich and continue to guide others.
A fascinating discussion is worth comment. I think that you need to write more on this topic, it might not be a taboo matter but typically people do not speak about these issues. To the next! Many thanks!
navarro pharmacy: viagra from pharmacy – precision rx pharmacy
Woah! I’m really digging the template/theme of this site. It’s simple, yet effective. A lot of times it’s tough to get that “perfect balance” between usability and visual appeal. I must say you have done a fantastic job with this. Also, the blog loads very fast for me on Internet explorer. Excellent Blog!
https://indianpharmacy.company/# india pharmacy
online pharmacy india: Online medicine order – buy medicines online in india
I could not resist commenting. Very well written.
provigil pharmacy express rite aid 24 hour pharmacy store locator cialis pharmacy india
pharmacy website india: indian pharmacy paypal – online shopping pharmacy india
I want to to thank you for this wonderful read!! I absolutely enjoyed every little bit of it. I’ve got you bookmarked to check out new stuff you post…
indian pharmacies safe world pharmacy india reputable indian pharmacies
Online medicine home delivery: top online pharmacy india – reputable indian online pharmacy
http://mexicopharmacy.cheap/# mexico drug stores pharmacies
pharmacy website india: cheapest online pharmacy india – п»їlegitimate online pharmacies india
I really love your site.. Very nice colors & theme. Did you make this web site yourself? Please reply back as I’m trying to create my own personal blog and would like to know where you got this from or exactly what the theme is called. Cheers!
india pharmacy cheapest online pharmacy india world pharmacy india
п»їbest mexican online pharmacies: buying prescription drugs in mexico – mexican rx online
mexico pharmacies prescription drugs: п»їbest mexican online pharmacies – mexican drugstore online
Hi! I could have sworn I’ve visited your blog before but after looking at some of the articles I realized it’s new to me. Anyhow, I’m definitely happy I found it and I’ll be book-marking it and checking back often!
https://pharmbig24.com/# cheap viagra pharmacy
top online pharmacy india indianpharmacy com pharmacy website india
Oh my goodness! Amazing article dude! Thank you so much, However I am encountering issues with your RSS. I don’t understand the reason why I am unable to join it. Is there anyone else having identical RSS issues? Anybody who knows the answer will you kindly respond? Thanx!!
Sup?Your post has truly resonated with me and ignited a strong desire to explore the topic further. I greatly admire your profound knowledge and insights, and I genuinely appreciate your unique perspective. Thank you for generously sharing your thoughts and taking the time to do so!
mexican pharmacy percocet: priceline pharmacy viagra – rx express pharmacy panama city fl
An interesting discussion is worth comment. I do believe that you need to publish more about this subject, it might not be a taboo subject but typically people don’t speak about these topics. To the next! Best wishes.
pharmacy today: medco pharmacy viagra – Frumil
Azulfidine animal rx pharmacy voltaren emulgel online pharmacy
There’s definately a lot to learn about this subject. I really like all the points you made.
indian pharmacy: top 10 online pharmacy in india – top 10 online pharmacy in india
I really love your blog.. Very nice colors & theme. Did you create this site yourself? Please reply back as I’m planning to create my own personal website and want to find out where you got this from or exactly what the theme is named. Cheers.
Hey there! I just would like to give you a big thumbs up for your excellent information you’ve got here on this post. I’ll be returning to your site for more soon.
This site was… how do I say it? Relevant!! Finally I’ve found something that helped me. Many thanks!
Bonus Code: LOYAL125TAROT-2 Comp Points Sloto Cash Casino was opened in 2007 and the owner listed online is Deck Media. As usual, there are two sides to everything as some online review sites are listing Sloto Cash Casino as a reliable site while others claim it should not be trusted. If Sloto Cash Casino had larger and concerning problems, we would not see it operating still as they have been online for so long and they do have a license as well. The license is authorized by Curacao. US players are more than welcomed at Sloto Cash Casino as are most of the players around the world. This might mean a little more paperwork when claiming your first winnings, but we believe it is worth it. SIGN UP FOR 10 FREE SPINS NO DEPOSIT Sloto Cash gives a welcome bonus package with totaly 300 free spins and deposit bonuses with your five first deposits. Sign up and enter the bonus code 31FREE to get $31 no deposit casino bonus. Make a first deposit of $20 and enter the bonus code SLOTO1MATCH to get 100 free spins + 200% casino bonus. +18, T&C apply. The free $31 no deposit bonus at Sloto Cash Casino can be credited to your account if you follow the instructions that we’re giving you below. Make sure that you follow these directions as they are given and that you don’t skip or modify any of the steps. Step 1.
https://dellidesigns.com/finger-lakes-casino-and-racetrack-reviews
Beat the heat this summer by spinning and winning today with Summer Slots! Never has the game been more realistic as you spin your way to the casino floor with bonuses and eye catching excitement you can play on your computer, phone or tablet! To play penny slots, you must first create an online casino account. Casino software providers are the companies behind the online free slots we know and love. When you play online, you’ll always come across games from industry giants like IGT and RTG. And you’ll even see innovative slots from newcomers like Pocket Games Soft. Penny slots are essentially the oldest kind of slot since the earliest slots required you to bet a meagre coin and stand a chance of winning a free drink or a cigar. The first slots were created by Sittman and Pitt in the year 1891 and they simply involved inserting a nickel and pulling a lever.
Профессиональный сервисный центр по ремонту фототехники в Москве.
Мы предлагаем: ремонт фотовспышек с гарантией
Наши мастера оперативно устранят неисправности вашего устройства в сервисе или с выездом на дом!
Подробнее на сайте сервисного центра remont-vspyshek-realm.ru
gates of olympus oyna gates of olympus slot gates of olympus turkce
Профессиональный сервисный центр по ремонту компьютероной техники в Москве.
Мы предлагаем: стоимость ремонта телефона
Наши мастера оперативно устранят неисправности вашего устройства в сервисе или с выездом на дом!
Next time I read a blog, Hopefully it doesn’t disappoint me just as much as this one. I mean, Yes, it was my choice to read, nonetheless I really believed you would have something useful to say. All I hear is a bunch of whining about something that you could possibly fix if you weren’t too busy looking for attention.
Профессиональный сервисный центр по ремонту фото техники от зеркальных до цифровых фотоаппаратов.
Мы предлагаем: вызвать мастера по ремонту проекторов
Наши мастера оперативно устранят неисправности вашего устройства в сервисе или с выездом на дом!
betine com guncel giris betine sikayet betine giris
http://casibom.auction/# casibom guncel
Excellent post! We will be linking to this particularly great content on our site. Keep up the great writing.
There is definately a great deal to know about this issue. I love all of the points you’ve made.
casibom giris adresi casibom guncel casibom guncel
You are so awesome! I don’t believe I’ve read anything like this before. So great to find another person with a few unique thoughts on this issue. Really.. many thanks for starting this up. This website is something that’s needed on the internet, someone with a bit of originality.
Hi there! This blog post could not be written much better! Looking at this post reminds me of my previous roommate! He continually kept talking about this. I most certainly will forward this article to him. Fairly certain he’ll have a great read. Thank you for sharing!
Hello. impressive job. I did not expect this. This is a splendid story. Thanks!
https://betine.online/# betine giris
Oh my goodness! Incredible article dude! Many thanks, However I am encountering troubles with your RSS. I don’t know why I am unable to join it. Is there anyone else getting similar RSS issues? Anyone who knows the solution can you kindly respond? Thanx!!
Профессиональный сервисный центр по ремонту компьютерных блоков питания в Москве.
Мы предлагаем: ремонт источников питания
Наши мастера оперативно устранят неисправности вашего устройства в сервисе или с выездом на дом!
Хочу поделиться опытом покупки в одном интернет-магазине сантехники. Решил обновить ванную комнату и искал место, где можно найти широкий выбор раковин и ванн. Этот магазин приятно удивил своим ассортиментом и сервисом. Там есть всё: от классических чугунных ванн до современных акриловых моделей.
Если вам нужна купить мойку для ванны , то это точно туда. Цены конкурентные, а качество товаров подтверждено сертификатами. Консультанты помогли с выбором, ответили на все вопросы. Доставка пришла вовремя, и установка прошла без проблем. Остался очень доволен покупкой и сервисом.
Мой телефон перестал заряжаться, и я не знал, что делать. По совету друга обратился в этот сервисный центр. Мастера быстро нашли проблему и устранили её. Теперь мой телефон снова в строю! Рекомендую всем: где чинят телефоны.
Can I simply just say what a comfort to find a person that truly understands what they are discussing on the web. You definitely understand how to bring a problem to light and make it important. More and more people need to read this and understand this side of your story. I can’t believe you aren’t more popular because you certainly have the gift.
ремонт техники профи в самаре
<a href=”https://remont-kondicionerov-wik.ru”>сервис кондиционеров</a>
There’s definately a lot to know about this topic. I love all the points you’ve made.
Aw, this was a really nice post. Taking a few minutes and actual effort to generate a really good article… but what can I say… I put things off a lot and don’t seem to get anything done.
http://gatesofolympusoyna.online/# gates of olympus oyna
May I simply just say what a relief to find somebody that actually knows what they’re talking about on the web. You certainly realize how to bring a problem to light and make it important. More people ought to read this and understand this side of the story. I was surprised you are not more popular given that you certainly possess the gift.
casibom 158 giris casibom guncel giris adresi casibom
An interesting discussion is definitely worth comment. I do think that you need to publish more about this subject matter, it may not be a taboo subject but generally folks don’t speak about these subjects. To the next! Cheers.
Профессиональный сервисный центр по ремонту компьютероной техники в Москве.
Мы предлагаем: ремонт компьютеров адреса
Наши мастера оперативно устранят неисправности вашего устройства в сервисе или с выездом на дом!
https://betine.online/# betine promosyon kodu
gates of olympus oyna gates of olympus demo turkce oyna gates of olympus turkce
Good post. I am dealing with some of these issues as well..
Aw, this was a really good post. Taking the time and actual effort to generate a really good article… but what can I say… I procrastinate a whole lot and don’t manage to get nearly anything done.
farmacia online barata: comprar cialis online seguro opiniones – farmacias online baratas
sildenafilo 50 mg precio sin receta Viagra sildenafilo comprar viagra en espaГ±a amazon
Excellent article! We are linking to this particularly great article on our site. Keep up the good writing.
Профессиональный сервисный центр по ремонту камер видео наблюдения по Москве.
Мы предлагаем: сервисные центры ремонту камер в москве
Наши мастера оперативно устранят неисправности вашего устройства в сервисе или с выездом на дом!
http://tadalafilo.bid/# farmacias online seguras en espaГ±a
farmacia online madrid: farmacia online madrid – farmacias online seguras
Профессиональный сервисный центр по ремонту бытовой техники с выездом на дом.
Мы предлагаем: ремонт крупногабаритной техники в нижнем новгороде
Наши мастера оперативно устранят неисправности вашего устройства в сервисе или с выездом на дом!
п»їfarmacia online espaГ±a cialis 20 mg precio farmacia farmacias direct
comprar viagra contrareembolso 48 horas: Viagra sildenafilo – sildenafilo 100mg precio espaГ±a
Right here is the perfect blog for anybody who really wants to find out about this topic. You know so much its almost hard to argue with you (not that I really would want to…HaHa). You definitely put a brand new spin on a subject that’s been discussed for ages. Wonderful stuff, just great.
http://farmaciaeu.com/# farmacia online barcelona
sildenafilo cinfa 100 mg precio farmacia: comprar viagra contrareembolso 48 horas – sildenafilo 50 mg comprar online
Good site you have got here.. It’s difficult to find high quality writing like yours these days. I really appreciate people like you! Take care!!
https://sildenafilo.men/# sildenafilo sandoz 100 mg precio
farmacias online seguras
http://sildenafilo.men/# sildenafilo sandoz 100 mg precio
comprar viagra en espaГ±a envio urgente contrareembolso: viagra precio – sildenafil 100mg genГ©rico
farmacia online barata y fiable: farmacias online seguras – farmacia online barata y fiable
Профессиональный сервисный центр по ремонту бытовой техники с выездом на дом.
Мы предлагаем: ремонт крупногабаритной техники в перми
Наши мастера оперативно устранят неисправности вашего устройства в сервисе или с выездом на дом!
Если вы искали где отремонтировать сломаную технику, обратите внимание – ремонт бытовой техники в тюмени
Зарегистрируйтесь прямо сейчас и получите 100 фриспинов без депозита, чтобы испытать свою удачу в увлекательных играх и повысить свои шансы на крупный выигрыш. рейтинг казино онлайн qqsxqjhmrv …
https://sildenafilo.men/# sildenafilo 100mg sin receta
farmacias online seguras: Cialis generico – farmacia online barata
Стильные советы по созданию необычных образов на каждый день.
Статьи стилистов, новости, все новые коллекции и мероприятия.
https://mvmedia.ru/novosti/123-10-interesnyh-faktov-o-vetements-brend-kotoryy-izmenil-mir-mody/
https://tadalafilo.bid/# farmacia online madrid
farmacias online seguras
You should be a part of a contest for one of the most useful sites on the web. I will highly recommend this web site!
http://farmaciaeu.com/# farmacias online baratas
farmacia barata: farmacia 24 horas – farmacia online barcelona
I blog often and I really thank you for your information. This article has truly peaked my interest. I’m going to bookmark your site and keep checking for new information about once per week. I subscribed to your Feed too.
Bongdalu cập nhật tin tức bóng đá nóng hổi, thể thao sôi động và giải trí hấp dẫn
Hi there! This article couldn’t be written much better! Looking through this post reminds me of my previous roommate! He continually kept talking about this. I most certainly will forward this information to him. Pretty sure he will have a great read. I appreciate you for sharing!
Rồng Bạch Kim – Soi cầu lô chính xác miễn phí chính xác số #1 2024
acquisto farmaci con ricetta: Cialis generico 20 mg 8 compresse prezzo – Farmacie online sicure
Профессиональный сервисный центр по ремонту парогенераторов в Москве.
Мы предлагаем: ремонт парогенераторов в москве
Наши мастера оперативно устранят неисправности вашего устройства в сервисе или с выездом на дом!
acquistare farmaci senza ricetta Cialis generico controindicazioni Farmacie on line spedizione gratuita
viagra ordine telefonico acquisto viagra viagra online consegna rapida
https://farmaciait.men/# Farmacia online piГ№ conveniente
acquisto farmaci con ricetta
buy balloons cheaply https://balloon-store-dubai.com
farmacie online sicure: Cialis generico recensioni – comprare farmaci online con ricetta
Если вы искали где отремонтировать сломаную технику, обратите внимание – профи тех сервис волгоград
viagra consegna in 24 ore pagamento alla consegna: miglior sito dove acquistare viagra – alternativa al viagra senza ricetta in farmacia
I was able to find good advice from your content.
viagra naturale in farmacia senza ricetta acquisto viagra viagra generico prezzo piГ№ basso
pillole per erezioni fortissime viagra generico gel per erezione in farmacia
farmacia online piГ№ conveniente: Cialis generico recensioni – farmacia online
migliori farmacie online 2024: farmacia online migliore – farmacia online
http://farmaciait.men/# comprare farmaci online all’estero
farmacie online affidabili
migliori farmacie online 2024: Farmacia online piu conveniente – migliori farmacie online 2024
dove acquistare viagra in modo sicuro acquisto viagra viagra online spedizione gratuita
Motchilltv.fyi – Trang web xem phim Online chất lượng Full HD với giao diện thân thiện, trực quan cùng kho phim với hơn 15.000+ bộ phim mới và phim hot hiện nay.
top farmacia online Farmacie on line spedizione gratuita Farmacie on line spedizione gratuita
Bongdalu cập nhật tin tức bóng đá nóng hổi, thể thao sôi động và giải trí hấp dẫn.
top farmacia online: Farmacia online piГ№ conveniente – farmacia online senza ricetta
farmaci senza ricetta elenco: Farmacie online sicure – farmacia online piГ№ conveniente
https://tadalafilit.com/# farmacie online autorizzate elenco
acquisto farmaci con ricetta
Farmacia online miglior prezzo Farmacie on line spedizione gratuita farmaci senza ricetta elenco
farmaci senza ricetta elenco Farmacie che vendono Cialis senza ricetta Farmacie on line spedizione gratuita
Если вы искали где отремонтировать сломаную технику, обратите внимание – ремонт цифровой техники уфа
Farmacie on line spedizione gratuita: Farmacie on line spedizione gratuita – comprare farmaci online con ricetta
п»їFarmacia online migliore: Brufen antinfiammatorio – farmaci senza ricetta elenco
Farmacia online piГ№ conveniente Cialis generico 20 mg 8 compresse prezzo migliori farmacie online 2024
http://tadalafilit.com/# acquisto farmaci con ricetta
comprare farmaci online all’estero
acquistare farmaci senza ricetta Cialis generico controindicazioni Farmacia online miglior prezzo
Farmacie on line spedizione gratuita: Farmacia online migliore – top farmacia online
When I initially commented I seem to have clicked on the -Notify me when new comments are added- checkbox and now each time a comment is added I receive 4 emails with the exact same comment. Perhaps there is a means you can remove me from that service? Thank you.
comprare farmaci online all’estero Farmacia online migliore farmacie online affidabili
farmacie online sicure Ibuprofene 600 prezzo senza ricetta acquistare farmaci senza ricetta
https://farmaciait.men/# Farmacie on line spedizione gratuita
farmacia online
Farmacie on line spedizione gratuita: BRUFEN 600 prezzo in farmacia – farmacie online affidabili
farmaci senza ricetta elenco: BRUFEN 600 bustine prezzo – farmacie online autorizzate elenco
сервисный центр кондиционеров
Профессиональный сервисный центр по ремонту бытовой техники с выездом на дом.
Мы предлагаем:сервис центры бытовой техники ростов на дону
Наши мастера оперативно устранят неисправности вашего устройства в сервисе или с выездом на дом!
Farmacie online sicure Farmacie online sicure migliori farmacie online 2024
acquistare farmaci senza ricetta BRUFEN 600 bustine prezzo Farmacie online sicure
comprare farmaci online all’estero: Brufen antinfiammatorio – farmacie online autorizzate elenco
https://sildenafilit.pro/# viagra subito
farmacia online
top farmacia online: Cialis generico farmacia – acquistare farmaci senza ricetta
farmacia online senza ricetta BRUFEN 600 acquisto online farmaci senza ricetta elenco
Farmacie online sicure: Farmacia online piu conveniente – farmaci senza ricetta elenco
https://brufen.pro/# Brufen antinfiammatorio
farmacie online affidabili
viagra pfizer 25mg prezzo viagra prezzo siti sicuri per comprare viagra online
farmacia online piГ№ conveniente farmacia online Farmacia online miglior prezzo
acquisto farmaci con ricetta: BRUFEN 600 mg 30 compresse prezzo – Farmacie on line spedizione gratuita
can you buy ventolin over the counter uk: buy albuterol inhaler – online pharmacy ventolin
lasix for sale: buy furosemide – lasix 100 mg
Сервисный центр предлагает мастер по ремонту кофемашины gastrorag ремонт кофемашин gastrorag в петербурге
can you buy ventolin over the counter in nz Buy Ventolin inhaler online no prescription ventolin inhaler
http://ventolininhaler.pro/# ventolin 100 mg
сервисный центре предлагает ремонт телевизоров москва выезд – ремонт телевизоров
can i buy neurontin over the counter: neurontin pfizer – 32 neurontin
prednisone online paypal: prednisone buying – prednisone daily use
neurontin drug: cost of neurontin 100mg – neurontin 800
rybelsus generic rybelsus Rybelsus 7mg
rybelsus cost: Buy compounded semaglutide online – Semaglutide pharmacy price
https://prednisolone.pro/# prednisone 10mg for sale
Hi, I do think this is an excellent web site. I stumbledupon it 😉 I will revisit once again since I book-marked it. Money and freedom is the greatest way to change, may you be rich and continue to help other people.
prednisone 30: over the counter prednisone pills – prednisone for sale no prescription
purchase prednisone canada: prednisone generic brand name – prednisone 50 mg buy
buying prednisone: purchase prednisone no prescription – prednisone 5mg cost
https://prednisolone.pro/# prednisone 475
Если вы искали где отремонтировать сломаную технику, обратите внимание – тех профи
Профессиональный сервисный центр по ремонту компьютеров и ноутбуков в Москве.
Мы предлагаем: ремонт macbook m1
Наши мастера оперативно устранят неисправности вашего устройства в сервисе или с выездом на дом!
cost ventolin australia: Buy Ventolin inhaler online – ventolin australia prescription
lasix furosemide 40 mg: cheap lasix – lasix pills
neurontin 100mg tablet: where can i buy neurontin online – neurontin generic cost
generic neurontin: neurontin capsules 300mg – neurontin 50 mg
https://furosemide.men/# lasix 100mg
prednisone 15 mg daily: prednisone 20 mg in india – how to buy prednisone
http://canadapharma.shop/# prescription drugs canada buy online
Online medicine order: online Indian pharmacy – reputable indian online pharmacy
canadian discount pharmacy: Cheapest online pharmacy – canada drugs online reviews
india pharmacy mail order Indian pharmacy online buy prescription drugs from india
https://canadapharma.shop/# reliable canadian pharmacy reviews
mexico drug stores pharmacies: mexico drug stores pharmacies – mexico pharmacies prescription drugs
Профессиональный сервисный центр по ремонту кондиционеров в Москве.
Мы предлагаем: ремонт кондиционера москва
Наши мастера оперативно устранят неисправности вашего устройства в сервисе или с выездом на дом!
Профессиональный сервисный центр по ремонту моноблоков в Москве.
Мы предлагаем: замена матрицы моноблока цена
Наши мастера оперативно устранят неисправности вашего устройства в сервисе или с выездом на дом!
Профессиональный сервисный центр по ремонту гироскутеров в Москве.
Мы предлагаем: ремонт гироскутера в москве
Наши мастера оперативно устранят неисправности вашего устройства в сервисе или с выездом на дом!
purple pharmacy mexico price list: buying prescription drugs in mexico online – reputable mexican pharmacies online
http://indiadrugs.pro/# india pharmacy mail order
https://500px.com/p/bongdalu0101/
legit canadian pharmacy online Pharmacies in Canada that ship to the US safe reliable canadian pharmacy
https://www.furaffinity.net/user/bongdalu0101
Профессиональный сервисный центр по ремонту бытовой техники с выездом на дом.
Мы предлагаем: сервис центры бытовой техники тюмень
Наши мастера оперативно устранят неисправности вашего устройства в сервисе или с выездом на дом!
https://start.me/p/7PNkKK/bongdalu
trusted canadian pharmacy: certified canadian international pharmacy – precription drugs from canada
http://mexicanpharma.icu/# buying prescription drugs in mexico online
indian pharmacy paypal: Online medication home delivery – top 10 online pharmacy in india
п»їbest mexican online pharmacies https://mexicanpharma.icu/# medicine in mexico pharmacies
medicine in mexico pharmacies
mexican mail order pharmacies mexican pharmacy mexico pharmacies prescription drugs
It’s nearly impossible to find well-informed people in this particular topic, however, you seem like you know what you’re talking about! Thanks
http://mexicanpharma.icu/# mexican rx online
https://hypothes.is/users/Bongdalu0101
Профессиональный сервисный центр по ремонту планшетов в том числе Apple iPad.
Мы предлагаем: ремонт планшетов apple в москве
Наши мастера оперативно устранят неисправности вашего устройства в сервисе или с выездом на дом!
https://www.strata.com/forums/users/DA88tube/
https://circleten.org/a/316592?postTypeId=whatsNew
Wonderful post! We will be linking to this particularly great post on our site. Keep up the great writing.
https://mexicanpharma.icu/# mexican rx online
best online pharmacies in mexico mexican pharmacy mexico drug stores pharmacies
Профессиональный сервисный центр по ремонту посудомоечных машин с выездом на дом в Москве.
Мы предлагаем: ремонт посудомоечных машин на дому в москве
Наши мастера оперативно устранят неисправности вашего устройства в сервисе или с выездом на дом!
As soon as I noticed this internet site I went on reddit to share some of the love with them.
Greetings! Very useful advice within this post! It’s the little changes which will make the greatest changes. Many thanks for sharing!
https://mexicanpharma.icu/# mexican online pharmacies prescription drugs
I’m amazed, I have to admit. Rarely do I encounter a blog that’s both educative and entertaining, and let me tell you, you’ve hit the nail on the head. The issue is something that too few people are speaking intelligently about. Now i’m very happy that I came across this during my hunt for something regarding this.
medicine in mexico pharmacies: mexican pharma – mexico drug stores pharmacies
reputable mexican pharmacies online
Viagra homme prix en pharmacie sans ordonnance: Meilleur Viagra sans ordonnance 24h – Viagra sans ordonnance pharmacie France
https://pharmaciepascher.pro/# Pharmacie en ligne livraison Europe
pharmacie en ligne: Acheter Cialis – Pharmacie en ligne livraison Europe
Профессиональный сервисный центр по ремонту МФУ в Москве.
Мы предлагаем: ремонт мфу москва
Наши мастера оперативно устранят неисправности вашего устройства в сервисе или с выездом на дом!
https://clssansordonnance.icu/# Pharmacie Internationale en ligne
Viagra pas cher inde: Viagra prix – Viagra sans ordonnance 24h Amazon
bookmarked!!, I like your web site!
https://docs.google.com/presentation/d/18Vs7IDPl9JU_F0lXA6Zk3OjQWBN8mhqE_0qED3xao1I/edit?usp=sharing
https://da88tube.blogspot.com/2024/10/da88.html
pharmacie en ligne: Pharmacies en ligne certifiees – Pharmacie Internationale en ligne
Профессиональный сервисный центр по ремонту принтеров в Москве.
Мы предлагаем: сервисный центр принтеров
Наши мастера оперативно устранят неисправности вашего устройства в сервисе или с выездом на дом!
acheter mГ©dicament en ligne sans ordonnance Acheter Cialis 20 mg pas cher pharmacie en ligne france livraison internationale
Everything is very open with a precise clarification of the challenges. It was truly informative. Your site is very helpful. Thanks for sharing!
Pretty! This has been an incredibly wonderful post. Thank you for supplying this info.
pharmacie en ligne sans ordonnance: Cialis prix en pharmacie – pharmacie en ligne sans ordonnance
Today, while I was at work, my cousin stole my iPad and tested to see if it can survive a twenty five foot drop, just so she can be a youtube sensation. My iPad is now destroyed and she has 83 views. I know this is completely off topic but I had to share it with someone!
Can I just say what a relief to find someone who actually knows what theyre talking about on the internet. You definitely know how to bring an issue to light and make it important. More people need to read this and understand this side of the story. I cant believe youre not more popular because you definitely have the gift.
https://clssansordonnance.icu/# pharmacie en ligne
My partner and I stumbled over here by a different website and thought I might check things out. I like what I see so now i am following you. Look forward to looking over your web page yet again.
Сервисный центр предлагает стоимость ремонта бесперебойника gemix ремонт бесперебойника gemix адреса
Профессиональный сервисный центр по ремонту плоттеров в Москве.
Мы предлагаем: ремонт плоттеров с гарантией
Наши мастера оперативно устранят неисправности вашего устройства в сервисе или с выездом на дом!
Viagra homme prix en pharmacie sans ordonnance: Sildenafil Viagra – Viagra sans ordonnance pharmacie France
Pharmacie Internationale en ligne: Pharmacies en ligne certifiees – Pharmacie sans ordonnance
Профессиональный сервисный центр по ремонту бытовой техники с выездом на дом.
Мы предлагаем:сервис центры бытовой техники уфа
Наши мастера оперативно устранят неисправности вашего устройства в сервисе или с выездом на дом!
I am so happy to read this. This is the kind of manual that needs to be given and not the accidental misinformation that’s at the other blogs. Appreciate your sharing this best doc.
Профессиональный сервисный центр по ремонту объективов в Москве.
Мы предлагаем: ремонт диафрагмы объектива
Наши мастера оперативно устранят неисправности вашего устройства в сервисе или с выездом на дом!
SildГ©nafil 100mg pharmacie en ligne: Acheter du Viagra sans ordonnance – Viagra pas cher inde
Профессиональный сервисный центр по ремонту серверов в Москве.
Мы предлагаем: цены на ремонт серверов
Наши мастера оперативно устранят неисправности вашего устройства в сервисе или с выездом на дом!
Nice read, I just passed this onto a colleague who was doing some research on that. And he just bought me lunch as I found it for him smile Thus let me rephrase that: Thanks for lunch! “Too much sanity may be madness. And maddest of all, to see life as it is and not as it should be” by Miguel de Cervantes.
Viagra sans ordonnance pharmacie France Viagra generique en pharmacie Viagra homme prix en pharmacie sans ordonnance
https://vgrsansordonnance.com/# Viagra homme prix en pharmacie
semaglutide online rybelsus price rybelsus pill
https://rybelsus.shop/# buy semaglutide pills
https://ozempic.art/# buy ozempic
There is certainly a great deal to know about this topic. I like all of the points you have made.
buy semaglutide online: semaglutide tablets – buy semaglutide online
buy semaglutide pills: buy semaglutide pills – buy semaglutide online
buy cheap ozempic ozempic buy ozempic
ozempic cost: ozempic coupon – Ozempic without insurance
https://ozempic.art/# ozempic coupon
https://www.pinterest.com/DA88tube/
https://ozempic.art/# ozempic online
ozempic online ozempic cost buy ozempic
ozempic generic: Ozempic without insurance – buy ozempic
https://md.kif.rocks/s/Lxatlpb-d
buy semaglutide online: cheapest rybelsus pills – buy semaglutide pills
https://rybelsus.shop/# rybelsus price
ozempic online buy ozempic ozempic online
buy ozempic pills online: ozempic coupon – ozempic cost
http://ozempic.art/# buy ozempic
rybelsus pill: buy semaglutide pills – buy semaglutide online
http://ozempic.art/# buy cheap ozempic
ozempic: ozempic – ozempic coupon
ozempic cost ozempic online buy cheap ozempic
Everything is very open with a very clear description of the issues. It was definitely informative. Your website is very useful. Many thanks for sharing.
https://www.proko.com/@da88tube/activity
https://ozempic.art/# ozempic
https://ozempic.art/# ozempic
rybelsus cost: buy semaglutide online – rybelsus pill
https://anyflip.com/homepage/ntfac
ozempic online: ozempic – buy ozempic pills online
Hi there! This post couldn’t be written any better! Reading through this article reminds me of my previous roommate! He constantly kept talking about this. I most certainly will send this information to him. Pretty sure he will have a great read. Many thanks for sharing!
https://www.foroatletismo.com/foro/members/8daybet1.html
cheapest rybelsus pills: semaglutide tablets – rybelsus pill
Профессиональный сервисный центр по ремонту сетевых хранилищ в Москве.
Мы предлагаем: ремонт сетевых хранилищ в москве
Наши мастера оперативно устранят неисправности вашего устройства в сервисе или с выездом на дом!
Профессиональный сервисный центр по ремонту сигвеев в Москве.
Мы предлагаем: сигвей сервис
Наши мастера оперативно устранят неисправности вашего устройства в сервисе или с выездом на дом!
buy ozempic pills online ozempic cost ozempic
https://ozempic.art/# ozempic coupon
http://rybelsus.shop/# rybelsus pill
rybelsus cost: buy semaglutide pills – rybelsus price
buy ozempic: ozempic online – ozempic cost
https://ozempic.art/# ozempic coupon
http://ozempic.art/# buy ozempic
ozempic: buy ozempic pills online – Ozempic without insurance
Good site you’ve got here.. It’s difficult to find high quality writing like yours these days. I truly appreciate people like you! Take care!!
Ozempic without insurance: ozempic coupon – ozempic
buy rybelsus online buy rybelsus online semaglutide tablets
11.4 In particular, and without limiting the application of paragraph 11.3, you must not make use or available any cheats or technological measures designed to control access to, or elements of, our Services, including providing access to any Virtual Content, whether on a free of charge basis or otherwise. ⓘ Update trending cookie settings. ‘ + e.create_date + ‘ The player’s journey in a busy city has finally come to an end, but a new beginning awaits them in the peaceful and lovely countryside. Thus, people are free to build a comfortable life that they love or enjoy the most, including farming, transplanting, breeding, and more. Not only do they create things from the ground up, but they can also take over more businesses and interact with neighboring towns. Game of Thrones Slots Casino is an entertaining game that any true GoT fan will love. Try to win thousands of coins while having fun reliving some of the most memorable scenes from this popular TV series.
https://www.farmaciascarimas.com/forum/general-discussions/single-player-poker-games
When it comes to bonus features, the pick of these is probably the ‘Great Hall of Spins’. This feature offers four different types of free spins, one each for a different associated with a specific Norse god. During our review of the Spin Madness Casino, we assign the casino a rating of Poor on our trust index and players should stay away from this casino to avoid scams. During our review, we looked at player complaints from other review sites, estimated revenue, licenses, authenticity of the game, responsible gambling methods, quality of customer support, fairness of terms and conditions, withdrawal limits, withdrawal times, and many other factors. So, if you are wondering if this casino is safe or a scam? Read the full review below to learn more. Take off into the excitement at Spin Madness Casino with their spectacular welcome offer. This package gives up to €3,500 in bonus casino money and 150 free spins across your first three deposits. It makes sure that your introduction to the casino is as thrilling as possible. This is done by setting you up with significant bonuses and plenty of spins to enhance your winning potential from the start.
http://ozempic.art/# ozempic
https://rybelsus.shop/# rybelsus coupon
ozempic coupon buy ozempic ozempic coupon
https://ozempic.art/# buy cheap ozempic
buy semaglutide pills: semaglutide cost – rybelsus price
I was very pleased to discover this website. I wanted to thank you for ones time for this particularly wonderful read!! I definitely liked every little bit of it and i also have you book marked to check out new information in your site.
https://ozempic.art/# Ozempic without insurance
https://rybelsus.shop/# buy semaglutide online
В магазине сейфов предлагают сейфы купить можно купить сейф
buy rybelsus online semaglutide online cheapest rybelsus pills
After checking out a number of the articles on your site, I truly like your technique of writing a blog. I saved it to my bookmark website list and will be checking back in the near future. Please check out my website as well and let me know what you think.
ozempic coupon: ozempic generic – buy cheap ozempic
pin up giris pin up casino guncel giris pin-up casino
https://pinupru.site/# пин ап казино зеркало
пинап кз: пин ап 634 – пин ап
Профессиональный сервисный центр ремонт сотовых телефонов рядом сервисный центр ремонт телефонов
pin up giris: pin-up casino – pin up
pin up зеркало: pin up зеркало – пин ап казино
В магазине сейфов предлагают сейф 2 класса взломостойкости купить сейф 2
пинап кз http://pinupturkey.pro/# pin up casino giris
пин ап казино
Профессиональный сервисный центр по ремонту планшетов в Москве.
Мы предлагаем: сколько стоит починка планшета
Наши мастера оперативно устранят неисправности вашего устройства в сервисе или с выездом на дом!
pin up aviator: pin up casino – pin up casino
pin up azerbaijan pin up 306 pin-up casino giris
пин ап казино вход: pin up – pin up зеркало
pin-up casino giris: pin up giris – pin up aviator
пин ап казино онлайн http://pinupkz.tech/# пин ап
пин ап кз
Профессиональный сервисный центр по ремонту бытовой техники с выездом на дом.
Мы предлагаем: сервисные центры по ремонту техники в волгограде
Наши мастера оперативно устранят неисправности вашего устройства в сервисе или с выездом на дом!
пинап казино пин ап пин ап кз
https://pinupaz.bid/# pin up casino
pin up: pin up azerbaijan – pin up azerbaijan
pin up casino: pin-up kazino – pin up
Тут делают продвижение seo. медицинских. сайтов стратегия с роботами
Тут делают продвижение разработка сайта для медицинского центра создание медицинского сайта
пин ап кз http://pinupkz.tech/# пин ап 634
pin up
https://pinupru.site/# пин ап казино зеркало
пинап кз https://pinupkz.tech/# пин ап казино вход
пин ап казахстан
pin up azerbaijan pin up 306 pinup az
pin up bet: pin-up casino giris – pin up aviator
пин ап 634 http://pinupturkey.pro/# pin-up bonanza
пин ап казахстан
В магазине сейфов предлагают сейфы офисные взломостойкие взломостойкий сейф
http://pinupaz.bid/# pinup az
pin up azerbaijan pin up casino pin up azerbaijan
pin up казино: пин ап вход – pin up казино
pin up kz https://pinupturkey.pro/# pin-up bonanza
пинап казино
Тут делают продвижение seo-продвижение медицинских сайтов seo. медицинских. сайтов
Тут делают продвижение разработка сайта для медицинского центра разработка сайт медицинского центра
pin up guncel giris pin up guncel giris pin up casino guncel giris
http://pinupturkey.pro/# pin-up casino giris
https://www.vnbadminton.com/members/ko66vip.54056/
http://zithromax.company/# zithromax online usa
http://amoxil.llc/# buy amoxicillin 500mg uk
generic for amoxicillin Amoxicillin For sale amoxicillin in india
The best https://bestwebsiteto.com sites on the web to suit your needs. The top-rated platforms to help you succeed in learning new skills
neurontin 200 mg capsules: gabapentin best price – neurontin coupon
http://amoxil.llc/# amoxicillin for sale online
Профессиональный сервисный центр по ремонту бытовой техники с выездом на дом.
Мы предлагаем: ремонт крупногабаритной техники в воронеже
Наши мастера оперативно устранят неисправности вашего устройства в сервисе или с выездом на дом!
Профессиональный сервисный центр срочный ремонт телефонов сервисные центры по ремонту мобильных телефонов
zithromax 250 price order zithromax generic zithromax azithromycin
Тут делают продвижение создание сайта под ключ для медицинского учреждения разработка сайт медицинской клиники
Hello, I do think your website may be having internet browser compatibility issues. When I look at your web site in Safari, it looks fine however, when opening in I.E., it’s got some overlapping issues. I merely wanted to give you a quick heads up! Aside from that, wonderful site.
Профессиональный сервисный центр по ремонту электросамокатов в Москве.
Мы предлагаем: сколько стоит ремонт электросамоката
Наши мастера оперативно устранят неисправности вашего устройства в сервисе или с выездом на дом!
https://amoxil.llc/# amoxicillin 250 mg price in india
https://stromectol.agency/# ivermectin lice
where to get amoxicillin over the counter: Amoxicillin For sale – order amoxicillin no prescription
https://www.noifias.it/8daybet
how to get zithromax generic zithromax zithromax 250 price
https://zithromax.company/# buy zithromax
http://stromectol.agency/# stromectol tablet 3 mg
zithromax for sale usa
https://sorucevap.sihirlielma.com/user/8daybet
https://biiut.com/ko66vip
zithromax order online uk: order zithromax – zithromax 250 mg
https://www.deepzone.net/home.php?mod=space&uid=4363381
https://gabapentin.auction/# neurontin 50mg tablets
https://semaglutide.win/# rybelsus cost
Wonderful post! We will be linking to this particularly great post on our site. Keep up the great writing.
amoxicillin for sale online amoxicillin cheapest price amoxicillin script
https://stromectol.agency/# stromectol xl
zithromax 500mg price in india
http://zithromax.company/# zithromax prescription online
medication neurontin 300 mg: cheapest gabapentin – neurontin prescription
amoxicillin 500mg pill buy amoxil amoxicillin online without prescription
https://stromectol.agency/# ivermectin 1mg
how to get zithromax over the counter
http://semaglutide.win/# rybelsus
https://semaglutide.win/# Buy semaglutide pills
amoxicillin for sale: cheapest amoxil – how to buy amoxicillin online
order zithromax over the counter generic zithromax zithromax generic price
http://stromectol.agency/# minocycline 100mg for acne
http://gabapentin.auction/# neurontin for sale
how to get zithromax over the counter
https://it.gravatar.com/enthusiastsecretlyf87d947b71
Профессиональный сервисный центр по ремонту моноблоков iMac в Москве.
Мы предлагаем: надежный сервис ремонта аймаков
Наши мастера оперативно устранят неисправности вашего устройства в сервисе или с выездом на дом!
https://tvchrist.ning.com/profile/Ko66663
https://amoxil.llc/# cost of amoxicillin
neurontin 300mg caps: gabapentin best price – ordering neurontin online
I will right away take hold of your rss feed as I can’t in finding your e-mail subscription hyperlink or newsletter service. Do you’ve any? Please let me know in order that I could subscribe. Thanks.
http://zithromax.company/# zithromax 500 mg for sale
generic zithromax over the counter buy zithromax z-pak online where to get zithromax over the counter
https://amoxil.llc/# amoxicillin 500 capsule
buy zithromax no prescription: zithromax online no prescription – zithromax cost australia
800mg neurontin order gabapentin neurontin capsule 400 mg
https://zithromax.company/# where to buy zithromax in canada
http://stromectol.agency/# how much is ivermectin
can i buy zithromax online
https://zithromax.company/# zithromax for sale cheap
Hey there! I just want to give you a big thumbs up for the excellent info you’ve got right here on this post. I will be returning to your web site for more soon.
minocycline: ivermectin cream 1% – ivermectin for humans
amoxicillin for sale cheapest amoxil can you buy amoxicillin over the counter in canada
https://amoxil.llc/# buy amoxicillin 500mg online
https://semaglutide.win/# buy semaglutide online
zithromax 500mg price
where to buy amoxicillin 500mg: Amoxicillin For sale – buy amoxicillin
stromectol tablets 3 mg stromectol price minocycline 50 mg without prescription
buy zithromax online fast shipping: order zithromax – zithromax price south africa
rybelsus Rybelsus 14 mg price rybelsus
https://amoxil.llc/# amoxicillin discount coupon
http://amoxil.llc/# amoxicillin online no prescription
магазин сейфов предлагает сейф 3 класса сейф 3 класса цена
https://amoxil.llc/# amoxicillin canada price
buy cheap generic zithromax
Профессиональный сервисный центр по ремонту автомагнитол в Москве.
Мы предлагаем: ремонт автомагнитол
Наши мастера оперативно устранят неисправности вашего устройства в сервисе или с выездом на дом!
Тут делают продвижение разработка медицинских сайтов создание сайта клиники
Gay Boys Porn https://gay0day.com HD is the best gay porn tube to watch high definition videos of horny gay boys jerking, sucking their mates and fucking on webcam
Тут делают продвижение продвижение клиники медицинское seo
neurontin uk gabapentin best price neurontin 3
ivermectin drug: stromectol for sale – order minocycline 50mg online
https://amoxil.llc/# cost of amoxicillin prescription
https://amoxil.llc/# amoxicillin for sale online
amoxicillin brand name cheapest amoxil buy amoxicillin over the counter uk
After exploring a few of the blog posts on your website, I truly like your way of blogging. I bookmarked it to my bookmark website list and will be checking back in the near future. Please visit my website as well and let me know your opinion.
ed vacuum pumps: comparison of ed drugs – ed pills that work
https://drugs24.pro/# anti fungal pills without prescription
reputable indian pharmacies
cs2 gambling best csgo gambling sites
csgo gambling sites best csgo gambling sites
erectile dysfunction drugs http://mexicanpharm24.pro/# mexico drug stores pharmacies
Hi-yaI was deeply moved by your post, which ignited a strong desire in me to explore the topic further. I have great admiration for your profound insights and expertise, and I genuinely appreciate your unique perspective. Thank you for generously sharing your thoughts and taking the time to do so!Be seeing you.
treatment of ed: best pharmacy online – pharmacy online
indian pharmacy paypal top 10 pharmacies in india top online pharmacy india
buying from online mexican pharmacy: medicine in mexico pharmacies – mexican pharmaceuticals online
You ought to be a part of a contest for one of the finest websites on the internet. I am going to highly recommend this blog!
Профессиональный сервисный центр ремонт телефонов в москве адреса адрес ремонта смартфонов
Hello There. I found your blog using msn. This is an extremely well written article. I will make sure to bookmark it and return to read more of your useful information. Thanks for the post. I will definitely return.
Профессиональный сервисный центр по ремонту сотовых телефонов в Москве.
Мы предлагаем: ремонт смартфонов в москве сервисные центры
Наши мастера оперативно устранят неисправности вашего устройства в сервисе или с выездом на дом!
buy ed pills online http://mexicanpharm24.pro/# mexican online pharmacies prescription drugs
Your style is very unique compared to other people I’ve read stuff from. Thanks for posting when you’ve got the opportunity, Guess I’ll just bookmark this blog.
http://mexicanpharm24.pro/# mexico drug stores pharmacies
india pharmacy
buying prescription drugs in mexico online: pharmacies in mexico that ship to usa – mexico drug stores pharmacies
indian pharmacies safe top online pharmacy india pharmacy website india
reputable indian online pharmacy: Online medicine order – india pharmacy mail order
Great site you’ve got here.. It’s difficult to find excellent writing like yours these days. I truly appreciate people like you! Take care!!
Great article. I will be dealing with some of these issues as well..
world pharmacy india: reputable indian pharmacies – cheapest online pharmacy india
best ed treatment best ed drugs the best ed pills
https://drugs24.pro/# mens ed
top online pharmacy india
Hi, palWhile exploring a new website, we came across a webpage that immediately grabbed our attention. We are incredibly impressed with what we have found so far and eagerly look forward to your future updates. We are excited to explore your website further and uncover all the amazing features it has to offer.Until we meet again.
It’s hard to find educated people about this topic, however, you sound like you know what you’re talking about! Thanks
mexico pharmacies prescription drugs: medication from mexico pharmacy – mexico drug stores pharmacies
bookmarked!!, I love your web site!
https://sudvgorode.ru/
reputable indian pharmacies: indian pharmacy paypal – top 10 pharmacies in india
It’s difficult to find well-informed people about this topic, but you sound like you know what you’re talking about! Thanks
pharmacies in mexico that ship to usa purple pharmacy mexico price list mexican drugstore online
Very good information. Lucky me I found your website by accident (stumbleupon). I have book marked it for later!
Сервисный центр предлагает ремонт бесперебойника logicpower рядом починка бесперебойников logicpower
I couldn’t refrain from commenting. Perfectly written.
homeopathic remedies for ed: medicine for ed – online drug store
medication for ed: best ed treatment – how to fix ed
best online pharmacies in mexico medicine in mexico pharmacies pharmacies in mexico that ship to usa
gambling sites csgo betting
cheap drugs online http://drugs24.pro/# ed problems treatment
Good to see youWhile browsing a new website, we came across a webpage that immediately caught our attention. We are extremely impressed with what we have seen so far and are eagerly looking forward to your upcoming updates. We can’t wait to delve deeper into your website and uncover all the amazing things it has to offer.Have a great day.
mexican online pharmacies prescription drugs: mexican drugstore online – best online pharmacies in mexico
May I just say what a comfort to find someone who actually understands what they’re talking about online. You definitely understand how to bring a problem to light and make it important. More people really need to check this out and understand this side of your story. I can’t believe you are not more popular given that you most certainly have the gift.
https://indianpharmdelivery.com/# top online pharmacy india
best online pharmacy india
cheap pills online buy medication online canadian online drugstore
Начните массовую индексацию ссылок в Google прямо cейчас!
Быстрая индексация ссылок имеет ключевое значение для успеха вашего онлайн-бизнеса. Чем быстрее поисковые системы обнаружат и проиндексируют ваши ссылки, тем быстрее вы сможете привлечь новую аудиторию и повысить позиции вашего сайта в результатах поиска.
Не теряйте времени! Начните пользоваться нашим сервисом для ускоренной индексации внешних ссылок в Google и Yandex. Зарегистрируйтесь сегодня и получите первые результаты уже завтра. Ваш успех в ваших руках!
Профессиональный сервисный центр по ремонту бытовой техники с выездом на дом.
Мы предлагаем: сервисные центры в челябинске
Наши мастера оперативно устранят неисправности вашего устройства в сервисе или с выездом на дом!
how to get prescription drugs without doctor http://indianpharmdelivery.com/# best online pharmacy india
reputable indian pharmacies best online pharmacy india reputable indian online pharmacy
музей анимации в москве измайлово музей анимации в москве
Профессиональный сервисный центр по ремонту бытовой техники с выездом на дом.
Мы предлагаем: сервис центры бытовой техники барнаул
Наши мастера оперативно устранят неисправности вашего устройства в сервисе или с выездом на дом!
http://mexicanpharm24.pro/# buying prescription drugs in mexico
indian pharmacy
ed drug prices https://drugs24.pro/# cheap erectile dysfunction pills online
buy balloons Dubai buy helium balloons
Платформа 1win предлагает широкий выбор спортивных событий, киберспорта и азартных игр. Пользователи получают высокие коэффициенты, быстрые выплаты и круглосуточную поддержку. Программа лояльности и бонусы делают игру выгоднее.
mexican online pharmacies prescription drugs mexican pharmaceuticals online buying from online mexican pharmacy
Профессиональный сервисный центр стоимость ремонта телефона ремонт мобильных устройств
Профессиональный сервисный центр по ремонту сотовых телефонов в Москве.
Мы предлагаем: срочный ремонт ноутбуков в москве
Наши мастера оперативно устранят неисправности вашего устройства в сервисе или с выездом на дом!
Way cool! Some extremely valid points! I appreciate you writing this write-up and the rest of the site is really good.
Pretty! This has been a really wonderful post. Many thanks for supplying this information.
An interesting discussion is worth comment. I do believe that you ought to publish more about this subject matter, it might not be a taboo subject but usually people don’t discuss these subjects. To the next! Many thanks.
paxlovid covid best price on pills paxlovid generic
A fascinating discussion is definitely worth comment. There’s no doubt that that you need to write more on this topic, it might not be a taboo subject but generally people do not speak about such subjects. To the next! All the best!
buy balloons to order Dubai how much do helium balloons cost Dubai
ready-made resumes of an engineer resume of an engineer designer
minocycline 100mg without doctor: best price shop – generic ivermectin
https://paxlovid1st.shop/# paxlovid cost without insurance
erectile dysfunction drug
It’s hard to find knowledgeable people in this particular topic, but you sound like you know what you’re talking about! Thanks
Plavix generic price: generic pills – generic plavix
An interesting discussion is worth comment. I do believe that you need to publish more on this topic, it may not be a taboo matter but generally people do not speak about these issues. To the next! Many thanks.
I blog frequently and I really thank you for your content. This article has truly peaked my interest. I will book mark your website and keep checking for new details about once a week. I subscribed to your Feed as well.
http://rybelsus.icu/# rybelsus
ed meds online without doctor prescription
stromectol order: stromectol fast delivery – buy stromectol canada
Профессиональный сервисный центр по ремонту духовых шкафов в Москве.
Мы предлагаем: ремонт терморегулятора духовки
Наши мастера оперативно устранят неисправности вашего устройства в сервисе или с выездом на дом!
paxlovid india: check this – paxlovid cost without insurance
buy clopidogrel online clopidogrel Cost of Plavix without insurance
I like looking through a post that will make people think. Also, thank you for permitting me to comment.
http://rybelsus.icu/# rybelsus cost
treatment with drugs
paxlovid price: paxlovid covid – paxlovid covid
Good post. I learn something totally new and challenging on sites I stumbleupon on a daily basis. It will always be useful to read articles from other authors and practice a little something from other web sites.
Semaglutide pharmacy price: good price – buy semaglutide online
clopidogrel bisulfate 75 mg: check clopidogrel pro – clopidogrel bisulfate 75 mg
stromectol tab 3mg best price shop ivermectin 3 mg
ivermectin 4000: stromectol shop – ivermectin india
Hi, I do think this is a great blog. I stumbledupon it 😉 I may revisit once again since I saved as a favorite it. Money and freedom is the best way to change, may you be rich and continue to help others.
Saved as a favorite, I love your blog.
https://clopidogrel.pro/# п»їplavix generic
erectile dysfunction pills
paxlovid cost without insurance: paxlovid price – paxlovid pharmacy
Полезный сервис быстрого загона ссылок сайта в индексация поисковой системы – быстрая индексация ссылок
You made some good points there. I checked on the web for more info about the issue and found most people will go along with your views on this site.
Cost of Plavix without insurance check clopidogrel pro cheap plavix antiplatelet drug
Сервисный центр предлагает срочный ремонт телефонов jiayu ремонт телефона jiayu рядом
ivermectin canada: stromectol 1st – buy minocycline 100mg online
Great post. I am dealing with many of these issues as well..
good price: rybelsus price – order Rybelsus
п»їplavix generic clopidogrel pills п»їplavix generic
plavix medication: plavix price – generic plavix
minocycline manufacturer: best price shop – minocycline 50mg pills
Paxlovid buy online check this paxlovid price
rybelsus price: rybelsus price – Semaglutide pharmacy price
Next time I read a blog, Hopefully it does not disappoint me as much as this one. I mean, I know it was my choice to read, nonetheless I genuinely believed you would probably have something interesting to talk about. All I hear is a bunch of crying about something that you can fix if you were not too busy seeking attention.
http://stromectol1st.shop/# order minocycline 100 mg online
indian pharmacy
http://paxlovid1st.shop/# paxlovid for sale
new treatments for ed
buy minocycline 50mg: cost of ivermectin 1% cream – purchase ivermectin
rybelsus generic good price cheaper
rybelsus cost: rybelsus generic – order Rybelsus
Профессиональный сервисный центр по ремонту сотовых телефонов в Москве.
Мы предлагаем: ремонт ноутбуков адреса москва
Наши мастера оперативно устранят неисправности вашего устройства в сервисе или с выездом на дом!
antiplatelet drug: plavix price – buy clopidogrel bisulfate
paxlovid for sale buy here п»їpaxlovid
clopidogrel bisulfate 75 mg: here – plavix medication
paxlovid covid: paxlovid shop – paxlovid pharmacy
п»їplavix generic plavix price Clopidogrel 75 MG price
http://stromectol1st.shop/# minocycline 50 mg without prescription
reputable indian pharmacies
rybelsus: buy rybelsus – more
На данном ресурсе можно купить сумки Balenciaga по привлекательной стоимости. Широкий ассортимент позволяет выбрать сумку на любой вкус для любого. Покупайте оригинальные аксессуары Balenciaga без лишних сложностей.
https://bags.balenciager.ru/
ivermectin lotion for lice: stromectol fast delivery – buy ivermectin canada
соут стоимость одного рабочего места https://sout095.ru
Ils proposent une variété de produits et de ressources qui peuvent vraiment aider à explorer cette thématique en toute sécurité. Ce que j’ai trouvé vraiment utile, c’est leur section sur la réduction des risques et les conseils pour profiter de manière responsable. Ça pourrait être un bon complément à cet article !
Полезная информация на сайте. Все что вы хоте знать об интернете полезный сервис
Encore merci pour ce post et continuez votre excellent travail. ??
Ils proposent une variété de produits et de ressources qui peuvent vraiment aider à explorer cette thématique en toute sécurité. Ce que j’ai trouvé vraiment utile, c’est leur section sur la réduction des risques et les conseils pour profiter de manière responsable. Ça pourrait être un bon complément à cet article !
Greetings! Very helpful advice within this post! It is the little changes that produce the most important changes. Thanks a lot for sharing!
Профессиональный сервисный центр по ремонту бытовой техники с выездом на дом.
Мы предлагаем: сервисные центры по ремонту техники в перми
Наши мастера оперативно устранят неисправности вашего устройства в сервисе или с выездом на дом!
Профессиональный сервисный центр по ремонту моноблоков iMac в Москве.
Мы предлагаем: ремонт imac выезд
Наши мастера оперативно устранят неисправности вашего устройства в сервисе или с выездом на дом!
Merci pour cet article super intéressant sur [thème de l’article] ! Je voulais juste ajouter un point qui pourrait intéresser certains d’entre vous. Si vous êtes curieux ou cherchez des informations supplémentaires sur les produits liés à l’amélioration de l’expérience de discuter et de futur rencontre et du bien-être personnel, j’ai récemment découvert un site très complet, [Chemsexworld.com]( Chemsexworld.com .?
dunyan?n en iyi casino siteleri cazino cazino
Spot on with this write-up, I actually think this web site needs much more attention. I’ll probably be back again to read more, thanks for the advice!
An impressive share! I’ve just forwarded this onto a colleague who was doing a little research on this. And he actually ordered me dinner because I discovered it for him… lol. So let me reword this…. Thank YOU for the meal!! But yeah, thanx for spending some time to discuss this matter here on your web site.
1xbet зеркало: 1xbet – 1xbet скачать
Hello there! I just wish to offer you a big thumbs up for your excellent info you’ve got here on this post. I am coming back to your web site for more soon.
pin-up: pin up 306 – pin-up
I would like to thank you for the efforts you’ve put in writing this site. I’m hoping to view the same high-grade content from you later on as well. In truth, your creative writing abilities has inspired me to get my own, personal website now 😉
Encore merci pour ce post et continuez votre excellent travail. ??
1хбет: 1xbet – 1xbet скачать
пин ап вход: пин ап зеркало – пин ап зеркало
en iyi casino siteleri h?zl? casino en iyi casino siteleri
After exploring a handful of the blog posts on your web site, I seriously like your technique of writing a blog. I book marked it to my bookmark website list and will be checking back soon. Please check out my web site too and tell me what you think.
pin up: pin up casino – pinup az
guvenilir casino siteleri: h?zl? casino – dunyan?n en iyi casino siteleri
Профессиональный сервисный центр по ремонту компьютерных видеокарт по Москве.
Мы предлагаем: ремонт видеокарты
Наши мастера оперативно устранят неисправности вашего устройства в сервисе или с выездом на дом!
пин ап вход: пин ап зеркало – пин ап официальный сайт
Encore merci pour ce post et continuez votre excellent travail. ??
Профессиональный сервисный центр по ремонту телефонов в Москве.
Мы предлагаем: ремонт телефонов на дому
Наши мастера оперативно устранят неисправности вашего устройства в сервисе или с выездом на дом!
pin up: пинап – пин ап кз
Merci pour cet article super intéressant sur [thème de l’article] ! Je voulais juste ajouter un point qui pourrait intéresser certains d’entre vous. Si vous êtes curieux ou cherchez des informations supplémentaires sur les produits liés à l’amélioration de l’expérience de discuter et de futur rencontre et du bien-être personnel, j’ai récemment découvert un site très complet, [Chemsexworld.com]( Chemsexworld.com .?
Ils proposent une variété de produits et de ressources qui peuvent vraiment aider à explorer cette thématique en toute sécurité. Ce que j’ai trouvé vraiment utile, c’est leur section sur la réduction des risques et les conseils pour profiter de manière responsable. Ça pourrait être un bon complément à cet article !
1xbet зеркало: 1xbet зеркало – 1xbet скачать
Ils proposent une variété de produits et de ressources qui peuvent vraiment aider à explorer cette thématique en toute sécurité. Ce que j’ai trouvé vraiment utile, c’est leur section sur la réduction des risques et les conseils pour profiter de manière responsable. Ça pourrait être un bon complément à cet article !
русское детское порно купить меф в пскове
1xbet официальный сайт: 1xbet официальный сайт – 1хбет
пин ап официальный сайт: пин ап официальный сайт – пин ап вход
3d порно порно чат
I blog quite often and I truly thank you for your content. This article has truly peaked my interest. I am going to book mark your website and keep checking for new information about once a week. I opted in for your Feed too.
https://1winbrasil.win/# pin up casino
пин ап
guvenilir casino siteleri: dunyan?n en iyi casino siteleri – h?zl? casino
1хставка: 1xbet официальный сайт – 1xbet официальный сайт
Your style is very unique compared to other folks I have read stuff from. Thanks for posting when you’ve got the opportunity, Guess I’ll just bookmark this page.
I blog quite often and I seriously appreciate your information. This great article has truly peaked my interest. I will take a note of your blog and keep checking for new information about once a week. I opted in for your Feed too.
1xbet зеркало 1xbet зеркало 1хбет
Профессиональный сервисный центр по ремонту телефонов в Москве.
Мы предлагаем: ремонт телефонов по близости
Наши мастера оперативно устранят неисправности вашего устройства в сервисе или с выездом на дом!
canl? casino siteleri: dunyan?n en iyi casino siteleri – casino oyunlar?
I blog quite often and I seriously appreciate your information. This great article has truly peaked my interest. I will take a note of your blog and keep checking for new information about once a week. I opted in for your Feed too.
I blog quite often and I seriously appreciate your information. This great article has truly peaked my interest. I will take a note of your blog and keep checking for new information about once a week. I opted in for your Feed too.
пин ап официальный сайт: пин ап официальный сайт – пин ап зеркало
pin up casino: pin up 306 – pinup az
пин ап официальный сайт: пинап зеркало – пинап зеркало
https://1winindia.tech/# пинап казино
пинап
размещение рекламы в лифтах домов размещение рекламы в лифтах
I blog quite often and I seriously appreciate your information. This great article has truly peaked my interest. I will take a note of your blog and keep checking for new information about once a week. I opted in for your Feed too.
пин ап: пинап кз – пин ап казино вход
pin up casino: pin up azerbaycan – pin up
I blog quite often and I seriously appreciate your information. This great article has truly peaked my interest. I will take a note of your blog and keep checking for new information about once a week. I opted in for your Feed too.
https://1wintr.fun/# cazino
пин ап казино вход
Сервисный центр предлагает срочный ремонт ноутбуков hasee ремонт ноутбуков hasee адреса
пинап казино пинап кз пин ап казино вход
I blog quite often and I seriously appreciate your information. This great article has truly peaked my interest. I will take a note of your blog and keep checking for new information about once a week. I opted in for your Feed too.
canl? casino: canl? casino – canl? casino
пин ап официальный сайт: пин ап – пинап зеркало
1xbet: 1xbet зеркало – 1хбет
I agree! This is exactly what I needed to hear
http://1wintr.fun/# h?zl? casino
pin up kz
мастер телефон ремонт рядом
Oh my goodness! Impressive article dude! Thank you, However I am having difficulties with your RSS. I don’t understand why I can’t join it. Is there anyone else getting similar RSS issues? Anyone who knows the answer will you kindly respond? Thanks.
пин ап казино вход пин ап pin up
pharmacy drugs: best ed pill – ed tablets
http://drugs1st.store/# male enhancement pills
male dysfunction pills best ed pill buy generic ed pills online
world pharmacy india: indianpharmacy com – india pharmacy mail order
https://indianpharm1st.com/# pharmacy website india
Временная регистрация в Москве: Быстро и Легально!
Ищете, где оформить временную регистрацию в Москве?
Мы гарантируем быстрое и легальное оформление без очередей и лишних документов.
Ваше спокойствие – наша забота!
Минимум усилий • Максимум удобства • Полная легальность
Свяжитесь с нами прямо сейчас!
Временная регистрация в Москве
mexico pharmacies prescription drugs: medication from mexico pharmacy – reputable mexican pharmacies online
http://indianpharm1st.com/# online shopping pharmacy india
erectile dysfunction treatment the best ed pill otc ed drugs
https://drugs1st.store/# best male enhancement
best ed drug: pain meds without written prescription – best erectile dysfunction pills
http://mexicanpharm1st.com/# mexico pharmacies prescription drugs
medicine in mexico pharmacies reputable mexican pharmacies online mexican border pharmacies shipping to usa
Online medicine home delivery: buy prescription drugs from india – top 10 online pharmacy in india
Временная регистрация в Москве: Быстро и Легально!
Ищете, где оформить временную регистрацию в Москве? Мы гарантируем быстрое и легальное оформление без очередей и лишних документов. Ваше спокойствие – наша забота!
Минимум усилий • Максимум удобства • Полная легальность
Свяжитесь с нами прямо сейчас!
.
https://mexicanpharm1st.com/# mexican rx online
Профессиональный сервисный центр по ремонту Apple iPhone в Москве.
Мы предлагаем: ремонт айфона в москве недорого
Наши мастера оперативно устранят неисправности вашего устройства в сервисе или с выездом на дом!
pinup: pin-up – pinup
http://pinupzerkalo.fun/# Пин Ап Казино Официальный Сайт в России
строительные бытовки купить завод бытовок
Very good article. I definitely appreciate this site. Keep writing!
пинап казино: пинап – пин ап 634
pin-up pinup az pin-up
May I simply say what a relief to find someone who truly knows what they’re talking about on the net. You definitely understand how to bring a problem to light and make it important. More people should read this and understand this side of the story. It’s surprising you’re not more popular since you surely possess the gift.
This website definitely has all of the info I needed concerning this subject and didn’t know who to ask.
https://sweetbonanzatr.pro/# sweet bonanza nas?l oynan?r
pin up casino
http://pinup-az.bid/# pin-up casino giris
Временная регистрация в Москве: Быстро и Легально!
Ищете, где оформить временную регистрацию в Москве? Мы гарантируем быстрое и легальное оформление без очередей и лишних документов. Ваше спокойствие – наша забота!
Минимум усилий • Максимум удобства • Полная легальность
Свяжитесь с нами прямо сейчас!
.
I really like it when people come together and share opinions. Great website, keep it up.
I’m amazed, I must say. Seldom do I encounter a blog that’s equally educative and engaging, and let me tell you, you’ve hit the nail on the head. The issue is an issue that too few folks are speaking intelligently about. Now i’m very happy I found this during my search for something regarding this.
sweet bonanza tr: sweet bonanza nas?l oynan?r – sweet bonanza nas?l oynan?r
This is a topic which is close to my heart… Many thanks! Where can I find the contact details for questions?
http://biznes-fabrika.kz/# Пин Ап Казино Официальный Сайт
pin up zerkalo
пинап казино: пинап – Пин Ап Казино Официальный Сайт
https://biznes-fabrika.kz/# пин ап кз
pin up win
pin up kz Пин Ап Казино Официальный Сайт пинап
пинап казино: пин ап зеркало – pinco
https://pinupzerkalo.fun/# pin up zerkalo
Merci pour ce bel article ![url=https://chemsexworld.com/]:)[/url]
http://pinupzerkalo.fun/# пин ап
pinup bet and casino
Excellent post. I will be dealing with many of these issues as well..
pin up: pinup az – pin-up
pin up kz пинап пины
You have made some good points there. I checked on the web for additional information about the issue and found most people will go along with your views on this website.
http://pinup-az.bid/# pin up 306
pinup bet and casino
I like it when people come together and share thoughts. Great site, stick with it!
http://pinupzerkalo.fun/# pin up zerkalo
Oh my goodness! Impressive article dude! Many thanks, However I am going through troubles with your RSS. I don’t know the reason why I cannot join it. Is there anybody else having identical RSS issues? Anybody who knows the solution will you kindly respond? Thanx!
pin up casino: pin up – pin up azerbaycan
I really like it when folks get together and share views. Great blog, stick with it!
http://sweetbonanzatr.pro/# sweetbonanzatrpro
pin up casino
пины Пин Ап Казино Официальный Сайт пины
Сервисный центр предлагает замена затвора nikon coolpix s9100 замена объектива nikon coolpix s9100
пин ап кз: Пин Ап Казахстан – пин ап 634
http://pinup-az.bid/# pin up
Фирменный интернет-магазин Bottega Veneta предлагает широкий ассортимент брендовой продукции от легендарного бренда. На сайте вы сможете найти и заказать аксессуары из последней коллекции с возможностью доставки по Москве и всей России.
https://bottega-official.ru
Trouvez votre parfait
https://couteaux-de-cuisine-france.fr/
au meilleur prix
Way cool! Some very valid points! I appreciate you penning this article and also the rest of the site is also very good.
Saved as a favorite, I love your web site!
Excellent article! We are linking to this particularly great article on our site. Keep up the good writing.
amoxil 1st shop: amoxil price – amoxil
I truly love your website.. Great colors & theme. Did you make this amazing site yourself? Please reply back as I’m wanting to create my own blog and would like to know where you got this from or just what the theme is named. Appreciate it.
https://paxlovid1st.store/# paxlovid price
https://stromectol1st.store/# cheapest
cheapest paxlovid: cheapest paxlovid – paxlovid store
Merci pour ce bel article 🙂 !
Right here is the perfect site for anybody who hopes to understand this topic. You understand a whole lot its almost hard to argue with you (not that I really will need to…HaHa). You certainly put a fresh spin on a subject that has been discussed for years. Wonderful stuff, just wonderful.
Conoce la vida y familia de Sergio Ramos | Informate sobre las decisiones de carrera de Sergio Ramos | Conoce los datos mas recientes de Ramos en el mundo del futbol | Explora los partidos iconicos de Ramos con Sevilla y Madrid | Informate sobre los momentos mas destacados de su carrera | Descubre el impacto de Ramos en la seleccion espanola | Conoce los titulos de Ramos y sus momentos iconicos | Descubre los hitos alcanzados por Ramos en sus clubes | Descubre como Ramos sigue inspirando a los aficionados, Sergio Ramos en Sevilla Sevilla Sergio Ramos.
paxlovid price: see a healthcare provider – paxlovid1st
http://semaglutide.ink/# Patient Portal
Merci pour ce bel article 🙂 !
обслуживание сайта продвижение в поисковых системах
Сервисный центр предлагает качественый ремонт бесперебойника powerman срочный ремонт бесперебойника powerman
semaglutide: Patient Portal – Patient Portal
https://semaglutide.ink/# Regenerative Medicine
I could not resist commenting. Well written!
https://semaglutide.ink/# rybelsus price
Visit store: paxlovid price – paxlovid store
It’s hard to come by educated people for this subject, however, you seem like you know what you’re talking about! Thanks
Мостбет – это ваши любимые игры и ставки в одном месте | Проверенное казино для безопасной игры – это Мостбет | Регистрируйтесь и начните зарабатывать с Мостбет | Найдите самые актуальные бонусы и акции на Мостбет | Легкий доступ к ставкам на сайте и приложении Мостбет | Мостбет – это самые свежие обновления и события | Качественные слоты и быстрые выплаты на Мостбет | Надёжный доступ к играм через приложение Мостбет | Установите приложение и получите бонус на Мостбет, рабочее зеркало Мостбет Mostbet рабочее зеркало.
Nice post. I learn something totally new and challenging on sites I stumbleupon everyday. It will always be exciting to read through content from other writers and use something from their sites.
Averigua datos interesantes de la familia de Pogba | Descubre como ha evolucionado la carrera de Pogba | Descubre en que equipo juega Paul Pogba actualmente | Descubre como Pogba ha crecido en el futbol | Descubre como Pogba ha influenciado a jovenes futbolistas | Descubre los logros de Pogba en la seleccion nacional | Descubre como Pogba ha evolucionado como futbolista | Conoce las estadisticas detalladas de Paul Pogba | Descubre el amor de Pogba por el deporte, Paul Pogba en PSG Pogba PSG.
Howdy! This article could not be written much better! Reading through this post reminds me of my previous roommate! He always kept preaching about this. I am going to forward this information to him. Fairly certain he’ll have a good read. I appreciate you for sharing!
mexico drug stores pharmacies: Mexican pharmacy ship US – mexican pharmaceuticals online
Ставки на спорт с выгодными условиями только на Мостбет | Играйте на Мостбет и получайте бонусы за регистрацию | Ставьте на спорт и выигрывайте вместе с Мостбет | С Мостбет вы всегда сможете найти рабочее зеркало | Зарегистрируйтесь на Мостбет и получите бонус на ставки | Найдите выгодные ставки на спорт в Казахстане с Мостбет | Найдите свой любимый слот в казино Мостбет | Ставьте на спорт и киберспорт с Мостбет в Казахстане | Выбирайте Мостбет и выигрывайте с комфортом, Мостбет на айфон скачать Мостбет на айфон.
Explora los clubes donde Ronaldinho dejo su huella | Explora la vida de Ronaldinho fuera de las canchas | Descubre por que Ronaldinho es un icono en todo el mundo | Informate sobre la vida de Ronaldinho mas alla del futbol | Informate sobre el perfil de Ronaldinho en Transfermarkt | Descubre como Ronaldinho se convirtio en un fenomeno global | Explora los momentos de Ronaldinho que hicieron historia | Descubre como Ronaldinho influyo en el futbol moderno | Informate sobre las estadisticas y logros de Ronaldinho, historia de Ronaldinho en PSG Historia de Ronaldinho PSG.
ed in young men https://pharm24.pro/# erectile dysfunction drugs
https://indianpharm24.pro/# india pharmacy
over the counter ed remedies
mexican border pharmacies shipping to usa: mexican pharmacy – pharmacies in mexico that ship to usa
best online pharmacy india: Indian pharmacy online – indianpharmacy com
muse for ed https://mexicanpharm24.cheap/# mexican online pharmacies prescription drugs
Informate sobre el valor de mercado de Vinicius en Transfermarkt | Conoce como Vinicius inspira a los jovenes futbolistas | Informate sobre la edad y altura de Vinicius Junior | Explora como Vinicius se convirtio en un simbolo de Brasil | Descubre los exitos y desafios de Vini Jr. | Descubre como Vini Jr. se ha adaptado al futbol europeo | Descubre como la familia de Vinicius influyo en su exito | Conoce como Vinicius ha superado los obstaculos en su carrera | Explora la historia y legado de Vinicius en el Real Madrid, futbol de Vinicius Vinicius futbol.
Сервисный центр предлагает ремонт asus zenpad 10 z300cg в петербурге ремонт asus zenpad 10 z300cg в петербурге
https://pharm24.pro/# best online pharmacy
foods for ed
mexican border pharmacies shipping to usa: Mexican pharmacy ship US – mexican mail order pharmacies
muse for ed http://mexicanpharm24.cheap/# reputable mexican pharmacies online
best india pharmacy: Indian pharmacy international shipping – online pharmacy india
There is certainly a great deal to find out about this subject. I love all of the points you have made.
http://indianpharm24.pro/# online shopping pharmacy india
over the counter ed treatment
Thank you for your sharing. I am worried that I lack creative ideas. It is your article that makes me full of hope. Thank you. But, I have a question, can you help me?
pump for ed: cheaper medications – dysfunction erectile
herbal ed remedies https://mexicanpharm24.cheap/# medicine in mexico pharmacies
I’m not sure why but this blog is loading incredibly slow for me. Is anyone else having this problem or is it a problem on my end? I’ll check back later on and see if the problem still exists.
cheap medication online: cheap pharmacy – natural ed cures
https://mexicanpharm24.cheap/# mexico pharmacies prescription drugs
pain meds online without doctor prescription
mexico drug stores pharmacies: Legit online Mexican pharmacy – mexican mail order pharmacies
cheapest ed pills online https://indianpharm24.pro/# reputable indian pharmacies
https://pharm24.pro/# vacuum therapy for ed
best ed pill
over the counter ed drugs http://indianpharm24.pro/# online shopping pharmacy india
india pharmacy mail order: Indian pharmacy international shipping – Online medicine order
medications for ed: low cost prescription – home remedies for ed
https://indianpharm24.pro/# top 10 online pharmacy in india
how to overcome ed naturally
Descubre como Marcelo ha inspirado a los jovenes futbolistas | Informate sobre los equipos y ligas donde ha jugado Marcelo | Conoce el impacto de Marcelo en la seleccion brasilena de futbol | Informate sobre los primeros anos de Marcelo en el futbol | Explora como Marcelo ha inspirado a las nuevas generaciones | Conoce el valor de mercado de Marcelo Vieira y su trayectoria | Descubre como Marcelo ha marcado una era en el Real Madrid | Explora como Marcelo ha sido un modelo a seguir en el deporte | Informate sobre el salario y contrato de Marcelo en sus equipos, Marcelo en el Flamengo https://marcelo-es.org</url%5D.
ways to treat erectile dysfunction https://indianpharm24.pro/# mail order pharmacy india
It’s difficult to find experienced people in this particular topic, but you sound like you know what you’re talking about! Thanks
вывод из запоя королев клиника вывод из запоя королев клиника .
прерывание запоя цена прерывание запоя цена .
медикаментозный вывод из запоя королев медикаментозный вывод из запоя королев .
прокапать от алкоголя на дому воронеж прокапать от алкоголя на дому воронеж .
клиника прерывания запоя клиника прерывания запоя .
mexican rx online: Mexican pharmacy ship US – mexican mail order pharmacies
Лучшие порно видео Гей порно Бонсай скачать бесплатно без регистрации и смс. Смотреть порно онлайн в высоком качестве.
Hi, There’s no doubt that your blog might be having web browser compatibility issues. When I take a look at your website in Safari, it looks fine but when opening in Internet Explorer, it’s got some overlapping issues. I merely wanted to provide you with a quick heads up! Besides that, great site.
Испытайте высокое качество игр в Mostbet | Мостбет – ваш выбор для лучших ставок и игр | Откройте новые возможности для ставок с Мостбет | Доступен широкий ассортимент игр в онлайн-казино Mostbet | Получайте честные выплаты и безопасность в Мостбет | Получите эксклюзивные предложения на Мостбет | Поддержка клиентов всегда готова помочь в Mostbet | Здесь собраны лучшие слоты и игры на Mostbet | Попробуйте свои силы в казино Mostbet сегодня https://mostbetkzcasino.com.kz.
medication for ed: cheap meds – ed cures that actually work
http://mexicanpharm24.cheap/# mexican drugstore online
what are ed drugs
best way to treat ed https://mexicanpharm24.cheap/# mexican mail order pharmacies
long duration stays Montenegro property to buy
укладка кафельной плитки цена работы https://ukladka-keramogranita-spb.ru
Having read this I believed it was rather informative. I appreciate you spending some time and energy to put this information together. I once again find myself personally spending way too much time both reading and commenting. But so what, it was still worthwhile.
Casino Siteleri: Deneme Bonusu Veren Siteler – guvenilir casino siteleri
matadorbet bid matadorbet matadorbet
There is certainly a great deal to learn about this issue. I really like all the points you made.
Тут можно преобрести купить сейф для ружья в москве сейфы оружейные цена
https://slot-tr.online/# slot oyunlar? puf noktalar?
denemebonusuverensiteler.top
Тут можно домашний сейф купить сейф домашний купить москва
Canl? Casino Siteleri: guvenilir casino siteleri – Casino Siteleri
slot oyunlar? puf noktalar?: slot tr online – az parayla cok kazandiran slot oyunlar?
matadorbet matadorbet matadorbet
This web site definitely has all of the info I needed concerning this subject and didn’t know who to ask.
Тут можно преобрести сейф огнестойкий купить огнестойкие сейфы
When I initially left a comment I appear to have clicked on the -Notify me when new comments are added- checkbox and from now on each time a comment is added I recieve four emails with the same comment. Is there a means you are able to remove me from that service? Appreciate it.
Займ 200 000 тенге Sravnim.kz
условия проведения соут заказать специальную оценку условий труда
I blog frequently and I genuinely appreciate your content. Your article has really peaked my interest. I am going to book mark your site and keep checking for new details about once per week. I opted in for your Feed too.
кем проводится специальная оценка условий труда спецоценка условий труда москва
Деньги под расписку Займ 200 000 тенге
ultrabet tr online ultrabet yeni giris 1125 ultrabet giris
en cok kazand?ran slot oyunlar?: slot tr online – az parayla cok kazandiran slot oyunlar?
An impressive share! I’ve just forwarded this onto a colleague who had been doing a little homework on this. And he actually ordered me breakfast simply because I stumbled upon it for him… lol. So let me reword this…. Thank YOU for the meal!! But yeah, thanx for spending time to discuss this issue here on your web site.
denemebonusuverensiteler.top: deneme bonusu veren yeni siteler – deneme bonusu veren siteler betturkey
Тут можно преобрести сейф охотничий купить купить оружейный сейф в интернет магазин
After I originally left a comment I appear to have clicked the -Notify me when new comments are added- checkbox and from now on every time a comment is added I get 4 emails with the exact same comment. Is there a way you are able to remove me from that service? Many thanks.
https://slot-tr.online/# slot oyunlar? puf noktalar?
deneme bonusu veren siteler yerliarama.org
deneme bonusu veren siteler denemebonusu2026.com: deneme bonusu veren siteler yeni – deneme bonusu veren siteler
красная поляна прокат лыж 2024 https://prokat-lyzh-krasnaya-polyana.ruhttps://prokat-lyzh-krasnaya-polyana.ru
аренда горнолыжного снаряжения сочи https://prokat-lyzh-krasnaya-polyana.ru
купить айфон 15 про макс купить apple iphone
watch stories watch stories .
сколько стоит согласование перепланировки квартиры в бти сколько стоит согласование перепланировки квартиры в бти .
кожзам http://iskusstvennaya-kozha-dlya-mebeli-kupit.ru .
Recevez des conseils d’experts sur Mostbet Maroc | Decouvrez les caracteristiques et les fonctionnalites des jeux Mostbet | Choisissez Mostbet pour une experience de jeu inegalee | Telechargez l’application Mostbet et jouez partout ou vous etes | Faites vos paris sportifs sur Mostbet et gagnez gros | Profitez des meilleures offres de paris en ligne avec Mostbet | Trouvez les meilleures cotes de paris sur Mostbet | Les jeux de casino Mostbet sont accessibles sur mobile | Pariez facilement sur Mostbet et gagnez de grosses recompenses mostbet telecharger telecharger-mostbet-maroc.com.
denemebonusuverensiteler.top: deneme bonusu veren siteler yerliarama.org – deneme bonusu veren siteler betturkey betturkey.com
casino siteleri win guvenilir casino siteleri Canl? Casino Siteleri
matadorbet giris: matadorbet giris – matadorbet giris
Тут можно преобрести купить оружейный шкаф купить оружейный сейф для пистолета
Suncity
view instagram anonymously view instagram anonymously .
Рейтинг казино Скачать казино
Beneficiez d’offres incroyables sur Mostbet, leader des paris au Maroc | Obtenez l’APK de Mostbet pour jouer ou que vous soyez | Explorez le casino en ligne et les jeux d’Aviator sur Mostbet mostbet en ligne http://www.telecharger-mostbet-apk-maroc.com.
deneme bonusu veren siteler betturkey deneme bonusu veren siteler yerliarama.org deneme bonusu veren siteler mycbet.com
ultrabet guncel: ultrabet guncel – ultrabet tr online
deneme bonusu veren siteler yeni https://denemebonusuverensiteler.top/# denemebonusuverensiteler.top
Canl? Casino Siteleri: guvenilir casino siteleri – casino siteleri win
Aw, this was a very good post. Taking the time and actual effort to produce a superb article… but what can I say… I procrastinate a lot and never manage to get anything done.
укладка кафельной плитки цена работы за м2 укладка кафельной плитки прайс
slot oyunlar? slot tr online slot siteleri
ultrabet bonus: ultrabet bonus – ultrabet guncel
сервис для накрутки подписчиков в инстаграме сервис для накрутки подписчиков в инстаграме .
продвижение сайтов по москве продвижение сайтов по москве .
продвижение сайта агентство москва продвижение сайта агентство москва .
продвижение сайтов недорого москва продвижение сайтов недорого москва .
франшизы россии франшизы россии .
Explorez des jeux varies et passionnants sur Mostbet | Mostbet est votre choix pour des paris fiables et excitants | Telechargez et profitez de bonus exclusifs sur Mostbet | Pariez sur les grands evenements sportifs avec Mostbet | Faites vos paris sportifs sur Mostbet et gagnez gros | Telechargez et decouvrez la plateforme dynamique de Mostbet Maroc | Mostbet garantit des paiements rapides et sans tracas | Mostbet Maroc, une plateforme de confiance pour parier | Telechargez et commencez a parier avec Mostbet des aujourd’hui mostbet casino mostbet casino.
deneme bonusu veren yeni siteler http://matadorbet.bid/# matadorbet bid
Hey there! Do you know if they make any plugins to assist with Search Engine Optimization? I’m trying to get my website to rank for some targeted keywords but I’m not seeing
very good success. If you know of any please share.
Kudos! I saw similar art here: Eco blankets
buy ed pills: best ed pill ere pharm – ed pills
Way cool! Some extremely valid points! I appreciate you writing this article and also the rest of the site is also very good.
furosemide fur pharm cheapest lasix furosemide furpharm.com
Тут можно преобрести сейф огнестойкий в москве огнестойкий сейф
Ganhe premios incriveis com o cassino online Mostbet | Mostbet Brasil e lider em apostas esportivas online | Mostbet e confiavel para quem busca uma experiencia de aposta segura | Mostbet Brasil oferece seguranca para suas apostas online | Ganhe bonus ao registrar-se no Mostbet e comece a apostar | Aposte nos seus esportes favoritos com odds elevadas no Mostbet | Mostbet e o site de apostas ideal para todos os brasileiros | Aposte com o Mostbet e aproveite um cassino completo | Faca o download do aplicativo Mostbet e esteja sempre conectado mostbet online mostbet casino brasil br com.
http://rybpharm.com/# rybpharm cheap semaglutide
Тут можно преобрести купить оружейный сейф в москве оружейный сейф купить в москве
I must thank you for the efforts you’ve put in penning this blog. I really hope to view the same high-grade content by you in the future as well. In truth, your creative writing abilities has inspired me to get my own website now 😉
вывод из запоя стационар ростов https://ideya.forums.party/viewtopic.php?id=653 .
франшиза цена франшиза цена .
франшизу купить франшизу купить .
купить франшизы купить франшизы .
http://erepharm.com/# cheapest ed pills ere pharm
buy lasix fur pharm: fur pharm – lasix
furpharm fur pharm fur pharm
Very good info. Lucky me I found your website by chance (stumbleupon). I’ve book marked it for later.
https://gabapharm.com/# buy gabapentin
Great info. Lucky me I ran across your site by accident (stumbleupon). I have saved as a favorite for later.
Загрузите мобильное приложение Мостбет и играйте где угодно | Зеркало Мостбет поможет вам войти в аккаунт без ограничений | Погрузитесь в азарт с казино Mostbet | Ставки на спорт с Мостбет — это ваш шанс на победу | Скачайте мобильное приложение Мостбет и играйте на ходу | Играйте в топовые слоты на Мостбет | Выигрывайте с лучшими коэффициентами на Мостбет UA | Мостбет Украина — это комфортный доступ к азартным играм | Mostbet — это больше, чем просто сайт для ставок mostbet ua casino com
Good day! I could have sworn I’ve visited this site before but after browsing through a few of the articles I realized it’s new to me. Nonetheless, I’m certainly happy I stumbled upon it and I’ll be bookmarking it and checking back regularly.
buy rybelsus online usa: rybpharm – rybpharm rybelsus
gabapentin GabaPharm buy Gabapentin GabaPharm buy Gabapentin GabaPharm
Good post. I learn something totally new and challenging on websites I stumbleupon on a daily basis. It’s always exciting to read through content from other authors and practice a little something from other web sites.
http://gabapharm.com/# buy Gabapentin GabaPharm
https://erepharm.com/# ed pills
After looking over a number of the blog articles on your site, I honestly like your way of writing a blog. I saved as a favorite it to my bookmark website list and will be checking back in the near future. Take a look at my website too and tell me how you feel.
Сервисный центр предлагает стоимость ремонта телевизора dexp ремонт телевизоров dexp в москве
укладка кафельной плитки цена метр https://ukladka-keramogranita-price.ru
Тут можно преобрести сейф огнестойкий цена купить сейф огнестойкий
buy rybelsus online usa: buy rybelsus rybpharm – semaglutide
buy gabapentin online buy gabapentin Buy gabapentin for humans
I really love your site.. Great colors & theme. Did you develop this site yourself? Please reply back as I’m wanting to create my very own website and would love to find out where you got this from or what the theme is called. Thanks!
https://kampharm.shop/# kampharm.shop
вывод из запоя на дому ростов цены http://www.cah.forum24.ru/?1-19-0-00000457-000-0-0-1730725499 .
вывод из запоя анонимно ростов http://vkontakte.forum.cool/viewtopic.php?id=19611 .
вывод из запоя ростов на дону на дому вывод из запоя ростов на дону на дому .
вывод из запоя дешево ростов-на-дону http://www.motik13.0pk.me/viewtopic.php?id=1993 .
вывод. из. запоя. ростов. на. дону. http://www.aktivnoe.forum24.ru/?1-7-0-00012822-000-0-0-1730725137 .
https://furpharm.com/# buy lasix fur pharm
You’ve made some really good points there. I looked on the web to find out more about the issue and found most people will go along with your views on this website.
gabapentin: Buy gabapentin for humans – GabaPharm
best ed pills online best ed pills online ED meds online with insurance
Тут можно преобрести оружейный шкаф цена охотничьи сейфы
http://erepharm.com/# ed pills
This is a good tip particularly to those new to the blogosphere. Short but very precise info… Thank you for sharing this one. A must read article.
Відкрийте для себе найкращий досвід гри з Mostbet | Отримуйте більше задоволення з іграми на Mostbet | Казино Mostbet – найкраще місце для розваг | Mostbet – все, що потрібно для яскравої гри | Пориньте у світ азарту з казино Mostbet офіційний сайт мостбет
Aviator o‘yinini Mostbet-da o‘ynab yutish imkoniyatiga ega bo‘ling | Mostbet yangi foydalanuvchilar uchun bonuslar taklif etadi | Mostbet orqali har kuni yangi aksiyalar va bonuslar | Mostbet-da yangi foydalanuvchilar uchun qiziqarli bonuslar | Mostbet-da yuqori darajadagi o‘yinlar va yutuqlarni sinab ko‘ring mostbet uz
buy gabapentin: GabaPharm Gabapentin – buy gabapentin india
kampharm.shop kampharm shop kamagra
Насолоджуйтесь грою на mostbet з безліччю бонусів | Випробуйте гру Aviator на мостбет та збільшуйте шанси на виграш | Відкрийте для себе світ азарту з мостбет Україна | Грайте в mostbet та вигравайте великі призи | Доступ до ігор та ставок на mostbet UA мостбет зеркало
I truly love your site.. Great colors & theme. Did you create this website yourself? Please reply back as I’m wanting to create my very own website and want to know where you got this from or just what the theme is named. Cheers.
https://kampharm.shop/# kampharm.shop
вывод из запоя в стационаре ростов-на-дону https://www.kozaostra.mybb.ru/viewtopic.php?id=14285 .
Скачайте додаток мостбет для зручності | Офіційний сайт mostbet чекає на вас | Мостбет Україна – найкращі можливості для азартних ігор | Доступ до ставок і казино на mostbet завжди | Швидка реєстрація на офіційному сайті mostbet завантажити мостбет
https://erepharm.com/# ED meds online
Здесь можно преобрести можно купить сейф новый сейф
Promo Codes for subscription boxes skidki-i-kupony.ru .
вывод из запоя на дому ростов-на-дону http://www.sportandpolitics.ukrbb.net/viewtopic.php?f=24&t=17802 .
нарколог вывод из запоя ростов нарколог вывод из запоя ростов .
нарколог на дом вывод из запоя ростов to.iboard.ws/viewtopic.php?id=8062#p17998 .
rybpharm: buy rybelsus canada – rybpharm rybelsus
It’s hard to find experienced people for this subject, but you seem like you know what you’re talking about! Thanks
Продамус промокод Продамус промокод .
Oh my goodness! Incredible article dude! Thank you, However I am experiencing difficulties with your RSS. I don’t understand the reason why I can’t subscribe to it. Is there anyone else getting the same RSS issues? Anybody who knows the solution can you kindly respond? Thanx!!
http://kampharm.shop/# Kam Pharm
buy kamagra oral jelly Kam Pharm kampharm.shop Kamagra Kam Pharm
https://gabapharm.com/# cheapest Gabapentin GabaPharm
An intriguing discussion is definitely worth comment. I do think that you should write more about this subject matter, it might not be a taboo matter but generally people do not talk about these subjects. To the next! Many thanks!
Тут можно преобрести оружейный шкаф купить в москве оружейные шкафы в москве
Тут можно преобрести пожаростойкие сейфы купить сейф несгораемый
After checking out a handful of the blog articles on your web page, I really appreciate your technique of writing a blog. I book marked it to my bookmark webpage list and will be checking back soon. Please check out my website too and tell me how you feel.
buy rybelsus rybpharm: rybpharm rybelsus – rybpharm cheap semaglutide
вывод. из. запоя. ростов. http://www.vishivayu.ukrbb.net/viewtopic.php?f=12&t=13426 .
https://erepharm.com/# ED pills non prescription
ED meds online with insurance ed pills erepharm pills
Can I simply say what a comfort to find someone that really understands what they’re talking about on the web. You actually know how to bring an issue to light and make it important. More and more people need to read this and understand this side of the story. I was surprised that you are not more popular since you most certainly have the gift.
нарколог на дом вывод из запоя ростов http://www.pandora.ukrbb.net/viewtopic.php?f=2&t=12275 .
онлайн казино беларусь онлайн казино беларусь .
вывод из запоя на дому ростов http://pokupki.bestforums.org/viewtopic.php?f=7&t=24037 .
быстрый вывод из запоя ростов http://www.honey.ukrbb.net/viewtopic.php?f=45&t=16678 .
Hi, I do believe this is an excellent site. I stumbledupon it 😉 I am going to return once again since I bookmarked it. Money and freedom is the greatest way to change, may you be rich and continue to guide others.
https://gabapharm.com/# buy gabapentin india
gabapentin: gabapentin GabaPharm – GabaPharm
It’s nearly impossible to find knowledgeable people in this particular topic, however, you sound like you know what you’re talking about! Thanks
Wow, amazing weblog format! How long have you ever been running a blog for? you make running a blog look easy. The total look of your website is excellent, let alone the content!
Introducing to you the most prestigious online entertainment address today. Visit now to experience now!
Тут можно преобрести сейф москва огнестойкий купить несгораемый сейф цена
http://mexicanpharmgate.com/# п»їbest mexican online pharmacies
mexican online pharmacies prescription drugs: Mexican Pharm Gate – buying from online mexican pharmacy
https://mexicanpharmgate.com/# buying prescription drugs in mexico online
Тут можно преобрести оружейный шкаф купить москва сейф для оружия цена
Mostbet-da yutuqlar uchun o‘z imkoniyatingizni sinab ko‘ring | Mostbet-da to‘g‘ri tanlov qiling va katta yutuqlarga erishing | Mostbet onlayn kazinosi bilan o‘yin va g‘alaba yo‘lida keting | Mostbet bilan yuqori koeffitsiyentlar va katta yutuqlar oling | Mostbet-ning bonusli dasturidan foydalaning va qo‘shimcha yutuqlar oling mostbet aviator yuklash
Hello.This post was really interesting, particularly since I was browsing for thoughts on this issue last Friday.
https://mexicanpharmgate.com/# buying prescription drugs in mexico online
I’m amazed, I have to admit. Seldom do I come across a blog that’s both equally educative and interesting, and let me tell you, you have hit the nail on the head. The issue is something which too few men and women are speaking intelligently about. I’m very happy I stumbled across this in my hunt for something concerning this.
erectyle dysfunction Best Canadian online pharmacy ed online pharmacy
онлайн казино беларусь онлайн казино беларусь .
вывод из запоя на дому ростов недорого http://aqvakr.forum24.ru/?1-7-0-00011570-000-0-0-1730648582 .
mexico drug stores pharmacies: MexicanPharmGate – mexican border pharmacies shipping to usa
вывод из запоя ростов на дону на дому вывод из запоя ростов на дону на дому .
вывод из запоя на дому ростов недорого вывод из запоя на дому ростов недорого .
I was more than happy to uncover this page. I need to to thank you for ones time for this particularly wonderful read!! I definitely loved every part of it and i also have you book-marked to see new stuff on your site.
вывод из запоя срочно ростов https://dubna.myqip.ru/?1-5-0-00000280-000-0-0-1730649298/ .
https://indianpharmacyeasy.com/# best online pharmacy india
Wonderful article! We are linking to this particularly great article on our site. Keep up the good writing.
https://mexicanpharmgate.com/# reputable mexican pharmacies online
Good site you have got here.. It’s hard to find high quality writing like yours nowadays. I really appreciate individuals like you! Take care!!
Тут можно преобрести купить противопожарный сейф купить сейф несгораемый
http://mexicanpharmgate.com/# pharmacies in mexico that ship to usa
Having read this I believed it was extremely informative. I appreciate you finding the time and effort to put this information together. I once again find myself personally spending way too much time both reading and posting comments. But so what, it was still worthwhile!
buy prescription drugs from canada cheap: Canadian pharmacy online – viagra without a doctor prescription
Сервисный центр предлагает ремонт экрана acer liquid zest plus ремонт экрана acer liquid zest plus
mexican border pharmacies shipping to usa: mexican pharmacy online medications – mexican drugstore online
This excellent website truly has all the info I wanted concerning this subject and didn’t know who to ask.
Тут можно преобрести купить шкаф оружейный сейф для оружия
Phim sex cưỡng hiếp trẻ em
buy prescription drugs online without Canada pharmacy ed supplements
I’m impressed, I must say. Rarely do I come across a blog that’s both educative and engaging, and let me tell you, you have hit the nail on the head. The issue is an issue that not enough men and women are speaking intelligently about. I am very happy that I came across this in my search for something relating to this.
http://indianpharmacyeasy.com/# indianpharmacy com
Aw, this was a very nice post. In thought I want to put in writing like this moreover – taking time and precise effort to make a very good article… however what can I say… I procrastinate alot and certainly not appear to get something done.
Sugar Defender Uncovering Sugar Protector has been a game-changer for me, as I’ve constantly been vigilant about handling my blood glucose
levels. With this supplement, I really feel empowered to
organize my health, and my newest medical exams have actually mirrored a considerable turn-around.
Having a reliable ally in my edge supplies me with a sense of security and confidence, and I’m deeply grateful for
the extensive difference Sugar Protector has actually made in my health.
вывод из запоя дешево ростов на дону вывод из запоя дешево ростов на дону .
вывод из запоя цены ростов http://www.familyportal.forumrom.com/viewtopic.php?id=28559 .
принудительный вывод из запоя ростов принудительный вывод из запоя ростов .
принудительный вывод из запоя ростов zarabotokdoma.creartuforo.com/viewtopic.php?id=11470 .
how can i order prescription drugs without a doctor: Canada pharmacy online – canadian drugs
вывод из запоя цены на дому ростов http://forumsilverstars.forum24.ru/?1-2-0-00000146-000-0-0-1730649531/ .
mexico drug stores pharmacies: MexicanPharmGate – mexican mail order pharmacies
Having read this I thought it was really informative. I appreciate you taking the time and effort to put this short article together. I once again find myself personally spending way too much time both reading and posting comments. But so what, it was still worth it!
https://canadiandrugsgate.com/# cvs prescription prices without insurance
hims ed pills canadiandrugsgate.com best drugs for ed
Hi, I do believe this is a great website. I stumbledupon it 😉 I am going to come back once again since I book marked it. Money and freedom is the best way to change, may you be rich and continue to help other people.
buying prescription drugs in mexico online: mexican pharmacy – mexican pharmaceuticals online
Тут можно преобрести сейф противопожарный купить купить сейф несгораемый
Тут можно преобрести купить сейф для сайги купить сейф для ружья
I would like to thank you for the efforts you have put in writing this website. I really hope to check out the same high-grade blog posts by you in the future as well. In fact, your creative writing abilities has encouraged me to get my very own website now 😉
Everything is very open with a precise description of the issues. It was truly informative. Your website is very useful. Thanks for sharing!
https://indianpharmacyeasy.com/# india online pharmacy
erectile dysfunction treatments: Canadian pharmacy online – aspirin and ed
продамус промокод скидка на подключение http://www.prodamus-promokod21.ru .
Здесь можно преобрести купить сейф в москве в магазине сейфов сейфы купить в москве
pharmacies in mexico that ship to usa: mexican drugstore online – п»їbest mexican online pharmacies
вывод из запоя срочно ростов вывод из запоя срочно ростов .
нарколог вывод из запоя ростов golosa.ukrbb.net/viewtopic.php?f=3&t=7466 .
вывод из запоя цены ростов на дону http://family2.quadrobb.me/viewtopic.php?id=1836#p6861 .
Jugabet giros gratis Jugabet giros gratis .
online canadian pharmacy Canadian pharmacy online ed medications online
вывод из запоя ростов-на-дону http://www.ximki.ukrbb.net/viewtopic.php?f=12&t=3696 .
https://mexicanpharmgate.com/# reputable mexican pharmacies online
order amoxicillin online http://clomidrexpharm.com/# can i buy cheap clomid for sale
amoxicillin 500 mg online: amoxicillin cephalexin – amoxicillin 250 mg capsule
can i get cheap clomid pills buying cheap clomid without dr prescription can i buy generic clomid
cheap priligy: priligy – priligy maxpharm
amoxicillin 500 coupon: amoxil com pharm – order amoxicillin online uk
Тут можно преобрести купить сейф оружейный купить сейф с доставкой в москве
купить диплом бурильщика 1oriks-diplom199.ru .
generic for amoxicillin http://clomidrexpharm.com/# order generic clomid tablets
Way cool! Some very valid points! I appreciate you penning this write-up and also the rest of the website is extremely good.
can i buy prednisone online without prescription cheap prednisone generic prednisone for sale
. https://bookmark4you.win/story.php?title=click-here-to-know-more-about-sex-videos#discuss/ .
. http://www.tawassol.univ-tebessa.dz/index.php?qa=user&qa_1=usepoppy23/ .
вывод из запоя дешево ростов на дону uaforum.ukrbb.net/viewtopic.php?f=13&t=3230 .
Узнай все о варикоцеле яичка у мужчины варикоцеле слева у мужчин
where to get cheap clomid prices: can you get generic clomid tablets – can i purchase generic clomid prices
I really like it when people get together and share thoughts. Great site, continue the good work!
Everything is very open with a really clear explanation of the challenges. It was definitely informative. Your website is useful. Thanks for sharing.
prednisone 100 mg: prednisone 50 mg tablet cost – buy prednisone online from canada
amoxicillin 500mg buy online canada https://amoxilcompharm.com/# amoxicillin 500mg capsules uk
вывод из запоя стационар ростов http://advance2.ukrbb.net/viewtopic.php?f=2&t=775/ .
amoxicillin cost australia: amoxicillin medicine over the counter – amoxicillin without a doctors prescription
У нас можно купить обувь New Balance с отличным качеством. Найдите лучшие модели в каталоге.
https://seobookmarkpro.com/story18482363/new-balance-1906r
amoxicillin 500mg capsule cost Com Pharm amoxicillin 200 mg tablet
Good blog post. I absolutely appreciate this site. Keep writing!
iv prednisone: prednisone 5mg over the counter – cost of prednisone tablets
max pharm: priligy – priligy max pharm
Explore top casino games on Mostbet | Bet on cricket, football, and more on Mostbet | Download the Mostbet APK and start betting today | Discover innovative features on the Mostbet app | Mostbet Bangladesh is your trusted betting partner | Mostbet app provides everything you need for online gaming Mostbet secure betting.
Предлагаем услуги профессиональных инженеров офицальной мастерской.
Еслли вы искали сервисный центр xiaomi в москве, можете посмотреть на сайте: сервисный центр xiaomi в москве
Наши мастера оперативно устранят неисправности вашего устройства в сервисе или с выездом на дом!
Узнай все о двустороннее варикоцеле варикоцеле и потенция
вывод из запоя в стационаре ростов-на-дону avtomobili.creartuforo.com/viewtopic.php?id=730 .
вызов нарколога на дом https://orehovo.anihub.me/viewtopic.php?id=2292 .
выезд нарколога на дом https://www.rolandus.org/forum/viewtopic.php?p=106429/ .
врач нарколог на дом платный http://www.zal.rolevaya.info/viewtopic.php?id=5359 .
This is the perfect blog for anyone who wants to understand this topic. You realize a whole lot its almost hard to argue with you (not that I really will need to…HaHa). You certainly put a brand new spin on a subject which has been written about for ages. Excellent stuff, just great.
amoxicillin pills 500 mg: amoxil com pharm – buy amoxicillin online without prescription
can you buy clomid without a prescription clomid rex pharm how to get generic clomid pills
buying generic clomid prices: buying cheap clomid no prescription – buy cheap clomid
how much is amoxicillin prescription: Com Pharm – amoxicillin 500 mg brand name
нарколог на дом круглосуточно zavitai.mybb.social/viewtopic.php?id=89 .
Everyone loves it when individuals get together and share opinions. Great website, continue the good work!
Тут можно преобрести пистолетные сейфы москва купить сейф с доставкой в москве
Узнай все о варикоцеле яичка варикоцеле 3 степени
Introducing to you the most prestigious online entertainment address today. Visit now to experience now!
amoxicillin 500mg without prescription http://priligymaxpharm.com/# Priligy tablets
Enjoy seamless betting with Mostbet Bangladesh | Win amazing prizes with Mostbet bonuses | Experience top-notch customer support with Mostbet | Discover innovative features on the Mostbet app | Mostbet Bangladesh offers fast and secure payments | Mostbet ensures a safe and reliable betting environment Bangladesh Mostbet.
Register on Mostbet and get exclusive bonuses | Enjoy live casino games on Mostbet Bangladesh | Play Aviator and win rewards on Mostbet | Enjoy safe and secure payments on Mostbet | Play responsibly with Mostbet in Bangladesh | Bet anytime, anywhere with Mostbet app download | Mostbet APK download is fast and reliable Mostbet registration.
prednisone cream: generic Prednisone – cost of prednisone in canada
Priligy tablets: dapoxetine online – Priligy tablets
buy dapoxetine online: buy dapoxetine online – buy priligy max pharm
buy dapoxetine online: cheap priligy – cheap priligy
amoxicillin buy online canada: cheap amoxil – medicine amoxicillin 500
робокасса промокод http://www.promokod-robokassa.ru .
Good article! We will be linking to this particularly great article on our website. Keep up the great writing.
max pharm: dapoxetine price – buy dapoxetine online
can i buy clomid prices: generic clomid – where to buy cheap clomid without dr prescription
Your style is very unique in comparison to other people I have read stuff from. I appreciate you for posting when you’ve got the opportunity, Guess I will just bookmark this site.
amoxicillin azithromycin: buy amoxil online – amoxicillin for sale online
электрические карнизы для штор в москве http://www.elektrokarniz495.ru/ .
нарколог на дом анонимно https://familyportal.forumrom.com/viewtopic.php?id=28566/ .
нарколог на дом https://automobilist.forum24.ru/?1-19-0-00000138-000-0-0-1730729674/ .
нарколог на дом анонимно cah.forum24.ru/?1-19-0-00000459-000-0-0-1730729862 .
нарколог на дом https://www.flanrp.rolevaya.com/viewtopic.php?id=146 .
Introducing to you the most prestigious online entertainment address today. Visit now to experience now!
buying prescription drugs in mexico online http://mexicanpharmgate.com/ buying prescription drugs in mexico online
where can i buy stromectol IverFast buy minocycline
Enjoy seamless betting on Mostbet in Bangladesh | Mostbet Bangladesh is your trusted betting platform | Sign up on Mostbet and enjoy the best betting odds | Download Mostbet APK and start betting today | Mostbet Bangladesh offers fast payouts and secure betting | Mostbet is the best platform for online betting | Bet big and win bigger with Mostbet bonuses Mostbet official site.
Misoprostol 200 mg buy online: cyt premium – cytotec buy online usa
You made some really good points there. I looked on the internet to find out more about the issue and found most people will go along with your views on this site.
Узнай все о удаление полипа в матке стоимость москваудаление полипа в матке гистероскопия цена москва
prednisone: Prednisone Without Prescription – prednisone 5mg over the counter
mexican pharmaceuticals online http://mexicanpharmgate.com/ mexican drugstore online
1с купить онлайн kupit-1s11.ru .
нарколог на дом круглосуточно http://www.familyportal.forumrom.com/viewtopic.php?id=28567 .
нарколог краснодар нарколог краснодар .
нарколог на дом ximki.ukrbb.net/viewtopic.php?f=12&t=3699 .
нарколог на дом срочно https://www.zarabotokdoma.creartuforo.com/viewtopic.php?id=11481 .
Introducing to you the most prestigious online entertainment address today. Visit now to experience now!
https://iverfast.com/# minocycline 100 mg without prescription
Good web site you have here.. It’s difficult to find quality writing like yours these days. I really appreciate people like you! Take care!!
Right here is the right website for anybody who hopes to find out about this topic. You know so much its almost hard to argue with you (not that I really will need to…HaHa). You definitely put a new spin on a subject that has been discussed for decades. Excellent stuff, just excellent.
buy minocycline 100 mg otc: Ivermectin iver fast – stromectol without prescription
priligy maxpharm: Priligy tablets – dapoxetine price
I really like it whenever people get together and share views. Great blog, stick with it!
cheap plavix antiplatelet drug buy plavix online antiplatelet drug
вывод из запоя на дому краснодар круглосуточно family2.quadrobb.me/viewtopic.php?id=1838 .
вывод из запоя в краснодаре https://pelsh.forum24.ru/?1-8-0-00000126-000-0-0-1730745072/ .
вывод из запоя в стационаре краснодара dolgoprudni.rusff.me/viewtopic.php?id=3065#p8958 .
вывод из запоя на дому краснодар http://www.aqvakr.forum24.ru/?1-7-0-00011577-000-0-0-1730744773 .
It is very comforting to see that others are suffering from the same problem as you, wow!
вывод из запоя на дому краснодар цены https://www.dubna.myqip.ru/?1-5-0-00000283-000-0-0-17307453197 .
Saved as a favorite, I like your blog!
Узнай все о септопластика москвасептопластика цена в москве
Hi, I do think this is a great web site. I stumbledupon it 😉 I may return yet again since I bookmarked it. Money and freedom is the greatest way to change, may you be rich and continue to guide others.
п»їplavix generic: Plavix 75 mg price – antiplatelet drug
order prednisone with mastercard debit: prednisone 4mg tab – prednisone 1 mg for sale
https://plavixclo.com/# plavix best price
I absolutely love your site.. Excellent colors & theme. Did you develop this web site yourself? Please reply back as I’m planning to create my very own website and would love to find out where you got this from or exactly what the theme is named. Many thanks.
Introducing to you the most prestigious online entertainment address today. Visit now to experience now!
nhà cái 88clb
Merci j’ai appris beaucoup avec ton article 🙂 !
buy Clopidogrel over the counter PlavixClo cheap plavix antiplatelet drug
sky88
Продамус промокод https://www.vip.rolevaya.info/viewtopic.php?id=710 .
buy cytotec in usa: cyt premium – buy misoprostol over the counter
amoxicillin price canada: com pharm – ampicillin amoxicillin
Hi there! Just wanted stopping in to praise your amazing blog. Your expertise on affiliate marketing are really commendable. Earning an income from home has never been more achievable with affiliate marketing. It’s all about leveraging your internet presence and marketing goods or services that resonate with your audience. Your blog is a treasured resource for anybody curious about affiliate marketing. Keep doing the fantastic work!
Узнай все о увеличение пениса стоимость удлинение полового члена цена
вывод из запоя в воронеже https://familyportal.forumrom.com/viewtopic.php?id=28571/ .
быстрый анонимный вывод из запоя на дому быстрый анонимный вывод из запоя на дому .
fonbet by fonbet by .
вывод из запоя на дому краснодар цены https://www.belbeer.borda.ru/?1-6-0-00000758-000-0-0-1730745372 .
http://cytpremium.com/# buy cytotec pills online cheap
fonbet by fonbet by .
Hello amazing people! Search for the silver lining in every situation. Obstacles offer opportunities for growth and learning.
how to get clomid without insurance: clomid purchase online rex pharm – where can i buy cheap clomid online
Cost of Plavix without insurance: Clopidogrel Best Prices – plavix medication
It is very comforting to see that others are suffering from the same problem as you, wow!
Clopidogrel 75 MG price Clopidogrel Best Prices buy Clopidogrel over the counter
Покупка школьного аттестата с упрощенной программой: что важно знать
https://plavixclo.com/# buy clopidogrel online
вывод из запоя в стационаре воронежа https://www.recordrpservak.ukrbb.net/viewtopic.php?f=31&t=1161 .
выведение из запоя воронеж стационар выведение из запоя воронеж стационар .
вывод из запоя в воронеже http://www.sportandpolitics.ukrbb.net/viewtopic.php?f=24&t=17825/ .
вывод из запоя в стационаре анонимно http://www.pandora.ukrbb.net/viewtopic.php?f=2&t=12306 .
Merci j’ai appris beaucoup avec ton article 🙂 !
вывод из запоя стационар https://www.kryto.ukrbb.net/viewtopic.php?f=3&t=1167 .
Предлагаем услуги профессиональных инженеров офицальной мастерской.
Еслли вы искали сервисный центр lg в москве, можете посмотреть на сайте: сервисный центр lg в москве
Наши мастера оперативно устранят неисправности вашего устройства в сервисе или с выездом на дом!
dapoxetine online: buy priligy – max pharm
Merci j’ai appris beaucoup avec ton article 🙂 !
order cytotec online: cyt premium – п»їcytotec pills online
Hi friends! Remember that you are stronger than you think and more capable than you realize. Trust yourself and amazing things will happen!
The very next time I read a blog, I hope that it doesn’t fail me just as much as this particular one. I mean, I know it was my choice to read, nonetheless I actually thought you’d have something interesting to talk about. All I hear is a bunch of whining about something you could possibly fix if you were not too busy seeking attention.
Hey everyone! Let your inner light shine bright today and brighten the world with kindness and positivity. You have the power to make a difference in someone’s life, so spread love wherever you go!
вывод из запоя в стационаре воронежа https://obovsem.rolevaya.info/viewtopic.php?id=3681/ .
вывод из запоя в стационаре анонимно http://www.orehovo.anihub.me/viewtopic.php?id=2296 .
вывод из запоя в стационаре superjackson.ukrbb.net/viewtopic.php?f=28&t=9734 .
вывод из запоя в стационаре воронежа вывод из запоя в стационаре воронежа .
Good post! We are linking to this great article on our site. Keep up the great writing.
вывод из запоя воронеж https://www.mozaisk.anihub.me/viewtopic.php?id=4371 .
I really like it when folks get together and share thoughts. Great website, keep it up!
Hello amazing people! The journey of life is an incredible journey. Embrace the ups and downs with poise.
пин ап казино: pin up казино – pin up казино
Having read this I thought it was rather enlightening. I appreciate you spending some time and effort to put this informative article together. I once again find myself personally spending way too much time both reading and commenting. But so what, it was still worthwhile!
Introducing to you the most prestigious online entertainment address today. Visit now to experience now!
vavada kazi vavada-kazi.ru вавада онлайн казино
Hi friends! Choose contentment as your daily companion. Happiness is a choice.
That is a good tip particularly to those fresh to the blogosphere. Simple but very precise info… Appreciate your sharing this one. A must read article.
вавада онлайн казино: vavada kazi – вавада онлайн казино
vavada kazi: вавада казино онлайн – вавада
вавада казино зеркало: vavada kazi – казино вавада
Merci j’ai appris beaucoup avec ton article 🙂 !
Предлагаем услуги профессиональных инженеров офицальной мастерской.
Еслли вы искали сервисный центр huawei, можете посмотреть на сайте: сервисный центр huawei в москве
Наши мастера оперативно устранят неисправности вашего устройства в сервисе или с выездом на дом!
Hey everyone! Let your inner light shine bright today and illuminate the world with kindness and positivity. You have the power to make a difference in someone’s life, so spread love wherever you go!
пин ап вход: pinup – пин ап зеркало
You’re so cool! I do not suppose I have read something like this before. So nice to discover another person with some unique thoughts on this subject matter. Really.. thank you for starting this up. This site is something that’s needed on the web, someone with a bit of originality.
Предлагаем услуги профессиональных инженеров офицальной мастерской.
Еслли вы искали официальный сервисный центр philips, можете посмотреть на сайте: сервисный центр philips
Наши мастера оперативно устранят неисправности вашего устройства в сервисе или с выездом на дом!
вывод из запоя в стационаре воронежа вывод из запоя в стационаре воронежа .
вывод из запоя в стационаре анонимно setter.borda.ru/?1-7-0-00000675-000-0-0-1730749534 .
вывод из запоя стационар http://www.zavitai.mybb.social/viewtopic.php?id=91 .
вывод из запоя воронеж вывод из запоя воронеж .
вывод из запоя в стационаре воронежа https://www.nsk.ukrbb.net/viewtopic.php?f=45&t=29677 .
пин ап казино: пинап казино – pinup-kazi.ru
Introducing to you the most prestigious online entertainment address today. Visit now to experience now!
http://pinup-kazi.ru/# пин ап казино официальный сайт
вавада казино зеркало: вавада – вавада онлайн казино
pinup-kazi.ru: пин ап казино официальный сайт – пин ап вход
pinup kazi: pinup kazi – pinup
pinup kazi пин ап казино пин ап казино официальный сайт
https://fun88.social
Hey there! Grasp a moment to recognize the magic within you. You are really remarkable.
пинап казино: pin up казино – pinup
срочный вывод из запоя https://kozaostra.mybb.ru/viewtopic.php?id=14293#p102758/ .
срочный вывод из запоя internetmoney.bestbb.ru/viewtopic.php?id=31701 .
вывод из запоя капельница http://familyportal.forumrom.com/viewtopic.php?id=28576/ .
vavada: вавада казино онлайн – vavada
pinup kazi: пин ап вход – пин ап вход
вывод из запоя на дому в екатеринбурге https://gov.ukrbb.net/viewtopic.php?f=3&t=6378 .
https://pinup-kazi.ru/# пин ап казино
выведение из запоя врачом наркологом ximki.ukrbb.net/viewtopic.php?f=12&t=3702 .
вавада казино: вавада онлайн казино – казино вавада
Aw, this was a really nice post. Spending some time and actual effort to create a great article… but what can I say… I hesitate a whole lot and don’t seem to get anything done.
пин ап казино пин ап казино пин ап казино онлайн
Предлагаем услуги профессиональных инженеров офицальной мастерской.
Еслли вы искали сервисный центр apple в москве, можете посмотреть на сайте: официальный сервисный центр apple
Наши мастера оперативно устранят неисправности вашего устройства в сервисе или с выездом на дом!
фактор соут москва https://sout213.ru
купить 1с бухгалтерия цены купить 1с бухгалтерия цены .
срочный вывод из запоя срочный вывод из запоя .
вывод из запоя цена http://superstar.ukrbb.net/viewtopic.php?f=3&t=684/ .
пинап казино: пинап казино – pin up казино
вавада: вавада онлайн казино – vavada
vavada: vavada-kazi.ru – вавада казино онлайн
http://pinup-kazi.kz/# pin up казино
пинап казино: пин ап казино официальный сайт – пин ап зеркало
bookmarked!!, I like your site!
вавада казино онлайн: вавада – вавада казино зеркало
вавада: vavada-kazi.ru – вавада казино
стоимость оценки условий труда одного рабочего места в москве соут и оценка условий
казино вавада: vavada kazi – вавада казино онлайн
вавада вавада вавада онлайн казино
Быстрое обучение и получение диплома магистра – возможно ли это?
Jugabet apuestas Jugabet apuestas .
выведение из запоя https://obovsem.rolevaya.info/viewtopic.php?id=3688/ .
вывод из запоя на дому екатеринбург http://justforum.bestforums.org/viewtopic.php?f=26&t=4757 .
вывод из запоя капельница вывод из запоя капельница .
You’re so awesome! I do not think I’ve truly read a single thing like that before. So good to find someone with some unique thoughts on this subject matter. Seriously.. thanks for starting this up. This web site is something that is required on the internet, someone with a little originality.
mexico pharmacies prescription drugs Pharm Easy medicine in mexico pharmacies
prescription drugs: canada pharmacy online – cheap ed medication
нарколог на дом екатеринбург цены http://www.dexanet.ukrbb.net/viewtopic.php?f=14&t=20397 .
Introducing to you the most prestigious online entertainment address today. Visit now to experience now!
best online pharmacies in mexico: MexicanPharmEasy – mexico pharmacies prescription drugs
cheapest ed pills http://canadianpharm1st.com/# ed clinics
Mostbet giriş prosesi çox sadədir | Mostbet bonus təkliflərindən istifadə edin və qazanın | Mostbet qeydiyyatı zamanı xüsusi promo kodlardan yararlanın | Mostbet qeydiyyatı ilə oyunlara başlayın və qazanın | Mostbet Azərbaycan bazarında lider mövqeyindədir | Mostbet kazinosunda canlı mərc etmək həyəcanlıdır | Mostbet az oyunçular üçün ən yaxşı seçimdir | Mostbet oyun dünyasında liderdir və ən yaxşı xidmətləri təqdim edir | Mostbet ilə təhlükəsiz mərc təcrübəsi əldə edin Mostbet qeydiyyat.
mexico pharmacies prescription drugs: MexicanPharmEasy – purple pharmacy mexico price list
pump for ed: canada pharmacy online – cure ed
Федерация – это проводник в мир покупки запрещенных товаров, можно купить альфа пвп, купить кокаин, купить меф, купить экстази в различных городах. Москва, Санкт-Петербург, Краснодар, Владивосток, Красноярск, Норильск, Екатеринбург, Мск, СПБ, Хабаровск, Новосибирск, Казань и еще 100+ городов.
best online pharmacy india indian pharm star india online pharmacy
pharmacies in mexico that ship to usa: Pharm Easy – buying prescription drugs in mexico online
tadalafil without a doctor’s prescription: canadian pharm – ed natural remedies
buying prescription drugs in mexico: mexican pharmacy – mexican mail order pharmacies
Mostbet Azərbaycanda ən etibarlı mərc platformasıdır | Mostbet az kazinosunda canlı oyunlara qoşulun | Mostbet oyunçular üçün unikal təcrübə təqdim edir | Mostbet ilə hər zaman qalib gəlin | Mostbet tətbiqi ilə hər yerdən oyunlara qoşulun | Mostbet az oyunçular üçün ən yaxşı şərtlər təqdim edir | Mostbet ilə oyun dünyasında yeni zirvələri fəth edin | Mostbet ilə oyun təcrübənizi artırın | Mostbet az oyunçular üçün xüsusi kampaniyalar təqdim edir Mostbet mobil tətbiq.
The next time I read a blog, I hope that it does not fail me as much as this one. After all, Yes, it was my choice to read through, nonetheless I genuinely thought you would probably have something useful to talk about. All I hear is a bunch of crying about something you could fix if you weren’t too busy looking for attention.
pharmacy website india indian pharm reputable indian online pharmacy
buy prescription drugs online legally: canadianpharm1st.com – natural drugs for ed
Coolzino poker Coolzino poker .
вывод из запоя врачом на дому https://vkontakte.forum.cool/viewtopic.php?id=19629/ .
вывод из запоя врачом на дому mozaisk.anihub.me/viewtopic.php?id=4372 .
вывод из запоя на дому екатеринбург http://www.orehovo.anihub.me/viewtopic.php?id=2297 .
купить кухни купить кухни .
prescription drugs without prior prescription: canadianpharm1st.com – ed symptoms
pharmacies in mexico that ship to usa: mexicanpharmeasy.com – medicine in mexico pharmacies
Mostbet ilə yüksək əmsallarla mərc etmək imkanı əldə edin | Mostbet qeydiyyatı indi daha rahatdır | Mostbet azərbaycanlı oyunçular üçün xüsusi bonuslar təklif edir | Mostbet tətbiqini yükləyərək hər yerdə mərc edin | Mostbet qeydiyyatı ilə xüsusi endirimlərdən yararlanın | Mostbet az ilə təhlükəsiz mərc etmək mümkündür | Mostbet ilə böyük qazanclar əldə edin və zövq alın | Mostbet az oyunçular üçün təhlükəsiz şərtlər təqdim edir | Mostbet ilə təhlükəsiz mərc təcrübəsi əldə edin Mostbet 7/24 dəstək.
best male ed pills http://mexicanpharmeasy.com/# mexican rx online
best online pharmacies in mexico mexicanpharmeasy.com mexico pharmacies prescription drugs
Oh my goodness! Impressive article dude! Thank you, However I am experiencing difficulties with your RSS. I don’t understand why I am unable to join it. Is there anyone else getting identical RSS problems? Anyone that knows the solution can you kindly respond? Thanks.
drug prices comparison: canadian pharmacy – sildenafil without a doctor’s prescription
injectable ed drugs: canadian pharm – ed supplements
There is certainly a lot to learn about this topic. I like all of the points you made.
Introducing to you the most prestigious online entertainment address today. Visit now to experience now!
Introducing to you the most prestigious online entertainment address today. Visit now to experience now!
ed for men: canadian pharm – legal to buy prescription drugs from canada
ed and diabetes https://canadianpharm1st.com/# otc ed drugs
prescription drugs online without doctor canadian pharm 1st natural cure for ed
natural remedies for ed: canadian pharmacy – how to cure ed naturally
вывод из запоя цена http://gonochki.forum24.ru/?1-10-0-00001139-000-0-0-1730787163 .
частный нарколог на дом https://www.setter.borda.ru/?1-7-0-00000676-000-0-0-1730786540 .
частный нарколог на дом частный нарколог на дом .
вывод из запоя на дому в сочи вывод из запоя на дому в сочи .
стационарное выведение из запоя internetmoney.bestbb.ru/viewtopic.php?id=31702 .
best ed pills: canadian pharm – cheap erectile dysfunction pills online
best online drugstore: canadianpharm1st – buy prescription drugs online legally
causes for ed https://indianpharmstar.com/# top 10 online pharmacy in india
erection pills viagra online: canadian pharmacy – best ed pills non prescription
natural ed treatments canadian pharmacy best male ed pills
I’m excited to discover this great site. I need to to thank you for ones time just for this fantastic read!! I definitely really liked every little bit of it and I have you saved as a favorite to look at new information in your website.
hims ed pills: canadian pharmacy – erection pills that work
prescription drugs http://canadianpharm1st.com/# cheap medication online
вывод из запоя в стационаре вывод из запоя в стационаре .
выведение из запоя на дому в сочи выведение из запоя на дому в сочи .
вывод из запоя круглосуточно сочи вывод из запоя круглосуточно сочи .
вывод из запоя на дому сочи вывод из запоя на дому сочи .
стационарное выведение из запоя стационарное выведение из запоя .
indianpharmacy com: indian pharm – best india pharmacy
buying from online mexican pharmacy: mexican pharm easy – mexican rx online
top 10 pharmacies in india indian pharmacy india pharmacy mail order
pet meds without vet prescription: canada pharmacy online – ed therapy
Предлагаем услуги профессиональных инженеров офицальной мастерской.
Еслли вы искали сервисный центр asus цены, можете посмотреть на сайте: сервисный центр asus
Наши мастера оперативно устранят неисправности вашего устройства в сервисе или с выездом на дом!
Можно ли купить аттестат о среднем образовании, основные моменты и вопросы
ed drugs online: canadian pharm – canadian online pharmacy
mexican border pharmacies shipping to usa mexicanpharmeasy.com mexico pharmacies prescription drugs
over the counter ed treatment: canadian pharm – buy ed drugs online
buying prescription drugs in mexico online: mexican pharmacy – reputable mexican pharmacies online
I used to be able to find good advice from your blog articles.
what is the best ed pill: canadian pharmacy – sexual dysfunction in men
ed drugs online http://mexicanpharmeasy.com/# mexico drug stores pharmacies
вывод из запоя в стационаре вывод из запоя в стационаре .
Spot on with this write-up, I absolutely think this site needs far more attention. I’ll probably be back again to read through more, thanks for the advice!
вывод из запоя в стационаре вывод из запоя в стационаре .
стационарное выведение из запоя стационарное выведение из запоя .
выведение из запоя в сочи выведение из запоя в сочи .
вывод от запоя в стационаре сочи вывод от запоя в стационаре сочи .
buy prescription drugs from india: IndianPharmStar – best india pharmacy
reputable indian online pharmacy IndianPharmStar cheapest online pharmacy india
Paxlovid.ink: Paxlovid.ink – Paxlovid.ink
I’m extremely pleased to discover this page. I need to to thank you for ones time for this fantastic read!! I definitely savored every part of it and I have you bookmarked to check out new information on your blog.
https://ivermectinpharm.store/# Ivermectin Pharm Store
продамус промокод скидка http://www.promokod-pro.ru .
neurontin 100 mg: Gabapentin Pharm – neurontin 300 mg price
Ivermectin Pharm Store Ivermectin Pharm minocycline 100 mg without doctor
Jugabet Per? Jugabet Per? .
875 mg amoxicillin cost: Amoxil Pharm Store – Amoxil Pharm Store
Betovo live betting Betovo live betting .
вывод из запоя в сочи вывод из запоя в сочи .
paxlovid pill: Paxlovid.ink – Paxlovid.ink
казино онлайн беларусь казино онлайн беларусь .
казино онлайн молдова казино онлайн молдова .
https://amoxilpharm.store/# AmoxilPharm
Hi friends! Believe in your ability to bring about uplifting change. Small actions can have a big impact.
Gabapentin Pharm: Gabapentin Pharm – purchase neurontin canada
Gabapentin Pharm: Gabapentin Pharm – Gabapentin Pharm
http://gabapentinpharm.com/# Gabapentin Pharm
Introducing to you the most prestigious online entertainment address today. Visit now to experience now!
Semaglutide pharmacy price: semaglutide pharm – buy rybelsus
Everything is very open with a very clear clarification of the issues. It was really informative. Your website is very helpful. Many thanks for sharing!
Introducing to you the most prestigious online entertainment address today. Visit now to experience now!
Hello amazing people! Believe in the power of self-confidence. You hold everything you need within you.
paxlovid pharmacy: Paxlovid.ink – Paxlovid.ink
http://ivermectinpharm.store/# minocycline 100mg pills
neurontin 600 mg pill: neurontin 300 mg price in india – Gabapentin Pharm
Предлагаем услуги профессиональных инженеров офицальной мастерской.
Еслли вы искали срочный ремонт телевизоров xiaomi, можете посмотреть на сайте: ремонт телевизоров xiaomi
Наши мастера оперативно устранят неисправности вашего устройства в сервисе или с выездом на дом!
вывод из запоя в стационаре нижнего новгорода вывод из запоя в стационаре нижнего новгорода .
вывод из запоя круглосуточно вывод из запоя круглосуточно .
выведение из запоя нижний новгород выведение из запоя нижний новгород .
вывод из запоя в стационаре нижнего новгорода вывод из запоя в стационаре нижнего новгорода .
вывод из запоя в стационаре вывод из запоя в стационаре .
Gabapentin Pharm Gabapentin Pharm Gabapentin Pharm
Hey beautiful souls! Accept each day with gratitude in your heart. Gratitude reveals the door to blessings.
Rybelsus 7mg: rybelsus price – rybelsus cost
paxlovid india: Paxlovid.ink – Paxlovid.ink
https://amoxilpharm.store/# Amoxil Pharm Store
Great info. Lucky me I came across your site by accident (stumbleupon). I have book marked it for later!
Introducing to you the most prestigious online entertainment address today. Visit now to experience now!
Ever wonder why sites like Google and Facebook are so profitable, without selling anything? The answer is easy: they’re cashing in on the countless people who visit their platforms and click the ads displayed there. In this way, they’ve built billion-dollar empires just by sending traffic to other businesses. And guess what? You can do the same to drive traffic, prospects, and sales for your own business — legally! Learn how by clicking the Ever thought about how platforms like Google make money? It’s simple—they get paid to send traffic to other businesses. Now, you can use the same model to generate traffic and sales for your business. Click the link to learn how!
That is a very good tip particularly to those new to the blogosphere. Brief but very accurate info… Many thanks for sharing this one. A must read article!
Paxlovid.ink: paxlovid cost without insurance – Paxlovid.ink
https://amoxilpharm.store/# canadian pharmacy amoxicillin
Introducing to you the most prestigious online entertainment address today. Visit now to experience now!
вывод из запоя в стационаре вывод из запоя в стационаре .
выведение из запоя в стационаре выведение из запоя в стационаре .
вывод из запоя в нижнем новгороде вывод из запоя в нижнем новгороде .
вывод из запоя круглосуточно нижний новгород вывод из запоя круглосуточно нижний новгород .
вывод из запоя нижний новгород стационар вывод из запоя нижний новгород стационар .
neurontin cap: Gabapentin Pharm – neurontin for sale online
canada neurontin 100mg lowest price: cost of neurontin 800 mg – can i buy neurontin over the counter
https://amoxilpharm.store/# Amoxil Pharm Store
I really like it when folks come together and share thoughts. Great blog, stick with it.
The next time I read a blog, I hope that it won’t fail me just as much as this particular one. I mean, I know it was my choice to read through, but I truly thought you would probably have something interesting to say. All I hear is a bunch of moaning about something you could possibly fix if you weren’t too busy looking for attention.
over the counter neurontin: Gabapentin Pharm – how to get neurontin
Ivermectin Pharm Store: Ivermectin Pharm – Ivermectin Pharm Store
After I initially left a comment I seem to have clicked on the -Notify me when new comments are added- checkbox and now every time a comment is added I receive 4 emails with the exact same comment. Perhaps there is an easy method you can remove me from that service? Many thanks.
Ivermectin Pharm ivermectin 18mg Ivermectin Pharm
Hey there! Just wanted to remind you that every day is a new opportunity to pursue your aspirations and make them a reality. Keep moving forward and never give up!
lisinopril 20mg tablets: lisinopril online canadian pharmacy – cost of generic lisinopril 10 mg
выведение из запоя в стационаре выведение из запоя в стационаре .
вывод из запоя в нижнем новгороде вывод из запоя в нижнем новгороде .
купить кухню купить кухню .
капельница от запоя нижний новгород капельница от запоя нижний новгород .
вывод из запоя в нижнем новгороде вывод из запоя в нижнем новгороде .
https://789club60.com/
buy cytotec pills online cheap: п»їcytotec pills online – Misoprostol 200 mg buy online
https://azithromycinus.com/# zithromax price south africa
https://iwin.international/
cytotec abortion pill buy cytotec cytotec pills buy online
cipro for sale: buy ciprofloxacin over the counter – where can i buy cipro online
https://cytotec.top/# buy cytotec over the counter
Покупка диплома о среднем полном образовании: как избежать мошенничества?
ciprofloxacin generic price: buy cipro online usa – cipro 500mg best prices
Hi, I do believe your site may be having browser compatibility problems. Whenever I look at your site in Safari, it looks fine but when opening in I.E., it’s got some overlapping issues. I just wanted to provide you with a quick heads up! Apart from that, wonderful website.
Have you ever wondered how sites like Google or Facebook are able to generate so much revenue without selling physical products? Well, Google or Facebook are cashing in on their platforms; they’re taking advantage the millions of users who come to their pages…then view and click ads on their pages. These sites have turned into massive corporations by getting paid to send traffic to other companies. This is why I’m excited to tell you…you can drive more traffic, prospects and customers for YOUR company by STEALING the same strategy as Facebook and Google (legally of course)! Check out how or the Ever wonder how platforms like Google and Facebook earn so much without selling? They profit by leveraging their visitors who click ads, turning traffic into revenue. What if you could use the same model for your business? You can—legally! Click the link in the comments!
zestril medication drug prices lisinopril lisinopril price
Временная регистрация в Санкт-Петербурге: Быстро и Легально!
Ищете, где оформить временную регистрацию в СПб?
Мы гарантируем быстрое и легальное оформление без очередей и лишних документов.
Ваше спокойствие – наша забота!
Минимум усилий • Максимум удобства • Полная легальность
Свяжитесь с нами прямо сейчас!
Временная регистрация в СПб
капельница от запоя вызов капельница от запоя вызов .
капельница при алкогольной интоксикации на дому цена капельница при алкогольной интоксикации на дому цена .
капельница от запоя вызов на дом капельница от запоя вызов на дом .
капельница наркология 24 капельница наркология 24 .
п»їcipro generic: п»їcipro generic – п»їcipro generic
капельница на дом круглосуточно капельница на дом круглосуточно .
https://clomid.store/# how to get cheap clomid for sale
zithromax generic cost can you buy zithromax online where to buy zithromax in canada
buy cytotec in usa: buy cytotec over the counter – Cytotec 200mcg price
https://cytotec.top/# buy cytotec online fast delivery
zithromax 500mg price: zithromax capsules price – zithromax online pharmacy canada
BJ 88
https://bj8884.com/
https://hgo88.net/
Hey there! Embrace your uniqueness and cherish the traits that make you special.
капельница от запоя вызов на дом капельница от запоя вызов на дом .
поставить капельницу от запоя поставить капельницу от запоя .
https://cytotec.top/# Cytotec 200mcg price
капельница от запоя нижний новгород капельница от запоя нижний новгород .
You have made some really good points there. I checked on the net to find out more about the issue and found most people will go along with your views on this site.
Временная регистрация в Санкт-Петербурге: Быстро и Легально!
Ищете, где оформить временную регистрацию в СПБ?
Мы гарантируем быстрое и легальное оформление без очередей и лишних документов.
Ваше спокойствие – наша забота!
Минимум усилий • Максимум удобства • Полная легальность
Свяжитесь с нами прямо сейчас!
Временная регистрация в СПБ
can you buy zithromax over the counter in australia zithromax 250 mg tablet price order zithromax without prescription
Тактичные штаны: идеальный выбор для стильных мужчин, как сочетать их с другой одеждой.
Тактичные штаны: удобство и функциональность, которые подчеркнут ваш стиль и индивидуальность.
Идеальные тактичные штаны: находка для занятых людей, который подчеркнет вашу уверенность и статус.
Сочетание стиля и практичности в тактичных штанах, которые подчеркнут вашу спортивную натуру.
Советы по выбору тактичных штанов для мужчин, чтобы подчеркнуть свою уникальность и индивидуальность.
Тактичные штаны: вечная классика мужского гардероба, которые подчеркнут ваш вкус и качество вашей одежды.
Лучший вариант для делового образа: тактичные штаны, которые подчеркнут ваш профессионализм и серьезность.
купить штани тактичні олива https://dffrgrgrgdhajshf.com.ua/ .
капельница от запоя цена капельница от запоя цена .
where can i get clomid pill: where to buy cheap clomid without prescription – can i order generic clomid without a prescription
Собственное производство металлоконструкций. Если вас интересует металлический навес к дому мы предлогаем изготовление под ключ навес на даче
Hi! I could have sworn I’ve been to this web site before but after browsing through many of the posts I realized it’s new to me. Anyways, I’m definitely pleased I discovered it and I’ll be book-marking it and checking back frequently!
поставить капельницу от запоя поставить капельницу от запоя .
Hi friends! Trust in the process of growth and change. Each challenge is a chance for development.
http://lisinoprilus.com/# cost for 40 mg lisinopril
Everything is very open with a precise clarification of the issues. It was truly informative. Your website is very helpful. Many thanks for sharing.
cytotec online cytotec pills buy online cytotec abortion pill
buy cipro: buy cipro online usa – buy generic ciprofloxacin
go88
lisinopril diuretic: lisinopril 40 mg tablet – lisinopril 15mg
вызвать капельнцу от запоя вызвать капельнцу от запоя .
сколько стоит капельница на дому от запоя сколько стоит капельница на дому от запоя .
капельница от запоя капельница от запоя .
https://ciprofloxacin.cheap/# cipro pharmacy
Hi there! I could have sworn I’ve visited this blog before but after looking at many of the articles I realized it’s new to me. Regardless, I’m certainly delighted I found it and I’ll be book-marking it and checking back often!
вывод из запоя на дому нижний новгород вывод из запоя на дому нижний новгород .
Hello amazing people! Don’t forget that you possess the capability to create uplifting change in your life. Trust in yourself and make a move.
buy zithromax 500mg online: zithromax for sale cheap – buy zithromax
Тут можно преобрести купить сейф взломостойкий сейф пожаровзломостойкие купить
buy cipro: ciprofloxacin order online – buy cipro without rx
Oh my goodness! Impressive article dude! Thank you so much, However I am experiencing troubles with your RSS. I don’t understand the reason why I cannot subscribe to it. Is there anybody else having identical RSS problems? Anybody who knows the solution will you kindly respond? Thanks!
https://clomid.store/# where can i get clomid now
капельница наркология 24 капельница наркология 24 .
order cytotec online: buy cytotec pills – buy cytotec over the counter
This is a topic that’s near to my heart… Cheers! Where can I find the contact details for questions?
cipro cipro buy cipro online usa
where to buy cheap clomid without rx: how can i get cheap clomid – clomid without rx
Good day! I just would like to give you a big thumbs up for your excellent info you have got right here on this post. I am returning to your website for more soon.
cost of generic clomid tablets: cheap clomid pills – how to get clomid without prescription
https://ciprofloxacin.cheap/# cipro pharmacy
выводу из запоя в стационаре выводу из запоя в стационаре .
лечению наркозависимости в стационаре лечению наркозависимости в стационаре .
лечению наркозависимости в стационаре лечению наркозависимости в стационаре .
поздравления на свадьбу от друзей поздравления на свадьбу от друзей .
Good blog you have here.. It’s difficult to find excellent writing like yours these days. I seriously appreciate people like you! Take care!!
If you’re here, it means you’re eager to download
your posts, and Snapinsta is here to make that process seamless for you.
buy misoprostol over the counter buy cytotec online cytotec pills buy online
Go88
lisinopril 40mg prescription cost: prescription drug prices lisinopril – lisinopril 40 mg
where to get zithromax over the counter: buy zithromax online cheap – zithromax for sale us
https://ciprofloxacin.cheap/# cipro pharmacy
Hello my family member! I wish to say that this post is amazing, nice written and include almost all vital infos. I would like to look more posts like this .
I like it when individuals come together and share thoughts. Great blog, keep it up.
how to buy generic clomid online where can i get generic clomid without prescription can you buy clomid without a prescription
cipro pharmacy: buy cipro online without prescription – buy cipro
Very good information. Lucky me I came across your website by chance (stumbleupon). I’ve book-marked it for later!
where can i buy cheap clomid without rx: where to get clomid without insurance – how to buy generic clomid no prescription
https://ciprofloxacin.cheap/# buy cipro online canada
вывод из запоя стационар вывод из запоя стационар .
вывод из запоя в стационаре вывод из запоя в стационаре .
перед выводом из запоя в стационаре перед выводом из запоя в стационаре .
вывод из запоя в наркологическом стационаре вывод из запоя в наркологическом стационаре .
After looking at a handful of the blog articles on your blog, I seriously like your way of writing a blog. I saved it to my bookmark site list and will be checking back soon. Take a look at my website too and let me know your opinion.
Предлагаем услуги профессиональных инженеров офицальной мастерской.
Еслли вы искали ремонт телевизоров samsung рядом, можете посмотреть на сайте: ремонт телевизоров samsung
Наши мастера оперативно устранят неисправности вашего устройства в сервисе или с выездом на дом!
buying lisinopril in mexico: lisinopril brand name in india – zestril 20 mg price canadian pharmacy
I needed to thank you for this fantastic read!! I definitely enjoyed every bit of it. I have got you bookmarked to look at new things you post…
buy lisinopril online no prescription india lisinopril best price website
This website was… how do you say it? Relevant!! Finally I have found something which helped me. Many thanks!
zithromax for sale usa: zithromax over the counter – zithromax online australia
https://hitclub.shiksha
https://ciprofloxacin.cheap/# buy cipro online without prescription
Very good article! We are linking to this great content on our website. Keep up the good writing.
Is your business not growing? Mine was too until I realized that there are only three things you need to really grow your business. First, you need an EMAIL LIST. Without an email list, you don’t know who your audience is or how to market to them. Then, you need THE OFFER. When you know what your audience needs, you can offer a solution. And most of the time, the biggest problem they face is TRAFFIC. Without traffic, no list, no sales. Once you have these things in place, you can grow your business, offer more products, and earn big commissions. Just imagine: growing your audience, providing traffic, and making commissions every time your customers buy again. That’s what you want, right? You’ve got to check this out — go here and let me know what you think!
Временная регистрация в СПб: Быстро и Легально!
Ищете, где оформить временную регистрацию в Санкт-Петербурге?
Мы гарантируем быстрое и легальное оформление без очередей и лишних документов.
Ваше спокойствие – наша забота!
Минимум усилий • Максимум удобства • Полная легальность
Свяжитесь с нами прямо сейчас!
Временная регистрация
Oh my goodness! Incredible article dude! Many thanks, However I am going through troubles with your RSS. I don’t know the reason why I cannot join it. Is there anyone else getting similar RSS issues? Anyone who knows the solution can you kindly respond? Thanx!
buy cytotec in usa buy cytotec pills online cheap buy cytotec online fast delivery
cost of generic zithromax: where can i buy zithromax capsules – zithromax z-pak
https://clomid.store/# can i get generic clomid without dr prescription
Hi there! I simply would like to give you a huge thumbs up for your excellent information you have right here on this post. I will be returning to your blog for more soon.
generic zithromax india zithromax over the counter azithromycin zithromax
вывод из запоя стационар вывод из запоя стационар .
вывод из запоя самара стационар вывод из запоя самара стационар .
анонимный вывод из запоя в стационаре анонимный вывод из запоя в стационаре .
вывод из запоя в стационаре анонимно вывод из запоя в стационаре анонимно .
выводу из запоя в стационаре выводу из запоя в стационаре .
I seriously love your website.. Great colors & theme. Did you create this amazing site yourself? Please reply back as I’m wanting to create my own personal website and want to learn where you got this from or just what the theme is called. Appreciate it.
cytotec abortion pill: buy misoprostol over the counter – cytotec online
I blog often and I truly thank you for your content. This article has really peaked my interest. I am going to take a note of your website and keep checking for new details about once per week. I subscribed to your Feed as well.
https://clomid.store/# where can i get generic clomid without prescription
Spot on with this write-up, I absolutely believe that this website needs a lot more attention. I’ll probably be back again to read more, thanks for the info!
http://cenforce.icu/# cenforce
Hi, I do think this is a great website. I stumbledupon it 😉 I’m going to come back once again since I book marked it. Money and freedom is the best way to change, may you be rich and continue to help other people.
cheap kamagra: Kamagra 100mg – п»їkamagra
buy rybelsus online: semaglutide best price – generic rybelsus tabs
https://drugs1st.pro/# drugs1st
http://drugs1st.pro/# drugs1st
Aw, this was an incredibly good post. Taking the time and actual effort to generate a good article… but what can I say… I procrastinate a whole lot and don’t manage to get anything done.
после капельницы от запоя на дому после капельницы от запоя на дому .
semaglutide tablets generic rybelsus tabs semaglutide best price
вывод из запоя стационар вывод из запоя стационар .
вывод из запоя в стационаре Самары вывод из запоя в стационаре Самары .
капельницу от запоя капельницу от запоя .
капельница от запоя коломна капельница от запоя коломна .
order ed pills: where can i buy ed pills – п»їed pills online
https://drugs1st.pro/# ed therapy
https://cenforce.icu/# Cenforce 100mg tablets for sale
This really answered my problem, thank you!
Thanks for some other informative blog. The place else may I get that type of info written in such a perfect method? I have a venture that I am simply now working on, and I have been at the look out for such information.
canada ed drugs: drugs1st – drugs1st
Hi friends! Remember that setbacks are just obstacles to success. Embrace challenges with courage and resilience, and watch how you grow stronger with each hurdle you overcome.
There are some attention-grabbing deadlines on this article however I don’t know if I see all of them center to heart. There may be some validity but I will take hold opinion till I look into it further. Good article , thanks and we want extra! Added to FeedBurner as properly
Hi, I do believe this is a great website. I stumbledupon it 😉 I will come back once again since i have book marked it. Money and freedom is the greatest way to change, may you be rich and continue to help other people.
https://drugs1st.pro/# drugs1st
https://semaglutidetablets.store/# semaglutide best price
cheap semaglutide pills: cheap semaglutide pills – cheap semaglutide pills
I’m amazed, I have to admit. Rarely do I come across a blog that’s equally educative and entertaining, and without a doubt, you have hit the nail on the head. The issue is something that too few people are speaking intelligently about. I am very happy I stumbled across this during my search for something relating to this.
Betflare sports odds Betflare sports odds .
капельница от запоя коломна капельница от запоя коломна .
капельницы на дому от запоя капельницы на дому от запоя .
капельница на дому от запоя капельница на дому от запоя .
https://edpills.men/# cheapest ed pills
drugs1st: online drugstore – best ed pills non prescription
Way cool! Some very valid points! I appreciate you writing this article and the rest of the website is also really good.
https://drugs1st.pro/# canadian online drugs
Предлагаем услуги профессиональных инженеров офицальной мастерской.
Еслли вы искали ремонт телевизоров hisense в москве, можете посмотреть на сайте: ремонт телевизоров hisense адреса
Наши мастера оперативно устранят неисправности вашего устройства в сервисе или с выездом на дом!
drugs1st: drugs1st – best cure for ed
http://cenforce.icu/# order cenforce
Официальная покупка аттестата о среднем образовании в Москве и других городах
rybelsus semaglutide tablets cheap semaglutide pills rybelsus semaglutide tablets
Wonderful article! We will be linking to this particularly great content on our website. Keep up the good writing.
Does your business feel like it’s at a standstill? I was in the same position until I figured out there were only 3 things I had to do to achieve success. Step 1, I needed an EMAIL LIST – honestly, your email list is the critical part of your business because unless you know who you want to serve and how to contact them (and which group ultimately desires what you have to provide), you’re really not in business. Which brings us to… THE OFFER. This is the second step to success. When you understand what your list is facing, present them with a solution that meets their need. For a lot of people, the problem they have (and a amazing problem to solve)… is getting more visitors. Website traffic is how you’re going to grow your customer base of people who want to buy your products. Without visitors, there’s no list to monetize. After you have these in place, you can start introducing other products and services that work with what your customers wants! Imagine having all this in one place. What if you could grow your email list, offer a super high converting and IN DEMAND product (…TRAFFIC)… and then make big commissions every time your clients buy more? You’ve got it. Cha-Ching! 😉 You’ve got to check this out — go here next and let me know what you think — I am so excited about it.
https://cenforce.icu/# cenforce for sale
https://drugs1st.pro/# drugs1st
semaglutide tablets for weight loss: semaglutide tablets for weight loss – semaglutide tablets store
discount prescription drugs: vitamins for ed – drugs1st
Good post! We will be linking to this great content on our site. Keep up the good writing.
I used to be able to find good information from your blog posts.
https://cenforce.icu/# order cenforce
Hi there! I simply wish to give you a huge thumbs up for the great info you have here on this post. I will be coming back to your website for more soon.
https://drugs1st.pro/# natural herbs for ed
п»їcasino: casino bonus – yatД±rД±m bonusu veren siteler
There’s definately a lot to know about this subject. I really like all of the points you made.
https://pinup2025.com/# пинап казино
slot oyunlar? puf noktalar?: en kazancl? slot oyunlar? – az parayla cok kazandiran slot oyunlar?
iwinclub
iwin
en cok kazand?ran slot oyunlar? en cok kazand?ran slot oyunlar? slot oyunlar? puf noktalar?
iwin
https://slottr.top/# slot oyunlar?
http://pinup2025.com/# пин ап казино
I’m very pleased to uncover this web site. I need to to thank you for ones time just for this fantastic read!! I definitely enjoyed every bit of it and I have you saved as a favorite to see new information on your website.
slot oyunlar?: slot oyunlar? – slot siteleri
I’m amazed, I have to admit. Seldom do I encounter a blog that’s equally educative and entertaining, and let me tell you, you have hit the nail on the head. The issue is an issue that not enough folks are speaking intelligently about. I am very happy that I stumbled across this in my hunt for something relating to this.
tГјm bet siteleri orjinal siteler yabancД± mekan isimleri
http://pinup2025.com/# пин ап вход
gГјvenilir bahis siteleri 2024: vaycasino – popГјler bahis
slot oyunlar?: slot tr online – slot oyunlar?
Hello amazing people! Seek for the silver lining in every situation. Obstacles provide possibilities for growth and evolution.
Предлагаем услуги профессиональных инженеров офицальной мастерской.
Еслли вы искали ремонт телевизоров hisense цены, можете посмотреть на сайте: ремонт телевизоров hisense адреса
Наши мастера оперативно устранят неисправности вашего устройства в сервисе или с выездом на дом!
https://casinositeleri2025.pro/# son bahis gГјncel giriЕџ
I blog often and I really appreciate your content. This article has really peaked my interest. I am going to book mark your blog and keep checking for new details about once per week. I opted in for your Feed as well.
pinup 2025 pinup 2025 пин ап вход
https://slottr.top/# az parayla cok kazandiran slot oyunlar?
Right here is the perfect website for anyone who hopes to find out about this topic. You understand a whole lot its almost tough to argue with you (not that I actually will need to…HaHa). You definitely put a fresh spin on a topic that’s been discussed for ages. Excellent stuff, just wonderful.
пин ап казино зеркало: пин ап вход – pinup2025.com
http://casinositeleri2025.pro/# canlД± casino bahis siteleri
It’s hard to find knowledgeable people about this subject, however, you seem like you know what you’re talking about! Thanks
casino bonusu veren siteler: en gГјvenilir site – para kazandД±ran sohbet siteleri
en cok kazand?ran slot oyunlar? slot tr online slot tr online
http://casinositeleri2025.pro/# internet kumar siteleri
I love it whenever people get together and share ideas. Great blog, keep it up!
pinup 2025: pinup 2025 – пин ап
http://slottr.top/# slot oyunlar? puf noktalar?
http://slottr.top/# slot siteleri
пин ап казино зеркало pinup 2025 пинап казино
пин ап: пинап казино – pinup 2025
Good post. I learn something new and challenging on sites I stumbleupon every day. It’s always useful to read content from other authors and practice a little something from other websites.
pinup 2025: пин ап вход – пин ап вход
промокод prodamus https://promokod-prod.ru .
http://slottr.top/# az parayla cok kazandiran slot oyunlar?
пин ап зеркало пин ап казино официальный сайт пин ап казино официальный сайт
поиск телефона по номеру поиск телефона по номеру .
https://pinup2025.com/# пин ап зеркало
Everything is very open with a really clear description of the issues. It was really informative. Your website is very helpful. Many thanks for sharing.
https://slottr.top/# slot oyunlar?
slot siteleri: slot tr online – en cok kazand?ran slot oyunlar?
ok88
yabancД± Еџans oyunlarД± siteleri 1xbet bonus Г§evrim ЕџartlarД± gГјvenilir casino
пин ап вход: пин ап – пин ап вход
I quite like reading a post that will make people think. Also, many thanks for allowing for me to comment.
рулонные жалюзи с электроприводом рулонные жалюзи с электроприводом .
сервис накрутки подписчиков сервис накрутки подписчиков .
vorhersage vorhersage .
автоматический карниз для штор автоматический карниз для штор .
slot tr online: en kazancl? slot oyunlar? – slot oyunlar?
Hi friends! Remember that you are a masterpiece. Embrace your flaws and value your uniqueness.
This website truly has all of the info I wanted concerning this subject and didn’t know who to ask.
http://casinositeleri2025.pro/# yeni casino siteleri
http://casinositeleri2025.pro/# casino bet giriЕџ
Howdy! I could have sworn I’ve been to this website before but after going through some of the posts I realized it’s new to me. Regardless, I’m certainly delighted I came across it and I’ll be bookmarking it and checking back frequently!
bet siteler casД±no gГјvenilir casino siteleri
I couldn’t resist commenting
Hi friends! Opt kindness as your superpower. Compassion has the capacity to change the world.
This is a really good tip especially to those fresh to the blogosphere. Short but very precise info… Thanks for sharing this one. A must read article!
Процесс получения диплома стоматолога: реально ли это сделать быстро?
http://pinup2025.com/# pinup 2025
pinup2025.com: пин ап казино официальный сайт – пин ап вход
slot tr online: slot oyunlar? puf noktalar? – az parayla cok kazandiran slot oyunlar?
Way cool! Some very valid points! I appreciate you penning this article and the rest of the site is also very good.
slot tr online slot oyunlar? en kazancl? slot oyunlar?
http://pinup2025.com/# pinup 2025
Производство ангаров и складов под ключ.
Подробная информация и заказ ангаров быстровозводимых
https://slottr.top/# slot siteleri
en cok kazand?ran slot oyunlar?: en kazancl? slot oyunlar? – slot oyunlar?
https://casinositeleri2025.pro/# 100 tl bonus veren bahis siteleri
пинап казино пин ап казино зеркало пин ап казино
пин ап зеркало: pinup 2025 – пин ап зеркало
http://casinositeleri2025.pro/# gГјncel bahis siteleri
Тут можно сейф купить в москвесейф
каталоге франшиз franshizy36.ru .
slot tr online: slot tr online – en cok kazand?ran slot oyunlar?
https://pinup2025.com/# pinup 2025
пин ап зеркало пин ап pinup 2025
http://slottr.top/# en kazancl? slot oyunlar?
I’m impressed, I must say. Seldom do I come across a blog that’s both equally educative and amusing, and let me tell you, you have hit the nail on the head. The issue is something which not enough men and women are speaking intelligently about. I’m very happy that I came across this in my hunt for something relating to this.
Betovo casin? online Betovo casin? online .
стоимость франшизы стоимость франшизы .
betovo sport betovo sport .
pinup2025.com: пин ап казино зеркало – пин ап казино зеркало
en cok kazand?ran slot oyunlar?: az parayla cok kazandiran slot oyunlar? – slot oyunlar?
https://slottr.top/# en kazancl? slot oyunlar?
en kazancl? slot oyunlar? slot oyunlar? az parayla cok kazandiran slot oyunlar?
I’m amazed, I must say. Rarely do I come across a blog that’s both equally educative and entertaining, and without a doubt, you’ve hit the nail on the head. The issue is something that too few men and women are speaking intelligently about. I’m very happy that I came across this in my search for something relating to this.
yo88club.app
http://indiapharmi.com/# buy prescription drugs from india
Enjoyed looking at this, very good stuff, appreciate it. “Shared joys make a friend, not shared sufferings.”
best india pharmacy: Best Indian pharmacy – top 10 online pharmacy in india
п»їbest mexican online pharmacies: Online pharmacy – medicine in mexico pharmacies
ed natural remedies canadian pharmi legal to buy prescription drugs without prescription
Spot on with this write-up, I actually think this web site needs a great deal more attention. I’ll probably be returning to read more, thanks for the information.
вывод из запоя на дому спб цены вывод из запоя на дому спб цены .
https://mexicanpharmi.com/# mexican border pharmacies shipping to usa
https://mexicanpharmi.com/# mexico pharmacies prescription drugs
nfvj;tyysq ,hjrth nfvj;tyysq ,hjrth .
klima deutschland beschreibung klima deutschland beschreibung .
Your style is very unique compared to other folks I have read stuff from. I appreciate you for posting when you have the opportunity, Guess I will just book mark this web site.
таможня брокер http://www.tamozhennyj-predstavitel-moskva11.ru .
I cannot thank you enough for the blog post.Really looking forward to read more. Awesome. LSAT Analytical Reasoning
открыть франшизу открыть франшизу .
https://indiapharmi.com/# reputable indian online pharmacy
ed treatments that really work: Best Canadian online pharmacy – ed medications over the counter
best online pharmacies in mexico mexicanpharmi buying prescription drugs in mexico online
bookmarked!!, I love your site.
https://canadianpharmi.com/# canadian online drugs
DESIGN, FABRICATION & INSTALLATION OF CUSTOM MADE LOUVERS!
DK Construction & Design provides comprehensive, custom solutions for louvres,
sunshades, privacy screens, awnings, and balustrades made from aluminium, glass, and steel.
Our end-to-end service covers on-site measurements, design development, detailed drawings,
engineering, fabrication, and installation.
We work closely with designers, architects, and homeowners to deliver tailored shading,
privacy, and safety solutions. Our team ensures that every project meets the highest
standards of quality and durability, with a focus on functionality and aesthetics.
Whether you’re after sleek sun control systems or secure balustrading, we’ve got
the expertise to bring your vision to life.
Tel: +61475 617 720
Сайт компании DK Construction & Design
вывод из запоя санкт петербург вывод из запоя санкт петербург .
buying prescription drugs in mexico online: Legit online Mexican pharmacy – mexico drug stores pharmacies
Aw, this was an extremely good post. Finding the time and actual effort to generate a good article… but what can I say… I put things off a lot and don’t seem to get nearly anything done.
Introducing to you the most prestigious online entertainment address today. Visit now to experience now!
http://indiapharmi.com/# п»їlegitimate online pharmacies india
сб сб .
mexico drug stores pharmacies: Legit online Mexican pharmacy – medicine in mexico pharmacies
https://indiapharmi.com/# indian pharmacy online
http://mexicanpharmi.com/# best online pharmacies in mexico
открыть франшизу открыть франшизу .
https://yeu88.casino/
вывод из запоя цены вывод из запоя цены .
https://b52.tube
Very good information. Lucky me I recently found your blog by chance (stumbleupon). I have book-marked it for later!
официальный таможенный представитель официальный таможенный представитель .
pharmacies in mexico that ship to usa: Mexican pharmacy ship to usa – buying prescription drugs in mexico online
франшизы для малого бизнеса франшизы для малого бизнеса .
http://canadianpharmi.com/# pharmacy drugs
pharmacies in mexico that ship to usa: Best online Mexican pharmacy – buying prescription drugs in mexico
https://canadianpharmi.com/# sildenafil without a doctor’s prescription
mexican drugstore online mexican pharmi buying prescription drugs in mexico online
You are so interesting! I do not suppose I’ve read through anything like that before. So great to find someone with a few original thoughts on this topic. Seriously.. many thanks for starting this up. This website is one thing that’s needed on the web, someone with some originality.
Расслабьтесь с велас ароматическими свечами, куда поставить свечи?, Как создать уникальную атмосферу в доме с помощью свечей
velas aromaticas aromas https://scentalle.com/ .
https://mexicanpharmi.com/# mexico pharmacies prescription drugs
There’s certainly a great deal to know about this issue. I love all the points you’ve made.
http://mexicanpharmi.com/# mexican mail order pharmacies
remedies for ed Canada pharmacy online erectile dysfunction pills
8live
mexican rx online: Mexican pharmacy ship to usa – mexican drugstore online
Tải Go88
https://mexicanpharmi.com/# п»їbest mexican online pharmacies
https://sun-win.fund
buy medication online: Canada Pharmacy – sexual dysfunction in men
франшиза ру франшиза ру .
вино светлое вино светлое .
Pretty! This has been a really wonderful article. Thank you for supplying this info.
http://indiapharmi.com/# indianpharmacy com
https://mexicanpharmi.com/# mexico pharmacies prescription drugs
indian pharmacies safe India pharmacy international top online pharmacy india
prescription drugs without doctor approval: Canadian pharmacy prices – medication drugs
Предлагаем услуги профессиональных инженеров офицальной мастерской.
Еслли вы искали срочный ремонт телевизоров haier, можете посмотреть на сайте: ремонт телевизоров haier сервис
Наши мастера оперативно устранят неисправности вашего устройства в сервисе или с выездом на дом!
Сколько стоит диплом высшего и среднего образования и как его получить?
светильник уличный светодиодный консольный дку light 8018 80w ip65 светильник уличный светодиодный консольный дку light 8018 80w ip65 .
кухни заказ кухни заказ .
A motivating discussion is definitely worth comment. I think that you need to write more about this subject matter, it may not be a taboo subject but usually people do not discuss these issues. To the next! All the best.
http://canadianpharmi.com/# canadian pharmacy online
Предлагаем услуги профессиональных инженеров офицальной мастерской.
Еслли вы искали ремонт телевизоров lg адреса, можете посмотреть на сайте: ремонт телевизоров lg цены
Наши мастера оперативно устранят неисправности вашего устройства в сервисе или с выездом на дом!
белое вино виноградное белое вино виноградное .
вино белое вино белое .
canada ed drugs: canadianpharmi – erection pills online
Предлагаем услуги профессиональных инженеров офицальной мастерской.
Еслли вы искали срочный ремонт телефонов xiaomi, можете посмотреть на сайте: ремонт телефонов xiaomi цены
Наши мастера оперативно устранят неисправности вашего устройства в сервисе или с выездом на дом!
https://indiapharmi.com/# world pharmacy india
pharmacies in mexico that ship to usa Mexican pharmacies that ship to the United States best online pharmacies in mexico
Pretty! This was an incredibly wonderful article. Thanks for supplying this info.
mexico pharmacies prescription drugs: Purple pharmacy online ordering – mexican drugstore online
Introducing to you the most prestigious online entertainment address today. Visit now to experience now!
белое вино белое вино .
http://prednibest.com/# average cost of prednisone
Aw, this was an incredibly nice post. Spending some time and actual effort to generate a superb article… but what can I say… I hesitate a whole lot and never seem to get anything done.
buying amoxicillin in mexico: amoxicillin 750 mg price – order amoxicillin online uk
Introducing to you the most prestigious online entertainment address today. Visit now to experience now!
https://8usgames.asia
can you buy amoxicillin over the counter: AmoxStar – price of amoxicillin without insurance
Предлагаем услуги профессиональных инженеров офицальной мастерской.
Еслли вы искали ремонт телефонов vivo сервис, можете посмотреть на сайте: ремонт телефонов vivo цены
Наши мастера оперативно устранят неисправности вашего устройства в сервисе или с выездом на дом!
order amoxicillin online no prescription Amox Star amoxicillin order online
светодиодный светильник на столб уличный 100 вт светодиодный светильник на столб уличный 100 вт .
Предлагаем услуги профессиональных инженеров офицальной мастерской.
Еслли вы искали ремонт телефонов sony цены, можете посмотреть на сайте: ремонт телефонов sony адреса
Наши мастера оперативно устранят неисправности вашего устройства в сервисе или с выездом на дом!
Предлагаем услуги профессиональных инженеров офицальной мастерской.
Еслли вы искали ремонт телефонов realme сервис, можете посмотреть на сайте: ремонт телефонов realme
Наши мастера оперативно устранят неисправности вашего устройства в сервисе или с выездом на дом!
Immerse yourself in the world of sports betting and premium online casino at LEGABET. Enjoy accurate odds predictions, live match schedules, and the latest updates on sports events.”
https://clomidonpharm.com/# can i purchase generic clomid pill
http://clomidonpharm.com/# cost generic clomid without a prescription
промокод на продамус https://www.vip.rolevaya.info/viewtopic.php?id=710 .
вызов нарколога на дом круглосуточно вызов нарколога на дом круглосуточно .
светлое вино светлое вино .
купить хорошее белое вино купить хорошее белое вино .
where to buy clomid no prescription clomid without insurance how can i get cheap clomid without prescription
https://amoxstar.com/# amoxicillin for sale
amoxicillin 250 mg price in india: AmoxStar – order amoxicillin 500mg
нарколог на дом цены нарколог на дом цены .
вызов нарколога на дом вызов нарколога на дом .
buy cipro cheap CiPharmDelivery ciprofloxacin generic
Everything is very open with a really clear explanation of the challenges. It was definitely informative. Your site is useful. Thank you for sharing!
http://clomidonpharm.com/# can i purchase clomid tablets
I’m pretty pleased to discover this web site. I need to to thank you for your time just for this wonderful read!! I definitely liked every bit of it and I have you bookmarked to check out new things on your web site.
нарколог на дом анонимно нарколог на дом анонимно .
http://prednibest.com/# generic prednisone 10mg
I couldn’t resist commenting. Perfectly written!
cipro ciprofloxacin: ci pharm delivery – buy cipro online usa
generic clomid price: clomid on pharm – can i order clomid online
нарколог на дом срочно нарколог на дом срочно .
нарколог на дом краснодар нарколог на дом краснодар .
http://clomidonpharm.com/# where can i get cheap clomid without prescription
amoxicillin 500mg capsule Amox Star amoxicillin medicine
https://amoxstar.com/# amoxicillin online canada
I’m excited to uncover this site. I wanted to thank you for ones time for this particularly fantastic read!! I definitely appreciated every part of it and I have you book-marked to look at new things in your site.
Jugabet apuestas online Jugabet apuestas online .
An outstanding share! I have just forwarded this onto a co-worker who has been conducting a little homework on this. And he actually bought me breakfast simply because I found it for him… lol. So let me reword this…. Thank YOU for the meal!! But yeah, thanx for spending time to discuss this topic here on your web page.
buy amoxicillin online without prescription: AmoxStar – price of amoxicillin without insurance
alkozona http://www.alkozona.ru .
Spot on with this write-up, I truly believe that this site needs far more attention. I’ll probably be returning to see more, thanks for the info.
https://prednibest.com/# canada buy prednisone online
can you buy generic clomid without insurance clomid on pharm clomid prices
amoxicillin 30 capsules price: AmoxStar – amoxicillin 500mg capsules antibiotic
I blog frequently and I seriously thank you for your information. This great article has really peaked my interest. I’m going to bookmark your blog and keep checking for new information about once per week. I subscribed to your RSS feed too.
Howdy! This blog post couldn’t be written much better! Reading through this post reminds me of my previous roommate! He always kept preaching about this. I am going to forward this information to him. Pretty sure he’s going to have a good read. Thank you for sharing!
стоимость поролона стоимость поролона .
сделать проект перепланировки сделать проект перепланировки .
автоматические гардины для штор автоматические гардины для штор .
Introducing to you the most prestigious online entertainment address today. Visit now to experience now!
buy cipro no rx: buy cipro online canada – ciprofloxacin 500mg buy online
Здесь можно шкаф для оружия ценаоружейные шкафы и сейфы
Hi there, I believe your blog might be having browser compatibility issues. When I look at your blog in Safari, it looks fine however when opening in I.E., it’s got some overlapping issues. I simply wanted to provide you with a quick heads up! Aside from that, great website.
https://cipharmdelivery.com/# cipro online no prescription in the usa
Предлагаем услуги профессиональных инженеров офицальной мастерской.
Еслли вы искали ремонт телефонов samsung адреса, можете посмотреть на сайте: ремонт телефонов samsung сервис
Наши мастера оперативно устранят неисправности вашего устройства в сервисе или с выездом на дом!
Предлагаем услуги профессиональных инженеров офицальной мастерской.
Еслли вы искали ремонт телефонов nothing адреса, можете посмотреть на сайте: ремонт телефонов nothing сервис
Наши мастера оперативно устранят неисправности вашего устройства в сервисе или с выездом на дом!
I read this paragraph fully concerning the difference of latest and earlier technologies, it’s awesome article.
amoxicillin 500 mg where to buy Amox Star amoxicillin 500 mg tablets
Jugabet juegos Jugabet juegos .
Получайте больше прибыли на onexbet, не выходя из дома.
onexbet – ваш путь к успеху, даже в отпуске.
Победные ставки с onexbet, оптимальные шансы на победу.
Получите эмоциональный заряд от игры на onexbet, и вы обязательно останетесь довольны.
onexbet – безопасность и конфиденциальность, неизменно остаются важнейшими.
Мечтаете о финансовом благополучии? Вам нужен onexbet, – надежный партнер на пути к успеху.
onexbet – ваш верный компаньон в мире азарта, который всегда поддерживает ваши желания и цели.
Играя на onexbet, вы становитесь ближе к своей мечте, достигайте своих целей с onexbet.
onexbet – это не просто игра, это образ жизни, которая помогает вам обогатиться.
Хотите изменить свою жизнь к лучшему? Начните с onexbet, и вы поймете, что все возможно.
onexbet – это не просто игровая платформа, это ваш шанс на успех, который вы искали.
onexbet – это идеальное место для тех, кто ищет азарт и адреналин, но при этом ценит качество и надежность.
Доступ к самым популярным играм и событиям на onexbet, все это доступно для вас.
Готовы к новым достижениям? Начните с onexbet, и ваша жизнь никогда не будет прежней.
kadorazhjv kadorazhjv .
alkozona http://alkozona.ru/ .
how can i get generic clomid without dr prescription: clomidonpharm – how to buy cheap clomid
Hello there! I could have sworn I’ve been to this website before but after browsing through a few of the articles I realized it’s new to me. Nonetheless, I’m certainly pleased I found it and I’ll be bookmarking it and checking back often!
prednisone 5084: where to buy prednisone uk – prednisone 80 mg daily
http://prednibest.com/# 10 mg prednisone
Здесь можно купить сейф для дома цена домашний сейф купить
prednisone 10 mg daily PredniBest prednisone medication
Предлагаем услуги профессиональных инженеров офицальной мастерской.
Еслли вы искали ремонт телефонов poco, можете посмотреть на сайте: ремонт телефонов poco в москве
Наши мастера оперативно устранят неисправности вашего устройства в сервисе или с выездом на дом!
Oh my goodness! Incredible article dude! Many thanks, However I am having difficulties with your RSS. I don’t understand why I am unable to subscribe to it. Is there anybody getting similar RSS issues? Anyone that knows the answer can you kindly respond? Thanks.
prodamus промокод http://vip.rolevaya.info/viewtopic.php?id=7107#p12 .
Предлагаем услуги профессиональных инженеров офицальной мастерской.
Еслли вы искали ремонт телефонов meizu в москве, можете посмотреть на сайте: ремонт телефонов meizu адреса
Наши мастера оперативно устранят неисправности вашего устройства в сервисе или с выездом на дом!
Самый популярный букмекер onexbet, заходите и выигрывайте онлайн|Успешные ставки на спорт с onexbet, ставьте деньги и получайте прибыль|Безопасные ставки с onexbet, зарабатывайте без стресса|Больше шансов на успех с onexbet, не упустите возможность удвоить свой выигрыш|Лучшие игровые автоматы на onexbet, не упустите шанс стать миллионером|Быстрые выплаты на onexbet, важны ваш комфорт и удобство|Соблюдайте законодательство с onexbet, ваша безопасность – важнее всего|Онлайн трансляции спортивных событий на onexbet, ставьте деньги и наслаждайтесь игрой|Получайте эксклюзивные предложения от onexbet, получите возможность выиграть дополнительные призы|Играйте с живыми дилерами на onexbet, ощутите атмосферу настоящего казино|Следите за результатами на onexbet, онлайн ставки на спорт с onexbet – ваш успех|Делайте выгодные прогнозы и зарабатывайте, получайте прибыль без лишних затрат|Лучшие коэффициенты и выигрыши на onexbet, играйте и побеждайте с onexbet|Ваш комфорт – наш приоритет, наши специалисты помогут вам 24/7|Сделайте ставки с комфортом и удовольствием, получайте удовольствие от азарта с onexbet|Большие джекпоты на onexbet, ставьте и получайте крупные выигрыши|Увеличьте свой доход с onexbet, новый уровень заработка|Увеличьте свои шансы на победу с onexbet, ваш выигрыш – наша главная задача|Получайте прибыль от онлайн ставок на onexbet, больше денег с onexbet|Профессиональная букмекерская контора onex
download onexbet download onexbet .
электрокарниз купить в москве электрокарниз купить в москве .
мебельный поролон цена мебельный поролон цена .
заказать проект перепланировки квартиры в москве заказать проект перепланировки квартиры в москве .
Пошаговая инструкция по официальной покупке диплома о высшем образовании
I’d like to thank you for the efforts you have put in penning this blog. I’m hoping to see the same high-grade blog posts from you in the future as well. In truth, your creative writing abilities has motivated me to get my own, personal site now 😉
http://cipharmdelivery.com/# cipro online no prescription in the usa
buying clomid without dr prescription: can you get generic clomid without insurance – can i buy generic clomid now
This web site really has all the info I needed concerning this subject and didn’t know who to ask.
ciprofloxacin buy cipro without rx ciprofloxacin generic price
анонимное общение анонимное общение .
amoxicillin 775 mg: amoxacillian without a percription – amoxicillin buy no prescription
Предлагаем услуги профессиональных инженеров офицальной мастерской.
Еслли вы искали ремонт телефонов infinix, можете посмотреть на сайте: ремонт телефонов infinix
Наши мастера оперативно устранят неисправности вашего устройства в сервисе или с выездом на дом!
Предлагаем услуги профессиональных инженеров офицальной мастерской.
Еслли вы искали ремонт телефонов honor сервис, можете посмотреть на сайте: ремонт телефонов honor сервис
Наши мастера оперативно устранят неисправности вашего устройства в сервисе или с выездом на дом!
Здесь можно сейф для дома москва купить сейф домашний
https://prednibest.com/# compare prednisone prices
Very nice article. I certainly love this site. Continue the good work!
Jugabet casino Jugabet casino .
Saved as a favorite, I like your site!
https://prednibest.com/# prednisone drug costs
amoxicillin 500 mg without a prescription: amoxicillin 500mg capsules – order amoxicillin uk
Тут можно преобрести взломостойкий сейф для дома сейф взломостойкий купить
I have to thank you for the efforts you’ve put in writing this website. I am hoping to see the same high-grade content by you later on as well. In fact, your creative writing abilities has motivated me to get my own, personal website now 😉
generic amoxicillin over the counter Amox Star cost of amoxicillin
I must thank you for the efforts you’ve put in writing this blog. I’m hoping to see the same high-grade content from you later on as well. In truth, your creative writing abilities has encouraged me to get my own, personal blog now 😉
Предлагаем услуги профессиональных инженеров офицальной мастерской.
Еслли вы искали ремонт стиральных машин zanussi адреса, можете посмотреть на сайте: ремонт стиральных машин zanussi сервис
Наши мастера оперативно устранят неисправности вашего устройства в сервисе или с выездом на дом!
Предлагаем услуги профессиональных инженеров офицальной мастерской.
Еслли вы искали ремонт телефонов huawei цены, можете посмотреть на сайте: срочный ремонт телефонов huawei
Наши мастера оперативно устранят неисправности вашего устройства в сервисе или с выездом на дом!
get cheap clomid online: clomid on pharm – can i order generic clomid online
https://cipharmdelivery.com/# ciprofloxacin mail online
Spot on with this write-up, I really think this amazing site needs much more attention. I’ll probably be returning to read through more, thanks for the information!
cipro for sale: buy cipro online – ciprofloxacin order online
generic amoxil 500 mg amoxicillin cost australia rexall pharmacy amoxicillin 500mg
что спросить в анонимном чате что спросить в анонимном чате .
Introducing to you the most prestigious online entertainment address today. Visit now to experience now!
I really like it when folks get together and share thoughts. Great blog, continue the good work!
вывод из запоя на дому краснодар цены вывод из запоя на дому краснодар цены .
Oh my goodness! Awesome article dude! Many thanks, However I am experiencing issues with your RSS. I don’t know why I am unable to join it. Is there anybody having the same RSS problems? Anybody who knows the solution will you kindly respond? Thanx!!
http://prednibest.com/# prednisone no rx
вывод из запоя на дому краснодар цены вывод из запоя на дому краснодар цены .
краснодар вывод из запоя краснодар вывод из запоя .
Way cool! Some extremely valid points! I appreciate you writing this post plus the rest of the site is extremely good.
buying prednisone: prednisone 50 mg coupon – prednisone 5mg daily
Предлагаем услуги профессиональных инженеров офицальной мастерской.
Еслли вы искали ремонт стиральных машин siemens, можете посмотреть на сайте: ремонт стиральных машин siemens сервис
Наши мастера оперативно устранят неисправности вашего устройства в сервисе или с выездом на дом!
After looking into a handful of the articles on your blog, I really appreciate your way of writing a blog. I bookmarked it to my bookmark webpage list and will be checking back soon. Take a look at my web site too and tell me what you think.
выведение из запоя на дому спб цены выведение из запоя на дому спб цены .
Hello there! I could have sworn I’ve visited this website before but after browsing through a few of the articles I realized it’s new to me. Regardless, I’m definitely pleased I came across it and I’ll be bookmarking it and checking back regularly!
Предлагаем услуги профессиональных инженеров офицальной мастерской.
Еслли вы искали ремонт стиральных машин smeg в москве, можете посмотреть на сайте: срочный ремонт стиральных машин smeg
Наши мастера оперативно устранят неисправности вашего устройства в сервисе или с выездом на дом!
You’ve made some really good points there. I looked on the net for more information about the issue and found most people will go along with your views on this web site.
http://cipharmdelivery.com/# buy ciprofloxacin
amoxicillin 500mg prescription amoxicillin cephalexin amoxicillin online pharmacy
buy cipro cheap: buy cipro online canada – buy cipro
It’s hard to find well-informed people about this subject, however, you seem like you know what you’re talking about! Thanks
вывод из запоя на дому краснодар круглосуточно вывод из запоя на дому краснодар круглосуточно .
вывод из запоя в клинике спб вывод из запоя в клинике спб .
60 mg prednisone daily: Predni Best – how much is prednisone 10 mg
вывод из запоя круглосуточно краснодар на дому вывод из запоя круглосуточно краснодар на дому .
вывод из запоя на дому краснодар круглосуточно вывод из запоя на дому краснодар круглосуточно .
Great info. Lucky me I came across your site by accident (stumbleupon). I have book-marked it for later!
http://clomidonpharm.com/# how can i get clomid price
can i buy generic clomid pills clomidonpharm can i purchase cheap clomid without a prescription
Предлагаем услуги профессиональных инженеров офицальной мастерской.
Еслли вы искали ремонт стиральных машин indesit цены, можете посмотреть на сайте: ремонт стиральных машин indesit адреса
Наши мастера оперативно устранят неисправности вашего устройства в сервисе или с выездом на дом!
Предлагаем услуги профессиональных инженеров офицальной мастерской.
Еслли вы искали ремонт стиральных машин lg рядом, можете посмотреть на сайте: ремонт стиральных машин lg сервис
Наши мастера оперативно устранят неисправности вашего устройства в сервисе или с выездом на дом!
Good site you’ve got here.. It’s hard to find quality writing like yours nowadays. I truly appreciate people like you! Take care!!
prednisone online pharmacy: prednisone capsules – how to purchase prednisone online
This is a very good tip especially to those fresh to the blogosphere. Brief but very precise information… Many thanks for sharing this one. A must read article.
Your style is very unique in comparison to other people I’ve read stuff from. I appreciate you for posting when you’ve got the opportunity, Guess I will just book mark this blog.
выведение из запоя на дому спб цены выведение из запоя на дому спб цены .
Way cool! Some very valid points! I appreciate you penning this write-up and also the rest of the website is also really good.
https://cipharmdelivery.com/# buy cipro online
buy prednisone from canada 50 mg prednisone from canada prednisone steroids
Hi there! This blog post couldn’t be written any better! Looking at this article reminds me of my previous roommate! He continually kept preaching about this. I’ll send this information to him. Fairly certain he’ll have a great read. I appreciate you for sharing!
ciprofloxacin order online: buy cipro online usa – п»їcipro generic
Предлагаем услуги профессиональных инженеров офицальной мастерской.
Еслли вы искали ремонт стиральных машин kuppersbusch цены, можете посмотреть на сайте: ремонт стиральных машин kuppersbusch адреса
Наши мастера оперативно устранят неисправности вашего устройства в сервисе или с выездом на дом!
промокод prodamus промокод prodamus .
2.5 mg prednisone daily: PredniBest – prednisone 60 mg price
Nice post. I learn something new and challenging on blogs I stumbleupon on a daily basis. It will always be helpful to read articles from other authors and use something from their websites.
This blog was… how do I say it? Relevant!! Finally I’ve found something that helped me. Appreciate it!
Легальная покупка диплома ВУЗа с сокращенной программой обучения
выведение из запоя на дому спб цены выведение из запоя на дому спб цены .
выведение из запоя санкт петербург выведение из запоя санкт петербург .
вывод из запоя в спб вывод из запоя в спб .
вывод из запоя на дому в спб вывод из запоя на дому в спб .
Howdy! I could have sworn I’ve visited your blog before but after looking at some of the articles I realized it’s new to me. Anyways, I’m certainly pleased I stumbled upon it and I’ll be bookmarking it and checking back often!
http://cipharmdelivery.com/# where can i buy cipro online
Oh my goodness! Amazing article dude! Thank you, However I am going through difficulties with your RSS. I don’t understand the reason why I can’t join it. Is there anyone else getting similar RSS problems? Anybody who knows the solution will you kindly respond? Thanks.
Предлагаем услуги профессиональных инженеров офицальной мастерской.
Еслли вы искали ремонт приставок xbox сервис, можете посмотреть на сайте: срочный ремонт приставок xbox
Наши мастера оперативно устранят неисправности вашего устройства в сервисе или с выездом на дом!
Предлагаем услуги профессиональных инженеров офицальной мастерской.
Еслли вы искали ремонт стиральных машин aeg, можете посмотреть на сайте: ремонт стиральных машин aeg цены
Наши мастера оперативно устранят неисправности вашего устройства в сервисе или с выездом на дом!
where can i get clomid tablets: clomid on pharm – how to get clomid without insurance
Hi, I do think this is an excellent blog. I stumbledupon it 😉 I will return once again since i have book marked it. Money and freedom is the best way to change, may you be rich and continue to guide others.
This website definitely has all of the information I wanted about this subject and didn’t know who to ask.
After looking at a few of the blog posts on your site, I really appreciate your technique of writing a blog. I book-marked it to my bookmark website list and will be checking back in the near future. Take a look at my web site as well and let me know your opinion.
I really love your website.. Excellent colors & theme. Did you build this website yourself? Please reply back as I’m looking to create my very own site and would like to know where you got this from or what the theme is called. Thank you!
выведение из запоя на дому спб выведение из запоя на дому спб .
выведение из запоя спб выведение из запоя спб .
вывод из запоя санкт петербург вывод из запоя санкт петербург .
This is a topic which is near to my heart… Cheers! Where can I find the contact details for questions?
Предлагаем услуги профессиональных инженеров офицальной мастерской.
Еслли вы искали ремонт посудомоечных машин siemens сервис, можете посмотреть на сайте: ремонт посудомоечных машин siemens цены
Наши мастера оперативно устранят неисправности вашего устройства в сервисе или с выездом на дом!
Предлагаем услуги профессиональных инженеров офицальной мастерской.
Еслли вы искали ремонт приставок sony playstation в москве, можете посмотреть на сайте: ремонт приставок sony playstation адреса
Наши мастера оперативно устранят неисправности вашего устройства в сервисе или с выездом на дом!
Oh my goodness! Awesome article dude! Thanks, However I am encountering difficulties with your RSS. I don’t know why I can’t subscribe to it. Is there anyone else having identical RSS problems? Anyone that knows the solution will you kindly respond? Thanks.
снятие ломки на дому снятие ломки на дому .
I’m very happy to uncover this website. I wanted to thank you for ones time for this fantastic read!! I definitely appreciated every part of it and i also have you bookmarked to see new things in your blog.
снятие ломки на дому цена снятие ломки на дому цена .
Your style is so unique in comparison to other people I have read stuff from. Many thanks for posting when you’ve got the opportunity, Guess I will just bookmark this blog.
Great article! We are linking to this great article on our site. Keep up the good writing.
After I originally left a comment I seem to have clicked on the -Notify me when new comments are added- checkbox and from now on every time a comment is added I recieve 4 emails with the exact same comment. Perhaps there is an easy method you are able to remove me from that service? Thank you.
Предлагаем услуги профессиональных инженеров офицальной мастерской.
Еслли вы искали срочный ремонт посудомоечных машин miele, можете посмотреть на сайте: ремонт посудомоечных машин miele
Наши мастера оперативно устранят неисправности вашего устройства в сервисе или с выездом на дом!
Предлагаем услуги профессиональных инженеров офицальной мастерской.
Еслли вы искали ремонт стиральных машин dexp цены, можете посмотреть на сайте: ремонт стиральных машин dexp адреса
Наши мастера оперативно устранят неисправности вашего устройства в сервисе или с выездом на дом!
Pretty! This has been an extremely wonderful article. Thank you for supplying this info.
осушитель воздуха для компрессоров осушитель воздуха для компрессоров .
Spot on with this write-up, I seriously believe this web site needs far more attention. I’ll probably be returning to read more, thanks for the info.
снятие ломки цены снятие ломки цены .
снять ломку наркомана [url=www.aktivnoe.forum24.ru/?1-7-0-00012854-000-0-0-1730832702/]снять ломку наркомана[/url] .
Howdy! I just wish to offer you a huge thumbs up for the great information you have got here on this post. I am coming back to your web site for more soon.
снятие ломки в стационаре снятие ломки в стационаре .
This is a really good tip especially to those new to the blogosphere. Simple but very precise info… Many thanks for sharing this one. A must read article!
Your style is so unique in comparison to other people I’ve read stuff from. I appreciate you for posting when you have the opportunity, Guess I’ll just bookmark this blog.
Excellent post. I certainly love this website. Stick with it!
снятие ломок на дому снятие ломок на дому .
You’ve made some good points there. I looked on the web for more information about the issue and found most people will go along with your views on this website.
Wonderful article! We will be linking to this particularly great post
on our site. Keep up the good writing.
Spot on with this write-up, I honestly believe that this site needs far more attention. I’ll probably be returning to read more, thanks for the information.
A motivating discussion is worth comment. I do believe that you need to write more on this subject matter, it may not be a taboo subject but generally people do not talk about these issues. To the next! Many thanks!
Having read this I believed it was rather informative. I appreciate you finding the time and energy to put this information together. I once again find myself spending way too much time both reading and leaving comments. But so what, it was still worthwhile!
remez air осушитель воздуха remez air осушитель воздуха .
Предлагаем услуги профессиональных инженеров офицальной мастерской.
Еслли вы искали ремонт посудомоечных машин beko рядом, можете посмотреть на сайте: ремонт посудомоечных машин beko в москве
Наши мастера оперативно устранят неисправности вашего устройства в сервисе или с выездом на дом!
Предлагаем услуги профессиональных инженеров офицальной мастерской.
Еслли вы искали ремонт посудомоечных машин midea, можете посмотреть на сайте: ремонт посудомоечных машин midea цены
Наши мастера оперативно устранят неисправности вашего устройства в сервисе или с выездом на дом!
Greetings, I do think your blog might be having web browser compatibility problems. When I look at your website in Safari, it looks fine however when opening in I.E., it’s got some overlapping issues. I simply wanted to provide you with a quick heads up! Aside from that, wonderful site!
снятие наркотической ломки снятие наркотической ломки .
снятие ломки клинике снятие ломки клинике .
дом интернат в симферополе дом интернат в симферополе .
A fascinating discussion is definitely worth comment. I think that you need to publish more about this topic, it may not be a taboo matter but generally people do not discuss such subjects. To the next! Best wishes.
Не все «подсаживаются» на гелевую подводку и испытывают вау-эффект от увиденного результата. Без этого элемента макияжа кто знает, сводила ли бы с ума их внешность. Но одно ясно точно – пример этих роковых красоток точно вдохновляет купить подводку для глаз в интернет-магазине Aura-Shop Cosmetics. Мы предлагаем только профессиональную продукцию, которой успешно пользуются визажисты во всем мире: стойкие, гипоаллергенные подводки с насыщенным пигментом и качественными кисточками в комплекте. Макияж для бровей иногда является одним из самых главных элементов визажа, т.к. светлые брови не все.. Классическая косметика этого турецкого бренда способна удовлетворить пожелания самых стильных и искушенных модниц. Средство имеет приятную гелеобразную консистенцию и формирует четкий контур макияжа. Благодаря эргономичной, миниатюрной двухсторонней кисти состав легко распределяется, при этом варьируется интенсивность и толщина рисуемых стрелок.
https://wiki-room.win/index.php?title=Ручной_массажер_для_лица_отзывы
Все нефритовые роллеры разделяются на те, которыми работают в области лица и декольте, а также есть более крупные варианты для тела и головы. Миниатюрные модели предназначены для нежной дермы век. Давно известно, что природные самоцветы благоприятно влияют на здоровье и внешность человека. Для снятия отечности лица, омоложения кожи, выравнивания морщин, расслабления мышц и повышения тургора кожи необходим нефритовый массажер. Так ли он эффективен, как заявляют косметологи? Какие положительные свойства имеет и как эксплуатировать новинку из Китая правильно для достижения максимального эффекта?
промокод продамус на 5000 промокод продамус на 5000 .
снятие наркотической ломки снятие наркотической ломки .
Hello there! This blog post couldn’t be written any better! Going through this article reminds me of my previous roommate! He constantly kept preaching about this. I most certainly will send this article to him. Pretty sure he will have a very good read. Many thanks for sharing!
Предлагаем услуги профессиональных инженеров офицальной мастерской.
Еслли вы искали ремонт посудомоечных машин hotpoint ariston, можете посмотреть на сайте: ремонт посудомоечных машин hotpoint ariston рядом
Наши мастера оперативно устранят неисправности вашего устройства в сервисе или с выездом на дом!
Предлагаем услуги профессиональных инженеров офицальной мастерской.
Еслли вы искали ремонт посудомоечных машин aeg цены, можете посмотреть на сайте: ремонт посудомоечных машин aeg адреса
Наши мастера оперативно устранят неисправности вашего устройства в сервисе или с выездом на дом!
снятие ломки на дому цена снятие ломки на дому цена .
Разбавленные Разбавленные .
снятие ломки на дому [url=https://www.rolandus.org/forum/viewtopic.php?p=106505/]снятие ломки на дому[/url] .
пансионат для пожилых в крыму [url=xn—–2-53dwibb3a5adehvkaijkcgoft4dwa1orb.xn--p1ai]пансионат для пожилых в крыму[/url] .
Aw, this was an exceptionally good post. Taking a few minutes and actual effort to produce a superb article… but what can I say… I put things off a whole lot and never manage to get nearly anything done.
Hi there! This article couldn’t be written much better! Reading through this post reminds me of my previous roommate! He constantly kept preaching about this. I’ll send this information to him. Pretty sure he’s going to have a great read. Thanks for sharing!
Excellent post! We will be linking to this particularly great content on our website. Keep up the good writing.
The next time I read a blog, Hopefully it doesn’t disappoint me as much as this particular one. I mean, Yes, it was my choice to read, but I actually thought you would probably have something interesting to say. All I hear is a bunch of moaning about something you could possibly fix if you weren’t too busy searching for attention.
myspace.com http://maps.google.ae/url?q=renitdaniel.com/members/animaltiger58/activity/99272/ .
http://gramster.ru/# пин ап зеркало
Hello there, You’ve done a great job. I will definitely digg it and personally suggest sex my friends. I am sure they’ll be benefited from this site.
снять ломку наркомана снять ломку наркомана .
Hello there! I just wish to offer you a big thumbs up for the excellent information you’ve got right here on this post. I will be returning to your web site for more soon.
пин ап казино официальный сайт gramster пин ап зеркало
снятие ломки у наркомана снятие ломки у наркомана .
пин ап: gramster – пин ап казино официальный сайт
http://gramster.ru/# пин ап вход
https://gramster.ru/# пин ап зеркало
bookmarked!!, I really like your web site!
http://gramster.ru/# pinup 2025
myspace.com http://www.gay-weber-2.thoughtlanes.net/pornography-as-a-tool-for-overcoming-sexual-dysfunction-and-dissatisfaction-1734068315 .
http://gramster.ru/# pinup 2025
https://gramster.ru/# пин ап казино
пин ап вход: gramster.ru – pinup 2025
https://gramster.ru/# gramster.ru
myspace.com https://.9.adl@Forum.annecy-outdoor.com/suivi_forum/?a%5B%5D=%3Ca+href%3Dhttps%3A%2F%2Fmilsaver.com%2Fmembers%2Fquiethealth12%2Factivity%2F913842%2F%3Exxxc+-+xxxbp.tv%3C%2Fa%3E%3Cmeta+http-equiv%3Drefresh+content%3D0%3Burl%3Dhttps%3A%2F%2Ffinnzqgxm.topbloghub.com%2F38080653%2Fhow-porn-can-enhance-sexual-pleasure-for-couples+%2F%3E .
http://gramster.ru/# gramster.ru
Hi would you mind stating which blog platform you’re using?
I’m looking to start my own blog in the near future but
I’m having a hard time selecting between BlogEngine/Wordpress/B2evolution and Drupal.
The reason I ask is because your design and style seems
different then most blogs and I’m looking for something completely unique.
P.S Apologies for getting off-topic but I had to ask!
http://gramster.ru/# пин ап казино зеркало
пин ап вход: Gramster – пин ап казино
снятие ломки на дому цена снятие ломки на дому цена .
https://gramster.ru/# pinup 2025
промокоды изи дроп 100 процентов промокоды изи дроп 100 процентов .
промокод на easydrop промокод на easydrop .
промокод easy drop промокод easy drop .
пин ап зеркало [url=https://gramster.ru/#]Gramster[/url] пин ап зеркало
pinup 2025: gramster – пин ап казино
изи дроп промокод изи дроп промокод .
https://gramster.ru/# pinup 2025
http://gramster.ru/# pinup 2025
Everyone loves it when individuals come together and share opinions. Great blog, keep it up!
вывод из запоя на дому ростов цены вывод из запоя на дому ростов цены .
http://gramster.ru/# пин ап казино
пин ап казино: gramster.ru – пин ап зеркало
клиника вывод из запоя ростов клиника вывод из запоя ростов .
вывод из запоя ростовская область вывод из запоя ростовская область .
срочный вывод из запоя ростов срочный вывод из запоя ростов .
This website definitely has all of the info I wanted about this subject and didn’t know who to ask.
осушители воздуха промышленные для компрессора осушители воздуха промышленные для компрессора .
Как выбрать коляску 3 в 1: советы и рекомендации, которые обязательно пригодятся.
Идеальные коляски 3 в 1 для современных родителей, с широким функционалом и стильным дизайном.
Гид по выбору коляски 3 в 1, которые помогут вам сделать правильный выбор.
Секреты удачного выбора коляски 3 в 1, для максимального удобства вашего малыша.
Плюсы и минусы популярных моделей колясок 3 в 1, чтобы сделать обдуманный выбор.
купить коляску детскую купить коляску детскую .
http://gramster.ru/# пин ап казино зеркало
I was able to find good info from your blog posts.
https://gramster.ru/# пин ап казино зеркало
That is a really good tip particularly to those fresh to the blogosphere. Brief but very precise information… Thanks for sharing this one. A must read article.
вывод из запоя ростовская область вывод из запоя ростовская область .
http://gramster.ru/# pinup 2025
пин ап казино зеркало: gramster.ru – пин ап казино официальный сайт
An intriguing discussion is definitely worth comment. I do believe that you need to publish more about this subject, it may not be a taboo matter but usually people do not talk about such issues. To the next! Cheers.
https://gramster.ru/# пин ап казино официальный сайт
вывод из запоя цена ростов вывод из запоя цена ростов .
This is the right webpage for anybody who wishes to find out about this topic. You understand a whole lot its almost hard to argue with you (not that I really will need to…HaHa). You definitely put a new spin on a topic that’s been written about for years. Great stuff, just wonderful.
Эксклюзивные букеты роз уже ждут вас, порадуйте себя или близких.
Оформите заказ на букеты роз прямо сейчас, широкий выбор цветов и дизайнов.
Уникальные букеты роз от лучших флористов, оперативная доставка в любую точку.
Изысканные букеты роз от профессионалов, доставка в день заказа.
Изысканные композиции из роз, подарите частичку красоты близким.
Насладитесь красотой и свежестью цветов, круглосуточный сервис для вас.
Элегантные композиции из роз, доставка в удобное для вас время.
Выберите свой идеальный букет роз, удобные способы оплаты.
Красочные композиции из роз разных сортов, поможем выбрать идеальный вариант.
Утонченные композиции из роз, приятные цены и гарантированное качество.
Букеты роз – это всегда актуальный подарок, и мы доставим его к вашему порогу.
Прекрасные букеты роз для ваших близких, сделайте день особенным.
доставка цветов доставка цветов .
пин ап вход gramster.ru пин ап казино
вывод. из. запоя. анонимно. ростов. http://www.vyvod-iz-zapoya-rostov27.ru/ .
I could not refrain from commenting. Exceptionally well written!
http://gramster.ru/# пин ап казино официальный сайт
https://gramster.ru/# пин ап вход
gramster.ru: gramster – пин ап казино
You are so cool! I don’t suppose I have read something like this before. So great to discover somebody with unique thoughts on this subject. Seriously.. many thanks for starting this up. This web site is something that is required on the internet, someone with a bit of originality.
вывод из запоя на дому в ростове вывод из запоя на дому в ростове .
мини снегоход рыбак 2м snegohod-kupit.ru .
https://gramster.ru/# пин ап казино
http://gramster.ru/# pinup 2025
вывод из запоя стационар ростов вывод из запоя стационар ростов .
Предлагаем услуги профессиональных инженеров офицальной мастерской.
Еслли вы искали ремонт ноутбуков sony сервис, можете посмотреть на сайте: ремонт ноутбуков sony адреса
Наши мастера оперативно устранят неисправности вашего устройства в сервисе или с выездом на дом!
пинап казино gramster.ru пин ап зеркало
отели нижнего новгорода в центре города отели нижнего новгорода в центре города .
http://gramster.ru/# gramster.ru
http://gramster.ru/# pinup 2025
купить диплом в кургане
Hi there! I could have sworn I’ve visited this site before but after looking at some of the articles I realized it’s new to me. Nonetheless, I’m definitely delighted I stumbled upon it and I’ll be book-marking it and checking back frequently.
pinup 2025: gramster.ru – пин ап казино
This web site certainly has all of the information I needed about this subject and didn’t know who to ask.
sf150l снегоход irbis sf150l снегоход irbis .
вывод из запоя на дому ростов круглосуточно вывод из запоя на дому ростов круглосуточно .
After checking out a number of the articles on your web site, I seriously like your way of writing a blog. I added it to my bookmark webpage list and will be checking back soon. Take a look at my web site as well and let me know your opinion.
https://gramster.ru/# пин ап казино
https://gramster.ru/# пинап казино
I must thank you for the efforts you have put in penning this site. I really hope to see the same high-grade content by you in the future as well. In truth, your creative writing abilities has encouraged me to get my own, personal blog now 😉
https://gramster.ru/# пин ап казино зеркало
I’m impressed, I must say. Seldom do I encounter a blog that’s both educative and engaging, and without a doubt, you’ve hit the nail on the head. The problem is something not enough folks are speaking intelligently about. I’m very happy that I stumbled across this during my search for something regarding this.
отели нижнего новгорода в центре города отели нижнего новгорода в центре города .
пин ап казино зеркало gramster.ru пин ап казино
пин ап: gramster.ru – pinup 2025
http://gramster.ru/# пинап казино
I’d like to thank you for the efforts you have put in penning this site. I really hope to view the same high-grade content from you later on as well. In truth, your creative writing abilities has motivated me to get my own website now 😉
https://gramster.ru/# пин ап
https://gramster.ru/# пин ап вход
http://gramster.ru/# пинап казино
частный нарколог на дом частный нарколог на дом .
вызов нарколога на дом круглосуточно вызов нарколога на дом круглосуточно .
пин ап вход: gramster.ru – pinup 2025
нарколог на дом нарколог на дом .
вызов нарколога на дом вызов нарколога на дом .
нарколог на дом цены нарколог на дом цены .
You made some decent points there. I looked on the internet for additional information about the issue and found most individuals will go along with your views on this website.
http://gramster.ru/# пин ап вход
pinup 2025 Gramster пин ап казино официальный сайт
https://gramster.ru/# gramster.ru
Предлагаем услуги профессиональных инженеров офицальной мастерской.
Еслли вы искали срочный ремонт ноутбуков msi, можете посмотреть на сайте: ремонт ноутбуков msi рядом
Наши мастера оперативно устранят неисправности вашего устройства в сервисе или с выездом на дом!
https://gramster.ru/# pinup 2025
This post is priceless. How can I find out more?
https://gramster.ru/# pinup 2025
пинап казино: Gramster – пинап казино
нарколог на дом срочно нарколог на дом срочно .
Предлагаем услуги профессиональных инженеров офицальной мастерской.
Еслли вы искали ремонт ноутбуков lenovo, можете посмотреть на сайте: ремонт ноутбуков lenovo
Наши мастера оперативно устранят неисправности вашего устройства в сервисе или с выездом на дом!
Предлагаем услуги профессиональных инженеров офицальной мастерской.
Еслли вы искали ремонт ноутбуков msi в москве, можете посмотреть на сайте: ремонт ноутбуков msi
Наши мастера оперативно устранят неисправности вашего устройства в сервисе или с выездом на дом!
нарколог на дом цены нарколог на дом цены .
врач нарколог на дом врач нарколог на дом .
https://gramster.ru/# пин ап
http://gramster.ru/# пин ап казино
пинап казино gramster пин ап казино зеркало
https://indianpharmacy.win/# indian pharmacy
нарколог краснодар нарколог краснодар .
http://mexicanpharmacy.store/# buying prescription drugs in mexico online
выезд нарколога на дом выезд нарколога на дом .
п»їbest mexican online pharmacies: mexico pharmacies prescription drugs – buying prescription drugs in mexico
программы фирмы 1с программы фирмы 1с .
http://indianpharmacy.win/# п»їlegitimate online pharmacies india
Предлагаем услуги профессиональных инженеров офицальной мастерской.
Еслли вы искали ремонт ноутбуков toshiba адреса, можете посмотреть на сайте: ремонт ноутбуков toshiba адреса
Наши мастера оперативно устранят неисправности вашего устройства в сервисе или с выездом на дом!
нарколог на дом нарколог на дом .
Предлагаем услуги профессиональных инженеров офицальной мастерской.
Еслли вы искали ремонт ноутбуков fujitsu siemens адреса, можете посмотреть на сайте: ремонт ноутбуков fujitsu siemens цены
Наши мастера оперативно устранят неисправности вашего устройства в сервисе или с выездом на дом!
I was able to find good information from your articles.
Предлагаем услуги профессиональных инженеров офицальной мастерской.
Еслли вы искали ремонт ноутбуков toshiba в москве, можете посмотреть на сайте: срочный ремонт ноутбуков toshiba
Наши мастера оперативно устранят неисправности вашего устройства в сервисе или с выездом на дом!
http://canadianpharmacy.win/# best canadian online pharmacy
платный нарколог на дом платный нарколог на дом .
http://mexicanpharmacy.store/# reputable mexican pharmacies online
Предлагаем услуги профессиональных инженеров офицальной мастерской.
Еслли вы искали ремонт ноутбуков fujitsu siemens, можете посмотреть на сайте: ремонт ноутбуков fujitsu siemens цены
Наши мастера оперативно устранят неисправности вашего устройства в сервисе или с выездом на дом!
top 10 online pharmacy in india reputable indian online pharmacy indian pharmacy online
вызов нарколога на дом круглосуточно вызов нарколога на дом круглосуточно .
I like it whenever people get together and share ideas. Great website, keep it up!
top 10 pharmacies in india: buy prescription drugs from india – pharmacy website india
http://indianpharmacy.win/# online shopping pharmacy india
вывод из запоя анонимно краснодар вывод из запоя анонимно краснодар .
https://indianpharmacy.win/# reputable indian pharmacies
Hi, I do believe this is an excellent blog. I stumbledupon it 😉 I am going to revisit once again since I book-marked it. Money and freedom is the best way to change, may you be rich and continue to guide other people.
http://indianpharmacy.win/# cheapest online pharmacy india
https://mexicanpharmacy.store/# mexican pharmaceuticals online
Great post! We will be linking to this particularly great post on our website. Keep up the great writing.
купить 1с купить 1с .
online pharmacy india: top online pharmacy india – india online pharmacy
https://mexicanpharmacy.store/# best online pharmacies in mexico
нарколог на дом круглосуточно нарколог на дом круглосуточно .
buying prescription drugs in mexico mexican mail order pharmacies medicine in mexico pharmacies
You’re so awesome! I do not suppose I have read through something like this before. So great to find somebody with genuine thoughts on this subject. Really.. many thanks for starting this up. This web site is something that’s needed on the web, someone with a bit of originality.
вызов нарколога на дом круглосуточно вызов нарколога на дом круглосуточно .
Right here is the perfect web site for anybody who really wants to find out about this topic. You understand a whole lot its almost hard to argue with you (not that I actually would want to…HaHa). You definitely put a new spin on a topic which has been written about for ages. Excellent stuff, just wonderful.
https://mexicanpharmacy.store/# best online pharmacies in mexico
https://mexicanpharmacy.store/# mexican online pharmacies prescription drugs
врач нарколог на дом платный врач нарколог на дом платный .
There is certainly a lot to learn about this subject. I love all the points you made.
вывод из запоя кодирование краснодар вывод из запоя кодирование краснодар .
https://indianpharmacy.win/# india pharmacy
reputable mexican pharmacies online: mexican mail order pharmacies – buying prescription drugs in mexico
принудительный вывод из запоя краснодар принудительный вывод из запоя краснодар .
https://canadianpharmacy.win/# canadian pharmacy ltd
вывод из запоя с выездом краснодар вывод из запоя с выездом краснодар .
I’d like to thank you for the efforts you’ve put in penning this website. I’m hoping to check out the same high-grade content from you later on as well. In fact, your creative writing abilities has encouraged me to get my very own blog now 😉
срочная помощь вывод из запоя краснодар срочная помощь вывод из запоя краснодар .
https://indianpharmacy.win/# india pharmacy mail order
reputable indian online pharmacy best india pharmacy best india pharmacy
https://indianpharmacy.win/# india pharmacy mail order
This is a very good tip particularly to those new to the blogosphere. Simple but very accurate information… Thanks for sharing this one. A must read article.
http://canadianpharmacy.win/# pharmacy rx world canada
canadian drugs pharmacy: canadian pharmacy win – canadian pharmacy 365
вывод из запоя круглосуточно https://vyvod-iz-zapoya-krasnodar112.ru/ .
BOM86 là cổng game đổi thưởng đẳng cấp nhất hiện nay. Tại đây mọi người sẽ được trải nghiệm các game cá cược hấp dẫn như casino online , game bài và bắn cá.
That is a good tip especially to those fresh to the blogosphere. Brief but very precise information… Appreciate your sharing this one. A must read post.
алкоголизм вывод из запоя краснодар алкоголизм вывод из запоя краснодар .
https://indianpharmacy.win/# reputable indian pharmacies
вывод из запоя краснодар вывод из запоя краснодар .
I’m very pleased to uncover this web site. I want to to thank you for ones time just for this wonderful read!! I definitely loved every little bit of it and i also have you saved as a favorite to look at new information in your website.
нарколог вывод из запоя краснодар нарколог вывод из запоя краснодар .
вывод из запоя на дому в краснодаре вывод из запоя на дому в краснодаре .
https://indianpharmacy.win/# indian pharmacy online
Good post. I learn something new and challenging on sites I stumbleupon every day. It’s always interesting to read content from other writers and practice something from their web sites.
вывод из запоя кодирование краснодар вывод из запоя кодирование краснодар .
http://mexicanpharmacy.store/# mexico pharmacies prescription drugs
http://indianpharmacy.win/# online shopping pharmacy india
top 10 online pharmacy in india: indian pharmacy – buy prescription drugs from india
best online pharmacies in mexico mexican drugstore online buying prescription drugs in mexico online
A motivating discussion is definitely worth comment. I believe that you ought to publish more on this subject, it might not be a taboo subject but typically people don’t discuss these issues. To the next! Cheers!
вывод из запоя бесплатно вывод из запоя бесплатно .
нарколог на дом вывод из запоя краснодар нарколог на дом вывод из запоя краснодар .
https://mexicanpharmacy.store/# mexican online pharmacies prescription drugs
http://canadianpharmacy.win/# 77 canadian pharmacy
вывод из запоя ростов-на-дону вывод из запоя ростов-на-дону .
This page definitely has all the info I needed concerning this subject and didn’t know who to ask.
http://canadianpharmacy.win/# canadian drug prices
п»їlegitimate online pharmacies india: world pharmacy india – cheapest online pharmacy india
http://indianpharmacy.win/# indian pharmacies safe
принудительный вывод из запоя краснодар принудительный вывод из запоя краснодар .
I absolutely love your website.. Excellent colors & theme. Did you make this amazing site yourself? Please reply back as I’m trying to create my very own website and want to find out where you got this from or what the theme is named. Appreciate it.
вывод из запоя краснодар вывод из запоя краснодар .
medicine in mexico pharmacies medication from mexico pharmacy medication from mexico pharmacy
http://canadianpharmacy.win/# canadian pharmacy online
I was very pleased to uncover this web site. I want to to thank you for ones time for this particularly wonderful read!! I definitely really liked every part of it and i also have you book marked to see new things in your website.
вывод из запоя стационар краснодар вывод из запоя стационар краснодар .
http://canadianpharmacy.win/# canadian drugs pharmacy
http://mexicanpharmacy.store/# buying prescription drugs in mexico
I am glad to be one of several visitors on this outstanding web site (:, thanks for posting.
pharmacies in mexico that ship to usa: mexican online pharmacies prescription drugs – mexican online pharmacies prescription drugs
Oh my goodness! Impressive article dude! Many thanks, However I am going through difficulties with your RSS. I don’t understand why I can’t subscribe to it. Is there anybody getting similar RSS issues? Anyone that knows the solution will you kindly respond? Thanks!!
нарколог вывод из запоя ростов нарколог вывод из запоя ростов .
вывод из запоя ростов на дону вывод из запоя ростов на дону .
вывод из запоя вывод из запоя .
http://canadianpharmacy.win/# canada pharmacy 24h
https://indianpharmacy.win/# indian pharmacy paypal
It’s nearly impossible to find well-informed people in this particular topic, however, you sound like you know what you’re talking about! Thanks
вывод из запоя на дому ростов-на-дону вывод из запоя на дому ростов-на-дону .
вывод из запоя на дому в ростове вывод из запоя на дому в ростове .
https://mexicanpharmacy.store/# buying from online mexican pharmacy
п»їbest mexican online pharmacies buying prescription drugs in mexico online best online pharmacies in mexico
Spot on with this write-up, I seriously believe that this amazing site needs a lot more attention. I’ll probably be back again to read through more, thanks for the info!
indianpharmacy com: pharmacy website india – best india pharmacy
http://mexicanpharmacy.store/# purple pharmacy mexico price list
вывод из запоя на дому в ростове вывод из запоя на дому в ростове .
You are so cool! I do not believe I have read a single thing like that before. So great to find somebody with a few original thoughts on this topic. Really.. thank you for starting this up. This site is one thing that is required on the internet, someone with some originality.
https://canadianpharmacy.win/# canada discount pharmacy
“Hello very nice web site!! Man .. Excellent .. Amazing .. I will bookmark your web site and take the feeds also…I am glad to search out numerous helpful information right here within the post, we’d like work out more techniques in this regard, thank you for sharing.”
http://indianpharmacy.win/# indian pharmacy online
Hello there! I could have sworn I’ve visited this website before but after browsing through a few of the posts I realized it’s new to me. Regardless, I’m certainly pleased I stumbled upon it and I’ll be bookmarking it and checking back often!
https://canadianpharmacy.win/# canada pharmacy reviews
вывод из запоя на дому ростов-на-дону вывод из запоя на дому ростов-на-дону .
купить диплом о высшем образовании дешево
indian pharmacies safe: reputable indian online pharmacy – reputable indian online pharmacy
sport-weekend.com https://mvkursk.ru/technologies/elektronnye-prohodnye-sovremennye-resheniya-dlya-organizaczii-kontrolya-dostupa.html/ .
нарколог на дом вывод из запоя на дому нарколог на дом вывод из запоя на дому .
Great article. I will be facing many of these issues as well..
clockchok.ru https://zastroykaplus.ru/novosti/65729-kak-terminal-perco-cr11k-obespechivaet-tochnyy-i-udobnyy-uchet-rabochego-vremeni.html/ .
canadian pharmacy store best online canadian pharmacy canada cloud pharmacy
http://canadianpharmacy.win/# canadian pharmacies comparison
https://mexicanpharmacy.store/# mexico pharmacies prescription drugs
вывод из запоя срочно ростов вывод из запоя срочно ростов .
gtbike.ru http://togliatti24.ru/interesnoe/view/turnikety-perco-sovremennye-resenia-dla-kontrola-dostupa-i-bezopasnosti .
https://indianpharmacy.win/# п»їlegitimate online pharmacies india
Good post! We are linking to this great article on our site. Keep up the good writing.
sport-weekend.com http://www.om1.ru/news/world/345313-bollardy_avtomaticheskie_idealnoe_reshenie_dlja_kontrolja_dostupa_i_bezopasnosti/ .
canadian pharmacy in canada: best online canadian pharmacy – canada pharmacy online legit
http://canadianpharmacy.win/# reddit canadian pharmacy
вывод из запоя круглосуточно ростов-на-дону вывод из запоя круглосуточно ростов-на-дону .
Предлагаем услуги профессиональных инженеров офицальной мастерской.
Еслли вы искали ремонт ноутбуков toshiba, можете посмотреть на сайте: ремонт ноутбуков toshiba
Наши мастера оперативно устранят неисправности вашего устройства в сервисе или с выездом на дом!
Hi there! I simply want to give you a huge thumbs up for your excellent info you’ve got right here on this post. I’ll be coming back to your web site for more soon.
http://indianpharmacy.win/# top 10 pharmacies in india
Предлагаем услуги профессиональных инженеров офицальной мастерской.
Еслли вы искали ремонт ноутбуков fujitsu siemens сервис, можете посмотреть на сайте: ремонт ноутбуков fujitsu siemens адреса
Наши мастера оперативно устранят неисправности вашего устройства в сервисе или с выездом на дом!
Предлагаем услуги профессиональных инженеров офицальной мастерской.
Еслли вы искали ремонт ноутбуков toshiba сервис, можете посмотреть на сайте: ремонт ноутбуков toshiba
Наши мастера оперативно устранят неисправности вашего устройства в сервисе или с выездом на дом!
https://canadianpharmacy.win/# canadian pharmacy tampa
buying prescription drugs in mexico mexican online pharmacies prescription drugs mexico pharmacies prescription drugs
Having read this I thought it was really informative. I appreciate you spending some time and effort to put this short article together. I once again find myself spending a significant amount of time both reading and commenting. But so what, it was still worth it!
https://indianpharmacy.win/# Online medicine order
clockchok.ru http://donklephant.net/sotsium/sistema-elektronnyh-propuskov-cherez-turniket.html/ .
mexican drugstore online: mexico drug stores pharmacies – reputable mexican pharmacies online
вывод из запоя в ростове вывод из запоя в ростове .
I could not resist commenting. Exceptionally well written.
Предлагаем услуги профессиональных инженеров офицальной мастерской.
Еслли вы искали ремонт ноутбуков fujitsu siemens сервис, можете посмотреть на сайте: ремонт ноутбуков fujitsu siemens
Наши мастера оперативно устранят неисправности вашего устройства в сервисе или с выездом на дом!
Hi friends! Celebrate the tiny victories along the way. Every step forward is progress.
gtbike.ru https://sovross.ru/advertisment/shljuzovye-kabiny-blokpost-vazhnost-osobennosti-i-pravila-ekspluatacii/ .
http://fastpillsformen.com/# Viagra Tablet price
Generic Viagra online: FastPillsForMen – Sildenafil 100mg price
http://fastpillseasy.com/# boner pills online
I was very pleased to discover this great site. I want to to thank you for ones time just for this wonderful read!! I definitely liked every little bit of it and I have you saved to fav to see new information in your blog.
cheapest ed meds cheap cialis ed pills
вывод из запоя цены на дому ростов вывод из запоя цены на дому ростов .
отели в нижнем новгороде отели в нижнем новгороде .
вывод из запоя ростов-на-дону вывод из запоя ростов-на-дону .
I couldn’t resist commenting. Very well written!
https://maxpillsformen.com/# Cheap Cialis
Cialis 20mg price in USA: Buy Tadalafil 5mg – Cheap Cialis
스포츠 베팅 스포츠 베팅 .
Way cool! Some extremely valid points! I appreciate you penning this write-up plus the rest of the site is also very good.
generic sildenafil FastPillsForMen.com Cheap generic Viagra online
http://fastpillseasy.com/# ed pills for sale
вывод. из. запоя. анонимно. ростов. https://www.vyvod-iz-zapoya-rostov237.ru .
erectile dysfunction online: cheap erection pills – erection pills online
Buy generic 100mg Viagra online: buy viagra online – Viagra online price
This is a topic that’s close to my heart… Thank you! Exactly where are your contact details though?
https://fastpillsformen.com/# sildenafil 50 mg price
анонимный вывод из запоя ростов анонимный вывод из запоя ростов .
Generic Tadalafil 20mg price MaxPillsForMen.com Buy Tadalafil 5mg
Spot on with this write-up, I actually feel this site needs a great deal more attention. I’ll probably be returning to read more, thanks for the advice!
скорая наркологическая помощь скорая наркологическая помощь .
вызвать наркологическую помощь вызвать наркологическую помощь .
Introducing to you the most prestigious online entertainment address today. Visit now to experience now!
https://maxpillsformen.com/# Cialis 20mg price
Viagra online price: FastPillsForMen.com – Sildenafil 100mg price
best price for viagra 100mg: buy viagra here – Cheapest Sildenafil online
Предлагаем услуги профессиональных инженеров офицальной мастерской.
Еслли вы искали ремонт ноутбуков asus рядом, можете посмотреть на сайте: ремонт ноутбуков asus в москве
Наши мастера оперативно устранят неисправности вашего устройства в сервисе или с выездом на дом!
대한민국 카지노 대한민국 카지노 .
https://fastpillseasy.com/# order ed meds online
Order Viagra 50 mg online Fast Pills For Men Sildenafil Citrate Tablets 100mg
наркологическая скорая бесплатная наркологическая скорая бесплатная .
May I simply say what a relief to uncover somebody that actually knows what they are talking about over the internet. You definitely realize how to bring a problem to light and make it important. More people should check this out and understand this side of the story. I was surprised that you aren’t more popular given that you definitely have the gift.
Предлагаем услуги профессиональных инженеров офицальной мастерской.
Еслли вы искали срочный ремонт ноутбуков asus, можете посмотреть на сайте: ремонт ноутбуков asus
Наши мастера оперативно устранят неисправности вашего устройства в сервисе или с выездом на дом!
срочная наркологическая помощь в москве срочная наркологическая помощь в москве .
cheap ed meds online: fast pills easy – buy erectile dysfunction pills
That is a very good tip especially to those new to the blogosphere. Simple but very accurate information… Thank you for sharing this one. A must read post.
https://fastpillseasy.com/# ed medicines online
ed med online cheap cialis order ed pills
http://maxpillsformen.com/# Generic Cialis price
ed med online: FastPillsEasy – erectile dysfunction drugs online
That is a very good tip especially to those fresh to the blogosphere. Brief but very precise info… Appreciate your sharing this one. A must read post.
Viagra Tablet price: FastPillsForMen – Viagra generic over the counter
наркологическая скорая бесплатная https://cah.forum24.ru/?1-19-0-00000470-000-0-0-1730875154/ .
срочная наркологическая помощь срочная наркологическая помощь .
наркологическая скорая наркологическая скорая .
http://fastpillseasy.com/# where to buy erectile dysfunction pills
This site was… how do I say it? Relevant!! Finally I’ve found something which helped me. Kudos.
erectile dysfunction medications online fast pills easy best online ed meds
I must thank you for the efforts you’ve put in penning this site. I really hope to check out the same high-grade blog posts from you later on as well. In fact, your creative writing abilities has encouraged me to get my very own site now 😉
скорая наркологическая помощь в москве http://www.internetmoney.bestbb.ru/viewtopic.php?id=31709 .
скорая наркологическая помощь в москве скорая наркологическая помощь в москве .
http://maxpillsformen.com/# Buy Tadalafil 20mg
Sildenafil 100mg price: Viagra without a doctor prescription Canada – Cheapest Sildenafil online
viagra without prescription: Fast Pills For Men – cheapest viagra
online ed medicine erection pills online edmeds
http://fastpillseasy.com/# ed pills
http://fastpillseasy.com/# best online ed meds
Viagra online price: Fast Pills For Men – Cheap generic Viagra online
http://fastpillsformen.com/# viagra without prescription
Generic Tadalafil 20mg price buy cialis online buy cialis pill
срочная наркологическая помощь срочная наркологическая помощь .
вызвать наркологическую помощь вызвать наркологическую помощь .
наркологическая срочная помощь http://www.belbeer.borda.ru/?1-6-0-00000783-000-0-0-1730876081 .
edmeds: cheap cialis – where to buy ed pills
Good day! I could have sworn I’ve been to this blog before but after looking at a few of the articles I realized it’s new to me. Nonetheless, I’m definitely delighted I stumbled upon it and I’ll be book-marking it and checking back often!
наркологическая скорая бесплатная наркологическая скорая бесплатная .
наркологическая скорая помощь москва наркологическая скорая помощь москва .
http://maxpillsformen.com/# Cialis 20mg price in USA
Very good post! We are linking to this great post on our website. Keep up the great writing.
http://fastpillseasy.com/# erectile dysfunction pills online
order ed pills online: cheap cialis – online ed pharmacy
Tadalafil price Generic Cialis without a doctor prescription cheapest cialis
http://fastpillsformen.com/# order viagra
Your style is very unique compared to other people I’ve read stuff from. Many thanks for posting when you have the opportunity, Guess I’ll just bookmark this page.
http://maxpillsformen.com/# Generic Tadalafil 20mg price
http://fastpillseasy.com/# buy ed meds
cheapest cialis: cialis for sale – cialis for sale
Generic Viagra for sale Fast Pills For Men cheapest viagra
наркологическая скорая бесплатная http://www.klin.0pk.me/viewtopic.php?id=4428 .
вызов нарколога на дом частная скорая помощь http://www.justforum.bestforums.org/viewtopic.php?f=26&t=4785 .
скорая наркологическая помощь в москве http://www.vishivayu.ukrbb.net/viewtopic.php?f=12&t=13503 .
Hi there, I believe your website could possibly be having browser compatibility problems. When I take a look at your website in Safari, it looks fine however, when opening in Internet Explorer, it has some overlapping issues. I simply wanted to provide you with a quick heads up! Besides that, great blog!
загранпаспорт оформить загранпаспорт оформить .
https://maxpillsformen.com/# Tadalafil Tablet
срочное изготовление загранпаспорта срочное изготовление загранпаспорта .
I’m really enjoying the design and layout of your site.
It’s a very easy on the eyes which makes it much more enjoyable for me to come here and visit
more often. Did you hire out a developer to create your theme?
Exceptional work!
https://maxpillsformen.com/# Cialis without a doctor prescription
I need to to thank you for this fantastic read!! I absolutely loved every little bit of it. I’ve got you bookmarked to look at new things you post…
http://fastpillseasy.com/# ed med online
erectile dysfunction medications online: fast pills easy – online ed meds
cheap ed meds ed treatment online online ed meds
Предлагаем услуги профессиональных инженеров офицальной мастерской.
Еслли вы искали срочный ремонт ноутбуков acer, можете посмотреть на сайте: ремонт ноутбуков acer
Наши мастера оперативно устранят неисправности вашего устройства в сервисе или с выездом на дом!
Предлагаем услуги профессиональных инженеров офицальной мастерской.
Еслли вы искали ремонт macbook pro m3, можете посмотреть на сайте: срочный ремонт macbook pro m3
Наши мастера оперативно устранят неисправности вашего устройства в сервисе или с выездом на дом!
Generic Viagra online: Fast Pills For Men – best price for viagra 100mg
Предлагаем услуги профессиональных инженеров офицальной мастерской.
Еслли вы искали ремонт ноутбуков hp, можете посмотреть на сайте: ремонт ноутбуков hp рядом
Наши мастера оперативно устранят неисправности вашего устройства в сервисе или с выездом на дом!
Предлагаем услуги профессиональных инженеров офицальной мастерской.
Еслли вы искали ремонт macbook pro 16 сервис, можете посмотреть на сайте: ремонт macbook pro 16 рядом
Наши мастера оперативно устранят неисправности вашего устройства в сервисе или с выездом на дом!
Предлагаем услуги профессиональных инженеров офицальной мастерской.
Еслли вы искали срочный ремонт ноутбуков acer, можете посмотреть на сайте: ремонт ноутбуков acer цены
Наши мастера оперативно устранят неисправности вашего устройства в сервисе или с выездом на дом!
Предлагаем услуги профессиональных инженеров офицальной мастерской.
Еслли вы искали ремонт macbook pro m3 рядом, можете посмотреть на сайте: срочный ремонт macbook pro m3
Наши мастера оперативно устранят неисправности вашего устройства в сервисе или с выездом на дом!
https://fastpillseasy.com/# ed medication online
sildenafil over the counter FastPillsForMen buy Viagra over the counter
cheapest ed pills: ed rx online – erection pills online
рейтинг процессоров intel topcpu.ru .
Предлагаем услуги профессиональных инженеров офицальной мастерской.
Еслли вы искали ремонт ноутбуков hp, можете посмотреть на сайте: срочный ремонт ноутбуков hp
Наши мастера оперативно устранят неисправности вашего устройства в сервисе или с выездом на дом!
вывод из запоя капельница на дому вывод из запоя капельница на дому .
вывод из запоя дешево ростов на дону http://www.vyvod-iz-zapoya-rostov239.ru .
Предлагаем услуги профессиональных инженеров офицальной мастерской.
Еслли вы искали ремонт macbook pro 16, можете посмотреть на сайте: ремонт macbook pro 16
Наши мастера оперативно устранят неисправности вашего устройства в сервисе или с выездом на дом!
I blog quite often and I really thank you for your information. This article has really peaked my interest. I am going to book mark your website and keep checking for new information about once a week. I subscribed to your RSS feed too.
cheap ed medication: fast pills easy – ed online prescription
스포츠 베팅 스포츠 베팅 .
https://maxpillsformen.com/# Generic Tadalafil 20mg price
Предлагаем услуги профессиональных инженеров офицальной мастерской.
Еслли вы искали ремонт кофемашин spidem адреса, можете посмотреть на сайте: ремонт кофемашин spidem рядом
Наши мастера оперативно устранят неисправности вашего устройства в сервисе или с выездом на дом!
сравнение процессоров для пк http://www.topcpu.ru/ .
Hey, I loved your post! Check out my site: ANCHOR.
Cheapest Sildenafil online FastPillsForMen.com viagra without prescription
Cheap Cialis: buy cialis online – Tadalafil Tablet
диплом о высшем образовании купить
Предлагаем услуги профессиональных инженеров офицальной мастерской.
Еслли вы искали ремонт кофемашин spidem в москве, можете посмотреть на сайте: срочный ремонт кофемашин spidem
Наши мастера оперативно устранят неисправности вашего устройства в сервисе или с выездом на дом!
https://fastpillseasy.com/# online ed prescription
buy cialis pill Cialis 20mg price in USA Cialis over the counter
принудительный вывод из запоя ростов http://www.vyvod-iz-zapoya-rostov239.ru .
нарколог на дому капельница цена нарколог на дому капельница цена .
рейтинги процессоров рейтинги процессоров .
Tadalafil price: Max Pills For Men – Cialis without a doctor prescription
Предлагаем услуги профессиональных инженеров офицальной мастерской.
Еслли вы искали ремонт кофемашин neff сервис, можете посмотреть на сайте: ремонт кофемашин neff цены
Наши мастера оперативно устранят неисправности вашего устройства в сервисе или с выездом на дом!
Generic Tadalafil 20mg price: buy cialis online – Buy Tadalafil 20mg
Предлагаем услуги профессиональных инженеров офицальной мастерской.
Еслли вы искали ремонт кофемашин melitta, можете посмотреть на сайте: ремонт кофемашин melitta
Наши мастера оперативно устранят неисправности вашего устройства в сервисе или с выездом на дом!
Предлагаем услуги профессиональных инженеров офицальной мастерской.
Еслли вы искали ремонт кофемашин philips сервис, можете посмотреть на сайте: ремонт кофемашин philips рядом
Наши мастера оперативно устранят неисправности вашего устройства в сервисе или с выездом на дом!
Предлагаем услуги профессиональных инженеров офицальной мастерской.
Еслли вы искали ремонт macbook air m1 рядом, можете посмотреть на сайте: ремонт macbook air m1 в москве
Наши мастера оперативно устранят неисправности вашего устройства в сервисе или с выездом на дом!
make stamp online make stamp online .
вывод из запоя цена ростов вывод из запоя цена ростов .
Предлагаем услуги профессиональных инженеров офицальной мастерской.
Еслли вы искали ремонт кофемашин neff цены, можете посмотреть на сайте: ремонт кофемашин neff сервис
Наши мастера оперативно устранят неисправности вашего устройства в сервисе или с выездом на дом!
Предлагаем услуги профессиональных инженеров офицальной мастерской.
Еслли вы искали ремонт кофемашин melitta в москве, можете посмотреть на сайте: ремонт кофемашин melitta сервис
Наши мастера оперативно устранят неисправности вашего устройства в сервисе или с выездом на дом!
Introducing to you the most prestigious online entertainment address today. Visit now to experience now!
вывод из запоя принудительно вывод из запоя принудительно .
вывод из запоя на дому цена вывод из запоя на дому цена .
анонимный вывод из запоя ростов анонимный вывод из запоя ростов .
Introducing to you the most prestigious online entertainment address today. Visit now to experience now!
Предлагаем услуги профессиональных инженеров офицальной мастерской.
Еслли вы искали ремонт кофемашин philips рядом, можете посмотреть на сайте: ремонт кофемашин philips
Наши мастера оперативно устранят неисправности вашего устройства в сервисе или с выездом на дом!
Предлагаем услуги профессиональных инженеров офицальной мастерской.
Еслли вы искали ремонт macbook air m1 сервис, можете посмотреть на сайте: ремонт macbook air m1
Наши мастера оперативно устранят неисправности вашего устройства в сервисе или с выездом на дом!
http://sweetbonanza25.com/# sweet bonanza kazanma saatleri
Предлагаем услуги профессиональных инженеров офицальной мастерской.
Еслли вы искали срочный ремонт кофемашин miele, можете посмотреть на сайте: ремонт кофемашин miele
Наши мастера оперативно устранят неисправности вашего устройства в сервисе или с выездом на дом!
Широкий выбор фурнитуры для плинтуса, выберите подходящий вам вариант.
Прочные материалы для плинтуса, долговечные и надежные в использовании.
Легкость сборки плинтуса, без лишних усилий.
Модные элементы для украшения плинтуса, сделайте дом уютным и стильным.
Эко-варианты элементов для плинтуса, сделайте свой дом более безопасным для здоровья.
Популярные цветовые решения для фурнитуры плинтуса, создайте гармонию в доме.
Уникальные элементы для стильного плинтуса, привнесите уникальность в интерьер.
Рекомендации по заботе о фурнитуре для плинтуса, чтобы сделать правильный выбор.
Декоративные элементы для фурнитуры плинтуса, создайте уютный и стильный дом.
Изысканные решения для отделки плинтуса, для создания аристократичной атмосферы.
виниловые полы https://furnituradlyaplintusamsk.ru/ .
http://denemebonusuverensiteler25.com/# deneme bonusu veren siteler yeni
Предлагаем услуги профессиональных инженеров офицальной мастерской.
Еслли вы искали ремонт кофемашин delonghi сервис, можете посмотреть на сайте: ремонт кофемашин delonghi адреса
Наши мастера оперативно устранят неисправности вашего устройства в сервисе или с выездом на дом!
sweet bonanza giris sweet bonanza guncel sweet bonanza giris
yat?r?ms?z deneme bonusu veren siteler: deneme bonusu veren siteler yeni – deneme bonusu veren siteler
Pretty! This was an extremely wonderful article. Thank you for supplying these details.
http://sweetbonanza25.com/# sweet bonanza
Предлагаем услуги профессиональных инженеров офицальной мастерской.
Еслли вы искали срочный ремонт кофемашин miele, можете посмотреть на сайте: ремонт кофемашин miele цены
Наши мастера оперативно устранят неисправности вашего устройства в сервисе или с выездом на дом!
Предлагаем услуги профессиональных инженеров офицальной мастерской.
Еслли вы искали ремонт кофемашин delonghi, можете посмотреть на сайте: ремонт кофемашин delonghi адреса
Наши мастера оперативно устранят неисправности вашего устройства в сервисе или с выездом на дом!
I used to be able to find good info from your content.
вывод из запоя вывод из запоя .
make stamp online free http://www.stamp-creator-online0.com/ .
Предлагаем услуги профессиональных инженеров офицальной мастерской.
Еслли вы искали ремонт iphone xs рядом, можете посмотреть на сайте: ремонт iphone xs
Наши мастера оперативно устранят неисправности вашего устройства в сервисе или с выездом на дом!
https://casinositeleri25.com/# oyun s
выезд на дом капельница от запоя выезд на дом капельница от запоя .
вывод из запоя цены ростов-на-дону вывод из запоя цены ростов-на-дону .
вывод из запоя цены на дому ростов вывод из запоя цены на дому ростов .
deneme bonusu veren bet siteleri Casino Siteleri Deneme Bonusu Veren Siteler
http://slotsiteleri25.com/# slot siteleri
Предлагаем услуги профессиональных инженеров офицальной мастерской.
Еслли вы искали ремонт iphone xs, можете посмотреть на сайте: срочный ремонт iphone xs
Наши мастера оперативно устранят неисправности вашего устройства в сервисе или с выездом на дом!
sweet bonanza yorumlar: sweet bonanza oyna – sweet bonanza
az parayla cok kazandiran slot oyunlar?: az parayla cok kazandiran slot oyunlar? – slot casino siteleri
http://denemebonusuverensiteler25.com/# denemebonusuverensiteler25
Introducing to you the most prestigious online entertainment address today. Visit now to experience now!
Aw, this was an incredibly good post. Taking the time and actual effort to produce a great article… but what can I say… I hesitate a whole lot and don’t seem to get anything done.
https://slotsiteleri25.com/# az parayla cok kazandiran slot oyunlar?
sweet bonanza sweet bonanza giris sweet bonanza guncel
https://casinositeleri25.com/# guvenilir casino siteleri
slot siteleri: slot siteleri – slot oyunlar? puf noktalar?
stamp maker online stamp maker online .
sweet bonanza slot: sweet bonanza yorumlar – sweet bonanza slot
клиника вывод из запоя ростов клиника вывод из запоя ростов .
вывод из запоя в ростове на дону вывод из запоя в ростове на дону .
deneme bonusu veren siteler yeni denemebonusuverensiteler25 deneme bonusu veren siteler
https://casinositeleri25.com/# deneme bonusu veren casino siteleri
Introducing to you the most prestigious online entertainment address today. Visit now to experience now!
yeni siteler: canl? casino siteleri – canl? casino siteleri
대한민국 카지노 대한민국 카지노 .
пропуска в москву для грузовиков пропуска в москву для грузовиков .
промокод изи дроп http://www.izi-drop-promokod.ru/ .
slot oyunlar? puf noktalar? guvenilir slot siteleri en cok kazand?ran slot oyunlar?
https://slotsiteleri25.com/# en kazancl? slot oyunlar?
sweet bonanza yorumlar: sweet bonanza giris – sweet bonanza demo oyna
нарколог вывод из запоя ростов нарколог вывод из запоя ростов .
клиника вывод из запоя ростов клиника вывод из запоя ростов .
slot oyunlar? puf noktalar?: slot oyunlar? puf noktalar? – slot casino siteleri
This is a topic that’s close to my heart… Thank you! Where can I find the contact details for questions?
https://casinositeleri25.com/# canl? casino siteleri
sweet bonanza oyna sweet bonanza kazanma saatleri sweet bonanza
This is a topic that’s close to my heart… Best wishes! Where can I find the contact details for questions?
вывод из запоя цена вывод из запоя цена .
промокод изи дроп 100 процентов промокод изи дроп 100 процентов .
вывод из запоя на дому похмельная вывод из запоя на дому похмельная .
вывод из запоя на дому похмельная вывод из запоя на дому похмельная .
sweet bonanza guncel: sweet bonanza slot – sweet bonanza guncel
sweet bonanza yorumlar: sweet bonanza yorumlar – sweet bonanza kazanma saatleri
пропуск в москву на грузовой автомобиль пропуск в москву на грузовой автомобиль .
Deneme Bonusu Veren Siteler deneme bonusu veren casino siteleri canl? casino siteleri
When I originally commented I appear to have clicked the -Notify me when new comments are added- checkbox and from now on every time a comment is added I recieve four emails with the same comment. Is there a way you can remove me from that service? Thank you.
Предлагаем услуги профессиональных инженеров офицальной мастерской.
Еслли вы искали ремонт iphone 14 цены, можете посмотреть на сайте: ремонт iphone 14 адреса
Наши мастера оперативно устранят неисправности вашего устройства в сервисе или с выездом на дом!
en cok kazand?ran slot oyunlar?: slot oyunlar? puf noktalar? – en kazancl? slot oyunlar?
tГјrkiye nin en iyi yasal bahis sitesi
https://denemebonusuverensiteler25.com/# yat?r?ms?z deneme bonusu veren siteler
tk 999 com https://onlineuaeuniversities.org/ .
Casino Siteleri: Deneme Bonusu Veren Siteler – canl? casino siteleri
Предлагаем услуги профессиональных инженеров офицальной мастерской.
Еслли вы искали срочный ремонт iphone 14, можете посмотреть на сайте: ремонт iphone 14 рядом
Наши мастера оперативно устранят неисправности вашего устройства в сервисе или с выездом на дом!
I blog often and I genuinely appreciate your information. The article has really peaked my interest. I’m going to bookmark your site and keep checking for new information about once per week. I opted in for your RSS feed too.
нарколог на дом екатеринбург цены нарколог на дом екатеринбург цены .
вывод из запоя цена вывод из запоя цена .
Предлагаем услуги профессиональных инженеров офицальной мастерской.
Еслли вы искали ремонт iphone 15 pro max, можете посмотреть на сайте: ремонт iphone 15 pro max адреса
Наши мастера оперативно устранят неисправности вашего устройства в сервисе или с выездом на дом!
en kazancl? slot oyunlar?: az parayla cok kazandiran slot oyunlar? – en cok kazand?ran slot oyunlar?
sweet bonanza demo oyna sweet bonanza guncel sweet bonanza demo oyna
вывод из запоя цена вывод из запоя цена .
This is a topic that’s close to my heart… Take care! Exactly where are your contact details though?
guvenilir slot siteleri: guvenilir slot siteleri – az parayla cok kazandiran slot oyunlar?
https://denemebonusuverensiteler25.com/# denemebonusuverensiteler25
срочное оформление загранпаспорта срочное оформление загранпаспорта .
вывод из запоя на дому в сочи вывод из запоя на дому в сочи .
вывод из запоя на дому в сочи вывод из запоя на дому в сочи .
Предлагаем услуги профессиональных инженеров офицальной мастерской.
Еслли вы искали срочный ремонт iphone 15 pro max, можете посмотреть на сайте: ремонт iphone 15 pro max в москве
Наши мастера оперативно устранят неисправности вашего устройства в сервисе или с выездом на дом!
casino bahis siteleri Deneme Bonusu Veren Siteler casino bahis siteleri
tk999 casino tk999 casino .
Предлагаем услуги профессиональных инженеров офицальной мастерской.
Еслли вы искали ремонт iphone 15, можете посмотреть на сайте: ремонт iphone 15 рядом
Наши мастера оперативно устранят неисправности вашего устройства в сервисе или с выездом на дом!
You have made some really good points there. I looked on the web to learn more about the issue and found most people will go along with your views on this web site.
рейтинги процессоров рейтинги процессоров .
en kazancl? slot oyunlar?: guvenilir slot siteleri – az parayla cok kazandiran slot oyunlar?
en cok kazand?ran slot oyunlar?: slot oyunlar? puf noktalar? – slot oyunlar? puf noktalar?
Can I simply just say what a comfort to find someone who genuinely knows what they are discussing online. You actually understand how to bring a problem to light and make it important. More people need to check this out and understand this side of your story. I was surprised you’re not more popular since you certainly possess the gift.
yeni deneme bonusu veren siteler denemebonusuverensiteler25 yat?r?ms?z deneme bonusu veren siteler
вывод из запоя в наркологическом стационаре http://vyvod-iz-zapoya-sochi24.ru .
You made some good points there. I looked on the net for additional information about the issue and found most people will go along with your views on this website.
аттестат за 9 класс купить
http://denemebonusuverensiteler25.com/# deneme bonusu veren yeni siteler
Aw, this was a very nice post. Finding the time and actual effort to make a great article… but what can I say… I put things off a whole lot and don’t seem to get nearly anything done.
Предлагаем услуги профессиональных инженеров офицальной мастерской.
Еслли вы искали ремонт iphone 15 рядом, можете посмотреть на сайте: ремонт iphone 15
Наши мастера оперативно устранят неисправности вашего устройства в сервисе или с выездом на дом!
срочно сделать загранпаспорт срочно сделать загранпаспорт .
вывести из запоя в стационаре вывести из запоя в стационаре .
вывод из запоя круглосуточно сочи вывод из запоя круглосуточно сочи .
Oh my goodness! Incredible article dude! Thank you, However I am going through issues with your RSS. I don’t understand why I can’t subscribe to it. Is there anybody else having similar RSS issues? Anyone that knows the solution can you kindly respond? Thanks.
az parayla cok kazandiran slot oyunlar?: slot casino siteleri – az parayla cok kazandiran slot oyunlar?
yeni deneme bonusu veren siteler: deneme bonusu veren yeni siteler – denemebonusuverensiteler25
капельница от запоя цена капельница от запоя цена .
slot casino siteleri en kazancl? slot oyunlar? en cok kazand?ran slot oyunlar?
I love looking through a post that can make men and women think. Also, thanks for allowing me to comment.
I enjoy reading an article that will make people think. Also, thank you for allowing for me to comment.
http://sweetbonanza25.com/# sweet bonanza yorumlar
It’s really a great and useful piece of information. I’m satisfied that you simply shared this helpful info with us. Please stay us up to date like this. Thanks for sharing.
sweet bonanza demo oyna: sweet bonanza oyna – sweet bonanza
I’m very pleased to find this site. I want to to thank you for your time for this particularly fantastic read!! I definitely liked every part of it and i also have you book-marked to see new stuff in your web site.
SportyBet registration SportyBet registration .
капельница от похмелья купить https://vyvod-iz-zapoya-nizhnij-novgorod12.ru .
нижний новгород вывод из запоя на дому нижний новгород вывод из запоя на дому .
частный вывод из запоя частный вывод из запоя .
sweet bonanza guncel sweet bonanza giris sweet bonanza kazanma saatleri
Предлагаем услуги профессиональных инженеров офицальной мастерской.
Еслли вы искали срочный ремонт iphone 14 pro max, можете посмотреть на сайте: ремонт iphone 14 pro max
Наши мастера оперативно устранят неисправности вашего устройства в сервисе или с выездом на дом!
I like this blog its a master peace ! Glad I observed this on google .
Предлагаем услуги профессиональных инженеров офицальной мастерской.
Еслли вы искали ремонт iphone 14 pro, можете посмотреть на сайте: срочный ремонт iphone 14 pro
Наши мастера оперативно устранят неисправности вашего устройства в сервисе или с выездом на дом!
I really like reading an article that can make men and women think. Also, thanks for permitting me to comment.
denemebonusuverensiteler25: denemebonusuverensiteler25 – yeni deneme bonusu veren siteler
врач на дом капельница от запоя врач на дом капельница от запоя .
yeni deneme bonusu veren siteler: denemebonusuverensiteler25 – yeni deneme bonusu veren siteler
sweet bonanza sweet bonanza kazanma saatleri sweet bonanza giris
Предлагаем услуги профессиональных инженеров офицальной мастерской.
Еслли вы искали ремонт iphone 14 pro max в москве, можете посмотреть на сайте: ремонт iphone 14 pro max
Наши мастера оперативно устранят неисправности вашего устройства в сервисе или с выездом на дом!
After going over a few of the articles on your web site, I honestly appreciate your technique of writing a blog. I added it to my bookmark site list and will be checking back in the near future. Take a look at my web site too and let me know your opinion.
Предлагаем услуги профессиональных инженеров офицальной мастерской.
Еслли вы искали ремонт iphone 14 pro, можете посмотреть на сайте: ремонт iphone 14 pro
Наши мастера оперативно устранят неисправности вашего устройства в сервисе или с выездом на дом!
https://denemebonusuverensiteler25.com/# deneme bonusu veren siteler
капельница при алкогольной интоксикации на дому цена капельница при алкогольной интоксикации на дому цена .
SportyBet Zambia SportyBet Zambia .
вывод из запоя нижний новгород вывод из запоя нижний новгород .
рейтинг процессоров amd topcpu.ru .
deneme bonusu veren yeni siteler: denemebonusuverensiteler25 – deneme bonusu veren siteler
I truly love your blog.. Great colors & theme. Did you make this amazing site yourself? Please reply back as I’m planning to create my own website and would like to find out where you got this from or just what the theme is called. Kudos!
Greetings, I think your site could be having internet browser compatibility problems. When I take a look at your blog in Safari, it looks fine but when opening in I.E., it’s got some overlapping issues. I simply wanted to provide you with a quick heads up! Besides that, great blog!
canadian drug pharmacy: canadadrugpharmacy com – canada ed drugs
purple pharmacy mexico price list: Mexican Easy Pharm – mexican border pharmacies shipping to usa
На данном сайте можно ознакомиться с информацией о системах видеонаблюдения, их видах и особенностях. Здесь представлены подробные сведения о подборе оборудования, его установке и конфигурации.
видеонаблюдение
canadian online pharmacy reviews https://canadianmdpharm.shop/# legitimate canadian online pharmacies
cheapest online pharmacy india
Предлагаем услуги профессиональных инженеров офицальной мастерской.
Еслли вы искали ремонт iphone xs max, можете посмотреть на сайте: ремонт iphone xs max
Наши мастера оперативно устранят неисправности вашего устройства в сервисе или с выездом на дом!
mexico drug stores pharmacies Mexican Easy Pharm Mexican Easy Pharm
https://indiancertpharm.com/# Indian Cert Pharm
canadian pharmacy oxycodone
Mexican Easy Pharm: п»їbest mexican online pharmacies – п»їbest mexican online pharmacies
Предлагаем услуги профессиональных инженеров офицальной мастерской.
Еслли вы искали ремонт iphone se 2020 рядом, можете посмотреть на сайте: срочный ремонт iphone se 2020
Наши мастера оперативно устранят неисправности вашего устройства в сервисе или с выездом на дом!
canada drugstore pharmacy rx: CanadianMdPharm – canadian pharmacy antibiotics
капельница от похмелья цена капельница от похмелья цена .
вывод из запоя в стационаре воронежа https://vyvod-iz-zapoya-v-stacionare-voronezh22.ru/ .
After I initially left a comment I appear to have clicked the -Notify me when new comments are added- checkbox and from now on each time a comment is added I recieve four emails with the same comment. Is there an easy method you are able to remove me from that service? Thanks a lot.
trusted canadian pharmacy https://mexicaneasypharm.com/# Mexican Easy Pharm
indian pharmacy paypal
Предлагаем услуги профессиональных инженеров офицальной мастерской.
Еслли вы искали ремонт iphone 13 pro, можете посмотреть на сайте: срочный ремонт iphone 13 pro
Наши мастера оперативно устранят неисправности вашего устройства в сервисе или с выездом на дом!
Предлагаем услуги профессиональных инженеров офицальной мастерской.
Еслли вы искали ремонт iphone 13 адреса, можете посмотреть на сайте: ремонт iphone 13
Наши мастера оперативно устранят неисправности вашего устройства в сервисе или с выездом на дом!
Предлагаем услуги профессиональных инженеров офицальной мастерской.
Еслли вы искали срочный ремонт iphone xs max, можете посмотреть на сайте: ремонт iphone xs max сервис
Наши мастера оперативно устранят неисправности вашего устройства в сервисе или с выездом на дом!
На данном сайте вы сможете найти полезную информацию о препарате Ципралекс. Здесь представлены информация о основных показаниях, дозировке и вероятных побочных эффектах.
http://ZimovkaKarakudukKazakhstan.eorg.xyz/category/website/wgI2vZFhZf5rbhFqBTP7G0CD1
Indian Cert Pharm: Indian Cert Pharm – Indian Cert Pharm
online canadian pharmacy: canadian pharmacies online – online canadian pharmacy review
canadian online pharmacy https://indiancertpharm.com/# Best online Indian pharmacy
top online pharmacy india
рейтинги производительности процессоров рейтинги производительности процессоров .
Предлагаем услуги профессиональных инженеров офицальной мастерской.
Еслли вы искали ремонт iphone se 2020, можете посмотреть на сайте: ремонт iphone se 2020 рядом
Наши мастера оперативно устранят неисправности вашего устройства в сервисе или с выездом на дом!
best canadian online pharmacy reviews CanadianMdPharm best canadian online pharmacy reviews
canadian pharmacy world https://canadianmdpharm.com/# canada drugs reviews
reputable indian pharmacies
Mexican Easy Pharm: Mexican Easy Pharm – Mexican Easy Pharm
https://mexicaneasypharm.shop/# Mexican Easy Pharm
canadian pharmacies
Online pharmacy: online pharmacy india – IndianCertPharm
Introducing to you the most prestigious online entertainment address today. Visit now to experience now!
Предлагаем услуги профессиональных инженеров офицальной мастерской.
Еслли вы искали ремонт iphone 13 pro, можете посмотреть на сайте: ремонт iphone 13 pro сервис
Наши мастера оперативно устранят неисправности вашего устройства в сервисе или с выездом на дом!
Предлагаем услуги профессиональных инженеров офицальной мастерской.
Еслли вы искали ремонт iphone 13 цены, можете посмотреть на сайте: ремонт iphone 13
Наши мастера оперативно устранят неисправности вашего устройства в сервисе или с выездом на дом!
canadian pharmacy world https://indiancertpharm.com/# Indian pharmacy that ships to usa
cheapest online pharmacy india
Greetings! Very useful advice in this particular article! It is the little changes that produce the most significant changes. Thanks a lot for sharing!
вывод из запоя в стационаре воронежа http://www.vyvod-iz-zapoya-v-stacionare-voronezh22.ru/ .
снятие запоя на дому снятие запоя на дому .
дом престарелых в симферополе дом престарелых в симферополе .
геронтологический центр в симферополе геронтологический центр в симферополе .
Everything is very open with a really clear clarification of the challenges. It was truly informative. Your site is extremely helpful. Thanks for sharing!
legal to buy prescription drugs from canada reliable canadian pharmacy reviews canadian pharmacy online
medication from mexico pharmacy: mexican pharmaceuticals online – mexico drug stores pharmacies
northwest pharmacy canada: Canadian Md Pharm – canada discount pharmacy
canadian mail order pharmacy https://mexicaneasypharm.shop/# Mexican Easy Pharm
world pharmacy india
You’re so cool! I don’t believe I’ve truly read something like that before. So nice to find another person with a few genuine thoughts on this subject. Really.. many thanks for starting this up. This site is one thing that is needed on the web, someone with a little originality.
canada rx pharmacy world: reddit canadian pharmacy – canadian pharmacy store
canadian medications: CanadianMdPharm – northern pharmacy canada
рейтинг процессоров amd http://topcpu.ru/ .
Excellent web site you have here.. It’s hard to find high quality writing like yours these days. I seriously appreciate individuals like you! Take care!!
best rated canadian pharmacy Canadian Md Pharm canada rx pharmacy world
canadian world pharmacy https://mexicaneasypharm.shop/# best online pharmacies in mexico
india online pharmacy
Best online Indian pharmacy: Indian pharmacy that ships to usa – reputable indian online pharmacy
Mexican Easy Pharm: Mexican Easy Pharm – best online pharmacies in mexico
Indian Cert Pharm: Online pharmacy – Indian pharmacy international shipping
pharmacy rx world canada https://mexicaneasypharm.com/# pharmacies in mexico that ship to usa
mail order pharmacy india
Indian pharmacy international shipping indian pharmacy Indian Cert Pharm
программа 1с купить с установкой программа 1с купить с установкой .
1с предприятие купить программу 1с предприятие купить программу .
Hi, I do believe this is an excellent website. I stumbledupon it 😉 I will revisit once again since i have bookmarked it. Money and freedom is the best way to change, may you be rich and continue to help other people.
I’d like to thank you for the efforts you have put in penning this blog. I really hope to check out the same high-grade blog posts from you in the future as well. In fact, your creative writing abilities has encouraged me to get my very own website now 😉
Indian Cert Pharm: Indian pharmacy that ships to usa – Indian Cert Pharm
buy canadian drugs: CanadianMdPharm – canadian king pharmacy
дом пенсионеров в крыму дом пенсионеров в крыму .
дом пенсионеров в крыму https://svstrazh.forum24.ru/?1-18-0-00000125-000-0-0-1736935083/ .
canadian pharmacy world https://canadianmdpharm.com/# canada pharmacy online
buy medicines online in india
В этом информативном обзоре собраны самые интересные статистические данные и факты, которые помогут лучше понять текущие тренды. Мы представим вам цифры и графики, которые иллюстрируют, как развиваются различные сферы жизни. Эта информация станет отличной основой для глубокого анализа и принятия обоснованных решений.
Углубиться в тему – https://nakroklinikatest.ru/
В этой публикации мы сосредоточимся на интересных аспектах одной из самых актуальных тем современности. Совмещая факты и мнения экспертов, мы создадим полное представление о предмете, которое будет полезно как новичкам, так и тем, кто глубоко изучает вопрос.
Изучить вопрос глубже – https://nakroklinikatest.ru/
вывод из запоя в стационаре вывод из запоя в стационаре .
Mexican Easy Pharm Mexican Easy Pharm purple pharmacy mexico price list
online canadian pharmacy: northwest canadian pharmacy – canadian compounding pharmacy
I want to to thank you for this great read!! I definitely enjoyed every bit of it. I have you book marked to check out new stuff you post…
Предлагаем услуги профессиональных инженеров офицальной мастерской.
Еслли вы искали ремонт iphone 12 pro max в москве, можете посмотреть на сайте: ремонт iphone 12 pro max
Наши мастера оперативно устранят неисправности вашего устройства в сервисе или с выездом на дом!
Предлагаем услуги профессиональных инженеров офицальной мастерской.
Еслли вы искали ремонт iphone 11 рядом, можете посмотреть на сайте: срочный ремонт iphone 11
Наши мастера оперативно устранят неисправности вашего устройства в сервисе или с выездом на дом!
canadian pharmacy online reviews: CanadianMdPharm – buy prescription drugs from canada cheap
Indian Cert Pharm: Online pharmacy – IndianCertPharm
canadian pharmacy mall: CanadianMdPharm – canadapharmacyonline
Indian Cert Pharm: Indian Cert Pharm – Online medicine order
Предлагаем услуги профессиональных инженеров офицальной мастерской.
Еслли вы искали ремонт iphone se 2020, можете посмотреть на сайте: ремонт iphone se 2020 сервис
Наши мастера оперативно устранят неисправности вашего устройства в сервисе или с выездом на дом!
canadian pharmacy: canadian pharmacy antibiotics – ed drugs online from canada
canadian family pharmacy: Canadian Md Pharm – canadian pharmacy online store
вывод из запоя в стационаре вывод из запоя в стационаре .
Best online Indian pharmacy: Indian Cert Pharm – IndianCertPharm
1с предприятие купить программу 1с предприятие купить программу .
1с бухгалтерия купить 1с бухгалтерия купить .
Предлагаем услуги профессиональных инженеров офицальной мастерской.
Еслли вы искали ремонт iphone 11, можете посмотреть на сайте: ремонт iphone 11
Наши мастера оперативно устранят неисправности вашего устройства в сервисе или с выездом на дом!
Предлагаем услуги профессиональных инженеров офицальной мастерской.
Еслли вы искали ремонт iphone 12 pro max адреса, можете посмотреть на сайте: ремонт iphone 12 pro max
Наши мастера оперативно устранят неисправности вашего устройства в сервисе или с выездом на дом!
Предлагаем услуги профессиональных инженеров офицальной мастерской.
Еслли вы искали ремонт iphone se 2020 рядом, можете посмотреть на сайте: ремонт iphone se 2020 в москве
Наши мастера оперативно устранят неисправности вашего устройства в сервисе или с выездом на дом!
bookmarked!!, I really like your blog.
ed meds online canada: Canadian Md Pharm – online canadian pharmacy
Indian Cert Pharm: Online medicine – IndianCertPharm
sex nhật hiếp dâm trẻ em ấu dâm buôn bán vũ khí ma túy bán súng sextoy chơi đĩ sex bạo lực sex học đường tội phạm tình dục chơi les đĩ đực người mẫu bán dâm
canadian pharmacy 24: Canadian Md Pharm – canadian pharmacy store
canadian neighbor pharmacy https://indiancertpharm.com/# Indian Cert Pharm
best online pharmacy india
вывод из запоя в стационаре воронежа вывод из запоя в стационаре воронежа .
капельница от запоя нижний новгород капельница от запоя нижний новгород .
legal canadian pharmacy online: trusted canadian pharmacy – online canadian pharmacy
https://indiancertpharm.com/# Best Indian pharmacy
canadian drug
best canadian online pharmacy reviews: CanadianMdPharm – buying drugs from canada
капельница от запоя нижний новгород капельница от запоя нижний новгород .
вывод из запоя стационарно вывод из запоя стационарно .
вывод из запоя в стационаре самара вывод из запоя в стационаре самара .
canadian neighbor pharmacy: CanadianMdPharm – canada drugs reviews
Indian pharmacy that ships to usa: Best online Indian pharmacy – Indian Cert Pharm
Mexican Easy Pharm: п»їbest mexican online pharmacies – Mexican Easy Pharm
Mexican Easy Pharm: pharmacies in mexico that ship to usa – mexico drug stores pharmacies
Предлагаем услуги профессиональных инженеров офицальной мастерской.
Еслли вы искали ремонт ipad mini 3 цены, можете посмотреть на сайте: ремонт ipad mini 3
Наши мастера оперативно устранят неисправности вашего устройства в сервисе или с выездом на дом!
Best Indian pharmacy: Indian Cert Pharm – Best Indian pharmacy
Mexican Easy Pharm: mexican border pharmacies shipping to usa – Mexican Easy Pharm
вывод из запоя в стационаре вывод из запоя в стационаре .
вывод из запоя круглосуточно вывод из запоя круглосуточно .
Предлагаем услуги профессиональных инженеров офицальной мастерской.
Еслли вы искали ремонт ipad mini 4 цены, можете посмотреть на сайте: ремонт ipad mini 4 рядом
Наши мастера оперативно устранят неисправности вашего устройства в сервисе или с выездом на дом!
Предлагаем услуги профессиональных инженеров офицальной мастерской.
Еслли вы искали ремонт ipad pro 12.9, можете посмотреть на сайте: ремонт ipad pro 12.9 рядом
Наши мастера оперативно устранят неисправности вашего устройства в сервисе или с выездом на дом!
Best Indian pharmacy: Indian pharmacy international shipping – Best Indian pharmacy
https://canadianmdpharm.shop/# 77 canadian pharmacy
the canadian drugstore
купить аттестат в вологде
Предлагаем услуги профессиональных инженеров офицальной мастерской.
Еслли вы искали ремонт ipad mini 3, можете посмотреть на сайте: ремонт ipad mini 3 рядом
Наши мастера оперативно устранят неисправности вашего устройства в сервисе или с выездом на дом!
вывод из запоя в стационаре самара вывод из запоя в стационаре самара .
выведение из запоя в нижнем новгороде выведение из запоя в нижнем новгороде .
наркология вывод из запоя в стационаре наркология вывод из запоя в стационаре .
mexico pharmacies prescription drugs: Mexican Easy Pharm – Mexican Easy Pharm
Best online Indian pharmacy Best online Indian pharmacy Online medicine
pharmacy canadian superstore: pharmacies in canada that ship to the us – pharmacies in canada that ship to the us
mexico drug stores pharmacies https://mexicaneasypharm.com/# buying from online mexican pharmacy
medicine in mexico pharmacies
пропуск в москву для грузовых автомобилей пропуск в москву для грузовых автомобилей .
перед выводом из запоя в стационаре https://www.vyvod-iz-zapoya-v-stacionare-samara24.ru .
online canadian pharmacy: Canadian Md Pharm – canadian king pharmacy
Предлагаем услуги профессиональных инженеров офицальной мастерской.
Еслли вы искали ремонт ipad mini 4 рядом, можете посмотреть на сайте: срочный ремонт ipad mini 4
Наши мастера оперативно устранят неисправности вашего устройства в сервисе или с выездом на дом!
Предлагаем услуги профессиональных инженеров офицальной мастерской.
Еслли вы искали ремонт ipad pro 12.9, можете посмотреть на сайте: ремонт ipad pro 12.9 цены
Наши мастера оперативно устранят неисправности вашего устройства в сервисе или с выездом на дом!
mexico drug stores pharmacies https://mexicaneasypharm.shop/# mexican online pharmacies prescription drugs
mexican rx online
перед выводом из запоя в стационаре https://vyvod-iz-zapoya-v-stacionare-samara25.ru/ .
пропуск в москву для грузовиков пропуск в москву для грузовиков .
пропуска на грузовые машины в москве пропуска на грузовые машины в москве .
online canadian pharmacy review: canadian mail order pharmacy – legitimate canadian mail order pharmacy
The next time I read a blog, Hopefully it won’t disappoint me just as much as this one. After all, Yes, it was my choice to read through, but I genuinely believed you would have something helpful to talk about. All I hear is a bunch of moaning about something you could possibly fix if you weren’t too busy looking for attention.
Mexican Easy Pharm mexico drug stores pharmacies mexican online pharmacies prescription drugs
п»їbest mexican online pharmacies https://mexicaneasypharm.com/# Mexican Easy Pharm
mexico drug stores pharmacies
Pretty! This has been a really wonderful post. Thanks for providing this information.
вывод из запоя в стационаре самары вывод из запоя в стационаре самары .
Предлагаем услуги профессиональных инженеров офицальной мастерской.
Еслли вы искали ремонт iphone 12 в москве, можете посмотреть на сайте: ремонт iphone 12
Наши мастера оперативно устранят неисправности вашего устройства в сервисе или с выездом на дом!
https://mexicaneasypharm.com/# mexico drug stores pharmacies
canada drugstore pharmacy rx
Online medicine: Indian Cert Pharm – Online pharmacy
mexican pharmaceuticals online best online pharmacies in mexico п»їbest mexican online pharmacies
mexico pharmacies prescription drugs https://mexicaneasypharm.shop/# mexican drugstore online
mexican rx online
вывод из запоя в стационаре самара вывод из запоя в стационаре самара .
пропуск в москву для грузовых автомобилей пропуск в москву для грузовых автомобилей .
пропуск в москву для грузовых автомобилей пропуск в москву для грузовых автомобилей .
CytPharm: CytPharm – buy cytotec online
I blog frequently and I genuinely thank you for your content. The article has truly peaked my interest. I will bookmark your website and keep checking for new details about once per week. I subscribed to your RSS feed too.
https://cytpharm.shop/# purchase cytotec
prednisone 40 mg tablet
Kama Pharm: Kama Pharm – Kama Pharm
пропуск в москву на грузовой автомобиль пропуск в москву на грузовой автомобиль .
В статье по вопросам здоровья мы рассматриваем актуальные проблемы, с которыми сталкивается общество. Обсуждаются заболевания, факторы риска и важные аспекты профилактики. Читатели получат полезные советы о том, как сохранить здоровье и улучшить качество жизни.
Получить дополнительные сведения – https://nakroklinikatest.ru/
prednisone for cheap PredPharm Pred Pharm
http://semapharm24.com/# Sema Pharm 24
buy Kamagra
Your style is really unique in comparison to other folks I have read stuff from. Thanks for posting when you’ve got the opportunity, Guess I’ll just book mark this blog.
cheap semaglutide pills: cheap semaglutide pills – rybelsus semaglutide tablets
https://predpharm.com/# Pred Pharm
prednisone 54899
After I originally left a comment I appear to have clicked on the -Notify me when new comments are added- checkbox and now whenever a comment is added I receive four emails with the same comment. There has to be a means you are able to remove me from that service? Appreciate it.
Предлагаем услуги профессиональных инженеров офицальной мастерской.
Еслли вы искали ремонт iphone 12 рядом, можете посмотреть на сайте: ремонт iphone 12 сервис
Наши мастера оперативно устранят неисправности вашего устройства в сервисе или с выездом на дом!
https://cytpharm.shop/# cytotec buy online usa
Kamagra 100mg
purchase cytotec: CytPharm – Cyt Pharm
Kamagra 100mg: п»їkamagra – super kamagra
Greetings! Very useful advice within this article! It’s the little changes which will make the greatest changes. Thanks a lot for sharing!
can you buy prednisone over the counter Pred Pharm Pred Pharm
http://dappharm.com/# priligy
prednisone 50
https://predpharm.shop/# prednisone uk buy
super kamagra
Kama Pharm: Kamagra tablets – Kama Pharm
buy rybelsus online: buy semaglutide – Sema Pharm 24
вывод из запоя ростов-на-дону вывод из запоя ростов-на-дону .
купить 1с онлайн http://www.kupit-1s15.ru .
best movers near me best movers near me .
Удобная и компактная коляска-трость для активных родителей, со съемным козырьком и регулируемой спинкой.
Эргономичная коляска-трость с эффектным дизайном, которая поможет вам в повседневных прогулках.
Модная коляска-трость для маленького модника, с удобной ручкой и амортизаторами.
Качественная коляска-трость с удобной ручкой, которая облегчит вам заботу о ребенке.
babyton 320b babyton 320b .
промокод продамус скидка http://www.promokod-pro.ru/ .
https://dappharm.shop/# priligy
cheap kamagra
semaglutide tablets price: semaglutide best price – buy semaglutide
Sema Pharm 24: SemaPharm24 – generic rybelsus tabs
https://predpharm.com/# PredPharm
generic prednisone pills
На этом сайте вы сможете получить актуальное альтернативный адрес 1xBet.
Мы размещаем только свежие адреса на сайт.
Когда основной портал заблокирован, примените зеркалом.
Оставайтесь всегда в игре без перебоев.
https://telegra.ph/Otvetstvennaya-igra-kak-poluchat-udovolstvie-bez-riskov-01-21
https://dappharm.shop/# buy priligy
buy Kamagra
cost of prednisone 40 mg: order prednisone – prednisone brand name india
sildenafil oral jelly 100mg kamagra: Kama Pharm – Kama Pharm
Everything is very open with a clear explanation of the challenges. It was definitely informative. Your site is very useful. Thanks for sharing!
CytPharm buy cytotec online CytPharm
насос для воды насос для воды .
https://kamapharm.com/# buy kamagra online usa
prednisone 5 mg brand name
http://cytpharm.com/# Cytotec 200mcg price
buy Kamagra
semaglutide tablets store: semaglutide tablets store – cheap semaglutide pills
semaglutide tablets for weight loss: cheap semaglutide pills – semaglutide tablets for weight loss
buy prednisone online from canada: PredPharm – can i buy prednisone online in uk
Pred Pharm Pred Pharm Pred Pharm
buy kamagra online usa: Kama Pharm – buy Kamagra
I like it when people come together and share ideas. Great website, continue the good work.
http://cytpharm.com/# buy cytotec online
order prednisone with mastercard debit
https://cytpharm.com/# Cyt Pharm
Kamagra 100mg price
вывод из запоя вывод из запоя .
купить программу 1с бухгалтерия купить программу 1с бухгалтерия .
cheap semaglutide pills: Sema Pharm 24 – semaglutide tablets price
Kama Pharm: Kama Pharm – Kamagra 100mg price
Ищете свадебного фотографа для идеальной свадебной фотосессии?
Я помогу запечатлеть самые трогательные моменты вашего дня! Эмоции, искренность и индивидуальность в каждом кадре.
заказать услугу и узнать подробнее – видеограф в коломне.
Ваша история любви — в моих фотографиях!
A fascinating discussion is worth comment. There’s no doubt that that you need to write more on this subject, it may not be a taboo subject but typically folks don’t speak about these subjects. To the next! Many thanks!
https://cytpharm.com/# Cyt Pharm
п»їkamagra
SemaPharm24: SemaPharm24 – semaglutide tablets
https://predpharm.shop/# prednisone brand name in india
average cost of prednisone 20 mg
I love it when people get together and share views. Great blog, stick with it.
https://dappharm.shop/# buy priligy
super kamagra
Kama Pharm: buy Kamagra – Kamagra 100mg
Kama Pharm: cheap kamagra – Kama Pharm
buy priligy buy dapoxetine online priligy
https://predpharm.com/# prednisone steroids
prednisone online australia
https://semapharm24.com/# Sema Pharm 24
sildenafil oral jelly 100mg kamagra
buy cytotec online: buy cytotec pills – buy cytotec pills
пропуск в москву для грузовых автомобилей пропуск в москву для грузовых автомобилей .
Ищете свадебного фотографа для идеальной свадебной фотосессии?
Я помогу запечатлеть самые трогательные моменты вашего дня! Эмоции, искренность и индивидуальность в каждом кадре.
заказать услугу и узнать подробнее – фотограф.
Ваша история любви — в моих фотографиях!
оформить пропуск в москву для грузовиков оформить пропуск в москву для грузовиков .
Pred Pharm: Pred Pharm – prednisone online sale
sacramento movers sacramento movers .
https://kamapharm.com/# Kama Pharm
buy Kamagra
super kamagra: Kamagra 100mg – Kama Pharm
Kama Pharm п»їkamagra Kama Pharm
https://cytpharm.shop/# Cyt Pharm
can i purchase prednisone without a prescription
http://cytpharm.com/# CytPharm
buy kamagra online usa
buy priligy: cheap priligy – Priligy tablets
buy cytotec online: buy cytotec online – CytPharm
http://predpharm.com/# prednisone in mexico
Kamagra 100mg price
prednisone 20: prednisone buy – generic prednisone pills
https://predpharm.com/# prednisone 300mg
buy prednisone tablets uk
buy cytotec in usa order cytotec online CytPharm
prednisone cream rx: online prednisone 5mg – Pred Pharm
Предлагаем услуги профессиональных инженеров офицальной мастерской.
Еслли вы искали ремонт imac 27 рядом, можете посмотреть на сайте: ремонт imac 27
Наши мастера оперативно устранят неисправности вашего устройства в сервисе или с выездом на дом!
https://dappharm.com/# cheap priligy
buy Kamagra
buy misoprostol over the counter: buy cytotec pills – Misoprostol 200 mg buy online
Предлагаем услуги профессиональных инженеров офицальной мастерской.
Еслли вы искали ремонт ipad air 2, можете посмотреть на сайте: ремонт ipad air 2 рядом
Наши мастера оперативно устранят неисправности вашего устройства в сервисе или с выездом на дом!
buy prednisone 20mg: buy prednisone 10mg – prednisone without prescription
Предлагаем услуги профессиональных инженеров офицальной мастерской.
Еслли вы искали ремонт imac 21, можете посмотреть на сайте: ремонт imac 21
Наши мастера оперативно устранят неисправности вашего устройства в сервисе или с выездом на дом!
http://semapharm24.com/# semaglutide tablets for weight loss
prednisone for sale no prescription
Can I simply say what a comfort to find somebody that genuinely understands what they are talking about over the internet. You certainly know how to bring a problem to light and make it important. More people must read this and understand this side of the story. I can’t believe you’re not more popular because you definitely have the gift.
CytPharm: buy cytotec online – CytPharm
Pred Pharm Pred Pharm prednisone purchase online
п»їcytotec pills online: buy cytotec online – п»їcytotec pills online
http://cytpharm.com/# Cyt Pharm
Kamagra 100mg
buy dapoxetine online: priligy – cheap priligy
Hello there! I could have sworn I’ve visited this blog before but after looking at some of the articles I realized it’s new to me. Anyhow, I’m definitely delighted I stumbled upon it and I’ll be book-marking it and checking back frequently!
http://dappharm.com/# DapPharm
50mg prednisone tablet
DapPharm: priligy – cheap priligy
prednisone 20 mg prices: Pred Pharm – prednisone pill prices
You’ve made some good points there. I looked on the net for more info about the issue and found most individuals will go along with your views on this web site.
prednisone 5mg daily prednisone uk Pred Pharm
Предлагаем услуги профессиональных инженеров офицальной мастерской.
Еслли вы искали ремонт ipad air 2, можете посмотреть на сайте: ремонт ipad air 2 цены
Наши мастера оперативно устранят неисправности вашего устройства в сервисе или с выездом на дом!
http://semapharm24.com/# semaglutide tablets store
Kamagra Oral Jelly
пропуска на грузовые машины в москве пропуска на грузовые машины в москве .
пропуска в москву для грузовиков пропуска в москву для грузовиков .
prednisone 25mg from canada: PredPharm – prednisone 30 mg tablet
buy semaglutide: generic rybelsus tabs – semaglutide tablets
https://semapharm24.shop/# semaglutide best price
can i buy prednisone over the counter in usa
Pred Pharm: PredPharm – PredPharm
https://predpharm.shop/# Pred Pharm
п»їkamagra
http://semapharm24.com/# semaglutide tablets
prednisone prescription for sale
semaglutide tablets for weight loss buy semaglutide generic rybelsus tabs
buy dapoxetine online: buy dapoxetine online – buy dapoxetine online
Kamagra 100mg price: buy kamagra online usa – Kama Pharm
buy cytotec online: CytPharm – buy cytotec over the counter
Kama Pharm: Kamagra 100mg price – Kama Pharm
https://semapharm24.com/# buy semaglutide
Kamagra 100mg price
https://predpharm.shop/# buy 40 mg prednisone
prednisone best price
промокод на продамус промокод на продамус .
http://farmasilditaly.com/# cialis farmacia senza ricetta
acquistare farmaci senza ricetta
migliori farmacie online 2024 Brufen senza ricetta farmacia online piГ№ conveniente
https://farmatadalitaly.com/# acquistare farmaci senza ricetta
farmaci senza ricetta elenco
Предлагаем услуги профессиональных инженеров офицальной мастерской.
Еслли вы искали ремонт фотоаппаратов canon цены, можете посмотреть на сайте: ремонт фотоаппаратов canon цены
Наши мастера оперативно устранят неисправности вашего устройства в сервисе или с выездом на дом!
https://farmabrufen.com/# BRUFEN prezzo
farmaci senza ricetta elenco
Farmacie online sicure: farmacie online sicure – Farmacia online piГ№ conveniente
farmaci senza ricetta elenco
https://farmabrufen.shop/# FarmaBrufen
comprare farmaci online all’estero
top farmacia online: BRUFEN 600 acquisto online – farmacia online senza ricetta
farmacie online sicure BRUFEN 600 acquisto online acquistare farmaci senza ricetta
comprare farmaci online all’estero: Tadalafil generico migliore – acquistare farmaci senza ricetta
farmacie online autorizzate elenco
https://farmaprodotti.com/# farmacie online sicure
Farmacie on line spedizione gratuita
https://farmasilditaly.com/# viagra originale in 24 ore contrassegno
comprare farmaci online all’estero
pillole per erezione in farmacia senza ricetta: viagra online spedizione gratuita – gel per erezione in farmacia
viagra online in 2 giorni: viagra generico recensioni – viagra originale recensioni
п»їFarmacia online migliore
https://farmabrufen.com/# Farma Brufen
comprare farmaci online con ricetta
п»їFarmacia online migliore BRUFEN prezzo Farmacie online sicure
https://farmabrufen.com/# Farma Brufen
Farmacie on line spedizione gratuita
farmaci senza ricetta elenco: Farma Prodotti – farmacia online senza ricetta
Farmacie online sicure
https://farmaprodotti.com/# Farmacie on line spedizione gratuita
farmacie online affidabili
http://farmabrufen.com/# Ibuprofene 600 prezzo senza ricetta
farmacie online autorizzate elenco
farmaci senza ricetta elenco: Brufen senza ricetta – farmacia online piГ№ conveniente
п»їFarmacia online migliore
migliori farmacie online 2024 Ibuprofene 600 prezzo senza ricetta Farmacie online sicure
https://farmasilditaly.com/# viagra generico in farmacia costo
migliori farmacie online 2024
farmacia online piГ№ conveniente: Farm Tadal Italy – comprare farmaci online all’estero
https://farmatadalitaly.com/# farmacia online senza ricetta
comprare farmaci online con ricetta
viagra acquisto in contrassegno in italia: viagra 100 mg prezzo in farmacia – cialis farmacia senza ricetta
acquistare farmaci senza ricetta FarmaBrufen farmacie online autorizzate elenco
farmaci senza ricetta elenco: FarmTadalItaly – farmacia online
farmacie online sicure
https://farmatadalitaly.shop/# acquistare farmaci senza ricetta
Farmacia online piГ№ conveniente
farmacia online senza ricetta: Farma Prodotti – farmacia online piГ№ conveniente
промокод продамус скидка https://promokod-pro.ru/ .
alternativa al viagra senza ricetta in farmacia: pillole per erezione in farmacia senza ricetta – viagra 100 mg prezzo in farmacia
comprare farmaci online all’estero
https://farmasilditaly.shop/# miglior sito dove acquistare viagra
acquisto farmaci con ricetta
п»їFarmacia online migliore: Tadalafil generico migliore – farmacia online piГ№ conveniente
viagra consegna in 24 ore pagamento alla consegna: Farma Sild Italy – esiste il viagra generico in farmacia
Farmacia online miglior prezzo
Farmacia online piГ№ conveniente FarmaBrufen Farmacie on line spedizione gratuita
http://farmaprodotti.com/# Farmacie on line spedizione gratuita
top farmacia online
Hi, There’s no doubt that your blog may be having internet browser compatibility problems. When I look at your site in Safari, it looks fine however, if opening in Internet Explorer, it has some overlapping issues. I merely wanted to provide you with a quick heads up! Apart from that, fantastic blog.
farmaci senza ricetta elenco: Brufen senza ricetta – acquisto farmaci con ricetta
viagra prezzo farmacia 2023: Farma Sild Italy – viagra originale in 24 ore contrassegno
farmacia online piГ№ conveniente
https://farmatadalitaly.com/# Farmacie on line spedizione gratuita
farmacie online autorizzate elenco
You made some decent points there. I checked on the web to learn more about the issue and found most people will go along with your views on this site.
viagra naturale: Viagra – viagra online spedizione gratuita
farmacia online senza ricetta: Farma Prodotti – top farmacia online
comprare farmaci online con ricetta
farmacie online sicure Cialis generico top farmacia online
I appreciate the depth of research in this article. It’s both informative and engaging. Keep up the great work!