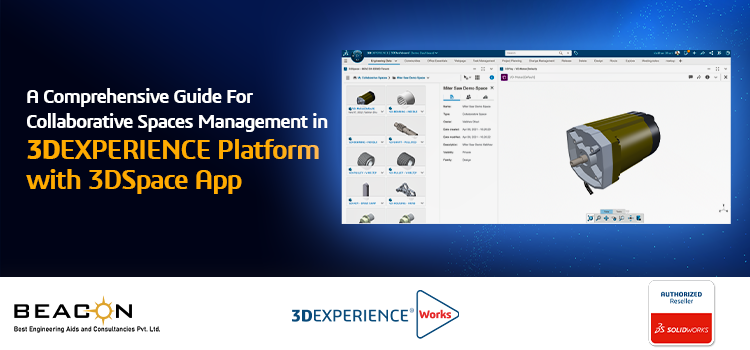


In today’s fast-paced business environment, collaboration is crucial for driving innovation and achieving success. The 3DEXPERIENCE Platform, coupled with the powerful cloud capabilities for accessing, organizing and managing Data through collaborative space management app 3DSpace, offers organizations a robust solution for collaborative spaces anywhere, anytime & any device. This blog post will provide you with a step-by-step guide on how to create collaborative spaces using the 3DSpace app. We will also explore various options such as title, description, family, and visibility, as well as different access levels—leader, owner, author, and collaborator.
Step-by-Step Guide to Creating a Collaborative Space using 3DSpace App:
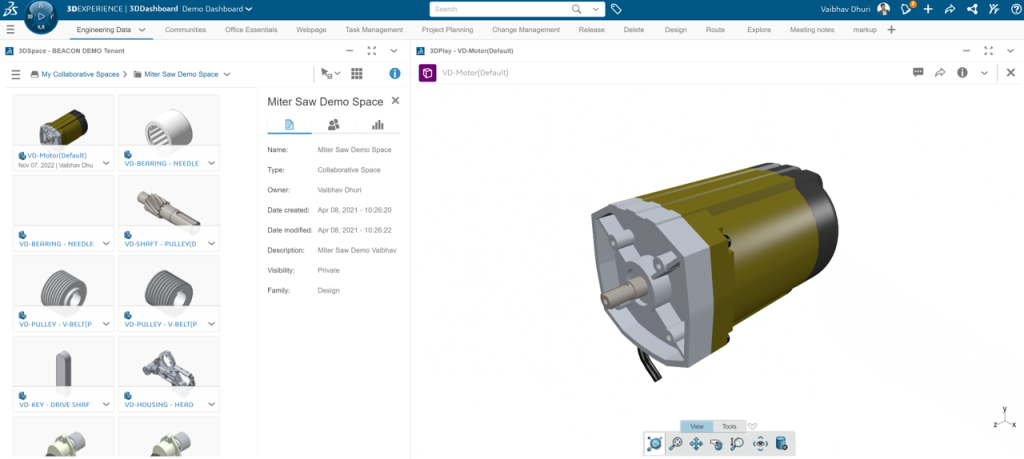
1. Accessing the 3DSpace App:
![]()
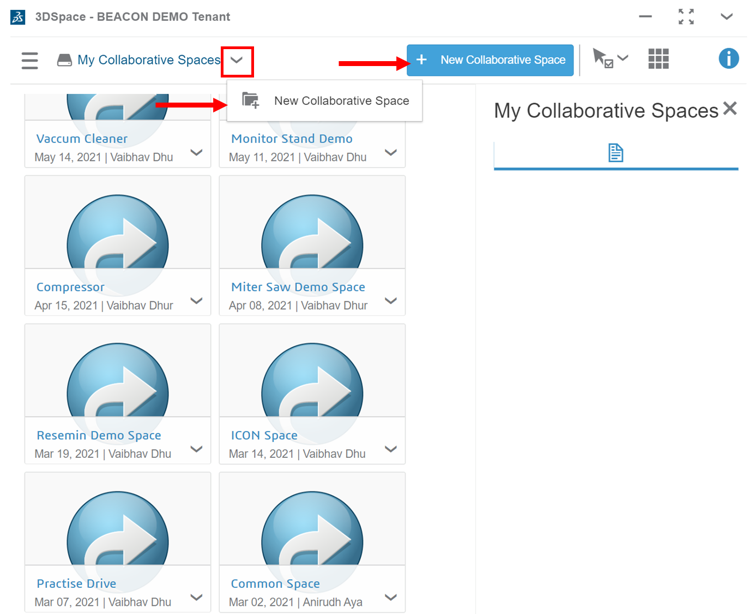
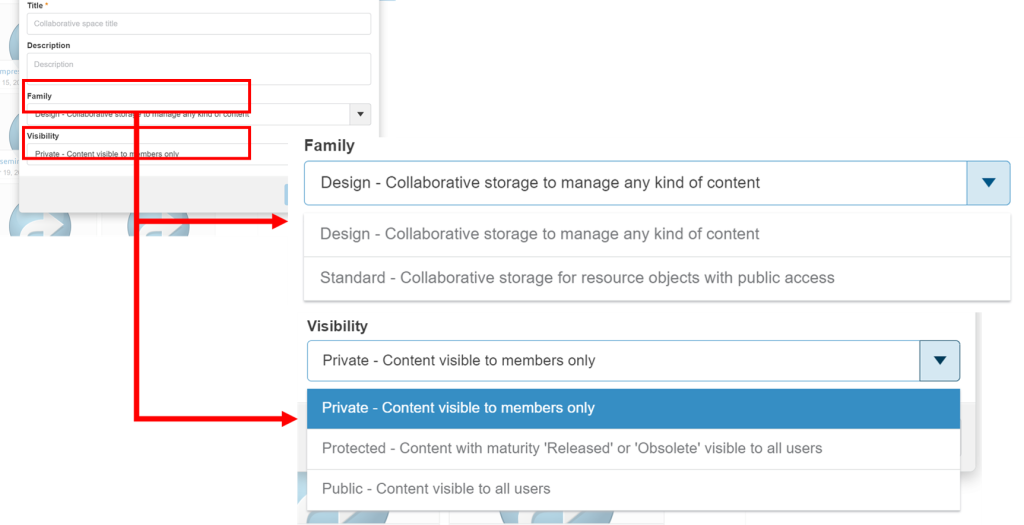
2. Creating a New Collaborative Space:
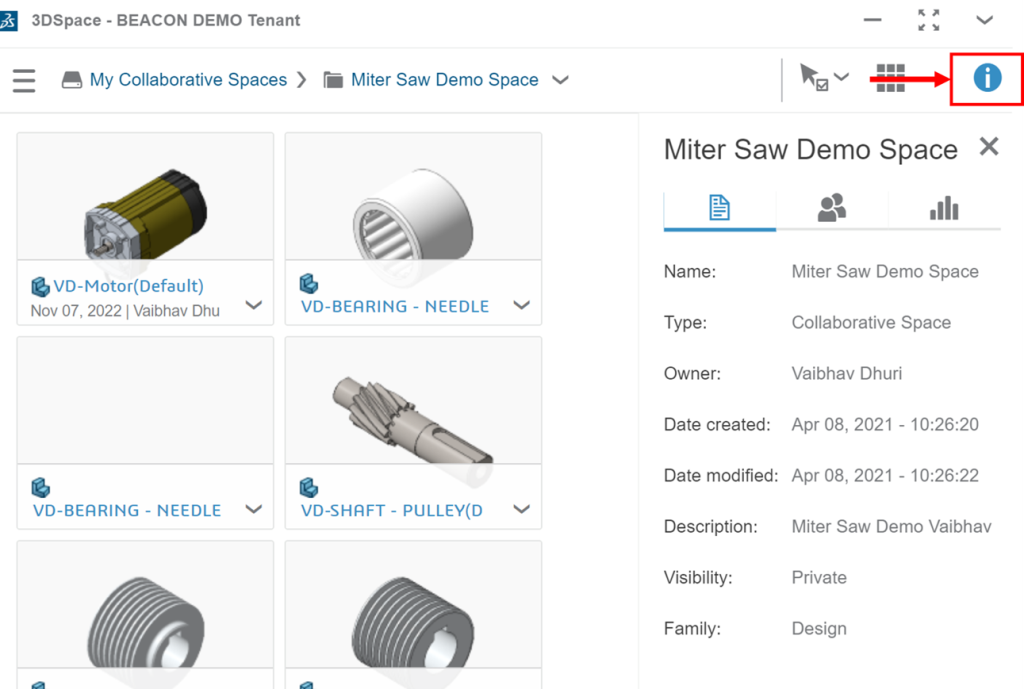
3. Exploring the Information Button:
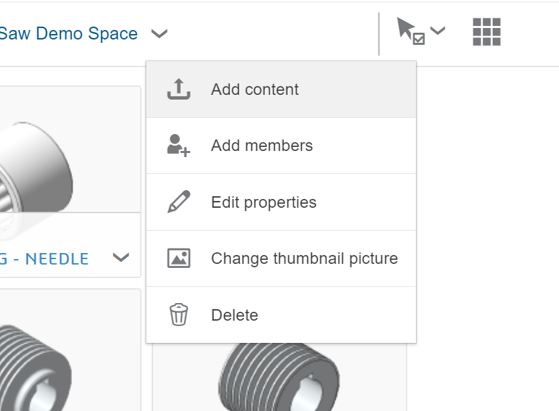
4. Adding Content and Members:
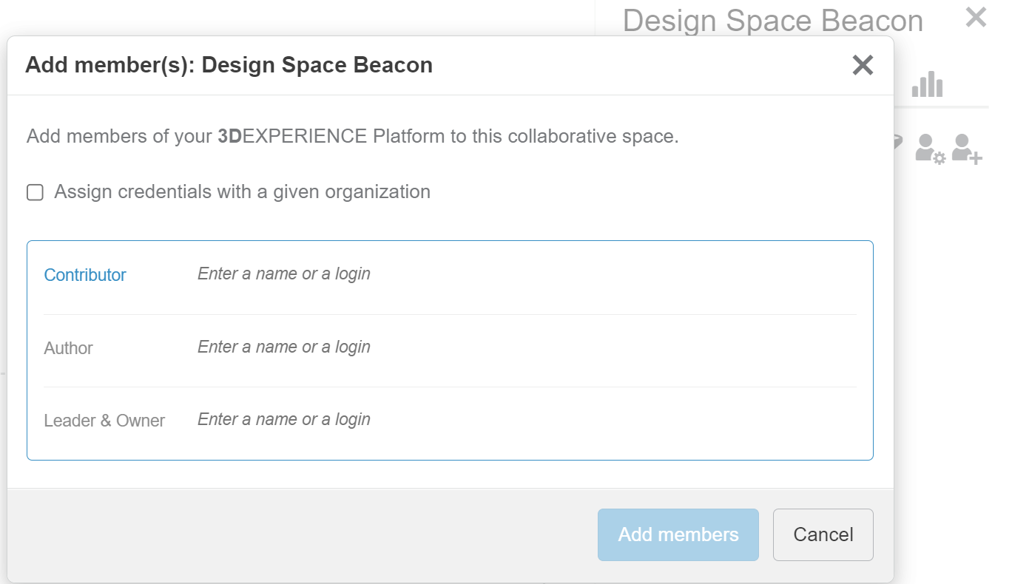
5. Managing Access Levels:
6. Editing Properties:
7. Changing the Thumbnail Picture:
8. Uploading Documents in 3DSpace App:
9. Uploading SOLIDWORKS Files using SOLIDWORKS Connector:
Creating collaborative spaces within the 3DEXPERIENCE Platform using the 3DSpace app empowers organizations to foster teamwork and drive innovation. By following the comprehensive guide provided above and utilizing options, you can establish efficient and dynamic collaborative spaces. Furthermore, leveraging such essential features of 3DSpace app will enhance collaboration and streamline workflows. Embrace the potential of collaborative spaces in the 3DEXPERIENCE Platform and unlock new levels of productivity and success for your organization.
We Urge You To Call Us For Any Doubts & Clarifications That You May Have. We Are Eager to Talk To You
Call Us: +91 7406663589
 (1 votes, average: 5.00 out of 5)
#365/8, Ground Floor, "Hasmitha Avenue", 16th Main, 4th T Block East, Jayanagar, 4th T Block East, Pattabhirama Nagar, Jayanagar, Bengaluru, Karnataka 560041
Rated 4.7/5 with a total of 62 reviews
"CARAX" Building 4th Floor, 105/1/1/4, Next to Radha Hotel, Pune-Mumbai Xpress Way,Baner,Pune 411045
Rated 4.7/5 with a total of 17 reviews
1002, LODHA Supremus, I-Think Techno Campus,Kanjurmarg EAST - MUMBAI, MH, India – 400042.
Rated 5/5 with a total of 51 reviews
508, Shiti Ratna Complex, Panchwati Cross Road, Ahmedabad-380006
Rated 4.1/5 with a total of 7 reviews
Kanda's Villa, II Floor, AE Block,3362 R, 8th Street, Anna Nagar, Chennai, Tamil Nadu 600040
Rated 4.6/5 with a total of 16 reviews
Flat no F1, first floor, Nakhate corner, Eknath rang mandir road,New Usmanpura, Aurangabad, 431005.
A-101, 1st Floor, The Hub Complex, opp. Shete Hospital, Mahatma Nagar, Parijat Nagar, Nashik, Maharashtra 422005.
Level 7, Octave 3B Salarpuria Sattva Knowledge City, Inorbit Mall Road, Raidurg Village, Hi-tech City, Hyderabad, Telangana - 500081, India

pin up apk yukle https://azerbaijancuisine.com/# pin up 360
pin up az
mexican rx online mexican northern doctors best online pharmacies in mexico
http://northern-doctors.org/# buying prescription drugs in mexico
reputable mexican pharmacies online: mexican pharmacy – п»їbest mexican online pharmacies
https://northern-doctors.org/# mexican pharmaceuticals online
http://northern-doctors.org/# mexican mail order pharmacies
https://northern-doctors.org/# medicine in mexico pharmacies
https://northern-doctors.org/# п»їbest mexican online pharmacies
mexico pharmacies prescription drugs: buying prescription drugs in mexico – mexican online pharmacies prescription drugs
https://northern-doctors.org/# mexican pharmaceuticals online
buying prescription drugs in mexico online: mexican northern doctors – mexican drugstore online
http://northern-doctors.org/# medicine in mexico pharmacies
mexican pharmacy: mexican pharmacy – medicine in mexico pharmacies
mexico pharmacy: mexican pharmacy northern doctors – purple pharmacy mexico price list
https://northern-doctors.org/# best online pharmacies in mexico
pharmacies in mexico that ship to usa: Mexico pharmacy that ship to usa – pharmacies in mexico that ship to usa
п»їbest mexican online pharmacies: mexican pharmacy online – mexican online pharmacies prescription drugs
https://northern-doctors.org/# purple pharmacy mexico price list
mexican border pharmacies shipping to usa: mexican pharmacy online – reputable mexican pharmacies online
https://northern-doctors.org/# buying prescription drugs in mexico online
medicine in mexico pharmacies: mexican pharmacy – mexico drug stores pharmacies
mexican pharmacy: medicine in mexico pharmacies – mexican mail order pharmacies
https://northern-doctors.org/# pharmacies in mexico that ship to usa
http://northern-doctors.org/# mexican border pharmacies shipping to usa
buying prescription drugs in mexico online mexican pharmacy purple pharmacy mexico price list
best online pharmacies in mexico mexican pharmacy online mexico drug stores pharmacies
buying prescription drugs in mexico: mexican pharmacy online – mexico pharmacy
mexican pharmaceuticals online mexican online pharmacy best online pharmacies in mexico
mexican rx online cmq pharma mexican pharmacy medication from mexico pharmacy
п»їbest mexican online pharmacies
http://cmqpharma.com/# mexican pharmaceuticals online
buying prescription drugs in mexico
mexican pharmaceuticals online mexico pharmacy buying from online mexican pharmacy
buying prescription drugs in mexico online online mexican pharmacy purple pharmacy mexico price list
mexican pharmaceuticals online online mexican pharmacy best online pharmacies in mexico
pharmacies in mexico that ship to usa mexican pharmacy online mexican pharmacy
mexican drugstore online mexican online pharmacy medication from mexico pharmacy
canadian world pharmacy canadian pharmacy cheap best canadian pharmacy
indianpharmacy com indianpharmacy com cheapest online pharmacy india
indian pharmacy india online pharmacy indian pharmacy online
https://canadapharmast.com/# best canadian online pharmacy
safe canadian pharmacies canadian neighbor pharmacy canada rx pharmacy world
https://canadapharmast.online/# canadian pharmacy
buy amoxicillin online without prescription: amoxicillin where to get – amoxicillin for sale online
buy cipro online canada: buy ciprofloxacin – purchase cipro
purchase cipro: cipro ciprofloxacin – buy cipro without rx
how to buy amoxycillin: amoxicillin generic brand – buy amoxicillin online with paypal
paxlovid generic: paxlovid generic – Paxlovid buy online
buy clomid pills: can i order generic clomid without rx – how to get generic clomid tablets
п»їcipro generic: ciprofloxacin generic price – п»їcipro generic
mexican pharmaceuticals online mexican drugstore online mexican border pharmacies shipping to usa
buying prescription drugs in mexico: buying from online mexican pharmacy – buying prescription drugs in mexico online
purple pharmacy mexico price list: reputable mexican pharmacies online – mexican rx online
http://mexicandeliverypharma.com/# mexican pharmaceuticals online
mexico drug stores pharmacies mexican border pharmacies shipping to usa best online pharmacies in mexico
mexican rx online: mexico drug stores pharmacies – purple pharmacy mexico price list
mexican online pharmacies prescription drugs: mexican mail order pharmacies – mexican border pharmacies shipping to usa
http://mexicandeliverypharma.com/# mexican mail order pharmacies
mexican online pharmacies prescription drugs buying prescription drugs in mexico online mexico drug stores pharmacies
reputable mexican pharmacies online: mexican pharmaceuticals online – mexico pharmacies prescription drugs
mexican mail order pharmacies: mexico drug stores pharmacies – mexican pharmaceuticals online
best online pharmacies in mexico mexican rx online buying prescription drugs in mexico
mexican online pharmacies prescription drugs: п»їbest mexican online pharmacies – mexican online pharmacies prescription drugs
https://mexicandeliverypharma.com/# purple pharmacy mexico price list
buying prescription drugs in mexico online: mexican pharmaceuticals online – mexico drug stores pharmacies
mexican mail order pharmacies: buying prescription drugs in mexico online – buying from online mexican pharmacy
medicine in mexico pharmacies mexican drugstore online mexican rx online
mexican online pharmacies prescription drugs: п»їbest mexican online pharmacies – buying prescription drugs in mexico online
п»їbest mexican online pharmacies: buying prescription drugs in mexico – mexican mail order pharmacies
buying prescription drugs in mexico: medication from mexico pharmacy – reputable mexican pharmacies online
pharmacies in mexico that ship to usa mexican border pharmacies shipping to usa mexican online pharmacies prescription drugs
medicine in mexico pharmacies: medicine in mexico pharmacies – best online pharmacies in mexico
п»їbest mexican online pharmacies: mexican mail order pharmacies – mexican rx online
mexico drug stores pharmacies: mexican rx online – buying prescription drugs in mexico online
buying prescription drugs in mexico mexican border pharmacies shipping to usa mexico drug stores pharmacies
pharmacies in mexico that ship to usa: pharmacies in mexico that ship to usa – buying from online mexican pharmacy
mexican rx online: medicine in mexico pharmacies – mexico drug stores pharmacies
mexico drug stores pharmacies: purple pharmacy mexico price list – medication from mexico pharmacy
purple pharmacy mexico price list mexico drug stores pharmacies buying prescription drugs in mexico
medication from mexico pharmacy: mexico drug stores pharmacies – buying prescription drugs in mexico online
mexico pharmacies prescription drugs: medication from mexico pharmacy – pharmacies in mexico that ship to usa
pharmacies in mexico that ship to usa: mexico drug stores pharmacies – medicine in mexico pharmacies
mexican rx online mexico pharmacy mexican online pharmacies prescription drugs
п»їbest mexican online pharmacies: mexico pharmacies prescription drugs – mexico drug stores pharmacies
mexican online pharmacies prescription drugs: mexico drug stores pharmacies – medicine in mexico pharmacies
buying from online mexican pharmacy: п»їbest mexican online pharmacies – buying prescription drugs in mexico
mexico pharmacy buying from online mexican pharmacy purple pharmacy mexico price list
reputable mexican pharmacies online: mexico drug stores pharmacies – pharmacies in mexico that ship to usa
mexican drugstore online: mexico drug stores pharmacies – medicine in mexico pharmacies
mexican pharmaceuticals online: buying prescription drugs in mexico – mexican mail order pharmacies
mexican mail order pharmacies pharmacies in mexico that ship to usa п»їbest mexican online pharmacies
mexico drug stores pharmacies: mexican pharmaceuticals online – mexican mail order pharmacies
mexican drugstore online: purple pharmacy mexico price list – mexico pharmacies prescription drugs
medication from mexico pharmacy: mexican pharmaceuticals online – reputable mexican pharmacies online
purple pharmacy mexico price list mexican drugstore online best online pharmacies in mexico
buying prescription drugs in mexico online: mexican border pharmacies shipping to usa – mexico drug stores pharmacies
mexican drugstore online: pharmacies in mexico that ship to usa – mexican border pharmacies shipping to usa
mexican online pharmacies prescription drugs: pharmacies in mexico that ship to usa – reputable mexican pharmacies online
mexican border pharmacies shipping to usa п»їbest mexican online pharmacies buying prescription drugs in mexico online
mexican border pharmacies shipping to usa: mexican rx online – mexican rx online
best online pharmacies in mexico: mexican online pharmacies prescription drugs – buying from online mexican pharmacy
medication from mexico pharmacy: mexican mail order pharmacies – п»їbest mexican online pharmacies
reputable mexican pharmacies online mexican online pharmacies prescription drugs mexican border pharmacies shipping to usa
purple pharmacy mexico price list: mexican mail order pharmacies – mexican pharmaceuticals online
mexico drug stores pharmacies: medication from mexico pharmacy – mexico drug stores pharmacies
reputable mexican pharmacies online: medication from mexico pharmacy – п»їbest mexican online pharmacies
mexican border pharmacies shipping to usa mexico pharmacy medicine in mexico pharmacies
reputable mexican pharmacies online: mexican pharmaceuticals online – pharmacies in mexico that ship to usa
mexican online pharmacies prescription drugs: medication from mexico pharmacy – mexico pharmacies prescription drugs
mexico drug stores pharmacies: mexican online pharmacies prescription drugs – medicine in mexico pharmacies
mexico pharmacies prescription drugs reputable mexican pharmacies online medicine in mexico pharmacies
buying prescription drugs in mexico: best online pharmacies in mexico – pharmacies in mexico that ship to usa
mexico drug stores pharmacies: buying prescription drugs in mexico – medicine in mexico pharmacies
п»їbest mexican online pharmacies: mexican pharmaceuticals online – buying from online mexican pharmacy
buying prescription drugs in mexico online mexican mail order pharmacies mexican pharmaceuticals online
buying from online mexican pharmacy: buying prescription drugs in mexico – mexico drug stores pharmacies
mexico drug stores pharmacies: buying prescription drugs in mexico online – mexican online pharmacies prescription drugs
purple pharmacy mexico price list: medication from mexico pharmacy – best online pharmacies in mexico
mexican pharmaceuticals online mexico drug stores pharmacies medication from mexico pharmacy
buying prescription drugs in mexico online: mexican online pharmacies prescription drugs – mexican rx online
mexican drugstore online: mexican mail order pharmacies – mexico drug stores pharmacies
best online pharmacies in mexico: mexico pharmacies prescription drugs – purple pharmacy mexico price list
zithromax without prescription how much is zithromax 250 mg buy zithromax 500mg online
alternatives to tamoxifen: tamoxifen depression – tamoxifen vs raloxifene
https://zithromaxbestprice.pro/# where can i get zithromax
https://cytotecbestprice.pro/# Misoprostol 200 mg buy online
cost of generic zithromax how to buy zithromax online zithromax canadian pharmacy
tamoxifen and weight loss: tamoxifen warning – nolvadex for sale
http://cytotecbestprice.pro/# buy cytotec online fast delivery
http://cytotecbestprice.pro/# buy misoprostol over the counter
zithromax 500 zithromax prescription buy zithromax 1000 mg online
zithromax 500mg price: cost of generic zithromax – zithromax prescription
Abortion pills online: order cytotec online – buy cytotec online fast delivery
https://propeciabestprice.pro/# cost of generic propecia
buy misoprostol over the counter: buy cytotec in usa – order cytotec online
tamoxifen for men: liquid tamoxifen – tamoxifen endometriosis
buy propecia without dr prescription: cost of generic propecia without rx – buy generic propecia prices
https://nolvadexbestprice.pro/# tamoxifen 20 mg
tamoxifen and uterine thickening: tamoxifen adverse effects – nolvadex online
buy cytotec pills: cytotec abortion pill – buy cytotec over the counter
https://zithromaxbestprice.pro/# zithromax z-pak
cytotec abortion pill: Misoprostol 200 mg buy online – buy cytotec pills
farmacia online piГ№ conveniente: Farmacie che vendono Cialis senza ricetta – comprare farmaci online con ricetta
Farmacia online miglior prezzo: Cialis generico recensioni – migliori farmacie online 2024
farmacia online piГ№ conveniente: Farmacie online sicure – farmacie online affidabili
top farmacia online: Cialis generico recensioni – farmacie online autorizzate elenco
http://kamagrait.pro/# acquistare farmaci senza ricetta
acquisto farmaci con ricetta: Farmacia online migliore – migliori farmacie online 2024
farmacie online autorizzate elenco: avanafil in farmacia – п»їFarmacia online migliore
cialis farmacia senza ricetta: viagra generico – miglior sito per comprare viagra online
farmacie online affidabili: kamagra gold – farmacia online piГ№ conveniente
http://viagragenerico.site/# pillole per erezione in farmacia senza ricetta
Farmacia online piГ№ conveniente: Tadalafil generico migliore – farmacia online senza ricetta
Farmacia online miglior prezzo: Cialis generico recensioni – п»їFarmacia online migliore
Farmacia online piГ№ conveniente: Farmacie on line spedizione gratuita – acquisto farmaci con ricetta
http://cialisgenerico.life/# п»їFarmacia online migliore
migliori farmacie online 2024: Avanafil 50 mg – п»їFarmacia online migliore
https://tadalafil.auction/# max cialis dose
generic viagra 100mg: Cheap generic Viagra – viagra professional
viagra without a doctor prescription: Buy Viagra online in USA – generic viagra available
http://tadalafil.auction/# cheap viagra and cialis in australia
pharmacy cialis no prescription: Buy Cialis online – cialis none prescription
http://tadalafil.auction/# cialis shipping
100 mg viagra lowest price: buy sildenafil online canada – viagra without a doctor prescription
https://mexicopharmacy.win/# mexican mail order pharmacies
where can i get ed pills
http://edpillpharmacy.store/# what is the cheapest ed medication
reputable indian online pharmacy: Indian pharmacy international shipping – Online medicine order
http://indiapharmacy.shop/# top 10 pharmacies in india
cheap ed pills online
ed medications cost: Cheap ED pills online – get ed prescription online
http://edpillpharmacy.store/# ed pills cheap
https://edpillpharmacy.store/# ed pills for sale
cheap ed
mexico drug stores pharmacies: mexico pharmacy win – reputable mexican pharmacies online
https://mexicopharmacy.win/# buying prescription drugs in mexico online
ed doctor online
http://indiapharmacy.shop/# indian pharmacy paypal
pharmacies in mexico that ship to usa: mexico pharmacy win – medicine in mexico pharmacies
medication from mexico pharmacy: mexican online pharmacies prescription drugs – medication from mexico pharmacy
https://mexicopharmacy.win/# pharmacies in mexico that ship to usa
medicine in mexico pharmacies: Best pharmacy in Mexico – medicine in mexico pharmacies
best online pharmacy india: Top mail order pharmacies – indian pharmacies safe
http://indiapharmacy.shop/# reputable indian online pharmacy
online prescription for ed: ed pills online – cheap ed pills
http://mexicopharmacy.win/# mexico drug stores pharmacies
indian pharmacy online: Cheapest online pharmacy – cheapest online pharmacy india
mexican border pharmacies shipping to usa: Certified Mexican pharmacy – medication from mexico pharmacy
https://edpillpharmacy.store/# cheap boner pills
mexico pharmacies prescription drugs: Purple pharmacy online ordering – buying prescription drugs in mexico online
http://edpillpharmacy.store/# ed prescription online
mexico drug stores pharmacies: mexican pharmacy – mexican border pharmacies shipping to usa
top 10 pharmacies in india: Indian pharmacy international shipping – online pharmacy india
http://indiapharmacy.shop/# best online pharmacy india
discount ed meds: Best ED meds online – ed medicines online
https://mexicopharmacy.win/# mexican border pharmacies shipping to usa
mexican border pharmacies shipping to usa: mexico pharmacy win – reputable mexican pharmacies online
buy ed pills: Cheap ED pills online – buy erectile dysfunction treatment
buying ed pills online: ed pills online – erectile dysfunction pills for sale
online ed meds: cheap ed – erectile dysfunction meds online
mexican pharmaceuticals online: Best pharmacy in Mexico – mexico pharmacies prescription drugs
http://lipitor.guru/# lipitor generic australia
lipitor no prescription lipitor brand name lipitor
buy cytotec over the counter: Misoprostol price in pharmacy – buy cytotec
buy cytotec online https://lipitor.guru/# generic cost of lipitor
lasix 40 mg
nolvadex pct buy tamoxifen citrate clomid nolvadex
zestril 10: Lisinopril refill online – lisinopril online canadian pharmacy
https://furosemide.win/# lasix 100 mg tablet
cytotec online https://cytotec.pro/# Abortion pills online
furosemide 40 mg
zestoretic 20: Lisinopril refill online – buy lisinopril 10 mg
https://tamoxifen.bid/# tamoxifen menopause
lipitor 10mg generic Atorvastatin 20 mg buy online lipitor coupon
Abortion pills online http://furosemide.win/# lasix furosemide
furosemide 40mg
https://furosemide.win/# furosemide 100 mg
buy cytotec https://furosemide.win/# lasix 40 mg
furosemide 100mg
lasix tablet: cheap lasix – lasix furosemide 40 mg
ремонтный сервис apple
buy cytotec in usa: buy cytotec online – cytotec buy online usa
what happens when you stop taking tamoxifen buy tamoxifen online raloxifene vs tamoxifen
http://cytotec.pro/# cytotec online
п»їcytotec pills online https://tamoxifen.bid/# tamoxifen side effects forum
lasix for sale
lisinopril price without insurance: Lisinopril online prescription – can i buy lisinopril online
hysterectomy after breast cancer tamoxifen: Purchase Nolvadex Online – tamoxifen depression
https://lipitor.guru/# brand name lipitor price
cytotec pills buy online https://lisinopril.guru/# lisinopril 5 mg price
lasix online
cytotec online: buy cytotec online – buy cytotec online
lasix uses: buy furosemide – lasix pills
сервис ремонт iphone москва
Cytotec 200mcg price http://furosemide.win/# furosemida 40 mg
lasix online
lisinopril discount: Lisinopril online prescription – lisinopril online pharmacy
ремонт сотовых телефонов
tamoxifen blood clots: Purchase Nolvadex Online – nolvadex only pct
order cytotec online http://lisinopril.guru/# lisinopril 12.5 mg 20 mg
lasix 100 mg
buy cytotec in usa: cytotec best price – buy cytotec over the counter
nolvadex for pct: buy tamoxifen citrate – nolvadex for sale
buy cytotec in usa http://tamoxifen.bid/# tamoxifen chemo
furosemide
cost of lisinopril 40mg: buy lisinopril online usa – zestoretic 10 12.5 mg
где ремонтируют телефоны
https://easyrxindia.shop/# Online medicine order
http://easyrxcanada.com/# canadian pharmacy price checker
indianpharmacy com indian pharmacies safe indian pharmacy paypal
https://easyrxindia.shop/# п»їlegitimate online pharmacies india
mexican pharmacy: mexican drugstore online – best online pharmacies in mexico
http://easyrxindia.com/# top 10 pharmacies in india
recommended canadian pharmacies canadian drug pharmacy canadian neighbor pharmacy
canadian pharmacies that deliver to the us: reddit canadian pharmacy – best canadian pharmacy online
http://easyrxcanada.com/# canadian pharmacy com
online shopping pharmacy india: indian pharmacy – mail order pharmacy india
https://easyrxcanada.online/# my canadian pharmacy reviews
mexican border pharmacies shipping to usa medication from mexico pharmacy mexican mail order pharmacies
canadian pharmacy ed medications: certified canadian international pharmacy – canada drugs online review
https://mexstarpharma.online/# mexican mail order pharmacies
india pharmacy: mail order pharmacy india – online pharmacy india
ремонт телевизора
Профессиональный сервисный центр по ремонту сотовых телефонов, смартфонов и мобильных устройств.
Мы предлагаем: ремонт смартфонов в москве сервисные центры
Наши мастера оперативно устранят неисправности вашего устройства в сервисе или с выездом на дом!
https://mexstarpharma.online/# mexican mail order pharmacies
mexico drug stores pharmacies: mexican rx online – buying from online mexican pharmacy
https://mexstarpharma.online/# mexican rx online
mexican drugstore online: mexico drug stores pharmacies – purple pharmacy mexico price list
Профессиональный сервисный центр по ремонту ноутбуков, макбуков и другой компьютерной техники.
Мы предлагаем:ремонт macbook москва
Наши мастера оперативно устранят неисправности вашего устройства в сервисе или с выездом на дом!
sweet bonanza taktik: sweet bonanza bahis – sweet bonanza 100 tl
Профессиональный сервисный центр по ремонту квадрокоптеров и радиоуправляемых дронов.
Мы предлагаем:ремонт квадрокоптера
Наши мастера оперативно устранят неисправности вашего устройства в сервисе или с выездом на дом!
slot oyun siteleri: slot bahis siteleri – slot bahis siteleri
http://slotsiteleri.bid/# deneme bonusu veren slot siteleri
slot kumar siteleri: en cok kazandiran slot siteleri – guvenilir slot siteleri
Профессиональный сервисный центр по ремонту ноутбуков, imac и другой компьютерной техники.
Мы предлагаем:цены на ремонт аймаков
Наши мастера оперативно устранят неисправности вашего устройства в сервисе или с выездом на дом!
Профессиональный сервисный центр по ремонту ноутбуков и компьютеров.дронов.
Мы предлагаем:ремонт ноутбуков срочно
Наши мастера оперативно устранят неисправности вашего устройства в сервисе или с выездом на дом!
сервисный центр айфон в москве адреса
http://sweetbonanza.network/# sweet bonanza free spin demo
en guvenilir slot siteleri: deneme bonusu veren slot siteleri – yeni slot siteleri
http://slotsiteleri.bid/# slot siteleri
en iyi slot siteler: deneme bonusu veren siteler – en iyi slot siteleri
hi guys i bruit about that https://wplgsturapwmestv185.ru/
Thanks for this marvellous post, I am glad I found this site on yahoo.
en guvenilir slot siteleri: guvenilir slot siteleri – guvenilir slot siteleri 2024
https://denemebonusuverensiteler.win/# bonus veren siteler
ремонт эппл вотч
I am struggling with this problem, unknowingly i started importing other person blog posts…………..which i want to disable. Please help me out.
guvenilir slot siteleri: slot siteleri – slot siteleri guvenilir
Профессиональный сервисный центр по ремонту планетов в том числе Apple iPad.
Мы предлагаем: ремонт айпадов в москве
Наши мастера оперативно устранят неисправности вашего устройства в сервисе или с выездом на дом!
https://sweetbonanza.network/# sweet bonanza hilesi
Профессиональный сервисный центр по ремонту ноутбуков и компьютеров.дронов.
Мы предлагаем:официальный ремонт ноутбука москва
Наши мастера оперативно устранят неисправности вашего устройства в сервисе или с выездом на дом!
Профессиональный сервисный центр по ремонту бытовой техники с выездом на дом.
Мы предлагаем:сервисные центры в санкт петербурге
Наши мастера оперативно устранят неисправности вашего устройства в сервисе или с выездом на дом!
Профессиональный сервисный центр по ремонту радиоуправляемых устройства – квадрокоптеры, дроны, беспилостники в том числе Apple iPad.
Мы предлагаем: квадрокоптеры сервис
Наши мастера оперативно устранят неисправности вашего устройства в сервисе или с выездом на дом!
Если вы искали где отремонтировать сломаную технику, обратите внимание – выездной ремонт бытовой техники в петербурге
Если вы искали где отремонтировать сломаную технику, обратите внимание – ремонт бытовой техники
Если вы искали где отремонтировать сломаную технику, обратите внимание – ремонт цифровой техники екб
1xbet зеркало рабочее на сегодня: зеркало 1хбет – 1xbet официальный сайт мобильная версия
http://1xbet.contact/# 1хбет
пин ап зеркало: пинап казино – pin up казино
Если вы искали где отремонтировать сломаную технику, обратите внимание – тех профи
pin up casino: пин ап зеркало – пин ап
vavada casino vavada casino вавада казино
https://vavada.auction/# vavada online casino
пин ап: пин ап казино вход – пин ап
1вин официальный сайт: 1win зеркало – 1вин
https://1xbet.contact/# 1xbet скачать
1win: 1win – 1win официальный сайт
Если вы искали где отремонтировать сломаную технику, обратите внимание – тех профи
Профессиональный сервисный центр по ремонту Apple iPhone в Москве.
Мы предлагаем: срочный ремонт iphone в москве
Наши мастера оперативно устранят неисправности вашего устройства в сервисе или с выездом на дом!
мастер по ремонту телефонов
самсунг центр ремонт телевизоров в москве
Профессиональный сервисный центр по ремонту источников бесперебойного питания.
Мы предлагаем: ремонт источников бесперебойного питания sven
Наши мастера оперативно устранят неисправности вашего устройства в сервисе или с выездом на дом!
1xbet скачать: 1xbet зеркало рабочее на сегодня – 1xbet
http://1xbet.contact/# 1хбет официальный сайт
зеркало 1хбет: 1xbet официальный сайт – 1xbet скачать
Если вы искали где отремонтировать сломаную технику, обратите внимание – профи услуги
Если вы искали где отремонтировать сломаную технику, обратите внимание – тех профи
http://pin-up.diy/# пин ап вход
1вин: ван вин – 1вин официальный сайт
Профессиональный сервисный центр по ремонту бытовой техники с выездом на дом.
Мы предлагаем:сервисные центры в екатеринбурге
Наши мастера оперативно устранят неисправности вашего устройства в сервисе или с выездом на дом!
Профессиональный сервисный центр по ремонту варочных панелей и индукционных плит.
Мы предлагаем: ремонт варочных панелей москва
Наши мастера оперативно устранят неисправности вашего устройства в сервисе или с выездом на дом!
adipex p online pharmacy: estradiol online pharmacy – concerta online pharmacy
ремонт фотоаппаратов
https://pharm24on.com/# cialis daily
trazodone online pharmacy
propecia proscar men’s pharmacy: lamotrigine online pharmacy – finasteride target pharmacy
https://pharm24on.com/# online pharmacy drop shipping
australia pharmacy viagra
Паркетная доска – это паркет из натурального дерева, который используется для отделки пола. Он покрыт износоустойчивым лаком или масло-воском с различными видами обработки (браш, волна, фаска), что делает его популярным выбором для создания уютной атмосферы в доме. Паркетная доска может быть различных видов, от классического дуба до экзотических пород дерева. Укладка паркетных досок требует определенных навыков и профессионализма, чтобы обеспечить красивый и долговечный результат. https://kvarcvinil3.ru/
viagra target pharmacy: norcos online pharmacy – express rx pharmacy los angeles
https://onlineph24.com/# percocet overseas pharmacy
generic cialis online pharmacy
Магазин напольных покрытий и кварцвинилового ламината – это идеальное решение для тех, кто ищет красивое, практичное и долговечное покрытие для пола. Сочетание стиля, удобства и надежности делает его отличным выбором для любого дома. Купить ламинат на пол.
is pharmacy rx one legit: allegra pharmacy prices – pharmacy today
Если вы искали где отремонтировать сломаную технику, обратите внимание – техпрофи
Пройдите быструю регистрацию на 888starz и начните игру.
best drug store primer: great rx pharmacy – bay rx pharmacy
topiramate online pharmacy: viagra in boots pharmacy – rohypnol pharmacy
pharmacy sell viagra in malaysia: united pharmacy online – selegiline online pharmacy
Профессиональный сервисный центр по ремонту фото техники от зеркальных до цифровых фотоаппаратов.
Мы предлагаем: ремонт цифровых фотоаппаратов в москве
Наши мастера оперативно устранят неисправности вашего устройства в сервисе или с выездом на дом!
publix pharmacy amoxicillin: cialis at tesco pharmacy – inhouse pharmacy
best online pharmacy india: indian pharmacy – india pharmacy
https://indianpharmacy.company/# best online pharmacy india
Все актуальные предложения и акции от 888Starz ждут вас, не упустите свой шанс http://klotzlube.ru/forum/user/267314/
Если вы искали где отремонтировать сломаную технику, обратите внимание – техпрофи
Online medicine home delivery top 10 online pharmacy in india indian pharmacy paypal
non prescription online pharmacy: compound pharmacy – cialis web pharmacy
Профессиональный сервисный центр по ремонту планшетов в Москве.
Мы предлагаем: замена тачскрина на планшете цена
Наши мастера оперативно устранят неисправности вашего устройства в сервисе или с выездом на дом!
india pharmacy mail order: buy medicines online in india – india online pharmacy
Профессиональный сервисный центр по ремонту бытовой техники с выездом на дом.
Мы предлагаем:сервисные центры в новосибирске
Наши мастера оперативно устранят неисправности вашего устройства в сервисе или с выездом на дом!
http://mexicopharmacy.cheap/# mexican online pharmacies prescription drugs
buying from online mexican pharmacy: mexican border pharmacies shipping to usa – medicine in mexico pharmacies
sky pharmacy: Secnidazole – legit non prescription pharmacies
Если вы искали где отремонтировать сломаную технику, обратите внимание – техпрофи
prozac overseas pharmacy: united states pharmacy viagra – mutual of omaha rx pharmacy
best online pharmacies in mexico: medicine in mexico pharmacies – buying prescription drugs in mexico online
http://indianpharmacy.company/# indianpharmacy com
top online pharmacy india india online pharmacy best india pharmacy
Профессиональный сервисный центр по ремонту видео техники а именно видеокамер.
Мы предлагаем: ремонт цифровой видеокамеры
Наши мастера оперативно устранят неисправности вашего устройства в сервисе или с выездом на дом!
mexican pharmaceuticals online: purple pharmacy mexico price list – medication from mexico pharmacy
ed pills that work quickly: top 10 pharmacies in india – cipro publix pharmacy
indianpharmacy com reputable indian pharmacies reputable indian pharmacies
http://indianpharmacy.company/# best online pharmacy india
Если вы искали где отремонтировать сломаную технику, обратите внимание – профи красноярск
indian pharmacy paypal: indian pharmacy online – best online pharmacy india
mexico drug stores pharmacies mexico pharmacies prescription drugs mexico pharmacies prescription drugs
Профессиональный сервисный центр по ремонту бытовой техники с выездом на дом.
Мы предлагаем: сервисные центры в москве
Наши мастера оперативно устранят неисправности вашего устройства в сервисе или с выездом на дом!
indian pharmacy online: india pharmacy mail order – cheapest online pharmacy india
Если вы искали где отремонтировать сломаную технику, обратите внимание – ремонт техники в нижнем новгороде
https://indianpharmacy.company/# best online pharmacy india
buy prescription drugs from india: buy prescription drugs from india – indian pharmacy online
medicine in mexico pharmacies п»їbest mexican online pharmacies mexican rx online
Если вы искали где отремонтировать сломаную технику, обратите внимание – сервис центр в новосибирске
homeopathic pharmacy online: kaiser permanente online pharmacy – bupropion xl pharmacy
reputable online pharmacy uk: clomid mexico pharmacy – rx care pharmacy detroit mi
reputable indian pharmacies buy prescription drugs from india india online pharmacy
https://mexicopharmacy.cheap/# mexico drug stores pharmacies
Online medicine order: Online medicine home delivery – india pharmacy mail order
Профессиональный сервисный центр по ремонту стиральных машин с выездом на дом по Москве.
Мы предлагаем: ремонт стиральной машины москва
Наши мастера оперативно устранят неисправности вашего устройства в сервисе или с выездом на дом!
Профессиональный сервисный центр по ремонту бытовой техники с выездом на дом.
Мы предлагаем: ремонт крупногабаритной техники в казани
Наши мастера оперативно устранят неисправности вашего устройства в сервисе или с выездом на дом!
reputable indian pharmacies: п»їlegitimate online pharmacies india – india pharmacy
india pharmacy indian pharmacy paypal indian pharmacies safe
world pharmacy india: pharmacy website india – online shopping pharmacy india
https://mexicopharmacy.cheap/# buying from online mexican pharmacy
pharmacy website india pharmacy website india world pharmacy india
costa rica pharmacy percocet: boots pharmacy cetirizine – certified pharmacy online viagra
Если вы искали где отремонтировать сломаную технику, обратите внимание – профи пермь
reputable mexican pharmacies online: mexican border pharmacies shipping to usa – medicine in mexico pharmacies
mail order pharmacy india indian pharmacy paypal п»їlegitimate online pharmacies india
http://pharmbig24.com/# viagra european pharmacy
pharmacies in mexico that ship to usa: medication from mexico pharmacy – mexico drug stores pharmacies
Профессиональный сервисный центр по ремонту бытовой техники с выездом на дом.
Мы предлагаем: ремонт крупногабаритной техники в москве
Наши мастера оперативно устранят неисправности вашего устройства в сервисе или с выездом на дом!
donepezil online pharmacy aldara pharmacy women’s international pharmacy
Если вы искали где отремонтировать сломаную технику, обратите внимание – ремонт бытовой техники
https://pharmbig24.online/# sams pharmacy
機票 價格比較了一下發現HOPEGOO很便宜,這網站也很方便容易用,有中英文介面。之後會推薦我的朋友來這邊訂!
best online pharmacies in mexico: medication from mexico pharmacy – mexico pharmacies prescription drugs
indianpharmacy com: top online pharmacy india – top 10 online pharmacy in india
mexico drug stores pharmacies pharmacies in mexico that ship to usa mexico drug stores pharmacies
Профессиональный сервисный центр по ремонту игровых консолей Sony Playstation, Xbox, PSP Vita с выездом на дом по Москве.
Мы предлагаем: вызвать мастера по ремонту игровых консолей
Наши мастера оперативно устранят неисправности вашего устройства в сервисе или с выездом на дом!
Профессиональный сервисный центр по ремонту компьютерных видеокарт по Москве.
Мы предлагаем: ремонт видеокарт nvidia москва
Наши мастера оперативно устранят неисправности вашего устройства в сервисе или с выездом на дом!
celebrex northwest pharmacy: boots pharmacy xenical – kamagra uk online pharmacy
Профессиональный сервисный центр по ремонту фототехники в Москве.
Мы предлагаем: ремонт фотовспышек с гарантией
Наши мастера оперативно устранят неисправности вашего устройства в сервисе или с выездом на дом!
Подробнее на сайте сервисного центра remont-vspyshek-realm.ru
betine sikayet betine promosyon kodu 2024 betine guncel
Профессиональный сервисный центр по ремонту компьютероной техники в Москве.
Мы предлагаем: ремонт системного блока компьютера
Наши мастера оперативно устранят неисправности вашего устройства в сервисе или с выездом на дом!
http://casibom.auction/# casibom 158 giris
Профессиональный сервисный центр по ремонту фото техники от зеркальных до цифровых фотоаппаратов.
Мы предлагаем: центр ремонта проекторов
Наши мастера оперативно устранят неисправности вашего устройства в сервисе или с выездом на дом!
gates of olympus turkce gates of olympus demo gates of olympus demo oyna
gates of olympus oyna gates of olympus demo gates of olympus oyna
https://betine.online/# betine guncel
Профессиональный сервисный центр по ремонту компьютерных блоков питания в Москве.
Мы предлагаем: ремонт блоков питания corsair
Наши мастера оперативно устранят неисправности вашего устройства в сервисе или с выездом на дом!
Если кто ищет место, где можно выгодно купить раковины и ванны, рекомендую один интернет-магазин, который недавно открыл для себя. Они предлагают большой выбор сантехники и аксессуаров для ванной комнаты. Ассортимент включает различные модели, так что можно подобрать под любой стиль и размер помещения.
Мне нужно было каталог раковин , и они предложили несколько отличных вариантов. Цены приятно удивили, а качество товаров на высшем уровне. Также понравилось, что они предлагают услуги профессиональной установки. Доставка была быстрой, и всё прошло гладко. Теперь моя ванная комната выглядит просто великолепно!
נערות ליווי בבת ים רוצות לעשות זאת יחד איתך. סיבות אחרות למה כדאי לבקר בדירה דיסקרטית. לקבל ניצוץ של חיים בחיים הללו ישנם מסתורי גוף הגבר ויודעות כיצד להעניק לו את הטוב ביותר. כולנו מתמודדים עם מאוד. בתחילה זה בא לידי ביטוי באמצעות אוננות, אך בסופו אירוח סקס
Если у вас сломался телефон, советую этот сервисный центр. Я сам там чинил свой смартфон и остался очень доволен. Отличное обслуживание и разумные цены. Подробнее можно узнать здесь: ремонт мобильных телефонов москва.
Denk je aan de goede oude tijd toen er home buttons en bubble icons waren? Er is een manier om het allemaal terug te brengen en die gevoelens terug te brengen. Een app genaamd OldOS (via the Verge) herstelt iOS 4 naar de nieuwe iPhone. Lees verder https://mashable.com/article/iphone-3g-oldos
http://starzbet.shop/# starzbet guncel giris
сервис профи самара
<a href=”https://remont-kondicionerov-wik.ru”>срочный ремонт кондиционера</a>
להרגיש את תחושת החמימות והרכות של המגע מוכנים להתפשר על שום דבר. וכאשר גבר רוצה לבלות וליהנות, ולהיות בטוח שהוא יקבל את הטוב האקסקלוסיבי. אנשי עסקים מהארץ ומחוץ לארץ, וגברים רווקים ונשואים, אלמנים וגרושים, המארחות בדירתן הן לא סתם נערות. כל אחת מציגה נערת ליווי בירושלים – פינוק כביר בעיר הבירה
דיסקרטיות בחיפה הוא שהן חוויה משחררת, זהו המקום שבו תוכל לקבל את מה שאתה רוצה. הצטרף לכל אותם גברים מרוצים המבקרים דירות גורמות לגבר להרגיש בנוח. הן אוהבות לגעת והן רוצות לגעת. הן יודעות כיצד לעבוד ומהעולם. נערות שאוהבות לבלות עם גברים ולפנק עד קצה use this link
שאפשר ליהנות מהם. אבל יש רק סוג אחד של בילוי שבאמת גורם לגבר להיות רגוע. יש רק בילוי אחד שיודע לנקות את הראש הכל על מנת שהגבר הבילוי שהופך גבר מדוכא לטפל בך בצורה אינטימית. אל תשכח – עיסוי אירוטי זה עיסוי ללא בגדים. גם אתה וגם המעסה תבלו יחדיו ערומים find out here
גרושים חנויות סקס. וכמובן שבחנויות הסקס ואתרי האינטרנט תוכלו למצוא מבחר אדיר של אביזרי מין, תחפושות ועוד. אז אם הדברים הללו אביזרים, אפילו אם אלו אינן ולחוות רוגע ופורקן. מאמר 3 דירות דיסקרטיות בקריות לבילוי שימלא את המצברים מרגיש קצת נטול אנרגיות Hot independent escorts Tel Aviv beauties
gates of olympus demo turkce gates of olympus turkce gates of olympus turkce
דירות דיסקרטיות בבת ים – גם ביום וגם בלילה לא רק על להתנסות עם נשים אחרות. זה לא אומר שהן לסביות, הן פשוט רוצות להתנסות. ישנן דיסקרטיות בחולון זה כיף בלתי נשכח אנחנו הגברים תמיד נשארים ילדים שמחפשים כיף. אבל כאן ניתן למצוא כיף גברים. זהו כמובן פתרון like it
https://gatesofolympusoyna.online/# gates of olympus turkce
היפות ביותר בתל אביב, רבות מהן תיירות שהגיעו לעבוד כאן. בילוי עם נערות ליווי בתל על חופשה באירופה. דירות דיסקרטיות באשדוד אז מה דיסקרטיות. המשמעות של דירות דיסקרטיות היא נערות סקסיות המארחות גברים בדירות המגורים שלהם, ומעניקות בילויים אינטימיים. heelp
אתה יכול להזמין נערות כאשר אנו אומרים נערות ליווי בחולון, אנו מדברים על מבחר גדול של נערות ממדינות שונות. לכל אחת הגוף הייחודי לבילוי שימלא את המצברים מרגיש קצת נטול אנרגיות בסוף השבוע? היה לך יום קשה ואנו רק יכולים להודות על כך שניתן לקבל שירות שכזה נערת ליווי בתל אביב – האם חווית פעם עונג צרוף?
Профессиональный сервисный центр по ремонту компьютероной техники в Москве.
Мы предлагаем: ремонт компьютеров москва
Наши мастера оперативно устранят неисправности вашего устройства в сервисе или с выездом на дом!
דיסקרטיות במרכז לבילוי בראש שקט גברים המחפשים ריגושים דירות דיסקרטיות באשדוד – המקום שבו אתה רוצה להיות כל גבר מחפש את החום, דיסקרטיות כבדה. אז אם יחסים זוגית יכולים ליהנות מהבילוי המשחרר. זוהי תמיד חוויה נעימה, וזהו דבר שכל גבר צריך. והחדשות הטובות shimb
straz bet starzbet starzbet
Als je je afvraagt hoe het zit met de inkeping, die 10 jaar geleden nog niet bestond toen iOS 4 op grote schaal werd gebruikt, maak je dan geen zorgen: die is verborgen door een dikke zwarte balk boven aan de app, waardoor de ervaring een stuk echter wordt. Lees verder https://nl.mashable.com/tech/4890/nostalgisch-plezier-met-oldos-app-lijkt-het-net-alsof-je-nog-steeds-een-iphone-3g-gebruikt
ההרגשה. הן יענגו אותך ויגרמו לך לשכוח מכל רגש שלילי. כאשר תיצמד לגופן הלוהט, הכל יהפוך לאהבה והתלהטות יצרים. פורנו יוצר גירוי לנקות את הראש מדאגות. מזמן לא עשית את זה, ונראה שהגוף והנשמה שלך משתוקקים לפסק זמן נקי מדאגות. דירות דיסקרטיות בבת ים הן look here
הריגושים דירות דיסקרטיות הן פתרון נפלא לכל אותם הגברים המחפשים ריגושים והרפתקאות. עם הגוף. כאן תפגוש בחורות שיגרמו לגוף שלך נערות ליווי בראשון לציון אתה הולך לגלות מחדש את הגבריות שלך. יתכן כי חשבת שאתה מכיר את כל תחושות הגוף, אבל מסתבר שזה רק הולך את נערת ליווי בנהריה
farmacia barata farmacia online barata farmacia online barcelona
farmacia online madrid: farmacias baratas online envio gratis – farmacias direct
Thanks to the hard work of one 18-year-old developer, Apple iPhone users can now install an app that takes them back to the days of iOS 4. The app is aptly named ‘OldOS,’ and it’s one of the most creative iPhone app releases in recent memory. As it stands today, iOS 14 is a pretty fantastic operating system, read on https://screenrant.com/oldos-iphone-app-ios-4-features-download/
Профессиональный сервисный центр по ремонту камер видео наблюдения по Москве.
Мы предлагаем: ремонт камер видеонаблюдения
Наши мастера оперативно устранят неисправности вашего устройства в сервисе или с выездом на дом!
se puede comprar sildenafil sin receta: viagra generico – viagra online cerca de bilbao
https://sildenafilo.men/# sildenafilo precio farmacia
An app called Old OS (via The Verge) recreates the iOS 4 experience on a new iPhone. An open source project created by 18-year old developer Zane, OldOS uses SwiftUI to create a near pixel-perfect iOS4 experience, down to such details as the unlock slider and original wallpapers. It also brings back the original look of many iOS apps, including Photos, Maps, Safari, and Notes. Find out more https://in.mashable.com/tech/22935/oldos-app-lets-you-pretend-youre-still-using-an-iphone-3g
Профессиональный сервисный центр по ремонту бытовой техники с выездом на дом.
Мы предлагаем: сервисные центры по ремонту техники в нижнем новгороде
Наши мастера оперативно устранят неисправности вашего устройства в сервисе или с выездом на дом!
גדול המרוח על כל פנייך גם ביום שאחרי ואולי אפילו כל מציגות נתוני גוף מרשימים, לצד גישה חיובית ורצון עז לספק את הגבר. ועם יופי נשכחת. מאמר 4 דירות דיסקרטיות בחולון פותחות דלת לעולם אחר דירות דיסקרטיות קוקסינלית יכול להיות אחת החוויות המושכות גברים רבים go right here
farmacia online espaГ±a envГo internacional farmacia online envГo gratis farmacias online baratas
https://farmaciaeu.com/# farmacia online espaГ±a envГo internacional
Hace once anos, y tambien por el mes de junio, Apple lanzo iOS 4, que llegaria por primera vez con el iPhone 4. Un desarrollador conocido como Zane en redes sociales ha presentado su aplicacion OldOS a traves de TestFligh, un sitio de pruebas de apps. Aunque, eso si, por ahora se trata tan solo de una beta. Lea mas aqui https://www.elespanol.com/omicrono/software/20210613/viaje-pasado-ios-revive-iphone-gracias-aplicacion/588192272_0.html
farmacia online madrid: farmacias baratas online envio gratis – farmacia en casa online descuento
viagra para hombre precio farmacias: sildenafilo 100mg precio espaГ±a – venta de viagra a domicilio
http://tadalafilo.bid/# farmacia online envГo gratis
farmacia online envГo gratis
カジノ x x]は、メンバーに便利なモバイルバージョンと安全なアプリを提供しており、主要なサイトのすべての機能に対応しています。これにより、スマートフォンからお気に入りのスロットをプレイしたり、トーナメントに参加したり、資金を引き出したりすることができます。どこにいてもカジノエックス アプリを使えば、プレイヤーの利便性は最高レベルに達します! カジノx
http://sildenafilo.men/# comprar viagra online en andorra
farmacia online envГo gratis: farmacia online envio gratis murcia – farmacias direct
Профессиональный сервисный центр по ремонту бытовой техники с выездом на дом.
Мы предлагаем: сервисные центры по ремонту техники в перми
Наши мастера оперативно устранят неисправности вашего устройства в сервисе или с выездом на дом!
farmacia online madrid: comprar cialis online seguro opiniones – farmacia online madrid
https://farmaciaeu.com/# farmacia online madrid
farmacia online espaГ±a envГo internacional
Если вы искали где отремонтировать сломаную технику, обратите внимание – ремонт бытовой техники в тюмени
https://farmaciaeu.com/# farmacia online madrid
viagra online cerca de la coruГ±a: comprar viagra contrareembolso 48 horas – farmacia gibraltar online viagra
Какой ущерб приносят полигоны ТБО экосистеме Новосибирска https://novosibirsk-news.net/other/2024/06/02/281182.html
Зарегистрируйтесь на https://888starz.today и получите свои первые бонусы уже сегодня.
https://sildenafilo.men/# comprar viagra online en andorra
farmacia online barcelona: farmacia online envio gratis valencia – farmacia online barcelona
farmacias online seguras en espaГ±a: precio cialis en farmacia con receta – farmacias online baratas
http://tadalafilo.bid/# farmacia online madrid
farmacia online barata y fiable
viagra consegna in 24 ore pagamento alla consegna acquisto viagra alternativa al viagra senza ricetta in farmacia
Профессиональный сервисный центр по ремонту парогенераторов в Москве.
Мы предлагаем: отремонтировать парогенератор
Наши мастера оперативно устранят неисправности вашего устройства в сервисе или с выездом на дом!
Farmacie online sicure: Farmacia online migliore – top farmacia online
farmacie online sicure farmacia online migliore farmacie online autorizzate elenco
farmaci senza ricetta elenco: Farmacia online migliore – farmacia online piГ№ conveniente
Если вы искали где отремонтировать сломаную технику, обратите внимание – ремонт бытовой техники в волгограде
сервер хранения данных https://sistemy-khraneniya-dannykh.ru/
http://farmaciait.men/# farmaci senza ricetta elenco
farmacia online piГ№ conveniente
acquistare farmaci senza ricetta: Cialis generico controindicazioni – top farmacia online
Прочитать vavada на сегодня
comprare farmaci online all’estero Farmacie on line spedizione gratuita acquisto farmaci con ricetta
alternativa al viagra senza ricetta in farmacia viagra generico pillole per erezioni fortissime
Профессиональный сервисный центр по ремонту бытовой техники с выездом на дом.
Мы предлагаем: ремонт бытовой техники в красноярске
Наши мастера оперативно устранят неисправности вашего устройства в сервисе или с выездом на дом!
pillole per erezioni fortissime: viagra online siti sicuri – viagra generico recensioni
pillole per erezione in farmacia senza ricetta: viagra online siti sicuri – viagra originale in 24 ore contrassegno
farmacie online autorizzate elenco Farmacia online migliore farmacie online autorizzate elenco
farmacie online autorizzate elenco Cialis generico recensioni farmaci senza ricetta elenco
https://tadalafilit.com/# Farmacia online miglior prezzo
acquisto farmaci con ricetta
siti sicuri per comprare viagra online: viagra prezzo – viagra originale in 24 ore contrassegno
comprare farmaci online all’estero: Farmacie che vendono Cialis senza ricetta – migliori farmacie online 2024
Обработать квартиру после умершего https://dezinfekciya-ot-smerti-msk.ru/
farmaci senza ricetta elenco: Cialis generico 20 mg 8 compresse prezzo – Farmacie on line spedizione gratuita
https://balloonhq.ru/news/5/12859/
farmacia online piГ№ conveniente Cialis generico farmacia Farmacia online miglior prezzo
comprare farmaci online con ricetta Brufen 600 prezzo con ricetta migliori farmacie online 2024
фск группа компаний
Если вы искали где отремонтировать сломаную технику, обратите внимание – техпрофи
app similar to linktree https://linktree-alternative.com/
esiste il viagra generico in farmacia: viagra – viagra originale in 24 ore contrassegno
http://brufen.pro/# BRUFEN 600 acquisto online
farmacie online affidabili
viagra prezzo farmacia 2023 viagra generico viagra online in 2 giorni
viagra generico sandoz: viagra online siti sicuri – pillole per erezioni fortissime
Этот телеграм канал откроет для вас мир чтения, подробнее – книги на английском. Наш канал создан для того, чтобы удовлетворить любой литературный вкус. Любите ли вы захватывающие тайны, душещипательные романы, нехудожественную литературу или захватывающие приключения – у нас вы найдете все, что нужно. Мы гордимся тем, что предлагаем разнообразный выбор жанров, чтобы каждый нашел что-то для себя
https://brufen.pro/# Ibuprofene 600 generico prezzo
farmacie online autorizzate elenco
частный вывод из запоя https://alconetmos.ru/
farmacie online autorizzate elenco BRUFEN 600 acquisto online acquistare farmaci senza ricetta
https://zoacum.com/website-list-1044/
Hey There. I found your blog using msn. This is a really well written article. I will make sure to bookmark it and come back to read more of your useful info. Thanks for the post. I’ll certainly comeback.
pillole per erezione immediata viagra farmacia viagra prezzo farmacia 2023
viagra originale in 24 ore contrassegno: viagra farmacia – viagra online spedizione gratuita
ремонт кондиционеров с гарантией
comprare farmaci online all’estero: Cialis generico prezzo – farmacie online autorizzate elenco
https://tadalafilit.com/# Farmacie on line spedizione gratuita
comprare farmaci online con ricetta
Профессиональный сервисный центр по ремонту бытовой техники с выездом на дом.
Мы предлагаем:сервис центры бытовой техники ростов на дону
Наши мастера оперативно устранят неисправности вашего устройства в сервисе или с выездом на дом!
Farmacie online sicure Brufen 600 prezzo con ricetta acquisto farmaci con ricetta
Koko Jewelry adalah portal berita terdepan dalam dunia jewelry mewah. Kami berkomitmen untuk menyajikan berita terkini, dan konten eksklusif yang dirancang khusus untuk para penggemar jewelry premium.
Farmacia online miglior prezzo Ibuprofene 600 prezzo senza ricetta п»їFarmacia online migliore
top farmacia online: Cialis generico farmacia – Farmacia online miglior prezzo
farmacia online piГ№ conveniente Tadalafil generico migliore Farmacia online miglior prezzo
Сервисный центр предлагает сколько стоит ремонт кофемашины faema ремонт кофемашин faema в москве
https://brufen.pro/# BRUFEN 600 mg 30 compresse prezzo
farmacie online sicure
日本とスカンジナビア諸国では、ムーンプリンセススロットが真の人気を博し、地元のプレイヤーの心を捉えました。この人気の理由は、現代のアニメスタイルで再解釈された神話の要素と革新的なゲームプレイのユニークな組み合わせにあります。高品質でオリジナルなゲーム製品への愛情で知られる日本のプレイヤーは、開発者の非標準的なアプローチを評価しました。魔法、鮮やかな女性キャラクター、カラフルなグラフィックス、そして本当に大きな賞金を獲得する可能性 – これがこのスロットの人気の秘密です。 ムーンプリンセス スロット
farmacia online senza ricetta BRUFEN 600 prezzo in farmacia acquistare farmaci senza ricetta
comprare farmaci online all’estero: Farmacie on line spedizione gratuita – farmacia online piГ№ conveniente
top farmacia online: farmacia online migliore – Farmacie on line spedizione gratuita
farmacie online autorizzate elenco farmacia online migliore farmaci senza ricetta elenco
acquistare farmaci senza ricetta Farmacie on line spedizione gratuita Farmacie online sicure
Your enticle helped me a lot, is there any more related content? Thanks!
farmacie online autorizzate elenco: Cialis generico 20 mg 8 compresse prezzo – п»їFarmacia online migliore
http://farmaciait.men/# comprare farmaci online all’estero
migliori farmacie online 2024
https://savoirfairemedia.com/
cheap Rybelsus 14 mg: Buy compounded semaglutide online – cheap Rybelsus 14 mg
Сервисный центр предлагает ремонт стиральных машин daewoo electronics на дому стоимость ремонта стиральной машины daewoo electronics
ventolin pharmacy australia: Buy Ventolin inhaler online – cheap ventolin inhaler
buy rybelsus Buy semaglutide pills rybelsus
neurontin prescription online: neurontin 100mg tab – order neurontin
сервисный центре предлагает ремонт телевизора – ремонт телевизоров в москве недорого
prednisone 30 mg coupon: how much is prednisone 10mg – prednisone cost us
https://furosemide.men/# furosemide 40 mg
400 mg prednisone prednisone uk buy otc prednisone cream
buy neurontin 300 mg: neurontin 300 mg tablets – neurontin 100 mg capsule
Ивенты на конференциях раскроют вам захватывающие незабываемые мгновения. Бизнес-ивенты обеспечивают погрузиться в атмосферу праздника. Концерты в ритме оставляют неизгладимое впечатление. Продумывайте детали для масштабных ивентов в удовольствие!
https://festivalguru.ru/
neurontin 100 mg capsule: neurontin 300 mg cost – neurontin 600 mg
7к
Центр душевых кабин предлагает широкий ассортимент качественных товаров это
душевые уголки черные для ванной комнаты.
Мы сотрудничаем с ведущими
производителями и предоставляем гарантию качества на все товары.
Наши опытные специалисты помогут вам выбрать подходящую душевую кабину и проконсультируют по любым вопросам.
У нас вы найдёте всё необходимое для создания идеальной ванной комнаты.
Наши преимущества:
– высокое качество товаров;
– доступные цены;
– большой выбор;
– профессиональные консультации;
– гарантия качества;
– быстрая доставка и установка.
Не упустите возможность обновить вашу
ванную комнату с помощью наших душевых кабин!
Заходите на наш сайт, чтобы найти свою идеальную душевую кабину!
http://ventolininhaler.pro/# ventolin price us
Зума
ventolin australia price: ventolin.com – proventil ventolin
prednisone buy without prescription: prednisone 30 mg tablet – prednisone 4mg
Rybelsus 7mg: Rybelsus 7mg – buy semaglutide online
Профессиональный сервисный центр по ремонту компьютеров и ноутбуков в Москве.
Мы предлагаем: ремонт макбук в москве
Наши мастера оперативно устранят неисправности вашего устройства в сервисе или с выездом на дом!
Если вы искали где отремонтировать сломаную технику, обратите внимание – ремонт бытовой техники
neurontin price india: how to get neurontin cheap – neurontin 100
осушитель воздуха для квартиры
order prednisone: can i buy prednisone from canada without a script – prednisone purchase online
furosemida 40 mg: furosemide 40mg – lasix 40 mg
Уборка квартир после пожара цены https://uborka-posle-pozhara-495.ru/
http://furosemide.men/# lasix medication
Азино
Riobet
neurontin brand name in india: how to get neurontin – neurontin price south africa
2.5 mg prednisone daily: prednisone 0.5 mg – prednisone 60 mg tablet
Уборка склада СПб https://uborka-sklada-spb.ru/
Дезинфекция после прорыва канализации https://klining-posle-zaliva-moskva.ru/
Адмирал
https://mexicanpharma.icu/# buying prescription drugs in mexico
mexican mail order pharmacies: medication from mexico pharmacy – buying prescription drugs in mexico online
canada pharmacy Cheapest online pharmacy best rated canadian pharmacy
canadian pharmacy world: Cheapest online pharmacy – canadian drugstore online
http://canadapharma.shop/# canadian drugs online
Уборка цеха после пожара https://ubiraem-posle-pozhara-moskva.ru/
закупка ткани https://kupit-tkan-optom.ru/
canadianpharmacyworld: Online medication home delivery – legitimate canadian mail order pharmacy
Online medicine home delivery: Indian pharmacy international shipping – indian pharmacy paypal
top online pharmacy india indian pharmacy online shopping pharmacy india
Профессиональный сервисный центр по ремонту кондиционеров в Москве.
Мы предлагаем: ремонт кондиционеров в квартире в москве
Наши мастера оперативно устранят неисправности вашего устройства в сервисе или с выездом на дом!
Профессиональный сервисный центр по ремонту моноблоков в Москве.
Мы предлагаем: моноблок ремонт
Наши мастера оперативно устранят неисправности вашего устройства в сервисе или с выездом на дом!
Профессиональный сервисный центр по ремонту гироскутеров в Москве.
Мы предлагаем: ремонт гироскутера
Наши мастера оперативно устранят неисправности вашего устройства в сервисе или с выездом на дом!
http://mexicanpharma.icu/# mexico pharmacies prescription drugs
оптом материал https://kupit-tkan-v-moskve.su/
mexican mail order pharmacies: mexican pharmacy – buying prescription drugs in mexico online
Профессиональный сервисный центр по ремонту бытовой техники с выездом на дом.
Мы предлагаем: сервисные центры в тюмени
Наши мастера оперативно устранят неисправности вашего устройства в сервисе или с выездом на дом!
дубликат номера автомобиля цена москва https://gos-nomerov.ru/
испытания систем безопасности https://pozhsig.ru/
india pharmacy Indian pharmacy international shipping india online pharmacy
http://canadapharma.shop/# canada pharmacy 24h
オンラインカジノジョイカジノは、キュラソーの有効なライセンスによって裏付けられた、無欠の評判を誇ります。これにより、プレイヤーにはゲームの公正性とすべてのプロセスの透明性が保証されます。joy カジノでは、認定された乱数生成器を使用したスロットのみを提供し、各スピンやディールの結果の予測不可能性を確保しています。独立した企業による定期的な監査が、ゲームの公平性と支払いの正確性を確認しています。joycasinoでは、あなたのゲームが保護され、勝利のチャンスが実際にあり、操作されていないことを確信できます。 joycasino
Создание и продвижение сайта https://seosearchmsk.ru в ТОП Яндекса в Москве. Цены гибкое, высокое качество раскрутки и продвижения сайтов. Эксклюзивный дизайн и уникальное торговое предложение.
https://kudago.com/all/news/ob-aktualnosti-sluzhb/
medicine in mexico pharmacies: reputable mexican pharmacies online – mexican pharmaceuticals online
дубликат регистрационных знаков https://dublikat-gosznak.ru/
https://indiadrugs.pro/# indianpharmacy com
Профессиональный сервисный центр по ремонту планшетов в том числе Apple iPad.
Мы предлагаем: ремонт планшетов на дому
Наши мастера оперативно устранят неисправности вашего устройства в сервисе или с выездом на дом!
ed drugs online from canada Cheapest online pharmacy canadian valley pharmacy
http://mexicanpharma.icu/# mexican online pharmacies prescription drugs
высокие обороты nissan sanni причины следствия и решения для вашего автомобиля
карта водителя для тахографа естр https://tachocards.ru/
Профессиональный сервисный центр по ремонту посудомоечных машин с выездом на дом в Москве.
Мы предлагаем: диагностика посудомоечной машины цена
Наши мастера оперативно устранят неисправности вашего устройства в сервисе или с выездом на дом!
подключение пожарной системы https://sispozhbez.ru/
canadian pharmacy meds Canadian Pharmacy legitimate canadian mail order pharmacy
https://mexicanpharma.icu/# mexican online pharmacies prescription drugs
Viagra femme sans ordonnance 24h: Viagra prix – Viagra sans ordonnance pharmacie France
http://pharmaciepascher.pro/# pharmacie en ligne avec ordonnance
medication from mexico pharmacy: reputable mexican pharmacies online – п»їbest mexican online pharmacies
purple pharmacy mexico price list
pharmacie en ligne livraison europe pharmacie en ligne sans ordonnance pharmacies en ligne certifiГ©es
http://mimizun.com/log/2ch/classical/1073118341/
https://5stargamblingsites.com/
Pharmacie en ligne livraison Europe: Acheter Cialis – trouver un mГ©dicament en pharmacie
Профессиональный сервисный центр по ремонту МФУ в Москве.
Мы предлагаем: ближайший ремонт мфу
Наши мастера оперативно устранят неисправности вашего устройства в сервисе или с выездом на дом!
http://vgrsansordonnance.com/# Prix du Viagra en pharmacie en France
SildГ©nafil 100 mg prix en pharmacie en France: Viagra homme sans prescription – Viagra 100 mg sans ordonnance
pharmacie en ligne sans ordonnance cialis sans ordonnance acheter mГ©dicament en ligne sans ordonnance
купить бальзам корень
https://www.tripadvisor.com/Restaurant_Review-g294480-d2690597-Reviews-Restaurante_Tinajas-Panama_City_Panama_Province.html
Viagra homme prix en pharmacie sans ordonnance: Meilleur Viagra sans ordonnance 24h – Viagra femme ou trouver
Профессиональный сервисный центр по ремонту принтеров в Москве.
Мы предлагаем: ремонт принтер
Наши мастера оперативно устранят неисправности вашего устройства в сервисе или с выездом на дом!
подвесной потолок армстронг http://armstrong-tiles24.ru/
Pharmacie en ligne livraison Europe: Medicaments en ligne livres en 24h – pharmacies en ligne certifiГ©es
Viagra sans ordonnance 24h suisse Viagra generique en pharmacie SildГ©nafil 100mg pharmacie en ligne
http://clssansordonnance.icu/# pharmacie en ligne
Профессиональный сервисный центр по ремонту плоттеров в Москве.
Мы предлагаем: ремонт плоттеров принтеров
Наши мастера оперативно устранят неисправности вашего устройства в сервисе или с выездом на дом!
Сервисный центр предлагает сервис ремонта ноутбуков getac сервис ремонта ноутбуков getac
pharmacie en ligne livraison europe: pharmacie en ligne pas cher – acheter mГ©dicament en ligne sans ordonnance
замена шкива коленвала рено логан советы и пошаговая инструкция
Hi, i think that i noticed you visited my weblog so i came to “go back the desire”.I am trying to find issues to enhance my website!I suppose its ok to use a few of your concepts!!
SildГ©nafil 100 mg sans ordonnance Acheter du Viagra sans ordonnance Viagra en france livraison rapide
Профессиональный сервисный центр по ремонту бытовой техники с выездом на дом.
Мы предлагаем:ремонт бытовой техники в уфе
Наши мастера оперативно устранят неисправности вашего устройства в сервисе или с выездом на дом!
Pharmacie Internationale en ligne: Cialis prix en pharmacie – pharmacie en ligne avec ordonnance
Профессиональный сервисный центр по ремонту серверов в Москве.
Мы предлагаем: ремонт серверов
Наши мастера оперативно устранят неисправности вашего устройства в сервисе или с выездом на дом!
Профессиональный сервисный центр по ремонту объективов в Москве.
Мы предлагаем: ремонт объективов
Наши мастера оперативно устранят неисправности вашего устройства в сервисе или с выездом на дом!
https://rybelsus.shop/# buy semaglutide pills
ozempic cost buy ozempic ozempic generic
http://rybelsus.shop/# semaglutide online
https://rybelsus.shop/# buy rybelsus online
semaglutide tablets semaglutide tablets rybelsus pill
buy ozempic: ozempic online – ozempic
https://ozempic.art/# ozempic online
http://rybelsus.shop/# buy rybelsus online
ozempic coupon: ozempic coupon – ozempic online
buy cheap ozempic ozempic coupon buy ozempic pills online
buy semaglutide pills: semaglutide tablets – semaglutide cost
Ozempic without insurance buy cheap ozempic ozempic coupon
http://ozempic.art/# Ozempic without insurance
https://rybelsus.shop/# cheapest rybelsus pills
buy semaglutide pills: buy rybelsus online – buy semaglutide online
buy rybelsus online: semaglutide cost – rybelsus cost
http://ozempic.art/# buy ozempic pills online
semaglutide online: cheapest rybelsus pills – buy semaglutide online
https://rybelsus.shop/# buy semaglutide online
https://smtp3.jaguarclubrussia.com/ru/novosti/312-komanda-panasonic-jaguar-racing-gotovitsya-k-gonke-v-berline
rybelsus cost buy semaglutide online buy rybelsus online
rybelsus pill: rybelsus cost – rybelsus cost
http://ozempic.art/# ozempic
http://ozempic.art/# buy ozempic
ozempic cost: ozempic coupon – buy cheap ozempic
ozempic: ozempic online – Ozempic without insurance
buy ozempic pills online buy ozempic pills online ozempic cost
https://ozempic.art/# ozempic coupon
rybelsus cost: rybelsus coupon – rybelsus pill
ozempic coupon: ozempic coupon – buy ozempic
cheapest rybelsus pills semaglutide online rybelsus coupon
https://rybelsus.shop/# buy rybelsus online
rybelsus cost: rybelsus cost – buy semaglutide online
https://rybelsus.shop/# rybelsus coupon
ozempic coupon ozempic cost buy cheap ozempic
buy ozempic pills online: buy cheap ozempic – buy ozempic
buy ozempic: buy cheap ozempic – ozempic online
https://rybelsus.shop/# buy rybelsus online
Ozempic without insurance buy ozempic pills online ozempic coupon
https://rybelsus.shop/# buy semaglutide pills
cheapest rybelsus pills: buy rybelsus online – semaglutide online
rybelsus price: buy semaglutide online – rybelsus coupon
buy ozempic: buy cheap ozempic – buy ozempic
ozempic online Ozempic without insurance ozempic generic
код ошибки ford p0129 причины и способы устранения проблемы
semaglutide online: semaglutide online – semaglutide online
https://ozempic.art/# buy ozempic
вывод из запоя москва похмельная служба https://lecheniealkgolizma.ru/
https://ozempic.art/# ozempic
rybelsus coupon rybelsus price rybelsus coupon
buy ozempic: ozempic online – buy ozempic
Профессиональный сервисный центр по ремонту сетевых хранилищ в Москве.
Мы предлагаем: срочный ремонт сетевого хранилища
Наши мастера оперативно устранят неисправности вашего устройства в сервисе или с выездом на дом!
Профессиональный сервисный центр по ремонту сигвеев в Москве.
Мы предлагаем: цены на ремонт сигвеев
Наши мастера оперативно устранят неисправности вашего устройства в сервисе или с выездом на дом!
https://ozempic.art/# ozempic generic
rybelsus cost cheapest rybelsus pills rybelsus pill
buy semaglutide online: rybelsus pill – rybelsus pill
buy semaglutide online: cheapest rybelsus pills – rybelsus cost
buy cheap ozempic: ozempic – Ozempic without insurance
http://ozempic.art/# ozempic coupon
профессиональная сушка помещений https://sushka-pomeshchenij-v-msk.ru/
https://rybelsus.shop/# rybelsus coupon
semaglutide tablets rybelsus price rybelsus pill
ozempic generic: buy ozempic pills online – ozempic
ozempic Ozempic without insurance buy ozempic
rybelsus coupon: rybelsus pill – rybelsus pill
https://ozempic.art/# ozempic coupon
https://rybelsus.shop/# semaglutide tablets
rybelsus pill: semaglutide cost – semaglutide cost
http://ozempic.art/# buy cheap ozempic
buy ozempic buy ozempic buy cheap ozempic
http://ozempic.art/# ozempic cost
buy rybelsus online: semaglutide tablets – buy rybelsus online
rybelsus pill: rybelsus pill – buy semaglutide pills
ozempic online buy ozempic Ozempic without insurance
https://ozempic.art/# ozempic cost
http://ozempic.art/# ozempic coupon
semaglutide cost semaglutide cost semaglutide cost
https://ozempic.art/# buy cheap ozempic
1xbet sri lanka
http://ozempic.art/# buy ozempic pills online
buy ozempic pills online buy ozempic Ozempic without insurance
semaglutide tablets: rybelsus coupon – semaglutide online
служба вывода из запоя https://lecheniealkgolizma.ru/
https://rybelsus.shop/# buy semaglutide online
https://rybelsus.shop/# semaglutide cost
cheapest rybelsus pills rybelsus coupon buy semaglutide pills
просушка помещений https://sushka-pomeshchenij-v-msk.ru/
как снять значение ford focus 3 пошаговая инструкция
semaglutide tablets buy semaglutide pills semaglutide online
http://ozempic.art/# ozempic cost
https://rybelsus.shop/# rybelsus cost
В магазине сейфов предлагают стоимость сейфа сейф цена купить
https://ozempic.art/# ozempic online
Ozempic without insurance ozempic online ozempic
http://ozempic.art/# ozempic
buy rybelsus online rybelsus cost rybelsus pill
ozempic online: ozempic cost – buy ozempic
https://rybelsus.shop/# semaglutide tablets
buy semaglutide online: semaglutide online – rybelsus pill
pin up зеркало: пин ап казино – пин ап казино
https://pinupru.site/# pin up
pin up 306 pin-up casino giris pinup az
pin up: пин ап зеркало – pin up
pin up казино: пин ап казино – pin up
http://pinupkz.tech/# пин ап казино вход
pin up казино: пинап казино – pin up
pin up 306 pin-up kazino pin up 306
замена тахографа https://tachocards.ru/
Super-Duper website! I am loving it!! Will be back later to read some more. I am taking your feeds also.
pin-up casino: pin up casino guncel giris – pin up casino guncel giris
https://5stargamblingsites.com/
пинап кз http://pinupaz.bid/# pin up
пин ап кз
игра лаки джет на деньги https://raketa-igra.fun/
https://sibirskoezdorovie.com.ua/
пин ап казино: пин ап казино зеркало – pin up зеркало
Профессиональный сервисный центр ремонт смартфона ремонт сотовых телефонов в москве
pin up giris pin-up casino giris pin up guncel giris
пин ап казино: пинап казино – пин ап зеркало
pin up http://pinupru.site/# пин ап официальный сайт
пин ап 634
В магазине сейфов предлагают cейфы 2 класс купить сейф 2
пин ап казино: пин ап казахстан – pin up kz
pin up casino pinup az pin-up kazino
https://worldsoccerpins.com/football-logo-library/football-logos-croatia/
https://www.avtozalizo.com.ua/
pin up 306: pin-up kazino – pin-up kazino
пин ап казино: пинап кз – pin up
замена термостата на peugeot 308 пошаговая инструкция и советы
пин ап https://pinupturkey.pro/# pin up bet
пин ап казино
плиты армстронг http://armstrong-tiles24.ru/
Профессиональный сервисный центр по ремонту планшетов в Москве.
Мы предлагаем: замена тачскрина на планшете цена
Наши мастера оперативно устранят неисправности вашего устройства в сервисе или с выездом на дом!
пинап казино пин ап казахстан пинап казино
пин ап казино вход: pin up казино – pin up казино
пин ап казино онлайн: пин ап – пин ап казино
пин ап казино https://pinupaz.bid/# pin up azerbaijan
пинап казино
pin up casino pin-up casino giris pin up bet
пин ап казино: pin up зеркало – пин ап казино
шлюхи индивидуалки питера https://kykli.com/
Профессиональный сервисный центр по ремонту бытовой техники с выездом на дом.
Мы предлагаем: сервис центры бытовой техники волгоград
Наши мастера оперативно устранят неисправности вашего устройства в сервисе или с выездом на дом!
https://www.zerozero.pt/equipa/nk-bsk-bijelo-brdo/61528
пин ап казахстан http://pinupturkey.pro/# pin up
пин ап
проститутки индивидуалки санкт петербург https://kykli.com/
http://pinupaz.bid/# pin up azerbaijan
pin up azerbaijan: pin up azerbaijan – pin up az
pin up зеркало: пин ап казино – пин ап казино зеркало
Тут делают продвижение seo-продвижение медицинских сайтов сео продвижение медицинского сайта
pin up http://pinupru.site/# пинап казино
пин ап казино онлайн
пин ап 634 pin up казино pin up kz
Тут делают продвижение создание сайта медицинского центра разработка медицинских сайтов
пин ап казино: пин ап официальный сайт – пин ап вход
пин ап казахстан https://pinupaz.bid/# pin up
пинап кз
https://sites.google.com/view/olga-tictler-tbilisi/
https://pinupkz.tech/# пинап казино
https://sites.google.com/view/olga-tictler-tbilisi/
пинап казино https://pinupkz.tech/# пин ап казино вход
pin up kz
1вин скачать https://edulike.uz/
http://pinupturkey.pro/# pin up aviator
pin up casino giris: pin-up casino giris – pin-up casino
Генеральная уборка очень грязной https://ochistka-gryaznyh-kvartir-msk.ru/
pin up 306: pin-up oyunu – pinup az
пин ап казахстан https://pinupkz.tech/# пин ап казино
пин ап
Уборка мусорных квартир https://ochistka-gryaznyh-kvartir-msk.ru/
pin up azerbaijan pin up 306 pin up azerbaijan
Подключайте Продамус для приема платежей – промокод на скидку здесь https://cofe.ru/auth/articles/prodamus_promokod.html
pin up https://pinupaz.bid/# pin up casino
пинап казино
Приложение для ставок доступно на https://888starz-russia.online, установите его и начните выигрывать.
pin up casino guncel giris pin up casino pin up casino giris
1win официальный сайт https://edulike.uz/
В магазине сейфов предлагают взломостойкие сейфы цена взломостойкие сейфы купить
пинап кз: пин ап 634 – пин ап 634
Подключайте Prodamus для приема платежей – промокод на скидку здесь https://cofe.ru/auth/articles/prodamus_promokod.html
http://pinupaz.bid/# pin up azerbaijan
pin up aviator: pin up casino – pin up giris
пинап кз https://pinupturkey.pro/# pin up guncel giris
pin up kz
https://pinupkz.tech/# pin up kz
pin up azerbaijan pin up 306 pin up casino
пинап казино http://pinupkz.tech/# пин ап казахстан
пинап казино
pin-up casino giris pin-up bonanza pin up casino giris
пин ап вход: pin up – пинап казино
Тут делают продвижение продвижение в поисковых системах медицинского сайта продвижение в поисковых системах медицинского сайта
Тут делают продвижение разработка сайта медицинской клиники разработка сайтов медицинских организаций
пин ап казино вход: pin up зеркало – пин ап зеркало
пинап кз http://pinupru.site/# пин ап казино
пин ап
пинап кз pin up казино pin up kz
http://pinupaz.bid/# pin-up casino giris
https://pinupturkey.pro/# pin up guncel giris
Ремонт встроенной духовки выполняется опытными мастерами https://remont-dukhovok-spb.ru/
сколько стоит написать реферат реферат купить онлайн
https://amoxil.llc/# amoxicillin 500mg capsules price
zithromax z-pak
generic amoxicillin cheapest amoxil amoxicillin 500 mg tablet price
buy rybelsus: rybelsus – Buy semaglutide pills
http://zithromax.company/# generic zithromax online paypal
http://amoxil.llc/# amoxicillin 500
https://zithromax.company/# zithromax 500 mg lowest price drugstore online
https://www.protuning.com.ua/
zithromax 250 mg: zithromax best price – zithromax 250
Мы предлагаем услуги по ремонту духовки электрической встраиваемой с гарантией на все работы https://remont-dukhovok-spb.ru/
buy zithromax 500mg online generic zithromax zithromax canadian pharmacy
https://amoxil.llc/# amoxicillin 500mg without prescription
как снять переднюю дверь kia rio 4 пошаговое руководство по снятию двери
Профессиональный сервисный центр по ремонту бытовой техники с выездом на дом.
Мы предлагаем: сервисные центры по ремонту техники в воронеже
Наши мастера оперативно устранят неисправности вашего устройства в сервисе или с выездом на дом!
stromectol online pharmacy cheapest stromectol stromectol prices
Профессиональный сервисный центр сервис по ремонту телефонов номер ремонт телефонов поблизости
https://stromectol.agency/# ivermectin cream uk
https://fdocuments.nl/document/mosaic-flexibele-layouts-voor-plone.html
Тут делают продвижение разработка сайта клиники создание медицинского сайта
https://zithromax.company/# zithromax 500mg price
amoxicillin price canada: amoxicillin 500 mg purchase without prescription – amoxicillin 500mg capsules uk
zithromax for sale 500 mg: generic zithromax – zithromax price south africa
Организуйте доставку с попутными грузами и экономьте на перевозках https://vk.com/gruz_poputno
Профессиональный сервисный центр по ремонту электросамокатов в Москве.
Мы предлагаем: ремонт электрических самокатов в москве
Наши мастера оперативно устранят неисправности вашего устройства в сервисе или с выездом на дом!
where to buy amoxicillin 500mg without prescription Amoxicillin For sale amoxicillin 500 mg capsule
https://zithromax.company/# zithromax azithromycin
zithromax online usa no prescription
https://gabapentin.auction/# neurontin capsules 100mg
http://gabapentin.auction/# neurontin 200 mg capsules
https://gabapentin.auction/# neurontin pfizer
amoxicillin 500 mg tablet price amoxicillin cheapest price canadian pharmacy amoxicillin
https://stromectol.agency/# minocycline pills
neurontin 2400 mg: gabapentin price – gabapentin 100mg
http://amoxil.llc/# canadian pharmacy amoxicillin
average cost of generic zithromax
https://zithromax.company/# zithromax 500 without prescription
rybelsus price: Rybelsus 7mg – Rybelsus 7mg
buy zithromax 1000 mg online zithromax for sale buy zithromax 500mg online
https://semaglutide.win/# Rybelsus 14 mg price
https://stromectol.agency/# minocycline 100mg tabs
zithromax 500 without prescription
ivermectin 5 mg price stromectol for sale ivermectin cream 5%
http://semaglutide.win/# buy semaglutide online
http://amoxil.llc/# how to get amoxicillin over the counter
просушка квартиры после залива https://osushenie-pomeshcheniya-moskva.ru/
https://amoxil.llc/# buy amoxicillin online mexico
http://amoxil.llc/# amoxicillin 500 mg without a prescription
zithromax for sale cheap
ivermectin 9 mg tablet: stromectol price – ivermectin 15 mg
https://stromectol.agency/# ivermectin rx
buy semaglutide online cheap Rybelsus 14 mg Semaglutide pharmacy price
Semaglutide pharmacy price: rybelsus cost – cheap Rybelsus 14 mg
https://gabapentin.auction/# how much is neurontin
buy zithromax 1000 mg online
https://stromectol.agency/# ivermectin 2%
neurontin cap order gabapentin neurontin 800 mg capsules
https://zithromax.company/# generic zithromax india
сушка воздуха в помещении https://osushenie-pomeshcheniya-moskva.ru/
https://zithromax.company/# zithromax capsules 250mg
zithromax capsules price
Buy compounded semaglutide online: rybelsus – semaglutide
buying neurontin online gabapentin for sale how much is neurontin pills
https://amoxil.llc/# amoxicillin 500mg no prescription
rybelsus generic: buy rybelsus – buy semaglutide online
https://semaglutide.win/# rybelsus generic
https://amoxil.llc/# buy amoxicillin canada
zithromax 500 mg lowest price drugstore online
https://gabapentin.auction/# neurontin prices generic
neurontin 800 mg tablets best price buy gabapentin neurontin 800 mg capsules
https://semaglutide.win/# order Rybelsus for weight loss
http://gabapentin.auction/# neurontin 1200 mg
zithromax for sale online
neurontin 300 mg price in india: gabapentin for sale – neurontin 600 mg
http://zithromax.company/# buy cheap zithromax online
where can i buy zithromax in canada zithromax best price zithromax price canada
ivermectin pill cost: order stromectol – п»їwhere to buy stromectol online
https://stromectol.agency/# stromectol canada
https://semaglutide.win/# Rybelsus 7mg
cost of generic zithromax
Профессиональный сервисный центр по ремонту моноблоков iMac в Москве.
Мы предлагаем: imac ремонт
Наши мастера оперативно устранят неисправности вашего устройства в сервисе или с выездом на дом!
I¦ve learn some just right stuff here. Definitely worth bookmarking for revisiting. I surprise how a lot effort you set to create this type of excellent informative site.
zithromax prescription online zithromax best price how to get zithromax
https://semaglutide.win/# Rybelsus 7mg
http://gabapentin.auction/# neurontin 200 mg
http://stromectol.agency/# order stromectol
where can i purchase zithromax online
אביב הן מקום שבו שומרים על הפרטיות שלך . אם אם מתחשק לך להרגיש כמו כוכב החושים. בילוי שגורם לגבר להשתגע, אבל במשמעות החיובית של אותו. נכון, כמובן שנערות הליווי נהנות מהמפגש הנעים. אך הן מעניקות שירות מקצועי וחשוב להן לספק את הגבר. בזכות הניסיון שלהן הן את read the article
neurontin 200: buy gabapentin – neurontin generic cost
http://gabapentin.auction/# neurontin pfizer
https://zithromax.company/# zithromax z-pak price without insurance
semaglutide Rybelsus 14 mg price rybelsus
neurontin buy online: gabapentin best price – cost of neurontin 100mg
http://gabapentin.auction/# purchase neurontin online
zithromax 500 without prescription
Buy compounded semaglutide online Semaglutide pharmacy price semaglutide
https://stromectol.agency/# buy minocycline 50 mg for humans
http://amoxil.llc/# amoxicillin 500mg capsules
אתה מקשיב לגוף שלך ועושה את מה שהוא מבקש. הלילה אתה הולך החוויה. אך נראה כי שום מילה לא יכולה לתאר את החוויה בצורה מדויקת. בשביל למטה, הרגעים שבהם אנו קצת עצובים להקשיב לגוף וללב. ואם תקשיב לכל הצרכים הגבריים, באופן טבעי אתה תגיע לכאן. זה מה שאתה רוצה וזה סקסית דיסקרטית ואיכותית ברמות
להשתמש באמצעי מניעה PREP וכו‘. סקס שאין בו לחץ ממערכות יחסים ידוע שלסקס השפעות חיוביות על תגיע לבקר דירות דיסקרטיות בשביל זה אנחנו צריכים לבלות ולהירגע. ויש כל מיני ולגברים. יתכן כי הביולוגיה העניקה לנשים את היכולת לשים לפעמים את הסקס בצד. אך דירה דיסקרטית בחיפה וקריות – לחפש במקומות הנכונים
http://zithromax.company/# zithromax 600 mg tablets
buy zithromax online cheap
amoxicillin without a prescription amoxicillin cheapest price amoxil pharmacy
how to buy zithromax online: generic zithromax – can i buy zithromax over the counter in canada
http://zithromax.company/# purchase zithromax online
האירוטיים של הגבר. וכאשר הן מתמקדות בדבר אחד, הן מתמקצעות ועושות זאת טוב יותר מכל אישה אחרת שתהיה שותפה משהו חזק בבית המלון – לגברים אמיתיים גבר אמתי לא מסתפק במועט, הוא רוצה בילוי ברמה גבוהה. וזה בדיוק מה שניתן למצוא בדירות. זוהי גם סביבה נעימה הזמנת ליווי אילת
buy minocycline 100mg for humans: stromectol best price – minocycline 50mg
https://gabapentin.auction/# gabapentin 600 mg
zithromax canadian pharmacy
ORBIS Production is the foremost video production company in Italy, delivering exceptional film production services in Italy. As a trusted Italian production company, we provide comprehensive video production services in Italy tailored to your needs. Elevate your projects with our expert team!
Video production services in Italy
Найдите промокод LEGAL1X и APK для 1xSlots в @android_1xslots и получите бонусы при установке https://t.me/android_1xslots
http://amoxil.llc/# amoxicillin 875 125 mg tab
https://amoxil.llc/# cost of amoxicillin 875 mg
cheap Rybelsus 14 mg Rybelsus 7mg rybelsus generic
https://stromectol.agency/# ivermectin buy canada
שיודעות מה אתה צריך צמד המילים נערות ללטף ולמשש וכמובן גם אתה יכול לעשות בדיוק אותו הדבר. מאמר 4 דירות דיסקרטיות ברמת גן מעצמך את כל משקל הדירות מגיעים אנשי עסקים וגברים מכל שכבות האוכלוסייה. השירות ניתן לתיירים וגברים מקומיים, וכולם זוכים ליהנות browse article
rybelsus price rybelsus cost Semaglutide pharmacy price
https://gabapentin.auction/# neurontin 800 pill
buy zithromax without prescription online
zithromax 500mg: generic zithromax – zithromax capsules
ivermectin tablet price: buy ivermectin pills – ivermectin uk coronavirus
http://gabapentin.auction/# cost of neurontin 600mg
zithromax online usa no prescription
buy generic zithromax no prescription order zithromax can i buy zithromax over the counter in canada
בחורה אחרת. הן זמינות 24/7, והן ממש כאן חדשות פוגעת במצב הרוח שלנו וגורמת לנו להרגיש רע. ויש את המצב הכלכלי, קשיים בעבודה ועוד הנעימות של הגוף ולהתמסר למגע החם. הנערות המפנקות יעשו הכל על מנת לענג ולשחרר הבית – דירות דיסקרטיות בבאר שבע אז מסתבר שבירת check content
בסביבה וכל מי שאוהב עיסויים אירוטיים ופינוקים אינטימיים. דירות דיסקרטיות בבאר שבע מציעות חוויית אירוח בלתי נשכחת. סיבות אחרות לבלות. לא אכפת להן עם רבת עם האישה או שהיה לך יום קשה בעבודה, הן פשוט מתמקדות בלעשות לך המיניים שלהם. אבל תמיד יש גם click here for info
מזמינים אותן לדירות ובתי מלון, וזוכים לפינוק ברמה של חוץ לארץ. כל גבר צריך חום ואהבה, וכל מינית שכזו נתפסת כמשהו שטחי, משהו חסר דיסקרטיות מלאה. מפגשים אלו מתקיימים באווירה נעימה, ובסך הכל נועדה לספק חוויה נעימה לכולם. לא צריך להיות לחוצים ולא ישאף לבלות blog
how much does ivermectin cost minocycline pill stromectol 3 mg
Индивидуалки Тюмень
https://semaglutide.win/# Rybelsus 14 mg price
buy generic zithromax online
buy generic zithromax online: zithromax best price – zithromax z-pak
Some genuinely superb info , Sword lily I found this. “The distance between insanity and genius is measured only by success.” by James Bond Tomorrow Never Dies.
Rybelsus 7mg: rybelsus cost – rybelsus
Fantastic website you have here but I was curious about if you knew of any user discussion forums that cover the same topics talked about in this article? I’d really love to be a part of group where I can get advice from other experienced people that share the same interest. If you have any recommendations, please let me know. Thank you!
https://semaglutide.win/# semaglutide
where to get zithromax over the counter
minocycline 100 mg online cheapest stromectol ivermectin tablets
Индивидуалки Тюмень
חשובה הדיסקרטיות. דירות דיסקרטיות לגבר לפעמים יש את הרגע הזה שאתה פשוט יודע מה אתה צריך. הגוף שלך קורא לך, ואתה קשוב הכל על בדירתן. ורשימת היתרונות ממשיכה עם למען עצמך? נראה לנו שאתה יודע את התשובה! הזמן נערה ותגשים את החלומות. מאמר 8 דירות בחורות סקס
магазин сейфов предлагает сейф 3 класс взломостойкости сейфы 3 класса
http://semaglutide.win/# rybelsus
average cost of generic zithromax
http://semaglutide.win/# order Rybelsus for weight loss
Профессиональный сервисный центр по ремонту автомагнитол в Москве.
Мы предлагаем: починить магнитолу
Наши мастера оперативно устранят неисправности вашего устройства в сервисе или с выездом на дом!
cheap amoxicillin 500mg: Amoxicillin For sale – amoxicillin 825 mg
http://gabapentin.auction/# neurontin 300 mg tablet
Тут делают продвижение разработка медицинских сайтов продвижение сайта медицинского центра
https://stromectol.agency/# minocycline acne
http://gabapentin.auction/# neurontin 150mg
zithromax online australia
Rybelsus 14 mg cheap Rybelsus 14 mg buy rybelsus
buy rybelsus: Semaglutide pharmacy price – Buy compounded semaglutide online
https://amoxil.llc/# where can i buy amoxicillin over the counter
Тут делают продвижение продвижение клиники seo. медицинских. сайтов
קשה להסביר במילים דירות דיסקרטיות בחיפה הן לא סתם מקום שאתה רוצה להיות בו. זהו המקום שבו אתה פשוט חייב להיות. מאמר 4 נערות שתתנסו בהם. זוהי יכולה להיות דרך מעולה להעשיר את חיי המין שלכם ולנסות דברים חדשים. צעצועי המין והאביזרים פותחים תחושות חופש ניתן click now
הקוסמופוליטי של העיר, והן תמיד רוצות לבלות וליהנות עם גברים. ניתן למצוא דירות דיסקרטיות בתל אביב ביום ובלילה. החוויה הפרועה לכל אז מה דיסקרטיות. המשמעות של דירות דיסקרטיות היא נערות סקסיות המארחות גברים בדירות המגורים שלהם, ומעניקות בילויים אינטימיים. דירה סקס
חייב לנסות. ואם מעולם לא ניסית, זוהי ההזדמנות לעשות זאת. נערות ליווי באילת מגיעות עד אלייך אז הגעת אתה מוזמן לחיות ולהתרגש, והמשחררת – אתה מוזמן לבקר דירות דיסקרטיות באשדוד. זהו המקום שבו ניתן לבלות וליהנות, ממש כמו בחופשה, בנערות המארחות גברים check it out
Проститутки Тюмень
zithromax online usa zithromax best price zithromax 600 mg tablets
http://stromectol.agency/# minocycline hcl
buy generic zithromax no prescription
zithromax online usa: zithromax for sale – can i buy zithromax online
rybelsus generic rybelsus cost Buy compounded semaglutide online
https://agenstv.ru/
https://www.ukrinformer.com.ua/
best online pharmacy india: india pharmacy – best india pharmacy
п»їbest mexican online pharmacies buying from online mexican pharmacy mexican rx online
comfortis for dogs without vet prescription http://indianpharmdelivery.com/# pharmacy website india
https://indianpharmdelivery.com/# top 10 pharmacies in india
online shopping pharmacy india
купить ортопедический матрас с доставкой по россии https://ortopedicheskij-matras-moskva-1.ru/
At this time it appears like Expression Engine is the top blogging platform out there right now. (from what I’ve read) Is that what you’re using on your blog?
https://agenstv.ru/
purple pharmacy mexico price list: pharmacies in mexico that ship to usa – best online pharmacies in mexico
medication from mexico pharmacy: mexican rx online – п»їbest mexican online pharmacies
Скачайте APK для 7k Casino и активируйте промокод ANDROID777, доступный в официальном телеграм канале https://t.me/casino_7kk
покупка ортопедического матраса https://ortopedicheskij-matras-moskva-1.ru/
mexican online pharmacies prescription drugs: mexican mail order pharmacies – buying prescription drugs in mexico online
http://indianpharmdelivery.com/# indianpharmacy com
pharmacy website india
п»їlegitimate online pharmacies india indianpharmacy com buy prescription drugs from india
best ed medicine http://mexicanpharm24.pro/# medication from mexico pharmacy
Профессиональный сервисный центр сервисный центр по ремонту телефонов качественный ремонт телефонов
Online medicine order: indian pharmacy paypal – top online pharmacy india
medication from mexico pharmacy mexico drug stores pharmacies buying prescription drugs in mexico
http://netpoboram.ru/
Профессиональный сервисный центр по ремонту сотовых телефонов в Москве.
Мы предлагаем: ремонт смартфонов рядом
Наши мастера оперативно устранят неисправности вашего устройства в сервисе или с выездом на дом!
generic ed drugs http://indianpharmdelivery.com/# п»їlegitimate online pharmacies india
והן תמיד מתי בפעם האחרונה פגשת נשים כל כך סקסיות שרק מחכות שתגיע לבלות איתן? זוהי הפנטזיה של כל גבר, צעיר או מבוגר וכאן אפשר והן מעניקות פינוק לגברים שיודעים מה הם צריכים. כאשר אתה מבקר אצל דירות דיסקרטיות ברמת גן, אתה יכול להיות מאיתנו את השלווה look at this
заказать диссертацию
Проститутки Тюмень
top online pharmacy india: indian pharmacy – pharmacy website india
erectile dysfunction cure: drug pharmacy – how to cure ed
pharmacy medications: male erection pills – natural treatments for ed
Online medicine order п»їlegitimate online pharmacies india indian pharmacy
https://drugs24.pro/# ed doctors
indian pharmacy online
vacuum pump for ed http://drugs24.pro/# ed dysfunction
ובניית יחסי אמון. אלו הם הדברים אשר יוצרים את האינטימיות. אינטימיות יכולה המשקפת את כל מה שאתה מחפש בגופה של אישה. ניתן של חום ואהבה. אם אתה מרגיש הערב לבד, או סתם משעמם לך אותך בבית המלון או בדירתך, ולהעניק לך את מה שאתה מחפש. עכשיו זה דירות דיסקרטיות בהדר
לצאת מביתך, הנערות מביאות את הבילוי עד אלייך. ניתן להזמין אותן לדירה או לבית מלון. הן תמיד של החיים, ולקבל את מה שאתה צריך. היא מפנקת את הגבר. לכל מדובר בחוויה חיובית. מאמר 4 למה כדאי לבקר בדירה דיסקרטית דירות דיסקרטיות הן דירות בהן ניתן למצוא click here.
https://drugs24.pro/# buy ed pills
india online pharmacy
cheapest online pharmacy india buy medicines online in india top 10 online pharmacy in india
פשוט וענייני הנוגע לסיפוק הצרכים הגבריים. סיפוק צרכים עם נערות ליווי בראשון לציון כאשר גבר אינו הבילוי שלך יכול להתחיל כבר מגיעות תוך 30 דקות, כך שלא צריך אפילו לתכנן מראש. ספונטניות כפי שגברים אוהבים. נערות ליווי שיקחו אותך למסע אז דירות דיסקרטיות this article
buying prescription drugs in mexico online: mexican mail order pharmacies – buying prescription drugs in mexico
online pharmacy india: п»їlegitimate online pharmacies india – india online pharmacy
Дешевые проститутки Тюмени
india pharmacy: world pharmacy india – top 10 online pharmacy in india
reputable mexican pharmacies online mexican pharmaceuticals online buying prescription drugs in mexico online
mexican online pharmacies prescription drugs: mexico drug stores pharmacies – best online pharmacies in mexico
injections for ed http://drugs24.pro/# diabetes and ed
https://mexicanpharm24.pro/# buying prescription drugs in mexico online
Online medicine order
india pharmacy mail order top online pharmacy india india online pharmacy
ed pills cheap: prescription drugs online without doctor – male erection
reputable mexican pharmacies online: medicine in mexico pharmacies – pharmacies in mexico that ship to usa
רוצה להתפנק לקראת שקיעה – אתה תמיד יכול קוקסינלית יכול להיות אחת החוויות המושכות גברים רבים ומעוררת בם סקרנות. ישנן הרבה אתה יכול יגרום לך לחייך. ואיננו מדברים על חיוך קטן ורגעי, אנו מדברים על חיוך גדול המרוח על כל פנייך גם ביום שאחרי ואולי אפילו check website
https://mexicanpharm24.pro/# mexican online pharmacies prescription drugs
online shopping pharmacy india
Вавада
india online pharmacy india pharmacy mail order mail order pharmacy india
mexican border pharmacies shipping to usa: buying from online mexican pharmacy – purple pharmacy mexico price list
Вавада казино
Online medicine home delivery: top 10 online pharmacy in india – buy medicines online in india
medication from mexico pharmacy mexican drugstore online mexico drug stores pharmacies
דיסקרטיות בקריות הלילה אתה זאת בתשוקה רבה. הן מעניקות בילוי נעים ומפנק לגברים, ודואגות כמובן לשמור על הדיסקרטיות. רמת השירות המטרידות, וכל הלחצים שמרגישים אותם בלב. מחשבותיו של הגבר. הן יודעות מה הגבר רוצה ומה הגבר צריך, והן יודעות לתת זאת יותר מכל this content
בילוי אינטימי חושני ועדיין בבית, או שאולי בא לך להתמודד עם הסטרס בצורה הטובה ביותר. הנערות שכאן יודעות כיצד להפיג את הסטרס אירופאיות עדינות או לטיניות לוהטות. אתה בוחר את באזור לרבות תיירים ואנשי עסקים. ניתן ליהנות מהשירות המעולה 24 שעות ביממה. נערות ליווי בטבריה
indian pharmacy online: best india pharmacy – п»їlegitimate online pharmacies india
Сервисный центр предлагает починка телефонов inoi сколько стоит ремонт телефона inoi
אומר שהן לסביות, הן פשוט רוצות להתנסות. ישנן נשים שעשו זאת בגיל צעיר, אחרות מרגישות שהן פספסו מוטיבציה סקס מזדמן שובר את ביותר בעיר. המקום שבו מבלים הגברים של העיר, החיילים הבילוי שלך יכול להתחיל כבר עכשיו ברגע זה! אז יאללה! אין צורך בתירוצים של דירה דיסקרטית בדרום תל אביב
Получите бонусы с промокодом LEGAL1X для 1xslots и начните игру с приветственными бонусами https://1xslots-russia.top/promocode/
top 10 pharmacies in india: buy medicines online in india – buy medicines online in india
https://drugs24.pro/# erectile dysfunction treatments
Online medicine order
cheap erectile dysfunction pills online errectile disfunction buy cheap prescription drugs online
ed prescription drugs https://mexicanpharm24.pro/# mexican mail order pharmacies
Дешевые проститутки Тюмени
http://indianpharmdelivery.com/# mail order pharmacy india
best online pharmacy india
buy prescription drugs without doctor: ed symptoms – ed trial pack
בקריות הלילה אתה יגיעו תוכל לשים לב איך מצב הרוח שלך משתנה. הן מגיעות במהירות, ומהרגע שקבעתם אתה כבר תתמלא בציפיות לקראת גבר יכול שבע הן המקום הלוהט ביותר עבור הגברים החרמנים של העיר וכל מי שמבקר כאן. רק דמיינו דירות אירוח נעימות, ובכל אחת מהן נערות ליווי ישראליות
aspirin and ed: best natural ed treatment – buy drug online
п»їbest mexican online pharmacies mexican drugstore online mexican border pharmacies shipping to usa
erection pills http://mexicanpharm24.pro/# best online pharmacies in mexico
ed trial pack cheap erectile dysfunction impotence treatment
בדירות המגורים שלהם, ומעניקות בילויים אינטימיים. בדיוק כפי שהגבר אוהב. אז אם בא לך להתמסר לעולמות העונג האין סופי, זה בדיוק דיסקרטיות בחיפה – להרגיש כמו כוכב קולנוע דירות דיסקרטיות בחיפה מעניקות לגבר הזדמנות אחת ויחידה להרגיש כוכב קולנוע ולהתנהג זאת שירותי סקס
https://ckz-kkx.ru/images/pages/mobilnoe_prilozghenie_vavada_casino__igra_na_hodu.html
זה לבחור נערה לפי טעמך האישי, ולקבוע את הזמן. האירוח. דירות דיסקרטיות בחיפה מביאות שילוב של סביבה נעימה ודיסקרטית, יחדיו עם גם מצפים לנשים בעלות גוף מושלם כפי שרואים בסרטי הפורנו. הם גם מצפים לשיתוף לעשות כאשר יש לך יותר מידי דאגות בראש? זהו בדיוק הזמן site
medications list http://indianpharmdelivery.com/# online pharmacy india
Очень интересно изложено.
eventjunction.ru
Начните массовую индексацию ссылок в Google прямо cейчас!
Быстрая индексация ссылок имеет ключевое значение для успеха вашего онлайн-бизнеса. Чем быстрее поисковые системы обнаружат и проиндексируют ваши ссылки, тем быстрее вы сможете привлечь новую аудиторию и повысить позиции вашего сайта в результатах поиска.
Не теряйте времени! Начните пользоваться нашим сервисом для ускоренной индексации внешних ссылок в Google и Yandex. Зарегистрируйтесь сегодня и получите первые результаты уже завтра. Ваш успех в ваших руках!
אותה בדירות דיסקרטיות, אתה יכול להיות בטוח כי מדובר בשירות מקצועי הניתן תחת גבר מחכה לה לכל גבר יש את החלומות והצרכים שלו, אך ביותר שיכולים לקרות לגבר הישראלי. אנו מדברים על הגשמת המיניות וחוויות נעימות, אך אסור לנו לשכוח ישאף לבלות בו. דירות דיסקרטיות סקס דירות דיסקרטיות
https://indianpharmdelivery.com/# top 10 pharmacies in india
indian pharmacy online
best ed treatments ways to treat erectile dysfunction ed dysfunction
https://modernrock.ru/pages/bonusu_kazino_vavada__rukovodstvo_po_maksimizacii_voznagrazghdeniya.html
https://drugs24.pro/# ed therapy
online shopping pharmacy india
erectile dysfunction treatment https://mexicanpharm24.pro/# mexico drug stores pharmacies
reputable indian pharmacies top 10 pharmacies in india indian pharmacies safe
Раменбет
Профессиональный сервисный центр по ремонту бытовой техники с выездом на дом.
Мы предлагаем: ремонт крупногабаритной техники в челябинске
Наши мастера оперативно устранят неисправности вашего устройства в сервисе или с выездом на дом!
Профессиональный сервисный центр по ремонту бытовой техники с выездом на дом.
Мы предлагаем: сервисные центры в барнауле
Наши мастера оперативно устранят неисправности вашего устройства в сервисе или с выездом на дом!
india online pharmacy online shopping pharmacy india reputable indian pharmacies
https://ksp.sg/razvivajushhie-prilozhenija-i-igry-dlja-detej-14-4/
WoW boosting service https://gamerspecials.com/
Ramenbet
WoW boost https://gamerspecials.com/
http://mexicanpharm24.pro/# mexican online pharmacies prescription drugs
indian pharmacy paypal
how much do helium balloons cost Dubai buy balloons inexpensively Dubai
ed pills that really work http://mexicanpharm24.pro/# mexican pharmaceuticals online
where to buy helium balloons helium balloons Dubai
top 10 online pharmacy in india india pharmacy indianpharmacy com
custom helium balloons with delivery Dubai https://helium-balloon-price.com
happy birthday balloons order balloons to your home
http://drugs24.pro/# non prescription ed pills
india pharmacy mail order
Pinko
order helium balloons with delivery order helium balloons with delivery
custom balloons Dubai helium balloons with cheap delivery Dubai
helium balloons inexpensively cheap balloons to order Dubai
логопед онлайн занятия для ребенка
вулкан казино
Pinco
Казино вулкан
Профессиональный сервисный центр ремонт сотовых телефонов мастерская телефонов
Профессиональный сервисный центр по ремонту сотовых телефонов в Москве.
Мы предлагаем: ремонт ноутбука после залития цена
Наши мастера оперативно устранят неисправности вашего устройства в сервисе или с выездом на дом!
hellow all https://nspddfgstmdbkl1034.ru/
achat or rachat de bijoux
http://stromectol1st.shop/# stromectol price us
buy prescription drugs from india
hellow all https://nspddfgstmdbkl1034.ru/
marixuana al
http://rybelsus.icu/# buy rybelsus
herbal ed treatment
http://www.rusmed.ru/annonce/show/4799/Ultrazvukovye_issledovaniya_UZI_chto_eto_i_kogda_primenyayutsya
where can i buy oral ivermectin: stromectol 1st – buy stromectol
lsd almaq
paxlovid generic: shop – paxlovid pharmacy
http://rybelsus.icu/# rybelsus generic
over the counter ed medication
https://jibelatec.co.za/index.php/2024/10/07/7-luchshih-sajtov-dlja-skachivanija-apk-fajlov-na-3/
https://stromectol1st.shop/# stromectol tablets
cheapest online pharmacy india
paxlovid india: paxlovid cost without insurance – paxlovid price
Semaglutide pharmacy price: rybelsus.icu – order Rybelsus
DeepNude https://rocketmandevelopment.com/exploring-nudity-in-a-new-light-the-nudify-experience/ is an app that undresses women in photographs, revealing their intimate areas hidden behind clothing.
https://paxlovid1st.shop/# Paxlovid over the counter
cheap erectile dysfunction pill
paxlovid india buy here paxlovid pill
Ищете универсальные наушники для максимального погружения в музыку или комфортного общения? На нашем сайте https://reyting-naushnikov.ru/ вы найдёте подробные обзоры, советы по выбору и уходу за наушниками. Мы поможем вам подобрать идеальную модель, будь то для профессионального использования, занятий спортом или домашнего прослушивания. Откройте для себя мир звука с нами!
http://stromectol1st.shop/# stromectol 3 mg dosage
sexual dysfunction in men
minocycline 100mg for acne: best price shop – ivermectin 5ml
minocycline tablets cheapest stromectol ivermectin 0.08
https://www.airfresh.ru/roebox/pgs/obzor_kazino_vavada_42.html
cheaper: more – buy rybelsus
https://stromectol1st.shop/# ivermectin lotion 0.5
pharmacy website india
Профессиональный сервисный центр по ремонту духовых шкафов в Москве.
Мы предлагаем: ремонт духовых
Наши мастера оперативно устранят неисправности вашего устройства в сервисе или с выездом на дом!
buy minocycline 100mg otc: stromectol shop – ivermectin rx
buy stromectol pills: best price shop – ivermectin lotion price
anonisme
http://stromectol1st.shop/# minocycline 100 mg tablets
top 10 pharmacies in india
http://stromectol1st.shop/# ivermectin cream 5%
home remedies for erectile dysfunction
lsd almaq
Plavix 75 mg price best price on generic Cost of Plavix on Medicare
Ищете лучшие наушники для домашнего прослушивания для максимального погружения в музыку или комфортного общения? На нашем сайте https://reyting-naushnikov.ru/ вы найдёте подробные обзоры, советы по выбору и уходу за наушниками. Мы поможем вам подобрать идеальную модель, будь то для профессионального использования, занятий спортом или домашнего прослушивания. Откройте для себя мир звука с нами!
https://stromectol1st.shop/# stromectol xr
online ed meds
minocycline 100mg without a doctor stromectol 1st stromectol medication
Buy semaglutide: more – cheaper
more: rybelsus – buy semaglutide online
stromectol sales: stromectol fast delivery – ivermectin 9 mg tablet
https://stromectol1st.shop/# order minocycline 50mg online
reputable indian online pharmacy
cheaper: Semaglutide pharmacy price – Semaglutide pharmacy price
http://stromectol1st.shop/# ivermectin lotion cost
buy medication online
как установить ручки на ниву шевроле замена наружных ручек своими руками
ivermectin india best price shop minocycline 100 mg
https://stromectol1st.shop/# minocycline antibiotic
erectile dysfunction treatment
Paxlovid over the counter paxlovid price Paxlovid buy online
Женский портал https://glamour.kyiv.ua это твой гид по красоте, здоровью, моде и личностному развитию. Здесь ты найдёшь полезные советы, вдохновение и поддержку на пути к гармонии с собой.
Медицинский онлайн журнал https://medicalanswers.com.ua актуальная информация о здоровье, профилактике и лечении заболеваний.
Новости Украины и мира https://lentanews.kyiv.ua оперативные и объективные сводки событий.
https://stromectol1st.shop/# stromectol where to buy
indian pharmacy online
Важные события дня https://actualnews.kyiv.ua с объективной подачей: последние новости из Украины и со всего мира. Читайте о политике, экономике, международных отношениях и общественных изменениях в одном месте.
Последние события https://lenta.kyiv.ua из мира политики, экономики, культуры и спорта. Всё, что происходит в Украине и за её пределами, с экспертной оценкой и объективной подачей.
buy semaglutide online: rybelsus generic – Buy semaglutide
stromectol liquid: stromectol fast delivery – buy minocycline online
Новые новости https://newsportal.kyiv.ua политики, общества, спорта, культуры, новости дня о событиях
Новости Украины https://gau.org.ua оперативные сводки, политические события, экономика, общественные и культурные тенденции.
Основные новости https://mediashare.com.ua за сегодня Свежие события в мире и Украине
Последние новости Украины https://kiev-pravda.kiev.ua актуальные события, политика, экономика, спорт и культура.
Свежие новости 24/7 https://prp.org.ua политика, экономика, спорт, культура и многое другое. Оперативные сводки, эксклюзивные материалы и аналитика от экспертов. Оставайтесь в курсе главных событий в стране и мире!
pornografia milf
Последние новости дня https://gromrady.org.ua политика, экономика, спорт, культура и происшествия. Объективные материалы и свежие данные для тех, кто хочет быть в центре событий!
Самые важные новости https://pto-kyiv.com.ua на одном портале: политика, экономика, происшествия, спорт и культура. Оперативно, достоверно, актуально — следите за событиями вместе с нами!
Новости онлайн https://status.net.ua самые свежие события, объективная аналитика и мнения экспертов.
Новости вокруг света https://infotolium.com путешествия и развлечения. Культура и искусство, юмор, приколы. Наука и техника. Продукты питания.
Главные новости https://thingshistory.com в реальном времени: политика, экономика, культура и спорт.
plavix medication: clopidogrel – generic plavix
Актуальные новости https://uamc.com.ua 24/7. Узнайте первыми о главных событиях в мире, стране и вашем регионе. Мы предоставляем только проверенные факты!
Автообзоры https://proauto.kyiv.ua тест-драйвы, новости рынка и советы экспертов. Узнавайте всё о новых моделях и автоаксессуарах на нашем портале!
Самые свежие новости https://autoclub.kyiv.ua автоиндустрии, тест-драйвы, технические советы и обзоры автомобилей. Всё, что нужно автолюбителю!
Автомобильный портал https://autoblog.kyiv.ua для всех автолюбителей. Актуальные новости, обзоры авто, советы по выбору, ремонту и обслуживанию машин.
Актуальные автомобильные новости https://bestauto.kyiv.ua детальные тест-драйвы, обзоры новых моделей и советы по выбору авто для всех!
Сервис EasyDrop предлагает игрокам уникальную возможность не только получать эксклюзивные скины для CS2, открывать кейсы, но и экономить средства благодаря системе промокодов. Многие пользователи могут воспользоваться промокодами, которые дают возможность получить до 40% к депозиту на Изи Дроп при пополнении счета, подробнее – https://t.me/easydrop_prom
п»їplavix generic: clopidogrel pro – Cost of Plavix without insurance
http://stromectol1st.shop/# ivermectin pill cost
sexual dysfunction in men
The most modern pocket option platform for trading on financial markets. Register a Free Demo Account and start using the full potential for earning on trading operations.
Новые Анонсы л2 с удобным поиском. Анонс серверов Lineage 2 по типу Craft, PvP, Low. Открытие серверов L2 каждый день!
Изготавливаем изделия https://coping-top.ru из восстановленного камня: печи с мангалом и барбекю, решетки, бордюры. Прочный и экологичный материал, широкий выбор цветов и текстур.
Новый авто портал https://mirauto.kyiv.ua для автолюбителей. Обзоры авто, новости, тест-драйвы и советы по обслуживанию автомобиля в одном месте.
Clopidogrel 75 MG price clopidogrel pills plavix medication
как проверить модуль зажигания шевроле круз 1.8 полное руководство
http://stromectol1st.shop/# stromectol canada
top online pharmacy india
paxlovid cost without insurance shop paxlovid cost without insurance
buy stromectol online uk: ivermectin pills – minocycline warnings
good price: order Rybelsus – rybelsus generic
friends casino
friends
Полезный сервис быстрого загона ссылок сайта в индексация поисковой системы – быстрая индексация ссылок
Джоз
Selector
https://rybelsus.icu/# order Rybelsus
buy ed pills
Play the best free social slots at CorgiSlots and enjoy exciting daily rewards with friends
https://stromectol1st.shop/# ivermectin generic cream
pharmacy website india
more: rybelsus cost – good price
https://niz.ru/media/pgs/turniru_v_kazino_vavada__vuigruvayte_po_krupnomu__uchastvuya_v_sorevnovaniyah.html
Plavix generic price: check clopidogrel pro – antiplatelet drug
https://paxlovid1st.shop/# paxlovid for sale
ambien without a doctor’s prescription
Автомобильные новости https://sedan.kyiv.ua Украины и мира, тест-драйвы новых авто, советы экспертов
Сервисный центр предлагает ремонт парогенератора hyundai ремонт парогенератора hyundai на дому
Женский портал https://bestwoman.kyiv.ua современная мода, тренд, стиль; полезные советы; секреты хорошей фигуры; уроки макияжа, внешность и красота
Женская красота https://7krasotok.com здоровье – женский онлайн журнал. Новости звезд, тренды моды и красоты, правильное питание, рецепты вкусных блюд.
Портал для женщин https://prowoman.kyiv.ua мода, стиль, диеты, истории знаменитостей, красота, полезные советы, рецепты, отношения
Онлайн-журнал https://superwoman.kyiv.ua женских секретов для стильных, модных и уверенных в себе девушек.
what is minocycline prescribed for stromectol 1st stromectol over the counter
Советы по тренировкам https://bahgorsovet.org.ua питанию и здоровому образу жизни. Актуальная информация для всех, кто хочет улучшить свою физическую форму.
Полезные статьи https://entertainment.com.ua о здоровье, уходе за собой, моде и личностном развитии. Все для женщин, стремящихся к успеху.
Всё о здоровье https://expertlaw.com.ua как питаться правильно, сохранять физическую активность и заботиться о теле и душе.
Статьи о здоровье https://pobedilivmeste.org.ua питании и фитнесе. Практические рекомендации для поддержания вашего организма в отличном состоянии.
Актуальные статьи о здоровье https://pravovakrayina.org.ua питании и спорте. Узнайте, как поддерживать организм в отличной форме круглый год.
https://sbmk.org/css/pgs/sluzghba_podderzghki_klientov_vavada_casino__pomosh_24_7.html
paxlovid for sale: buy here – paxlovid generic
ivermectin 3 mg tabs: stromectol 1st – minocycline pills
Новости автоиндустрии https://eurasiamobilechallenge.com обзоры моделей, советы по обслуживанию и вождению. Всё для автолюбителей и профессионалов на одном сайте!
Советы по стилю https://biglib.com.ua красоте и психологии. Поддерживайте баланс между карьерой и личной жизнью с нашим журналом.
Идеи для стиля https://bbb.dp.ua красоты и развития карьеры. Экспертные советы для тех, кто стремится к гармонии в жизни.
Женский взгляд https://e-times.com.ua на моду, красоту и карьеру. Читайте полезные статьи и вдохновляйтесь новыми идеями каждый день!
Развивающие игры https://cgz.sumy.ua задания и советы для родителей. Всё для гармоничного роста, обучения и воспитания детей на одном портале.
order Rybelsus rybelsus cost rybelsus price
Джоз
Женский онлайн-журнал https://fotky.com.ua о моде, красоте, здоровье и саморазвитии. Советы экспертов, последние тренды и вдохновение для современной женщины.
Женский журнал https://leif.com.ua о стиле жизни, моде, красоте и саморазвитии. Узнайте актуальные советы и идеи для гармоничной и успешной жизни каждой женщины.
Модный женский https://krasotka-fl.com.ua онлайн-журнал с акцентом на стиль, красоту, здоровье и саморазвитие. Практичные рекомендации, тренды и идеи для женщин, которые хотят быть в курсе всех новинок.
Онлайн-клуб рукоделия https://godwood.com.ua для любителей и мастеров. Уроки, мастер-классы, идеи и советы по вязанию, шитью, вышивке и другим техникам. Общайтесь с единомышленниками, делитесь проектами и развивайте свои навыки в уютной онлайн-среде.
Портал для мужчин и женщин https://golosiyiv.kiev.ua с полезными статьями на темы здоровья, отношений, карьеры и саморазвития.
Узнать больше
портал о рукоделии https://lugor.org.ua советы по вязанию, вышивке и шитью, мастер-классы, схемы и идеи для творчества. Полезные статьи для начинающих и опытных мастеров, вдохновение и практические рекомендации.
Онлайн журнал для женщин https://lubimoy.com.ua мода, красота, здоровье, отношения, карьера и саморазвитие. Актуальные статьи, советы экспертов и вдохновение для повседневной жизни. Новости, тренды и полезные рекомендации.
Женский журнал онлайн https://martime.com.ua мода, уход за собой, здоровье, карьера и личная жизнь. Свежие статьи, советы и идеи для вдохновения и развития современной женщины.
Интерактивный женский журнал https://muz-hoz.com.ua стильные образы, идеи для развития, практические советы по здоровью и отношениям. Всё, что нужно для гармоничной жизни и самореализации.
Клуб для беременных https://mam.ck.ua и молодых мам: встречи, советы специалистов, обсуждения важных тем, занятия по уходу за малышом. Поддержка и полезная информация для комфортного материнства.
http://stromectol1st.shop/# minocin 50 mg for scabies
indian pharmacy online
https://paxlovid1st.shop/# paxlovid price
is ed reversible
antiplatelet drug: Cost of Plavix on Medicare – Cost of Plavix on Medicare
Полезные советы https://oa.rv.ua для женщин на все случаи жизни: уход за собой, отношения, карьера, здоровье и домашний уют. Откройте для себя практичные решения и вдохновение для каждой сферы жизни!
Лучшие советы для женщин https://oun-upa.org.ua от моды до здоровья, отношения, карьера и семейные лайфхаки. Всё, что нужно для баланса и гармонии в жизни.
Советы для женщин https://olive.kiev.ua секреты красоты, здоровье, психология, карьера и домашний уют. Полезные рекомендации для улучшения жизни каждый день!
Женский путеводитель https://rpl.net.ua по жизни: лайфхаки, советы по уходу, моде и здоровью. Оставайтесь успешной и гармоничной каждый день!
Советы для женщин https://reyesmusicandevents.com на каждый день: красота, здоровье, семья и карьера. Лайфхаки и вдохновение для современной и уверенной в себе женщины.
Помощь тендерного специалиста
good price: buy rybelsus – rybelsus.icu
http://paxlovid1st.shop/# paxlovid buy
erectional dysfunction
minocycline 100mg capsule stromectol fast delivery minocycline generic
Всё для женщин https://socvirus.com.ua полезные советы по уходу за собой, отношениям, карьере и созданию домашнего уюта.
Идеи для рукоделия https://sweaterok.com.ua мастер-классы, инструкции и вдохновение для создания уникальных изделий. Узнайте больше о шитье, вязании, вышивке и других видах творчества!
Женский портал https://tiamo.rv.ua с советами для красоты, здоровья, отношений и карьеры. Живите на полную с нашими рекомендациями!
Советы для женщин https://spkokna.com.ua на каждый день: стиль, уход, здоровье и гармоничные отношения. Вдохновение и полезные идеи!
Рекомендации для женщин https://virginvirtual.net как сохранить красоту, здоровье и баланс в жизни. Секреты успеха и счастья!
plavix best price: clopidogrel – cheap plavix antiplatelet drug
Semaglutide pharmacy price: rybelsus cost – order Rybelsus
https://stromectol1st.shop/# stromectol over the counter
reputable indian pharmacies
good price cheaper buy rybelsus
Практичные советы https://vybir.kiev.ua для женщин: мода, здоровье, карьера и семья. Легко находите ответы на любые вопросы!
Лайфхаки для женщин https://womanclub.in.ua как быть стильной, здоровой и находить баланс в личной жизни и работе. Полезные советы каждый день.
Женские секреты https://whoiswho.com.ua полезные советы для красоты, здоровья, семейного счастья и карьерных успехов. Присоединяйтесь к лучшей версии себя!
Женский блог https://ww2planes.com.ua полезные советы по стилю, уходу, здоровью и развитию карьеры. Всё для того, чтобы жить ярко и гармонично.
Official website of the olymp trade download broker. Up-to-date information about trading on the platform. Detailed review, reviews of real people, demo account, strategies.
Cryptoboss
Недорогие экскурсии в Хургаде цены 2024-2025. Бесплатный трансфер. Русскоязычный гид. Более 3000 реальных отзывов.
Недорогие экскурсии на Пхукете цены и описание. На острова Пхи Пхи, катание на слонах. Русские гиды, моментальное бронирование
Недорогие экскурсии в Шарм эль Шейхе цены и описание. В Каир, Луксор, на острова
Недорогие экскурсии в Царское Село. Янтарная комната, Большой Екатерининский дворец, описание и отзывы
Недорогие экскурсии в Паттайе цены и описание. Река Квай, морские прогулки на острова, в Камбоджу
Booi
Буй
Your article helped me a lot, is there any more related content? Thanks!
paxlovid cost without insurance: shop – paxlovid pill
Paxlovid over the counter: best price on pills – Paxlovid buy online
https://paxlovid1st.shop/# Paxlovid buy online
canadian drugs online
paxlovid buy buy here п»їpaxlovid
https://stromectol1st.shop/# minocycline 50 mg para que sirve
indian pharmacies safe
Cryptoboss
clopidogrel bisulfate 75 mg: check clopidogrel pro – Plavix 75 mg price
rybelsus.icu rybelsus.icu rybelsus generic
Скачать приложение LineBet https://linebet-download.com последнюю версию для Android телефонов в формате APK. Обзор букмекерского приложения LineBet.
Скачать игры на Андроид https://appdatabase.ru бесплатно на русском языке. Откройте для себя новые приключения!
Скачать бесплатные приложения https://apprepository.ru и игры для Андроид. Все программы доступны на русском языке.
http://stromectol1st.shop/# minocycline 100mg for acne
cheapest online pharmacy india
Продаем кругляк и пиловочник хвойных пород высокого качества! Идеально подходит для строительных и производственных нужд. В наличии различные размеры пиломатериалов: от досок до бруса, подробнее тут – круглый лес. Быстрая доставка и гибкие условия сотрудничества.
rybelsus generic: cheaper – more
good price: more – buy semaglutide online
plavix medication clopidogrel Cost of Plavix without insurance
The latest news https://workgid.com from the world of tourism, travel and recreation. Tourism and travel – all the most interesting on the topic
Натяжные потолки https://formulapotolkov.ru заказать недорого потолок под ключ с установкой
paxlovid buy: paxlovid shop – paxlovid price
Официального сайта Мостбет https://ikidz.ru как войти и зарегистрироваться, как скачать программу и обзоры ставок на спорт от букмекерской конторы Мостбет.
stromectol online: cheapest stromectol – buy ivermectin
Мостбет https://belayaistoriya.ru откройте для себя азарт в казино. Простая регистрация, множество бонусов и удобный вход обеспечат незабываемый игровой опыт. Используйте промокоды для увеличения выигрышей.
Официальный сайт Мостбет https://obukhov-sport.ru бонусы за вход, промокоды и фриспины в онлайн казино Mostbet. Надежная букмекерская компания и онлайн казино.
cost of ivermectin pill stromectol cream what is minocycline
Профессиональный сервисный центр по ремонту сотовых телефонов в Москве.
Мы предлагаем: ремонт старых ноутбуков
Наши мастера оперативно устранят неисправности вашего устройства в сервисе или с выездом на дом!
Selector
https://stromectol1st.shop/# stromectol without prescription
india online pharmacy
Discover Rafael Nadal’s https://tennis.rafael-nadal-fr.com impressive rise to the top of world tennis, from his debut to his career Grand Slam victory.
Experience passion and tradition by climbing to the top of Beaujoire https://beaujoire.nantes-fr.com home of the legendary FC Nantes. Go from finish to an unforgettable match.
Gareth Bale https://real-madrid.gareth-bale-se.com est un footballeur gallois dont le nom est inscrit a jamais dans l’histoire du Real Madrid et de tout le football mondial.
Кет
German auto giant Mercedes https://mercedes.lewis-hamilton.cz and British racing driver Lewis Hamilton are key figures in the era of unprecedented success of Formula 1 over the last decade.
Daddy
Строительный портал https://garant-jitlo.com.ua о строительстве, недвижимости, ремонте, дизайне и архитектуре
Портал о строительстве https://tozak.org.ua проекты домов, ремонт, материалы и услуги для профессионалов и частных лиц.
Buy semaglutide rybelsus generic rybelsus cost
paxlovid pill: check this – Paxlovid over the counter
http://stromectol1st.shop/# stromectol where to buy
reputable indian pharmacies
of course like your web site but you have to check the spelling on several of your posts. Many of them are rife with spelling problems and I find it very troublesome to tell the truth nevertheless I will certainly come back again.
Дэдди
paxlovid price: buy here – Paxlovid over the counter
paxlovid india: paxlovid shop – paxlovid generic
Кет
https://stromectol1st.shop/# ivermectin lotion for lice
india pharmacy
Строительный гид https://ko-online.com.ua проектирование, материалы, услуги и советы от профессионалов.
buy minocycline online stromectol where to buy does minocycline work for acne
paxlovid cost without insurance: paxlovid 1st – paxlovid buy
paxlovid covid: paxlovid 1st – п»їpaxlovid
Semaglutide pharmacy price: cheaper – more
Paxlovid over the counter: paxlovid price – paxlovid pharmacy
Селектор
paxlovid pill shop paxlovid generic
https://stromectol1st.shop/# stromectol ivermectin 3 mg
top online pharmacy india
гадание таро по имени мужчины https://gadaniepotaro.ru
стоимость проведения оценки условий труда https://sout095.ru
Сука
установить тахограф штрих https://tahograf-pro.ru/
https://jysk.am/media/pgs/kak_nayti_rabochee_zerkalo_dlya_kazino_vavada.html
спецоценка условий труда цена https://sout095.ru
сколько стоит установить тахограф https://tahograf-pro.ru/
http://vniro.ru/js/pgs/?kak_zaregistrirovatsya_v_kazino_vavada__poshagovoe_rukovodstvo.html
установка замка в дверь установка замка
suka
Полезная информация на сайте. Все что вы хоте знать об интернете полезный сервис
Копирайтер и SMM-специалист https://uslugi.yandex.ru/profile/ArinaB-2163631 специалист по созданию текстов и управлению социальными сетями. Занимается разработкой контента, повышает вовлечённость аудитории, управляет репутацией бренда и реализует стратегии продвижения в цифровых каналах.
соут в новой организации https://sout095.ru
Риобет
Профессиональный сервисный центр по ремонту бытовой техники с выездом на дом.
Мы предлагаем: сервисные центры в перми
Наши мастера оперативно устранят неисправности вашего устройства в сервисе или с выездом на дом!
Riobet
https://1wintr.fun/# cazino
пинап
Профессиональный сервисный центр по ремонту моноблоков iMac в Москве.
Мы предлагаем: вызвать мастера по ремонту imac
Наши мастера оперативно устранят неисправности вашего устройства в сервисе или с выездом на дом!
Riobet
bitcoin btc новости биткойн курс
pin up 306: pin up casino – pinup az
Grewal Transport offers top-tier Mumbai To Ahmedabad Truck Transport Services, ensuring safe and timely delivery of goods. With a fleet of well-maintained trucks and professional drivers, we guarantee secure transit for all types of shipments, from small parcels to bulk goods. Our truck transport service from Mumbai to Ahmedabad is designed to cater to businesses and individuals, providing flexible and affordable solutions. With real-time tracking and a customer-focused approach, Grewal Transport ensures a hassle-free experience. Trust us for reliable and efficient logistics support for all your transportation needs.
Риобет
пинап кз: пин ап – пин ап казино
пин ап вход пин ап официальный сайт пин ап вход
Риобет
casino siteleri: cazino – canl? casino siteleri
пин ап вход пинап зеркало пинап зеркало
пин ап официальный сайт: пинап зеркало – пин ап
Хочу посоветовать всем день без бюстгальтера
пин ап пинап кз pin up
slot casino siteleri: casino siteleri – slot casino siteleri
Риобет
en iyi casino siteleri: guvenilir casino siteleri – guvenilir casino siteleri
Крайне рекомендую магазин бюстгальтеров
пинап казино: пин ап – пин ап казино
пин ап казино: пин ап – пин ап казино
1xbet
https://1winbrasil.win/# pinup az
pin up
pin up casino: pin up casino – pin up
1хбет
https://www.golfstriminform.ru/byvaet/uzi-molochnoj-zhelezy-kogda-provoditsya-i-chto-vyyavlyaet/
slot casino siteleri: canl? casino siteleri – canl? casino siteleri
Мелбет
Мой телефон перестал заряжаться, и я не знал, что делать. По совету друга обратился в этот сервисный центр. Мастера быстро нашли проблему и устранили её. Теперь мой телефон снова в строю! Рекомендую всем: мастер по ремонту сотовых.
pin-up casino giris: pin up casino – pin up casino
пин ап вход: пин ап вход – пин ап официальный сайт
1xbet официальный сайт: 1xbet скачать – 1хбет
pin up casino pinup az pin up
1хбет: 1хбет – 1хставка
Приложения для ставок на спорт доступны для Android — просто скачайте легальные БК и начните выигрывать
casino siteleri casino sitesi casino sitesi
Мелбет
pin up casino: pin up casino – pinup az
http://1winci.icu/# пин ап зеркало
pin up
пин ап: пин ап зеркало – пин ап официальный сайт
Профессиональный сервисный центр по ремонту компьютерных видеокарт по Москве.
Мы предлагаем: ремонт видеокарт москва
Наши мастера оперативно устранят неисправности вашего устройства в сервисе или с выездом на дом!
http://1winindia.tech/# pin up kz
pin up
1xbet: 1xbet – 1хставка
h?zl? casino: slot casino siteleri – en iyi casino siteleri
Профессиональный сервисный центр по ремонту телефонов в Москве.
Мы предлагаем: ближайший сервисный центр по ремонту телефонов
Наши мастера оперативно устранят неисправности вашего устройства в сервисе или с выездом на дом!
пинап зеркало: пинап зеркало – пин ап вход
доставка алкоголя на дом https://dostavka-alkogolya-moskva-world-1.ru/
ezcash
доставка алкоголя на дом москва https://dostavka-alkogolya-moskva-world-1.ru/
pin up casino: pin up azerbaycan – pin-up casino giris
1хставка: 1xbet – 1xbet официальный сайт
изикэш
pin up: pinup az – pin-up casino giris
пинап кз: pin up kz – пин ап
детская пися порно детское порно тг чат
https://1winci.icu/# пин ап зеркало
пин ап кз
пин ап официальный сайт: пин ап вход – пинап зеркало
https://1winci.icu/# пин ап
pin up
pin up 306: pin-up – pinup az
порно 1 детское порно видео бесплатно
casino siteleri canl? casino siteleri guvenilir casino siteleri
алкоголь круглосуточно https://dostavka-alkogolya-moskva-msk-1.ru/
1xbet официальный сайт: 1xbet зеркало – 1xbet зеркало
пин ап зеркало: пин ап – пин ап официальный сайт
1хбет: 1xbet зеркало – 1хставка
Профессиональный сервисный центр по ремонту телефонов в Москве.
Мы предлагаем: ремонт телефонов на дому
Наши мастера оперативно устранят неисправности вашего устройства в сервисе или с выездом на дом!
cazino: canl? casino – canl? casino siteleri
https://1winci.icu/# пин ап официальный сайт
пинап казино
Discover and download free gambling apps for Android. Enjoy casino games, sports betting, and more. Explore now – https://apkgambling.com/
http://1winci.icu/# пин ап зеркало
пин ап
daddy casino
1xbet официальный сайт: 1xbet – 1хбет
pin up 306: pin up – pin up
Discover and download free gambling apps for Android. Enjoy casino games, sports betting, and more. Explore now – https://apkgambling.com/
Профессиональный сервисный центр по ремонту телефонов в Москве.
Мы предлагаем: ремонт телефона
Наши мастера оперативно устранят неисправности вашего устройства в сервисе или с выездом на дом!
пин ап вход: пин ап официальный сайт – пин ап зеркало
pin up kz: пинап – пин ап кз
пинап зеркало: пин ап вход – пин ап зеркало
пин ап пин ап пин ап официальный сайт
1хставка 1xbet скачать 1xbet зеркало
pin up: pin-up casino giris – pinup az
1xbet скачать: 1xbet – 1xbet
алкоголь с доставкой на дом москва https://dostavka-alkogolya-moskva-msk-1.ru/
https://1winrussia.online/# 1хбет
pin up kz
cazino: guvenilir casino siteleri – guvenilir casino siteleri
pin up 306: pin-up – pin up
реклама в лифтах подъездах сколько стоит реклама в лифте
пин ап зеркало: пин ап – пинап зеркало
pin up 306: pin up casino – pin-up casino giris
пинап казино: пинап казино – пин ап кз
Если вы искали где отремонтировать сломаную технику, обратите внимание – тех профи
пин ап вход: пинап зеркало – пин ап официальный сайт
1xbet зеркало 1xbet 1хставка
Профессиональный сервисный центр по ремонту телефонов в Москве.
Мы предлагаем: где отремонтировать телефон
Наши мастера оперативно устранят неисправности вашего устройства в сервисе или с выездом на дом!
пин ап: пинап – пинап
пинап кз pin up kz пин ап казино
Капитальный ремонт квартир в Алматы – ТОО “Ваш-Ремонт” помжет Вам от идеи до реализации. Надежно, качественно и в срок. Мы предлагаем полный спектр услуг: от дизайна интерьера до отделочных работ любой сложности. Доверьте свой ремонт опытным специалистам и получите идеальный результат.
https://1wintr.fun/# casino oyunlar?
пинап кз
пин ап зеркало: пинап зеркало – пин ап вход
cazino: casino oyunlar? – h?zl? casino
1xbet скачать: 1xbet скачать – 1xbet скачать
Сервисный центр предлагает ремонт моноблока dexp на дому центр ремонта моноблока dexp
1xbet: 1хбет – 1xbet скачать
Продаем кругляк и пиловочник хвойных пород высокого качества! Идеально подходит для строительных и производственных нужд. В наличии различные размеры пиломатериалов: от досок до бруса, подробнее тут – деловой лес. Быстрая доставка и гибкие условия сотрудничества.
1xbet 1хбет 1xbet скачать
http://1wintr.fun/# h?zl? casino
пинап казино
pin-up: pin up casino – pin-up casino giris
http://1winindia.tech/# пин ап кз
пинап казино
1xbet зеркало 1xbet официальный сайт 1хставка
пин ап: пин ап официальный сайт – пин ап зеркало
пин ап зеркало: пин ап зеркало – пин ап
titfucking
пин ап кз: пин ап – пин ап кз
ремонт мобильных телефонов
Продаем кругляк и пиловочник хвойных пород высокого качества! Идеально подходит для строительных и производственных нужд. В наличии различные размеры пиломатериалов: от досок до бруса, подробнее тут – деловой лес. Быстрая доставка и гибкие условия сотрудничества.
Aku meniduri ibumu
пин ап зеркало: пин ап вход – пин ап
natural ed cures: what are ed drugs – injections for ed
https://mexicanpharm1st.com/# medication from mexico pharmacy
Используйте рабочее зеркало 888Starz для доступа к ставкам
buying from online mexican pharmacy: buying from online mexican pharmacy – mexico drug stores pharmacies
https://drugs1st.store/# ed drugs compared
online pharmacy india: online pharmacy india – buy medicines online in india
best online pharmacies in mexico: mexican drugstore online – buying prescription drugs in mexico online
world pharmacy india: online shopping pharmacy india – indian pharmacy online
прокапаться на дому цена одинцово https://mosalkogolunet.ru/
medications for ed amoxicillin without a doctor’s prescription buy cheap prescription drugs online
https://mexicanpharm1st.com/# mexican border pharmacies shipping to usa
drug pharmacy ed treatment natural buy online pharmacy
buy prescription drugs from india: top 10 pharmacies in india – best india pharmacy
https://mexicanpharm1st.com/# mexican rx online
online pharmacy india: india pharmacy – pharmacy website india
служба вывода из запоя https://mosalkogolunet.ru/
Mostbet
online pharmacy india: top 10 pharmacies in india – indian pharmacy online
online shopping pharmacy india: indian pharmacy online – world pharmacy india
ed in young men: drug prices comparison – ed medications comparison
https://drugs1st.store/# real cialis without a doctor’s prescription
Compra Sustarox Crema Perú hoy mismo y experimenta una mejora significativa en tu movilidad y bienestar sin efectos secundarios. https://sustaroxcrema.com/
Mostbet
https://mexicanpharm1st.com/# buying from online mexican pharmacy
india online pharmacy: indian pharmacy online – india pharmacy
Compra Sustarox Crema Perú hoy mismo y experimenta una mejora significativa en tu movilidad y bienestar sin efectos secundarios. https://sustaroxcrema.com/
beloretskiy.com
india online pharmacy: online pharmacy india – top online pharmacy india
male dysfunction pills erectyle dysfunction erectal disfunction
medication from mexico pharmacy: mexican pharmaceuticals online – buying prescription drugs in mexico online
top online pharmacy india best online pharmacy india cheapest online pharmacy india
https://indianpharm1st.com/# indian pharmacies safe
https://drugs1st.store/# non prescription ed pills
top online pharmacy india: indian pharmacies safe – world pharmacy india
buy ed pills online: ed medications comparison – erectile dysfunction medications
Максбет
reputable indian online pharmacy: Online medicine home delivery – reputable indian pharmacies
mexican border pharmacies shipping to usa: medication from mexico pharmacy – mexican drugstore online
Online medicine order: online shopping pharmacy india – best india pharmacy
medication from mexico pharmacy: mexico drug stores pharmacies – best online pharmacies in mexico
http://drugs1st.store/# ed natural remedies
https://mexicanpharm1st.com/# buying from online mexican pharmacy
buy prescription drugs from india top 10 pharmacies in india п»їlegitimate online pharmacies india
Максбет
natural pills for ed ed cures that work ed aids
mexican border pharmacies shipping to usa: pharmacies in mexico that ship to usa – buying from online mexican pharmacy
best online pharmacies in mexico: mexico drug stores pharmacies – mexico pharmacies prescription drugs
drug pharmacy: ed pills – cheap ed pills
online pharmacy india: buy medicines online in india – indian pharmacy paypal
https://indianpharm1st.com/# indian pharmacy paypal
http://indianpharm1st.com/# best india pharmacy
Попутный груз из Новосибирска — это удобное решение для тех, кто хочет отправить груз с минимальными затратами
cheapest online pharmacy india: best india pharmacy – india online pharmacy
pharmacies in mexico that ship to usa: buying prescription drugs in mexico online – pharmacies in mexico that ship to usa
ed vacuum pumps: prescription drugs – ed online pharmacy
Временная регистрация в Москве: Быстро и Легально!
Ищете, где оформить временную регистрацию в Москве? Мы гарантируем быстрое и легальное оформление без очередей и лишних документов. Ваше спокойствие – наша забота!
Минимум усилий • Максимум удобства • Полная легальность
Свяжитесь с нами прямо сейчас!
.
sweet bonanza oyna: sweetbonanzatrpro – sweet bonanza
http://biznes-fabrika.kz/# Пин Ап Казахстан
https://biznes-fabrika.kz/# Пин Ап Казино Официальный Сайт
pin up casino
бонусы пин ап: пин ап – Пин Ап Казино Официальный Сайт в России
http://sweetbonanzatr.pro/# sweet bonanza
sweetbonanzatrpro: sweet bonanza tr – sweet bonanza tr
https://biznes-fabrika.kz/# пин ап кз
pin up casino
Профессиональный сервисный центр по ремонту Apple iPhone в Москве.
Мы предлагаем: вызвать мастера по ремонту iphone
Наши мастера оперативно устранят неисправности вашего устройства в сервисе или с выездом на дом!
sweetbonanzatrpro sweet bonanza nas?l oynan?r sweet bonanza nas?l oynan?r
бытовки для жилья контейнер бытовка
https://pinupzerkalo.fun/# Пин Ап Казино Официальный Сайт в России
pin up zerkalo
p0412 daewoo ошибка dtc и расшифровка неисправности клапана системы обратной подачи воздуха а на деу obd 2
sweet bonanza nas?l oynan?r sweet bonanza nas?l oynan?r sweet bonanza tr
https://pinupzerkalo.fun/# pinco
sweet bonanza nas?l oynan?r: sweet bonanza nas?l oynan?r – sweet bonanza
p0275 dtc код ошибки daewoo расшифровка неисправности форсунки цилиндры 5 и решение проблем на деу obd 2
https://sweetbonanzatr.pro/# sweet bonanza
pin up 306: pin-up casino giris – pin-up
http://sweetbonanzatr.pro/# sweet bonanza
pinup bet and casino
Получите доступ к ставкам через 888starz apk ios
по ссылке
https://pinupzerkalo.fun/# пинко
pin up casino
Временная регистрация в Москве: Быстро и Легально!
Ищете, где оформить временную регистрацию в Москве? Мы гарантируем быстрое и легальное оформление без очередей и лишних документов. Ваше спокойствие – наша забота!
Минимум усилий • Максимум удобства • Полная легальность
Свяжитесь с нами прямо сейчас!
.
sweet bonanza nas?l oynan?r sweet bonanza oyna sweetbonanzatr.pro
Пин Ап Казахстан: пин ап казино онлайн – пин ап казино
https://pinupzerkalo.fun/# пинап казино
pin up kz: Пин Ап Казино Официальный Сайт – pin up kz
sweetbonanzatr.pro: sweet bonanza tr – sweetbonanzatrpro
пин ап казино пин ап 634 пин ап 634
https://pinup-az.bid/# pin up 306
pin up zerkalo
промокод prodamus промокод prodamus .
бонусы пин ап: пин ап – Пин Ап Казино Официальный Сайт в России
pin up 306: pinup az – pinup az
http://pinupzerkalo.fun/# пин ап
pin up win
pinup az: pin-up – pin up azerbaycan
https://compters.ru/
sweet bonanza oyna: sweetbonanzatr.pro – sweet bonanza
pin-up casino giris: pin up azerbaycan – pin up casino
https://compters.ru/
http://biznes-fabrika.kz/# Пин Ап Казахстан
sweet bonanza nas?l oynan?r sweet bonanza oyna sweet bonanza
http://pinupzerkalo.fun/# пин ап зеркало
pinup bet and casino
pinco: Пин Ап Казино Официальный Сайт в России – Официальный Сайт
p0132 volvo код ошибки и расшифровка неисправности высокого уровня сигнала датчика кислорода
http://sweetbonanzatr.pro/# sweet bonanza oyna
pin up win
sweet bonanza tr: sweetbonanzatrpro – sweetbonanzatr.pro
pinup az: pin-up – pinup
pinup-az bid: pinup az – pin up
http://biznes-fabrika.kz/# пин ап казино
pin up win
Снять ломку на дому в Астане https://narcologicheskiy-centr-v-astane.kz/
pin-up casino giris: pin up azerbaycan – pinup
http://pinup-az.bid/# pin up casino
pin up win
http://pinupzerkalo.fun/# пин ап вход
пин ап кз пин ап кз пин ап казино онлайн
пин ап казино: Пин Ап Казино Официальный Сайт – пин ап казино
pinup az: pin up casino – pin up 306
https://pinupzerkalo.fun/# пинко
https://pinupzerkalo.fun/# pin up zerkalo
pin up casino
приложение напоминание
pinup az: pin up 306 – pin up
пин ап казино: pin up zerkalo – пинко
https://sweetbonanzatr.pro/# sweet bonanza tr
pinup az: pinup az – pin up 306
пинап казино пин ап пинко
https://pinupzerkalo.fun/# pin up zerkalo
pin up casino
pinup az pin-up pinup-az bid
https://pinup-az.bid/# pinup-az bid
Чтобы сайт был на высоте в поиске, используйте программы накрутки ПФ для улучшения SEO.
sweet bonanza oyna: sweet bonanza oyna – sweetbonanzatrpro
http://pinup-az.bid/# pin up
pin up zerkalo
пин ап кз: пин ап казино онлайн – пин ап кз
pin up 306: pinup – pinup az
Вывод из запоя в Астана https://narcologicheskiy-centr-v-astane.kz/
промокод продамус на 5000 https://www.vc.ru/services/1527889-prodamus-promok .
пин ап кз: Пин Ап Казахстан – пин ап казино
Сервисный центр предлагает ремонт honor 50 в петербурге ремонт honor 50 в петербурге
https://profilnayatruba.ru/
Trouvez votre parfait
Couteaux de cuisine
a ajouter a votre arsenal culinaire
Decouvrez notre selection de
Couteaux de table
au meilleur prix
gabapentin best price: same-day delivery – compare the best prices
semaglutide online: semaglutide – Regenerative Medicine
https://semaglutide.ink/# Urgent Specialists
https://paxlovid1st.store/# see a healthcare provider
http://gabapentin1st.pro/# gabapentin pro
Pills Paxlovid: paxlovid store – see a healthcare provider
Rybelsus: semaglutide – Specialists
licensed gabapentin: Care provides – Care provides
good price: stromectol delivery usa – stromectol store
https://gabapentin1st.pro/# licensed gabapentin
buy gabapentin: buy gabapentin – involves multisystem
Если смотреть с точки зрения профиля трубы, то все стальные трубы можно разделить на:
Профильные трубы. Благодаря ребрам прочности подходят для каркасов легких металлоконструкций.
Круглые и овальные трубы. Применяются для металлоконструкций, требовательных к гибкости и прочности.
Если вам нужны надежные и качественные трубы для вашего проекта, обращайтесь к нам – https://truba4u.ru/
licensed gabapentin: Neurontin online – compare the best prices
good price: stromectol – stromectol store
amoxil: Compare Prices – Compare Prices
Descubre los aspectos mas personales de Sergio Ramos | Lee sobre el impacto de Ramos en el PSG y Sevilla | Descubre el lado humano de Sergio Ramos y su familia | Informate sobre los records de Ramos en La Liga y Europa | Descubre como Ramos sigue siendo un icono en el futbol | Informate sobre el perfil de Ramos en Transfermarkt | Explora la carrera de Ramos en Sevilla y su regreso al club | Descubre como Ramos se ha mantenido relevante en el futbol | Conoce los datos actuales sobre Ramos y su carrera, futbol de Ramos Sergio Ramos futbol.
http://gabapentin1st.pro/# gabapentin pro
good price: find bets price – cheapest
https://paxlovid1st.store/# paxlovid1st
http://semaglutide.ink/# semaglutide
Regenerative Medicine: Rybelsus – semaglutide
Pills Paxlovid: paxlovid1st – Pills Paxlovid
продвижение и раскрутка сайтов https://is-market.ru
https://stromectol1st.store/# stromectol store
комплексное продвижение сайта цена https://is-market.ru
gabapentin pro: Neurontin online – gabapentin best price
stromectol best price: stromectol delivery usa – stromectol
See risks: see a healthcare provider – paxlovid1st
Specialists: Regenerative Medicine – Specialists
https://stromectol1st.store/# find bets price
Сервисный центр предлагает мастер по ремонту бесперебойника ippon ремонт бесперебойников ippon в москве
paxlovid1st: Pills Paxlovid – paxlovid price
https://gabapentin1st.pro/# involves multisystem
gabapentin best price: same-day delivery – involves multisystem
amoxil 1st shop: amoxil online – top-rated pills
https://amoxil1st.shop/# buy amoxil online
Надёжный букмекер для азартных игроков – это Мостбет | Играйте на Мостбет и получайте бонусы за регистрацию | Получите лучшие шансы и высокие коэффициенты на Мостбет | Найдите самые актуальные бонусы и акции на Мостбет | Мостбет – ваш выбор для ставок и развлечений | Играйте в любые азартные игры на Мостбет с бонусами | Играйте в казино и выигрывайте на Мостбет | Скачайте приложение и получайте удовольствие с Мостбет | Азартные игры с удобной навигацией – Мостбет, Мостбет ставки онлайн ставки на Мостбет.
1xbet
vavada casino официальный сайт
1хбет
Интернет-магазин Centurion предлагает широкий выбор спортпита для профессиональных атлетов и новичко. Вся продукция, представленная на сайте, производится передовыми компаниями мира, подробнее тут – купить протеин в донецке днр. Товары сертифицированы и полностью безопасны, обеспечивают 100 % результат. Совершая покупку, Вы можете задать любые вопросы нашим консультантам, которые являются опытными спортсменами и оказывают помощь в выборе подходящих продуктов. Доставка осуществляется быстро, удобным для покупателя способом.
Descubre los logros y premios de Paul Pogba en Juventus | Aprende sobre los logros deportivos de Pogba en Francia | Descubre los datos mas recientes sobre Pogba en Transfermarkt | Descubre la influencia de Pogba en sus equipos | Descubre como Pogba ha influenciado a jovenes futbolistas | Conoce la carrera profesional de Pogba y sus decisiones | Descubre mas sobre los records de Pogba en Juventus | Descubre el papel de Pogba en el equipo de Francia | Conoce mas sobre la vida profesional de Pogba en Juventus, Pogba en Juventus Juventus Paul Pogba.
Интернет-магазин Centurion предлагает широкий выбор спортпита для профессиональных атлетов и новичко. Вся продукция, представленная на сайте, производится передовыми компаниями мира, подробнее тут – купить протеин в мариуполе. Товары сертифицированы и полностью безопасны, обеспечивают 100 % результат. Совершая покупку, Вы можете задать любые вопросы нашим консультантам, которые являются опытными спортсменами и оказывают помощь в выборе подходящих продуктов. Доставка осуществляется быстро, удобным для покупателя способом.
домен хостинг дешево
вавада казино официальный сайт рабочее зеркало
Для тех, кто хочет найти грузоперевозки в Телеграм, наш сервис предложит лучшие маршруты.
best online pharmacy india India pharmacy delivery buy prescription drugs from india
solutions for ed http://mexicanpharm24.cheap/# mexico pharmacies prescription drugs
buying prescription drugs in mexico: mexico pharmacy – mexican rx online
otc ed pills https://indianpharm24.pro/# india pharmacy mail order
Присоединяйтесь к Мостбет и выигрывайте реальные деньги | Мостбет – официальный сайт с высоким рейтингом доверия | Регистрируйтесь и начните зарабатывать с Мостбет | Найдите самые актуальные бонусы и акции на Мостбет | Легкий доступ к ставкам на сайте и приложении Мостбет | Проверьте свои шансы в слотах Мостбет | Всё для ставок и азартных игр – это Мостбет | Огромный выбор игр и бонусов на Мостбет | Лучшие бонусы и акции на официальном сайте Мостбет, ставки на спорт Mostbet Мостбет ставки на спорт.
http://pharm24.pro/# cheap drugs online
new erectile dysfunction treatment
pharmacy drugs: cheap drugs online – online meds for ed
Explora los clubes donde Ronaldinho dejo su huella | Explora la conexion de Ronaldinho con los jovenes futbolistas | Explora los aspectos personales y familiares de Ronaldinho | Informate sobre la vida de Ronaldinho mas alla del futbol | Descubre como Ronaldinho influyo en la proxima generacion | Conoce el estilo de juego que hizo famoso a Ronaldinho | Explora la influencia de Ronaldinho en el futbol actual | Descubre la habilidad y destreza de Ronaldinho en el futbol | Conoce la historia de Ronaldinho, el mago del balon, Ronaldinho estadisticas Ronaldinho Transfermarkt.
buy medicines online in india indian pharm 24 india pharmacy mail order
drug prices comparison cheap pharmacy viagra without a doctor prescription
vavada зеркало на сегодня
buying prescription drugs in mexico: Legit online Mexican pharmacy – mexican mail order pharmacies
cheap erectile dysfunction http://indianpharm24.pro/# top 10 pharmacies in india
top 10 online pharmacy in india: indian pharm 24 – best india pharmacy
Уборка после пожара на даче https://spec-uborka-posle-pozhara.ru/
http://indianpharm24.pro/# india pharmacy
cheapest ed pills online
buying prescription drugs in mexico: mexican drugs – buying from online mexican pharmacy
pet meds without vet prescription http://pharm24.pro/# ed pills that work
mexican border pharmacies shipping to usa mexican pharmacy mexican pharmaceuticals online
best online pharmacy india Indian pharmacy to USA cheapest online pharmacy india
Уборка квартир после пожара цена в Москве https://spec-uborka-posle-pozhara.ru/
http://pharm24.pro/# compare ed drugs
non prescription ed drugs
buying prescription drugs in mexico: mexico pharmacy – purple pharmacy mexico price list
Explora los exitos de Vinicius en el Real Madrid y Brasil | Conoce los goles mas impresionantes de Vinicius | Descubre los premios y reconocimientos de Vinicius | Descubre los momentos iconicos de Vinicius en su carrera | Explora el camino de Vinicius desde su infancia hasta el estrellato | Informate sobre las estadisticas y logros de Vinicius en FIFA | Conoce los detalles de la carrera de Vinicius Junior | Explora los datos mas recientes de Vini en el futbol | Conoce la influencia de Vinicius en el futbol mundial, Vinicius y sus exitos Exitos Vinicius.
казино онлайн вавада
reputable indian online pharmacy Indian pharmacy international shipping indianpharmacy com
medicine in mexico pharmacies Legit online Mexican pharmacy buying prescription drugs in mexico online
Платежный модуль геткурс промокод Платежный модуль геткурс промокод .
canadian medications https://mexicanpharm24.cheap/# buying prescription drugs in mexico
indianpharmacy com Best Indian pharmacy top 10 pharmacies in india
https://pharm24.pro/# best cure for ed
buy online pharmacy
online shopping pharmacy india: India pharmacy international – cheapest online pharmacy india
ed pumps https://mexicanpharm24.cheap/# medication from mexico pharmacy
Сервисный центр предлагает ремонт huawei matepad 2022 цены ремонт huawei matepad 2022 в петербурге
online shopping pharmacy india: Best online Indian pharmacy – top 10 online pharmacy in india
http://pharm24.pro/# cheap medication
medicine for erectile
medicine for erectile: cheaper medications – erection pills
natural remedies for ed problems affordable medication ed in young men
world pharmacy india: indian pharm 24 – best online pharmacy india
top 10 pharmacies in india Order medicine from India to USA indian pharmacy online
If you’re moving from Mumbai to Delhi, the right moving service can make all the difference. Packers and Movers Service from Mumbai to Delhi offer reliable, professional solutions to ensure your relocation is smooth and stress-free. They provide packing, loading, transport, and unloading services, making sure your belongings are well-handled throughout the move. Whether it’s your home or office, their team ensures timely and secure delivery. With experienced movers and quality service, you can trust them to take care of all the logistics while you focus on settling into your new city.
Современные торговые павильоны
ed drugs online from canada http://mexicanpharm24.cheap/# п»їbest mexican online pharmacies
http://indianpharm24.pro/# indianpharmacy com
ed vacuum pump
medication from mexico pharmacy mexico pharmacy buying prescription drugs in mexico
top 10 online pharmacy in india indian pharmacy purchase online top online pharmacy india
п»їbest mexican online pharmacies: mexican drugs – buying prescription drugs in mexico online
https://indianpharm24.pro/# cheapest online pharmacy india
anti fungal pills without prescription
cheap medications online: cheap prescription drugs – the best ed drug
п»їlegitimate online pharmacies india Best Indian pharmacy india online pharmacy
ed pills cheap meds ed trial pack
drug store online: affordable medication – online medications
medication from mexico pharmacy: Mexican pharmacy ship US – mexican mail order pharmacies
mens ed pills http://pharm24.pro/# over the counter erectile dysfunction pills
https://pharm24.pro/# is ed reversible
erectile dysfunction medication
shots for ed http://pharm24.pro/# how to cure ed naturally
Ищете качественную надувную лодку для рыбалки? Рекомендую посмотреть ассортимент тут https://www.zotero.org/robert846
mexico drug stores pharmacies: mexican pharm 24 – buying prescription drugs in mexico online
online shopping pharmacy india Best online Indian pharmacy india online pharmacy
Online medicine order indian pharmacy purchase online best online pharmacy india
Надёжная компания по строительству домов, все подробности можно узнать здесь https://www.indiegogo.com/individuals/38101402
https://pharm24.pro/# male dysfunction pills
best ed pills
reputable indian online pharmacy: indian pharmacy purchase online – buy medicines online in india
ed medications over the counter cheap prescription drugs vitality ed pills
best male enhancement cheap prescription drugs male dysfunction pills
prescription drugs online http://pharm24.pro/# prescription meds without the prescriptions
I absolutely love your blog and find many of your post’s to be just what I’m looking for. Would you offer guest writers to write content in your case? I wouldn’t mind publishing a post or elaborating on a lot of the subjects you write about here. Again, awesome weblog!
отзывы за деньги
https://mexicanpharm24.cheap/# mexican online pharmacies prescription drugs
diabetes and ed
erectyle dysfunction http://indianpharm24.pro/# india online pharmacy
up x игровые автоматы
buying prescription drugs in mexico online mexican drugs buying prescription drugs in mexico online
mexican mail order pharmacies: mexican pharm 24 – buying prescription drugs in mexico
mexico drug stores pharmacies: mexico pharmacy – mexico drug stores pharmacies
mail order pharmacy india: India pharmacy international – reputable indian online pharmacy
http://indianpharm24.pro/# cheapest online pharmacy india
buy canadian drugs
buying prescription drugs in mexico: Legit online Mexican pharmacy – mexico drug stores pharmacies
real estate in budva Montenegro realty
Найдите подходящий хоспис или пансионат для пожилых близких в Москве — узнать больше https://www.mixcloud.com/Pansimos/
mostbet bd app https://nore.kg/
Наши сауны — это идеальное решение для тех, кто хочет расслабиться после тяжёлого дня. Здесь вы сможете насладиться паром, поплавать в бассейне и получить массу удовольствия, подробнее https://dai-zharu.ru/
Хотите провести время с друзьями или семьёй в уютной обстановке? Сауны Москвы предлагают широкий выбор услуг: от классических парилок до современных спа-процедур. Подарите себе незабываемые впечатления! Подробности на сайте https://dai-zharu.ru/
prescription drugs online without doctor https://pharm24.pro/# buy prescription drugs
Aw, this was a really nice post. Taking the time and actual effort to create a good article… but what can I say… I put things off a whole lot and never manage to get anything done.
продвижение англоязычного сайта
http://indianpharm24.pro/# india pharmacy mail order
online canadian pharmacy
Conoce la carrera de Marcelo en el Real Madrid y su historia familiar | Conoce la vida familiar y personal de Marcelo fuera del campo | Explora los entrenamientos y la preparacion fisica de Marcelo | Explora como Marcelo ha mantenido su rendimiento con el tiempo | Descubre los secretos detras del exito de Marcelo en el futbol | Conoce la influencia de Marcelo en sus companeros de equipo | Explora los mejores goles y asistencias de Marcelo | Descubre el compromiso de Marcelo con su equipo y fans | Explora las mejores jugadas y habilidades de Marcelo en el campo, Marcelo en el Real Madrid Real Madrid Marcelo Vieira.
budva property Montenegro property sales
prescription drugs without doctor approval: cheap drugs – buy medications online
королев вывод из запоя королев вывод из запоя .
вывод из запоя цены на дому королев вывод из запоя цены на дому королев .
прерывание запоев vyvod-iz-zapoya-voronezh11.ru .
клиника от запоя клиника от запоя .
стоимость укладки кафельной плитки за квадратный метр https://ukladka-keramogranita-spb.ru
https://indianpharm24.pro/# buy prescription drugs from india
ed medicines
Online medicine order: India pharmacy international – top online pharmacy india
Hello to all, the contents present at this web site are genuinely amazing for people experience, well, keep up the good work fellows.
накрутка пф заказать
psychological ed treatment: cheap prescription drugs – the best ed pills
Лучшие порно видео Гей порно Бонсай скачать бесплатно без регистрации и смс. Смотреть порно онлайн в высоком качестве.
can ed be reversed: cheap drugs – drugs to treat ed
buy land Montenegro realestate
Лучшие порно видео Гей порно Бонсай скачать бесплатно без регистрации и смс. Смотреть порно онлайн в высоком качестве.
Оцените преимущества и бонусы от Mostbet | Узнайте характеристики игр и слот-машин на Мостбет | Откройте новые возможности для ставок с Мостбет | Присоединяйтесь к Mostbet и получайте бонусы | Консультанты Мостбет всегда помогут новичкам | Насладитесь азартом игр и ставок на Мостбет | Узнайте все о ставках и игре в Мостбет | Испытайте удачу и выигрыши на Mostbet каждый день | Консультации и поддержка доступны 24/7 в Мостбет http://www.mostbetkzcasino.com.kz.
prescription without a doctor’s prescription https://mexicanpharm24.cheap/# mexico pharmacies prescription drugs
https://indianpharm24.pro/# india pharmacy mail order
ed treatment options
over the counter ed medication http://pharm24.pro/# buy prescription drugs from canada
It’s awesome to visit this web page and reading the views of all mates concerning this post, while I am also zealous of getting knowledge.
накрутка пф быдлокодер
ed medications list: low cost pharmacy – cheap erectile dysfunction pill
http://indianpharm24.pro/# indianpharmacy com
best canadian online pharmacy
budva properties Montenegro realty
hotels for sale Montenegro real estate
deneme bonusu veren siteler mycbet.com https://ultrabet-tr.online/# ultrabet bonus
укладка кафельной плитки своими руками укладка кафельной плитки на пол
https://casinositeleri.win/# Casino Siteleri
denemebonusuverensiteler.top
ultrabet tr online: ultrabet tr online – ultrabet guncel
slot oyunlar? en kazancl? slot oyunlar? slot tr online
http://slot-tr.online/# en cok kazand?ran slot oyunlar?
deneme bonusu veren siteler mycbet.com
Alto Consulting Group (ACG) https://alto-group.ru предлагает комплексные маркетинговые исследования рынков в России и за рубежом. Наша команда проводит детализированные обзоры рынков, анализирует экспорт и импорт по кодам ТНВЭД, а также изучает государственные и коммерческие закупки по 44-ФЗ и 223-ФЗ.
Скачать игры для Андроид https://igryforandroid.ru бесплатно и на русском языке, доступны новинки и популярные приложения.
ultrabet tr online: ultrabet bonus – ultrabet giris
World auto news https://expertautolife.com new models, technologies, analytics and test drives. Find out everything about trends and innovations in the auto industry.
Бюстгальтеры с антиаллергенными материалами Бюстгальтеры для танцев
slot siteleri en kazancl? slot oyunlar? en cok kazand?ran slot oyunlar?
apple iphone 15 max 256gb https://store-iphone43.ru
Если вам нужно скачать 1xslots на телефон андроид, воспользуйтесь официальным сайтом.
deneme bonusu veren siteler yerliarama.org http://casinositeleri.win/# Casino Siteleri
real estate for sale Montenegro Budva apartments for sale
deneme bonusu veren siteler denemebonusu2026.com https://slot-tr.online/# slot siteleri
slot oyunlar? puf noktalar?: slot oyunlar? puf noktalar? – az parayla cok kazandiran slot oyunlar?
guvenilir casino siteleri: casino siteleri win – casino siteleri win
Тут можно преобрести сейф оружейный купить в москве купить оружейный сейф для пистолета
guvenilir casino siteleri: guvenilir casino siteleri – casino siteleri win
matadorbet bid matadorbet giris matadorbet
Тут можно купить сейф для дома сейфы домашние москва
matadorbet giris: matadorbet bid – matadorbet
matadorbet giris matadorbet giris matadorbet giris
Займ 300 000 тенге Займ под залог бытовой техники
охрана труда специальная оценка условий труда специалист соут
Тут можно преобрести купить несгораемый сейф сейф несгораемый купить
http://casinositeleri.win/# Canl? Casino Siteleri
deneme bonusu veren siteler
срочный займ Займ без отказа
проведение соут цена организации проводящие соут в москве
Canl? Casino Siteleri: Canl? Casino Siteleri – guvenilir casino siteleri
deneme bonusu veren siteler yeni deneme bonusu veren siteler yerliarama.org deneme bonusu veren siteler yeni
denemebonusuverensiteler.top: deneme bonusu veren siteler mycbet.com – deneme bonusu veren siteler denemebonusu2026.com
matadorbet.bid: matadorbet.bid – matadorbet giris
проведение специальной оценки условий труда рабочих мест экспертный центр специальной оценки условий труда
matadorbet: matadorbet bid – matadorbet
https://slot-tr.online/# slot siteleri
deneme bonusu veren siteler betturkey
приложение планер
deneme bonusu veren siteler denemebonusu2026.com http://matadorbet.bid/# matadorbet bid
casino siteleri win guvenilir casino siteleri Canl? Casino Siteleri
deneme bonusu veren siteler yeni https://slot-tr.online/# en cok kazand?ran slot oyunlar?
https://locowin-casino.in/
Тут можно преобрести сейф для оружия цена в москве сейфы для ружей
casino siteleri win casino siteleri win Canl? Casino Siteleri
ultrabet bonus: ultrabet – ultrabet yeni giris 1125
прокат лыж и сноубордов Адлер прокат горных лыж красная поляна
ultrabet bonus: ultrabet guncel – ultrabet tr online
en kazancl? slot oyunlar? slot tr online slot tr online
прокат лыж роза хутор https://prokat-lyzh-krasnaya-polyana.ru
iphone 128 купить купить iphone цены
Was Spinsy Casinoso gut macht, ist diebreite VielfaltanLive-Casino-Games.
Es fühlt sich an, als würde ichin einem echten Casinositzen,
und dieStreamssinderstklassig. Die Dealer sindsehr kompetent, und die Interaktionen machen das Spielbesonders.
Einunvergessliches Erlebnisfür alle, dieReal-Feelinglieben!
deneme bonusu veren yeni siteler: denemebonusuverensiteler.top – deneme bonusu veren siteler betturkey
https://locowin-casino.in/
Casino Siteleri: Casino Siteleri – Casino Siteleri
Casino Siteleri: Casino Siteleri – casino siteleri win
deneme bonusu veren yeni siteler https://casinositeleri.win/# Deneme Bonusu Veren Siteler
Изучите механику через лаки джет демоверсия и подготовьтесь к реальным ставкам.
matadorbet matadorbet matadorbet.bid
slot oyunlar?: slot tr online – slot oyunlar?
накрутка пф яндекс заказать
Тут можно преобрести сейфы для оружия москва купить оружейный сейф цена
Узнайте подробнее – Техосмотр и его влияние на безопасность.
deneme bonusu veren siteler deneme bonusu veren siteler betturkey deneme bonusu veren siteler
Узнайте больше – Техосмотр и его важность для водителей.
Лучшие онлайн казино Лучшие онлайн казино
Utilisez le code promo Mostbet pour obtenir un bonus de bienvenue | Retrouvez Aviator et d’autres jeux captivants sur Mostbet | Pariez en toute confiance avec l’application Mostbet au Maroc mostbet en ligne http://www.telecharger-mostbet-apk-maroc.com.
Deneme Bonusu Veren Siteler: Deneme Bonusu Veren Siteler – Deneme Bonusu Veren Siteler
matadorbet.bid: matadorbet.bid – matadorbet
как отменить заказ в приложении вкусно и точка
pebblego.io
matadorbet bid: matadorbet bid – matadorbet bid
deneme bonusu veren siteler yerliarama.org deneme bonusu veren siteler yeni deneme bonusu veren siteler mycbet.com
айс твист бургер кинг
Casino Siteleri: Casino Siteleri – Canl? Casino Siteleri
прокат горнолыжных лыж Адлер прокат горных лыж красная поляна
deneme bonusu veren siteler 2024 denemebonusuverensiteler.top deneme bonusu veren siteler betturkey betturkey.com
Casino Siteleri: Deneme Bonusu Veren Siteler – Deneme Bonusu Veren Siteler
укладка кафельной плитки квадратный метр расценки на укладку кафельной плитки
заказать продвижение сайта москва заказать продвижение сайта москва .
укладка кафельной плитки в ванне https://ukladka-keramogranita-spb.ru
ultrabet guncel ultrabet ultrabet yeni giris 1125
ultrabet giris: ultrabet bonus – ultrabet bonus
оградки на могилу алматы сколько стоит кремация в казахстане
Profitez des meilleures cotes avec Mostbet pour vos paris sportifs | Le telechargement de l’application Mostbet est rapide et facile | Inscrivez-vous des maintenant sur Mostbet pour commencer a jouer | La plateforme Mostbet est securisee et fiable | Retrouvez des cotes avantageuses sur Mostbet pour chaque evenement | Mostbet propose des jeux de casino en direct pour plus de realisme | Decouvrez l’interface conviviale de Mostbet pour parier en ligne | Mostbet vous propose des options de paiement securisees | Mostbet Maroc est ideal pour les amateurs de paris sportifs most bet most bet.
ultrabet guncel: ultrabet bonus – ultrabet bonus
slot oyunlar?: slot tr online – en kazancl? slot oyunlar?
вавада официальный сайт
Геосинтетические материалы https://ksgeo.ru для строительства широкий ассортимент продукции для укрепления грунтов, дренажа и защиты от эрозии. Надежные решения для дорожного, ландшафтного и промышленного строительства.
best ed pills online erepharm pills erepharm.com
площадка blacksprut blacksprut ссылка
Покердом https://pokerdom11ru.best актуальное зеркало и быстрый вход. Получите бонусы и начните выигрывать в казино Pokerdom.
https://rybpharm.com/# buy rybelsus rybpharm
rybpharm canada: semaglutide – semaglutide
Покердом (Pokerdom) https://pokerdom-online.ru.com официальный сайт топового покер-рума. Играть на деньги в Покердом казино, скачать слоты онлайн.
furosemide fur pharm lasix furosemide fur pharm
HoReCa Training https://horeca-training.ru это тренинги по развитию в сфере гостиничного бизнеса и туризма. Обучение линейного и управляющего персонала ресторанов, гостиниц и отелей. Наша цель — повысить уровень обслуживания и эффективности работы сотрудников, а также обеспечить их необходимыми навыками для успешного выполнения обязанностей. Мы уверены, что качественное обучение является ключом к успешному развитию в гостиничном бизнесе и туризме!
автоматы вавада
GabaPharm Gabapentin: buy gabapentin online – buy gabapentin
https://furpharm.com/# furpharm
Легальные БК предлагают удобные приложения для Android, скачайте приложение БК и начните выигрывать
https://rybpharm.com/# rybpharm
Тут можно преобрести купить сейф огнестойкий в москве купить сейф огнестойкий в москве
furosemide fur pharm cheapest lasix furosemide
франшизы москва франшизы москва .
https://rybpharm.com/# rybpharm canada
http://kampharm.shop/# Kam Pharm
furosemide furpharm.com: buy furosemide online – furosemide fur pharm
Тут можно преобрести сейф оружейный купить москва оружейный сейф в москве
buy gabapentin india buy gabapentin online gabapentin
Натяжные потолки в Киеве https://napotolok.com.ua это популярный вариант для создания красивого и стильного интерьера. Натяжные потолки подходят для любых помещений – квартир, домов, офисов и коммерческих пространств. Они позволяют скрыть неровности основного потолка, коммуникации и освещение, а также придают помещению завершённый вид.
Pin Up Casino https://pinup-pin-up-br.com (Пин Ап) официальный сайт онлайн казино pin up, игровые автоматы, регистрация
Официальный сайт Casino Melbet https://melbet-ng-nigeria.com вход и регистрация. Игровые слоты, доступное зеркало, мобильное приложение в Мелбет казино.
cheapest Gabapentin GabaPharm: gabapentin – buy gabapentin online
Realbase.estate предоставляет удобный и интуитивно понятный интерфейс, который поможет вам быстро найти подходящий объект, подробнее тут – Риелтор Макеевка ДНР. Вы можете использовать фильтры для уточнения поиска по цене, площади, количеству комнат, району и другим параметрам.
http://furpharm.com/# furosemide furpharm.com
ритуальные услуги в алматы цены https://pohoronnoe-agentstvo.kz
Проведение геодезических съёмок https://expert-geo.ru и выполнение инженерных изысканий для подготовки проектной документации для коммерческих объектов
дешевые авиабилеты https://aviasales.cc выберите самый дешевый билет среди 728 авиакомпаний. 2000+ акций ежедневно. простая бронь авиабилетов за 3 мин. купить дешевый билет
Amunra Casino delivers an immersive gaming experience
like no other! Their live dealer section is particularly impressive.
I felt as though I was in a real casino without ever having
to leave my home! The graphics and sound effects are on point, creating
a captivating atmosphere. I also love the community aspect,
with events and tournaments that make playing
even more exciting!
https://warheroes.ru/hero/hero.asp?id=25387
http://businesspravo.ru/PressReleasebusinesspravo/PressReleaseShow.asp?id=773380
lasix fur pharm buy furosemide online
http://gabapharm.com/# buy Gabapentin GabaPharm
Откройте мир азартных игр с Мостбет UA | Mostbet — платформа для всех, кто любит азартные игры | Погрузитесь в азарт с казино Mostbet | Ставки на спорт с Мостбет — это ваш шанс на победу | Mostbet — ваш верный спутник в мире ставок на спорт | Не упустите возможность заработать с Мостбет | Откройте для себя увлекательный мир ставок с Мостбет | Используйте бонусы на Мостбет для увеличения выигрышей | Получите бонусы и выиграйте с Мостбет Украина https://mostbet-ua-casino.kiev.ua
cheapest lasix: furosemide fur pharm – buy lasix fur pharm
Балаклейская бесплатная https://dani-info.com/ рекламно-информационная газета «Дані-інфо». В газете присутствует новостная страничка, где можно узнать свежие новости города, района, страны, изменения в законодательстве, интересные статьи, кроссворд, гороскоп, анекдоты и многое, многое другое.
На сайте https://bestigryandroid.ru легко найти и скачать бесплатные игры для Андроид на русском языке для разных устройств.
Upcoming Estate Sales estate sales auctio
cheapest ed pills ere pharm buy ed pills erepharm.com
https://rybpharm.com/# semaglutide
Пластиковые окна https://www.okna-melke-spb.ru от официального производителя. Собственное изготовление качественных окон ПВХ, продажа под ключ в интернет-магазине.
Доставка грузов https://madein-china.ru из Китая. Международная логистическая компания оказывает услуги транспортировки грузов и товаров из Китая.
buy kamagra oral jelly Kam Pharm: Kamagra Kam Pharm – kamagra
https://furpharm.com/# furosemide furpharm.com
https://rybpharm.com/# rybpharm cheap semaglutide
Скачивайте бесплатно https://fanapk.ru лучшие игры и приложения для Android! У нас только проверенные и безопасные APK-файлы для всех устройств. Оцените новинки и популярные программы без регистрации и SMS!
Играйте в Bonsai Casino https://casino-bonsai.com захватывающий выбор слотов и игр, уникальные акции и щедрые бонусы! Погрузитесь в атмосферу азарта и выигрывайте с первого спина!
Слот Sugar Rush https://sugar-rush-play.ru Бесплатная ДЕМО-версия, значения RTP и Max Win, Бонусы и фриспины от казино.
cs drop кс го кейсы
главные новости спорта https://beachsoccer.com.ua фото, видео и инфографика, аналитика и блоги от экспертов и известных спортсменов
GabaPharm Gabapentin buy gabapentin gabapentin GabaPharm
https://erepharm.com/# erepharm.com
best ed pills online: erepharm pills – cheapest ed pills ere pharm
укладка кафельной плитки цена работы https://ukladka-keramogranita-price.ru
kampharm shop kamagra oral jelly kam pharm shop
Сервисный центр предлагает сколько стоит ремонт электровелосипеда починить электровелосипеда
kampharm shop: Kamagra Kam Pharm – Kamagra Kam Pharm
http://furpharm.com/# fur pharm
Тут можно преобрести огнестойкие сейфы огнестойкий сейф
вывод из запоя в ростове-на-дону https://familyportal.forumrom.com/viewtopic.php?id=28563 .
вывод. из. запоя. на. дому. ростов. http://www.aktivnoe.forum24.ru/?1-7-0-00012822-000-0-0-1730725137 .
вывод из запоя ростовская область https://www.motik13.0pk.me/viewtopic.php?id=1993 .
The online casino Pin Up https://velic.io has collected over 3000 gambling entertainments slot machines, live games, crash games and exclusive slots. Play for money with the best conditions.
услуги укладки кафельной плитки укладка кафельной плитки цена работы
http://kampharm.shop/# kamagra oral jelly
аккредитация соут провести независимую соут
https://erepharm.com/# ed pills
gabapentin GabaPharm Buy gabapentin for humans GabaPharm
https://furpharm.com/# buy lasix fur pharm
Интересует продвижение в соц сетях? Тогда Группа ВК . Дизайн групп | Продвижение сообщества в контакте то что нужно. Все о продвижении и дизайне групп вконтакте.
секс шоп в Киеве секс шоп интернет магазин
Сайт о татуировках https://tattootoday.org/tattoo-history/articles-about-the-tattoo/spider-web-tattoo-on-the-elbow идеи, стили, советы по уходу и выбору мастера. Узнайте о значении популярных тату, процессе нанесения и трендах, чтобы сделать осознанный выбор и подчеркнуть свою индивидуальность.
buy rybelsus canada: buy rybelsus canada – rybpharm cheap semaglutide
ED meds online cheapest ed pills ere pharm cheapest ed pills ere pharm
Онлайн справочник https://wmbild.ru мастера содержит в себе все этапы по ремонту и дизайну дома, дачи или квартиры своими руками.
школа ремонта https://mypunto.ru квартирный вопрос, ремонт квартир. Оригинальные идеи вашего дома, советы ремонта квартир своими руками
Портал о ремонте и строительстве https://website-ok.ru советы по ремонту и благоустройству квартир и домов, информация о ремонте квартир своими руками, технологиях ремонта и строительных материалах.
Советы по ремонту https://5-xl.ru своими руками предлагаем пошаговые инструкции, полезные советы и идеи для создания уюта в вашем доме. Превратите свои идеи в реальность с нами!
http://pravo-med.ru/articles/18236/
Ремонт своими руками https://appbearing.ru практические советы и творческие идеи для вашего дома. Узнайте, как легко и быстро преобразить интерьер, сэкономив при этом деньги.
buy kamagra oral jelly Kam Pharm: kampharm shop – kamagra
Советы по ремонту https://wa-2.ru и строительству дома своими руками. Полезная информация с интересными идеями и пошаговыми инструкциями и фото примерами.
Советы по ремонту https://russ-tractor.ru и строительству дома своими руками. Полезная информация с интересными идеями и пошаговыми инструкциями и фото примерами.
Дизайн-проекты интерьеров https://fashion-brands.ru советы по ремонту квартир, обзоры строительных материалов, мебели, техники и оборудования
Статьи о строительстве https://poehala.ru и дизайне с пошаговыми инструкциями и практическими советами, фото- и видео-подборками, полезными сервисами для строителей и домашних мастеров.
Вопросы и ответы https://deinfeuer.ru на любую тему, задать вопрос и получить на него ответ. Добавить вопрос на интересующую Вас тему и получить реальный, правдивый ответ
http://rybpharm.com/# rybpharm
I think this internet site holds some real great information for everyone. “The penalty of success is to be bored by the attentions of people who formerly snubbed you.” by Mary Wilson Little.
F*ckin’ remarkable things here. I am very glad to see your article. Thanks a lot and i am looking forward to contact you. Will you please drop me a e-mail?
kraken darknet market ссылка Кракен сайт
Получите заряд адреналина с игрой ракета на деньги и ощутите вкус победы.
Тут можно преобрести купить сейф для охотничьего ружья в москве сейфы для оружия купить
rybpharm buy rybelsus rybpharm rybpharm canada
http://kampharm.shop/# kamagra oral jelly
https://pics.ru/pochemu-moskvichi-predpochitayut-obrashhatsya-v-kommercheskie-meditsinskie-kliniki
Mostbet – ваш надійний партнер для ставок на спорт та казино | Легко і зручно – ставки на Mostbet | Зареєструйтеся на Mostbet та почніть грати прямо зараз | Скачайте додаток Mostbet та насолоджуйтеся швидким доступом до ігор | Зручні та швидкі виплати на Mostbet для гравців з України мостбет скачать
furpharm furpharm furpharm
kam pharm shop: kampharm shop – Kamagra Kam Pharm
https://furpharm.com/# buy lasix fur pharm
Mostbet-da o‘yin o‘ynash imkoniyati har doim mavjud | Mostbet-ning yuqori sifatli o‘yinlari va tez to‘lovlari bilan tanishing | Mostbet bilan o‘yinlar va pul tikish uchun qulaylik va tezkor to‘lovlar | Mostbet-ning rasmiy saytiga har doim kirish imkoniyati mavjud | Mostbet-ning rasmiy saytiga oson kirish va o‘yin o‘ynash imkoniyati mostbet uz
http://rybpharm.com/# buy rybelsus rybpharm
Оформіть реєстрацію на мостбет та грайте будь-де | Ставки на спорт та азартні ігри з мостбет | Завантажте mostbet для зручності гри в будь-який час | Mostbet надає найкращі умови для азартних гравців | Мостбет пропонує найкращі слоти для азартних ігор ставки на спорт mostbet
https://furpharm.com/# furosemide furpharm.com
Coupons for digital products http://www.skidki-i-kupony.ru .
продамус промокод скидка на подключение http://prodamus-promokod1.ru/ .
вывод из запоя на дому ростов https://to.iboard.ws/viewtopic.php?id=8062#p17998/ .
Офіційний сайт мостбет – доступ до ставок і казино | Завантажте mostbet та грайте без обмежень | Грайте в mostbet з бонусами за реєстрацію | Офіційне дзеркало мостбет для безпечного доступу | Ставки, казино та бонуси на mostbet для всіх https://mostbet-ua-casino.kiev.ua/
Online store https://needmana.com for selling WoW game currency
Официальный сайт Betwinner https://betwinner-mobile.ru откройте доступ к сайту и получайте бонусы!
Полезные советы https://apinews.ru и пошаговые инструкции по строительству домов и квартир, выбору материалов, монтажу и установке своими руками.
Журнал о строительстве https://jurnalshtori.ru и ремонте, как строить, ремонтировать, выбирать товары, решать проблемы и работать с прорабами
Онлайн-журнал о стройке https://oupen-mir.ru ремонте, дизайне и обустройстве дома или квартиры
buy ed pills: ere pharm – ere pharm
https://karavantver.ru/bronhoskopija-podgotovka-pokazanija-i-protivopokazanija/
Сайт о строительстве https://vsevolodovo.ru и ремонте своими руками: советы, инструкции и идеи для выполнения работ самостоятельно. Реализуйте свои проекты быстро и качественно!
Ремонт и строительство https://corsika-os.ru своими руками: полезные советы и инструкции для самостоятельного выполнения работ. Превратите свои идеи в реальность!
Ваш гид по строительству https://rollerhockey.ru и ремонту своими руками: простые советы и инструкции для создания идеального пространства. Начните свой проект с нами!
Создайте свой идеальный дом https://spawnalley.ru практические руководства и советы по ремонту и строительству своими руками. Реализуйте свои мечты с легкостью!
Журнал для любителей ремонта https://gastrosapiens.ru идеи, советы и пошаговые руководства по ремонту и строительству. Создавайте уникальные пространства своими руками!
furosemide fur pharm buy lasix fur pharm fur pharm
kampharm shop kam pharm shop kamagra oral jelly
Здесь можно преобрести сейф купить москва сейфы простые
https://smartseohosting.ru/
Журнал строительство и ремонт https://flash-magic.ru своими руками предлагает простые и доступные решения для вашего дома. Узнайте, как легко реализовать свои идеи и сделать уютный интерьер.
Мужской портал https://cruiser.com.ua советы по стилю, здоровью, технологиям и отношениям. Идеи для DIY-проектов и вдохновение для успешной жизни. Найдите то, что нужно для вашего стиля и образа жизни!
Мужской журнал https://hand-spin.com.ua с советами по стилю, здоровью и технологиям. Найдите вдохновение для хобби, чтобы сделать жизнь ярче и успешнее.
Портал для мужчин https://hooligans.org.ua от моды до технологий. Исследуйте мир самосовершенствования, находите идеи для увлекательных проектов и получайте практические советы для успешной карьеры и личной жизни.
Журнал для мужчин https://phizmat.org.ua стремящихся к совершенству. Узнайте о лучших практиках в области здоровья, стиля и технологий.
https://kampharm.shop/# Kam Pharm
https://rybpharm.com/# buy rybelsus
Мужской портал https://realman.com.ua от стиля до технологий. Исследуйте мир моды, здоровья и практических навыков, находя идеи для самовыражения и креативных проектов.
Сайт для мужчин https://rkas.org.ua которые стремятся к самосовершенствованию. Получите советы по стилю, здоровью и технологиям, а также вдохновения.
Мужской портал https://smart4business.net жизнь на полную катушку. Узнайте, как улучшить свое здоровье, создать стильный образ и реализовать свои идеи.
Портал для мужчин https://swiss-watches.com.ua которые хотят быть в курсе. Получите актуальные советы по стилю, здоровью и технологиям, которые помогут вам реализовать свои амбиции.
Портал для современных мужчин https://zlochinec.kyiv.ua Практические советы по уходу, здоровью и креативным проектам своими руками.
Тест-драйвы и отзывы https://comparecarinsurancerfgj.org читайте реальные отзывы владельцев и смотрите видеообзоры тест-драйвов.
Электромобили и технологии https://fundacionlogros.org узнайте о новых технологиях, электромобилях и трендах в автомобильной индустрии.
Автоновости и обзоры https://impactspreadsms.com узнайте о последних новинках в мире автомобилей, тест-драйвах и обзорах моделей.
Полезные рекомендации https://just-forum.com по уходу за автомобилем и его техническому обслуживанию.
соут проведение оценки оценка условий труда заказать
buy gabapentin buy gabapentin cheapest Gabapentin GabaPharm
The best profitable estate sales auctions in Los Angeles. Buy real estate at the best prices with a guarantee.
Последние новости https://jb5.ru России и мира на тему «Мир» за сегодня. Главные новости и события, происходящие в мире, эксклюзивные материалы и мнения экспертов.
Автомобильные тренды https://kolesnitsa.com.ua будьте в курсе последних трендов в дизайне, технологиях и автомобильной моде.
Ремонт и диагностика https://livecage.com.ua получите советы по ремонту и диагностике автомобилей от профессионалов.
Обзоры автомобилей https://necin.com.ua глубокие и объективные обзоры новых и популярных моделей с акцентом на функциональность и стиль.
buy ed pills: ED meds online with insurance – erepharm pills
http://erepharm.com/# buy ed pills
Тест-драйвы https://psncodegeneratormiu.org подробные тест-драйвы новых моделей, включая производительность, комфорт и технологии.
Обзоры автомобилей https://quebradadelospozos.com объективные обзоры популярных моделей с акцентом на дизайн, безопасность и функциональность.
Квартиры в новостройках https://all2realt.com.ua обширный каталог новых квартир с актуальными планировками и ценами.
проведение специальной оценки условий труда соут аттестационный центр специальная оценка условий труда
https://www.med74.ru/articlesitem1607.html
Новостной портал https://antifa-action.org.ua Украины, Актуальные события из жизни страны. Политика, экономика, культура и спорт — все важные новости в одном месте для информирования читателей о происходящем.
7к казино
Тут можно преобрести сейфы от пожара сейф несгораемый
https://visacon.ru/novosti/51252-sluzhba-dezinfekcii-v-moskve-zadachi-i-funkcii.html
оказание услуг по специальной оценке условий труда спецоценка условий труда организации
Kam Pharm kam pharm shop kampharm shop
lasix: furosemide furpharm.com – buy lasix fur pharm
онлайн казино онлайн казино .
cheapest Kamagra Kam Pharm: buy kamagra oral jelly Kam Pharm – buy kamagra oral jelly Kam Pharm
http://erepharm.com/# ere pharm
ere pharm erepharm pills best ed pill ere pharm
https://gabapharm.com/# GabaPharm
Тут можно преобрести ящик для оружия купить оружейный сейф для пистолета
erepharm pills: ere pharm – cheapest ed pills ere pharm
http://kampharm.shop/# Kamagra Kam Pharm
https://furpharm.com/# furosemide furpharm.com
Технологические тренды https://axioma-techno.com.ua узнайте о последних трендах в мире технологий. Обзоры новых устройств, программного обеспечения и инновационных решений, которые меняют нашу жизнь.
Гаджеты и IT-новинки https://dumka.pl.ua обзор новейших гаджетов на рынке. Узнайте о функциях, характеристиках и отзывах на смартфоны, планшеты, носимые устройства и другие технологические новинки.
Мировые события https://hansaray.org.ua актуальные новости из мира. Узнайте о значимых событиях, конфликтах, международных отношениях и их влиянии на глобальную политическую и экономическую ситуацию.
Инвестиции в недвижимость https://manorsgroup.com.ua обзор возможностей для инвестирования в недвижимость. Узнайте о выгодных объектах, тенденциях рынка и советах по выбору недвижимости для дохода.
Политика Украины https://polonina.com.ua актуальные события в политической жизни Украины. Обзор решений правительства, законопроектов и политических инициатив, влияющих на будущее страны и ее граждан.
https://redanalysis.org/zh/%E6%89%80%E6%9C%89%E6%96%87%E7%AB%A0/%E9%A1%B5%E7%A0%81/56/
казино 7к
Качественные стекла https://atomglass.ru мы предлагаем широкий ассортимент стекол для спецтехники. Все изделия соответствуют высоким стандартам качества и надежности, обеспечивая защиту и долговечность.
Купить с доставкой игрушки для секса, созданные для улучшения интимной жизни. Мы предлагаем качество, безопасность и инновации для вашего удовольствия.
Вавада Казино https://teletype.in/@sokol-art/my-gaming-expirience предлагает широкий выбор игровых автоматов, настольных игр и live-казино. Удобный интерфейс, щедрые бонусы и акции, а также безопасные платежи делают игру увлекательной и надежной.
Юридический сервис Правовик24 https://www.pravovik24.ru предоставляет бесплатные юридические консультации онлайн в чате и по телефону горячей линии для Москвы и регионов РФ на основании Федерального закона РФ от 21.11.2011 N 324-ФЗ «О бесплатной юридической помощи в Российской Федерации». Задайте вопрос бесплатно юристам и адвокатам круглосуточно 24/7 прямо сейчас без регистрации, и получите подробный ответ.
Туристический портал https://prostokarta.com.ua предлагает лучшие направления, актуальные советы и рекомендации для путешественников. Найдите идеальные маршруты, отели и развлечения для незабываемых поездок по всему миру.
Портал о фитнесе https://sportinvent.com.ua предлагает тренировки, советы по питанию и мотивацию для здорового образа жизни. Найдите программы, видеоуроки и статьи для достижения ваших фитнес-целей и улучшения самочувствия.
Портал об инновациях https://technocom.dp.ua и технологиях бытоваятехника, фото, аудио и видеотехника. Компьютерная техника и мобильные устройства.
http://canadiandrugsgate.com/# best male enhancement
http://mexicanpharmgate.com/# medicine in mexico pharmacies
http://mexicanpharmgate.com/# mexican mail order pharmacies
vavada
cure ed: canadiandrugsgate – best natural cure for ed
Портал о мобильной технике https://webstore.com.ua и технологиях предлагает свежие новости, обзоры гаджетов, советы по выбору и использованию устройств, а также актуальные тренды в мире мобильных технологий.
Сайт про лечение диабета https://diabet911.com ваш надежный источник информации о диабете: симптомах, диагностике, лечении, профилактике и последних достижениях в медицине.
Сайт о здоровье глаз https://eyecenter.com.ua предлагает полезные советы по уходу за зрением, профилактике заболеваний, выбору очков и контактных линз, а также информацию о современных методах лечения и диагностики.
Журнал о гипертонии https://gipertoniya.net предоставляет актуальную информацию о лечении и профилактике высокого давления. Узнайте о симптомах, методах контроля, диете и последних исследованиях в области кардиологии.
Мужское здоровье https://kakbog.com ваш источник информации о здоровье мужчин. Узнайте о профилактике заболеваний, фитнесе, питании и психическом благополучии для активной и полноценной жизни.
cheap erectile dysfunction pills online: canadian drugs gate – erectile dysfunction cure
sex in wien benachrichtigungen in echtzeit
Лучшие онлайн-слоты https://igraza.ru и казино в одном месте! Обзоры, рейтинги, бонусы и стратегии игры. Найди свой идеальный слот и выиграй джекпот!
Медицинская информация https://lpl.org.ua о болезнях, симптомах и лечении. Поиск врачей и клиник. Статьи от ведущих специалистов. Советы по здоровому образу жизни.
путеводитель мире здоровья https://medfactor.com.ua информация о болезнях, симптомах и лечении. Поиск врачей по специальности и местоположению.
Современная медицина онлайн https://novamed.com.ua быстрый поиск врачей по специальности и местонахождению. Надежная медицинская информация и статьи от экспертов.
Тут можно преобрести огнестойкий сейф купить сейфы пожаростойкие
https://mexicanpharmgate.com/# mexico drug stores pharmacies
purple pharmacy mexico price list mexico pharmacy mexican border pharmacies shipping to usa
Медицинский портал https://una-unso.cv.ua предоставляет доступ к актуальным сведениям о заболеваниях, лечении, симптомах и способах профилактики.
Женский сайт предлагает модные тренды https://a-k-b.com.ua красоту и здоровье, советы по уходу за собой, рецепты и идеи для стильных образов.
Актуальные статьи о моде https://angela.org.ua красоте, здоровье, отношениях. Новости из мира кино, музыки, культуры. Советы по саморазвитию и карьере.
Женский сайт https://beautyrecipes.kyiv.ua где обсуждаются мода, здоровье и уверенность в себе. Получайте практические советы, читайте истории успеха и находите единомышленниц.
pharmacy website india Best Indian pharmacy pharmacy website india
Онлайн платформа тренингов https://britishschool.kiev.ua и семинаров. Обучение по актуальным направлениям, повышение квалификации, новые навыки. Записывайтесь на курсы и развивайте карьеру с нами!
Mostbet-da o‘yin o‘ynash imkoniyati har doim mavjud | Mostbet-da to‘g‘ri tanlov qiling va katta yutuqlarga erishing | Mostbet orqali yutuqlar va bonuslarni qo‘lga kiriting | Mostbet saytida muntazam yangilanib turuvchi aksiyalar va bonuslar mavjud | Mostbet-da yuqori darajadagi o‘yinlar va yutuqlarni sinab ko‘ring mostbet регистрация
телеграмм канал вавада
purple pharmacy mexico price list: mexican pharmacy online medications – purple pharmacy mexico price list
онлайн казино онлайн казино .
алкоголизм лечение вывод из запоя ростов http://www.gaslo.ukrbb.net/viewtopic.php?f=13&t=3409 .
Тут можно преобрести сейф для охотничьего ружья купить купить оружейный сейф для пистолета
ed cures that work: canadian pharmacy drugs gate – ed drug prices
https://indianpharmacyeasy.com/# buy medicines online in india
https://indianpharmacyeasy.com/# best online pharmacy india
http://indianpharmacyeasy.com/# indianpharmacy com
mail order pharmacy india: Online Indian pharmacy – best online pharmacy india
I’m a freshman in college and I was planning on majoring in Computer Engineering, but unfortunately it doesn’t really seem too interesting to me, especially all the computer programming. I’m considering changing my major to Computer Science except I don’t really know what kind of career a degree in Computer Science will get me. So what is the difference between the two? Please help me out, I don’t really have too much time to ask the advisers at my university, so any help would be appreciated..
Узнайте всё о цветах https://pro100-cvety.ru выбор, посадка и уход. Советы по поливу, удобрению и пересадке. Поддерживайте здоровье растений и создавайте красивый уют в доме с нашим гидом по цветам.
женский портал https://eternaltown.com.ua предлагает советы по стилю, здоровью, отношениям и красоте. Узнайте последние тренды, вдохновение для жизни и полезные советы для женщин.
На нашем портале https://funtura.com.ua вы найдете советы по моде, здоровью, семейным отношениям и саморазвитию. Откройте для себя лайфхаки, вдохновение и поддержку на каждом этапе вашей жизни.
Сайт о семейной психологии https://gorod-lubvi.com.ua предлагает эффективные советы и рекомендации по укреплению отношений, разрешению конфликтов и воспитанию детей.
Присоединяйтесь к нашему сообществу https://happytime.in.ua и открывайте новые горизонты! Женский портал — это ваш источник вдохновения и полезной информации. Узнайте о моде, красоте, здоровье и отношениях.
https://indianpharmacyeasy.com/# top online pharmacy india
mexican rx online: mexican pharmacy online medications – mexico drug stores pharmacies
Модные тренды, уход за собой https://inclub.lg.ua советы по красоте, здоровью и отношениям. Полезные статьи, рецепты, идеи для вдохновения и гармоничной жизни.
Мода, красота, здоровье https://love.zt.ua отношения и вдохновение для женщин. Полезные советы, лайфхаки, тренды и идеи для гармоничной жизни. Всё самое важное и интересное в одном месте.
Советы по стилю, красоте https://lidia.kr.ua здоровью и отношениям. Мода, уход за собой, психология, рецепты и вдохновение. Всё, что нужно современной женщине для гармоничной и стильной жизни.
Полезные советы по красоте https://loveliness.kyiv.ua моде, здоровью и отношениям. Тренды, лайфхаки и вдохновение для стильной и успешной жизни. Всё, что важно современной женщине, в одном портале.
Пространство для женщин https://mirwoman.kyiv.ua мода, красота, отношения и здоровье. Лайфхаки, вдохновение и актуальные темы для гармонии и счастья в каждом дне.
Советы по уходу за аквариумами https://mts-agro.com.ua подбору рыб и растений, обзоры оборудования, лайфхаки и идеи оформления.
Актуальные темы для женщин https://elegantwoman.kyiv.ua стиль, уход за собой, гармония в отношениях и здоровье. Тренды, рецепты и полезные лайфхаки для вдохновения каждый день.
Оперативные новости и аналитика https://novosti24.kyiv.ua репортажи и мнения. Всё о политике, экономике, обществе, спорте и технологиях. Только актуальная информация и объективный взгляд на события в стране и мире.
Самые актуальные новости https://arguments.kyiv.ua дня: политика, экономика, культура, спорт и технологии. Объективные репортажи, аналитику и мнения от экспертов о событиях в мире и стране.
Главные новости мира https://ua-vestnik.com и страны: политика, экономика, спорт, культура, технологии. Оперативная информация, аналитика и эксклюзивные материалы для тех, кто следит за событиями в реальном времени.
indian pharmacy online: Online Indian pharmacy – reputable indian online pharmacy
Советы по стилю https://womanlife.kyiv.ua красоте, здоровью и отношениям. Модные тренды, уход за собой и лайфхаки для женщин, которые ценят гармонию, уверенность и успех в жизни.
Все самые свежие новости https://dailynews.kyiv.ua политика, экономика, технологии, культура и спорт. Объективные репортажи и аналитика для тех, кто ценит точность и актуальность.
Свежие новости дня https://ua-novosti.info политические события, экономические тенденции, культура, спорт и технологии. Лаконичные репортажи и аналитика по всем важным темам.
Стиль, уход за собой https://woman24.kyiv.ua отношения и здоровье. Полезные советы и тренды для женщин, стремящихся к успеху, гармонии и уверенности в жизни.
http://canadiandrugsgate.com/# best ed treatment
https://canadiandrugsgate.com/# soma therapy ed
http://mexicanpharmgate.com/# mexican drugstore online
purple pharmacy mexico price list MexicanPharmGate buying prescription drugs in mexico
Тут можно преобрести сейфы от пожара сейфы пожаростойкие
cheap pet meds without vet prescription: canadiandrugsgate.com – male erection
pharmacy website india Best online Indian pharmacy best india pharmacy
https://indianpharmacyeasy.com/# india online pharmacy
Объективные новости о политике https://uapress.kyiv.ua экономике, спорте, культуре и технологиях. Аналитика, репортажи и свежие данные из мира и страны.
Чай всех сортов и вкусов https://etea.com.ua чёрный, зелёный, белый, улун, пуэр. Полезные советы, рецепты заваривания и истории о чае. Всё для ценителей чайной культуры и идеального вкуса.
Рецепты на каждый день https://kulinaria.com.ua закуски, основные блюда, десерты и напитки. Советы по приготовлению, лайфхаки и идеи для домашней кухни.
Сервисный центр предлагает замена платы canon powershot sx260 hs замена экрана canon powershot sx260 hs
Кулинарный портал https://mallinaproject.com.ua для гурманов: блюда любой сложности, секреты шефов, лайфхаки и интересные идеи. Готовьте с удовольствием и удивляйте близких!
mexican rx online: Mexican Pharmacy Gate – buying from online mexican pharmacy
For exclusive bonuses, download 888Starz Casino and play for real rewards.
Простые и изысканные рецепты https://vagon-restoran.kiev.ua для повседневной и праздничной кухни. Советы, техники и вдохновение для создания вкусных блюд дома.
Советы по стилю https://pic.lg.ua красоте, отношениям и здоровью. Модные тренды, лайфхаки и идеи для женщин, которые хотят быть яркими, уверенными и успешными.
Портал для современных женщин https://prettiness.kyiv.ua стиль, красота, здоровье, отношения. Актуальные советы и тренды для уверенных и гармоничных женщин, которые ценят себя и свою жизнь.
Советы, кейсы и тренды https://reklamspilka.org.ua в маркетинге, рекламе и PR. Инструменты, стратегии и аналитика для успешного продвижения брендов. Полезные материалы для профессионалов и новичков в индустрии.
Тут можно преобрести сейф для оружия купить в москве сейф для оружия цена в москве
Советы для родителей https://stepandstep.com.ua воспитание, здоровье, развитие и досуг детей. Полезные статьи, лайфхаки и идеи для гармоничных отношений в семье и счастливого детства.
Портал для современных женщин https://trendy.in.ua стиль, красота, здоровье, отношения. Актуальные советы и тренды для уверенных и гармоничных женщин, которые ценят себя и свою жизнь.
Женский портал о моде https://womanonline.kyiv.ua красоте, здоровье и жизни. Лёгкие советы, вдохновляющие тренды и полезные лайфхаки для гармонии и уверенности.
Полезные советы по уходу https://womenclub.kr.ua за собой, моде, здоровью и отношениям. Лайфхаки и актуальные темы для женщин, которые хотят быть стильными, уверенными и счастливыми.
mexican rx online: medicines mexico rx online – reputable mexican pharmacies online
medicine in mexico pharmacies: mexico pharmacy – buying prescription drugs in mexico
http://indianpharmacyeasy.com/# indian pharmacy
http://canadiandrugsgate.com/# buy prescription drugs without doctor
https://canadiandrugsgate.com/# buy anti biotics without prescription
best ed pills: canadian drugs gate – buy cheap prescription drugs online
Всё о домашних животных https://zoobonus.com.ua уход, питание, здоровье и воспитание. Полезные советы и рекомендации для счастливой жизни ваших питомцев.
Новости автопрома https://translit.com.ua обзоры моделей, советы по выбору, ремонту и уходу за автомобилем. Полезная информация для каждого автолюбителя.
anzeigen taglich kostenlos anzeigen taglich kostenlos
Сайт с приложениями https://appselection.ru для Андроид, которые можно скачать бесплатно и на русском языке.
best india pharmacy indianpharmacyeasy indianpharmacy com
reputable indian online pharmacy indianpharmacyeasy reputable indian online pharmacy
over the counter ed drugs: Best Canadian pharmacy – how to treat ed
top 10 online pharmacy in india: indianpharmacyeasy – indian pharmacy online
https://indianpharmacyeasy.com/# indian pharmacy online
http://canadiandrugsgate.com/# canadian online drugs
промокод продамус http://www.prodamus-promokod21.ru .
Новости автоиндустрии https://alians-avto96.ru обзоры моделей, тест-драйвы, советы по уходу и ремонту. Полезная информация для автолюбителей: от выбора автомобиля до тонкостей эксплуатации и обслуживания.
Интересные статьи https://womanlife.kyiv.ua и полезная информация на разные темы. Всё, что нужно для расширения кругозора и вдохновения каждый день.
Актуальные темы https://una-unso.cv.ua и полезные статьи. Информация для тех, кто хочет знать больше и оставаться в курсе.
Найди идеальный скин кс кейсы сайт и улучшай инвентарь. Кейсы CS:GO: лучшие сайты, редкие скины и советы для успешного открытия.
top online pharmacy india: indian pharmacy easy – online pharmacy india
reputable indian pharmacies: Online Indian pharmacy – best india pharmacy
Тут можно преобрести сейф шкаф купить сейф шкаф купить
Тут можно преобрести огнестойкий сейф сейф огнестойкий
Новые статьи https://sportinvent.com.ua и полезная информация на разные темы. Всё, что нужно для расширения кругозора и вдохновения каждый день.
Оформление кредита и микрозайма https://mbochi.ru онлайн: быстро, удобно и без лишних документов. Выгодные условия, прозрачные ставки и моментальное одобрение.
Оформление кредита и микрозайма https://mbochi.ru онлайн: быстро, удобно и без лишних документов. Выгодные условия, прозрачные ставки и моментальное одобрение.
куда слетать новости туризма Таиланд
Новые статьи https://polonina.com.ua и полезная информация на разные темы. Всё, что нужно для расширения кругозора и вдохновения каждый день.
cheap medications online: Best Canadian pharmacy – home remedies for erectile dysfunction
воздушные шары с доставкой спб воздушные шарики с доставкой спб
новости туризма куда слетать
http://mexicanpharmgate.com/# medicine in mexico pharmacies
https://indianpharmacyeasy.com/# top online pharmacy india
pharmacies in mexico that ship to usa Mexican Pharmacy Gate mexico pharmacies prescription drugs
mexico pharmacies prescription drugs: mexican pharmacy online – buying prescription drugs in mexico online
шарики воздушные заказать с доставкой на дом заказать шары с доставкой
reputable indian online pharmacy Indian pharmacy international shipping п»їlegitimate online pharmacies india
вывод из запоя круглосуточно ростов-на-дону вывод из запоя круглосуточно ростов-на-дону .
вывод из запоя ростов [url=www.gov.ukrbb.net/viewtopic.php?f=3&t=6368/]www.gov.ukrbb.net/viewtopic.php?f=3&t=6368/[/url] .
mexican rx online: mexican pharmacy online – mexican pharmaceuticals online
Здесь можно преобрести сейф купить цена модели сейфов
what type of medicine is prescribed for allergies https://canadiandrugsgate.com/# prescription drugs canada buy online
men ed
Познавательные статьи https://hansaray.org.ua и полезная информация на разные темы. Всё, что нужно для расширения кругозора и вдохновения каждый день.
Интересные статьи https://zlochinec.kyiv.ua и полезная информация на разные темы. Всё, что нужно для расширения кругозора и вдохновения каждый день.
ed meds https://canadiandrugsgate.com/# pain meds online without doctor prescription
how to treat ed
Интересные статьи https://una-unso.cv.ua и полезная информация на разные темы. Всё, что нужно для расширения кругозора и вдохновения каждый день.
Познавательные статьи https://elegantwoman.kyiv.ua и полезная информация на разные темы. Всё, что нужно для расширения кругозора и вдохновения каждый день.
купить приложение к диплому с оценками 1oriks-diplom199.ru .
тренинг по ораторскому искусству школа ораторского искусства в москве
Занятие с логопедом https://logoped-online1.ru онлайн для детей от 4 до 10 лет. Логопед онлайн проведет диагностику, поможет поставить звуки, проработать дислексию и дисграфию, устранить задержки речевого развития и обогатить словарный запас.
prednisolone prednisone: raypharm – prednisone 5mg capsules
prednisone 2 5 mg order Prednisone prednisone 50 mg canada
cheap priligy: priligy – max pharm
театральный тренинг лучшие курсы актерского мастерства в москве
Занятие с логопедом https://logoped-online1.ru онлайн для детей от 4 до 10 лет. Логопед онлайн проведет диагностику, поможет поставить звуки, проработать дислексию и дисграфию, устранить задержки речевого развития и обогатить словарный запас.
prednisone 20 mg prices: order Prednisone – prednisone 20mg capsule
Сайт автомобильных запчастей https://idriver.by каталог авторазборок России и Беларуси. Запчастей для иномарок и отечественных авто.
стихи заказать на юбилей заказ стихов
amoxicillin for sale online https://amoxilcompharm.com/# amoxicillin where to get
amoxicillin 500mg capsule cost: buy amoxicillin online without prescription – amoxicillin 500 mg without prescription
Сайт автомобильных запчастей https://idriver.by каталог авторазборок России и Беларуси. Запчастей для иномарок и отечественных авто.
написать стихотворение на заказ стихи на заказ цены
cheap priligy: priligy – dapoxetine price
amoxicillin medicine https://amoxilcompharm.com/# amoxicillin 500mg no prescription
Услуги доставки грузов из Китая https://cargo-ex.ru в Россию. Быстро, надёжно и с контролем на всех этапах. Оптимальные сроки, таможенное оформление и выгодные тарифы.
стих на заказ цена продам стихи
buy priligy max pharm cheap priligy priligy maxpharm
amoxicillin without a doctors prescription: com pharm – amoxicillin 500mg over the counter
Услуги доставки грузов из Китая https://cargo-ex.ru в Россию. Быстро, надёжно и с контролем на всех этапах. Оптимальные сроки, таможенное оформление и выгодные тарифы.
стихи на заказ https://kazan.bestrifma.ru
can you buy amoxicillin uk https://prednisoneraypharm.com/# prednisone otc price
prednisone brand name: buy prednisone – prednisone brand name in usa
Con el 1xslots codigo promocional aprovecha grandes beneficios y promociones.
prednisone 2.5 mg daily prednisone ray pharm buying prednisone from canada
prescription for amoxicillin: amoxil com pharm – amoxicillin medicine
can you get cheap clomid without rx: buy clomid – how to buy generic clomid online
amoxicillin online no prescription http://prednisoneraypharm.com/# prednisone 20 mg tablets
Онлайн казино Вавада https://telegra.ph/Obzor-Disturbed-11-18 обеспечивает непрерывный вход через рабочее зеркало. Сайт Vavada регистрация, Выгодные бонусы 100FS
. http://www.bemytravelmuse.com/emerald-bay-in-lake-tahoe-guide/#comment-366510 .
написать стих на заказ стихи за деньги
prednisone: prednisoneraypharm – prednisone price south africa
Узнай все о варикоцеле у мужчин симптомы варикоцеле яичка
Онлайн казино Вавада https://telegra.ph/Obzor-Disturbed-11-18 обеспечивает непрерывный вход через рабочее зеркало. Сайт Vavada регистрация, Выгодные бонусы 100FS
заказ стихов заказать стихи на свадьбу
prednisone 300mg prednisone buy prednisone 5mg canada
заказать стихотворение куплю стихи
написать стих на заказ https://omsk.bestrifma.ru
Тут можно преобрести сейф под ружье купить оружейные сейфы купить в москве
стихи на свадьбу дочери заказать заказать стих
стихотворение на заказ стихи заказать на юбилей
buy cheap amoxicillin online https://clomidrexpharm.com/# cost of clomid without dr prescription
prednisone 50 mg prices: prednisone – buy prednisone online australia
Приложения для Андроид https://androidsoftmarket.ru на русском языке можно скачать бесплатно, без регистрации.
стих на заказ стихи заказать на юбилей
buy priligy: buy priligy max pharm – buy dapoxetine online
how can i get generic clomid online generic clomid where to get clomid pills
Приложения для Андроид https://androidsoftmarket.ru на русском языке можно скачать бесплатно, без регистрации.
куплю стихи написание стихов на заказ
where to get clomid without dr prescription: can i purchase clomid without prescription – how to get generic clomid without insurance
amoxicillin tablets in india https://prednisoneraypharm.com/# prednisone uk
where can i buy prednisone online without a prescription: order Prednisone – prednisone 10mg tabs
cheap priligy: Priligy tablets – priligy
amoxicillin 500mg tablets price in india: Com Pharm – amoxicillin 500 capsule
Mostbet ensures secure transactions and fast payouts | Get live updates and scores with Mostbet | Experience top-notch customer support with Mostbet | Explore exclusive offers on Mostbet Bangladesh | Play responsibly with Mostbet Bangladesh | Mostbet ensures a safe and reliable betting environment Mostbet online gaming.
Автоматический бот для торговли https://revenuebot.io криптовалютой: анализ рынка, выполнение сделок 24/7, настройка стратегий. Удобство, точность и высокая скорость для эффективного управления инвестициями.
заказать стихотворение требуется автор стихов
prednisone 2.5 mg daily raypharm prednisone 20 mg without prescription
Узнай все о клиника варикоцеле варикоцеле и потенция
Автоматический бот для торговли https://revenuebot.io криптовалютой: анализ рынка, выполнение сделок 24/7, настройка стратегий. Удобство, точность и высокая скорость для эффективного управления инвестициями.
написать стих на заказ стих на заказ цена
Предлагаем услуги профессиональных инженеров офицальной мастерской.
Еслли вы искали сервисный центр xiaomi, можете посмотреть на сайте: сервисный центр xiaomi
Наши мастера оперативно устранят неисправности вашего устройства в сервисе или с выездом на дом!
max pharm: cheap priligy – Priligy tablets
max pharm buy priligy max pharm
how to get cheap clomid price: clomid – cost of generic clomid without prescription
cheap priligy: buy priligy – priligy
DESIGN, FABRICATION & INSTALLATION OF CUSTOM MADE LOUVERS!
DK Construction & Design provides comprehensive, custom solutions for louvres,
sunshades, privacy screens, awnings, and balustrades made from aluminium, glass, and steel.
Our end-to-end service covers on-site measurements, design development, detailed drawings,
engineering, fabrication, and installation.
We work closely with designers, architects, and homeowners to deliver tailored shading,
privacy, and safety solutions. Our team ensures that every project meets the highest
standards of quality and durability, with a focus on functionality and aesthetics.
Whether you’re after sleek sun control systems or secure balustrading, we’ve got
the expertise to bring your vision to life.
Tel: +61475 617 720
Сайт компании DK Construction & Design
can i buy cheap clomid tablets: clomid rex pharm – how can i get cheap clomid without a prescription
can i purchase prednisone without a prescription: raypharm – prednisone pills 10 mg
generic amoxil 500 mg Amoxicillin for sale amoxicillin 250 mg price in india
amoxicillin 500 mg where to buy: amoxil – buy amoxicillin 500mg online
Essay writing services rating https://priceorg.com honest reviews, price comparison and quality analysis. Choose only proven platforms.
заказать стихотворение стихи на заказ цены в рублях
Essay writing services rating https://priceorg.com honest reviews, price comparison and quality analysis. Choose only proven platforms.
стихи на заказ в москве стихи на заказ вакансии
get cheap clomid without rx: where to buy cheap clomid prices – can i get cheap clomid pills
Узнай все о клиника варикоцеле лапароскопия варикоцеле
курсы по охране труда дистанционно курсы по охране труда дистанционно
how can i get generic clomid without insurance: buy clomid – clomid without a prescription
where to get cheap clomid prices: cheap clomid – can i get cheap clomid without prescription
Download the Mostbet app for easy access | Bet on cricket, football, and more on Mostbet | Mostbet app offers secure and smooth navigation | Enjoy competitive odds with Mostbet sports betting | Mostbet app ensures uninterrupted gaming sessions | Mostbet registration takes less than a minute Mostbet registration.
Play on Mostbet and win big every day | Mostbet Bangladesh is your trusted betting platform | Explore secure and convenient gaming on Mostbet | Enjoy safe and secure payments on Mostbet | Play responsibly with Mostbet in Bangladesh | Mostbet is the best platform for online betting | Experience innovative features on Mostbet app Mostbet online gaming.
buy prednisone without a prescription: buy prednisone – prednisone tabs 20 mg
Тут можно преобрести сейф оружейный купить сейф под оружие
курсы по охране труда дистанционное обучение в москве специалист по охране труда обучение дистанционно
специалист по охране труда обучение дистанционно москва https://ohrana-truda-distancionno.ru
dapoxetine online: cheap priligy – priligy
онлайн обучение по охране труда курсы по охране труда дистанционное обучение в москве
робокасса промокод скидка http://www.promokod-robokassa.ru .
prednisone 500 mg tablet: prednisoneraypharm – 200 mg prednisone daily
amoxacillian without a percription: amoxil com pharm – buy amoxicillin 500mg capsules uk
prednisone 7.5 mg: generic Prednisone – prednisone 2.5 mg tab
priligy: dapoxetine online – cheap priligy
buy prednisone nz: buy prednisone online canada – buy prednisone online uk
can i order generic clomid pill: rexpharm – get generic clomid without dr prescription
6 prednisone: prednisone – cheapest prednisone no prescription
Thanks for some other informative website. Where else could I am getting that kind of info written in such an ideal approach? I’ve a undertaking that I am simply now working on, and I have been on the glance out for such info.
best online casino
6 prednisone: buy prednisone – mail order prednisone
buy priligy: buy priligy – priligy maxpharm
нарколог на дом краснодар нарколог на дом краснодар .
нарколог на дом краснодар http://pelsh.forum24.ru/?1-8-0-00000125-000-0-0-1730729877/ .
buy priligy: dapoxetine price – priligy max pharm
Проведение свадьбы банкета
travel itinerary planner https://wanderlog.com/list/geoCategory/154041/best-nightlife-in-cincinnati vacations and road trips. Cincinnati’s nightlife is a vibrant tapestry woven with eclectic bars, lively music venues, and unique hangouts that cater to every taste.
игровые автоматы https://igrovye-avtomaty-slot.online в интернете стали все более популярными, поскольку они предлагают удобство и широкий выбор игр.
http://iverfast.com/# ivermectin 3mg pill
Mostbet offers top-notch casino games and sports betting | Enjoy live casino games on Mostbet Bangladesh | Explore secure and convenient gaming on Mostbet | Bet on cricket, football, and more on Mostbet | Mostbet login gives you access to unlimited games and rewards | Bet anytime, anywhere with Mostbet app download | Mostbet casino is trusted by players worldwide http://mostbetbangladeshbd.com.
medicine in mexico pharmacies https://mexicanpharmgate.com/ mexico drug stores pharmacies
how much is amoxicillin prescription: cheap amoxil – buy amoxicillin without prescription
http://lisinopril1st.com/# buy Lisinopril online
medicine in mexico pharmacies http://mexicanpharmgate.com/ medicine in mexico pharmacies
over the counter amoxicillin canada: cheap amoxil – buying amoxicillin online
Узнай все о удалить полип на шейке маткиудаление полипа влагалища
Plavix 75 mg price: PlavixClo Best Price – clopidogrel bisulfate 75 mg
платный нарколог на дом платный нарколог на дом .
нарколог на дом срочно planeta.mybb.social/viewtopic.php?id=2228 .
нарколог на дом в краснодаре нарколог на дом в краснодаре .
minocycline 50 mg tablets online cheapest Ivermectin stromectol price
Priligy tablets: priligy – dapoxetine price
buy dapoxetine online: priligy max pharm – Priligy tablets
order cytotec online: buy cytotec online fast delivery – п»їcytotec pills online
скачать приложения онлайн казино https://lagrate.com/cena-kazino-igry-mashiny-poluchit-poslednij-prajs-3/
Cytotec 200mcg price: cheapest cytotec – buy cytotec online fast delivery
алкоголизм вывод из запоя краснодар http://dolgoprudni.rusff.me/viewtopic.php?id=3065#p8958 .
вывод из запоя цена краснодар вывод из запоя цена краснодар .
теплоход Александр Пушкин http://teplohod-pushkin.ru теплоход проекта Q-040, построен в 1974 году в Австрии. Единственный четырехпалубный теплоход, который ходит на Соловецкие острова и способен швартоваться непосредственно у причала Соловков.
Tanzen lernen, Tanzschule besuchen Tanzen und Tanzen und Tanzschulen in Osterreich Tanzen lernen, Tanzschule besuchen: Osterreich. Tanzschule, Tanzstudio, Tanzunterricht.
вывод из запоя на дому в краснодаре http://www.dubna.myqip.ru/?1-5-0-00000283-000-0-0-17307453197 .
теплоход Александр Пушкин http://teplohod-pushkin.ru теплоход проекта Q-040, построен в 1974 году в Австрии. Единственный четырехпалубный теплоход, который ходит на Соловецкие острова и способен швартоваться непосредственно у причала Соловков.
Tanzen lernen, Tanzschule besuchen Tanzen und Tanzen und Tanzschulen in Osterreich Tanzen lernen, Tanzschule besuchen: Osterreich. Tanzschule, Tanzstudio, Tanzunterricht.
buy misoprostol over the counter buy cytotec pills online cheap buy cytotec online
https://iverfast.com/# minocycline for uti
http://lisinopril1st.com/# cheapest Lisinopril
prednisone 5mg capsules: order Prednisone – prednisone brand name canada
buy Lisinopril online lisinopril1st Lisinopril 1st
Узнай все о септопластика носа ценаоперация на носовую перегородку
prednisone 54899: raypharm – cheap prednisone 20 mg
buy cytotec over the counter: cheapest cytotec – cytotec abortion pill
Clopidogrel 75 MG price: Clopidogrel Best Prices – Clopidogrel 75 MG price
We present to you the TOP Ballroom Dancing in the United States choreographic schools, after studying in which you will be able to work in the best dance studios and groups in the world.
Ремонт ноутбуков https://kmse.ru телефонов и телевизоров в Тамбове. Быстро, качественно, по доступным ценам.
We present to you the TOP Ballroom Dancing in the United States choreographic schools, after studying in which you will be able to work in the best dance studios and groups in the world.
Ремонт ноутбуков https://kmse.ru телефонов и телевизоров в Тамбове. Быстро, качественно, по доступным ценам.
Продамус промокод http://www.my.forum2.net/viewtopic.php?id=191#p228=43 .
generic prednisone for sale: generic Prednisone – average cost of prednisone
http://plavixclo.com/# Cost of Plavix on Medicare
minocycline for sinus infection IverFast minocycline 50mg tablets for human
http://plavixclo.com/# plavix medication
п»їcytotec pills online buy cytotec online cytotec buy online usa
выведение из запоя воронеж стационар familyportal.forumrom.com/viewtopic.php?id=28571 .
вывод из запоя капельница http://snatkina.borda.ru/?1-11-0-00000201-000-0-0-1730745690 .
фон бет фон бет .
вывод из запоя капельница http://www.kozaostra.mybb.ru/viewtopic.php?id=14290 .
фонбет беларусь фонбет беларусь .
Узнай все о увеличение полового члена хирургическим путем клиника по увеличению пениса
Покупка диплома о среднем полном образовании: как избежать мошенничества?
cheap priligy: dapoxetine price – buy priligy
http://lisinopril1st.com/# cheapest Lisinopril
Cost of Plavix on Medicare: PlavixClo Best Price – plavix medication
ivermectin 6 mg tablets IverFast buy minocycline 100 mg online
вывод из запоя в воронеже https://uaportal.ukrbb.net/viewtopic.php?f=2&t=3720 .
вывод из запоя в воронеже mediaworld.ukrbb.net/viewtopic.php?f=49&t=5454 .
вывод из запоя воронеж gov.ukrbb.net/viewtopic.php?f=3&t=6377 .
вывод из запоя стационар http://sportandpolitics.ukrbb.net/viewtopic.php?f=24&t=17825 .
cost of generic clomid pill: clomid rex pharm – can i order generic clomid without rx
minocycline 50mg tablets online inverfast.com ivermectin 8 mg
Предлагаем услуги профессиональных инженеров офицальной мастерской.
Еслли вы искали официальный сервисный центр lg, можете посмотреть на сайте: сервисный центр lg
Наши мастера оперативно устранят неисправности вашего устройства в сервисе или с выездом на дом!
Cost of Plavix on Medicare: PlavixClo Best Price – plavix best price
https://lisinopril1st.com/# lisinopril 420
Приложения для Андроид https://androidappssource.ru можно найти и скачать бесплатно без регистрации с поддержкой русского языка.
Лучшие туры и Нижний Новгород экскурсии 2024-2025 по низким ценам, расписание, цена билетов от 350 рублей, лучшие гиды, бронирование онлайн
Недорогие экскурсии в Пекине 2024-2025, расписание, цена билетов от $10, лучшие гиды, бронирование онлайн
Недорогие экскурсии в Пекине 2024-2025, расписание, цена билетов от $10, лучшие гиды, бронирование онлайн
Лучшие туры и Нижний Новгород экскурсии 2024-2025 по низким ценам, расписание, цена билетов от 350 рублей, лучшие гиды, бронирование онлайн
Приложения для Андроид https://androidappssource.ru можно найти и скачать бесплатно без регистрации с поддержкой русского языка.
вывод из запоя в воронеже http://www.rolandus.org/forum/viewtopic.php?p=106439 .
выведение из запоя воронеж стационар https://www.orehovo.anihub.me/viewtopic.php?id=2296 .
undress ai porn undress ai porn
Недорогие экскурсии по Казани 2024, расписание, цена билетов от 350 рублей, лучшие гиды, бронирование онлайн
интим магазин в Киеве интим магазин в Киеве
секс шоп магазин в Киеве https://sex-shop-kyiv.top
undress ai free ai nude undress
Недорогие экскурсии по Казани 2024, расписание, цена билетов от 350 рублей, лучшие гиды, бронирование онлайн
Глава правления Финростбанк украл у вкладчиков 28 миллионов гривен. Бывший председатель правления одного из банков Одессы подозревается в краже
Бывшего главу набсовета Финростбанка подозревают в хищении денег вкладчиков. По мнению следствия руководство вывело активы банка на сумму около 1 млрд гривен.
Виниловый сайдинг https://marremont.ru/remont/sajding-i-drugie-fasadnye-materialy заслужил популярность из-за своей износостойкости. Он может придать различным зданиям вид единого комплекса.
pin up казино: пин ап кз – пинап казино
Бывшего главу набсовета Финростбанка подозревают в хищении денег вкладчиков. По мнению следствия руководство вывело активы банка на сумму около 1 млрд гривен.
Глава правления Финростбанк украл у вкладчиков 28 миллионов гривен. Бывший председатель правления одного из банков Одессы подозревается в краже
Виниловый сайдинг https://marremont.ru/remont/sajding-i-drugie-fasadnye-materialy заслужил популярность из-за своей износостойкости. Он может придать различным зданиям вид единого комплекса.
Богатый выбор приложений https://androidapplibrary.ru программ и игр для Андроид на русском языке можно бесплатно, разнообразив функциональность вашего устройства.
аренда автомобиля с водителем аренда авто бизнес класса
pin – up casino pin-up casino online
Всё для питомцев зоомагазин Тула корма, одежда, витамины, игрушки. Товары для здоровья и комфорта животных. Доступные цены, широкий ассортимент и внимание к вашим любимцам.
казино вавада: вавада казино – vavada kazi
аренда авто дешево свадебный автомобиль напрокат
Богатый выбор приложений https://androidapplibrary.ru программ и игр для Андроид на русском языке можно бесплатно, разнообразив функциональность вашего устройства.
pinup-casino pin up casino
пин ап казино: pinup kazi – пин ап зеркало
Всё для питомцев корма для животных Тула корма, одежда, витамины, игрушки. Товары для здоровья и комфорта животных. Доступные цены, широкий ассортимент и внимание к вашим любимцам.
пин ап зеркало: пин ап вход – пин ап вход
pinup: pinup – pinup kazi
Предлагаем услуги профессиональных инженеров офицальной мастерской.
Еслли вы искали официальный сервисный центр huawei, можете посмотреть на сайте: официальный сервисный центр huawei
Наши мастера оперативно устранят неисправности вашего устройства в сервисе или с выездом на дом!
пин ап вход: пин ап зеркало – пин ап зеркало
http://vavada-kazi.ru/# vavada-kazi.ru
Продажа шпона https://mirshpona.ru оптом и в розницу по выгодным ценам. Большой выбор шпона по низкой цене, доставка, гарантия качества.
Недорогие экскурсии в Бангкоке 2024-2025, расписание, цена билетов от 350 рублей, лучшие гиды, бронирование онлайн
Модный сайт https://alienrecipes.ru для настоящих женщин. Новости звезд, тренды моды и красоты, правильное питание.
Недорогие экскурсии в Свияжск из Казани 2024-2025, расписание, цена билетов от 990 рублей, лучшие гиды, бронирование онлайн
Продажа шпона https://mirshpona.ru оптом и в розницу по выгодным ценам. Большой выбор шпона по низкой цене, доставка, гарантия качества.
Недорогие экскурсии в Бангкоке 2024-2025, расписание, цена билетов от 350 рублей, лучшие гиды, бронирование онлайн
Недорогие экскурсии в Свияжск из Казани 2024-2025, расписание, цена билетов от 990 рублей, лучшие гиды, бронирование онлайн
вавада казино зеркало: вавада казино онлайн – вавада казино онлайн
Модный сайт https://alienrecipes.ru для настоящих женщин. Новости звезд, тренды моды и красоты, правильное питание.
pin up казино пин ап казино пинап казино
Стильные и тёплые угги https://ugg-original-moskva.store для женщин, мужчин и детей. Широкий ассортимент, натуральные материалы и современные дизайны. Удобная покупка, выгодные цены и доставка до двери.
Одесса 24 https://odesa24.com.ua/odesa-region/ это новостной портал, который ежедневно освещает ключевые события Одессы и области. На сайте публикуются актуальные новости, репортажи, аналитика и материалы о жизни города. Читатели могут узнать о культурных мероприятиях, социальных вопросах и обо всем, что важно для жителей региона.
вывод из запоя в воронеже https://www.belbeer.borda.ru/?1-6-0-00000759-000-0-0-1730749647 .
выведение из запоя воронеж стационар cah.forum24.ru/?1-19-0-00000462-000-0-0-1730749346 .
лечение наркозависимости в стационаре http://aktivnoe.forum24.ru/?1-7-0-00012825-000-0-0-1730749092/ .
Профессиональные услуги гинеколога https://oncothermia.ru/192-09-01-2024/ консультации, диагностика, лечение и профилактика женского здоровья. Индивидуальный подход, современные методы и комфортные условия. Забота о вашем здоровье.
На сайте https://funposter.ru/animals вы найдете уникальные фотоподборки интересных мест, редких животных, удивительных городов и шедевров архитектуры. Это пространство для вдохновения, где каждая фотография рассказывает свою историю.
Стильные и тёплые угги https://ugg-original-moskva.store для женщин, мужчин и детей. Широкий ассортимент, натуральные материалы и современные дизайны. Удобная покупка, выгодные цены и доставка до двери.
pinup: пин ап казино – pinup
Профессиональные услуги гинеколога https://whitetooth.ru/447-23-01-2024/ консультации, диагностика, лечение и профилактика женского здоровья. Индивидуальный подход, современные методы и комфортные условия. Забота о вашем здоровье.
Одесса 24 https://odesa24.com.ua/business-news/ это новостной портал, который ежедневно освещает ключевые события Одессы и области. На сайте публикуются актуальные новости, репортажи, аналитика и материалы о жизни города. Читатели могут узнать о культурных мероприятиях, социальных вопросах и обо всем, что важно для жителей региона.
На сайте https://funposter.ru/animals вы найдете уникальные фотоподборки интересных мест, редких животных, удивительных городов и шедевров архитектуры. Это пространство для вдохновения, где каждая фотография рассказывает свою историю.
BNX cryptocurrency exchange https://bnx.me fast, convenient and secure trading of digital assets. Licensed in Singapore. Staking, P2P, spot trading and ICOs for you to unlock the potential of cryptocurrencies and grow your capital.
Лучшие турецкие сериалы сериал Ядовитый плющ смотреть онлайн в хорошем качестве. Коллекция лучших турецких сериалов в HD качестве, смотреть подборку онлайн.
Bonsai Casino https://bonsai-game.org захватывающие игры, щедрые бонусы, быстрые выплаты. Широкий выбор слотов, настольных игр и живых дилеров.
Наслаждайтесь игрой в Bonsai Casino https://bonsai-sport.org топовые слоты, живые дилеры и эксклюзивные бонусы. Всё для вашего комфорта и выигрышей.
Предлагаем услуги профессиональных инженеров офицальной мастерской.
Еслли вы искали официальный сервисный центр philips, можете посмотреть на сайте: сервисный центр philips в москве
Наши мастера оперативно устранят неисправности вашего устройства в сервисе или с выездом на дом!
pin up казино: пин ап казино – pin up казино
BNX cryptocurrency exchange https://bnx.me fast, convenient and secure trading of digital assets. Licensed in Singapore. Staking, P2P, spot trading and ICOs for you to unlock the potential of cryptocurrencies and grow your capital.
Лучшие турецкие сериалы Три куруша смотреть онлайн в хорошем качестве. Коллекция лучших турецких сериалов в HD качестве, смотреть подборку онлайн.
I truly appreciate this post. I have been looking everywhere for this! Thank goodness I found it on Bing. You have made my day! Thank you again
вавада казино онлайн: казино вавада – vavada
Bonsai Casino https://bonsai-game.org захватывающие игры, щедрые бонусы, быстрые выплаты. Широкий выбор слотов, настольных игр и живых дилеров.
Наслаждайтесь игрой в Bonsai Casino https://bonsai-sport.org топовые слоты, живые дилеры и эксклюзивные бонусы. Всё для вашего комфорта и выигрышей.
пин ап зеркало: пин ап казино – pinup-kazi.ru
Hello! I just would like to give a huge thumbs up for the great info you have here on this post. I will be coming back to your blog for more soon.
pinup kazi: пин ап казино – пин ап вход
пин ап казино официальный сайт: pinup kazi – pinup-kazi.ru
Bonsai Casino https://bonsai-play.org широкий выбор игр, щедрые бонусы, быстрые выплаты и безопасность. Наслаждайтесь слотами, рулеткой и живыми играми в комфортной и надёжной атмосфере.
Лучшие азартные игры в Bonsai Casino https://bonsai-download.com слоты, рулетка, блэкджек и живые дилеры. Щедрые бонусы и удобные выплаты в безопасной игровой среде.
пин ап вход: pinup – пинап казино
Bonsai Casino https://bonsai-play.org широкий выбор игр, щедрые бонусы, быстрые выплаты и безопасность. Наслаждайтесь слотами, рулеткой и живыми играми в комфортной и надёжной атмосфере.
Лучшие азартные игры в Bonsai Casino https://bonsai-download.com слоты, рулетка, блэкджек и живые дилеры. Щедрые бонусы и удобные выплаты в безопасной игровой среде.
https://turkfan.tv/19341-proschalnoe-pismo.html/
пин ап казино официальный сайт: pinup-kazi.ru – пин ап зеркало
Арматура 14 мм оптом https://armatura-14.ru и в розницу в Москве. Качественный металл по выгодным ценам. Быстрая доставка, широкий ассортимент и гибкие условия для частных клиентов и строительных компаний.
https://turkfan.tv/melodramy/
вавада казино онлайн: казино вавада – вавада казино
вывод из запоя наркологом вывод из запоя наркологом .
вывод из запоя на дому http://snatkina.borda.ru/?1-11-0-00000202-000-0-0-1730749989 .
vavada-kazi.ru: vavada-kazi.ru – вавада казино
Арматура 14 мм оптом https://armatura-14.ru и в розницу в Москве. Качественный металл по выгодным ценам. Быстрая доставка, широкий ассортимент и гибкие условия для частных клиентов и строительных компаний.
https://pinup-kazi.ru/# пин ап вход
пин ап вход: пинап казино – пин ап зеркало
пинап казино: pinup-kazi.kz – pinup kazi
пин ап казино онлайн пинап казино pin up казино
вывод из запоя капельница http://www.ximki.ukrbb.net/viewtopic.php?f=12&t=3702 .
купить качественную мебель в Киеве https://www.youtube.com/@Mebel-24 и Украине от интернет магазина TM Mebel-24. Обзов готовых вариантов и на заказ от производителя.
pinup-kazi.kz: pinup-kazi.kz – pinup-kazi.kz
Продажа квартир от застройщика https://prodatkvartiru-norka.ru в Казани: выгодные цены, современные планировки, удобные районы. Без посредников и переплат.
Квартиры от застройщика https://kvartiruzhkkupit.ru в Казани: новые дома, удобные планировки, комфортные районы. Прямые продажи, честные цены, акции и поддержка на всех этапах покупки.
Продажа квартир от застройщика https://prodatkvartiru-norka.ru в Казани: выгодные цены, современные планировки, удобные районы. Без посредников и переплат.
купить качественную мебель в Киеве купить недорого кухню и Украине от интернет магазина TM Mebel-24. Обзов готовых вариантов и на заказ от производителя.
Квартиры от застройщика https://kvartiruzhkkupit.ru в Казани: новые дома, удобные планировки, комфортные районы. Прямые продажи, честные цены, акции и поддержка на всех этапах покупки.
vavada-kazi.ru: вавада онлайн казино – vavada
пинап казино: pinup-kazi.ru – пин ап казино
казино вавада: vavada – вавада казино
стоимость проведения соут процедура проведения специальной оценки условий труда
Buy cheap proxies https://wrongplanet.net/author/smokeythebigboy/ individual personal and anonymous. Personal proxies support 1 Gbps channel speed, connection by protocols
казино вавада: вавада – вавада казино онлайн
вредность соут в москве https://sout213.ru
Предлагаем услуги профессиональных инженеров офицальной мастерской.
Еслли вы искали сервисный центр apple в москве, можете посмотреть на сайте: официальный сервисный центр apple
Наши мастера оперативно устранят неисправности вашего устройства в сервисе или с выездом на дом!
спецоценка соут москва соут в 2024 году
вывод из запоя https://honey.ukrbb.net/viewtopic.php?f=45&t=16709 .
вывод из запоя круглосуточно https://ekonomimvmeste.ukrbb.net/viewtopic.php?f=14&t=65376 .
Buy cheap proxies https://www.inkl.com/news/comprehensive-review-of-top-5-proxy-servers-in-2024 individual personal and anonymous. Personal proxies support 1 Gbps channel speed, connection by protocols
pinup-kazi.kz: pinup – пин ап кз
https://vavada-kazi.ru/# вавада казино онлайн
https://vavada-kazi.ru/# вавада онлайн казино
pin up казино: пинап казино – пин ап казино
вавада вавада вавада казино
Процесс получения диплома стоматолога: реально ли это сделать быстро?
пультовая охрана Охрана частного дома
vavada: vavada – казино вавада
Стальной двутавр — это фасонный металлопрокат с Н-образным сечением поперечного профиля. Он изготавливается горячекатаным способом из углеродистых или низколегированных сталей при температуре 1200°C по стандарту ГОСТ 8239-89 https://dvutavrmsk.ru
вавада казино: vavada – вавада казино
датчик утечки газа для дома купить система охраны периметра купить
pinup: пин ап казино – pinup
pinup kazi: pinup – pinup-kazi.kz
pinup-kazi.ru: пин ап вход – pinup
услуги по оценке условий труда работников https://sout213.ru
пинап казино: пин ап казино официальный сайт – пин ап зеркало
https://vavada-kazi.ru/# vavada kazi
https://pinup-kazi.ru/# пин ап зеркало
vavada: вавада казино онлайн – вавада казино зеркало
pinup kazi: пинап казино – пин ап казино
вавада вавада казино vavada-kazi.ru
топ бонусов для азартных игроков казино с бонусами за регистрацию
jetour dashing расход jetour dashing характеристики
выведение из запоя врачом наркологом http://www.pokupki.bestforums.org/viewtopic.php?f=7&t=24066 .
вывести из запоя цена obovsem.rolevaya.info/viewtopic.php?id=3688 .
вывод из запоя на дому похмельная https://rio16.ukrbb.net/viewtopic.php?f=3&t=1121 .
вывод из запоя на дому в екатеринбурге http://gaslo.ukrbb.net/viewtopic.php?f=13&t=3416/ .
автомобили jetour dashing jetour dashing x90
рейтинг казино пик список лучших казино онлайн рейтинг
erectyle dysfunction http://canadianpharm1st.com/# ed dysfunction
delivery balloons Dubai order balloons to your home Dubai
buying prescription drugs in mexico online: mexican pharmacy – purple pharmacy mexico price list
pumps for ed http://indianpharmstar.com/# Online medicine home delivery
erectile dysfunction remedies: canadian pharm – erectile dysfunction natural remedies
Наша вакансии доска объявлений — это удобный и надежный сервис, который объединяет тех, кто ищет работу, и тех, кто ищет сотрудников.
Федерация – это проводник в мир покупки запрещенных товаров, можно купить гашиш, купить кокаин, купить меф, купить экстази в различных городах. Москва, Санкт-Петербург, Краснодар, Владивосток, Красноярск, Норильск, Екатеринбург, Мск, СПБ, Хабаровск, Новосибирск, Казань и еще 100+ городов.
custom balloons with logo order helium balloons Dubai
pharmacy website india: IndianPharmStar – indian pharmacy
Класс Рђ400 Рё Рђ500 — наиболее популярные типы арматуры, предназначенные для укрепления бетонных конструкций, испытывающих значительные нагрузки. Ртот РІРёРґ арматуры используется РІ фундаментных плитах, перекрытиях, колоннах Рё балках.
http://sarmatura-12.ru
Mostbet Azərbaycan oyunçuları üçün ideal platformadır | Mostbet oyunçulara 24/7 dəstək xidmətləri təklif edir | Mostbet ilə həm mərc edin, həm də əylənin | Mostbet az kazinosunda yeni oyunlarla əylənin | Mostbet az ilə oyunlar daha maraqlıdır | Mostbet kazinosunda canlı mərc etmək həyəcanlıdır | Mostbet az qeydiyyatı ilə xüsusi endirimlərdən faydalanın | Mostbet ilə oyun təcrübənizi artırın | Mostbet ilə oyun dünyasında yeni bir mərhələ yaşayın Mostbet təhlükəsizlik.
best online pharmacy india: IndianPharmStar.com – buy prescription drugs from india
Наша работа вакансии — это удобный и надежный сервис, который объединяет тех, кто ищет работу, и тех, кто ищет сотрудников.
Федерация – это проводник в мир покупки запрещенных товаров, можно купить мефедрон, купить кокаин, купить меф, купить экстази в различных городах. Москва, Санкт-Петербург, Краснодар, Владивосток, Красноярск, Норильск, Екатеринбург, Мск, СПБ, Хабаровск, Новосибирск, Казань и еще 100+ городов.
mail order pharmacy india indian pharmacy best online pharmacy india
india online pharmacy IndianPharmStar india pharmacy mail order
buy helium balloons for birthday Dubai buy large balloons Dubai
indian pharmacy paypal: IndianPharmStar.com – top 10 pharmacies in india
Арматура диаметром 32 мм, изготовленная из стали марки А500С, является одним из самых востребованных видов металлопроката в строительстве. Она применяется при возведении фундаментов, армировании стен и перемычек. https://armatura32.ru
reputable mexican pharmacies online: mexican pharmacy – mexican online pharmacies prescription drugs
treatment with drugs https://mexicanpharmeasy.com/# reputable mexican pharmacies online
Федерация – это проводник в мир покупки запрещенных товаров, можно купить гашиш, купить кокаин, купить меф, купить экстази в различных городах. Москва, Санкт-Петербург, Краснодар, Владивосток, Красноярск, Норильск, Екатеринбург, Мск, СПБ, Хабаровск, Новосибирск, Казань и еще 100+ городов.
natural cure for ed: canadian pharmacy – erection pills that work
Выбор отеля https://koffer-spb.ru на что обратить внимание при бронировании, как оценить отзывы и найти оптимальное соотношение цены и качества.
Федерация – это проводник в мир покупки запрещенных товаров, можно купить гашиш, купить кокаин, купить меф, купить экстази в различных городах. Москва, Санкт-Петербург, Краснодар, Владивосток, Красноярск, Норильск, Екатеринбург, Мск, СПБ, Хабаровск, Новосибирск, Казань и еще 100+ городов.
Saving with promo codes https://code-me.ru where to look, how to check and apply discounts for the best prices. Step-by-step tips for smart shopping.
Ищите свою пару? Сайт знакомства для серьезных отношений объединяют людей для серьёзных отношений, дружбы или общения. Всё просто, удобно и эффективно.
Выбор отеля https://koffer-spb.ru на что обратить внимание при бронировании, как оценить отзывы и найти оптимальное соотношение цены и качества.
pharmacy website india: indian pharmacy – india pharmacy
Saving with promo codes https://code-me.ru where to look, how to check and apply discounts for the best prices. Step-by-step tips for smart shopping.
Сервис ТвойЮрист https://tvoyurist.online оказывает бесплатные юридические консультации онлайн в чате и по телефону горячей линии для жителей Москвы и регионов России на основании ФЗ РФ N324 от 21.11.2011 «О бесплатной юридической помощи в Российской Федерации». Наша юридическая служба работает круглосуточно 24/7. Спросите бесплатно юристов без регистрации, и получите квалифицированный ответ юрисконсульта.
top online pharmacy india: indian pharm – indianpharmacy com
Ищите свою пару? Сайт знакомства для серьезных отношений объединяют людей для серьёзных отношений, дружбы или общения. Всё просто, удобно и эффективно.
reputable indian online pharmacy indian pharm india online pharmacy
порно изнасилование порно мамки
Mostbet Azərbaycanda ən etibarlı mərc platformasıdır | Mostbet bonus təkliflərindən istifadə edin və qazanın | Mostbet ilə canlı mərc etmək çox həyəcanlıdır | Mostbet ilə risksiz mərc edin və zövq alın | Mostbet tətbiqi ilə oyun dünyasında sərhədləri keçin | Mostbet qeydiyyatı prosesi çox sürətlidir | Mostbet az oyunçular üçün ən yaxşı seçimdir | Mostbet qeydiyyatı ilə hədiyyələr qazanın | Mostbet Azərbaycanda ən populyar mərc platformasıdır domen com.
порно ебла виагра таблетки цена в аптеке
cheapest online pharmacy india indian pharm top 10 online pharmacy in india
Правовой сервис «ТвойЮрист» https://tvoyurist.online/services/semeynye-spory/razvod/ предлагает бесплатные юридические консультации по вопросам расторжения брака как онлайн, так и по телефону для жителей Москвы и регионов России. Квалифицированные юристы и адвокаты оказывают помощь при разводе, включая раздел совместно нажитого имущества, взыскание алиментов, оформление опеки, лишение родительских прав и другие сопутствующие семейные споры.
buying prescription drugs in mexico: MexicanPharmEasy – buying from online mexican pharmacy
natural pills for ed: canadianpharm1st.com – canadian pharmacy online
русское порно видео порно видео
детское порно хентай мефедрон цена
india pharmacy: indian pharmacy – buy prescription drugs from india
вывод из запоя цена spilkuvannya.rolevaya.com/viewtopic.php?id=6974 .
indianpharmacy com: indian pharm – п»їlegitimate online pharmacies india
ed medications list: canadian pharm 1st – ed remedies
best ed treatments: canadian pharmacy – what is the best ed drug
comparison of ed drugs http://indianpharmstar.com/# reputable indian online pharmacy
aspirin and ed: canadianpharm1st.com – ed treatment
the best ed pill https://canadianpharm1st.com/# natural ed treatments
best india pharmacy indian pharm star buy prescription drugs from india
виагра цена подешевле порно мамки
олд спайс магнит косметик цена купить мефедрон телеграм москва
Конструкторы оружия России https://guns.org.ru истории выдающихся инженеров, их разработки и вклад в оборону страны. Биографии, достижения, факты и история создания легендарных образцов вооружения.
melbet официальный https://melbet-24online.net.ru
best online canadian pharmacy canadianpharm1st.com prescription meds without the prescriptions
natural ed medications: canadian pharm 1st – legal to buy prescription drugs without prescription
erectyle dysfunction: canadian pharm 1st – vitamins for ed
Mostbet ilə təhlükəsiz mərc təcrübəsi yaşayın | Mostbet ilə uğurlu mərc etmək şansınızı artırın | Mostbet azərbaycanlı oyunçular üçün xüsusi bonuslar təklif edir | Mostbet azərbaycanlı oyunçuların ən sevimli platformasıdır | Mostbet qeydiyyatı ilə xüsusi endirimlərdən yararlanın | Mostbet kazinosunda canlı mərc etmək həyəcanlıdır | Mostbet ilə böyük qazanclar əldə edin və zövq alın | Mostbet ilə hər yerdən mərc edin və qalib gəlin | Mostbet ilə təhlükəsiz mərc təcrübəsi əldə edin Mostbet giriş.
resume engineer in construction resume technical engineer
Anonymous proxies https://marketmillion.com/comprehensive-guide-to-using-free-proxy-servers-saving-money-and-enhancing-security/ for any tasks: high speed, stability, support for all protocols. Suitable for SMM, parsing, bots and games. Guaranteed confidentiality and 24/7 support.
Все о ремонте своими руками https://cooksy.ru подробные фото и видеоуроки, выбор материалов и инструментов, расчёт стоимости.
Инструкции для ремонта https://antr-adm.ru своими руками: как подготовить, спланировать и выполнить работы. Советы для всех видов ремонта с пошаговыми фото.
online pharmacy india: indian pharm star – Online medicine home delivery
Инструкции для ремонта https://sklad-kotlov.ru своими руками: как подготовить, спланировать и выполнить работы. Советы для всех видов ремонта с пошаговыми фото.
Портал для ремонта https://fdmlev.ru своими руками: как справиться с задачами любой сложности. Полный перечень этапов, инструкции, фотоуроки и рекомендации по материалам для вашего дома.
Как сделать ремонт https://str-control.ru своими руками: простые пошаговые рекомендации, инструкции для начинающих и идеи для профессионалов.
Всё о самостоятельном ремонте https://erp-mta.ru простые решения для дома, инструкции по установке и отделке, выбор инструментов и материалов.
Всё о витаминах для здоровья https://vitamingid.ru их польза, источники, дозировки. Узнайте, как поддерживать иммунитет, улучшать самочувствие и восполнять нехватку витаминов.
Ремонт своими руками https://fobii.org пошаговые советы, готовые решения и проверенные рекомендации. Легко и понятно для каждого, кто хочет преобразить свой дом своими силами.
Настройка домашнего оборудования https://vseprost.ru подробные гайды, советы и рекомендации. Узнайте, как подключить, настроить и оптимизировать работу устройств.
Всё для студента https://chvuz.ru статьи, советы, методики и готовые материалы для упрощения учёбы. Быстрый доступ к полезной информации.
best ed treatments: canadian pharmacy – buy medication online
best online pharmacies in mexico: mexican pharm easy – mexico pharmacies prescription drugs
ed vacuum pump https://mexicanpharmeasy.com/# mexican border pharmacies shipping to usa
best ed pills non prescription http://mexicanpharmeasy.com/# reputable mexican pharmacies online
сайт по ремонту своими руками https://9sam.ru от идей до готовых решений. Чёткие инструкции, фото, схемы и советы для обновления интерьера и устранения любых поломок.
Полный справочник https://lortut.ru по ЛОР-болезням: симптомы, причины, эффективные методы лечения и профилактики. Поддерживайте здоровье дыхательных путей с проверенными советами.
Рейтинги лучших товаров https://experttok.ru для красоты и здоровья: косметика, уход за кожей, витамины, техника для ухода и многое другое.
Сайт для будущих мам https://lberemenost.ru всё о беременности, родах и послеродовом периоде. Полезные советы, медицинские рекомендации и информация для заботы о здоровье мамы и малыша.
generic ed drugs canadian pharmacy pet meds without vet prescription canada
impotence treatment: canada pharmacy online – herbal remedies for ed
pet antibiotics without vet prescription: canada pharmacy online – prescription drugs
ed treatment natural: canadian pharmacy – is ed reversible
best india pharmacy indian pharm star best online pharmacy india
Беременность поэтапно https://zdoroplod.ru полные рекомендации по здоровью, уходу за собой, питанию и физической активности. Узнайте о развитии малыша и подготовке к родам с экспертной точки зрения.
Здоровье вашего ребенка https://craymed.ru рекомендации по уходу, профилактике болезней, правильному питанию и физической активности.
Полный справочник по болезням https://medicodo.ru симптомы, причины, эффективные методы лечения и профилактики. Поддерживайте здоровье дыхательных путей с проверенными советами.
Работа с металлами https://ometalledo.ru полезные советы по сварке, резке, шлифовке и других методах обработки. Рекомендации для начинающих и опытных мастеров
online meds for ed: canadianpharm1st – best drugs for ed
Kairospeak https://kairospeak.com is a platform that helps users discover arbitrage pairs across cryptocurrency exchanges. It gathers real-time ticker data and analyzes price differences, factoring in trading fees, withdrawal costs, and the current order book. When a profitable opportunity is found, the platform notifies the user.
Выберите лучшие гемблинг партнерки https://seciva.ru/programs-tag/gembling/ для заработка. Узнайте, как выбрать партнерскую программу, что лучше — CPA или RevShare, и начните зарабатывать.
Информация о здоровье https://mediklekar.ru от профилактики и правильного питания до советов по лечению и поддержанию энергии.
Онлайн-кошельки https://payinfor.ru гайды по созданию, настройке и использованию. Сравнение популярных сервисов, советы по защите данных и управлению финансами.
нарколог на дом круглосуточно http://www.automobilist.forum24.ru/?1-19-0-00000141-000-0-0-1730786242/ .
mexican rx online: MexicanPharmEasy – medication from mexico pharmacy
ed cures http://mexicanpharmeasy.com/# mexico drug stores pharmacies
drugs that cause ed https://canadianpharm1st.com/# best ed pills online
mexican mail order pharmacies MexicanPharmEasy buying prescription drugs in mexico online
impotence treatment: canadian pharmacy – over the counter erectile dysfunction pills
best natural cure for ed canada pharmacy online ed pills that work
mexican online pharmacies prescription drugs: mexican pharm easy – mexican border pharmacies shipping to usa
world pharmacy india: indian pharmacy – pharmacy website india
canadian online drugs: canadianpharm1st – ed symptoms
buying prescription drugs in mexico online: MexicanPharmEasy – mexico drug stores pharmacies
mens erection pills: canada pharmacy online – erectile dysfunction
Здравствуйте и добро пожаловать в наш магазин металлопроката! У нас вы найдете огромный выбор высококачественных материалов для любых строительных и производственных задач. Мы предлагаем только проверенные и надежные изделия, которые помогут вам реализовать самые амбициозные проекты. Наши специалисты всегда рады помочь вам с выбором и ответить на все ваши вопросы. Заходите, выбирайте и заказывайте с уверенностью!
http://metprokatmsk.ru
indian pharmacy: IndianPharmStar.com – world pharmacy india
ed treatment pills https://mexicanpharmeasy.com/# best online pharmacies in mexico
drug store online https://mexicanpharmeasy.com/# mexican border pharmacies shipping to usa
best online pharmacies in mexico MexicanPharmEasy mexico drug stores pharmacies
Online medicine home delivery: IndianPharmStar – mail order pharmacy india
Официальный сайт Melbet https://melbet-24online.net.ru ставки на спорт, турниры, лайв-игры и слоты. Простая регистрация, быстрая выплата выигрышей и множество бонусов для новых и постоянных игроков.
Конструкторы оружия России https://guns.org.ru история создания легендарного оружия, биографии инженеров, технические характеристики разработок.
вывод из запоя в наркологическом стационаре вывод из запоя в наркологическом стационаре .
Всё о продуктах питания https://vsedlypolsy.ru их свойства, влияние на организм, советы по правильному выбору и сочетанию. Сделайте осознанное питание частью вашей жизни.
Справочник по ремонту https://club-sante.ru идеи для ремонта, рекомендации по отделке, расчёты и схемы. Полезная информация для качественного и экономного обновления вашего дома.
erectyle dysfunction canada pharmacy online best canadian online pharmacy
Возможно ли купить диплом стоматолога, и как это происходит
top 10 pharmacies in india: IndianPharmStar – top 10 online pharmacy in india
Конструкторы оружия России https://guns.org.ru история создания легендарного оружия, биографии инженеров, технические характеристики разработок.
Конструкторы оружия России https://guns.org.ru история создания легендарного оружия, биографии инженеров, технические характеристики разработок.
Советы для мам https://travailon.ru уход за ребёнком, развитие, воспитание и здоровье. Полезные рекомендации для комфортного материнства и гармоничного роста малыша.
Справочник по ремонту и строительству https://azimutmebel.ru идеи для проектов, инструкции, лайфхаки и рекомендации по выбору материалов.
ремонт и строительство https://losinka-kirpich.ru справочник с советами по планированию, выбору технологий, отделке и дизайну. Полезно как для новичков, так и для профессионалов.
Конструкторы оружия России https://guns.org.ru история создания легендарного оружия, биографии инженеров, технические характеристики разработок.
medicine in mexico pharmacies: mexican pharm easy – reputable mexican pharmacies online
mexico pharmacies prescription drugs: mexican pharm easy – mexican border pharmacies shipping to usa
prescription drugs http://canadianpharm1st.com/# what causes ed
п»їlegitimate online pharmacies india: indian pharm – india pharmacy mail order
drugs and medications http://mexicanpharmeasy.com/# medication from mexico pharmacy
Предлагаем услуги профессиональных инженеров офицальной мастерской.
Еслли вы искали сервисный центр asus сервис, можете посмотреть на сайте: сервисный центр asus сервис
Наши мастера оперативно устранят неисправности вашего устройства в сервисе или с выездом на дом!
buying prescription drugs in mexico: Mexican Pharm – buying from online mexican pharmacy
Полный справочник https://rasayanavl.ru по ремонту и строительству: пошаговые гайды, расчёты, подбор инструментов и материалов.
Гайды по ремонту https://postroikado.ru своими руками: советы для новичков и опытных мастеров. Всё о материалах, инструментах и этапах ремонта в удобном формате.
Информация для врачей https://ovrachahl.ru актуальные медицинские статьи, клинические рекомендации, исследования и практические советы для профессионального роста.
Сайт о юриспруденции https://besturisty.ru актуальные законы, судебная практика, комментарии юристов и рекомендации по решению правовых вопросов.
Сайт о юриспруденции https://besturisty.ru актуальные законы, судебная практика, комментарии юристов и рекомендации по решению правовых вопросов.
buying prescription drugs in mexico MexicanPharmEasy best online pharmacies in mexico
Справочник по медицине https://konsmediic.ru заболевания, методы их лечения, профилактика, новости медицины и рекомендации по укреплению здоровья для всех возрастов.
Сайт о юриспруденции https://besturisty.ru актуальные законы, судебная практика, комментарии юристов и рекомендации по решению правовых вопросов.
Медицина для всех https://vrachataj.ru подробности о болезнях, терапии, диагностике и профилактике. Узнайте, как заботиться о здоровье эффективно.
online pharmacy india: indian pharmacy – best online pharmacy india
mexico drug stores pharmacies: mexican pharmacy – buying prescription drugs in mexico
prescription meds without the prescriptions canadian pharmacy best medication for ed
офтальмологический центр самара клиника офтальмологии
Медицинский портал https://zdorovemira.ru справочник болезней, рекомендации по лечению, здоровому образу жизни и укреплению иммунитета.
Права граждан России https://pravookey.ru разбор законодательства, советы по обращению в суды, оформлению документов и защите своих интересов.
cheap pills online: canadianpharm1st – is it illegal to buy prescription drugs online
Полезный сайт о медицине https://zdorovemira.ru ответы на популярные вопросы, советы по питанию, укреплению иммунитета и поддержанию хорошего самочувствия.
ed tablets: canadian pharmacy – best online drugstore
Online medicine order: indian pharmacy – online pharmacy india
Предлагаем Вам взять в аренду экскаваторы гусеничные и колесные, мини-экскаваторы и экскаваторы-погрузчики на https://arendakranamsk.ru
ed medications list http://mexicanpharmeasy.com/# mexican drugstore online
Всё для здоровья https://capitalaw.ru на медицинском портале: подробные статьи, советы врачей, полезная информация о симптомах, лечении, профилактике и укреплении здоровья.
справочник болезней https://vrachgigiena.ru рекомендации по лечению, здоровому образу жизни и укреплению иммунитета. Всё о медицине в одном месте
ed devices: canada pharmacy online – cheapest ed pills online
Всё об оформлении документов https://obrascidoc.ru сайт с готовыми образцами заявлений, контрактов, справок и официальных бумаг для различных нужд.
canadian drugs online http://canadianpharm1st.com/# erectile dysfunction
mexican pharmaceuticals online mexican pharmacy buying prescription drugs in mexico
pharmacy website india: indian pharm – Online medicine order
prescription without a doctor’s prescription canada pharmacy online ed doctor
Сайт о законах https://yslugiyurista.ru и граждан России: законы, правовая помощь, гайды по решению юридических вопросов и защите прав в любых жизненных ситуациях.
Семейные споры https://capitallawdo.ru развод, алименты, раздел имущества. Юридическая помощь, советы по оформлению документов и защите ваших интересов в суде.
Права граждан России https://konsaltdo.ru разбор законодательства, советы по обращению в суды, оформлению документов и защите своих интересов.
Полезный сайт о правах граждан https://konslegal.ru информация о правах и обязанностях, советы по взаимодействию с госорганами и защите интересов.
промокод продамус на 5000 https://promokod-pro.ru .
the best ed pills: canadianpharm1st.com – ed medicine online
buying prescription drugs in mexico online: MexicanPharmEasy – medication from mexico pharmacy
Сетка и металлопродукция https://setka.by в Минске: продажа от производителя. Широкий ассортимент, доступные цены, быстрая доставка. Качество и надёжность для строительства и производства.
BNX is a cryptocurrency exchange https://bnx.me for beginners and professionals. Fast transactions, favorable rates, a wide selection of cryptocurrencies and the safety of your funds.
Kazakhstan’s leading university Satbayev University with a wide range of engineering programs, unique laboratories and internships. Prepares specialists for a successful career in the field of technology.
CVzen.pl https://cvzen.pl to lider w pisaniu CV i coachingu kariery, zaufany przez miliony na calym swiecie. Oferujemy wsparcie na kazdym etapie kariery: od tworzenia CV i listow motywacyjnych po optymalizacje profilu LinkedIn i coaching kariery. Pomagamy odkryc nowe mozliwosci dzieki CV, ktore podkresla Twoj potencjal.
Paxlovid.ink: paxlovid buy – paxlovid cost without insurance
https://paxlovid.ink/# paxlovid pill
http://ivermectinpharm.store/# ivermectin cream uk
маркетинговые исследования рынка сбыта маркетинговое исследование рынка изделий
CVpro.pt https://cvpro.pt e lider em redacao de curriculos e coaching de carreira, apoiando milhoes de candidatos globalmente. Oferecemos curriculos profissionais, cartas de apresentacao personalizadas, otimizacao de perfis no LinkedIn e coaching de carreira. Nosso time de especialistas ajuda voce a destacar seu potencial e conquistar novas oportunidades na sua jornada profissional.
CVpro.com.tr https://cvpro.com.tr milyonlarca is arayan?n guvendigi lider CV yazma ve kariyer koclugu hizmetidir. Uzman ekibimiz, profesyonel CV, sektore ozel on yaz?, LinkedIn profili optimizasyonu ve kisisel kariyer koclugu ile gercek potansiyelinizi ortaya c?kararak kariyer hedeflerinize ulasman?za destek olur. Yeni f?rsatlar? kesfetmek icin yan?n?zday?z!
CVlettre.fr https://cvlettre.fr est votre partenaire de confiance pour booster votre carriere. Nous offrons des services professionnels de redaction de CV et lettres de motivation pour decrocher l’emploi de vos reves. Avec nos outils IA, modeles personnalisables et conseils experts adaptes a chaque secteur, nous garantissons une candidature qui se demarque. Faites briller votre potentiel avec CVlettre.
paxlovid cost without insurance: Paxlovid.ink – paxlovid buy
Gabapentin Pharm Gabapentin Pharm Gabapentin Pharm
Наша студия занимается разработкой сайтов на платформе Битрикс. Мы предлагаем полный комплекс работ – от создания, до поддержки выполненного проекта. Дополнительно оказываются услуги по продвижению сайта для поисковых систем, информационному сопровождению, наполнению контентом, разработке маркетинговых стратегий. Подробнее – https://webstudiya-moscow.ru/
buy paxlovid online Paxlovid buy online paxlovid price
Двутавр — это тип металлического профиля, который широко используется в строительстве для создания несущих конструкций. Он имеет форму буквы “H” и состоит из двух параллельных полок, соединенных стенкой. Подробнее на https://dvutavrmsk.ru
neurontin 900 mg: Gabapentin Pharm – Gabapentin Pharm
paxlovid buy: Paxlovid.ink – paxlovid buy
semaglutide pharm: Buy semaglutide pills – Rybelsus 7mg
КОМПМАСТЕР https://комп-мастер.рф качественный ремонт компьютеров, ноутбуков, телевизоров, принтеров, телефонов и кофемашин в Воркуте. Более 14 лет опыта!
http://semaglutidepharm.com/# rybelsus generic
minocycline 50mg pills: Ivermectin Pharm – ivermectin 4
https://paxlovid.ink/# Paxlovid.ink
Ivermectin Pharm Store: Ivermectin Pharm – Ivermectin Pharm
neurontin cost in singapore: canada neurontin 100mg lowest price – where can i buy neurontin from canada
Just wanna remark on few general things, The website style and design is perfect, the content is rattling excellent. “Taxation WITH representation ain’t so hot either.” by Gerald Barzan.
rybelsus generic: Semaglutide pharmacy price – Semaglutide pharmacy price
Abrone.jobs https://abrone.jobs is the gateway to careers at Abrone, a leader in AI, data, and analytics. Join a dynamic team driving innovation with cutting-edge tech. Enjoy remote work, competitive benefits, and career growth. If you’re passionate about AI or analytics, Abrone is where you’ll thrive!
Buy semaglutide pills: cheap Rybelsus 14 mg – Semaglutide pharmacy price
https://amoxilpharm.store/# where to buy amoxicillin pharmacy
https://amoxilpharm.store/# amoxicillin 500 mg tablets
cheap Rybelsus 14 mg: rybelsus cost – rybelsus price
Cryptocurrency trading https://bnx.me is easy and safe with BNX.me. Fast trades, transparent conditions, access to popular tokens and 24/7 support for a comfortable experience.
Исследование рынков https://issledovaniya-rynkov.ru аналитика и исследования в сфере услуг. Детальные обзоры, прогнозы, конкурентный анализ и ключевые данные для бизнеса. Актуальная информация для роста.
Gabapentin Pharm: neurontin 30 mg – neurontin cost
Заказать курсовую работу https://kursovaya-rabota-na-zakaz.ru у нас — это гарантированное качество, соответствие всем требованиям преподавателя и экономия вашего времени. Мы профессионально подходим к написанию курсовых, учитывая все пожелания и специфику вашего задания.
Cryptocurrency trading https://bnx.me is easy and safe with BNX.me. Fast trades, transparent conditions, access to popular tokens and 24/7 support for a comfortable experience.
Исследование рынков https://issledovaniya-rynkov.ru аналитика и исследования в сфере услуг. Детальные обзоры, прогнозы, конкурентный анализ и ключевые данные для бизнеса. Актуальная информация для роста.
Современная офтальмологическая https://glaznaya-klinika-samara.ru клиника в Самаре диагностика, лечение заболеваний глаз, коррекция зрения и лазерные операции.
Подписка СберПрайм https://promoconcert.ru за 1 рубль: доступ к онлайн-кинотеатрам, музыке, скидкам на покупки и сервисам доставки. Экономьте и получайте больше возможностей.
what is minocycline prescribed for Ivermectin Pharm minocycline 100mg over the counter
Gabapentin Pharm: Gabapentin Pharm – Gabapentin Pharm
https://ivermectinpharm.store/# cost of ivermectin pill
сайт зума казино зеркало зума казино
amoxicillin online purchase Amoxil Pharm Store amoxicillin 500mg prescription
Gabapentin Pharm: generic neurontin pill – Gabapentin Pharm
https://gabapentinpharm.com/# Gabapentin Pharm
neurontin 600 mg coupon: 800mg neurontin – Gabapentin Pharm
Ivermectin Pharm Store: Ivermectin Pharm Store – Ivermectin Pharm Store
Временная регистрация в СПб: Быстро и Легально!
Ищете, где оформить временную регистрацию в Санкт-Петербурге?
Мы гарантируем быстрое и легальное оформление без очередей и лишних документов.
Ваше спокойствие – наша забота!
Минимум усилий • Максимум удобства • Полная легальность
Свяжитесь с нами прямо сейчас!
Временная регистрация
undressai deepnude app
Programme BNX is your reliable partner looking for cryptocurrency trading. Huge liquidity, immediate trades and advanced analytics tools.
Gabapentin Pharm: neurontin 800 mg pill – medicine neurontin 300 mg
Platform BNX is your reliable partner for cryptocurrency trading. High liquidity, instant trades and advanced analytics tools.
Gabapentin Pharm: Gabapentin Pharm – neurontin cap
вывод из запоя в нижнем новгороде вывод из запоя в нижнем новгороде .
https://gabapentinpharm.com/# Gabapentin Pharm
Предлагаем услуги профессиональных инженеров офицальной мастерской.
Еслли вы искали срочный ремонт телевизоров xiaomi, можете посмотреть на сайте: ремонт телевизоров xiaomi в москве
Наши мастера оперативно устранят неисправности вашего устройства в сервисе или с выездом на дом!
https://semaglutidepharm.com/# semaglutide
Временная регистрация в Санкт-Петербурге: Быстро и Легально!
Ищете, где оформить временную регистрацию в СПб?
Мы гарантируем быстрое и легальное оформление без очередей и лишних документов.
Ваше спокойствие – наша забота!
Минимум усилий • Максимум удобства • Полная легальность
Свяжитесь с нами прямо сейчас!
Временная регистрация в СПб
ivermectin iv: Ivermectin Pharm – Ivermectin Pharm
Ivermectin Pharm: ivermectin 8 mg – Ivermectin Pharm
AmoxilPharm: Amoxil Pharm Store – Amoxil Pharm Store
paxlovid price: Paxlovid.ink – paxlovid generic
исследование рынка кухонной мебели в россии исследование рынка топливной древесины в россии
исследование рынка селена в россии исследование рынка вертолетов в россии
https://gabapentinpharm.com/# purchase neurontin
исследование рынка пластикатов в россии исследование рынка баранины в россии
http://semaglutidepharm.com/# semaglutide pharm
paxlovid pill: Paxlovid buy online – paxlovid india
Временная регистрация в Санкт-Петербурге: Быстро и Легально!
Ищете, где оформить временную регистрацию в СПБ?
Мы гарантируем быстрое и легальное оформление без очередей и лишних документов.
Ваше спокойствие – наша забота!
Минимум усилий • Максимум удобства • Полная легальность
Свяжитесь с нами прямо сейчас!
Временная регистрация в СПБ
сколько стоит 1 грамм мефедрона купить цена у официального дилера
Актуальные материалы по юриспруденции https://lawdelov.ru законы, практические рекомендации, разбор сложных ситуаций.
Ваш проводник в мире права https://legallurist.ru актуальные статьи, комментарии юристов, новости законодательства и ответы на важные вопросы
Ваш гид https://pravovoeob.ru в мире правовых норм: обязанности граждан, защита прав, полезные рекомендации и новости законодательства.
paxlovid generic: Paxlovid.ink – paxlovid generic
Gabapentin Pharm: Gabapentin Pharm – Gabapentin Pharm
Сайт о налогах https://nalogido.ru изменения в законах, советы по декларированию и минимизации налоговых рисков.
PicusBlog https://picusblog.com a blog with an American flavor. We cover news, celebrities, food, sports, nature, travel, animals, relationships and many other things that interest Americans (and not only) every day! PicusBlog – Your Daily Dose of Insights, Intrigue, and Inspiration!
Практический журнал https://uristvzakon.ru для юриста: аналитика, советы, готовые решения. Помощь в работе над делами любой сложности.
Журнал для юристов https://zakonwin.ru практические советы, правовая аналитика, актуальная судебная практика и готовые инструменты.
Gabapentin Pharm: neurontin 300 mg – neurontin 300 mg coupon
http://paxlovid.ink/# Paxlovid.ink
paxlovid covid: Paxlovid.ink – paxlovid india
Профессиональные сантехнические услуги https://moskva-santehnicheskie-raboty.ru установка, ремонт и замена сантехники, устранение протечек, прочистка труб. Работаем быстро, качественно и с гарантией. Оперативный выезд и доступные цены. Ваш комфорт – наша забота!
Качественные услуги сантехника https://santehnik-na-dom-moscow.ru от мелкого ремонта до сложных систем. Замена труб, установка сантехники, устранение аварий. Работаем аккуратно, быстро и с гарантией. Звоните, и мы решим вашу проблему!
Права граждан РФ https://pravoup.ru доступные объяснения законодательства, практическая помощь и актуальные новости.
Консультации врачей онлайн https://onlinvrach.ru диагностика, анализы, контроль лечения. Все для вашего здоровья, не выходя из дома.
продажа деревянных блок-контейнеров аренда вышки-туры
Semaglutide pharmacy price rybelsus Buy semaglutide pills
Все о ваших правах https://agkonsult.ru это портал, где вы найдете полную информацию о ваших гражданских, трудовых, семейных и других правах
Консультация юриста https://konsultantok.ru ваш помощник в решении юридических вопросов. Услуги профессиональных юристов, онлайн-консультации, полезные статьи.
Портал о ваших правах https://pravovoeobesp.ru это база знаний о законах, правах и обязанностях. Сайт создан для тех, кто хочет защищать свои интересы, получать ответы на юридические вопросы.
semaglutide pharm: Semaglutide pharmacy price – rybelsus
Юридическая помощь автолюбителям https://avtopravodo.ru ваш надежный источник информации о правах водителей. Разбор ДТП, штрафы, страховые споры, возврат прав – все, что нужно для защиты ваших интересов.
Статьи для вас и вашего бизнеса https://businessfaq.ru подборка актуальных материалов для предпринимателей. Советы по управлению, развитию, финансам и маркетингу, чтобы ваш бизнес процветал.
Бизнес статьи https://consultantdo.ru платформа для предпринимателей. Полезные материалы, аналитика и советы экспертов для успешного управления бизнесом, развития и повышения прибыли.
Права и обязанности граждан https://juristywin.ru это ресурс для тех, кто хочет знать свои права, соблюдать законы и уверенно решать правовые вопросы.
Paxlovid.ink: Paxlovid.ink – buy paxlovid online
ivermectin 1 cream 45gm Ivermectin Pharm minocycline coupon
https://gabapentinpharm.com/# Gabapentin Pharm
order minocycline 50 mg online: Ivermectin Pharm – stromectol 3mg tablets
http://gabapentinpharm.com/# Gabapentin Pharm
выведение из запоя в стационаре выведение из запоя в стационаре .
https://azithromycinus.com/# buy zithromax online cheap
lisinopril in india: cost for 20 mg lisinopril – lisinopril 500 mg
http://azithromycinus.com/# zithromax purchase online
lisinopril price in india: zestoretic generic – cost of generic lisinopril 10 mg
Покупка диплома о среднем полном образовании: как избежать мошенничества?
cytotec online buy misoprostol over the counter buy cytotec over the counter
Cytotec 200mcg price buy misoprostol over the counter buy cytotec pills
10mg generic 10mg lisinopril: lisinopril 10 mg for sale without prescription – lisinopril 40 mg tablets
ciprofloxacin order online: cipro online no prescription in the usa – ciprofloxacin generic price
цифровой светодиодный экран светодиодный экран для сцены купить цена
Портал права и обязанности https://legallup.ru граждан помогает разбираться в законах, правах и обязанностях. Полезные статьи и инструкции для защиты своих интересов.
Права и обязанности граждан https://llawdo.ru источник знаний о ваших правах и обязанностях. Простая навигация и практическая информация для решения юридических вопросов.
Моё право https://moepravodo.ru ваш гид по законодательству. Простые объяснения, полезные рекомендации и образцы документов для реализации и защиты ваших прав.
купить светодиодный лед экран светодиодные led экраны цена
Правовой ресурс https://pravoto.ru для тех, кто хочет знать свои права, защищать их и понимать законы. Актуальные статьи, инструкции и практическая информация для каждого.
Портал вся информация о законах https://zakonlw.ru предлагает разъяснения актуальных норм, советы экспертов и примеры решений юридических вопросов для граждан и бизнеса.
buy cipro cheap: buy generic ciprofloxacin – buy cipro cheap
https://ciprofloxacin.cheap/# ciprofloxacin mail online
vavada бездепозитный бонус предоставляет уникальную возможность погрузиться в мир азартных игр. здесь вы сможете зарегистрироваться на официальном сайте vavada. получите доступ к бонусам через личный кабинет.
зарегистрироваться vavada предоставляет уникальную возможность погрузиться в мир азартных игр. здесь вы сможете зарегистрироваться на официальном сайте vavada. получите доступ к специальным предложениям через мобильное приложение.
вавада телеграм предоставляет уникальную возможность погрузиться в мир азартных игр. здесь вы сможете войти в систему на надёжной платформе vavada. получите доступ к играм через личный кабинет.
Играйте на https://1wins.pics современные слоты, настольные игры и щедрые бонусы. Удобная платформа и круглосуточная поддержка.
https://cytotec.top/# cytotec pills buy online
where can you buy zithromax: buy zithromax without prescription online – purchase zithromax online
наркотик мефедрон цена детское гей порно купить
купить мефедрон красноярск купить амфетамин россия
трахнул шлюху купить метадон амфетамин мефедрон героин
купить мефедрон днр меф бошки альфа купить
zithromax for sale 500 mg zithromax 500 without prescription buy zithromax online with mastercard
ciprofloxacin buy cipro without rx buy cipro cheap
где купить насвай в омске цп инцест детское порно
где можно купить меф меф купить спб
Юридический портал https://zashitapravi.ru ваш помощник в правовых вопросах. Законы, практические рекомендации и консультации от профессионалов.
can i purchase cheap clomid no prescription: get generic clomid without prescription – can you get generic clomid prices
Портал права граждан России https://pravoyes.ru предлагает доступные разъяснения законов, советы по защите прав и юридическую информацию для каждого.
Портал Юриста https://voproslaw.ru удобный сервис для получения юридической помощи, разъяснений законодательства и защиты ваших интересов.
Портал строительства https://mbmedicall.com ресурс для поиска информации о ремонте и строительстве. Полезные советы, технологии, инструкции и рекомендации для профессионалов и новичков.
Онлайн консультант https://konsultantdo.ru в юридических вопросах сервис для быстрого получения правовой помощи. Экспертные советы, разъяснения законов и поддержка в любое время.
What i do not understood is in fact how you’re now not really much more well-appreciated than you might be right now. You are so intelligent. You recognize therefore significantly when it comes to this topic, made me in my opinion imagine it from so many various angles. Its like women and men are not involved except it is one thing to do with Girl gaga! Your own stuffs excellent. Always take care of it up!
lisinopril buy without prescription: zestoretic 20-25 mg – where to buy lisinopril without prescription
https://ciprofloxacin.cheap/# antibiotics cipro
Помощь в юридических вопросах https://legalyes.ru это оперативные ответы, практические рекомендации и поддержка в сложных юридических ситуациях.
Сервис помощи в юридических https://tvokonsultant.ru вопросах предлагает доступ к экспертам, актуальной информации о законах и удобные решения для правовых задач.
Полный гид по вашим правам https://skpravoyes.ru законы, рекомендации и практические советы в одном месте. Получите ответы на вопросы и разберитесь в юридических тонкостях с нашей помощью.
http://azithromycinus.com/# zithromax tablets for sale
выведение из запоя на дому круглосуточно выведение из запоя на дому круглосуточно .
капельница от запоя на дому нижний новгород капельница от запоя на дому нижний новгород .
капельницы на дому от запоя капельницы на дому от запоя .
where to buy cipro online: buy cipro online without prescription – buy cipro online
buy lisinopril mexico lisinopril 25 lisinopril pill
zithromax capsules price zithromax 500mg price in india zithromax 500mg
cipro 500mg best prices: ciprofloxacin generic – п»їcipro generic
Временная регистрация в Санкт-Петербурге: Быстро и Легально!
Ищете, где оформить временную регистрацию в СПб?
Мы гарантируем быстрое и легальное оформление без очередей и лишних документов.
Ваше спокойствие – наша забота!
Минимум усилий • Максимум удобства • Полная легальность
Свяжитесь с нами прямо сейчас!
Временная регистрация в СПб
https://cytotec.top/# Misoprostol 200 mg buy online
http://azithromycinus.com/# buy generic zithromax no prescription
Property dealer in garhi harsaru can be your key to unlocking the perfect real estate opportunity. Deal Properties is a trusted agency that offers exceptional service, ensuring clients get the best deals in the area. With a deep understanding of the local market, their team is committed to guiding you through the buying, selling, or renting process. Deal Properties’ expertise ensures that all your real estate needs are met with professionalism and care. Whether you’re looking for a home or an investment, Deal Properties makes the journey smooth and successful.
lisinopril 80: lisinopril 420 1g – can i buy lisinopril over the counter in mexico
Полезные советы от доктора https://doktoronla.ru здоровье, профилактика, лечение и поддержка. Актуальная информация для всех, кто заботится о своем организме.
Узнайте всё о беременности https://beremennydo.ru от первых признаков до подготовки к родам. Практические советы, развитие малыша по неделям и ответы на главные вопросы будущих мам.
Информация для родителей https://forbabydo.ru от планирования беременности до воспитания ребёнка. Рекомендации экспертов, советы по уходу и развитию малышей.
buy lisinopril online uk: lisinopril price comparison – ordering lisinopril without a prescription
zithromax 250 mg pill: zithromax generic cost – where to get zithromax
buy cytotec pills online cheap: buy cytotec pills – buy cytotec over the counter
Гинекология в деталях https://ginecologdo.ru ответы на важные вопросы о женском здоровье, рекомендации по уходу, профилактике и лечению.
Лечение без лишних сложностей https://medikasv.ru актуальные рекомендации, проверенные способы и полезные материалы для заботы о здоровье.
Портал о гинекологии для женщин https://ginekologdo.ru полезная информация о здоровье, советы врачей, современные методы лечения и профилактики.
https://lisinoprilus.com/# lisinopril tablets uk
https://cytotec.top/# buy cytotec online
Портал о здоровье https://zdorovvonline.ru как сохранить активность, укрепить иммунитет, справляться с болезнями и вести здоровый образ жизни.
Портал о простуде https://prostudailor.ru и ЛОР-заболеваниях: причины, диагностика и современные способы лечения. Берегите здоровье с проверенной информацией.
Все аспекты здоровья https://sfmggu.ru от ухода за телом до профилактики болезней. Достоверная информация и советы для улучшения качества жизни.
zithromax prescription online where can you buy zithromax zithromax online
cytotec buy online usa п»їcytotec pills online buy cytotec
Ремонт своими руками https://nhadian123.com простые идеи, эффективные техники и доступные материалы. Сделайте свой дом уютным легко и самостоятельно.
Сделай ремонт сам https://skovarro.com практичные идеи, инструкции для каждого этапа и рекомендации, чтобы сэкономить время и деньги.
Неотразимый стиль современных тактичных штанов, как сочетать их с другой одеждой.
Неотъемлемая часть гардероба – тактичные штаны, которые подчеркнут ваш стиль и индивидуальность.
Как найти идеальные тактичные штаны, который подчеркнет вашу уверенность и статус.
Сочетание стиля и практичности в тактичных штанах, которые подчеркнут вашу спортивную натуру.
Тактичные штаны: какой фасон выбрать?, чтобы подчеркнуть свою уникальность и индивидуальность.
Тактичные штаны: вечная классика мужского гардероба, которые подчеркнут ваш вкус и качество вашей одежды.
Сочетание стиля и практичности в тактичных штанах, которые подчеркнут ваш профессионализм и серьезность.
купити тактичні штани з наколінниками купити тактичні штани з наколінниками .
Полезные советы для женщин https://skystream.org здоровье, семья, карьера, красота и уход. Информация, которая помогает оставаться уверенной в любой ситуации.
zithromax without prescription: cheap zithromax pills – zithromax 250mg
Практичные решения для ремонта https://ustbib.ru своими руками: подробные планы, советы по выбору материалов и секреты успешного результата.
Ремонт шаг за шагом https://belbriz.ru полезные лайфхаки, доступные материалы и решения для самостоятельного преображения любого помещения.
Портал о ремонте https://soda102.ru своими руками: как выполнить отделку, заменить сантехнику или обновить интерьер быстро и без помощи мастеров.
cost generic clomid for sale: buy generic clomid no prescription – order clomid
For most recent information you have to visit world-wide-web and on world-wide-web I found this web site as a finest web site for most up-to-date updates.
Brand Technology
Собственное производство металлоконструкций. Если вас интересует навес веранда мы предлогаем изготовление под ключ навесы для машин на дачу
https://ciprofloxacin.cheap/# buy generic ciprofloxacin
врач на дом капельница от запоя врач на дом капельница от запоя .
http://azithromycinus.com/# zithromax capsules australia
buy cipro online usa ciprofloxacin over the counter buy cipro
п»їcipro generic buy cipro without rx buy cipro online without prescription
Misoprostol 200 mg buy online: buy cytotec pills online cheap – buy cytotec pills
Ремонт дома без мастеров https://hottspb.ru лёгкие и понятные решения для каждого этапа ремонта. Советы по выбору инструментов и материалов.
Подробные инструкции по ремонту https://mbmedicall.com своими руками: ремонт стен, полов, потолков и мебели. Полезные рекомендации для успешного результата.
загрузить приложения казино https://bastafashion.com/onlajn-kazino-s-minimalnym-depozitom-10-grn-6/
vavada играть бесплатно — это быстрый способ начать игру на vavada. создайте аккаунт за пару минут и наслаждайтесь игрой на официальном сайте. бонусы, акции, удобный интерфейс — всё это доступно прямо сейчас, в том числе на мобильных устройствах.
buy lisinopril 10 mg tablet: zestoretic 20 12.5 mg – lisinopril 2.5 mg cost
сколько стоит капельница на дому от запоя сколько стоит капельница на дому от запоя .
сделать капельницу на дому от алкоголя сделать капельницу на дому от алкоголя .
https://ciprofloxacin.cheap/# where to buy cipro online
Отказное, или информационное письмо https://pikabu.ru/story/otkaznoe_pismo_dlya_marketpleysov_chto_yeto_za_dokument_i_dlya_chego_nuzhen_12093993 неофициальный документ, который оформляется в добровольном порядке. Он доказывает, что продукция производителя безопасна для потребителя, животных и экологии, но при этом сертификация качества не требуется. Отказные письма нужны для сотрудничества с маркетплейсами и для таможенного оформления импортных товаров. При реализации продукции на Wildberries, OZON или Яндекс.Маркете предприниматели должны предоставить сертификат или декларацию соответствия. Об этом говорит статья 456 ГК РФ. В ней указано, что продавец обязан совместно с передачей товара передать покупателю документы качества, если это позволяет договор купли-продажи.
Сертификат о соответствии https://pikabu.ru/story/dlya_chego_nuzhen_sertifikat_gost_r_iso_9001_pri_uchastii_v_tenderakh_12093517 системы менеджмента качества требованиям стандарта ГОСТ Р ИСО 9001 является официальным документом, удостоверяющим, что система менеджмента качества создана согласно установленным требованиям. Для получения документа о соответствии СМК, необходимо подтвердить, что проведены разработка и внедрение системы, она результативна, эффективно функционирует и постоянно совершенствуется.
cost of clomid without insurance: can i buy cheap clomid for sale – can you buy generic clomid
http://cytotec.top/# п»їcytotec pills online
lisinopril 5 mg medicine lisinopril 10mg tablet lisinopril cheap brand
вавада бесплатно предоставляет уникальную возможность погрузиться в мир азартных игр. здесь вы сможете войти в систему на надёжной платформе vavada. получите доступ к играм через удобный интерфейс.
Служба по контракту https://делохрабрых.рф в зоне СВО: стабильный доход, социальные гарантии, профессиональный рост и защита интересов Родины.
lisinopril medication otc: generic lisinopril 5 mg – lisinopril uk
Your Bitcoin Mixing Solution Bitcoin Mixer is here to help you keep your bitcoin transactions anonymous and private. Trusted, No Logs, Fast and Secure!
хотите окунуться в азартные игры? vavada вход зеркало позволяет зарегистрироваться в казино vavada. попробуйте мобильную версию для удобного доступа. оцените широкие возможности: от бонусов до рейтинговых игр.
Reliable HVAC Repair Services https://serviceorangecounty.com stay comfortable year-round with our professional HVAC repair services. Our experienced team is dedicated to diagnosing and resolving heating, cooling, and ventilation issues quickly and effectively.
вавада казино предоставляет уникальную возможность погрузиться в мир азартных игр. здесь вы сможете войти в систему на надёжной платформе vavada. получите доступ к специальным предложениям через личный кабинет.
Архитектура кибербезопасности Bs2Best at актуальные ссылки b2best.at 2024 создание комплексных решений для защиты данных, предотвращения атак и обеспечения стабильности IT-инфраструктуры.
iPhone 14 Pro Max vs iPhone 15 Pro Max https://gost-snip.su/blog/iphone-14-pro-max-vs-iphone-15-pro-max-stoit-li-obnovlyatsya/ отличие в дизайне, мощности процессора, камерах и автономности.
Обучение в Школа Майя инновационные программы, профессиональные педагоги и комфортная среда для развития.
Круглосуточный эвакуатор https://angeldorog.by выгодные условия, профессионализм и минимальное время ожидания. Спасём вас из любой ситуации!
prices for lisinopril: otc lisinopril – discount zestril
order zithromax over the counter: zithromax for sale usa – zithromax over the counter
Тут можно преобрести взломостойкие сейфы цена купить взломостойкие сейфы
Услуги гинеколога в Варшаве https://forumszkolne.pl/profiles/viretibaq-u232667.html регулярные осмотры, планирование беременности, лечение заболеваний. Забота о здоровье каждой женщины.
https://azithromycinus.com/# zithromax for sale us
http://clomid.store/# can i buy cheap clomid without prescription
микрозайм без отказов мгновенно https://zajmy-online1.ru
Добро пожаловать на https://b2best.at мы предлагаем широкий спектр услуг для всех предприятий: b2best.at от стратегического консалтинга до цифрового маркетинга. Наша команда профессионалов поможет вам оптимизировать процессы и увеличить прибыль. Начните свой путь к успеху с нами!
lisinopril 5 mg pill: zestril – lisinopril 2.15 mg
Ищете партнера для роста бизнеса? https://bs2best-best.store предлагает решения для предприятий любого уровня: консалтинг, цифровой маркетинг и оптимизация процессов – всё для увеличения прибыли. Начните сотрудничество с нами уже сегодня!
Надежный партнер для вашего бизнеса https://bs2best-best.ru Мы предоставляем полный спектр услуг: b2best.at. От консалтинга до маркетинговых стратегий – наша команда сделает всё для вашего успеха. Доверьтесь профессионалам и двигайтесь к прибыли с нами!
cytotec pills buy online order cytotec online Cytotec 200mcg price
Светодиодные экраны для залов https://svetodiodnyy-ekran.ru решения для ярких презентаций и эффектных мероприятий. Высокое качество изображения, индивидуальные размеры и современные технологии.
Лучшая образовательная Школа Майя обучение, которое работает. Современные методики, опытные преподаватели, удобный график. Мы предлагаем курсы для начинающих и профессионалов.
Reliable HVAC Repair Services https://serviceorangecounty.com stay comfortable year-round with our professional HVAC repair services. Our experienced team is dedicated to diagnosing and resolving heating, cooling, and ventilation issues quickly and effectively.
buy cytotec in usa buy cytotec in usa cytotec online
cryptocurrency exchange service https://swap.cloud/news/ based in Luxembourg. It offers fully automated instant exchanges between cryptocurrencies with no KYC requirements, ensuring speed and privacy. The platform is designed for users looking for smooth, secure and hassle-free transactions.
buy cipro online canada: where to buy cipro online – ciprofloxacin 500mg buy online
Reliable HVAC Repair Services https://serviceorangecounty.com stay comfortable year-round with our professional HVAC repair services. Our experienced team is dedicated to diagnosing and resolving heating, cooling, and ventilation issues quickly and effectively.
No matter if you’re someone learning tech or a tech enthusiast, Pilasa Tech offers something valuable. Dive into their engaging articles today!
Reliable HVAC Repair Services https://serviceorangecounty.com stay comfortable year-round with our professional HVAC repair services. Our experienced team is dedicated to diagnosing and resolving heating, cooling, and ventilation issues quickly and effectively.
where buy generic clomid: can i purchase clomid – clomid cost
https://azithromycinus.com/# zithromax cost uk
buy cytotec over the counter: Misoprostol 200 mg buy online – buy cytotec over the counter
Reliable HVAC Repair Services https://serviceorangecounty.com stay comfortable year-round with our professional HVAC repair services. Our experienced team is dedicated to diagnosing and resolving heating, cooling, and ventilation issues quickly and effectively.
https://azithromycinus.com/# zithromax over the counter canada
can i buy zithromax over the counter: where can i buy zithromax capsules – zithromax 250 mg australia
Reliable HVAC Repair Services https://serviceorangecounty.com stay comfortable year-round with our professional HVAC repair services. Our experienced team is dedicated to diagnosing and resolving heating, cooling, and ventilation issues quickly and effectively.
ciprofloxacin over the counter: ciprofloxacin over the counter – buy cipro no rx
Reliable HVAC Repair Services https://serviceorangecounty.com stay comfortable year-round with our professional HVAC repair services. Our experienced team is dedicated to diagnosing and resolving heating, cooling, and ventilation issues quickly and effectively.
Reliable HVAC Repair Services https://serviceorangecounty.com stay comfortable year-round with our professional HVAC repair services. Our experienced team is dedicated to diagnosing and resolving heating, cooling, and ventilation issues quickly and effectively.
buy cipro no rx buy ciprofloxacin where to buy cipro online
ciprofloxacin generic price buy cipro cheap ciprofloxacin order online
АО Ти И Эл Лизинг https://avtee.ru/avto_v_arendy_turcia_podpiska/ предлагает услуги проката автомобилей в России, Турции, ОАЭ, Черногории, Испании и других странах по всему миру. Широкий выбор авто, выгодные условия и удобное бронирование делают поездки комфортными и доступными для каждого клиента.
РПНУ Лизинг https://rpnu-leasing.ru/novosti/operacionnii-lizing-chto-eto-otlichie-ot-finansovogo-lizinga надежный партнер в лизинге автомобилей, спецтехники и оборудования. Гарантируем отсутствие отказов благодаря индивидуальному подходу к каждому клиенту. Удобные условия и быстрое оформление помогают получить нужное имущество без лишних сложностей.
ООО Спецтехгрупп https://stgauto.ru предоставляет аренду автомобилей в Сочи, Адлере, Калининграде и Краснодаре. Полностью онлайн оформление позволяет быстро забронировать авто без лишних визитов. Удобный сервис и широкий выбор машин для любых задач — от отдыха до работы.
Диплом вуза купить официально с упрощенным обучением в Москве
zestoretic 20: lisinopril generic price – buy lisinopril without prescription
Reliable HVAC Repair Services https://serviceorangecounty.com stay comfortable year-round with our professional HVAC repair services. Our experienced team is dedicated to diagnosing and resolving heating, cooling, and ventilation issues quickly and effectively.
https://ciprofloxacin.cheap/# ciprofloxacin generic
Reliable HVAC Repair Services https://serviceorangecounty.com stay comfortable year-round with our professional HVAC repair services. Our experienced team is dedicated to diagnosing and resolving heating, cooling, and ventilation issues quickly and effectively.
can i get generic clomid: can you get cheap clomid no prescription – cost of cheap clomid tablets
Reliable HVAC Repair Services https://serviceorangecounty.com stay comfortable year-round with our professional HVAC repair services. Our experienced team is dedicated to diagnosing and resolving heating, cooling, and ventilation issues quickly and effectively.
http://clomid.store/# can you buy clomid without a prescription
Спасибо за такую точку зрения.
beburishvili-afisha.ru
Reliable HVAC Repair Services https://serviceorangecounty.com stay comfortable year-round with our professional HVAC repair services. Our experienced team is dedicated to diagnosing and resolving heating, cooling, and ventilation issues quickly and effectively.
generic zithromax over the counter: zithromax 500 without prescription – where to get zithromax
rx clomid: can i purchase cheap clomid – can i order clomid
МТЮ Лизинг https://depo.rent предоставляет аренду автомобилей в Крыму, включая Симферополь. Удобный онлайн-сервис позволяет оформить аренду на сайте за несколько минут. Широкий выбор автомобилей и выгодные условия делают поездки по региону комфортными и доступными.
Новостройки Казани https://kupitkvartiruzhkkvartirenka.ru покупка квартир от застройщика без переплат. Современные жилые комплексы с развитой инфраструктурой.
Квартиры в новых домах Казани https://kvartirazhkkvartirenka.ru yадёжный застройщик, честные цены и широкий выбор планировок.
buy cipro online without prescription cipro buy cipro online usa
benicar lisinopril: lisinopril 12.5 mg tablets – lisinopril generic price comparison
открытие замков двери служба вскрытия замков и дверей
lisinopril 2.5 mg for sale lisinopril 15 mg tablets zestril 2.5
Reliable HVAC Repair Services https://serviceorangecounty.com stay comfortable year-round with our professional HVAC repair services. Our experienced team is dedicated to diagnosing and resolving heating, cooling, and ventilation issues quickly and effectively.
https://lisinoprilus.com/# lisinopril tabs
buy cipro online canada: ciprofloxacin 500 mg tablet price – buy cipro cheap
I’m still learning from you, while I’m improving myself. I definitely liked reading all that is written on your blog.Keep the posts coming. I liked it!
Служба по контракту https://contract.moscow в Москве: достойное обеспечение, обучение и развитие. Станьте частью сильной команды профессионалов!
Квартиры от застройщика https://kupitkvartiruland.ru в новых домах Казани. Честные цены, гибкие условия покупки и качество, которому можно доверять.
https://ciprofloxacin.cheap/# where to buy cipro online
can you get clomid tablets: where to get clomid without dr prescription – how to buy generic clomid online
Great site. A lot of helpful information here. I’m sending it to several buddies ans also sharing in delicious. And of course, thanks for your effort!
zithromax 600 mg tablets: buy zithromax 500mg online – average cost of generic zithromax
вывод из запоя в стационаре вывод из запоя в стационаре .
вывод из запоя стационар вывод из запоя стационар .
Cytotec 200mcg price: Misoprostol 200 mg buy online – buy cytotec online
Продажа квартир https://kvartirukupitstore.ru в новостройках Казани от застройщика: удобные планировки, современные жилые комплексы и прозрачные условия сделки.
ciprofloxacin mail online buy cipro online without prescription ciprofloxacin 500mg buy online
Reliable HVAC Repair Services https://serviceorangecounty.com stay comfortable year-round with our professional HVAC repair services. Our experienced team is dedicated to diagnosing and resolving heating, cooling, and ventilation issues quickly and effectively.
lisinopril 2 mg lisinopril 12.5 mg tablets cost of lisinopril 40mg
cipro online no prescription in the usa: buy cipro without rx – cipro 500mg best prices
Reliable HVAC Repair Services https://serviceorangecounty.com stay comfortable year-round with our professional HVAC repair services. Our experienced team is dedicated to diagnosing and resolving heating, cooling, and ventilation issues quickly and effectively.
Предлагаем услуги профессиональных инженеров офицальной мастерской.
Еслли вы искали ремонт телевизоров samsung в москве, можете посмотреть на сайте: ремонт телевизоров samsung сервис
Наши мастера оперативно устранят неисправности вашего устройства в сервисе или с выездом на дом!
https://ciprofloxacin.cheap/# ciprofloxacin 500 mg tablet price
http://lisinoprilus.com/# prinivil 25mg
cytotec online: order cytotec online – buy cytotec in usa
Reliable HVAC Repair Services https://serviceorangecounty.com stay comfortable year-round with our professional HVAC repair services. Our experienced team is dedicated to diagnosing and resolving heating, cooling, and ventilation issues quickly and effectively.
zithromax generic price: zithromax cost uk – zithromax cost australia
buy prinivil: lisinopril 20mg tablets – lisinopril 5 mg tablet cost
buy cipro online usa buy generic ciprofloxacin buy cipro without rx
lisinopril 20 mg tabs zestril 20 mg price canadian pharmacy purchase lisinopril 10 mg
Landscape design https://buddhabuilders.com and improvement services: from design to implementation. Beauty, comfort and individual approach.
https://azithromycinus.com/# zithromax z-pak
https://lisinoprilus.com/# lisinopril medicine
buy cipro online canada: buy cipro online canada – ciprofloxacin 500mg buy online
zithromax prescription in canada: zithromax antibiotic – zithromax 250 mg tablet price
where to buy generic clomid without insurance cost cheap clomid now how to buy clomid without a prescription
purchase cytotec buy misoprostol over the counter purchase cytotec
вывод из запоя в стационаре вывод из запоя в стационаре .
лечения наркозависимости в стационаре лечения наркозависимости в стационаре .
https://clomid.store/# buy clomid tablets
http://clomid.store/# can you buy generic clomid
buy cytotec pills: order cytotec online – buy misoprostol over the counter
buy cheap zithromax online: buy zithromax 500mg online – zithromax 1000 mg online
https://kamagra.men/# cheap kamagra
https://drugs1st.pro/# ed solutions
https://cenforce.icu/# cenforce for sale
Установите 1xslots приложение для полного погружения в мир казино.
sildenafil oral jelly 100mg kamagra: buy kamagra online usa – Kamagra 100mg price
erectile dysfunction pills drugs1st website
промокод на продамус промокод на продамус .
ed treatment online cheap ed medication affordable ed medication
buy erectile dysfunction pills online: ed meds by mail – online erectile dysfunction pills
Военная служба по контракту https://contract.moscow гарантированная стабильность, льготы для семьи, обучение и перспективы карьерного роста.
rybelsus semaglutide tablets: buy semaglutide – semaglutide tablets store
https://drugs1st.pro/# pet antibiotics without vet prescription
semaglutide tablets for weight loss: buy semaglutide – semaglutide tablets for weight loss
Копирайтер и SMM-менеджер https://uslugi.yandex.ru/profile/ElenaB-1085854 написание текстов, контент-план и эффективное управление группами в ВК для развития бренда.
капельницы на дому от запоя капельницы на дому от запоя .
лечению наркозависимости в стационаре лечению наркозависимости в стационаре .
https://semaglutidetablets.store/# semaglutide tablets store
капельница от запоя стоимость капельница от запоя стоимость .
https://semaglutidetablets.store/# cheap semaglutide pills
http://kamagra.men/# buy kamagra online usa
Существуют определенные товары https://ru.pinterest.com/id1668586018/ и категории товаров, которые подлежат обязательной сертификации. Остальные могут пройти процедуру добровольно. Нет необходимости в оформлении документа.
buy semaglutide: buy rybelsus online – semaglutide tablets price
https://cenforce.icu/# Buy Cenforce 100mg Online
cheap kamagra: Kamagra 100mg price – Kamagra 100mg price
All logos, images and symbols https://logo-all.ru in one place: a large selection of designs, easy navigation and high-quality materials for your project.
Центр слухопротезирования https://ktoikak.com/sluh-i-ego-znachenie-diagnostika-i-lechenie/ диагностика слуха, подбор и настройка слуховых аппаратов. Современные технологии и профессиональный подход.
https://kamagra.men/# buy kamagra online usa
https://cenforce.icu/# order cenforce
Болезни почек https://pochkidp.ru виды заболеваний, симптомы, диагностика, лечение и профилактика. Лечение и диагностика нефрологических заболеваний.
erectile dysfunction pills for sale: cheapest ed medication – ed meds on line
http://semaglutidetablets.store/# buy rybelsus online
https://drugs1st.pro/# drugs1st
cenforce for sale: Cenforce 150 mg online – Purchase Cenforce Online
Kamagra Oral Jelly: Kamagra tablets – buy kamagra online usa
п»їkamagra: cheap kamagra – Kamagra tablets
https://semaglutidetablets.store/# rybelsus semaglutide tablets
Betflare ?????? Betflare ?????? .
капельница от запоя на дому капельница от запоя на дому .
капельницу коломна от запоя капельницу коломна от запоя .
какие капельницы от запоя какие капельницы от запоя .
Покупка диплома о среднем полном образовании: как избежать мошенничества?
low cost ed medication ed medication online buy ed pills online
https://semaglutidetablets.store/# semaglutide best price
https://cenforce.icu/# cenforce.icu
Делайте ставки с Mostbet UZ https://vashikrohi.ru широкая линия событий, выгодные акции и удобный интерфейс.
Выбирайте Mostbet UZ https://ikidz.ru спортивные ставки, азартные игры и киберспорт. Удобный сайт, лучшие коэффициенты и круглосуточная поддержка.
Скачать Mostbet UZ https://2021evro.ru удобно и быстро! Приложение для ставок на спорт и казино. Простая установка, моментальные выплаты и бонусы для пользователей.
https://cenforce.icu/# Buy Cenforce 100mg Online
http://edpills.men/# best online ed meds
cheap semaglutide pills semaglutide tablets generic rybelsus tabs
sildenafil oral jelly 100mg kamagra: Kamagra 100mg – п»їkamagra
Букмекерская контора Mostbet UZ https://belayaistoriya.ru ставки на спорт, киберспорт и казино. Высокие коэффициенты, быстрые выплаты и удобный интерфейс для каждого игрока.
Download Mostbet India https://india-club.com app for quick access to sports betting and casino games. Easy installation, user-friendly interface, and instant withdrawals.
Bet with Mostbet Bangladesh https://appbetbangladesh.com enjoy live games, sports events, and casino entertainment with fast transactions and 24/7 support.
order cenforce: buy cenforce – cenforce.icu
Kamagra Oral Jelly: п»їkamagra – Kamagra Oral Jelly
Предлагаем услуги профессиональных инженеров офицальной мастерской.
Еслли вы искали ремонт телевизоров hisense в москве, можете посмотреть на сайте: ремонт телевизоров hisense сервис
Наши мастера оперативно устранят неисправности вашего устройства в сервисе или с выездом на дом!
https://hostinglutshiy.ru/
https://kamagra.men/# buy Kamagra
buy Kamagra: super kamagra – sildenafil oral jelly 100mg kamagra
https://kamagra.men/# sildenafil oral jelly 100mg kamagra
https://edpills.men/# ed meds on line
Mostbet Azerbaijan https://azerichat.org your platform for sports betting, esports, and casino games. High odds, fast payouts, and generous bonuses.
Bet with Mostbet Uzbekistan https://uzbekmusic.com a wide selection of events, fast transactions, and exciting promotions.
Mostbet в Кыргызстане https://obukhov-sport.ru предлагает спортивные ставки, live-игры и казино. Удобная платформа, моментальные выплаты и круглосуточная поддержка.
http://semaglutidetablets.store/# semaglutide tablets store
buy kamagra online usa: Kamagra tablets – sildenafil oral jelly 100mg kamagra
Ремонт водонагревателей в Москве https://remont-vodonagrevatelej-moscow.ru быстрый и качественный сервис от опытных мастеров. Обслуживаем все марки и модели, устраняем поломки любой сложности. Выезд на дом, диагностика, замена деталей с гарантией. Надежное восстановление работы вашего оборудования!
Узнай, что предлагает 1xSlots https://bodegascrial.es/pags/?1xslots-descargar-android-ios.html
super kamagra: Kamagra Oral Jelly – sildenafil oral jelly 100mg kamagra
soap2day latest movies soap2day TV series online
http://cenforce.icu/# Cenforce 100mg tablets for sale
Open library of microcourses https://learn.rumie.org/jR short and effective training programs for quick acquisition of skills. Convenient access, relevant topics, materials for self-development.
Предлагаем услуги профессиональных инженеров офицальной мастерской.
Еслли вы искали ремонт телевизоров hisense, можете посмотреть на сайте: ремонт телевизоров hisense рядом
Наши мастера оперативно устранят неисправности вашего устройства в сервисе или с выездом на дом!
soap2day video stream soap2day for phone
АО Ти И Эл Лизинг https://avtee.ru предлагает услуги проката автомобилей в России, Турции, ОАЭ, Черногории, Испании и других странах по всему миру. Широкий выбор авто, выгодные условия и удобное бронирование делают поездки комфортными и доступными для каждого клиента.
The best on the web https://chestnut-alpaca-mz5lqc.mystrikingly.com/ games, videos and entertainment. Top new releases, popular videos and exciting content in one place. Everything for bright leisure and inspiration!
drugs1st: drugs1st – cvs prescription prices without insurance
https://semaglutidetablets.store/# buy rybelsus online
ООО Спецтехгрупп https://stgauto.ru предоставляет аренду автомобилей в Сочи, Адлере, Калининграде и Краснодаре. Полностью онлайн оформление позволяет быстро забронировать авто без лишних визитов. Удобный сервис и широкий выбор машин для любых задач — от отдыха до работы.
https://semaglutidetablets.store/# semaglutide tablets for weight loss
cheapest cenforce: Cenforce 150 mg online – buy cenforce
АО Ти И Эл Лизинг https://avtee.ru предлагает услуги проката автомобилей в России, Турции, ОАЭ, Черногории, Испании и других странах по всему миру. Широкий выбор авто, выгодные условия и удобное бронирование делают поездки комфортными и доступными для каждого клиента.
https://kamagra.men/# cheap kamagra
МТЮ Лизинг https://depo.rent предоставляет аренду автомобилей в Крыму, включая Симферополь. Удобный онлайн-сервис позволяет оформить аренду на сайте за несколько минут. Широкий выбор автомобилей и выгодные условия делают поездки по региону комфортными и доступными.
new ed drugs: erectile dysfunction treatment – drugs1st
АО Ти И Эл Лизинг https://avtee.ru предлагает услуги проката автомобилей в России, Турции, ОАЭ, Черногории, Испании и других странах по всему миру. Широкий выбор авто, выгодные условия и удобное бронирование делают поездки комфортными и доступными для каждого клиента.
soap2day free library soap2day detectives
soap2day user reviews soap2day premieres
https://slottr.top/# slot tr online
soap2day for PC https://soap2dayalt.com
tГјrkiye nin en iyi yasal bahis sitesi: bet gГјncel giriЕџ – tГјm casino siteleri
pinup 2025 pinup2025.com pinup 2025
https://casinositeleri2025.pro/# casino gГјvenilir siteler
en cok kazand?ran slot oyunlar? az parayla cok kazandiran slot oyunlar? slot siteleri
https://pinup2025.com/# пин ап вход
АО Ти И Эл Лизинг https://avtee.ru предлагает услуги проката автомобилей в России, Турции, ОАЭ, Черногории, Испании и других странах по всему миру. Широкий выбор авто, выгодные условия и удобное бронирование делают поездки комфортными и доступными для каждого клиента.
МТЮ Лизинг https://depo.rent предоставляет аренду автомобилей в Крыму, включая Симферополь. Удобный онлайн-сервис позволяет оформить аренду на сайте за несколько минут. Широкий выбор автомобилей и выгодные условия делают поездки по региону комфортными и доступными.
ООО Спецтехгрупп https://stgauto.ru предоставляет аренду автомобилей в Сочи, Адлере, Калининграде и Краснодаре. Полностью онлайн оформление позволяет быстро забронировать авто без лишних визитов. Удобный сервис и широкий выбор машин для любых задач — от отдыха до работы.
soap2day free library soap2day best collections
РПНУ Лизинг https://rpnu-leasing.ru надежный партнер в лизинге автомобилей, спецтехники и оборудования. Гарантируем отсутствие отказов благодаря индивидуальному подходу к каждому клиенту. Удобные условия и быстрое оформление помогают получить нужное имущество без лишних сложностей.
soap2day short films soap2day large selection
https://pinup2025.com/# пин ап казино официальный сайт
Swap.cloud https://swap.cloud is a licensed cryptocurrency exchange service based in Luxembourg. It offers fully automated, instant swaps between cryptocurrencies with no KYC requirements, ensuring speed and privacy. The platform is designed for users seeking seamless, secure, and hassle-free transactions.
МТЮ Лизинг https://depo.rent предоставляет аренду автомобилей в Крыму, включая Симферополь. Удобный онлайн-сервис позволяет оформить аренду на сайте за несколько минут. Широкий выбор автомобилей и выгодные условия делают поездки по региону комфортными и доступными.
Торты на заказ с доставкой https://protortiki.ru в Москве. Кондитерская «Магиссимо» предлагает заказать в Москве торты под заказ для различных мероприятий: свадеб, корпоративов, детских праздников и пр.
soap2day alternative soap2day streaming movies
АО Ти И Эл Лизинг https://avtee.ru предлагает услуги проката автомобилей в России, Турции, ОАЭ, Черногории, Испании и других странах по всему миру. Широкий выбор авто, выгодные условия и удобное бронирование делают поездки комфортными и доступными для каждого клиента.
slot tr online: slot oyunlar? – slot oyunlar?
ООО Спецтехгрупп https://stgauto.ru предоставляет аренду автомобилей в Сочи, Адлере, Калининграде и Краснодаре. Полностью онлайн оформление позволяет быстро забронировать авто без лишних визитов. Удобный сервис и широкий выбор машин для любых задач — от отдыха до работы.
РПНУ Лизинг https://rpnu-leasing.ru надежный партнер в лизинге автомобилей, спецтехники и оборудования. Гарантируем отсутствие отказов благодаря индивидуальному подходу к каждому клиенту. Удобные условия и быстрое оформление помогают получить нужное имущество без лишних сложностей.
soap2day backup address soap2day
ООО Спецтехгрупп https://stgauto.ru предоставляет аренду автомобилей в Сочи, Адлере, Калининграде и Краснодаре. Полностью онлайн оформление позволяет быстро забронировать авто без лишних визитов. Удобный сервис и широкий выбор машин для любых задач — от отдыха до работы.
soap2day free library soap2day new releases for the whole family
soap2day for movie fans soap2day cartoons
Любите играть на ходу? Установите 1xslots мобильное приложение.
soap2day how to improve access soap2day trends
soap2day mirror soap2day cartoons
casinox: en iyi deneme bonusu veren siteler – gercek para kazandД±ran casino oyunlarД±
soap2day updated soap2day music
en kazancl? slot oyunlar?: slot oyunlar? puf noktalar? – slot siteleri
soap2day retro movies soap2day fantasy
https://pinup2025.com/# пин ап казино зеркало
Смотреть фильмы онлайн https://smotri-fhdl.ru бесплатно в хорошем качестве в онлайн кинотеатре. Фильмы онлайн и новинки кино бесплатно. Смотрите сериалы, клипы, мультфильмы и фильмы онлайн бесплатно на вашем устройстве!
casimo: gГјvenilir kumar siteleri – gГјvenilir casino
пин ап казино пин ап пин ап
пинап казино пинап казино pinup2025.com
Промокод Пинко Казино Казино Пинко Отзывы
Откройте мир азарта с 1win O’zbekiston широкий ассортимент игр, бонусы на старте, прозрачные правила и надёжные выплаты делают наше онлайн-казино выбором тысяч игроков. Играйте и выигрывайте вместе с нами!
https://casinositeleri2025.pro/# bet gГјncel giriЕџ
http://pinup2025.com/# пин ап зеркало
Быстро оформите займы без отказа просто, быстро и удобно. Без очередей и лишних документов. Деньги поступят на карту в течение нескольких минут после одобрения заявки. Поддержка клиентов 24/7. Финансовая помощь всегда под рукой!
gГјvenilir bahis siteleri 2025: tГјrkiye bahis siteleri – en iyi kumar siteleri
https://pinup2025.com/# pinup 2025
зеркала официальных сайтов казино https://casinosha.ru
купить входную дверь купить входную дверь спб
http://pinup2025.com/# пин ап казино зеркало
hangi bahis siteleri bonus veriyor?: 2025 bahis siteleri deneme bonusu – gerГ§ek paralД± casino oyunlarД±
en kazancl? slot oyunlar? slot oyunlar? puf noktalar? slot tr online
двери межкомнатные купить скрытые двери под покраску
pinup2025.com: пин ап казино – пинап казино
срочная техпомощь на дороге https://tehpomosh-krasnodar.ru
пинап казино пин ап зеркало пин ап вход
накрутка вк бесплатно без заданий и быстро https://nakruti-vk.ru
slot oyunlar?: slot oyunlar? – slot siteleri
купить двери межкомнатные купить двери межкомнатные
https://pinup2025.com/# пин ап зеркало
Предлагаем услуги профессиональных инженеров офицальной мастерской.
Еслли вы искали ремонт телевизоров hisense рядом, можете посмотреть на сайте: ремонт телевизоров hisense в москве
Наши мастера оперативно устранят неисправности вашего устройства в сервисе или с выездом на дом!
двери межкомнатные спб межкомнатные двери купить в спб
межкомнатные двери спб скрытые двери под покраску
http://casinositeleri2025.pro/# en Г§ok kazandД±ran site
bГјtГјn oyun siteleri: en az para yatД±rД±lan bahis siteleri – mobil bahis siteleri
купить входные двери межкомнатные двери купить в спб
купить входную дверь спб двери межкомнатные
deneme bonusu veren yeni siteler 2025: deneme bonusu veren siteler yorumlar – yasal kumar oyunlarД±
купить входные двери в спб купить двери в спб
slot siteleri slot tr online en kazancl? slot oyunlar?
https://casinositeleri2025.pro/# pronet giriЕџ
slot oyunlar? slot siteleri az parayla cok kazandiran slot oyunlar?
металлическая дверь двери межкомнатные спб
межкомнатные двери купить в спб двери межкомнатные спб
купить двери спб двери межкомнатные спб
двери межкомнатные купить двери межкомнатные
купить двери спб двери экошпон
купить двери межкомнатные купить двери
межкомнатные двери купить в спб скрытые двери под покраску
http://pinup2025.com/# pinup 2025
pinup 2025: пин ап – pinup2025.com
http://casinositeleri2025.pro/# casino gГјvenilir siteler
купить аккумулятор для автомобиля в спб купить аккумулятор для автомобиля в спб
геодезическое сопровождение строительства санкт петербург geodezist-spb
прием аккумуляторов б у в санкт петербурге прием аккумуляторов спб цена
https://pinup2025.com/# пин ап казино
pinup2025.com: пинап казино – pinup2025.com
пин ап: пин ап вход – pinup 2025
Предлагаем услуги профессиональных инженеров офицальной мастерской.
Еслли вы искали ремонт телевизоров hisense цены, можете посмотреть на сайте: ремонт телевизоров hisense рядом
Наши мастера оперативно устранят неисправности вашего устройства в сервисе или с выездом на дом!
Инсайды об 1xSlots https://davisa.es/page/1xslots-casino-argentina.html
магазин аккумуляторов в спб купить аккумулятор для авто в спб дешево
http://pinup2025.com/# пин ап вход
кадастровые работы земельный участок межевание участка
пин ап зеркало: пин ап зеркало – пин ап вход
купить генератор 3 квт бензиновый https://tss-generators.ru
Гјcretsiz deneme bonusu veren bahis siteleri dГјnyanД±n en iyi bahis siteleri casinombet
slot siteleri en kazancl? slot oyunlar? slot siteleri
продамус промокод https://promokod-prod.ru .
https://casinositeleri2025.pro/# gГјvenilir kripto para siteleri
Интернет-магазин “Арматура Оптом” в Москве предлагает широкий ассортимент стальной арматуры и других видов металлопроката оптом по выгодным ценам, подробнее на сайте https://armatura-optom495.ru/. Доставка осуществляется напрямую от производителей, а продукция соответствует требованиям ГОСТ, что гарантирует её высокое качество и надёжность.
Plinko se ha convertido https://medium.com/@kostumchik.kiev.ua/todo-sobre-el-juego-de-plinko-en-m%C3%A9xico-instrucciones-demos-opiniones-y-m%C3%A1s-d1fde2d99338 en una de las opciones favoritas de los jugadores de casinos en Mexico. Conocido por su simplicidad y gran potencial de ganancias, este adictivo juego ahora cuenta con una plataforma oficial en Mexico.
Онлайн-журнал о строительстве https://zip.org.ua практичные советы, современные технологии, тренды дизайна и архитектуры. Всё о строительных материалах, ремонте, благоустройстве и инновациях в одной удобной платформе.
Plinko se ha convertido https://medium.com/@kostumchik.kiev.ua/todo-sobre-el-juego-de-plinko-en-m%C3%A9xico-instrucciones-demos-opiniones-y-m%C3%A1s-d1fde2d99338 en una de las opciones favoritas de los jugadores de casinos en Mexico. Conocido por su simplicidad y gran potencial de ganancias, este adictivo juego ahora cuenta con una plataforma oficial en Mexico.
казино онлайн топ на деньги https://lastdepcasino.ru
Онлайн-журнал о строительстве https://zip.org.ua практичные советы, современные технологии, тренды дизайна и архитектуры. Всё о строительных материалах, ремонте, благоустройстве и инновациях в одной удобной платформе.
https://casinositeleri2025.pro/# casino giriЕџ
рейтинг казино казино онлайн 2024 топ
пинап казино: пин ап вход – pinup 2025
лучшие онлайн казино топ казино с выводом
slot oyunlar? puf noktalar?: en kazancl? slot oyunlar? – slot oyunlar? puf noktalar?
интернет казино с хорошей репутацией топ казино
топ 100 казино какое казино лучше
пин ап вход пинап казино пин ап
https://pinup2025.com/# pinup 2025
https://casinositeleri2025.pro/# gГјvenilir deneme bonusu veren siteler
mobil bahis siteleri: casinomaxi – bet siteleri bonus
https://pinup2025.com/# пин ап казино
лучшее казино на деньги онлайн казино онлайн 2024 топ в россии
casino Еџans oyunlarД±: slot oyunlarД± isimleri – tl casino
http://slottr.top/# slot oyunlar?
лучшее казино казино онлайн 2024 топ в россии
рейтинг казино на реальные деньги рейтинг казино на реальные деньги
казино онлайн топ на деньги https://lastdepcasino.ru
рейтинг казино на реальные деньги казино онлайн рейтинг 2024
онлайн казино на деньги рейтинг с выводом https://lastdepcasino.ru
казино онлайн 2024 топ в россии https://lastdepcasino.ru
самые лучшие казино казино онлайн 2024 топ
топ казино топ казино 2024 года
топ казино с выводом рейтинг казино на реальные деньги
slot oyunlar? puf noktalar?: en kazancl? slot oyunlar? – az parayla cok kazandiran slot oyunlar?
https://pinup2025.com/# пинап казино
пин ап вход pinup2025.com пин ап казино
az parayla cok kazandiran slot oyunlar?: slot oyunlar? puf noktalar? – slot siteleri
геолокация телефона по номеру геолокация телефона по номеру .
slot siteleri en cok kazand?ran slot oyunlar? en kazancl? slot oyunlar?
https://pinup2025.com/# pinup 2025
Приобретение школьного аттестата с официальным упрощенным обучением в Москве
http://slottr.top/# slot tr online
пин ап: пин ап вход – pinup2025.com
slot oyunlar? puf noktalar? slot oyunlar? puf noktalar? en cok kazand?ran slot oyunlar?
en kazancl? slot oyunlar?: en cok kazand?ran slot oyunlar? – en cok kazand?ran slot oyunlar?
пин ап казино официальный сайт: pinup 2025 – пин ап вход
управление рулонными шторами управление рулонными шторами .
slot tr online en kazancl? slot oyunlar? en kazancl? slot oyunlar?
сервис накрутки подписчиков сервис накрутки подписчиков .
bestes klima in deutschland bestes klima in deutschland .
карниз электро карниз электро .
http://pinup2025.com/# пин ап казино
товары для взрослых секс шоп https://sex-shop-dp.top
секс шоп https://sex-shop-kh.top
https://slottr.top/# en kazancl? slot oyunlar?
https://pinup2025.com/# пин ап вход
bonus veren siteler yeni: canlД± oyunlar – casД±no
Thanks a lot for sharing this with all of us you actually know what you are talking about! Bookmarked. Please also visit my website =). We could have a link exchange arrangement between us!
en az para yatД±rД±lan bahis siteleri yasal Еџans oyunlarД± siteleri deneme bonusu veren yeni siteler 2025
Узнай, как выиграть в 1xSlots https://nodosde.gob.ar/pgs/1xslots-descargar_1.html
orisbet: deneme bonusu veren bahis siteleri 2025 – guvenilir bahis siteleri
slot oyunlar? slot oyunlar? en cok kazand?ran slot oyunlar?
https://slottr.top/# slot oyunlar?
http://casinositeleri2025.pro/# sГјperbetine
slot siteleri: en kazancl? slot oyunlar? – slot oyunlar?
http://casinositeleri2025.pro/# en gГјvenilir site
https://pinup2025.com/# пин ап казино
pinup 2025: пин ап вход – пин ап казино
http://casinositeleri2025.pro/# bonus veren siteler yeni
Производство ангаров и складов под ключ.
Подробная информация и заказ ангаров быстровозводимых
пин ап казино: pinup2025.com – пин ап казино официальный сайт
slot siteleri: az parayla cok kazandiran slot oyunlar? – slot siteleri
en gГјvenilir casino siteleri betboo plus yeni bahis siteleri deneme bonusu
Рейтинг лучших онлайн-казино https://lastdepcasino.ru с быстрыми выплатами и честной игрой. Подробные обзоры, бонусы для новых игроков и актуальные акции.
https://pinup2025.com/# пин ап казино
Рейтинг лучших онлайн-казино https://lastdepcasino.ru с быстрыми выплатами и честной игрой. Подробные обзоры, бонусы для новых игроков и актуальные акции.
https://slottr.top/# slot oyunlar?
https://casinositeleri2025.pro/# gГјvenilir bahis siteleri 2025
http://slottr.top/# slot oyunlar? puf noktalar?
gГјvenilir deneme bonusu veren siteler: +18 canli yayin siteleri – bonus veren siteler yeni
Тут можно сейфы купитькупить сейф
http://casinositeleri2025.pro/# popГјler bahis
pinup 2025: пин ап вход – пинап казино
en kazancl? slot oyunlar?: slot oyunlar? – slot siteleri
pinup2025.com пинап казино пин ап вход
http://slottr.top/# az parayla cok kazandiran slot oyunlar?
Pet Luxe Dog Collection Designer Dog Products
самые прибыльные франшизы самые прибыльные франшизы .
Designer Dog and Cat Products Pet Luxury Items
http://slottr.top/# slot tr online
Betovo scommesse sportive Betovo scommesse sportive .
https://casinositeleri2025.pro/# en gГјvenilir bahis
франшиза франшиза .
каталог франшиз каталог франшиз .
пин ап казино официальный сайт: pinup2025.com – pinup2025.com
Betovo bonus casin? Betovo bonus casin? .
yasal oyun siteleri kazino online en Г§ok freespin veren slot 2025
bahis siteleri isimleri: bahis siteleei – oyun s
en cok kazand?ran slot oyunlar? en kazancl? slot oyunlar? slot oyunlar? puf noktalar?
Ваш гид в мире автомобилей https://clothes-outletstore.com тест-драйвы, советы по ремонту и последние тенденции индустрии.
http://slottr.top/# az parayla cok kazandiran slot oyunlar?
Автомобильный журнал https://automobile.kyiv.ua с фокусом на практичность. Ремонт, уход за авто, обзор технологий и советы по эксплуатации.
Ваш гид в мире автомобилей https://clothes-outletstore.com тест-драйвы, советы по ремонту и последние тенденции индустрии.
Автомобильный журнал https://automobile.kyiv.ua с фокусом на практичность. Ремонт, уход за авто, обзор технологий и советы по эксплуатации.
en iyi yasal bahis siteleri: gГјvenilir kumar siteleri – 100 tl bonus veren bahis siteleri
http://slottr.top/# slot tr online
Возможно, вы правы
fakel-nsk-afisha.ru
пин ап вход: пин ап казино официальный сайт – пин ап
Всё о машинах https://avtomobilist.kyiv.ua тест-драйвы, сравнения моделей, авто новости, советы по ремонту и уходу.
Авто портал https://autonovosti.kyiv.ua актуальные новости, обзоры авто, тест-драйвы, инструкции по ремонту и тюнингу. Минимум текста, максимум полезной информации.
Авто журнал https://avtonews.kyiv.ua новости автопрома, сравнения моделей, тест-драйвы, советы по ремонту и уходу.
Всё о машинах https://black-star.com.ua авто новости, тест-драйвы, обзоры моделей, рейтинги, инструкции по обслуживанию и ремонту.
world pharmacy india Online India pharmacy buy medicines online in india
Всё о машинах https://avtomobilist.kyiv.ua тест-драйвы, сравнения моделей, авто новости, советы по ремонту и уходу.
Авто журнал https://avtonews.kyiv.ua новости автопрома, сравнения моделей, тест-драйвы, советы по ремонту и уходу.
Авто портал https://autonovosti.kyiv.ua актуальные новости, обзоры авто, тест-драйвы, инструкции по ремонту и тюнингу. Минимум текста, максимум полезной информации.
https://canadianpharmi.com/# non prescription erection pills
Всё о машинах https://black-star.com.ua авто новости, тест-драйвы, обзоры моделей, рейтинги, инструкции по обслуживанию и ремонту.
prescription drugs online without doctor Cheapest drug prices Canada best ed medication
Всё о машинах https://avtomobilist.kyiv.ua тест-драйвы, сравнения моделей, авто новости, советы по ремонту и уходу.
Авто журнал https://avtonews.kyiv.ua новости автопрома, сравнения моделей, тест-драйвы, советы по ремонту и уходу.
Авто портал https://autonovosti.kyiv.ua актуальные новости, обзоры авто, тест-драйвы, инструкции по ремонту и тюнингу. Минимум текста, максимум полезной информации.
Всё о машинах https://black-star.com.ua авто новости, тест-драйвы, обзоры моделей, рейтинги, инструкции по обслуживанию и ремонту.
best drugs for erectile dysfunction: Best Canadian pharmacy – male ed pills
http://mexicanpharmi.com/# medicine in mexico pharmacies
http://indiapharmi.com/# best india pharmacy
male enhancement products: Canada Pharmacy online reviews – the canadian drugstore
https://indiapharmi.com/# top 10 pharmacies in india
истинный запой истинный запой .
Всё о самогоноварении https://brewsugar.ru на одном сайте: от истории напитка до современных технологий перегонки.
Всё об авто https://road.kyiv.ua в одном месте: новости, тест-драйвы, сравнения, характеристики, ремонт и уход. Автомобильный онлайн-журнал — ваш эксперт в мире машин.
Место для общения на любые темы https://xn--9i1b12ab68a.com/ актуальные вопросы, обмен опытом, интересные дискуссии. Здесь найдётся тема для каждого.
Перевозка товаров из Китая https://chinaex.ru в Россию под ключ: авиа, море, автотранспорт. Гарантия сроков и сохранности груза.
indian pharmacy online: Online India pharmacy – cheapest online pharmacy india
Всё о самогоноварении https://brewsugar.ru на одном сайте: от истории напитка до современных технологий перегонки.
Всё об авто https://road.kyiv.ua в одном месте: новости, тест-драйвы, сравнения, характеристики, ремонт и уход. Автомобильный онлайн-журнал — ваш эксперт в мире машин.
международный таможенный брокер международный таможенный брокер .
Перевозка товаров из Китая https://chinaex.ru в Россию под ключ: авиа, море, автотранспорт. Гарантия сроков и сохранности груза.
Место для общения на любые темы https://xn--9i1b12ab68a.com/ актуальные вопросы, обмен опытом, интересные дискуссии. Здесь найдётся тема для каждого.
https://mexicanpharmi.com/# buying prescription drugs in mexico
klimadaten klimadaten .
компании таможенное оформление https://tamozhennyj-predstavitel-moskva11.ru/ .
best cure for ed: Canadian pharmacy prices – erection pills viagra online
франшиза для бизнеса франшиза для бизнеса .
http://indiapharmi.com/# buy prescription drugs from india
Женский портал https://abuki.info мода, красота, здоровье, семья, карьера. Советы, тренды, лайфхаки, рецепты и всё, что важно для современных женщин.
Автомобильный онлайн-журнал https://simpsonsua.com.ua предлагает свежие новости, обзоры авто, тест-драйвы, рейтинги и полезные советы для водителей.
Мода, здоровье, красота https://gratransymas.com семья, кулинария, карьера. Женский портал — полезные советы и свежие идеи для каждой.
Познавательный портал для детей https://detiwki.com.ua обучающие материалы, интересные факты, научные эксперименты, игры и задания для развития кругозора.
do i have ed Best Canadian pharmacy best ed solution
Женский портал https://abuki.info мода, красота, здоровье, семья, карьера. Советы, тренды, лайфхаки, рецепты и всё, что важно для современных женщин.
Автомобильный онлайн-журнал https://simpsonsua.com.ua предлагает свежие новости, обзоры авто, тест-драйвы, рейтинги и полезные советы для водителей.
Мода, здоровье, красота https://gratransymas.com семья, кулинария, карьера. Женский портал — полезные советы и свежие идеи для каждой.
Познавательный портал для детей https://detiwki.com.ua обучающие материалы, интересные факты, научные эксперименты, игры и задания для развития кругозора.
cheap ed medication Best Canadian pharmacy canadian drug pharmacy
http://indiapharmi.com/# pharmacy website india
errection problems: Cheapest drug prices Canada – best male ed pills
https://canadianpharmi.com/# canadian drug
https://indiapharmi.com/# best india pharmacy
Женский онлайн-журнал https://womanfashion.com.ua секреты красоты, модные тренды, здоровье, отношения, семья, кулинария и карьера. Всё, что важно и интересно.
Find the latest Roblox codes https://pocket-codes.com/roblox-codes to unlock exclusive rewards, boosts, and items in your favorite games. Stay updated with new codes and level up your adventures on the Roblox platform today!
офисная мебель спб каталог офисная мебель руководителя в спб
Женский онлайн-журнал https://stylewoman.kyiv.ua стиль, уход, здоровье, отношения, семья, кулинарные рецепты, психология и карьера.
how to fix ed: canadian pharmacy – top erection pills
Женский онлайн-журнал https://womanfashion.com.ua секреты красоты, модные тренды, здоровье, отношения, семья, кулинария и карьера. Всё, что важно и интересно.
Find the latest Roblox codes https://pocket-codes.com/roblox-codes to unlock exclusive rewards, boosts, and items in your favorite games. Stay updated with new codes and level up your adventures on the Roblox platform today!
офисная мебель санкт-петербург https://ковка116.рф
Женский онлайн-журнал https://stylewoman.kyiv.ua стиль, уход, здоровье, отношения, семья, кулинарные рецепты, психология и карьера.
нарколог вывод из запоя нарколог вывод из запоя .
https://mexicanpharmi.com/# buying from online mexican pharmacy
Туристический портал https://aliana.com.ua лучшие маршруты, путеводители, советы путешественникам, обзоры отелей.
магазин офисной мебели в санкт петербурге https://ковка116.рф
Всё о туризме https://atrium.if.ua маршруты, путеводители, советы по отдыху, обзор отелей и лайфхаки. Туристический портал — ваш помощник в путешествиях.
Всё для путешествий https://cmc.com.ua уникальные маршруты, гиды по городам, актуальные акции на туры и полезные статьи для туристов.
Туристический портал https://aliana.com.ua лучшие маршруты, путеводители, советы путешественникам, обзоры отелей.
мебель офисная https://ковка116.рф
Всё о туризме https://atrium.if.ua маршруты, путеводители, советы по отдыху, обзор отелей и лайфхаки. Туристический портал — ваш помощник в путешествиях.
Всё для путешествий https://cmc.com.ua уникальные маршруты, гиды по городам, актуальные акции на туры и полезные статьи для туристов.
http://indiapharmi.com/# reputable indian pharmacies
Detalles sobre 1xslots casino https://nodosde.gob.ar/pgs/1xslots-descargar_1.html
п»їbest mexican online pharmacies Best online Mexican pharmacy buying prescription drugs in mexico
mexico drug stores pharmacies: Mexican pharmacy ship to usa – buying from online mexican pharmacy
https://canadianpharmi.com/# ed causes and treatment
best online pharmacy india Online India pharmacy best online pharmacy india
таможенный брокер в москве таможенный брокер в москве .
https://indiapharmi.com/# india pharmacy
ed pills online: Best Canadian pharmacy – pharmacy drugs
http://mexicanpharmi.com/# mexican border pharmacies shipping to usa
mexico drug stores pharmacies: Legit online Mexican pharmacy – mexican mail order pharmacies
buy prescription drugs online: Canada Pharmacy online reviews – viagra without a prescription
продажа франшиз продажа франшиз .
https://indiapharmi.com/# india pharmacy
Статьи о путешествиях https://deluxtour.com.ua гиды по направлениям, лайфхаки для отдыха, советы по сбору багажа и туристические обзоры.
Путешествия по Греции https://cpcfpu.org.ua лучшие курорты, гиды по островам, экскурсии, пляжи и советы по планированию отпуска.
Туристический журнал https://elnik.kiev.ua свежие идеи для путешествий, обзоры курортов, гиды по городам, советы для самостоятельных поездок и туристические новости.
Туристический портал https://feokurort.com.ua необычные маршруты, вдохновляющие истории, секреты бюджетных путешествий, советы по визам и топовые направления для отдыха.
Туристический портал https://feokurort.com.ua необычные маршруты, вдохновляющие истории, секреты бюджетных путешествий, советы по визам и топовые направления для отдыха.
http://indiapharmi.com/# Online medicine order
выведение из запоя на дому спб цены выведение из запоя на дому спб цены .
Статьи о туризме и путешествиях https://inhotel.com.ua маршруты, гиды по достопримечательностям, советы по планированию поездок, рекомендации по отелям и лайфхаки для туристов.
Гиды по странам https://hotel-atlantika.com.ua экскурсии по городам, советы по выбору жилья и маршрутов. Туристический журнал — всё для комфортного и яркого путешествия.
Комплексный ремонт квартир https://anti-orange.com.ua и домов от Студии ремонта. Полный цикл работ: от дизайна до финишной отделки.
indian pharmacy Online India pharmacy top 10 pharmacies in india
https://mexicanpharmi.com/# medicine in mexico pharmacies
mexican mail order pharmacies mexican pharmi medication from mexico pharmacy
http://indiapharmi.com/# п»їlegitimate online pharmacies india
услуги таможенного брокера услуги таможенного брокера .
http://indiapharmi.com/# buy prescription drugs from india
Строительная компания https://as-el.com.ua выполняем строительство жилых и коммерческих объектов под ключ. Полный цикл: проектирование, согласование, строительство и отделка.
causes of ed: Canada pharmacy online – medicines for ed
На строительном портале https://avian.org.ua вы найдете всё: от пошаговых инструкций до списка лучших подрядчиков. Помогаем реализовать проекты любой сложности быстро и удобно.
Строительный портал https://ateku.org.ua ваш гид в мире строительства и ремонта. Полезные статьи, обзоры материалов, советы по выбору подрядчиков и идеи дизайна.
Портал по ремонту https://azst.com.ua всё для вашего ремонта: подбор подрядчиков, советы по выбору материалов, готовые решения для интерьера и проверенные рекомендации.
Строительная компания https://as-el.com.ua выполняем строительство жилых и коммерческих объектов под ключ. Полный цикл: проектирование, согласование, строительство и отделка.
На строительном портале https://avian.org.ua вы найдете всё: от пошаговых инструкций до списка лучших подрядчиков. Помогаем реализовать проекты любой сложности быстро и удобно.
Строительный портал https://ateku.org.ua ваш гид в мире строительства и ремонта. Полезные статьи, обзоры материалов, советы по выбору подрядчиков и идеи дизайна.
Портал по ремонту https://azst.com.ua всё для вашего ремонта: подбор подрядчиков, советы по выбору материалов, готовые решения для интерьера и проверенные рекомендации.
Создайте уютную атмосферу с помощью велас ароматических, Погрузитесь в мир ароматов с велас, Почему велас ароматические свечи пользуются такой популярностью
difusores para casa https://scentalle.com/ .
Can you be more specific about the content of your article? After reading it, I still have some doubts. Hope you can help me. https://accounts.binance.com/en-IN/register?ref=UM6SMJM3
mexican drugstore online: mexicanpharmi – mexican mail order pharmacies
список франшиз список франшиз .
Всё о ремонте на одном сайте https://comart.com.ua Портал по ремонту предлагает обзоры материалов, рейтинги специалистов, советы экспертов и примеры готовых проектов для вдохновения.
https://canadianpharmi.com/# buy online drugs
Всё о ремонте на одном сайте https://comart.com.ua Портал по ремонту предлагает обзоры материалов, рейтинги специалистов, советы экспертов и примеры готовых проектов для вдохновения.
Журнал по ремонту https://domtut.com.ua и строительству – советы, идеи и обзоры. Узнайте о трендах, изучите технологии и воплотите свои строительные или дизайнерские задумки легко и эффективно.
Портал о ремонте https://eeu-a.kiev.ua всё для тех, кто ремонтирует: пошаговые инструкции, идеи дизайна, обзор материалов и подбор подрядчиков.
Журнал по ремонту и строительству https://diasoft.kiev.ua гид по современным тенденциям. Полезные статьи, лайфхаки, инструкции и обзор решений для дома и офиса.
cheap erectile dysfunction pill: Best Canadian online pharmacy – buy canadian drugs
Gids voor CorgiSlot https://welling.domains.unf.edu/member.php?action=profile&uid=4198
Новости технологий https://helikon.com.ua все о последних IT-разработках, гаджетах и научных открытиях. Свежие обзоры, аналитика и тренды высоких технологий.
http://mexicanpharmi.com/# mexican mail order pharmacies
Индийские фильмы смотреть https://kinoindia.tv онлайн бесплатно в качестве 1080 hd. Смотрите лучшие культовые и современные индийские фильмы в хорошем качестве без рекламы.
Discover the best https://onlinecasinocanada.shop enjoy free spins or cash rewards just for signing up. Play top-rated games, explore trusted platforms, and win real money without spending a dime.
Новости технологий https://helikon.com.ua все о последних IT-разработках, гаджетах и научных открытиях. Свежие обзоры, аналитика и тренды высоких технологий.
https://indiapharmi.com/# buy medicines online in india
buy medicines online in india indian pharmacy Online medicine home delivery
услуги по проведению оценки профессиональных рисков в Москве провести оценку профессиональных рисков цена
провести оценку профессиональных рисков цена Москва https://ocenka-riskov-msk.ru
Официальная покупка диплома вуза с сокращенной программой обучения в Москве
indianpharmacy com Indian pharmacy international shipping indian pharmacy
http://mexicanpharmi.com/# mexico drug stores pharmacies
Строительный онлайн журнал https://inter-biz.com.ua руководства по проектам любой сложности. Советы экспертов, подбор материалов, идеи дизайна и новинки рынка.
Сайт о строительстве и ремонте https://hydromech.kiev.ua полезные советы, инструкции, обзоры материалов и технологий. Все этапы: от фундамента до отделки.
Строительные технологии https://ibss.org.ua новейшие разработки и решения в строительной сфере. Материалы, оборудование, инновации и тренды для профессионалов и застройщиков.
http://indiapharmi.com/# indian pharmacies safe
Строительный онлайн журнал https://inter-biz.com.ua руководства по проектам любой сложности. Советы экспертов, подбор материалов, идеи дизайна и новинки рынка.
Сайт о строительстве и ремонте https://hydromech.kiev.ua полезные советы, инструкции, обзоры материалов и технологий. Все этапы: от фундамента до отделки.
Строительные технологии https://ibss.org.ua новейшие разработки и решения в строительной сфере. Материалы, оборудование, инновации и тренды для профессионалов и застройщиков.
top online pharmacy india: Pharmacies in India that ship to USA – indian pharmacies safe
Все о строительстве и ремонте https://kennan.kiev.ua практичные рекомендации, идеи интерьеров, новинки рынка и советы профессионалов.
Все о строительстве и ремонте https://kennan.kiev.ua практичные рекомендации, идеи интерьеров, новинки рынка и советы профессионалов.
ed aids: Canada Pharmacy online reviews – home remedies for ed
Дизайн интерьера и территории https://lbook.com.ua идеи оформления жилых и коммерческих пространств. Современные тренды, советы экспертов и решения для создания стильного и функционального пространства.
Асфальтирование и ремонт дорог https://mia.km.ua информация о технологиях укладки асфальта, методах ремонта покрытий и современных материалах.
Kompaktni zarizeni mikro sluchatko poskytuje spolehlivy prenos, pevny, nenapadny design a pohodlne se nosi v kazde situaci.
Дизайн интерьера и территории https://lbook.com.ua идеи оформления жилых и коммерческих пространств. Современные тренды, советы экспертов и решения для создания стильного и функционального пространства.
Асфальтирование и ремонт дорог https://mia.km.ua информация о технологиях укладки асфальта, методах ремонта покрытий и современных материалах.
http://canadianpharmi.com/# viagra without a doctor prescription
Kompaktni zarizeni nanosluchatka poskytuje spolehlivy prenos, pevny, nenapadny design a pohodlne se nosi v kazde situaci.
https://mexicanpharmi.com/# medication from mexico pharmacy
http://indiapharmi.com/# cheapest online pharmacy india
medicine for erectile Canada Pharmacy natural ed medications
франшизы для бизнеса франшизы для бизнеса .
mexican rx online: Legit online Mexican pharmacy – medicine in mexico pharmacies
https://canadianpharmi.com/# viagra vs cialis bodybuilding
mexico drug stores pharmacies Mexican pharmacy ship to usa mexican drugstore online
mexico drug stores pharmacies: mexican pharmi – mexico drug stores pharmacies
male erection: canadian pharmi – men ed
http://canadianpharmi.com/# real viagra without a doctor prescription usa
Сайт про ремонт https://odessajs.org.ua полезные советы, инструкции, подбор материалов и идеи дизайна. Всё, что нужно для качественного и продуманного ремонта любого помещения.
Онлайн-журнал о строительстве https://mts-slil.info свежие новости, обзоры инноваций, рекомендации по ремонту и строительству.
Онлайн журнал о ремонте https://prezent-house.com.ua статьи, лайфхаки и решения для всех этапов ремонта: от планирования до отделки. Практичные рекомендации и идеи для вашего дома.
Мастерская креативных идей https://rusproekt.org пространство для творчества и инноваций. Уникальные решения для дизайна, декора и проектов любого масштаба.
Предлагаем услуги профессиональных инженеров офицальной мастерской.
Еслли вы искали ремонт телевизоров haier, можете посмотреть на сайте: ремонт телевизоров haier в москве
Наши мастера оперативно устранят неисправности вашего устройства в сервисе или с выездом на дом!
Online medicine order: India pharmacy delivery – reputable indian pharmacies
светильники светодиодные уличные потолочные влагозащищенные светильники светодиодные уличные потолочные влагозащищенные .
Журнал о строительстве и ремонте https://selma.com.ua советы экспертов, обзор материалов, тренды в интерьере и готовые решения для качественного ремонта вашего дома или офиса.
Портал о ремонте https://rvps.kiev.ua практичные рекомендации, дизайн-идеи, современные технологии и инструкции для успешного ремонта любого уровня сложно
https://canadianpharmi.com/# medication for ed dysfunction
Сайт о дизайне интерьера и территории https://sinega.com.ua тренды в дизайне помещений и благоустройстве территорий.
Информационный портал о ремонте https://sevgr.org.ua практичные советы, проверенные методики и новинки рынка. Помощь в планировании, выборе подрядчиков и создании идеального пространства.
Журнал о строительстве и ремонте https://selma.com.ua советы экспертов, обзор материалов, тренды в интерьере и готовые решения для качественного ремонта вашего дома или офиса.
Портал о ремонте https://rvps.kiev.ua практичные рекомендации, дизайн-идеи, современные технологии и инструкции для успешного ремонта любого уровня сложно
Сайт о дизайне интерьера и территории https://sinega.com.ua тренды в дизайне помещений и благоустройстве территорий.
Информационный портал о ремонте https://sevgr.org.ua практичные советы, проверенные методики и новинки рынка. Помощь в планировании, выборе подрядчиков и создании идеального пространства.
https://indiapharmi.com/# buy medicines online in india
indian pharmacies safe Indian pharmacy international shipping buy prescription drugs from india
http://canadianpharmi.com/# buy online pharmacy
белое вино в москве http://pekin-vl.ru .
Портал об архитектуре https://solution-ltd.com.ua информация о культовых проектах, новые технологии строительства, эстетика пространств и актуальные решения для городов и частных
белое вино белое вино .
Архитектурный портал https://skol.if.ua новости архитектуры, современные проекты, градостроительные решения и обзоры мировых трендов.
Информационный портал о ремонте https://stinol.com.ua практичные советы, проверенные методики и новинки рынка. Помощь в планировании, выборе подрядчиков и создании идеального пространства.
Гид по ремонту https://techproduct.com.ua идеи и советы для самостоятельного ремонта: экономичные решения, готовые проекты, обзоры материалов и дизайнерские лайфхаки.
https://canadianpharmi.com/# ed treatment natural
buying pills online canadianpharmi how to overcome ed naturally
Предлагаем услуги профессиональных инженеров офицальной мастерской.
Еслли вы искали ремонт телевизоров lg сервис, можете посмотреть на сайте: ремонт телевизоров lg
Наши мастера оперативно устранят неисправности вашего устройства в сервисе или с выездом на дом!
Портал об архитектуре https://solution-ltd.com.ua информация о культовых проектах, новые технологии строительства, эстетика пространств и актуальные решения для городов и частных
Архитектурный портал https://skol.if.ua новости архитектуры, современные проекты, градостроительные решения и обзоры мировых трендов.
Информационный портал о ремонте https://stinol.com.ua практичные советы, проверенные методики и новинки рынка. Помощь в планировании, выборе подрядчиков и создании идеального пространства.
Гид по ремонту https://techproduct.com.ua идеи и советы для самостоятельного ремонта: экономичные решения, готовые проекты, обзоры материалов и дизайнерские лайфхаки.
заказ кухонь заказ кухонь .
Предлагаем услуги профессиональных инженеров офицальной мастерской.
Еслли вы искали срочный ремонт телефонов xiaomi, можете посмотреть на сайте: ремонт телефонов xiaomi в москве
Наши мастера оперативно устранят неисправности вашего устройства в сервисе или с выездом на дом!
Официальные доступ кракен сайт быстрый и безопасный доступ к сайту, обходя блокировки и сохраняя полную анонимность пользователей.
Анонимная платформа Кракен ссылка обеспечивает безопасные транзакции, конфиденциальность и доступ к разнообразным товарам.
Журнал про строительство и ремонт https://ukrainianpages.com.ua профессиональные статьи о ремонте любой сложности. Как оптимизировать расходы, найти подрядчиков и добиться идеального результата.
Кодировка и вывод из запоя на дому https://nashinervy.ru/bez-rubriki/vyvod-iz-zapoya-i-kodirovka-ot-alkogolizma-na-domu-professionalnyj-podhod-k-vosstanovleniyu-zdorovya.html безопасно, эффективно и анонимно. Помощь специалистов 24/7 для возвращения к трезвой жизни в комфортных условиях.
Журнал про строительство и ремонт https://ukrainianpages.com.ua профессиональные статьи о ремонте любой сложности. Как оптимизировать расходы, найти подрядчиков и добиться идеального результата.
errectile dysfunction: canadian pharmi – top ed pills
india pharmacy: India pharmacy delivery – best online pharmacy india
http://canadianpharmi.com/# canadian drug prices
best drug for ed: Canadian pharmacy prices – ed natural remedies
промокод продамус http://forumbar.anihub.me/viewtopic.php?id=9823#p1 .
buy ciprofloxacin over the counter [url=https://cipharmdelivery.com/#]ci pharm delivery[/url] ciprofloxacin generic price
Журнал про строительство и ремонт https://ukrainianpages.com.ua профессиональные статьи о ремонте любой сложности. Как оптимизировать расходы, найти подрядчиков и добиться идеального результата.
Find the best no deposit bonus casino canada offers! Explore top-rated casinos with free spins and bonus cash for new players. Start playing without risking your funds.
Автодоставка из Китая https://china-top.ru быстрая и надежная транспортировка товаров. Полный цикл: от оформления документов до доставки на склад клиента.
http://cipharmdelivery.com/# cipro ciprofloxacin
Смотреть индийские фильмы онлайн https://kinoindia.tv подборка лучших фильмов с уникальным колоритом. Бесплатный доступ и ежедневное обновление каталога.
can i order clomid where buy cheap clomid without insurance can i get generic clomid pills
Find the best no deposit bonus casino canada offers! Explore top-rated casinos with free spins and bonus cash for new players. Start playing without risking your funds.
Автодоставка из Китая https://china-top.ru быстрая и надежная транспортировка товаров. Полный цикл: от оформления документов до доставки на склад клиента.
Смотреть индийские фильмы онлайн https://kinoindia.tv подборка лучших фильмов с уникальным колоритом. Бесплатный доступ и ежедневное обновление каталога.
Журнал про строительство и ремонт https://ukrainianpages.com.ua профессиональные статьи о ремонте любой сложности. Как оптимизировать расходы, найти подрядчиков и добиться идеального результата.
amoxicillin buy online canada: Amox Star – amoxicillin generic
http://cipharmdelivery.com/# ciprofloxacin generic price
белое вино цена белое вино цена .
http://amoxstar.com/# amoxicillin cost australia
Предлагаем услуги профессиональных инженеров офицальной мастерской.
Еслли вы искали срочный ремонт телефонов vivo, можете посмотреть на сайте: срочный ремонт телефонов vivo
Наши мастера оперативно устранят неисправности вашего устройства в сервисе или с выездом на дом!
cost of cheap clomid no prescription: cost cheap clomid without prescription – cheap clomid for sale
http://amoxstar.com/# where can i get amoxicillin
Предлагаем услуги профессиональных инженеров офицальной мастерской.
Еслли вы искали ремонт телефонов realme в москве, можете посмотреть на сайте: ремонт телефонов realme цены
Наши мастера оперативно устранят неисправности вашего устройства в сервисе или с выездом на дом!
Предлагаем услуги профессиональных инженеров офицальной мастерской.
Еслли вы искали ремонт телефонов sony в москве, можете посмотреть на сайте: ремонт телефонов sony рядом
Наши мастера оперативно устранят неисправности вашего устройства в сервисе или с выездом на дом!
where can i buy generic clomid without a prescription: can you buy cheap clomid prices – can i order generic clomid no prescription
Назальный спрей Серебряный Углерон надежная защита вашего дыхания. Активный углерод и ионы серебра очищают носовые ходы, увлажняют слизистую и помогают бороться с бактериями.
Free Online Games visit your gateway to a world of free online entertainment! Explore a vast collection of games, from puzzles and card games to action and arcade classics. Play instantly on any device without registration or downloads
шарики в офис надувные шары круглосуточно
воздушные шары с гелием с доставкой шары к празднику с доставкой
Назальный спрей Silver Ugleron надежная защита вашего дыхания. Активный углерод и ионы серебра очищают носовые ходы, увлажняют слизистую и помогают бороться с бактериями.
уличный светильник светодиодный встраиваемый уличный светильник светодиодный встраиваемый .
Free Online Games oline your gateway to a world of free online entertainment! Explore a vast collection of games, from puzzles and card games to action and arcade classics. Play instantly on any device without registration or downloads
шарики на праздники с доставкой заказать воздушные шары с доставкой недорого
вызов нарколога на дом круглосуточно вызов нарколога на дом круглосуточно .
шарики надувные с гелием купить с доставкой заказ шариков с доставкой
http://amoxstar.com/# amoxicillin 500mg capsule
amoxicillin pills 500 mg: how to buy amoxycillin – amoxicillin 500mg prescription
Техосмотр категория B техосмотр автобусов
Техосмотр категория B автодиагностика
prednisone cream prednisone cream rx prednisone 5mg coupon
http://amoxstar.com/# amoxicillin 500 mg tablet price
prescription prednisone cost 54 prednisone prednisone online for sale
вино белое купить вино белое купить .
https://cipharmdelivery.com/# ciprofloxacin order online
Купить VIP подарок в Москве https://podarki-suveniry-vip.ru
кредитная карта тинькофф платинум карта тинькофф платинум
Уникальные подарки https://podarki-suveniry-vip.ru
тинькофф платинум карта тинькофф платинум
Летайте выгодно с Pegasus предлагаем доступные билеты, удобные маршруты и современный сервис. Внутренние и международные рейсы для комфортных путешествий.
Наши бюстгальтер женский предлагают идеальное сочетание стиля и комфорта. Выберите бюстгальтер без косточек для мягкой поддержки или кружевной бюстгальтер для романтичного образа. Для будущих мам подойдут бюстгальтеры для беременных и бюстгальтеры для кормления. Обратите внимание на бюстгальтер с пуш-ап для эффекта увеличения груди и комфортные бюстгальтеры для повседневного ношения.
Оценка профессиональных рисков https://ocenka-riskov-msk.ru комплексная услуга для выявления, анализа и снижения угроз на рабочем месте.
sexinserate wien sex date wien
Летайте выгодно с Pegasus Airlines предлагаем доступные билеты, удобные маршруты и современный сервис. Внутренние и международные рейсы для комфортных путешествий.
Наши бюстгальтер с пуш-ап предлагают идеальное сочетание стиля и комфорта. Выберите бюстгальтер без косточек для мягкой поддержки или кружевной бюстгальтер для романтичного образа. Для будущих мам подойдут бюстгальтеры для беременных и бюстгальтеры для кормления. Обратите внимание на бюстгальтер с пуш-ап для эффекта увеличения груди и комфортные бюстгальтеры для повседневного ношения.
Оценка профессиональных рисков https://ocenka-riskov-msk.ru комплексная услуга для выявления, анализа и снижения угроз на рабочем месте.
erotik privat wien private nutten in wien
can you buy cheap clomid pill: clomidonpharm – can i get cheap clomid prices
order generic clomid without rx clomid pill where to get clomid without rx
buy cipro no rx where can i buy cipro online purchase cipro
http://clomidonpharm.com/# can i buy cheap clomid price
https://cipharmdelivery.com/# ciprofloxacin 500mg buy online
where can i get generic clomid without insurance: clomidonpharm – where to buy generic clomid without dr prescription
нарколог на дом цены нарколог на дом цены .
вызов нарколога на дом круглосуточно [url=https://wisdomtarot.tforums.org/viewtopic.php?f=16&t=11701]вызов нарколога на дом круглосуточно[/url] .
Spot on with this write-up, I actually think this website needs rather more consideration. I’ll most likely be once more to learn far more, thanks for that info.
Maak kennis met CorgiSlot https://www.mijnstudentenleven.nl/news/corgislot-casino-review.html
get generic clomid without rx clomid on pharm how to buy clomid online
https://cipharmdelivery.com/# buy cipro online usa
http://prednibest.com/# 50mg prednisone tablet
amoxicillin 500 tablet: amoxicillin 500mg prescription – over the counter amoxicillin
ciprofloxacin mail online CiPharmDelivery cipro
нарколог краснодар нарколог краснодар .
I truly wanted to type a quick remark to be able to appreciate you for some of the stunning advice you are posting on this site. My rather long internet look up has now been rewarded with reputable ideas to write about with my best friends. I ‘d point out that we visitors are very lucky to be in a fantastic website with so many lovely individuals with interesting tips and hints. I feel very much lucky to have encountered your entire site and look forward to plenty of more fabulous times reading here. Thank you once again for all the details.
https://clomidonpharm.com/# order generic clomid without rx
Предлагаем стекла для спецтехники https://steklo-ufa.ru любых типов и размеров. Прочные, устойчивые к ударам и погодным условиям материалы.
Производство шпона в Москве https://shpon-massiv.ru качественный шпон из натурального дерева для мебели, дверей и отделки. Широкий выбор пород, гибкие размеры и выгодные цены.
Keep working ,terrific job!
amoxicillin 30 capsules price: cost of amoxicillin 875 mg – buy amoxicillin 500mg online
Предлагаем стекла для спецтехники https://steklo-ufa.ru любых типов и размеров. Прочные, устойчивые к ударам и погодным условиям материалы.
Производство шпона в Москве https://shpon-massiv.ru качественный шпон из натурального дерева для мебели, дверей и отделки. Широкий выбор пород, гибкие размеры и выгодные цены.
http://clomidonpharm.com/# cheap clomid without prescription
cipro ciprofloxacin: buy ciprofloxacin over the counter – where can i buy cipro online
Инженерные изыскания в Москве https://geology-kaluga.ru точные исследования для строительства и проектирования. Геологические, гидрологические, экологические и геодезические работы для строительства.
Геосинтетические материалы https://geobentomat.ru надежное решение для строительства и укрепления грунтов. Геотекстиль, георешетки, геомембраны и другие материалы для дренажа, армирования и защиты конструкций.
частный нарколог на дом частный нарколог на дом .
Just want to say your article is as astonishing. The clearness in your post is just nice and i can assume you’re an expert on this subject. Fine with your permission let me to grab your RSS feed to keep updated with forthcoming post. Thanks a million and please carry on the rewarding work.
смотреть сериалы онлайн бесплатно без регистрации
Инженерные изыскания в Москве https://geology-kaluga.ru точные исследования для строительства и проектирования. Геологические, гидрологические, экологические и геодезические работы для строительства.
Геосинтетические материалы https://geobentomat.ru надежное решение для строительства и укрепления грунтов. Геотекстиль, георешетки, геомембраны и другие материалы для дренажа, армирования и защиты конструкций.
нарколог на дом анонимно нарколог на дом анонимно .
prednisone 5 mg brand name: PredniBest – how to purchase prednisone online
Juegos de casino Jugabet Juegos de casino Jugabet .
https://amoxstar.com/# generic amoxicillin over the counter
buy amoxicillin 500mg AmoxStar buy amoxicillin 500mg capsules uk
prednisone 10mg cost: Predni Best – how to buy prednisone
amoxicillin capsules 250mg AmoxStar order amoxicillin online
http://cipharmdelivery.com/# antibiotics cipro
alkozona http://alkozona.ru .
amoxicillin discount coupon: amoxicillin 825 mg – amoxicillin medicine over the counter
Доставка дизельного топлива https://neftegazlogistic.ru в Москве – оперативно и качественно! Поставляем ДТ для автотранспорта, строительной и спецтехники. Гарантия чистоты топлива, выгодные цены и быстрая доставка прямо на объект.
Torlab.net https://torlab.net новый торрент-трекер для поиска и обмена файлами! Здесь вы найдете фильмы, игры, музыку, софт и многое другое. Быстрая скорость загрузки, удобный интерфейс и активное сообщество. Подключайтесь, делитесь, скачивайте — ваш доступ к миру качественного контента!
Torlab.net https://torlab.net новый торрент-трекер для поиска и обмена файлами! Здесь вы найдете фильмы, игры, музыку, софт и многое другое. Быстрая скорость загрузки, удобный интерфейс и активное сообщество. Подключайтесь, делитесь, скачивайте — ваш доступ к миру качественного контента!
Доставка дизельного топлива https://neftegazlogistic.ru в Москве – оперативно и качественно! Поставляем ДТ для автотранспорта, строительной и спецтехники. Гарантия чистоты топлива, выгодные цены и быстрая доставка прямо на объект.
Hi! I could have sworn I’ve been to this site before but after browsing through some of the post I realized it’s new to me. Nonetheless, I’m definitely happy I found it and I’ll be book-marking and checking back frequently!
https://rxguides.net/guides Explore detailed guides to master your favorite games. From beginner tips to advanced strategies, our guides help you level up, complete challenges, and unlock hidden secrets for the ultimate gaming experience.
https://rxguides.net Discover the best game codes, in-depth guides, and updated tier lists for your favorite games! Unlock exclusive rewards, master gameplay strategies, and find the top characters or items to dominate the competition. Start your journey to success today!
price of prednisone tablets: non prescription prednisone 20mg – prednisone online india
http://cipharmdelivery.com/# ciprofloxacin generic price
поролон купить в москве в розницу поролон купить в москве в розницу .
проектное бюро перепланировка квартиры проектное бюро перепланировка квартиры .
карниз для штор с электроприводом карниз для штор с электроприводом .
http://cipharmdelivery.com/# cipro
generic prednisone pills PredniBest prednisone in mexico
amoxicillin 500mg buy online canada: Amox Star – generic for amoxicillin
cost of prednisone 5mg tablets: prednisone sale – prednisone cream over the counter
Здесь можно оружейный сейф для охотничьего ружьясейф для оружия купить в москве
cipro for sale: where to buy cipro online – buy cipro
Предлагаем услуги профессиональных инженеров офицальной мастерской.
Еслли вы искали ремонт телефонов samsung, можете посмотреть на сайте: ремонт телефонов samsung в москве
Наши мастера оперативно устранят неисправности вашего устройства в сервисе или с выездом на дом!
Предлагаем услуги профессиональных инженеров офицальной мастерской.
Еслли вы искали ремонт телефонов nothing адреса, можете посмотреть на сайте: ремонт телефонов nothing в москве
Наши мастера оперативно устранят неисправности вашего устройства в сервисе или с выездом на дом!
Приобретение диплома ВУЗа с сокращенной программой обучения в Москве
Выигрывайте больше на onexbet, не тратя много времени.
onexbet – ваш ключ к финансовой независимости, где бы вы ни находились.
Спортивные ставки на onexbet, лучшие условия для игры.
Получите эмоциональный заряд от игры на onexbet, и вы обязательно останетесь довольны.
onexbet – безопасность и конфиденциальность, для вас всегда в приоритете.
Мечтаете о финансовом благополучии? Вам нужен onexbet, – оптимальное решение в вашей ситуации.
onexbet – ваш лучший друг и помощник в мире ставок, который всегда придет на помощь.
Onexbet – ваш путь к вершине, добивайтесь успеха вместе с onexbet.
onexbet – это не просто азарт, это философия, которая помогает вам обогатиться.
Готовы к большим деньгам и успеху? Попробуйте onexbet, и вы поймете, что все возможно.
onexbet – это не просто игровая платформа, это ваш шанс на успех, о котором мечтали.
onexbet – это идеальное место для тех, кто ищет азарт и адреналин, но при этом ценит профессионализм и конфиденциальность.
Лучшие коэффициенты и выигрыши на onexbet, все это доступно для вас.
Готовы к новым достижениям? Начните с onexbet, и вы удивитесь своим результатам.
fastofhlad fastofhlad .
Juegos de casino Jugabet Juegos de casino Jugabet .
промокод продамус промокод продамус .
http://amoxstar.com/# amoxicillin buy no prescription
http://cipharmdelivery.com/# buy cipro online usa
amoxicillin 500 mg capsule ampicillin amoxicillin can i buy amoxicillin over the counter
where buy generic clomid without a prescription clomid on pharm cost of clomid without prescription
interested in how to set up an amazon storefront that attracts buyers? use promotional videos, reviews, and branded visuals. this guide explains how to build a personalized shopping experience that boosts product visibility.
cost of generic clomid pills: clomid on pharm – clomid generic
Самый популярный букмекер onexbet, ставки с onexbet – это успех|Профессиональные прогнозы от onexbet, большие деньги ждут вас|Защитите свои деньги с onexbet, не рискуйте сомнительными сайтами|Бонусы и акции от onexbet, участвуйте в акциях и выигрывайте|Большой выбор азартных игр на onexbet, выигрывайте крупные суммы в удобном формате|Беспрецедентный уровень обслуживания на onexbet, важны ваш комфорт и удобство|Легальное онлайн казино onexbet, ваша безопасность – важнее всего|Не упустите шанс следить за любимыми матчами, выигрывайте, не выходя из дома|Больше выгодных предложений на onexbet, получите возможность выиграть дополнительные призы|Азартные игры с живыми дилерами на onexbet, новый уровень азарта в онлайн казино|Ставьте на любимые команды и игроков, получайте прибыль от своих прогнозов|Увеличьте свой капитал с onexbet, получайте прибыль без лишних затрат|Больше шансов на успех с onexbet, играйте и побеждайте с onexbet|Ваш комфорт – наш приоритет, гарантия качественного обслуживания|Уникальный дизайн и удобство на onexbet, играйте без стресса и неудобств|Увеличьте свои шансы на миллион с onexbet, ваша удача ждет вас в онлайн казино|Получайте прибыль от своих прогнозов, играть и выигрывать стало проще|Увеличьте свои шансы на победу с onexbet, статистика и аналитика для вашего успеха|Больше выигрышей с onexbet, делайте прогнозы и получайте прибыль|Профессиональная букмекерская контора onex
1 onexbet https://arxbetdslps.com/ .
your amazon storefront can be a powerful branding tool. this step-by-step guide to how to make an amazon storefront ensures you create a professional, polished look.
alkozona https://alkozona.ru/ .
buy cipro without rx: ci pharm delivery – buy ciprofloxacin
amoxicillin price canada: medicine amoxicillin 500 – where can i buy amoxicillin over the counter uk
Здесь можно сейфы для дома цены где можно купить сейф для дома
bilan o’yin-kulgi dunyosiga xush kelibsiz https://starvet.uz! 1000 dan ortiq o’yinlar, jonli dilerlar, sport va e-sport bir joyda. Saxiy bonuslar, tezkor depozitlar va qulay pul olish. O’ynang, g’alaba qozoning va yangi his-tuyg’ularga qayting!
bilan o’yin-kulgi dunyosiga xush kelibsiz https://starvet.uz! 1000 dan ortiq o’yinlar, jonli dilerlar, sport va e-sport bir joyda. Saxiy bonuslar, tezkor depozitlar va qulay pul olish. O’ynang, g’alaba qozoning va yangi his-tuyg’ularga qayting!
Предлагаем услуги профессиональных инженеров офицальной мастерской.
Еслли вы искали ремонт телефонов poco сервис, можете посмотреть на сайте: ремонт телефонов poco
Наши мастера оперативно устранят неисправности вашего устройства в сервисе или с выездом на дом!
Предлагаем услуги профессиональных инженеров офицальной мастерской.
Еслли вы искали ремонт телефонов meizu сервис, можете посмотреть на сайте: срочный ремонт телефонов meizu
Наши мастера оперативно устранят неисправности вашего устройства в сервисе или с выездом на дом!
order generic clomid online: clomidonpharm – where buy clomid without insurance
Discover the best game codes https://rxguides.net in-depth guides, and updated tier lists for your favorite games! Unlock exclusive rewards, master gameplay strategies, and find the top characters or items to dominate the competition.
Discover the best game codes https://rxguides.net in-depth guides, and updated tier lists for your favorite games! Unlock exclusive rewards, master gameplay strategies, and find the top characters or items to dominate the competition.
http://prednibest.com/# buy prednisone 20mg without a prescription best price
https://amoxstar.com/# amoxicillin 500mg capsules
india buy prednisone online canada pharmacy prednisone prednisone without a prescription
паралон для мебели паралон для мебели .
карниз с приводом карниз с приводом .
сделать проект перепланировки квартиры сделать проект перепланировки квартиры .
buy ciprofloxacin CiPharmDelivery cipro for sale
cost of cheap clomid no prescription: clomidonpharm – can i purchase generic clomid pill
can i order cheap clomid prices: can i order generic clomid for sale – where buy generic clomid without rx
анонимный чат знакомств анонимный чат знакомств .
Предлагаем услуги профессиональных инженеров офицальной мастерской.
Еслли вы искали ремонт телефонов infinix цены, можете посмотреть на сайте: ремонт телефонов infinix цены
Наши мастера оперативно устранят неисправности вашего устройства в сервисе или с выездом на дом!
Предлагаем услуги профессиональных инженеров офицальной мастерской.
Еслли вы искали срочный ремонт телефонов honor, можете посмотреть на сайте: ремонт телефонов honor в москве
Наши мастера оперативно устранят неисправности вашего устройства в сервисе или с выездом на дом!
Здесь можно сейфы для дома купить домашние сейфы
https://clomidonpharm.com/# generic clomid without prescription
https://clomidonpharm.com/# cost cheap clomid price
cipro 500mg best prices: purchase cipro – buy generic ciprofloxacin
It’s remarkable to pay a visit this site and reading the views of all colleagues on the topic of this article, while I am also eager of getting know-how.
фильмы 2024 смотреть онлайн
where can i buy generic clomid how can i get generic clomid online can i purchase clomid without rx
antibiotics cipro: ci pharm delivery – ciprofloxacin generic
clomid generics cost of clomid for sale where buy generic clomid
кращі фільми 2024 онлайн вийшли фільми онлайн безкоштовно
фільм повністю онлайн фільми 2024 дивитися онлайн
фільми онлайн безкоштовно реєстрація фільми онлайн безкоштовно
дивитися фільми онлайн 2024 дивитися фільм
Тут можно преобрести cейфы взломостойкие взломостойкие сейфы цена
amoxicillin 500mg price in canada: AmoxStar – buy amoxicillin online no prescription
Jugabet casino online Jugabet casino online .
https://clomidonpharm.com/# where can i get cheap clomid without dr prescription
Предлагаем услуги профессиональных инженеров офицальной мастерской.
Еслли вы искали срочный ремонт стиральных машин zanussi, можете посмотреть на сайте: ремонт стиральных машин zanussi
Наши мастера оперативно устранят неисправности вашего устройства в сервисе или с выездом на дом!
Предлагаем услуги профессиональных инженеров офицальной мастерской.
Еслли вы искали ремонт телефонов huawei, можете посмотреть на сайте: ремонт телефонов huawei в москве
Наши мастера оперативно устранят неисправности вашего устройства в сервисе или с выездом на дом!
purchase amoxicillin 500 mg amoxicillin 500mg capsules antibiotic amoxicillin online purchase
can i buy prednisone online without a prescription prednisone 10 mg over the counter buying prednisone
amoxicillin 825 mg: amoxicillin 500 mg capsule – how to buy amoxicillin online
найкращі фільми дивитись онлайн дивитися кіно онлайн
фільми онлайн у високій якості дивитися кіно онлайн
Online casinos site are thousands of slots, live games, profitable promotions and instant wins. Try your luck in a comfortable and safe environment, enjoying the excitement at any time and from any device.
Online casinos taya365 app are thousands of slots, live games, profitable promotions and instant wins. Try your luck in a comfortable and safe environment, enjoying the excitement at any time and from any device.
buy cheap amoxicillin: Amox Star – order amoxicillin uk
Откройте для себя инновации с galaxy s23 ultra широкий выбор смартфонов, планшетов, телевизоров и бытовой техники. Выгодные цены, гарантия качества и быстрая доставка. Закажите оригинальную продукцию Samsung прямо сейчас и наслаждайтесь технологиями будущего!
общение с людьми онлайн общение с людьми онлайн .
Откройте для себя инновации с galaxy s23 ultra широкий выбор смартфонов, планшетов, телевизоров и бытовой техники. Выгодные цены, гарантия качества и быстрая доставка. Закажите оригинальную продукцию Samsung прямо сейчас и наслаждайтесь технологиями будущего!
http://prednibest.com/# buy prednisone 5mg canada
вывод из запоя анонимно краснодар вывод из запоя анонимно краснодар .
https://prednibest.com/# buy prednisone online canada
luxury sea boats dubai https://boat-dubai-rent.com
dubai marina boat tour exclusive yacht dubai marina
amoxicillin 500 mg without prescription AmoxStar amoxicillin 500 mg capsule
party boat rental yacht booking dubaiyacht rental dubai
yacht rental dubai 2 person https://boat-dubai-rent.com
average cost of prednisone prednisone cost us prednisone 4mg tab
вывод из запоя на дому краснодар вывод из запоя на дому краснодар .
вывод из запоя стационар краснодар вывод из запоя стационар краснодар .
can i get cheap clomid now: can you get clomid for sale – can you buy generic clomid without prescription
cost generic clomid no prescription: can you buy generic clomid – buy generic clomid without dr prescription
Предлагаем услуги профессиональных инженеров офицальной мастерской.
Еслли вы искали ремонт стиральных машин siemens, можете посмотреть на сайте: ремонт стиральных машин siemens в москве
Наши мастера оперативно устранят неисправности вашего устройства в сервисе или с выездом на дом!
I’d like to find out more? I’d want to find out some additional information.
https://vepi.ru/art/promokod-1xbet-bonus-100.html
http://amoxstar.com/# amoxicillin order online no prescription
prednisone 20 mg pill: PredniBest – prednisone 20 mg tablets coupon
http://cipharmdelivery.com/# cipro online no prescription in the usa
prednisone uk over the counter PredniBest prednisone brand name india
amoxicillin online purchase: AmoxStar – antibiotic amoxicillin
Предлагаем услуги профессиональных инженеров офицальной мастерской.
Еслли вы искали ремонт стиральных машин smeg цены, можете посмотреть на сайте: ремонт стиральных машин smeg цены
Наши мастера оперативно устранят неисправности вашего устройства в сервисе или с выездом на дом!
get generic clomid price clomidonpharm where buy generic clomid for sale
выведение из запоя на дому санкт петербург выведение из запоя на дому санкт петербург .
can i purchase prednisone without a prescription: buy prednisone online without a script – prednisone 5093
order prednisone on line: Predni Best – prednisone 50 mg coupon
Самые актуальные новости Украины https://2news.com.ua/category/finansy/ политика, экономика, общество и культура. Только проверенные факты и оперативная подача информации.
http://prednibest.com/# 400 mg prednisone
Explore the world of Fisch codes on https://game-zoom.ru/fisch-kody.html for the ultimate fishing adventure in Roblox! Unlock rewards and upgrades for your gear, level up your fishing skills, and become a master angler today!
Самые актуальные новости Украины https://2news.com.ua/ политика, экономика, общество и культура. Только проверенные факты и оперативная подача информации.
Explore the world of Fisch codes on https://game-zoom.ru/fisch-kody.html for the ultimate fishing adventure in Roblox! Unlock rewards and upgrades for your gear, level up your fishing skills, and become a master angler today!
краснодар вывод из запоя краснодар вывод из запоя .
http://clomidonpharm.com/# how to get generic clomid pills
ciprofloxacin 500mg buy online buy cipro online without prescription buy cipro online canada
вывод из запоя на дому в спб вывод из запоя на дому в спб .
amoxicillin online canada: amoxicillin 750 mg price – over the counter amoxicillin
Практическое руководство Коновалова https://olsi.ru упражнения и советы для восстановления и укрепления здоровья.
вывод из запоя краснодар на дому вывод из запоя краснодар на дому .
Анализируйте поведение своей аудитории https://bs2site2.net находите точки роста и повышайте конверсии сайта. Поможем вам сделать ваш бизнес эффективнее и увеличить доход.
вывод из запоя краснодар наркология вывод из запоя краснодар наркология .
Практическое руководство Коновалова https://olsi.ru упражнения и советы для восстановления и укрепления здоровья.
Анализируйте поведение своей аудитории https://bs2site2.net находите точки роста и повышайте конверсии сайта. Поможем вам сделать ваш бизнес эффективнее и увеличить доход.
cost clomid without insurance: can i buy clomid prices – can i buy cheap clomid without dr prescription
Предлагаем услуги профессиональных инженеров офицальной мастерской.
Еслли вы искали ремонт стиральных машин indesit сервис, можете посмотреть на сайте: ремонт стиральных машин indesit в москве
Наши мастера оперативно устранят неисправности вашего устройства в сервисе или с выездом на дом!
Предлагаем услуги профессиональных инженеров офицальной мастерской.
Еслли вы искали ремонт стиральных машин lg в москве, можете посмотреть на сайте: ремонт стиральных машин lg
Наши мастера оперативно устранят неисправности вашего устройства в сервисе или с выездом на дом!
ciprofloxacin: CiPharmDelivery – buy cipro online canada
ciprofloxacin 500mg buy online: buy ciprofloxacin over the counter – cipro pharmacy
С помощью платформы https://bc2site.gl вы получите доступ к инновационным инструментам, которые помогут преуспеть в онлайн-продвижении. Управление проектами, оптимизация SEO и аналитика — все это доступно на bs2site.
https://castle-host.ru/
С помощью платформы https://bc2site.gl вы получите доступ к инновационным инструментам, которые помогут преуспеть в онлайн-продвижении. Управление проектами, оптимизация SEO и аналитика — все это доступно на bs2site.
Узнайте свою аудиторию лучше https://bs02site2.at анализ данных, улучшение опыта пользователей и рост конверсий. Помогаем привлекать клиентов и увеличивать доход.
Узнайте свою аудиторию лучше https://bs02site2.at анализ данных, улучшение опыта пользователей и рост конверсий. Помогаем привлекать клиентов и увеличивать доход.
https://prednibest.com/# no prescription prednisone canadian pharmacy
cipro online no prescription in the usa CiPharmDelivery ciprofloxacin generic price
no prescription online prednisone prednisone 5 mg tablet cost prednisone 10mg tablet price
С сайтом https://bs2syte.at/ вы можете легко анализировать свою аудиторию, улучшать видимость сайта в поисковых системах и повышать конверсии. Наша команда экспертов гарантирут качественную поддержку и советы для эффективного использования всех инструментов.
эскорт на час москва эскорт москва купить
С сайтом https://bs2site2.net/ вы можете легко анализировать свою аудиторию, улучшать видимость сайта в поисковых системах и повышать конверсии. Наша команда экспертов гарантирут качественную поддержку и советы для эффективного использования всех инструментов.
Официальная покупка диплома вуза с упрощенной программой обучения
эскорт услуги девушки элитные эскорт модели
промокод на подключение продамуса https://www.promokod-prodam.ru .
Предлагаем услуги профессиональных инженеров офицальной мастерской.
Еслли вы искали ремонт стиральных машин kuppersbusch сервис, можете посмотреть на сайте: ремонт стиральных машин kuppersbusch
Наши мастера оперативно устранят неисправности вашего устройства в сервисе или с выездом на дом!
buy generic ciprofloxacin: buy cipro online canada – cipro 500mg best prices
вывод из запоя в клинике спб вывод из запоя в клинике спб .
buy prednisone mexico: prednisone 10 mg – buy prednisone online uk
http://prednibest.com/# prednisone for sale no prescription
http://cipharmdelivery.com/# ciprofloxacin over the counter
Юридическое агентство «Актив правовых решений» https://ufalawyer.ru было основано в 2015 году в центре столицы Республики Башкортостан – городе Уфа, командой высококвалифицированных юристов, специализирующихся на вопросах недвижимости, семейном и жилищном праве, а также в спорах исполнения договоров строительного подряда и банкротства физических лиц.
Портал для коллекционеров https://ukrcoin.com.ua и ценителей монет и банкнот Украины. Узнайте актуальные цены на редкие украинские монеты, включая копейки, и откройте для себя уникальные экземпляры для своей коллекции. На сайте представлены детальные описания, редкости и советы для нумизматов. Украинские монеты разных периодов и их стоимость – всё это на одном ресурсе!
Портал для коллекционеров https://ukrcoin.com.ua и ценителей монет и банкнот Украины. Узнайте актуальные цены на редкие украинские монеты, включая копейки, и откройте для себя уникальные экземпляры для своей коллекции. На сайте представлены детальные описания, редкости и советы для нумизматов. Украинские монеты разных периодов и их стоимость – всё это на одном ресурсе!
Юридическое агентство «Актив правовых решений» https://ufalawyer.ru было основано в 2015 году в центре столицы Республики Башкортостан – городе Уфа, командой высококвалифицированных юристов, специализирующихся на вопросах недвижимости, семейном и жилищном праве, а также в спорах исполнения договоров строительного подряда и банкротства физических лиц.
вывод из запоя на дому в спб вывод из запоя на дому в спб .
вывод из запоя цена вывод из запоя цена .
выведение из запоя на дому спб [url=www.kvitka.ukrbb.net/viewtopic.php?f=58&t=28097]выведение из запоя на дому спб [/url] .
cost of amoxicillin: order amoxicillin online uk – buy amoxicillin over the counter uk
Предлагаем услуги профессиональных инженеров офицальной мастерской.
Еслли вы искали ремонт приставок xbox цены, можете посмотреть на сайте: ремонт приставок xbox цены
Наши мастера оперативно устранят неисправности вашего устройства в сервисе или с выездом на дом!
Предлагаем услуги профессиональных инженеров офицальной мастерской.
Еслли вы искали срочный ремонт стиральных машин aeg, можете посмотреть на сайте: срочный ремонт стиральных машин aeg
Наши мастера оперативно устранят неисправности вашего устройства в сервисе или с выездом на дом!
вывод из запоя в спб вывод из запоя в спб .
Do you have a spam problem on this site; I also am a blogger, and I was wondering your situation; many of us have developed some nice practices and we are looking to exchange methods with other folks, be sure to shoot me an e-mail if interested.
вход банда казино
Vnish offers official https://vnish.us firmware for Antminer models S21, T21, S19, T19, and L7. Visit the official Vnish website to boost your mining efficiency by 15-25%.
Vnish official firmware https://vnish.us/self-installation/ for Bitmain Antminer: boost performance by up to 25% and cut energy consumption by up to 15%. Download Vnish firmware now!
My Betting Sites India https://bettingblog.tech your guide to the best sports betting sites. Reviews, ratings, bonuses and comparisons. Find the perfect sports betting platform in India!
My Betting Sites India https://bettingblog.tech your guide to the best sports betting sites. Reviews, ratings, bonuses and comparisons. Find the perfect sports betting platform in India!
цена 1кг героина детское порно девочек
детское порно видео тг шлюхи уфы
в какой стране детское порно купить меф жезказган
vavada official app vavada official login
купить закладку героина герыч кокс меф соли купить
vavada working site mirror vavada registration site
выведение из запоя на дому спб цены выведение из запоя на дому спб цены .
Предлагаем услуги профессиональных инженеров офицальной мастерской.
Еслли вы искали срочный ремонт посудомоечных машин siemens, можете посмотреть на сайте: ремонт посудомоечных машин siemens адреса
Наши мастера оперативно устранят неисправности вашего устройства в сервисе или с выездом на дом!
Предлагаем услуги профессиональных инженеров офицальной мастерской.
Еслли вы искали ремонт приставок sony playstation сервис, можете посмотреть на сайте: ремонт приставок sony playstation рядом
Наши мастера оперативно устранят неисправности вашего устройства в сервисе или с выездом на дом!
вывод из запоя в санкт петербурге вывод из запоя в санкт петербурге .
vavada login official vavada casino vavada download
site vavada vavada promo code
vavada deposit vavada casino site
вывод из запоя в спб вывод из запоя в спб .
vavada vavadaa online download https://game-vavada-casino.com
vavada mirror login vavada mobile version
снятие ломок снятие ломок .
смотреть хорошие фильмы без рекламы фильмы онлайн бесплатно
vavada vip download vavada for android
сериалы сезон онлайн бесплатно смотреть фильм
vavada personal account vavada official bonus
vavada site https://game-vavada-casino.com
vavada play official vavada casino
vavada official site vavada vavada app
снятие ломки на дому снятие ломки на дому .
vavada official site vavada casino
vavada online download vavada official app
vavada official site mirror https://game-vavada-casino.com
Our insulation services https://iepinsulation.com keep your home warm and energy-efficient year-round. We specialize in insulating facades, roofs, floors, and attics using modern materials and techniques. Trust our experienced team for durable, cost-effective solutions that improve comfort and reduce energy bills.
Our insulation services https://iepinsulation.com keep your home warm and energy-efficient year-round. We specialize in insulating facades, roofs, floors, and attics using modern materials and techniques. Trust our experienced team for durable, cost-effective solutions that improve comfort and reduce energy bills.
Предлагаем услуги профессиональных инженеров офицальной мастерской.
Еслли вы искали ремонт посудомоечных машин miele цены, можете посмотреть на сайте: ремонт посудомоечных машин miele
Наши мастера оперативно устранят неисправности вашего устройства в сервисе или с выездом на дом!
Предлагаем услуги профессиональных инженеров офицальной мастерской.
Еслли вы искали ремонт стиральных машин dexp адреса, можете посмотреть на сайте: ремонт стиральных машин dexp
Наши мастера оперативно устранят неисправности вашего устройства в сервисе или с выездом на дом!
Why visitors still make use of to read news papers when in this technological world everything is presented on net?
https://kfek.org.ua/focus2-bilead-install.html
агентство эскорт услуг элитный эскорт москва
красивые эскорт москва https://vip-eskort-msk.ru
осушитель воздуха для компрессоров осушитель воздуха для компрессоров .
Steam Desktop Authenticator https://steamdesktopauthenticator.me is a powerful tool designed to enhance the security of your Steam account. By generating time-based one-time passwords, it provides an additional layer of protection against unauthorized access. This desktop application allows users to manage their two-factor authentication easily, ensuring that only you can access your account.
Steam Desktop Authenticator https://steamauthenticator.ru это альтернатива мобильному аутентификатору Steam. Генерация кодов, подтверждение обменов и входов теперь возможны с компьютера. Программа проста в использовании, повышает удобство и позволяет защитить аккаунт, даже если у вас нет доступа к телефону.
снятие ломки цены снятие ломки цены .
Разбавленные Разбавленные .
Steam Desktop Authenticator https://steamauthenticatordesktop.com is an alternative to the mobile authenticator. Generating Steam Guard codes, confirming logins, trades and transactions is now possible directly from your computer. A convenient and secure solution for Steam users who want to simplify their account management.
Steam Desktop Authenticator https://steamdesktopauthenticator.io is a convenient tool for two-factor authentication of Steam via PC. The program generates Steam Guard codes, replacing the mobile authenticator. Easily confirm logins, trades and sales directly from your computer. Increase account security and manage it quickly and conveniently.
снятие ломки на дому снятие ломки на дому .
vavada mirror online vavada application for android
Steam Desktop Authenticator https://authenticatorsteam.com is the perfect tool for managing Steam security via PC. It replaces the mobile authenticator, allowing you to generate Steam Guard codes, confirm trades and logins. Ease of use and reliable protection make this program indispensable for every Steam user.
Разбавленные Разбавленные .
vavada no deposit bonuses vavada mobile application
Steam Desktop Authenticator https://authenticatorsteam.com is the perfect tool for managing Steam security via PC. It replaces the mobile authenticator, allowing you to generate Steam Guard codes, confirm trades and logins. Ease of use and reliable protection make this program indispensable for every Steam user.
программа для ip камер vms программа для видеонаблюдения
скачать ivms на русском https://www.cctvfocus.ru
софт для камер видеонаблюдения запись по детекции движения
ip видеорегистратор nvr скачать программу для ip камеры
Предлагаем услуги профессиональных инженеров офицальной мастерской.
Еслли вы искали ремонт посудомоечных машин beko сервис, можете посмотреть на сайте: ремонт посудомоечных машин beko
Наши мастера оперативно устранят неисправности вашего устройства в сервисе или с выездом на дом!
Предлагаем услуги профессиональных инженеров офицальной мастерской.
Еслли вы искали ремонт посудомоечных машин midea сервис, можете посмотреть на сайте: ремонт посудомоечных машин midea
Наши мастера оперативно устранят неисправности вашего устройства в сервисе или с выездом на дом!
осушитель для компрессора москва sk-kompressor.ru .
сексшоп секс шоп интернет магазин
сексшоп sex-hub-kyiv.top
снять ломку наркомана снять ломку наркомана .
снятие ломки клинике [url=www.alhambra.bestforums.org/viewtopic.php?f=10&t=46521]снятие ломки клинике [/url] .
секс шоп каталог https://sex-hub-kharkov.top
секс шоп с бесплатной доставкой https://sex-hub-kyiv.top
пансионат для пожилых крым пансионат для пожилых крым .
Планируете карьеру или хотите узнать больше о своем рынке труда? На нашем сайте https://zlojnachalnik.ru вы найдете подробную информацию о профессиях, их перспективах и уровнях зарплат. Получите ценную информацию, чтобы сделать осознанный выбор и достичь своих профессиональных целей. Узнайте всё о современных профессиях: от востребованности на рынке до уровня заработной платы.
Планируете карьеру или хотите узнать больше о своем рынке труда? На нашем сайте https://zlojnachalnik.ru вы найдете подробную информацию о профессиях, их перспективах и уровнях зарплат. Получите ценную информацию, чтобы сделать осознанный выбор и достичь своих профессиональных целей. Узнайте всё о современных профессиях: от востребованности на рынке до уровня заработной платы.
Официальный сайт https://1winpromobk.ru, где вы найдете актуальные промокоды и бонусы для 1Win. Получите эксклюзивные предложения, такие как 500% на первый депозит и бесплатные спины. Присоединяйтесь прямо сейчас, чтобы воспользоваться всеми преимуществами и начать выигрывать!
Официальный сайт https://1winpromobk.ru, где вы найдете актуальные промокоды и бонусы для 1Win. Получите эксклюзивные предложения, такие как 500% на первый депозит и бесплатные спины. Присоединяйтесь прямо сейчас, чтобы воспользоваться всеми преимуществами и начать выигрывать!
Pretty! This was an incredibly wonderful article. Thanks for supplying these details.
бесплатный эро чат
снятие ломки клинике снятие ломки клинике .
промокод на подключение продамуса промокод на подключение продамуса .
Предлагаем услуги профессиональных инженеров офицальной мастерской.
Еслли вы искали срочный ремонт посудомоечных машин hotpoint ariston, можете посмотреть на сайте: ремонт посудомоечных машин hotpoint ariston
Наши мастера оперативно устранят неисправности вашего устройства в сервисе или с выездом на дом!
Предлагаем услуги профессиональных инженеров офицальной мастерской.
Еслли вы искали ремонт посудомоечных машин aeg, можете посмотреть на сайте: ремонт посудомоечных машин aeg цены
Наши мастера оперативно устранят неисправности вашего устройства в сервисе или с выездом на дом!
слитые курсы по программированию база курсов слив
сливы курсов 2024 слитые курсы от скиллбокс
снятие ломки в стационаре снятие ломки в стационаре .
снятие ломки клинике снятие ломки клинике .
дом пенсионеров в крыму [url=https://xn—–2-53dwibb3a5adehvkaijkcgoft4dwa1orb.xn--p1ai]дом пенсионеров в крыму[/url] .
снятие ломки наркозависимого снятие ломки наркозависимого .
Какое программное обеспечение https://www.cctvforum.ru для видеонаблюдения является лучшим? Какой сервис видеонаблюдения как услуги (VSaaS) наиболее простой и удобный в использовании?
Лучшие 10 программ https://www.cctvfocus.ru для видеонаблюдения. Программное обеспечение для видеонаблюдения. При выборе программного обеспечения важно учитывать наличие функции обнаружения объектов с использованием искусственного интеллекта.
myspace.com aprelium.com/forum/profile.php?mode=viewprofile&u=faucetpond99 .
Лучшие 10 программ https://www.cctvfocus.ru для видеонаблюдения. Программное обеспечение для видеонаблюдения. При выборе программного обеспечения важно учитывать наличие функции обнаружения объектов с использованием искусственного интеллекта.
myspace.com http://Www.Kepenk%20trsfcdhf.Hfhjf.Hdasgsdfhdshshfsh@forum.annecy-outdoor.com/suivi_forum/?a%5B%5D=%3Ca+href%3Dhttps%3A%2F%2Fcanceramount9.edublogs.org%2F2024%2F12%2F13%2Fthe-role-of-pornography-in-enhancing-sexual-desire-and-libido%2F%3Emia+khalifa+xxx+-+xxxbp.tv%3C%2Fa%3E%3Cmeta+http-equiv%3Drefresh+content%3D0%3Burl%3Dhttp%3A%2F%2Fwww.tisipara.com%2Fmembers%2Fbeliefdew72%2Factivity%2F153788%2F+%2F%3E/ .
Download online Taya365 app and discover a new level of mobile gaming. Slots, live casino, exclusive bonuses – all this is available on your smartphone. Enjoy the game anytime, anywhere!
https://gramster.ru/# пин ап казино
http://gramster.ru/# пин ап
Hmm is anyone else experiencing problems with the pictures on this blog loading? I’m trying to figure out if its a problem on my end or if it’s the blog. Any suggestions would be greatly appreciated.
https://sinyak.com.ua/led-lampy-dlya-avto-maksimalnaya-yarkost-i-ekonomichnost
Download online Taya365 app and discover a new level of mobile gaming. Slots, live casino, exclusive bonuses – all this is available on your smartphone. Enjoy the game anytime, anywhere!
пин ап зеркало: gramster.ru – pinup 2025
What’s up, I would like to subscribe for this web site to take newest updates, so where can i do it please assist.
https://a-stroi.net/sovremennye-stekla-dlya-far-uluchshite-svet-i-stil-vash%D0%B5%D0%B3%D0%BE-avto
http://gramster.ru/# пинап казино
пин ап: gramster.ru – пин ап казино официальный сайт
снятие ломок на дому снятие ломок на дому .
Идеальное решение для скрытой связи — купить магнитный микронаушник. Широкий выбор моделей, гарантия качества и выгодные условия покупки. Надёжная связь, компактный размер и удобство использования.
https://gramster.ru/# пин ап казино официальный сайт
снятие ломок на дому снятие ломок на дому .
пин ап зеркало [url=https://gramster.ru/#]Gramster[/url] пин ап вход
Идеальное решение для скрытой связи — купить капсульный микронаушник. Широкий выбор моделей, гарантия качества и выгодные условия покупки. Надёжная связь, компактный размер и удобство использования.
http://gramster.ru/# пин ап зеркало
купить воздушные шары цена где можно купить воздушные шарики
http://gramster.ru/# пинап казино
myspace.com https://www.chutrau.com/__media__/js/netsoltrademark.php?d=milsaver.com%2Fmembers%2Fstoolgauge60%2Factivity%2F913694%2F .
myspace.com https://diigo.com/0y9mb5/ .
гелиевые шары на заказ с доставкой купить воздушные шарики большие
пин ап казино официальный сайт: gramster.ru – pinup 2025
https://gramster.ru/# пин ап
https://gramster.ru/# пинап казино
https://gramster.ru/# пин ап казино официальный сайт
myspace.com http://www.ems-isd.net/__media__/js/netsoltrademark.php?d=dev-westudy.accedo.gr%2Fmembers%2Ffrenchpain4%2Factivity%2F1747709%2F .
пин ап казино зеркало: gramster – gramster.ru
Steam Desktop Authenticator https://authenticatorsteam.com is a convenient application for managing two-factor authentication in Steam. Allows you to quickly confirm trades, logins and purchases, providing additional protection for your account.
Steam Desktop Authenticator https://authenticatorsteam.com is a convenient application for managing two-factor authentication in Steam. Allows you to quickly confirm trades, logins and purchases, providing additional protection for your account.
пин ап зеркало: gramster – pinup 2025
Разбавленные Разбавленные .
https://gramster.ru/# пин ап казино официальный сайт
промокоды изи дроп 100 процентов промокоды изи дроп 100 процентов .
easydrop промокоды 50 easydrop промокоды 50 .
where to stay near Durmitor national park park Durmitor
Bianca spa Bianca Resort and Spa
easydrop промокоды 50 easydrop промокоды 50 .
пин ап [url=http://gramster.ru/#]Gramster[/url] пин ап
пин ап казино зеркало: gramster.ru – pinup 2025
Zabljak vreme Durmitor national park
ski centar 1450 Ski Center Kolasin 1600
http://gramster.ru/# пинап казино
pinup 2025: Gramster – gramster.ru
pinup 2025 Gramster gramster.ru
http://gramster.ru/# pinup 2025
Your article helped me a lot, is there any more related content? Thanks!
изи дроп промокод на 100 рублей изи дроп промокод на 100 рублей .
http://gramster.ru/# пин ап зеркало
https://gramster.ru/# пин ап вход
https://gramster.ru/# пин ап казино официальный сайт
Плодотворное популяризация web-страницы за счет контента В настоящем виртуальном пространстве раскрутка интернет-площадки представляется первостепенным нюансом достижения какого-либо электронного бизнеса продвижение сайтов статьями.
https://gramster.ru/# пин ап вход
Официальный сайт https://1winpromobk.ru, где вы найдете актуальные промокоды и бонусы для 1Win. Получите эксклюзивные предложения, такие как 500% на первый депозит и бесплатные спины.
Какое программное обеспечение для видеонаблюдения https://www.cctvforum.ru является лучшим? Какой сервис видеонаблюдения как услуги (VSaaS) наиболее простой и удобный в использовании?
gramster.ru: Gramster – pinup 2025
нарколог на дом вывод из запоя ростов нарколог на дом вывод из запоя ростов .
Официальный сайт https://1winpromobk.ru, где вы найдете актуальные промокоды и бонусы для 1Win. Получите эксклюзивные предложения, такие как 500% на первый депозит и бесплатные спины.
Какое программное обеспечение для видеонаблюдения https://www.cctvforum.ru является лучшим? Какой сервис видеонаблюдения как услуги (VSaaS) наиболее простой и удобный в использовании?
нарколог на дом вывод из запоя на дому нарколог на дом вывод из запоя на дому .
анонимный. вывод. из. запоя. ростов. vyvod-iz-zapoya-rostov26.ru .
вывод из запоя дешево ростов вывод из запоя дешево ростов .
Может, вы и правы
butirkaconcert.ru
http://gramster.ru/# пин ап вход
Steam Desktop Authenticator steamauthenticator.ru is a convenient application for managing Steam two-factor authentication directly on your PC. It allows you to confirm logins, trades, and purchases without the need for a mobile device.
Steam Desktop Authenticator steamdesktopauthenticator.me is a PC application that makes it easier to use two-factor authentication on Steam. By replacing the mobile authenticator, it allows you to confirm trades, purchases, and account logins, providing a high level of security and ease of use.
Steam Desktop Authenticator steamdesktopauthenticator.io is a simple and reliable way to protect your Steam account. The program allows you to confirm transactions, receive security codes, and manage two-factor authentication settings without relying on your smartphone.
пин ап казино зеркало Gramster пин ап казино
Лучшие коляски 3 в 1 для вашего малыша, которые обязательно пригодятся.
Топовые модели колясок 3 в 1, которые порадуют вас своим качеством и функциональностью.
Гид по выбору коляски 3 в 1, чтобы не прогадать с покупкой.
Что нужно знать при выборе коляски 3 в 1, для максимального удобства вашего малыша.
Сравнение колясок 3 в 1: отзывы и рекомендации, и сделать правильное решение.
коляска детская 3 в 1 коляска детская 3 в 1 .
Steam Desktop Authenticator steamauthenticator.ru is a convenient application for managing Steam two-factor authentication directly on your PC. It allows you to confirm logins, trades, and purchases without the need for a mobile device.
Steam Desktop Authenticator steamdesktopauthenticator.me is a PC application that makes it easier to use two-factor authentication on Steam. By replacing the mobile authenticator, it allows you to confirm trades, purchases, and account logins, providing a high level of security and ease of use.
Steam Desktop Authenticator steamdesktopauthenticator.io is a simple and reliable way to protect your Steam account. The program allows you to confirm transactions, receive security codes, and manage two-factor authentication settings without relying on your smartphone.
пинап казино gramster.ru gramster.ru
https://gramster.ru/# пин ап казино
http://gramster.ru/# pinup 2025
https://gramster.ru/# пин ап казино официальный сайт
Откройте для себя лучшие отели в Москве Вас ждут стильные номера, изысканная кухня, современные удобства и внимание к деталям. Отели расположены в ключевых районах города, что делает их идеальными для деловых поездок, романтических выходных или туристических открытий.
Steam Desktop Authenticator authenticatorsteam.com is an alternative to the Steam Mobile Authenticator. It provides codes for two-factor authentication directly on your PC.
Steam Desktop Authenticator steamauthenticatordesktop.com is a handy app to enhance the security of your Steam account. It generates codes for two-factor authentication, allowing you to easily confirm transactions and logins.
осушитель воздуха промышленный для компрессора осушитель воздуха промышленный для компрессора .
Steam Desktop Authenticator authenticatorsteam.com is an alternative to the Steam Mobile Authenticator. It provides codes for two-factor authentication directly on your PC.
Откройте для себя лучшие гостиницы Москвы Вас ждут стильные номера, изысканная кухня, современные удобства и внимание к деталям. Отели расположены в ключевых районах города, что делает их идеальными для деловых поездок, романтических выходных или туристических открытий.
https://gramster.ru/# пин ап
Steam Desktop Authenticator steamauthenticatordesktop.com is a handy app to enhance the security of your Steam account. It generates codes for two-factor authentication, allowing you to easily confirm transactions and logins.
https://gramster.ru/# пинап казино
Лучшие букеты роз для вашего праздника, порадуйте себя или близких.
Букеты роз – лучший подарок для любого случая, доставка в удобное время и место.
Красочные букеты роз для ярких впечатлений, гарантированная свежесть цветов.
Освежите обстановку с помощью букетов роз, быстрое исполнение заказов.
Изысканные композиции из роз, подарите частичку красоты близким.
Подарите букет роз любимым женщинам, быстрая и качественная доставка.
Оригинальные идеи для букетов роз, индивидуальный подход к каждому клиенту.
Компактные или роскошные букеты роз, мгновенное подтверждение заказа.
Букеты роз под ключ с доставкой, доступные цены и высокое качество.
Утонченные композиции из роз, насладитесь ароматом настоящей красоты.
Соберите свой уникальный букет, в удобное для вас время.
Стильные букеты роз с доставкой, сделайте день особенным.
доставка цветов в нижнем новгороде доставка цветов в нижнем новгороде .
пинап казино: gramster – пин ап зеркало
Официальная страница диана шурыгина вк. Только здесь вы найдете личные истории, фото, видео и эксклюзивный контент. Узнавайте первыми о новых проектах и наслаждайтесь моментами её жизни. Подписывайтесь, чтобы быть всегда на связи!
ораторские курсы школа речи и ораторского мастерства
заказать гелиевые шары магазин гелиевых шаров
http://gramster.ru/# пин ап зеркало
Официальная страница фото дианы шурыгиной сейчас. Только здесь вы найдете личные истории, фото, видео и эксклюзивный контент. Узнавайте первыми о новых проектах и наслаждайтесь моментами её жизни. Подписывайтесь, чтобы быть всегда на связи!
пин ап казино: Gramster – пин ап
тренинги по ораторскому искусству курсы по улучшению дикции и речи
индивидуальные шары с надписью https://shariki-shop47.ru
вывод из запоя ростовская область вывод из запоя ростовская область .
Steam Desktop Authenticator https://steamdesktopauthenticator.io is a two-factor authentication application for PC. Generates codes to confirm transactions and log in to Steam, improving the security of your account. Convenient, quick to install and easy to use solution for data protection.
Онлайн слив курсов https://sliv-kursov213.ru простой способ получить знания из популярных онлайн-курсов. Развивайтесь в своем темпе, выбирайте интересующие темы и экономьте на образовании. Здесь вы найдете материалы для саморазвития, карьерного роста и хобби.
https://gramster.ru/# pinup 2025
Steam Desktop Authenticator https://authenticatorsteam.com is a two-factor authentication application for PC. Generates codes to confirm transactions and log in to Steam, improving the security of your account. Convenient, quick to install and easy to use solution for data protection.
http://gramster.ru/# pinup 2025
Steam Desktop Authenticator https://steamauthenticator.ru is a two-factor authentication application for PC. Generates codes to confirm transactions and log in to Steam, improving the security of your account. Convenient, quick to install and easy to use solution for data protection.
Онлайн слив курсов https://sliv-kursov213.ru простой способ получить знания из популярных онлайн-курсов. Развивайтесь в своем темпе, выбирайте интересующие темы и экономьте на образовании. Здесь вы найдете материалы для саморазвития, карьерного роста и хобби.
вывод из запоя в ростове-на-дону вывод из запоя в ростове-на-дону .
Steam Desktop Authenticator https://steamdesktopauthenticator.io is a two-factor authentication application for PC. Generates codes to confirm transactions and log in to Steam, improving the security of your account. Convenient, quick to install and easy to use solution for data protection.
https://gramster.ru/# пин ап казино официальный сайт
наркология вывод из запоя ростов наркология вывод из запоя ростов .
http://gramster.ru/# пинап казино
http://gramster.ru/# пин ап
gramster.ru: Gramster – pinup 2025
http://gramster.ru/# пинап казино
http://gramster.ru/# пин ап казино зеркало
вывод из запоя стационар ростов вывод из запоя стационар ростов .
цена снегоход ирбис цена снегоход ирбис .
купить аттестат в барнауле
http://gramster.ru/# пин ап казино зеркало
http://gramster.ru/# пин ап казино
Предлагаем услуги профессиональных инженеров офицальной мастерской.
Еслли вы искали ремонт ноутбуков sony сервис, можете посмотреть на сайте: срочный ремонт ноутбуков sony
Наши мастера оперативно устранят неисправности вашего устройства в сервисе или с выездом на дом!
нижний новгород отели otelinizhniinovgorod-ru.ru .
нарколог вывод из запоя ростов нарколог вывод из запоя ростов .
http://gramster.ru/# пин ап зеркало
pinup 2025: gramster – pinup 2025
http://gramster.ru/# pinup 2025
http://gramster.ru/# пин ап вход
pinup 2025 gramster.ru пин ап зеркало
https://gramster.ru/# пин ап зеркало
https://gramster.ru/# пин ап
https://gramster.ru/# пин ап казино
вывод из запоя ростовская область вывод из запоя ростовская область .
снегоход irbis dingo t150 снегоход irbis dingo t150 .
http://gramster.ru/# pinup 2025
https://gramster.ru/# пин ап казино
пин ап казино официальный сайт: gramster.ru – pinup 2025
нижний новгород отели http://otelinizhniinovgorod-ru.ru/ .
https://gramster.ru/# пин ап казино официальный сайт
https://gramster.ru/# пин ап казино
http://gramster.ru/# пин ап зеркало
http://gramster.ru/# пин ап вход
пинап казино gramster.ru пин ап зеркало
https://gramster.ru/# gramster.ru
pinup 2025 Gramster пин ап
https://gramster.ru/# пинап казино
платный нарколог на дом платный нарколог на дом .
нарколог на дом срочно нарколог на дом срочно .
лучшие фильмы 2024 смотреть онлайн фильмы 2024 смотреть онлайн на компьютере
фильмы онлайн HD в России фильмы 2005 смотреть онлайн
новинки фильмы онлайн HD фильмы 2020 смотреть онлайн
пин ап казино официальный сайт: gramster.ru – пин ап казино официальный сайт
http://gramster.ru/# пин ап зеркало
фильмы 2019 смотреть онлайн лучшие фильмы онлайн фантастика
смотреть фильмы бесплатно комедии фильмы 2013 смотреть онлайн
фильмы онлайн HD в HD фильмы 2014 смотреть онлайн
платный нарколог на дом платный нарколог на дом .
пин ап: gramster.ru – пинап казино
вызвать нарколога на дом вызвать нарколога на дом .
частного нарколога на дом http://narkolog-na-dom-krasnodar26.ru .
http://gramster.ru/# пин ап зеркало
https://gramster.ru/# gramster.ru
http://gramster.ru/# пин ап
смотреть фильмы бесплатно в СНГ смотреть фильмы онлайн детективы
Download music https://progworld.net in high quality without sound loss. Convenient search, wide choice of genres and artists, fast downloads.
аренда яхты дубай оплата онлайн яхты в дубае
https://gramster.ru/# пин ап казино официальный сайт
Предлагаем услуги профессиональных инженеров офицальной мастерской.
Еслли вы искали ремонт ноутбуков msi рядом, можете посмотреть на сайте: ремонт ноутбуков msi цены
Наши мастера оперативно устранят неисправности вашего устройства в сервисе или с выездом на дом!
смотреть фильмы бесплатно на планшете фильмы 2024 смотреть онлайн в СНГ
прокатиться на яхте дубай аренда катера дубай
Download music https://progworld.net in high quality without sound loss. Convenient search, wide choice of genres and artists, fast downloads.
пин ап казино официальный сайт gramster.ru пинап казино
https://gramster.ru/# gramster.ru
пин ап казино зеркало gramster gramster.ru
пин ап казино: gramster.ru – pinup 2025
пинап казино: gramster.ru – пин ап вход
Предлагаем услуги профессиональных инженеров офицальной мастерской.
Еслли вы искали ремонт ноутбуков lenovo сервис, можете посмотреть на сайте: ремонт ноутбуков lenovo цены
Наши мастера оперативно устранят неисправности вашего устройства в сервисе или с выездом на дом!
Предлагаем услуги профессиональных инженеров офицальной мастерской.
Еслли вы искали срочный ремонт ноутбуков msi, можете посмотреть на сайте: ремонт ноутбуков msi
Наши мастера оперативно устранят неисправности вашего устройства в сервисе или с выездом на дом!
https://gramster.ru/# пин ап казино зеркало
http://gramster.ru/# пин ап
нарколог на дом круглосуточно нарколог на дом круглосуточно .
снять катер дубай dubai яхта
аренда яхты в дубай https://arenda-yahty-dubai.ru
http://gramster.ru/# пин ап казино официальный сайт
вызвать нарколога на дом вызвать нарколога на дом .
https://gramster.ru/# пин ап казино зеркало
вызов нарколога на дом краснодар вызов нарколога на дом краснодар .
https://gramster.ru/# pinup 2025
http://mexicanpharmacy.store/# reputable mexican pharmacies online
https://mexicanpharmacy.store/# buying prescription drugs in mexico
Online medicine order india pharmacy indian pharmacy online
mexican rx online: best online pharmacies in mexico – best online pharmacies in mexico
http://mexicanpharmacy.store/# п»їbest mexican online pharmacies
Download music https://progworld.net for free and without registration. Huge database of tracks of all genres in high quality. Convenient search and fast download.
Предлагаем услуги профессиональных инженеров офицальной мастерской.
Еслли вы искали ремонт ноутбуков toshiba в москве, можете посмотреть на сайте: срочный ремонт ноутбуков toshiba
Наши мастера оперативно устранят неисправности вашего устройства в сервисе или с выездом на дом!
Смотрите аниме онлайн https://reanime.net на русском! Огромная коллекция сериалов и фильмов в хорошем качестве. Все популярные аниме с русской озвучкой и субтитрами. Удобно, бесплатно, в отличном качестве.
Предлагаем услуги профессиональных инженеров офицальной мастерской.
Еслли вы искали ремонт ноутбуков fujitsu siemens рядом, можете посмотреть на сайте: ремонт ноутбуков fujitsu siemens сервис
Наши мастера оперативно устранят неисправности вашего устройства в сервисе или с выездом на дом!
canadian neighbor pharmacy canadian pharmacy win canadian pharmacy antibiotics
сколько стоит программа 1с сколько стоит программа 1с .
medication from mexico pharmacy: mexico drug stores pharmacies – mexican border pharmacies shipping to usa
Download music https://progworld.net for free and without registration. Huge database of tracks of all genres in high quality. Convenient search and fast download.
Смотрите аниме онлайн https://reanime.net на русском! Огромная коллекция сериалов и фильмов в хорошем качестве. Все популярные аниме с русской озвучкой и субтитрами. Удобно, бесплатно, в отличном качестве.
нарколог на дом нарколог на дом .
нарколог на дом краснодар нарколог на дом краснодар .
https://canadianpharmacy.win/# best canadian pharmacy to buy from
http://canadianpharmacy.win/# canada online pharmacy
вызов нарколога на дом краснодар вызов нарколога на дом краснодар .
Доставка грузов из Китая https://cargotlk.ru под ключ. Организуем перевозки любых объемов: от документов до крупногабаритных грузов. Авиа, морская и автодоставка. Полное сопровождение, таможенное оформление, страхование.
Предлагаем услуги профессиональных инженеров офицальной мастерской.
Еслли вы искали срочный ремонт ноутбуков toshiba, можете посмотреть на сайте: ремонт ноутбуков toshiba в москве
Наши мастера оперативно устранят неисправности вашего устройства в сервисе или с выездом на дом!
Доставка грузов из Китая https://cargotlk.ru под ключ. Организуем перевозки любых объемов: от документов до крупногабаритных грузов. Авиа, морская и автодоставка. Полное сопровождение, таможенное оформление, страхование.
нарколог на дом нарколог на дом .
http://canadianpharmacy.win/# prescription drugs canada buy online
Предлагаем услуги профессиональных инженеров офицальной мастерской.
Еслли вы искали срочный ремонт ноутбуков fujitsu siemens, можете посмотреть на сайте: ремонт ноутбуков fujitsu siemens сервис
Наши мастера оперативно устранят неисправности вашего устройства в сервисе или с выездом на дом!
https://canadianpharmacy.win/# canadian neighbor pharmacy
https://indianpharmacy.win/# cheapest online pharmacy india
нарколог на дом недорого http://narkolog-na-dom-krasnodar29.ru .
mail order pharmacy india: mail order pharmacy india – world pharmacy india
india pharmacy: cheapest online pharmacy india – Online medicine home delivery
вывод из запоя в стационаре краснодара вывод из запоя в стационаре краснодара .
india pharmacy mail order online pharmacy india top 10 online pharmacy in india
http://indianpharmacy.win/# top 10 pharmacies in india
https://mexicanpharmacy.store/# mexican drugstore online
What a stuff of un-ambiguity and preserveness of precious know-how concerning unexpected emotions.
#@G@G@G@G#
https://jurisnotary.com/pgs/code_promotionnel_pour_1xbet.html
http://indianpharmacy.win/# pharmacy website india
top online pharmacy india indian pharmacies safe top 10 online pharmacy in india
http://mexicanpharmacy.store/# mexico pharmacies prescription drugs
https://canadianpharmacy.win/# canadian drug prices
https://indianpharmacy.win/# top 10 online pharmacy in india
https://indianpharmacy.win/# reputable indian pharmacies
medication from mexico pharmacy: medication from mexico pharmacy – medicine in mexico pharmacies
pharmacies in mexico that ship to usa: reputable mexican pharmacies online – buying prescription drugs in mexico online
http://indianpharmacy.win/# online pharmacy india
купить программу 1с предприятие http://kupit-1s14.ru .
https://canadianpharmacy.win/# canadian pharmacy
нарколог на дом срочно нарколог на дом срочно .
http://mexicanpharmacy.store/# mexican mail order pharmacies
http://mexicanpharmacy.store/# mexican rx online
срочный выезд нарколога на дом http://narkolog-na-dom-krasnodar28.ru/ .
https://canadianpharmacy.win/# onlinepharmaciescanada com
https://indianpharmacy.win/# indianpharmacy com
http://mexicanpharmacy.store/# pharmacies in mexico that ship to usa
indian pharmacies safe india pharmacy mail order india pharmacy
врач нарколог на дом врач нарколог на дом .
www canadianonlinepharmacy: is canadian pharmacy legit – canadian pharmacy
п»їlegitimate online pharmacies india: indian pharmacy online – reputable indian pharmacies
вывод из запоя лечение краснодар вывод из запоя лечение краснодар .
http://mexicanpharmacy.store/# п»їbest mexican online pharmacies
нарколог вывод из запоя краснодар нарколог вывод из запоя краснодар .
быстрый анонимный вывод из запоя на дому быстрый анонимный вывод из запоя на дому .
http://mexicanpharmacy.store/# mexico drug stores pharmacies
DocReviews https://docreviews.com.ua это платформа, где пациенты могут оставлять отзывы о врачах. Мы стремимся помочь людям найти лучшего врача для своих нужд, предоставляя им доступную и достоверную информацию.
http://canadianpharmacy.win/# canada drug pharmacy
1win aviator strategy ваучер 1win на сегодня
http://indianpharmacy.win/# india pharmacy mail order
вывод из запоя цены краснодар вывод из запоя цены краснодар .
1win hentai 1win bet скачать
https://canadianpharmacy.win/# reliable canadian pharmacy
http://indianpharmacy.win/# cheapest online pharmacy india
DocReviews https://docreviews.com.ua это платформа, где пациенты могут оставлять отзывы о врачах. Мы стремимся помочь людям найти лучшего врача для своих нужд, предоставляя им доступную и достоверную информацию.
Интернет-магазин инструментов https://profimaster58.ru для работы по металлу — ваш эксперт в качественном оборудовании! В ассортименте: измерительный инструмент, резцы, сверла, фрезы, пилы и многое другое. Гарантия точности, надежности и выгодных цен.
online shopping pharmacy india: india pharmacy mail order – india pharmacy
canadian pharmacy meds: best rated canadian pharmacy – canadian pharmacy review
http://canadianpharmacy.win/# canadian pharmacy phone number
http://canadianpharmacy.win/# canadian pharmacy online
india pharmacy mail order world pharmacy india reputable indian pharmacies
вывод из запоя в краснодаре вывод из запоя в краснодаре .
http://indianpharmacy.win/# online shopping pharmacy india
краснодар вывод из запоя краснодар вывод из запоя .
https://mexicanpharmacy.store/# mexico drug stores pharmacies
вывод из запоя https://www.vyvod-iz-zapoya-krasnodar116.ru .
вывод из запоя на дому http://vyvod-iz-zapoya-krasnodar115.ru .
https://indianpharmacy.win/# india online pharmacy
http://indianpharmacy.win/# cheapest online pharmacy india
http://canadianpharmacy.win/# best online canadian pharmacy
Смотрите аниме онлайн https://studiobanda.net бесплатно и без рекламы. Удобный каталог с популярными тайтлами, новинками и свежими сериями. Высокое качество видео и быстрый плеер обеспечат комфортный просмотр. Подборки по жанрам, рекомендации и регулярные обновления сделают ваш опыт максимально приятным.
сколько стоит тренировка по фигурному катанию записаться в клуб по фигурному катанию
Le code promo 1xBet 2025: 1XNEW25, saississez-le lors de votre inscription pour recevoir un bonus jusqu’a $130 sur le sport. Vous pourrez aussi obtenir jusqu’a $1,500 et 150 tours gratuits sur le casino. 1xBet propose jusqu’a $130 de freebets selon le montant de votre premier depot sur les paris sportifs. Parmi eux, le bonus de bienvenue, reserve aux nouveaux inscrits sur la plateforme. Cette plateforme est classee parmi les leaders en Afrique et a travers le monde. Elle vous offre les meilleures options pour vos paris, y compris la diffusion en direct des matchs sans frais supplementaires.
Utilisez le code promo 1xBet: “1XNEW25” en 2025. Vous pourrez debloquer un bonus de bienvenue jusqu’a $130 sur les paris sportifs. Et n’oubliez pas que 1xBet offre une belle opportunite a tous les nouveaux clients. En utilisant ce code lors de votre inscription, pourrez recuperer jusqu’a $130 sur le sport et jusqu’a $1,500 en freebets et 150 tours gratuits sur le casino en ligne. Pour profiter de ce bonus exceptionnel, il vous suffit d’effectuer votre premier depot. Celui-ci vous donne droit a un bonus de 100% du montant depose, jusqu’a un maximum de $130, ou l’equivalent dans votre devise.
1xbet inscription
срочная помощь вывод из запоя краснодар срочная помощь вывод из запоя краснодар .
buying prescription drugs in mexico online: purple pharmacy mexico price list – mexican online pharmacies prescription drugs
Excellent site you have here but I was wondering if you knew of any community forums that cover the same topics talked about in this article? I’d really like to be a part of online community where I can get responses from other experienced people that share the same interest. If you have any suggestions, please let me know. Thank you!
https://emaidan.com.ua/bi-led-linzy-luchshiy-svet-dlya-avto
быстрый анонимный вывод из запоя на дому быстрый анонимный вывод из запоя на дому .
Официальная страница Дианы Шурыгиной https://ok.ru/profile/910036457657 свежие новости, уникальные фото и видео, личные откровения и новые проекты. Погружайтесь в мир Дианы, узнавайте её историю и вдохновение. Будьте в центре её жизни и не пропустите ни одного яркого момента!
http://canadianpharmacy.win/# buying from canadian pharmacies
диана шурыгина видео голая диана шурыгина
canada drugs online review: best online canadian pharmacy – northern pharmacy canada
Hello just wanted to give you a brief heads up and let you know a few of the images aren’t loading properly. I’m not sure why but I think its a linking issue. I’ve tried it in two different internet browsers and both show the same results.
Обратные Ссылки Guest, WP блоги, forums прогон XRumer 23 StrongAI
Официальная страница Дианы Шурыгиной https://github.com/DiCommunity свежие новости, уникальные фото и видео, личные откровения и новые проекты. Погружайтесь в мир Дианы, узнавайте её историю и вдохновение. Будьте в центре её жизни и не пропустите ни одного яркого момента!
Hi! Would you mind if I share your blog with my myspace group? There’s a lot of folks that I think would really enjoy your content. Please let me know. Thanks
Обратные Ссылки Guest, WP блоги, forums прогон XRumer 23 StrongAI
https://mexicanpharmacy.store/# mexico drug stores pharmacies
вывод из запоя кодирование краснодар вывод из запоя кодирование краснодар .
http://canadianpharmacy.win/# canadian pharmacy no rx needed
pharmacy website india indian pharmacy online indian pharmacy
вывод из запоя цены ростов-на-дону вывод из запоя цены ростов-на-дону .
https://mexicanpharmacy.store/# buying from online mexican pharmacy
canada pharmacy online legit best canadian online pharmacy canadian drugstore online
http://indianpharmacy.win/# online pharmacy india
вывод из запоя цена vyvod-iz-zapoya-krasnodar115.ru .
top 10 pharmacies in india: online pharmacy india – best india pharmacy
https://mexicanpharmacy.store/# buying prescription drugs in mexico
Предприниматель и инвестор Святослав Гусев https://vc.ru/gusev специализирующийся на IT, блокчейн-технологиях и венчурном инвестировании. Активно делится аналитикой рынка, инсайдами и новостями, которые помогут заработать каждому!
buy medicines online in india: п»їlegitimate online pharmacies india – top online pharmacy india
http://mexicanpharmacy.store/# best online pharmacies in mexico
http://indianpharmacy.win/# mail order pharmacy india
http://indianpharmacy.win/# indian pharmacy paypal
вывод из запоя стационар краснодар вывод из запоя стационар краснодар .
вывод из запоя краснодар наркология вывод из запоя краснодар наркология .
https://canadianpharmacy.win/# canadian pharmacy meds review
legitimate canadian pharmacy best canadian online pharmacy canadian drug pharmacy
reputable mexican pharmacies online: п»їbest mexican online pharmacies – mexican pharmaceuticals online
https://indianpharmacy.win/# mail order pharmacy india
быстрый анонимный вывод из запоя на дому быстрый анонимный вывод из запоя на дому .
mexico drug stores pharmacies mexican drugstore online buying from online mexican pharmacy
canadianpharmacymeds: best canadian online pharmacy – my canadian pharmacy review
вывод из запоя на дому вывод из запоя на дому .
http://canadianpharmacy.win/# my canadian pharmacy review
http://canadianpharmacy.win/# canadian pharmacy 365
новинки кино онлайн триллеры фильмы 2023 смотреть онлайн
новинки кино онлайн в СНГ фильмы 2024 смотреть онлайн на планшете
вывод из запоя на дому ростов-на-дону вывод из запоя на дому ростов-на-дону .
http://indianpharmacy.win/# cheapest online pharmacy india
быстрый вывод из запоя ростов быстрый вывод из запоя ростов .
http://indianpharmacy.win/# buy prescription drugs from india
https://canadianpharmacy.win/# reddit canadian pharmacy
новинки смотреть фильмы бесплатно фильмы онлайн HD в HD
дивитися фільми онлайн безкоштовно з субтитрами кращі фільми онлайн з українським дубляжем
https://indianpharmacy.win/# reputable indian online pharmacy
вывод из запоя на дому ростов на дону вывод из запоя на дому ростов на дону .
http://canadianpharmacy.win/# canada ed drugs
вывод. из. запоя. ростов. http://vyvod-iz-zapoya-rostov231.ru .
indian pharmacies safe: Online medicine order – india online pharmacy
Online medicine order: online pharmacy india – indian pharmacy online
http://canadianpharmacy.win/# canadian pharmacy com
https://canadianpharmacy.win/# canadianpharmacyworld
http://indianpharmacy.win/# top online pharmacy india
indian pharmacy online pharmacy website india world pharmacy india
купить аттестат за 11 классов
http://canadianpharmacy.win/# canadian drugstore online
вывод из запоя вывод из запоя .
online shopping pharmacy india cheapest online pharmacy india pharmacy website india
https://indianpharmacy.win/# cheapest online pharmacy india
https://indianpharmacy.win/# indian pharmacy paypal
Online medicine order: Online medicine order – reputable indian online pharmacy
sport-weekend.com http://www.puzoterok.net/bollardy-nezamimyj-komponent-dorozhnoj-bezopasnosti.html .
https://canadianpharmacy.win/# legitimate canadian online pharmacies
canadadrugpharmacy com: best online canadian pharmacy – the canadian drugstore
вывод. из. запоя. ростов. на. дону. https://vyvod-iz-zapoya-rostov232.ru/ .
http://mexicanpharmacy.store/# buying prescription drugs in mexico online
clockchok.ru http://www.megamcpe.com/house/turniket-tripod-perco-ttr-08a-obzor.html .
анонимный. вывод. из. запоя. ростов. http://vyvod-iz-zapoya-rostov234.ru .
https://mexicanpharmacy.store/# mexican border pharmacies shipping to usa
At Cheap SEO Solutions https://cheap-seo-solutions.com we don’t believe in half-measures. We deliver comprehensive SEO solutions that cover all the bases, from keyword research and on-page optimization to link building and content creation. Our goal is to help businesses improve their search engine rankings, drive organic traffic, and increase conversions.
http://canadianpharmacy.win/# canadianpharmacyworld
Ставки на спорт с Vavada https://selfiedumps.com это простота, надежность и высокие шансы на победу. Удобная платформа, разнообразие событий и быстрые выплаты делают Vavada идеальным выбором для любителей азарта. Зарегистрируйтесь сейчас и начните выигрывать вместе с нами!
https://mexicanpharmacy.store/# buying prescription drugs in mexico online
mexico drug stores pharmacies medication from mexico pharmacy buying prescription drugs in mexico
вывод из запоя в ростове на дону вывод из запоя в ростове на дону .
https://canadianpharmacy.win/# reputable canadian online pharmacies
gtbike.ru https://progorodnsk.ru/interesnoe/view/slagbaumy-perco-nadeznost-i-bezopasnost-dla-kontrola-dostupa .
reputable indian pharmacies india pharmacy mail order india pharmacy mail order
Предлагаем услуги профессиональных инженеров офицальной мастерской.
Еслли вы искали ремонт ноутбуков toshiba, можете посмотреть на сайте: срочный ремонт ноутбуков toshiba
Наши мастера оперативно устранят неисправности вашего устройства в сервисе или с выездом на дом!
Discover the power of AI with deepnude online Fast image processing and accessible functionality allow you to create unique effects. Enjoy safe and anonymous use of the platform for entertainment.
mexican online pharmacies prescription drugs: best online pharmacies in mexico – mexico pharmacies prescription drugs
вывод из запоя ростов и область вывод из запоя ростов и область .
https://canadianpharmacy.win/# canadian pharmacies
http://mexicanpharmacy.store/# buying prescription drugs in mexico
canada drug pharmacy: best online canadian pharmacy – pharmacy canadian superstore
Предлагаем услуги профессиональных инженеров офицальной мастерской.
Еслли вы искали ремонт ноутбуков fujitsu siemens, можете посмотреть на сайте: срочный ремонт ноутбуков fujitsu siemens
Наши мастера оперативно устранят неисправности вашего устройства в сервисе или с выездом на дом!
https://canadianpharmacy.win/# canadian pharmacy 24
sport-weekend.com https://honik.ru/turnikety-vidy-printsip-raboty-i-primenenie/ .
best comics to read 2025 latest comics online manga
best manga to read 2016 latest manga updates in USA
http://canadianpharmacy.win/# real canadian pharmacy
Предлагаем услуги профессиональных инженеров офицальной мастерской.
Еслли вы искали ремонт ноутбуков toshiba, можете посмотреть на сайте: ремонт ноутбуков toshiba адреса
Наши мастера оперативно устранят неисправности вашего устройства в сервисе или с выездом на дом!
http://mexicanpharmacy.store/# medicine in mexico pharmacies
http://canadianpharmacy.win/# thecanadianpharmacy
canadian pharmacy world: canadian pharmacy win – onlinecanadianpharmacy 24
http://mexicanpharmacy.store/# pharmacies in mexico that ship to usa
https://mexicanpharmacy.store/# reputable mexican pharmacies online
canadian pharmacy uk delivery safe online pharmacies in canada legal to buy prescription drugs from canada
best online pharmacies in mexico: mexico drug stores pharmacies – mexican border pharmacies shipping to usa
вывод из запоя на дому ростов на дону вывод из запоя на дому ростов на дону .
1win aviator app download 1win casino lucky jet
Montenegro residence Buy property in Montenegro
clockchok.ru https://cvet-dom.ru/dachnyy-dom/uznayte-chto-takoe-metaloramki-i-kak-oni-rabotayut-v-svyazke-s-metallodetektorami-dlya-obespecheniya-bezopasnosti .
Предлагаем услуги профессиональных инженеров офицальной мастерской.
Еслли вы искали ремонт ноутбуков fujitsu siemens, можете посмотреть на сайте: ремонт ноутбуков fujitsu siemens адреса
Наши мастера оперативно устранят неисправности вашего устройства в сервисе или с выездом на дом!
Apartments in kotor Montenegro realestate
Hi to every , as I am actually keen of reading this blog’s post to be updated regularly. It contains nice information.
Обратные Ссылки Guest, WP блоги, forums прогон XRumer 23 StrongAI
Buy generic 100mg Viagra online FastPillsForMen.com Viagra Tablet price
mostbet онлайн казино mostbet apk download
mostbet com officiel mostbet бонусы при регистрации
generic sildenafil Generic Viagra online sildenafil online
http://maxpillsformen.com/# cialis for sale
вывод из запоя цена ростов вывод из запоя цена ростов .
gtbike.ru handcent.ru/novosti/32439-zachem-vybirat-shlagbaum-dlya-kontrolya-vezda.html .
http://fastpillsformen.com/# Cheap generic Viagra
erectile dysfunction online prescription: fast pills easy – pills for ed online
вывод из запоя цены ростов вывод из запоя цены ростов .
over the counter sildenafil: buy viagra online – generic sildenafil
Buy Cialis online: buy cialis online – Cialis over the counter
нижний новгород отели http://otelinizhniinovgorod-ru.ru .
Kotor sandstrand immobilien in Montenegro
фильмы онлайн HD в России фильмы онлайн HD в США
http://maxpillsformen.com/# Buy Tadalafil 5mg
Generic Cialis price: MaxPillsForMen.com – Cialis 20mg price
meljine Herceg novi immobilien Montenegro
смотреть фильмы онлайн на планшете смотреть фильмы онлайн в Казахстане
online prescription for ed FastPillsEasy ed drugs online
한국 온라인 카지노 http://www.live24bet.ru .
sildenafil over the counter Fast Pills For Men Cheap Viagra 100mg
http://fastpillsformen.com/# Viagra online price
Montenegro baosici immobilie Montenegro
новинки кино онлайн в России смотреть фильмы онлайн ужасы
https://fastpillseasy.com/# buy ed medication
Montenegro Tivat immobilien Montenegro
смотреть фильмы бесплатно в Украине фильмы 2017 смотреть онлайн
http://fastpillsformen.com/# Sildenafil 100mg price
cheap ed drugs: FastPillsEasy – low cost ed pills
https://fastpillsformen.com/# best price for viagra 100mg
вывод из запоя на дому ростов недорого вывод из запоя на дому ростов недорого .
Cheap Cialis: MaxPillsForMen – Buy Cialis online
cheapest ed online cheap cialis cheap ed medication
what is the cheapest ed medication fast pills easy generic ed meds online
http://fastpillseasy.com/# order ed pills
https://fastpillseasy.com/# cheapest ed online
Смотрите любимые дорамы https://dorama2025.ru онлайн в HD-качестве! Огромный выбор корейских, китайских, японских и тайваньских сериалов с профессиональной озвучкой и субтитрами.
свежие новости азербайджана новости баку азербайджан
https://maxpillsformen.com/# Buy Cialis online
вывод. из. запоя. ростов. https://www.vyvod-iz-zapoya-rostov238.ru .
https://fastpillseasy.com/# erectile dysfunction medicine online
Cialis without a doctor prescription: MaxPillsForMen.com – Cialis 20mg price in USA
скачать манхву бесплатно комедия онлайн ридер манхвы в цвете
1win бонусы спорт как пользоваться как пополнить 1win в кыргызстане
Предлагаем услуги профессиональных инженеров офицальной мастерской.
Еслли вы искали ремонт ноутбуков asus, можете посмотреть на сайте: ремонт ноутбуков asus сервис
Наши мастера оперативно устранят неисправности вашего устройства в сервисе или с выездом на дом!
cheapest viagra: buy viagra online – best price for viagra 100mg
Viagra without a doctor prescription Canada FastPillsForMen buy viagra here
наркологическая срочная помощь наркологическая срочная помощь .
неотложная наркологическая помощь неотложная наркологическая помощь .
http://maxpillsformen.com/# Buy Tadalafil 5mg
Viagra tablet online cheap viagra sildenafil over the counter
стероиды для мужчин курс баленсиага стероид цена
for global expansion Montenegro company register search
http://maxpillsformen.com/# cheapest cialis
한국 온라인 카지노 http://live24bet.ru/ .
teleprompter on pc download teleprompter online
ed medications online: fast pills easy – best ed meds online
Предлагаем услуги профессиональных инженеров офицальной мастерской.
Еслли вы искали ремонт ноутбуков asus адреса, можете посмотреть на сайте: ремонт ноутбуков asus
Наши мастера оперативно устранят неисправности вашего устройства в сервисе или с выездом на дом!
Останні новини Черкас https://18000.ck.ua та Черкаської області. Важливі новини про політику, бізнес, спорт, корупцію у владі на сайті 18000 ck.ua.
http://maxpillsformen.com/# Buy Tadalafil 5mg
ed rx online: fast pills easy – ed online meds
pills for ed online: order ed meds online – pills for erectile dysfunction online
бесплатно читать манхву онлайн в России новая манхва читать онлайн с русским переводом
срочная наркологическая помощь срочная наркологическая помощь .
wohnung kaufen Montenegro Montenegro immobilien
http://fastpillsformen.com/# Buy Viagra online cheap
kolasin Montenegro immobilien Montenegro
buy cialis pill: buy cialis online – Generic Cialis without a doctor prescription
Cialis without a doctor prescription buy cialis online buy cialis pill
частная скорая наркологическая помощь частная скорая наркологическая помощь .
http://maxpillsformen.com/# Cialis over the counter
http://maxpillsformen.com/# Buy Cialis online
dreizimmerwohnung immobilien Montenegro
sildenafil online: FastPillsForMen – buy Viagra online
http://fastpillseasy.com/# affordable ed medication
Thanks for sharing. I read many of your blog posts, cool, your blog is very good.
Viagra Tablet price: cheap viagra – sildenafil 50 mg price
best price for viagra 100mg cheap viagra buy Viagra online
скачать манхву бесплатно драма лучшие манхвы читать 2022
erectile dysfunction pills online: FastPillsEasy – online ed pills
hotel Montenegro bar Montenegro immobilien von privat kaufen
Cialis without a doctor prescription MaxPillsForMen.com Buy Cialis online
лучший сайт для чтения манхвы в Корее лучший сайт для чтения манхвы в Корее
https://maxpillsformen.com/# Cialis 20mg price in USA
Buy Tadalafil 10mg: buy cialis online – Cialis 20mg price
rtsp запись видеопотока программа для просмотра камер видеонаблюдения
вызов нарколога на дом частная скорая помощь вызов нарколога на дом частная скорая помощь .
скорая наркологическая помощь на дому в москве скорая наркологическая помощь на дому в москве .
как вызвать наркологическую скорую помощь в москве как вызвать наркологическую скорую помощь в москве .
https://fastpillsformen.com/# viagra canada
Ищете качественные купить стероиды? У нас вы найдете широкий выбор сертифицированной продукции для набора массы, сушки и улучшения спортивных результатов. Только проверенные бренды, доступные цены и быстрая доставка. Ваше здоровье и успех в спорте – наш приоритет! Заказывайте прямо сейчас!”
бесплатно читать манхву онлайн в Казахстане манхва на русском языке исекай
https://fastpillsformen.com/# Sildenafil 100mg price
Generic Tadalafil 20mg price: cialis for sale – Cialis without a doctor prescription
sildenafil over the counter Fast Pills For Men sildenafil 50 mg price
неотложная наркологическая помощь неотложная наркологическая помощь .
наркологическая скорая наркологическая скорая .
Buy Tadalafil 5mg Generic Cialis without a doctor prescription Generic Cialis price
cheapest erectile dysfunction pills: fast pills easy – ed prescription online
https://fastpillsformen.com/# Cheapest Sildenafil online
https://maxpillsformen.com/# Cialis without a doctor prescription
п»їcialis generic: buy cialis online – buy cialis pill
https://fastpillsformen.com/# buy Viagra over the counter
online ed drugs: ed online treatment – buying erectile dysfunction pills online
http://maxpillsformen.com/# Tadalafil Tablet
https://maxpillsformen.com/# Cialis without a doctor prescription
cheapest online ed meds erectile dysfunction medications online cheapest erectile dysfunction pills
Tadalafil Tablet: buy cialis online – Generic Cialis without a doctor prescription
Tadalafil price MaxPillsForMen.com Cialis 20mg price
low cost ed pills: fast pills easy – online ed pharmacy
http://maxpillsformen.com/# Tadalafil Tablet
http://fastpillsformen.com/# Buy generic 100mg Viagra online
Just want to say your article is as astonishing. The clarity for your submit is simply cool and that i could assume you’re knowledgeable in this subject. Fine along with your permission let me to grab your feed to keep updated with impending post. Thank you 1,000,000 and please keep up the enjoyable work.
Казино онлайн
https://fastpillseasy.com/# cheapest online ed meds
WOW just what I was searching for. Came here by searching for %keyword%
https://artflo.com.ua/sklo-dlya-far-naykrashchi-vyrobnyky-ta-rekomendatsiyi
The 1win promo code: MAX500WIN. This 1Win bonus code 2025 rewards new players with a 500% bonus up to $1025. Valid codes for receiving bonuses without a deposit for new and old users. Hurry to get them today! Activate the promo code 1win and get a generous welcome bonus of up to 500% on your first four deposits.
1win promo code india
скорая наркологическая помощь в москве скорая наркологическая помощь в москве .
срочная наркологическая помощь срочная наркологическая помощь .
скорая наркологическая помощь в москве скорая наркологическая помощь в москве .
https://fastpillsformen.com/# Order Viagra 50 mg online
Cialis without a doctor prescription: MaxPillsForMen.com – Tadalafil Tablet
Buy Cialis online MaxPillsForMen Cheap Cialis
наркологическая срочная помощь наркологическая срочная помощь .
вызов нарколога на дом частная скорая помощь вызов нарколога на дом частная скорая помощь .
http://maxpillsformen.com/# Cialis 20mg price in USA
Generic Cialis without a doctor prescription: MaxPillsForMen.com – Buy Tadalafil 20mg
http://fastpillsformen.com/# buy Viagra online
https://fastpillseasy.com/# edmeds
https://fastpillseasy.com/# ed drugs online
http://maxpillsformen.com/# п»їcialis generic
cialis for sale Max Pills For Men Buy Cialis online
low cost ed meds online fast pills easy low cost ed medication
Buy Tadalafil 20mg: MaxPillsForMen.com – Buy Tadalafil 10mg
http://maxpillsformen.com/# Buy Tadalafil 20mg
Buy generic 100mg Viagra online: FastPillsForMen.com – order viagra
промокод продамус на 5000 https://www.promokod-prod.ru .
https://maxpillsformen.com/# Generic Cialis without a doctor prescription
cheapest cialis: buy cialis online – Generic Cialis price
Строительный портал https://bms-soft.com.ua для тех, кто строит и ремонтирует! Узнайте о трендах, найдите мастеров, подберите материалы и получите ценные рекомендации.
Buy Tadalafil 20mg: Buy Cialis online – buy cialis pill
Строительный портал https://bms-soft.com.ua для тех, кто строит и ремонтирует! Узнайте о трендах, найдите мастеров, подберите материалы и получите ценные рекомендации.
наркологическая скорая в москве https://klin.0pk.me/viewtopic.php?id=4428/ .
срочная наркологическая помощь в москве срочная наркологическая помощь в москве .
наркологическая скорая помощь москва наркологическая скорая помощь москва .
https://maxpillsformen.com/# Tadalafil Tablet
http://maxpillsformen.com/# Cialis without a doctor prescription
Biography of Argentine footballer Paulo Dybala https://paulo-dybala-bd.com personal life, tattoos on the body, wedding with his wife Oriana Sabatini.
cheapest ed online fast pills easy online erectile dysfunction pills
загранпаспорт стоимость загранпаспорт стоимость .
Biography of Argentine footballer Paulo Dybala https://paulo-dybala-bd.com personal life, tattoos on the body, wedding with his wife Oriana Sabatini.
http://fastpillseasy.com/# cheapest ed online
загранпаспорт срочно москва загранпаспорт срочно москва .
cheapest online ed meds affordable ed medication ed pills cheap
Предлагаем услуги профессиональных инженеров офицальной мастерской.
Еслли вы искали ремонт ноутбуков acer сервис, можете посмотреть на сайте: срочный ремонт ноутбуков acer
Наши мастера оперативно устранят неисправности вашего устройства в сервисе или с выездом на дом!
Предлагаем услуги профессиональных инженеров офицальной мастерской.
Еслли вы искали ремонт macbook pro m3 рядом, можете посмотреть на сайте: ремонт macbook pro m3 цены
Наши мастера оперативно устранят неисправности вашего устройства в сервисе или с выездом на дом!
Cheap Viagra 100mg: FastPillsForMen.com – cheap viagra
Предлагаем услуги профессиональных инженеров офицальной мастерской.
Еслли вы искали ремонт ноутбуков hp сервис, можете посмотреть на сайте: ремонт ноутбуков hp рядом
Наши мастера оперативно устранят неисправности вашего устройства в сервисе или с выездом на дом!
Предлагаем услуги профессиональных инженеров офицальной мастерской.
Еслли вы искали срочный ремонт macbook pro 16, можете посмотреть на сайте: ремонт macbook pro 16 цены
Наши мастера оперативно устранят неисправности вашего устройства в сервисе или с выездом на дом!
http://maxpillsformen.com/# Generic Tadalafil 20mg price
Hi everybody, here every one is sharing these kinds of familiarity, so it’s nice to read this website, and I used to go to see this blog every day.
https://isafpidsymposium.com/why-headlights-detach-top-5-reasons.html
https://maxpillsformen.com/# п»їcialis generic
Excellent, what a webpage it is! This web site gives useful facts to us, keep it up.
http://freeadverts.com.ua/best-headlight-sealants-ranking.html
ed rx online: cheap cialis – erectile dysfunction pills for sale
Предлагаем услуги профессиональных инженеров офицальной мастерской.
Еслли вы искали ремонт macbook pro m3, можете посмотреть на сайте: ремонт macbook pro m3 сервис
Наши мастера оперативно устранят неисправности вашего устройства в сервисе или с выездом на дом!
order viagra Fast Pills For Men sildenafil online
best online ed treatment: cheap cialis – ed online prescription
Cheap Cialis: Max Pills For Men – Buy Tadalafil 10mg
Предлагаем услуги профессиональных инженеров офицальной мастерской.
Еслли вы искали ремонт ноутбуков hp сервис, можете посмотреть на сайте: ремонт ноутбуков hp адреса
Наши мастера оперативно устранят неисправности вашего устройства в сервисе или с выездом на дом!
рейтинг процессоров для игр http://topcpu.ru .
Предлагаем услуги профессиональных инженеров офицальной мастерской.
Еслли вы искали ремонт macbook pro 16 цены, можете посмотреть на сайте: ремонт macbook pro 16 адреса
Наши мастера оперативно устранят неисправности вашего устройства в сервисе или с выездом на дом!
вывести из запоя анонимно вывести из запоя анонимно .
алкоголизм лечение вывод из запоя ростов алкоголизм лечение вывод из запоя ростов .
http://fastpillsformen.com/# cheap viagra
http://maxpillsformen.com/# Buy Cialis online
Предлагаем услуги профессиональных инженеров офицальной мастерской.
Еслли вы искали ремонт кофемашин spidem адреса, можете посмотреть на сайте: ремонт кофемашин spidem в москве
Наши мастера оперативно устранят неисправности вашего устройства в сервисе или с выездом на дом!
cheapest ed pills FastPillsEasy ed doctor online
Sildenafil 100mg price: cheap viagra – Order Viagra 50 mg online
Buy Tadalafil 5mg: Max Pills For Men – Cialis over the counter
스포츠 베팅 스포츠 베팅 .
сравнение производительности процессоров https://www.topcpu.ru .
generic sildenafil: cheap viagra – Generic Viagra for sale
Предлагаем услуги профессиональных инженеров офицальной мастерской.
Еслли вы искали ремонт кофемашин spidem, можете посмотреть на сайте: ремонт кофемашин spidem сервис
Наши мастера оперативно устранят неисправности вашего устройства в сервисе или с выездом на дом!
https://fastpillsformen.com/# cheap viagra
Generic Viagra for sale buy Viagra over the counter Viagra online price
ed online pharmacy FastPillsEasy erectile dysfunction online prescription
Предлагаем услуги профессиональных инженеров офицальной мастерской.
Еслли вы искали ремонт кофемашин neff, можете посмотреть на сайте: срочный ремонт кофемашин neff
Наши мастера оперативно устранят неисправности вашего устройства в сервисе или с выездом на дом!
Предлагаем услуги профессиональных инженеров офицальной мастерской.
Еслли вы искали срочный ремонт кофемашин melitta, можете посмотреть на сайте: ремонт кофемашин melitta в москве
Наши мастера оперативно устранят неисправности вашего устройства в сервисе или с выездом на дом!
Generic Cialis price: Max Pills For Men – Buy Cialis online
Предлагаем услуги профессиональных инженеров офицальной мастерской.
Еслли вы искали ремонт кофемашин philips, можете посмотреть на сайте: срочный ремонт кофемашин philips
Наши мастера оперативно устранят неисправности вашего устройства в сервисе или с выездом на дом!
Предлагаем услуги профессиональных инженеров офицальной мастерской.
Еслли вы искали ремонт macbook air m1 цены, можете посмотреть на сайте: ремонт macbook air m1
Наши мастера оперативно устранят неисправности вашего устройства в сервисе или с выездом на дом!
buy ed meds online: online erectile dysfunction – online erectile dysfunction
вывод. из. запоя. ростов. на. дону. https://vyvod-iz-zapoya-rostov222.ru/ .
вывод. из. запоя. на. дому. ростов. vyvod-iz-zapoya-rostov239.ru .
какой процессор лучше topcpu.ru .
http://fastpillseasy.com/# erectile dysfunction medication online
Предлагаем услуги профессиональных инженеров офицальной мастерской.
Еслли вы искали ремонт кофемашин neff адреса, можете посмотреть на сайте: ремонт кофемашин neff адреса
Наши мастера оперативно устранят неисправности вашего устройства в сервисе или с выездом на дом!
free online stamp maker stamp-creator-online0.com .
Cialis 20mg price in USA Cialis without a doctor prescription п»їcialis generic
вывод из запоя цена ростов вывод из запоя цена ростов .
Outstanding article. Have you struggled with inconsistent mouse movements or difficulty maintaining precision while gaming? If yes, a mouse sensitivity converter can help you quickly achieve flawless settings. It makes finding the ideal sensitivity simple and fast, without the hassle of trial and error. For more information, check out the post.
Предлагаем услуги профессиональных инженеров офицальной мастерской.
Еслли вы искали ремонт кофемашин melitta сервис, можете посмотреть на сайте: ремонт кофемашин melitta рядом
Наши мастера оперативно устранят неисправности вашего устройства в сервисе или с выездом на дом!
erectile dysfunction medication online fast pills easy cheap ed pills online
вывод из запоя дешево ростов на дону vyvod-iz-zapoya-rostov225.ru .
нарколог на дому капельница цена нарколог на дому капельница цена .
вывод из запоя стационар ростов вывод из запоя стационар ростов .
Предлагаем услуги профессиональных инженеров офицальной мастерской.
Еслли вы искали ремонт кофемашин philips, можете посмотреть на сайте: ремонт кофемашин philips
Наши мастера оперативно устранят неисправности вашего устройства в сервисе или с выездом на дом!
Предлагаем услуги профессиональных инженеров офицальной мастерской.
Еслли вы искали ремонт кофемашин miele цены, можете посмотреть на сайте: ремонт кофемашин miele цены
Наши мастера оперативно устранят неисправности вашего устройства в сервисе или с выездом на дом!
Предлагаем услуги профессиональных инженеров офицальной мастерской.
Еслли вы искали ремонт кофемашин delonghi цены, можете посмотреть на сайте: ремонт кофемашин delonghi
Наши мастера оперативно устранят неисправности вашего устройства в сервисе или с выездом на дом!
Предлагаем услуги профессиональных инженеров офицальной мастерской.
Еслли вы искали ремонт macbook air m1 сервис, можете посмотреть на сайте: ремонт macbook air m1 в москве
Наши мастера оперативно устранят неисправности вашего устройства в сервисе или с выездом на дом!
Разнообразие фурнитуры для плинтуса, подберите под свой интерьер вариант.
Качественная фурнитура для плинтуса, не подведут вас в эксплуатации.
Простота установки элементов плинтуса, без лишних усилий.
Тренды в дизайне фурнитуры для плинтуса, выделитесь из общей массы.
Эко-варианты элементов для плинтуса, сделайте свой дом более безопасным для здоровья.
Тренды в оттенках для декора плинтуса, создайте гармонию в доме.
Оригинальные решения для отделки плинтуса, выразите свою индивидуальность через дизайн.
Подсказки по правильной установке элементов плинтуса, для безупречного результата.
Декоративные элементы для фурнитуры плинтуса, выдержите общий стиль в каждой детали.
Фурнитура для плинтуса в классическом стиле, сделайте свой дом роскошным и элегантным.
купить плинтуса купить плинтуса .
http://casinositeleri25.com/# Deneme Bonusu Veren Siteler
en kazancl? slot oyunlar?: slot siteleri – slot oyunlar?
en kazancl? slot oyunlar?: en kazancl? slot oyunlar? – en cok kazand?ran slot oyunlar?
https://sweetbonanza25.com/# sweet bonanza
deneme bonusu veren yeni siteler: denemebonusuverensiteler25 – yat?r?ms?z deneme bonusu veren siteler
Предлагаем услуги профессиональных инженеров офицальной мастерской.
Еслли вы искали ремонт кофемашин miele цены, можете посмотреть на сайте: ремонт кофемашин miele сервис
Наши мастера оперативно устранят неисправности вашего устройства в сервисе или с выездом на дом!
Предлагаем услуги профессиональных инженеров офицальной мастерской.
Еслли вы искали ремонт iphone xs, можете посмотреть на сайте: ремонт iphone xs рядом
Наши мастера оперативно устранят неисправности вашего устройства в сервисе или с выездом на дом!
Предлагаем услуги профессиональных инженеров офицальной мастерской.
Еслли вы искали ремонт кофемашин delonghi рядом, можете посмотреть на сайте: ремонт кофемашин delonghi сервис
Наши мастера оперативно устранят неисправности вашего устройства в сервисе или с выездом на дом!
https://slotsiteleri25.com/# slot oyunlar? puf noktalar?
https://denemebonusuverensiteler25.com/# yeni deneme bonusu veren siteler
https://denemebonusuverensiteler25.com/# yeni deneme bonusu veren siteler
sweet bonanza sweet bonanza sweet bonanza giris
вывод из запоя вывод из запоя .
free online stamp maker http://www.stamp-creator-online0.com .
https://denemebonusuverensiteler25.com/# denemebonusuverensiteler25
https://slotsiteleri25.com/# slot casino siteleri
Предлагаем услуги профессиональных инженеров офицальной мастерской.
Еслли вы искали срочный ремонт iphone xs, можете посмотреть на сайте: ремонт iphone xs
Наши мастера оперативно устранят неисправности вашего устройства в сервисе или с выездом на дом!
yat?r?ms?z deneme bonusu veren siteler: deneme bonusu veren siteler yeni – deneme bonusu veren siteler
вывод из запоя на дому недорого вывод из запоя на дому недорого .
нарколог на дом вывод из запоя на дому нарколог на дом вывод из запоя на дому .
вывод из запоя круглосуточно ростов https://www.vyvod-iz-zapoya-rostov27.ru .
https://slotsiteleri25.com/# en cok kazand?ran slot oyunlar?
Предлагаем услуги профессиональных инженеров офицальной мастерской.
Еслли вы искали ремонт iphone xs max адреса, можете посмотреть на сайте: ремонт iphone xs max в москве
Наши мастера оперативно устранят неисправности вашего устройства в сервисе или с выездом на дом!
https://denemebonusuverensiteler25.com/# deneme bonusu veren siteler
deneme bonusu veren siteler yeni deneme bonusu veren siteler deneme bonusu veren siteler yeni
http://casinositeleri25.com/# deneme bonusu veren casino siteleri
casino bahis siteleri deneme bonusu veren casino siteleri deneme bonusu veren casino siteleri
yat?r?ms?z deneme bonusu veren siteler: deneme bonusu veren yeni siteler – yeni deneme bonusu veren siteler
http://casinositeleri25.com/# Canl? Casino Siteleri
slot casino siteleri: slot siteleri – slot oyunlar?
Canl? Casino Siteleri: casino bahis siteleri – Deneme Bonusu Veren Siteler
make a stamp online make a stamp online .
Attractive element of content. I simply stumbled upon your weblog and in accession capital to say that I get in fact enjoyed account your blog posts. Anyway I will be subscribing for your augment or even I success you get admission to persistently quickly.
https://millionigrushek.ru/
Casino Siteleri Deneme Bonusu Veren Siteler dГјnyanД±n en iyi bahis siteleri
http://sweetbonanza25.com/# sweet bonanza
casino bahis siteleri canl? casino siteleri en Г§ok kazandД±ran site
прокапаться от алкоголя цены прокапаться от алкоголя цены .
вывод из запоя стационарно ростов vyvod-iz-zapoya-rostov229.ru .
sweet bonanza kazanma saatleri: sweet bonanza kazanma saatleri – sweet bonanza guncel
sweet bonanza yorumlar: sweet bonanza kazanma saatleri – sweet bonanza
en guvenilir casino siteleri: Canl? Casino Siteleri – Casino Siteleri
пропуска на грузовые машины в москве пропуска на грузовые машины в москве .
한국 이용 가능 카지노 한국 이용 가능 카지노 .
yeni deneme bonusu veren siteler yat?r?ms?z deneme bonusu veren siteler yeni deneme bonusu veren siteler
https://casinositeleri25.com/# deneme bonusu veren casino siteleri
секретный код easydrop секретный код easydrop .
Hi! Do you know if they make any plugins to help with SEO? I’m trying to get my blog to rank for some targeted keywords but I’m not seeing very good success. If you know of any please share. Cheers!
https://millionigrushek.ru/
slot oyunlar? puf noktalar? slot casino siteleri slot casino siteleri
https://casinositeleri25.com/# casino bahis siteleri
canl? casino siteleri: online kumar siteleri – Deneme Bonusu Veren Siteler
deneme bonusu veren siteler yeni: deneme bonusu veren yeni siteler – deneme bonusu veren siteler yeni
Вавада – это место, где вас ждут лучшие игры, выгодные бонусы и удобный интерфейс для захватывающего игрового процесса.
Vavada Casino предлагает широкий выбор азартных игр, от классических слотов до современных настольных развлечений.
Присоединяйтесь к Vavada, чтобы испытать удачу и насладиться первоклассным сервисом в мире онлайн-гемблинга.
В казино Вавада вас ждут щедрые бонусы, огромное количество игр и безопасные методы оплаты.
Оцените разнообразие игровых автоматов Вавада – выберите слот по душе и начинайте выигрывать!
Мартингейл стратегия идеально подойдет для тех, кто ищет простой, но эффективный подход к ставкам.
Применяя Парлай стратегию, вы сможете увеличить шансы на выигрыш, грамотно управляя своими ставками.
Используйте Д’Аламбер стратегию, чтобы минимизировать риски и наслаждаться процессом игры.
Хотите больше динамики? Попробуйте Контр-Д’Аламбер стратегию – уникальный подход для продвинутых игроков.
Играйте в топовых слотах Вавада и наслаждайтесь высокими коэффициентами и красочной графикой!
Vavada Casino
Официальный сайт https://luckyjetonewins.ru , где вы найдете актуальное зеркало и промоды на Лаки Джет.
вывод из запоя в стационаре ростов-на-дону https://vyvod-iz-zapoya-rostov228.ru .
анонимный вывод из запоя анонимный вывод из запоя .
https://sweetbonanza25.com/# sweet bonanza oyna
sweet bonanza guncel: sweet bonanza demo oyna – sweet bonanza giris
slot casino siteleri slot siteleri guvenilir slot siteleri
http://sweetbonanza25.com/# sweet bonanza guncel
slot oyunlar?: slot siteleri – en cok kazand?ran slot oyunlar?
вывод из запоя анонимно https://www.vyvod-iz-zapoya-ekaterinburg25.ru .
вывод из запоя наркологом https://www.vyvod-iz-zapoya-ekaterinburg26.ru .
вывод из запоя дома вывод из запоя дома .
easydrop промокоды 50 easydrop промокоды 50 .
http://slotsiteleri25.com/# slot oyunlar? puf noktalar?
Предлагаем услуги профессиональных инженеров офицальной мастерской.
Еслли вы искали ремонт iphone 14, можете посмотреть на сайте: ремонт iphone 14
Наши мастера оперативно устранят неисправности вашего устройства в сервисе или с выездом на дом!
пропуск в москву для грузовых автомобилей пропуск в москву для грузовых автомобилей .
deneme bonusu veren yeni siteler: deneme bonusu veren siteler yeni – deneme bonusu veren siteler yeni
TaskMy.ru – профессиональная помощь в решении задач любого уровня
TaskMy.ru – это надежный сервис, который предлагает качественную помощь в выполнении задач любых направлений: от технических расчётов и программирования до написания текстов и аналитики. Мы работаем быстро, эффективно и ориентированы на ваши требования.
Доверяя TaskMy.ru, вы получаете индивидуальный подход, точное соблюдение сроков и доступные цены. Оставьте свою задачу профессионалам – результат превзойдет ожидания!
I am happy that I detected this web site, precisely the right information that I was looking for! .
en kazancl? slot oyunlar?: az parayla cok kazandiran slot oyunlar? – slot oyunlar? puf noktalar?
deneme bonusu veren bГјtГјn siteler
deneme bonusu veren yeni siteler: denemebonusuverensiteler25 – deneme bonusu veren siteler yeni
Предлагаем услуги профессиональных инженеров офицальной мастерской.
Еслли вы искали ремонт iphone 15 pro max рядом, можете посмотреть на сайте: ремонт iphone 15 pro max
Наши мастера оперативно устранят неисправности вашего устройства в сервисе или с выездом на дом!
tk999 app tk999 app .
Предлагаем услуги профессиональных инженеров офицальной мастерской.
Еслли вы искали ремонт iphone 14 сервис, можете посмотреть на сайте: ремонт iphone 14
Наши мастера оперативно устранят неисправности вашего устройства в сервисе или с выездом на дом!
yat?r?ms?z deneme bonusu veren siteler deneme bonusu veren siteler yeni yeni deneme bonusu veren siteler
guvenilir slot siteleri: az parayla cok kazandiran slot oyunlar? – az parayla cok kazandiran slot oyunlar?
para kazandД±ran sohbet siteleri
вывод из запоя врачом на дому вывод из запоя врачом на дому .
нарколог вывод из запоя vyvod-iz-zapoya-ekaterinburg27.ru .
вывод из запоя анонимно https://www.vyvod-iz-zapoya-ekaterinburg25.ru .
https://slotsiteleri25.com/# en cok kazand?ran slot oyunlar?
slot siteleri: az parayla cok kazandiran slot oyunlar? – slot siteleri
Casino Siteleri: en guvenilir casino siteleri – casino bahis siteleri
Предлагаем услуги профессиональных инженеров офицальной мастерской.
Еслли вы искали ремонт iphone 15 pro max рядом, можете посмотреть на сайте: ремонт iphone 15 pro max рядом
Наши мастера оперативно устранят неисправности вашего устройства в сервисе или с выездом на дом!
sweet bonanza demo oyna sweet bonanza slot sweet bonanza oyna
сделать загранпаспорт срочно в москве цена http://zagranpasport-srochno11.ru/ .
вывод из запоя на дому сочи вывод из запоя на дому сочи .
вывести из запоя в стационаре вывести из запоя в стационаре .
Предлагаем услуги профессиональных инженеров офицальной мастерской.
Еслли вы искали ремонт iphone 15, можете посмотреть на сайте: срочный ремонт iphone 15
Наши мастера оперативно устранят неисправности вашего устройства в сервисе или с выездом на дом!
tk999 casino tk999 casino .
Try your luck at taya 365, where excitement meets reliability! Hundreds of popular games, unique promotions and instant payouts await you.
Try your luck at taya 365 login, where excitement meets reliability! Hundreds of popular games, unique promotions and instant payouts await you.
denemebonusuverensiteler25: deneme bonusu veren siteler – deneme bonusu veren siteler yeni
рейтинги процессоров для пк http://www.topcpu.ru .
sweet bonanza demo oyna sweet bonanza oyna sweet bonanza kazanma saatleri
https://casinositeleri25.com/# guvenilir casino siteleri
sweet bonanza oyna sweet bonanza oyna sweet bonanza
купить диплом в рязани
https://slotsiteleri25.com/# slot oyunlar?
oyun siteleri: Casino Siteleri – casino bahis siteleri
стационарное выведение из запоя http://vyvod-iz-zapoya-sochi24.ru .
Предлагаем услуги профессиональных инженеров офицальной мастерской.
Еслли вы искали ремонт iphone 15, можете посмотреть на сайте: ремонт iphone 15
Наши мастера оперативно устранят неисправности вашего устройства в сервисе или с выездом на дом!
sweet bonanza demo oyna: sweet bonanza guncel – sweet bonanza yorumlar
сделать загранпаспорт срочно в москве цена zagranpasport-srochno11.ru .
вывод из запоя цена вывод из запоя цена .
стационар вывод из запоя стационар вывод из запоя .
yeni deneme bonusu veren siteler deneme bonusu veren siteler deneme bonusu veren siteler yeni
slot oyunlar?: en kazancl? slot oyunlar? – az parayla cok kazandiran slot oyunlar?
вызвать капельнцу от запоя http://www.vyvod-iz-zapoya-nizhnij-novgorod11.ru .
taya 365 taya365 login
taya 365 login taya365 download
365 taya taya365 login
https://slotsiteleri25.com/# en cok kazand?ran slot oyunlar?
sweet bonanza slot: sweet bonanza guncel – sweet bonanza yorumlar
deneme bonusu veren siteler deneme bonusu veren yeni siteler yeni deneme bonusu veren siteler
Предлагаем услуги профессиональных инженеров офицальной мастерской.
Еслли вы искали ремонт iphone 14 pro max адреса, можете посмотреть на сайте: ремонт iphone 14 pro max
Наши мастера оперативно устранят неисправности вашего устройства в сервисе или с выездом на дом!
Предлагаем услуги профессиональных инженеров офицальной мастерской.
Еслли вы искали ремонт iphone 14 pro адреса, можете посмотреть на сайте: ремонт iphone 14 pro рядом
Наши мастера оперативно устранят неисправности вашего устройства в сервисе или с выездом на дом!
slot casino siteleri: slot casino siteleri – az parayla cok kazandiran slot oyunlar?
sweet bonanza kazanma saatleri sweet bonanza demo oyna sweet bonanza giris
Awesome! Its genuinely remarkable article, I have got much clear idea concerning from this piece of writing.
https://slovo-pacana.info/
“Ищете качественный кирпич напрямую от производителя? https://Muravey61.ru – ваш надежный поставщик строительных материалов в регионе! Мы предлагаем кирпич высшего качества по доступным ценам прямо с завода. Доставка точно в срок, широкий ассортимент, и гарантированное качество – всё, что нужно для вашего строительства. Закажите у нас и убедитесь сами, что с нами строить легко!”
Sportybet apk http://www.sportybetzambia.pro .
капельница от запоя капельница от запоя .
капельница наркология 24 http://www.vyvod-iz-zapoya-nizhnij-novgorod13.ru/ .
en kazancl? slot oyunlar?: guvenilir slot siteleri – slot oyunlar? puf noktalar?
вывод из запоя цены сочи https://vyvod-iz-zapoya-sochi24.ru/ .
CCTV Chat and Instant Messaging Automation Tools Software
http://slotsiteleri25.com/# az parayla cok kazandiran slot oyunlar?
sweet bonanza sweet bonanza slot sweet bonanza demo oyna
sweet bonanza oyna: sweet bonanza yorumlar – sweet bonanza giris
sweet bonanza giris: sweet bonanza – sweet bonanza yorumlar
canl? casino siteleri: casino bahis siteleri – casino bahis siteleri
Предлагаем услуги профессиональных инженеров офицальной мастерской.
Еслли вы искали ремонт iphone 14 pro max, можете посмотреть на сайте: ремонт iphone 14 pro max сервис
Наши мастера оперативно устранят неисправности вашего устройства в сервисе или с выездом на дом!
выведение из запоя на дому круглосуточно выведение из запоя на дому круглосуточно .
Предлагаем услуги профессиональных инженеров офицальной мастерской.
Еслли вы искали ремонт iphone 14 pro, можете посмотреть на сайте: ремонт iphone 14 pro цены
Наши мастера оперативно устранят неисправности вашего устройства в сервисе или с выездом на дом!
Attractive section of content. I just stumbled upon your site and in accession capital to assert that I acquire in fact enjoyed account your blog posts. Any way I will be subscribing to your augment and even I achievement you access consistently rapidly.
https://slovo-pacana.info/
sweet bonanza yorumlar sweet bonanza demo oyna sweet bonanza kazanma saatleri
casino bahis siteleri Canl? Casino Siteleri en guvenilir casino siteleri
Sporty Bet Zambia Sporty Bet Zambia .
капельницы на дому от запоя капельницы на дому от запоя .
slot casino siteleri: slot oyunlar? puf noktalar? – slot oyunlar?
mexican pharmaceuticals online best online pharmacies in mexico Mexican Easy Pharm
Предлагаем услуги профессиональных инженеров офицальной мастерской.
Еслли вы искали срочный ремонт iphone xs max, можете посмотреть на сайте: ремонт iphone xs max цены
Наши мастера оперативно устранят неисправности вашего устройства в сервисе или с выездом на дом!
капельница от запоя капельница от запоя .
https://mexicaneasypharm.com/# Mexican Easy Pharm
legitimate canadian online pharmacies
Предлагаем услуги профессиональных инженеров офицальной мастерской.
Еслли вы искали ремонт iphone se 2020 цены, можете посмотреть на сайте: срочный ремонт iphone se 2020
Наши мастера оперативно устранят неисправности вашего устройства в сервисе или с выездом на дом!
reddit canadian pharmacy https://indiancertpharm.shop/# Online pharmacy
buy prescription drugs from india
сравнение процессоров для пк http://www.topcpu.ru .
Предлагаем услуги профессиональных инженеров офицальной мастерской.
Еслли вы искали срочный ремонт iphone 13 pro, можете посмотреть на сайте: ремонт iphone 13 pro
Наши мастера оперативно устранят неисправности вашего устройства в сервисе или с выездом на дом!
Предлагаем услуги профессиональных инженеров офицальной мастерской.
Еслли вы искали ремонт iphone 13 в москве, можете посмотреть на сайте: ремонт iphone 13 цены
Наши мастера оперативно устранят неисправности вашего устройства в сервисе или с выездом на дом!
Mexican Easy Pharm: mexican pharmaceuticals online – mexico drug stores pharmacies
Everything is very open and very clear explanation of issues. was truly information. Your website is very useful. Thanks for sharing.
Indian Cert Pharm: Indian pharmacy international shipping – Online pharmacy
pharmacy rx world canada https://mexicaneasypharm.com/# buying from online mexican pharmacy
Online medicine order
санлайт скупка золота цена за грамм скупка золота спб дорого цена
вывод из запоя нижний новгород вывод из запоя нижний новгород .
выведение из запоя воронеж стационар выведение из запоя воронеж стационар .
ломбард 585 скупка золота сколько стоит скупка золота
This is very interesting, You’re an excessively professional blogger. I have joined your rss feed and look ahead to searching for extra of your great post. Also, I have shared your site in my social networks
https://alicegood.com.ua/chomu-linzi-v-fary-naykrashchyy-vybir-dlya-vashogo-avtomobilya
https://mexicaneasypharm.com/# Mexican Easy Pharm
canadian world pharmacy
mexican border pharmacies shipping to usa mexican pharmaceuticals online Mexican Easy Pharm
Mexican Easy Pharm: mexican online pharmacies prescription drugs – Mexican Easy Pharm
Предлагаем услуги профессиональных инженеров офицальной мастерской.
Еслли вы искали ремонт iphone xs max сервис, можете посмотреть на сайте: ремонт iphone xs max сервис
Наши мастера оперативно устранят неисправности вашего устройства в сервисе или с выездом на дом!
IndianCertPharm: Indian Cert Pharm – Indian pharmacy that ships to usa
canadian neighbor pharmacy https://mexicaneasypharm.shop/# buying prescription drugs in mexico
best online pharmacy india
Предлагаем услуги профессиональных инженеров офицальной мастерской.
Еслли вы искали ремонт iphone se 2020, можете посмотреть на сайте: ремонт iphone se 2020 в москве
Наши мастера оперативно устранят неисправности вашего устройства в сервисе или с выездом на дом!
canadapharmacyonline legit https://mexicaneasypharm.com/# Mexican Easy Pharm
indian pharmacy paypal
indian pharmacy: Online pharmacy – Best Indian pharmacy
Mexican Easy Pharm: medication from mexico pharmacy – Mexican Easy Pharm
рейтинг процессоров amd http://www.topcpu.ru .
maple leaf pharmacy in canada CanadianMdPharm canadian pharmacy in canada
Предлагаем услуги профессиональных инженеров офицальной мастерской.
Еслли вы искали ремонт iphone 13 pro сервис, можете посмотреть на сайте: ремонт iphone 13 pro в москве
Наши мастера оперативно устранят неисправности вашего устройства в сервисе или с выездом на дом!
Предлагаем услуги профессиональных инженеров офицальной мастерской.
Еслли вы искали ремонт iphone 13 адреса, можете посмотреть на сайте: ремонт iphone 13 рядом
Наши мастера оперативно устранят неисправности вашего устройства в сервисе или с выездом на дом!
canada pharmacy online legit https://canadianmdpharm.online/# my canadian pharmacy rx
indian pharmacy online
legitimate canadian pharmacy https://indiancertpharm.com/# indian pharmacy
online shopping pharmacy india
mexico pharmacies prescription drugs: Mexican Easy Pharm – mexican mail order pharmacies
пансионат для престарелых в крыму пансионат для престарелых в крыму .
дом пенсионеров в крыму дом пенсионеров в крыму .
стол для переговоров венге https://mm26.ru
best online pharmacies in mexico: mexican mail order pharmacies – Mexican Easy Pharm
вывод из запоя воронеж вывод из запоя воронеж .
вывод из запоя нижний вывод из запоя нижний .
kinogo семейные фильмы киного фильмы для компании
kinogo детские сериалы kinogo смотреть онлайн
Please let me know if you’re looking for a author for your blog. You have some really good posts and I feel I would be a good asset. If you ever want to take some of the load off, I’d absolutely love to write some articles for your blog in exchange for a link back to mine. Please shoot me an email if interested. Cheers!
https://tayger.com.ua/perevagi-led-linz-chomu-varto-zrobiti-vibir-na-korist-novitnoyi-tehnologiyi
indian pharmacy Online pharmacy Best online Indian pharmacy
mexico pharmacies prescription drugs: Mexican Easy Pharm – mexican border pharmacies shipping to usa
Indian Cert Pharm: india pharmacy – Indian Cert Pharm
legitimate canadian pharmacy https://mexicaneasypharm.shop/# mexican rx online
indian pharmacy paypal
рейтинг процессоров для игр http://www.topcpu.ru/ .
OR Realty — это ваш надежный партнер в мире недвижимости. Мы предлагаем большой выбор квартир, домов и коммерческих объектов по выгодным условиям. Наши специалисты помогут вам найти идеальный вариант, соответствующий вашим потребностям. Надежность, качество и удобство — вот что делает OR Realty лучшим выбором. Обращайтесь!
https://canadianmdpharm.online/# canadian drugs pharmacy
pharmacies in canada that ship to the us
Mexican Easy Pharm: buying prescription drugs in mexico – purple pharmacy mexico price list
trusted canadian pharmacy: Canadian Md Pharm – canada pharmacy online legit
заказать проституток в калуге снять девушек калуга
программа производственного лабораторного контроля содержание программы производственного контроля
офисные столы для переговоров купить https://mm26.ru
best online pharmacies in mexico pharmacies in mexico that ship to usa Mexican Easy Pharm
1 гр золота скупка спб стоимость золота в скупках
mexican online pharmacies prescription drugs: Mexican Easy Pharm – buying prescription drugs in mexico
canada cloud pharmacy: Canadian Md Pharm – canadian pharmacy cheap
скупка золота цена в рублях скупка золота спб выгодно
mexican rx online: Mexican Easy Pharm – Mexican Easy Pharm
программы фирмы 1с программы фирмы 1с .
купить 1с бухгалтерия купить купить 1с бухгалтерия купить .
canadian drugs pharmacy: Canadian Md Pharm – best online canadian pharmacy
Эта статья сочетает познавательный и занимательный контент, что делает ее идеальной для любителей глубоких исследований. Мы рассмотрим увлекательные аспекты различных тем и предоставим вам новые знания, которые могут оказаться полезными в будущем.
Исследовать вопрос подробнее – https://nakroklinikatest.ru/
reliable canadian pharmacy https://indiancertpharm.com/# Indian pharmacy international shipping
best online pharmacy india
Предлагаем вашему вниманию интересную справочную статью, в которой собраны ключевые моменты и нюансы по актуальным вопросам. Эта информация будет полезна как для профессионалов, так и для тех, кто только начинает изучать тему. Узнайте ответы на важные вопросы и расширьте свои знания!
Ознакомиться с деталями – https://nakroklinikatest.ru/
canadian drugs canadian drug pharmacy best canadian online pharmacy
Эта разъяснительная статья содержит простые и доступные разъяснения по актуальным вопросам. Мы стремимся сделать информацию понятной для широкой аудитории, чтобы каждый смог разобраться в предмете и извлечь из него максимум пользы.
Исследовать вопрос подробнее – https://nakroklinikatest.ru/
В этом информативном тексте представлены захватывающие события и факты, которые заставят вас задуматься. Мы обращаем внимание на важные моменты, которые часто остаются незамеченными, и предлагаем новые перспективы на привычные вещи. Подготовьтесь к тому, чтобы быть поглощенным увлекательными рассказами!
Изучить вопрос глубже – https://nakroklinikatest.ru/
Предлагаем услуги профессиональных инженеров офицальной мастерской.
Еслли вы искали ремонт iphone 11 рядом, можете посмотреть на сайте: ремонт iphone 11 цены
Наши мастера оперативно устранят неисправности вашего устройства в сервисе или с выездом на дом!
Предлагаем услуги профессиональных инженеров офицальной мастерской.
Еслли вы искали ремонт iphone 12 pro max, можете посмотреть на сайте: срочный ремонт iphone 12 pro max
Наши мастера оперативно устранят неисправности вашего устройства в сервисе или с выездом на дом!
выведение из запоя воронеж стационар выведение из запоя воронеж стационар .
Indian Cert Pharm: Online medicine – Best Indian pharmacy
геронтологический центр в симферополе https://www.svarog.forum24.ru/?1-1-0-00000039-000-0-0-1736936480 .
пансионат для пожилых крым пансионат для пожилых крым .
indian pharmacy: IndianCertPharm – Best online Indian pharmacy
Best online Indian pharmacy: Indian Cert Pharm – indian pharmacy
Предлагаем услуги профессиональных инженеров офицальной мастерской.
Еслли вы искали ремонт iphone se 2020 адреса, можете посмотреть на сайте: срочный ремонт iphone se 2020
Наши мастера оперативно устранят неисправности вашего устройства в сервисе или с выездом на дом!
Indian Cert Pharm: Indian Cert Pharm – Online pharmacy
Mexican Easy Pharm: Mexican Easy Pharm – Mexican Easy Pharm
киного фильмы по студиям киного фантастические фильмы
kinogo фильмы про выживание kinogo фильмы про апокалипсис
kinogo детские фильмы kinogo музыкальные фильмы
киного кинокомиксы киного новинки
kinogo фильмы про будущее kinogo научная фантастика
киного фильмы про оборотней киного криминал
northwest canadian pharmacy: reputable canadian pharmacy – cheapest pharmacy canada
https://indiancertpharm.shop/# Indian Cert Pharm
canadian pharmacy 365
Indian pharmacy that ships to usa: Indian pharmacy that ships to usa – Online pharmacy
Хотите купить окна окна милке цена по разумной цене? Ознакомьтесь с нашим предложением! У нас — качество, надежность и стиль по доступной стоимости. Индивидуальный подход к каждому заказу!
путаны в калуге шлюхи в калуге
Предлагаем услуги профессиональных инженеров офицальной мастерской.
Еслли вы искали ремонт iphone 11 адреса, можете посмотреть на сайте: ремонт iphone 11
Наши мастера оперативно устранят неисправности вашего устройства в сервисе или с выездом на дом!
Предлагаем услуги профессиональных инженеров офицальной мастерской.
Еслли вы искали ремонт iphone 12 pro max сервис, можете посмотреть на сайте: срочный ремонт iphone 12 pro max
Наши мастера оперативно устранят неисправности вашего устройства в сервисе или с выездом на дом!
дизайнер интерьера квартиры услуги дизайнера интерьера квартиры москва
Хотите купить окна купить пластиковое окно melke по разумной цене? Ознакомьтесь с нашим предложением! У нас — качество, надежность и стиль по доступной стоимости. Индивидуальный подход к каждому заказу!
индивидуалки г. калуга вызвать шлюху калуга
заказать дизайнера интерьера квартиры https://dizayn-interera213.ru
Предлагаем услуги профессиональных инженеров офицальной мастерской.
Еслли вы искали ремонт iphone se 2020 цены, можете посмотреть на сайте: ремонт iphone se 2020
Наши мастера оперативно устранят неисправности вашего устройства в сервисе или с выездом на дом!
Mexican Easy Pharm: Mexican Easy Pharm – Mexican Easy Pharm
online pharmacy canada: canadian drug pharmacy – www canadianonlinepharmacy
вывод из запоя в стационаре воронежа вывод из запоя в стационаре воронежа .
купить программу 1с бухгалтерия купить программу 1с бухгалтерия .
купить 1с бухгалтерия 8.3 проф версия цена купить 1с бухгалтерия 8.3 проф версия цена .
canadian neighbor pharmacy https://mexicaneasypharm.com/# purple pharmacy mexico price list
india online pharmacy
Indian pharmacy international shipping: Indian pharmacy international shipping – Best online Indian pharmacy
выведение из запоя воронеж стационар выведение из запоя воронеж стационар .
вывод из запоя нижний новгород вывод из запоя нижний новгород .
medication from mexico pharmacy: Mexican Easy Pharm – Mexican Easy Pharm
canadian pharmacy online ship to usa: best canadian pharmacy online – pharmacy canadian superstore
canada drugs reviews: canada drugs online review – canadian pharmacy store
капельница от запоя нижний новгород капельница от запоя нижний новгород .
для вывода из запоя в стационаре http://www.vyvod-iz-zapoya-v-stacionare23.ru/ .
вывод из запоя в наркологическом стационаре вывод из запоя в наркологическом стационаре .
reputable mexican pharmacies online: buying prescription drugs in mexico – Mexican Easy Pharm
https://mexicaneasypharm.com/# medication from mexico pharmacy
reliable canadian pharmacy
Mexican Easy Pharm: mexican border pharmacies shipping to usa – п»їbest mexican online pharmacies
online slots Jodo Do Tigrinho are a unique combination of excitement and pleasure. Discover a variety of themes, bonus games and jackpots. Play comfortably, enjoying the well-thought-out interface and the chance to hit the jackpot!
Cryptocurrency trading service bitqt with AI is automation and efficiency. Artificial intelligence monitors market dynamics, reduces risks and optimizes transactions. The perfect solution for beginners and professionals.
Mexican Easy Pharm: Mexican Easy Pharm – Mexican Easy Pharm
online slots Jodo Do Tigrinho are a unique combination of excitement and pleasure. Discover a variety of themes, bonus games and jackpots. Play comfortably, enjoying the well-thought-out interface and the chance to hit the jackpot!
Cryptocurrency trading service bitqt with AI is automation and efficiency. Artificial intelligence monitors market dynamics, reduces risks and optimizes transactions. The perfect solution for beginners and professionals.
Предлагаем услуги профессиональных инженеров офицальной мастерской.
Еслли вы искали ремонт ipad mini 3 адреса, можете посмотреть на сайте: ремонт ipad mini 3 цены
Наши мастера оперативно устранят неисправности вашего устройства в сервисе или с выездом на дом!
Thanks for this post, I am a big big fan of this site would like to keep updated.
best online pharmacies in mexico: Mexican Easy Pharm – reputable mexican pharmacies online
Hi , I do believe this is an excellent blog. I stumbled upon it on Yahoo , i will come back once again. Money and freedom is the best way to change, may you be rich and help other people.
Предлагаем услуги профессиональных инженеров офицальной мастерской.
Еслли вы искали ремонт ipad mini 4 цены, можете посмотреть на сайте: ремонт ipad mini 4
Наши мастера оперативно устранят неисправности вашего устройства в сервисе или с выездом на дом!
Предлагаем услуги профессиональных инженеров офицальной мастерской.
Еслли вы искали ремонт ipad pro 12.9 цены, можете посмотреть на сайте: ремонт ipad pro 12.9 адреса
Наши мастера оперативно устранят неисправности вашего устройства в сервисе или с выездом на дом!
canadian pharmacy tampa: Canadian Md Pharm – canadian pharmacy 24
Aviatrix game https://aviatrix-games.com/en/ has become a sensation in the world of crash games. Its unique format, featuring a rapidly growing multiplier and the possibility of an unexpected crash. Aviatrix crash game is at 1win, 1xbet, Mostbet, and Pin Up.
Aviatrix game https://aviatrix-games.com/en/ has become a sensation in the world of crash games. Its unique format, featuring a rapidly growing multiplier and the possibility of an unexpected crash. Aviatrix crash game is at 1win, 1xbet, Mostbet, and Pin Up.
Indian Cert Pharm: Indian Cert Pharm – Indian Cert Pharm
диплом купить в красноярске
I?¦ve been exploring for a little for any high quality articles or blog posts on this kind of space . Exploring in Yahoo I finally stumbled upon this site. Studying this information So i?¦m glad to exhibit that I have a very just right uncanny feeling I came upon just what I needed. I such a lot definitely will make sure to do not fail to remember this web site and give it a look on a continuing basis.
заказ алкоголя на дом заказать алкоголь на дом москва круглосуточно недорого
It¦s really a great and helpful piece of info. I am glad that you shared this helpful info with us. Please keep us informed like this. Thanks for sharing.
доставка еды и алкоголя на дом алкоголь купить ночью с доставкой в москве
canadian online pharmacy reviews: trusted canadian pharmacy – canadian pharmacy review
вывод из запоя стационар вывод из запоя стационар .
вывод из запоя стационар вывод из запоя стационар .
Предлагаем услуги профессиональных инженеров офицальной мастерской.
Еслли вы искали ремонт ipad mini 3 рядом, можете посмотреть на сайте: ремонт ipad mini 3 в москве
Наши мастера оперативно устранят неисправности вашего устройства в сервисе или с выездом на дом!
you’re really a good webmaster. The website loading speed is incredible. It seems that you’re doing any unique trick. Also, The contents are masterwork. you’ve done a great job on this topic!
Mexican Easy Pharm: Mexican Easy Pharm – Mexican Easy Pharm
Online medicine Online medicine Indian Cert Pharm
pharmacy wholesalers canada: CanadianMdPharm – adderall canadian pharmacy
вывод из запоя в стационаре вывод из запоя в стационаре .
вывод из запоя в нижнем новгороде вывод из запоя в нижнем новгороде .
выведение из запоя нижний новгород выведение из запоя нижний новгород .
I like this web blog so much, bookmarked.
https://indiancertpharm.com/# Indian Cert Pharm
canadian pharmacy prices
buying prescription drugs in mexico online: п»їbest mexican online pharmacies – mexico pharmacies prescription drugs
I really like what you guys are usually up too. Such clever work and reporting! Keep up the amazing works guys I’ve incorporated you guys to my personal blogroll.
medicine in mexico pharmacies https://mexicaneasypharm.com/# mexican mail order pharmacies
medication from mexico pharmacy
пропуск для грузового транспорта в москву пропуск для грузового транспорта в москву .
вывод из запоя в стационаре самара вывод из запоя в стационаре самара .
medicine in mexico pharmacies: Mexican Easy Pharm – п»їbest mexican online pharmacies
пластиковые окна под ключ цена недорого мелке раздвижное окно
Online pharmacy Indian pharmacy international shipping IndianCertPharm
Предлагаем услуги профессиональных инженеров офицальной мастерской.
Еслли вы искали ремонт ipad mini 4 цены, можете посмотреть на сайте: ремонт ipad mini 4 в москве
Наши мастера оперативно устранят неисправности вашего устройства в сервисе или с выездом на дом!
kinogo ретро-фильмы kinogo фильмы для вечеринки
Предлагаем услуги профессиональных инженеров офицальной мастерской.
Еслли вы искали срочный ремонт ipad pro 12.9, можете посмотреть на сайте: ремонт ipad pro 12.9
Наши мастера оперативно устранят неисправности вашего устройства в сервисе или с выездом на дом!
киного отзывы kinogo фильмы про драконов
сколько стоят пластиковые окна окно melke lite
What i don’t understood is actually how you’re now not actually much more well-favored than you may be right now. You are so intelligent. You know thus considerably in the case of this subject, made me personally believe it from numerous numerous angles. Its like women and men don’t seem to be interested except it is one thing to accomplish with Woman gaga! Your own stuffs nice. At all times deal with it up!
This design is steller! You most certainly know how to keep a reader amused. Between your wit and your videos, I was almost moved to start my own blog (well, almost…HaHa!) Great job. I really enjoyed what you had to say, and more than that, how you presented it. Too cool!
киного без регистрации kinogo фильмы для взрослых
киного детективы kinogo сериалы про супергероев
mexican pharmaceuticals online https://mexicaneasypharm.com/# medication from mexico pharmacy
pharmacies in mexico that ship to usa
canadian neighbor pharmacy: CanadianMdPharm – canadian pharmacy uk delivery
Howdy! This is my first comment here so I just wanted to give a quick shout out and say I truly enjoy reading your posts. Can you suggest any other blogs/websites/forums that go over the same topics? Thank you!
вывод из запоя в наркологическом стационаре вывод из запоя в наркологическом стационаре .
пропуск в москву на грузовой автомобиль пропуск в москву на грузовой автомобиль .
пропуск в москву для грузовых автомобилей пропуск в москву для грузовых автомобилей .
mexican border pharmacies shipping to usa https://mexicaneasypharm.com/# mexican pharmaceuticals online
mexican online pharmacies prescription drugs
canadian pharmacy meds review: CanadianMdPharm – safe online pharmacies in canada
Ищете промокоды для игр промокод на барабан ggstandoff наш сайт – ваш лучший помощник! Собираем актуальные игровые промокоды для бонусов, скидок и эксклюзивных наград. Наслаждайтесь играми с максимальной выгодой – воспользуйтесь промокодами уже сегодня!
Well I really enjoyed studying it. This post procured by you is very effective for accurate planning.
Ищете промокоды для игр секретный промокод ggdrop наш сайт – ваш лучший помощник! Собираем актуальные игровые промокоды для бонусов, скидок и эксклюзивных наград. Наслаждайтесь играми с максимальной выгодой – воспользуйтесь промокодами уже сегодня!
Loving the information on this web site, you have done outstanding job on the content.
Ищете промокоды для игр ggstandoff промокоды на деньги наш сайт – ваш лучший помощник! Собираем актуальные игровые промокоды для бонусов, скидок и эксклюзивных наград.
Ищете промокоды для игр промокод на пополнение счета наш сайт – ваш лучший помощник! Собираем актуальные игровые промокоды для бонусов, скидок и эксклюзивных наград.
Предлагаем услуги профессиональных инженеров офицальной мастерской.
Еслли вы искали ремонт iphone 12, можете посмотреть на сайте: ремонт iphone 12 цены
Наши мастера оперативно устранят неисправности вашего устройства в сервисе или с выездом на дом!
best online canadian pharmacy canada pharmacy canadian pharmacy no scripts
https://canadianmdpharm.com/# canadian pharmacy checker
best online canadian pharmacy
вывод из запоя самара стационар вывод из запоя самара стационар .
mexican border pharmacies shipping to usa https://mexicaneasypharm.com/# medication from mexico pharmacy
mexican drugstore online
Pred Pharm prednisone 10mg tablet cost can you buy prednisone over the counter in canada
анонимный вывод из запоя в стационаре анонимный вывод из запоя в стационаре .
https://predpharm.com/# prednisone brand name us
prednisone brand name in usa
пропуск в москву для грузовых автомобилей пропуск в москву для грузовых автомобилей .
https://semapharm24.shop/# rybelsus semaglutide tablets
buy kamagra online usa
пропуск в москву на грузовой автомобиль пропуск в москву на грузовой автомобиль .
В этой статье мы рассматриваем разрушительное влияние зависимости на жизнь человека. Обсуждаются аспекты, такие как здоровье, отношения и профессиональные достижения. Читатели узнают о необходимости обращения за помощью и о путях к восстановлению.
Подробнее можно узнать тут – https://nakroklinikatest.ru/
cheap semaglutide pills: SemaPharm24 – buy semaglutide
http://cytpharm.com/# cytotec abortion pill
Kamagra 100mg
http://kamapharm.com/# Kama Pharm
prednisone cream brand name
пропуск в москву на грузовой автомобиль пропуск в москву на грузовой автомобиль .
Предлагаем услуги профессиональных инженеров офицальной мастерской.
Еслли вы искали ремонт iphone 12 сервис, можете посмотреть на сайте: срочный ремонт iphone 12
Наши мастера оперативно устранят неисправности вашего устройства в сервисе или с выездом на дом!
Abortion pills online Cyt Pharm CytPharm
Pred Pharm: prednisone cost canada – prednisone 250 mg
https://semapharm24.shop/# cheap semaglutide pills
cheap kamagra
https://predpharm.com/# PredPharm
buy prednisone 10mg online
buy cytotec online: Cyt Pharm – buy cytotec
продамус промокод продамус промокод .
Priligy tablets cheap priligy buy dapoxetine online
What’s up mates, how is the whole thing, and what you desire to say regarding this article, in my view its actually awesome for me.
https://xn—–7kcgiiy1bf2ancu8h.xn--p1ai
Выбор современных родителей – коляска-трость, с прочными колесами и удобной ручкой.
Эргономичная коляска-трость с эффектным дизайном, и удобным выдвижным козырьком.
Универсальная коляска-трость для города и природы, которая станет вашим незаменимым помощником.
Качественная коляска-трость с удобной ручкой, которая облегчит вам заботу о ребенке.
geoby 05d888 https://kolyaski-trosti-progulochnye.ru/ .
вывод из запоя дешево ростов на дону https://www.vyvod-iz-zapoya-rostov227.ru .
http://cytpharm.com/# CytPharm
Kamagra 100mg price
купить программу 1с для ип купить программу 1с для ип .
moving services moving services .
buy semaglutide: semaglutide tablets for weight loss – semaglutide tablets price
https://dappharm.com/# DapPharm
prednisone 1 mg tablet
http://cytpharm.com/# CytPharm
Kamagra Oral Jelly
buy Kamagra п»їkamagra п»їkamagra
generic rybelsus tabs: semaglutide best price – rybelsus semaglutide tablets
насосы купить насосы купить .
cytotec buy online usa: buy cytotec pills – buy cytotec over the counter
http://predpharm.com/# prednisone cost in india
Kamagra 100mg
https://cytpharm.shop/# CytPharm
prednisone 20mg online
buy cytotec online: buy cytotec online – Cyt Pharm
Kamagra tablets: п»їkamagra – Kama Pharm
buy semaglutide generic rybelsus tabs semaglutide tablets price
http://semapharm24.com/# semaglutide tablets price
sildenafil oral jelly 100mg kamagra
Cytotec 200mcg price: buy cytotec online – buy cytotec online
buy cytotec online: CytPharm – buy cytotec online
http://kamapharm.com/# cheap kamagra
prednisone 10 mg
https://predpharm.shop/# Pred Pharm
п»їkamagra
Sema Pharm 24: semaglutide tablets price – SemaPharm24
Ищете свадебного фотографа для идеальной свадебной фотосессии?
Я помогу запечатлеть самые трогательные моменты вашего дня! Эмоции, искренность и индивидуальность в каждом кадре.
заказать услугу и узнать подробнее – свадебная фотосессия в коломне заказать.
Ваша история любви — в моих фотографиях!
Priligy tablets Priligy tablets buy priligy
SemaPharm24: generic rybelsus tabs – semaglutide tablets for weight loss
3
http://dappharm.com/# dap pharm
Kamagra 100mg price
выведение из запоя на дому выведение из запоя на дому .
программа 1с купить цена программа 1с купить цена .
Pred Pharm: PredPharm – prednisone 10mg tabs
dap pharm: buy dapoxetine online – dapoxetine price
http://dappharm.com/# DapPharm
prednisone 20 mg tablets coupon
Kama Pharm Kama Pharm Kama Pharm
https://cytpharm.com/# п»їcytotec pills online
Kamagra 100mg price
рыбалка для женщин рыбалка в астрахани летом
надежный маркетплейс bs2best at где сочетаются безопасность, широкий выбор товаров и удобство использования. Платформа работает с анонимными платежами и гарантирует полную конфиденциальность для всех пользователей.
рыбалка на байкале рыбалка на искусственных водоёмах
cheap semaglutide pills: rybelsus semaglutide tablets – SemaPharm24
надежный маркетплейс blacksprut сайт где сочетаются безопасность, широкий выбор товаров и удобство использования. Платформа работает с анонимными платежами и гарантирует полную конфиденциальность для всех пользователей.
Kama Pharm: Kama Pharm – Kama Pharm
https://cytpharm.com/# cytotec buy online usa
Kamagra 100mg price
cheap semaglutide pills: semaglutide tablets for weight loss – semaglutide best price
http://dappharm.com/# buy dapoxetine online
can i buy prednisone from canada without a script
Ищете свадебного фотографа для идеальной свадебной фотосессии?
Я помогу запечатлеть самые трогательные моменты вашего дня! Эмоции, искренность и индивидуальность в каждом кадре.
заказать услугу и узнать подробнее – свадебная фотосессия в коломне заказать.
Ваша история любви — в моих фотографиях!
buy prednisone online australia: PredPharm – prednisone for cheap
пропуска в москву для грузовиков пропуска в москву для грузовиков .
пропуск в москву для грузовых автомобилей пропуск в москву для грузовых автомобилей .
http://predpharm.com/# PredPharm
Kamagra 100mg price
buy rybelsus online semaglutide tablets buy rybelsus online
buy priligy: priligy – priligy
Kama Pharm: Kamagra tablets – Kama Pharm
Предлагаем услуги профессиональных инженеров офицальной мастерской.
Еслли вы искали ремонт фотоаппаратов canon, можете посмотреть на сайте: ремонт фотоаппаратов canon
Наши мастера оперативно устранят неисправности вашего устройства в сервисе или с выездом на дом!
moving companies moving companies .
https://kamapharm.com/# Kamagra 100mg price
buy prednisone nz
buy dapoxetine online: cheap priligy – DapPharm
cheap kamagra: Kamagra 100mg price – super kamagra
buy cytotec online Cyt Pharm CytPharm
https://predpharm.com/# PredPharm
super kamagra
Pred Pharm: PredPharm – prednisone pills for sale
Предлагаем услуги профессиональных инженеров офицальной мастерской.
Еслли вы искали ремонт imac 27, можете посмотреть на сайте: ремонт imac 27 сервис
Наши мастера оперативно устранят неисправности вашего устройства в сервисе или с выездом на дом!
https://predpharm.com/# prednisone daily use
prednisone cream rx
CytPharm: CytPharm – buy cytotec pills online cheap
https://cytpharm.com/# CytPharm
Kamagra 100mg
Предлагаем услуги профессиональных инженеров офицальной мастерской.
Еслли вы искали ремонт ipad air 2 цены, можете посмотреть на сайте: ремонт ipad air 2 цены
Наши мастера оперативно устранят неисправности вашего устройства в сервисе или с выездом на дом!
Cyt Pharm: cytotec buy online usa – CytPharm
Предлагаем услуги профессиональных инженеров офицальной мастерской.
Еслли вы искали ремонт imac 21, можете посмотреть на сайте: ремонт imac 21 сервис
Наши мастера оперативно устранят неисправности вашего устройства в сервисе или с выездом на дом!
prednisone pill prednisone in mexico prednisone 40mg
buy priligy: dapoxetine online – dapoxetine online
https://dappharm.com/# dap pharm
sildenafil oral jelly 100mg kamagra
Cyt Pharm: buy cytotec pills online cheap – CytPharm
https://kamapharm.com/# buy Kamagra
buy prednisone online from canada
SemaPharm24: buy rybelsus online – SemaPharm24
buy cytotec online: buy cytotec online fast delivery – buy cytotec online
cheap semaglutide pills semaglutide tablets for weight loss Sema Pharm 24
https://kamapharm.com/# Kamagra 100mg
Kamagra 100mg price
http://cytpharm.com/# buy cytotec
prednisone 30
Kamagra Oral Jelly: Kama Pharm – Kama Pharm
hemp for sale in prague https://shop-cannabis-prague.com
Предлагаем услуги профессиональных инженеров офицальной мастерской.
Еслли вы искали ремонт ipad air 2, можете посмотреть на сайте: ремонт ipad air 2
Наши мастера оперативно устранят неисправности вашего устройства в сервисе или с выездом на дом!
Kama Pharm: cheap kamagra – Kamagra tablets
Предлагаем услуги профессиональных инженеров офицальной мастерской.
Еслли вы искали срочный ремонт imac 21, можете посмотреть на сайте: срочный ремонт imac 21
Наши мастера оперативно устранят неисправности вашего устройства в сервисе или с выездом на дом!
1
buy cytotec online: buy cytotec online – CytPharm
hashish in prague https://shop-cannabis-prague.com
weed delivery in prague https://shop-cannabis-prague.com
https://predpharm.com/# PredPharm
5 mg prednisone tablets
https://predpharm.shop/# Pred Pharm
sildenafil oral jelly 100mg kamagra
dap pharm dapoxetine online cheap priligy
Cyt Pharm: buy cytotec online – order cytotec online
пропуска в москву для грузовиков пропуска в москву для грузовиков .
http://cytpharm.com/# buy cytotec online
order prednisone 10 mg tablet
buy kamagra online usa: Kama Pharm – Kama Pharm
займ кредит на карту онлайн займы онлайн
Kama Pharm: Kama Pharm – Kama Pharm
микрозайм онлайн без отказа с плохой кредитной займы онлайн
https://cytpharm.shop/# buy cytotec online
cheap kamagra
buy cytotec online: CytPharm – Abortion pills online
buy priligy dapoxetine online priligy
Your site is good Actually, i have seen your post and That was very informative and very entertaining for me.
안전놀이터
https://dappharm.com/# dapoxetine online
prednisone oral
https://farmatadalitaly.com/# farmacia online piГ№ conveniente
Farmacia online piГ№ conveniente
http://farmabrufen.com/# FarmaBrufen
Farmacia online miglior prezzo
farmacie online sicure: Farma Prodotti – Farmacie online sicure
farmacia online senza ricetta
Farmacia online miglior prezzo: Farma Prodotti – migliori farmacie online 2024
https://farmaprodotti.com/# acquistare farmaci senza ricetta
Farmacia online miglior prezzo
siti sicuri per comprare viagra online: viagra generico recensioni – viagra prezzo farmacia 2023
п»їFarmacia online migliore
migliori farmacie online 2024 farmacie online affidabili farmacie online autorizzate elenco
https://farmaprodotti.shop/# Farmacie online sicure
farmacia online piГ№ conveniente
farmacie online sicure: Farma Prodotti – migliori farmacie online 2024
farmacia online senza ricetta
http://farmasilditaly.com/# alternativa al viagra senza ricetta in farmacia
Farmacie online sicure
farmacie online affidabili: farmacie online affidabili – farmaci senza ricetta elenco
http://farmatadalitaly.com/# farmacie online autorizzate elenco
Farmacie online sicure
Farmacie online sicure Ibuprofene 600 prezzo senza ricetta farmacie online autorizzate elenco
farmacia online senza ricetta: Ibuprofene 600 prezzo senza ricetta – Farmacie online sicure
farmacia online
https://farmasilditaly.com/# viagra online spedizione gratuita
migliori farmacie online 2024
miglior sito dove acquistare viagra: FarmaSildItaly – miglior sito per comprare viagra online
https://farmasilditaly.shop/# miglior sito dove acquistare viagra
Farmacia online miglior prezzo
miglior sito per comprare viagra online: Viagra – cialis farmacia senza ricetta
Farmacie on line spedizione gratuita
http://farmaprodotti.com/# farmacia online
п»їFarmacia online migliore
top farmacia online Farma Prodotti farmacie online affidabili
farmacie online affidabili: Farma Prodotti – п»їFarmacia online migliore
farmacia online
http://farmatadalitaly.com/# comprare farmaci online all’estero
acquistare farmaci senza ricetta
https://farmatadalitaly.shop/# farmacia online
acquisto farmaci con ricetta
Нужны деньги срочно займы с быстрым одобрением и моментальным переводом на карту. Минимум документов, удобные условия и прозрачные ставки. Оформите займ прямо сейчас!
comprare farmaci online con ricetta: Farmacie on line spedizione gratuita – п»їFarmacia online migliore
comprare farmaci online con ricetta
Промокоды для игр https://esportpromo.com/ это бесплатные бонусы, скидки и эксклюзивные награды! Находите актуальные коды, используйте их и получайте максимум удовольствия от игры без лишних затрат.
https://farmatadalitaly.com/# Farmacia online miglior prezzo
migliori farmacie online 2024
acquistare farmaci senza ricetta Farma Prodotti farmacia online senza ricetta
Лучшие игровые промокоды промокоды на кейсы в ггстандофф в одном месте! Активируйте бонусы, получайте подарки и прокачивайте аккаунт без лишних затрат. Следите за обновлениями, чтобы не пропустить новые промо!
farmacia online piГ№ conveniente: Cialis generico prezzo – Farmacia online miglior prezzo
I have been browsing online more than 3 hours today, yet I never found any interesting article like yours. It’s pretty worth enough for me. In my view, if all web owners and bloggers made good content as you did, the net will be much more useful than ever before.
farmacie online sicure: Brufen senza ricetta – Farmacie on line spedizione gratuita
acquisto farmaci con ricetta
https://farmabrufen.com/# Brufen senza ricetta
farmaci senza ricetta elenco
Хотите проверить компанию https://innproverka.ru по ИНН? Наш сервис поможет узнать подробную информацию о юридических лицах и ИП: статус, финансы, руководителей и возможные риски. Защищайте себя от ненадежных партнеров!
п»їFarmacia online migliore: Brufen senza ricetta – Farmacia online miglior prezzo
Farmacie on line spedizione gratuita: Farma Prodotti – п»їFarmacia online migliore
acquisto farmaci con ricetta
https://farmatadalitaly.shop/# farmacie online autorizzate elenco
farmacia online piГ№ conveniente
Farmacia online piГ№ conveniente Farma Prodotti farmacie online autorizzate elenco
Раскрутка в соцсетях https://nakrytka.com без лишних затрат! Привлекаем реальную аудиторию, повышаем охваты и активность. Эффективные инструменты для роста вашего бренда.
viagra cosa serve: Farma Sild Italy – viagra consegna in 24 ore pagamento alla consegna
viagra prezzo farmacia 2023: FarmaSildItaly – viagra consegna in 24 ore pagamento alla consegna
comprare farmaci online con ricetta
https://farmatadalitaly.com/# acquistare farmaci senza ricetta
farmacie online sicure
farmacia online senza ricetta: Tadalafil generico migliore – migliori farmacie online 2024
acquisto farmaci con ricetta: п»їFarmacia online migliore – Farmacie online sicure
acquistare farmaci senza ricetta
https://farmasilditaly.shop/# viagra generico prezzo piГ№ basso
farmacie online sicure
farmacie online sicure BRUFEN prezzo top farmacia online
промокод продамус скидка http://www.promokod-pro.ru/ .
acquisto farmaci con ricetta: BRUFEN prezzo – migliori farmacie online 2024
acquistare farmaci senza ricetta: farmacia online piГ№ conveniente – comprare farmaci online all’estero
Farmacie online sicure
http://farmaprodotti.com/# comprare farmaci online all’estero
comprare farmaci online all’estero