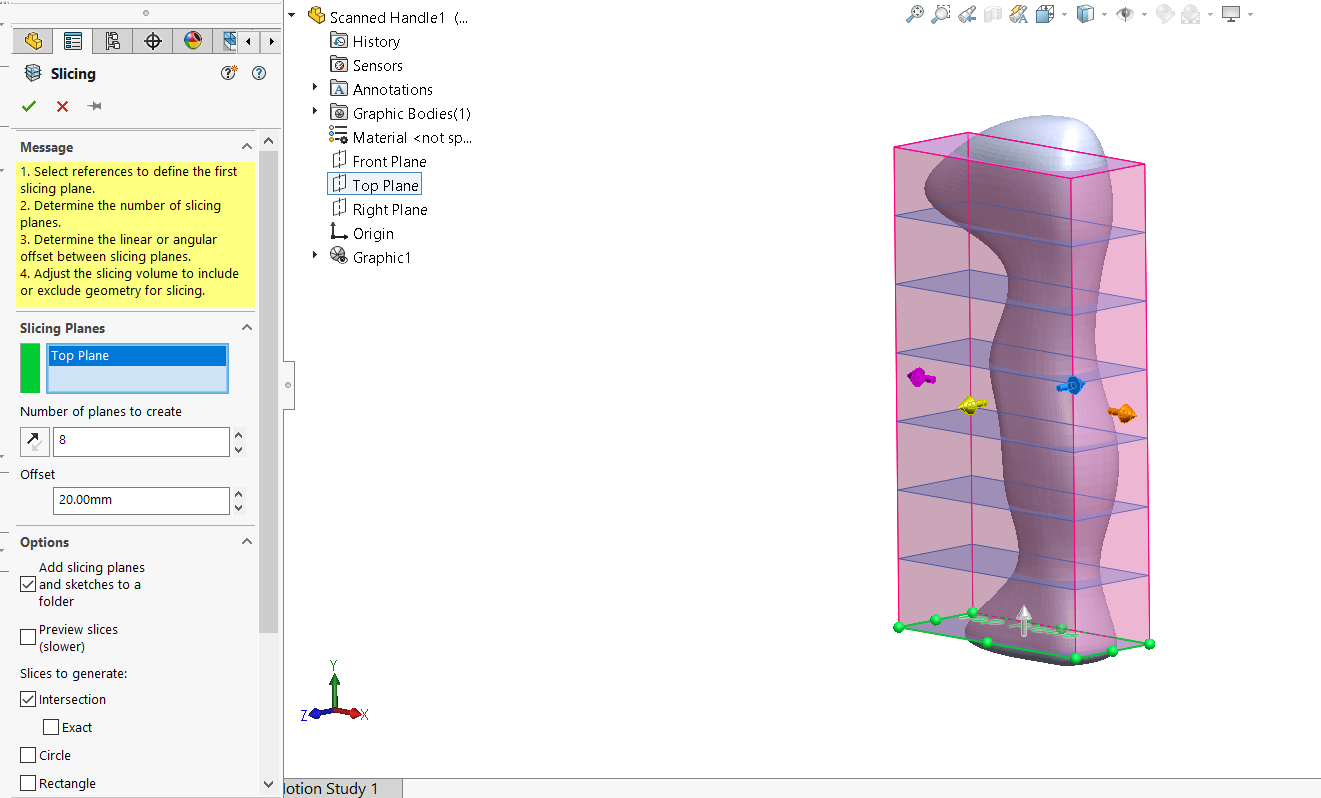


When creating large designs or designs in general, we encounter a lot of work that needs to be repeated. These works could be adding holes or placing components repeatedly in a design process or we encounter some designs that are common in different assemblies but still takes a lot of time to add, that we wish these designs could be done in a faster or much efficient way like the below assembly.

Smart component is one such feature that can make your life easy. These are components made in SolidWorks that bring along with it, smart features. Features like cuts, holes, fasteners etc., can be stored inside these smart components and called for whenever it is needed. Let us see how to create a smart component and how they can be used to do the designs in a much productive way.
For example, lets us consider my requirement is a smart hinge. The component smart hinge should have four holes with drill size of 5 mm. When the smart hinge is placed on a component, I want the necessary holes and the fasteners to appear along with it. Let us start by designing a hinge in which we will store all our smart features as shown in the below image.
Now that the hinge is created, let’s make an assembly.

Now we can use this assembly to make our smart component.

You will see, a window appears on the feature manager tree.
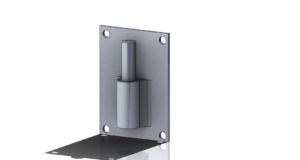
SolidWorks will capture all the associated drills you have made and the fasteners. SolidWorks will intimate us that the component is smart component by adding a lightning symbol in front of the part. Now that we have successfully created the smart component. Let us see how we can make use of it in SolidWorks.

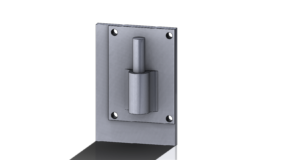
Save the smart component in the design library and create a part to use the smart component. For example, I have created a sheet metal base flange as shown in the image below.
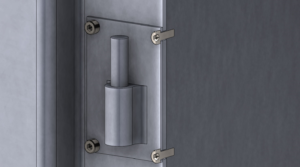
In the above image, a section view is taken, to clearly showcase the smart component along with the drill holes and their respective fasteners.
Smart component is a powerful feature of SolidWorks that can be saved in the design library and reused when needed. It is one of the features that increases your productivity and will help you decreases your design time.
We Urge You To Call Us For Any Doubts & Clarifications That You May Have. We Are Eager to Talk To You
Call Us: +91 7406663589
 (No Ratings Yet)
#365/8, Ground Floor, "Hasmitha Avenue", 16th Main, 4th T Block East, Jayanagar, 4th T Block East, Pattabhirama Nagar, Jayanagar, Bengaluru, Karnataka 560041
Rated 4.7/5 with a total of 62 reviews
"CARAX" Building 4th Floor, 105/1/1/4, Next to Radha Hotel, Pune-Mumbai Xpress Way,Baner,Pune 411045
Rated 4.7/5 with a total of 17 reviews
1002, LODHA Supremus, I-Think Techno Campus,Kanjurmarg EAST - MUMBAI, MH, India – 400042.
Rated 5/5 with a total of 51 reviews
508, Shiti Ratna Complex, Panchwati Cross Road, Ahmedabad-380006
Rated 4.1/5 with a total of 7 reviews
Kanda's Villa, II Floor, AE Block,3362 R, 8th Street, Anna Nagar, Chennai, Tamil Nadu 600040
Rated 4.6/5 with a total of 16 reviews
Flat no F1, first floor, Nakhate corner, Eknath rang mandir road,New Usmanpura, Aurangabad, 431005.
A-101, 1st Floor, The Hub Complex, opp. Shete Hospital, Mahatma Nagar, Parijat Nagar, Nashik, Maharashtra 422005.
Level 7, Octave 3B Salarpuria Sattva Knowledge City, Inorbit Mall Road, Raidurg Village, Hi-tech City, Hyderabad, Telangana - 500081, India

pin up onlayn kazino https://azerbaijancuisine.com/# pin up az
pin up casino
buying prescription drugs in mexico online Mexico pharmacy that ship to usa mexican mail order pharmacies
mexican pharmaceuticals online mexican pharmacy northern doctors mexican border pharmacies shipping to usa
pharmacies in mexico that ship to usa mexican pharmacy mexico drug stores pharmacies
mexico drug stores pharmacies mexican pharmacy purple pharmacy mexico price list
mexican drugstore online: northern doctors – buying from online mexican pharmacy
mexican rx online: mexican northern doctors – buying prescription drugs in mexico online
https://northern-doctors.org/# mexican online pharmacies prescription drugs
http://northern-doctors.org/# medication from mexico pharmacy
buying from online mexican pharmacy: mexican pharmacy online – purple pharmacy mexico price list
mexican pharmaceuticals online: mexican pharmacy northern doctors – buying prescription drugs in mexico
https://northern-doctors.org/# mexican pharmaceuticals online
buying prescription drugs in mexico online: mexican pharmacy – mexican rx online
mexican border pharmacies shipping to usa: mexican pharmacy – mexican pharmaceuticals online
https://northern-doctors.org/# pharmacies in mexico that ship to usa
buying prescription drugs in mexico online mexican northern doctors п»їbest mexican online pharmacies
mexico drug stores pharmacies: northern doctors pharmacy – mexican drugstore online
https://northern-doctors.org/# reputable mexican pharmacies online
medication from mexico pharmacy: mexican pharmacy northern doctors – mexico drug stores pharmacies
buying prescription drugs in mexico online: mexican pharmacy online – mexico drug stores pharmacies
https://northern-doctors.org/# reputable mexican pharmacies online
reputable mexican pharmacies online: п»їbest mexican online pharmacies – mexican pharmaceuticals online
https://northern-doctors.org/# mexican online pharmacies prescription drugs
buying from online mexican pharmacy: northern doctors – mexican mail order pharmacies
buying prescription drugs in mexico: mexican northern doctors – mexican pharmacy
mexican drugstore online mexican pharmacy online best online pharmacies in mexico
https://northern-doctors.org/# mexican pharmaceuticals online
mexico pharmacies prescription drugs: purple pharmacy mexico price list – п»їbest mexican online pharmacies
best online pharmacies in mexico: Mexico pharmacy that ship to usa – mexican pharmaceuticals online
http://northern-doctors.org/# buying prescription drugs in mexico
mexican border pharmacies shipping to usa: mexican northern doctors – buying from online mexican pharmacy
http://northern-doctors.org/# mexico drug stores pharmacies
buying prescription drugs in mexico online: Mexico pharmacy that ship to usa – mexican drugstore online
https://cmqpharma.com/# pharmacies in mexico that ship to usa
mexico drug stores pharmacies
mexican online pharmacies prescription drugs online mexican pharmacy mexican drugstore online
buying from online mexican pharmacy online mexican pharmacy pharmacies in mexico that ship to usa
mexican pharmaceuticals online pharmacies in mexico that ship to usa mexican pharmacy
mexican rx online mexican pharmacy mexican rx online
mexico pharmacies prescription drugs cmqpharma.com pharmacies in mexico that ship to usa
mexico drug stores pharmacies
https://cmqpharma.online/# mexican pharmaceuticals online
buying prescription drugs in mexico online
pharmacies in mexico that ship to usa: mexican drugstore online – mexican online pharmacies prescription drugs
purple pharmacy mexico price list cmqpharma.com mexico pharmacy
mexican pharmacy mexican pharmacy buying prescription drugs in mexico
best online pharmacies in mexico mexican online pharmacy mexican pharmacy
medicine in mexico pharmacies mexican drugstore online buying prescription drugs in mexico online
Really superb information can be found on weblog.Expand blog
online shopping pharmacy india mail order pharmacy india indianpharmacy com
http://canadapharmast.com/# reputable canadian pharmacy
п»їbest mexican online pharmacies mexican pharmaceuticals online purple pharmacy mexico price list
https://canadapharmast.online/# prescription drugs canada buy online
п»їlegitimate online pharmacies india indian pharmacy paypal best india pharmacy
http://canadapharmast.com/# canadian discount pharmacy
medication from mexico pharmacy mexico pharmacy medicine in mexico pharmacies
can i get clomid no prescription: buy generic clomid no prescription – can you get generic clomid without insurance
cipro online no prescription in the usa: buy cipro no rx – ciprofloxacin
canadian pharmacy amoxicillin: amoxicillin generic – amoxicillin medicine over the counter
п»їpaxlovid: paxlovid price – paxlovid price
cost clomid pills: get clomid no prescription – how can i get cheap clomid without a prescription
buy cipro without rx: buy cipro online usa – cipro pharmacy
amoxicillin 500 mg tablet price: amoxicillin 500mg price in canada – amoxicillin canada price
buy amoxicillin online without prescription: amoxicillin 500mg – amoxicillin 500 capsule
purple pharmacy mexico price list mexican mail order pharmacies п»їbest mexican online pharmacies
http://mexicandeliverypharma.com/# buying from online mexican pharmacy
reputable mexican pharmacies online: buying prescription drugs in mexico – medicine in mexico pharmacies
mexico drug stores pharmacies: pharmacies in mexico that ship to usa – mexico drug stores pharmacies
best online pharmacies in mexico medicine in mexico pharmacies buying from online mexican pharmacy
mexican rx online: medication from mexico pharmacy – buying prescription drugs in mexico
mexican rx online: mexico pharmacies prescription drugs – mexican pharmaceuticals online
http://mexicandeliverypharma.com/# mexican rx online
buying prescription drugs in mexico buying from online mexican pharmacy mexico drug stores pharmacies
purple pharmacy mexico price list: reputable mexican pharmacies online – medication from mexico pharmacy
pharmacies in mexico that ship to usa: purple pharmacy mexico price list – pharmacies in mexico that ship to usa
https://mexicandeliverypharma.com/# buying prescription drugs in mexico online
best online pharmacies in mexico: mexico drug stores pharmacies – mexico drug stores pharmacies
mexican mail order pharmacies mexico pharmacies prescription drugs mexican rx online
mexican online pharmacies prescription drugs: mexican mail order pharmacies – mexican drugstore online
buying prescription drugs in mexico online: mexican online pharmacies prescription drugs – mexico drug stores pharmacies
medication from mexico pharmacy: mexico drug stores pharmacies – buying from online mexican pharmacy
mexican drugstore online buying prescription drugs in mexico buying from online mexican pharmacy
buying prescription drugs in mexico online: п»їbest mexican online pharmacies – mexico drug stores pharmacies
buying from online mexican pharmacy: mexican pharmaceuticals online – mexico drug stores pharmacies
https://mexicandeliverypharma.com/# medication from mexico pharmacy
pharmacies in mexico that ship to usa: mexican rx online – buying from online mexican pharmacy
mexican drugstore online mexican mail order pharmacies mexican mail order pharmacies
mexico drug stores pharmacies: buying prescription drugs in mexico online – buying prescription drugs in mexico online
pharmacies in mexico that ship to usa: buying prescription drugs in mexico online – best online pharmacies in mexico
mexican drugstore online: mexican border pharmacies shipping to usa – mexico drug stores pharmacies
buying from online mexican pharmacy mexican mail order pharmacies mexican border pharmacies shipping to usa
mexican border pharmacies shipping to usa: buying from online mexican pharmacy – pharmacies in mexico that ship to usa
mexican pharmaceuticals online: mexican border pharmacies shipping to usa – mexican drugstore online
medication from mexico pharmacy mexican online pharmacies prescription drugs purple pharmacy mexico price list
mexico pharmacies prescription drugs: pharmacies in mexico that ship to usa – mexican pharmaceuticals online
buying prescription drugs in mexico online: pharmacies in mexico that ship to usa – mexican online pharmacies prescription drugs
mexican mail order pharmacies: reputable mexican pharmacies online – п»їbest mexican online pharmacies
mexico pharmacy mexican mail order pharmacies mexico drug stores pharmacies
mexican online pharmacies prescription drugs: mexican mail order pharmacies – mexican border pharmacies shipping to usa
mexico drug stores pharmacies: mexican drugstore online – mexico pharmacies prescription drugs
medication from mexico pharmacy: purple pharmacy mexico price list – mexico drug stores pharmacies
mexican border pharmacies shipping to usa buying prescription drugs in mexico online buying from online mexican pharmacy
mexican rx online: buying from online mexican pharmacy – mexico pharmacies prescription drugs
mexico drug stores pharmacies: reputable mexican pharmacies online – medication from mexico pharmacy
buying from online mexican pharmacy: mexico drug stores pharmacies – mexican rx online
п»їbest mexican online pharmacies buying from online mexican pharmacy best online pharmacies in mexico
mexican online pharmacies prescription drugs: mexican pharmaceuticals online – mexican mail order pharmacies
reputable mexican pharmacies online: buying from online mexican pharmacy – mexico pharmacies prescription drugs
mexico drug stores pharmacies: mexico drug stores pharmacies – mexico drug stores pharmacies
п»їbest mexican online pharmacies mexico drug stores pharmacies reputable mexican pharmacies online
п»їbest mexican online pharmacies: buying from online mexican pharmacy – buying from online mexican pharmacy
pharmacies in mexico that ship to usa: mexico pharmacies prescription drugs – mexico drug stores pharmacies
п»їbest mexican online pharmacies: purple pharmacy mexico price list – п»їbest mexican online pharmacies
mexican drugstore online mexican pharmaceuticals online medicine in mexico pharmacies
best online pharmacies in mexico: reputable mexican pharmacies online – mexican pharmaceuticals online
purple pharmacy mexico price list: mexico drug stores pharmacies – pharmacies in mexico that ship to usa
mexico drug stores pharmacies: buying prescription drugs in mexico online – mexican drugstore online
mexico drug stores pharmacies mexico pharmacies prescription drugs mexican rx online
Your article helped me a lot, is there any more related content? Thanks!
mexico pharmacies prescription drugs: mexican mail order pharmacies – buying from online mexican pharmacy
mexican pharmaceuticals online: best online pharmacies in mexico – mexico drug stores pharmacies
mexican pharmaceuticals online: best online pharmacies in mexico – medication from mexico pharmacy
best online pharmacies in mexico mexican mail order pharmacies п»їbest mexican online pharmacies
mexican drugstore online: purple pharmacy mexico price list – best online pharmacies in mexico
reputable mexican pharmacies online: mexican drugstore online – medicine in mexico pharmacies
best online pharmacies in mexico: mexican online pharmacies prescription drugs – medicine in mexico pharmacies
mexico drug stores pharmacies mexican pharmaceuticals online mexican rx online
medication from mexico pharmacy: pharmacies in mexico that ship to usa – reputable mexican pharmacies online
best online pharmacies in mexico: reputable mexican pharmacies online – mexico drug stores pharmacies
mexican border pharmacies shipping to usa: medicine in mexico pharmacies – mexican pharmaceuticals online
buying from online mexican pharmacy mexican border pharmacies shipping to usa mexican drugstore online
mexican mail order pharmacies: mexico drug stores pharmacies – reputable mexican pharmacies online
mexican mail order pharmacies: purple pharmacy mexico price list – mexico drug stores pharmacies
medicine in mexico pharmacies: buying prescription drugs in mexico online – mexican online pharmacies prescription drugs
mexico pharmacies prescription drugs mexican rx online mexican rx online
medicine in mexico pharmacies: medication from mexico pharmacy – mexican rx online
mexican rx online: mexico drug stores pharmacies – mexico pharmacies prescription drugs
п»їbest mexican online pharmacies: purple pharmacy mexico price list – mexico drug stores pharmacies
buying prescription drugs in mexico online purple pharmacy mexico price list medication from mexico pharmacy
cheap propecia price get generic propecia without rx get propecia online
zithromax 250 mg tablet price: where to buy zithromax in canada – buy zithromax online australia
https://prednisonebestprice.pro/# where can i buy prednisone without prescription
http://propeciabestprice.pro/# propecia online
buy cytotec online fast delivery п»їcytotec pills online buy misoprostol over the counter
tamoxifen therapy: femara vs tamoxifen – tamoxifen hot flashes
http://cytotecbestprice.pro/# buy cytotec
http://prednisonebestprice.pro/# prednisone 30 mg tablet
propecia cost of generic propecia price cost cheap propecia pill
buy prednisone tablets uk: prednisone 2.5 tablet – prednisone cost 10mg
https://zithromaxbestprice.pro/# zithromax over the counter canada
http://prednisonebestprice.pro/# prednisone in india
arimidex vs tamoxifen bodybuilding pct nolvadex tamoxifen and grapefruit
buy cheap propecia for sale: cheap propecia without prescription – cost of cheap propecia without a prescription
generic zithromax 500mg: buy cheap generic zithromax – zithromax 500 mg
buy prednisone online fast shipping: prednisone canada – order prednisone on line
https://zithromaxbestprice.pro/# buy zithromax without prescription online
cost of generic propecia online: buy propecia without rx – generic propecia without insurance
order cytotec online: buy cytotec over the counter – buy cytotec online fast delivery
http://cytotecbestprice.pro/# п»їcytotec pills online
buying generic propecia without prescription: order cheap propecia pill – get generic propecia price
where can i buy zithromax capsules: purchase zithromax online – zithromax 250 mg
buy propecia no prescription: order generic propecia without prescription – order cheap propecia prices
https://prednisonebestprice.pro/# buy prednisone no prescription
https://farmait.store/# acquisto farmaci con ricetta
Farmacia online miglior prezzo: Avanafil a cosa serve – Farmacia online miglior prezzo
farmacie online sicure: Tadalafil generico migliore – comprare farmaci online all’estero
Farmacie online sicure: kamagra oral jelly – farmacia online piГ№ conveniente
farmacia online senza ricetta: super kamagra – Farmacia online miglior prezzo
http://farmait.store/# Farmacia online piГ№ conveniente
acquisto farmaci con ricetta: Avanafil a cosa serve – top farmacia online
farmacia online senza ricetta: Cialis generico prezzo – acquistare farmaci senza ricetta
comprare farmaci online con ricetta: kamagra oral jelly consegna 24 ore – top farmacia online
comprare farmaci online con ricetta: kamagra gel – п»їFarmacia online migliore
http://avanafil.pro/# Farmacie online sicure
Farmacia online miglior prezzo: avanafil 100 mg prezzo – farmacia online piГ№ conveniente
Farmacia online miglior prezzo: Farmacie on line spedizione gratuita – migliori farmacie online 2024
farmacie online affidabili: Avanafil compresse – acquisto farmaci con ricetta
brand cialis online pharmacy: cialis 20mg for sale – cialis pills overnight
https://sildenafil.llc/# viagra for women
cost of viagra: Cheap Viagra online – viagra professional
http://sildenafil.llc/# viagra professional
generic cialis no prescription australia: cheapest tadalafil – cialis side effects women
female viagra: Cheap Viagra online – generic viagra overnight
https://tadalafil.auction/# cialis 20mg price
https://mexicopharmacy.win/# mexican pharmaceuticals online
where to buy erectile dysfunction pills
mexico drug stores pharmacies: Purple pharmacy online ordering – buying from online mexican pharmacy
https://edpillpharmacy.store/# online erectile dysfunction prescription
cheapest ed treatment
http://mexicopharmacy.win/# buying from online mexican pharmacy
http://indiapharmacy.shop/# п»їlegitimate online pharmacies india
cheapest ed online
get ed meds online: Cheap ED pills online – affordable ed medication
http://edpillpharmacy.store/# ed medicines
medicine in mexico pharmacies: mexican pharmacy – medicine in mexico pharmacies
mexican pharmaceuticals online: Mexico pharmacy online – buying prescription drugs in mexico online
mexico drug stores pharmacies: Mexico pharmacy online – mexican border pharmacies shipping to usa
best online pharmacies in mexico: Purple pharmacy online ordering – buying prescription drugs in mexico online
http://edpillpharmacy.store/# ed meds cheap
buying from online mexican pharmacy: mexico pharmacy win – medicine in mexico pharmacies
buy ed meds: cheap ed pills online – buying ed pills online
https://mexicopharmacy.win/# buying from online mexican pharmacy
cheap ed medicine: Best ED meds online – boner pills online
https://indiapharmacy.shop/# Online medicine order
buy ed medication online: Best ED pills non prescription – cheap ed pills
online ed medication: cheap ed pills online – online ed meds
http://edpillpharmacy.store/# pills for ed online
medication from mexico pharmacy: Mexico pharmacy online – pharmacies in mexico that ship to usa
https://edpillpharmacy.store/# best online ed meds
purple pharmacy mexico price list: Best pharmacy in Mexico – buying prescription drugs in mexico
https://edpillpharmacy.store/# online erectile dysfunction prescription
top online pharmacy india: indian pharmacy – pharmacy website india
mexican pharmaceuticals online: mexican pharmacy – buying prescription drugs in mexico
where to get ed pills: online ed prescription same-day – where can i buy erectile dysfunction pills
purple pharmacy mexico price list: mexico pharmacy win – medicine in mexico pharmacies
mexican drugstore online: mexico pharmacy win – buying from online mexican pharmacy
zestril tab 10mg: price of lisinopril generic – lisinopril 5 mg for sale
https://tamoxifen.bid/# hysterectomy after breast cancer tamoxifen
buy cytotec pills online cheap https://lipitor.guru/# how much is lipitor
lasix furosemide 40 mg
order cytotec online: buy cytotec online – cytotec pills buy online
https://lisinopril.guru/# lisinopril 5 mg over the counter
buy cytotec over the counter https://tamoxifen.bid/# tamoxifen rash
furosemide 100 mg
cytotec buy online usa cytotec best price cytotec abortion pill
cytotec pills buy online: Misoprostol 200 mg buy online – buy cytotec pills online cheap
buy cytotec https://lisinopril.guru/# best generic lisinopril
furosemide 100mg
http://cytotec.pro/# п»їcytotec pills online
п»їcytotec pills online https://cytotec.pro/# buy cytotec pills online cheap
lasix side effects
buy zestril lisinopril without prescription cheapest price for lisinopril india
lipitor discount: cheapest ace inhibitor – buy cheap lipitor
https://cytotec.pro/# order cytotec online
liptor: lipitor pfizer – cheapest generic lipitor
cytotec abortion pill https://lipitor.guru/# lipitor 80
lasix pills
https://cytotec.pro/# cytotec online
cytotec pills buy online: Misoprostol price in pharmacy – buy misoprostol over the counter
cytotec pills buy online http://lisinopril.guru/# zestril 10mg price
lasix for sale
nolvadex vs clomid: buy tamoxifen citrate – nolvadex 20mg
https://furosemide.win/# lasix side effects
lisinopril tabs 10mg: buy lisinopril – lisinopril 2.5 mg cost
buy cytotec http://furosemide.win/# lasix uses
lasix furosemide 40 mg
cheap lipitor online: buy lipitor 20mg – average cost of generic lipitor
lisinopril tabs 88mg: Lisinopril online prescription – lisinopril 20 mg buy
zestril 2.5 mg tablets: cheap lisinopril – prinivil 20 mg cost
lisinopril generic price comparison: Lisinopril refill online – prinivil 40 mg
buy cytotec online fast delivery http://lipitor.guru/# generic lipitor price
lasix generic name
furosemide 40 mg: furosemide online – lasix 40 mg
buy cytotec online http://cytotec.pro/# buy cytotec pills online cheap
lasix for sale
prinivil medication: Lisinopril refill online – lisinopril online canadian pharmacy
northern pharmacy canada: canadianpharmacymeds – canadian medications
canadian pharmacy ltd: pharmacy canadian superstore – canadian pharmacy 24h com safe
http://mexstarpharma.com/# buying prescription drugs in mexico
reputable mexican pharmacies online best online pharmacies in mexico mexican online pharmacies prescription drugs
https://easyrxindia.shop/# reputable indian pharmacies
mexican pharmaceuticals online mexican mail order pharmacies best online pharmacies in mexico
http://easyrxindia.com/# cheapest online pharmacy india
http://easyrxcanada.com/# best rated canadian pharmacy
buying prescription drugs in mexico: buying prescription drugs in mexico online – purple pharmacy mexico price list
northwest pharmacy canada canadian drugs online canadian pharmacy reviews
mail order pharmacy india: cheapest online pharmacy india – reputable indian pharmacies
http://easyrxindia.com/# best india pharmacy
https://easyrxcanada.online/# canadian pharmacy world reviews
top online pharmacy india: Online medicine order – buy medicines online in india
buying from online mexican pharmacy: mexican pharmacy – reputable mexican pharmacies online
https://easyrxindia.com/# reputable indian pharmacies
http://easyrxcanada.com/# drugs from canada
reputable indian pharmacies: india online pharmacy – online pharmacy india
http://denemebonusuverensiteler.win/# deneme bonusu
deneme bonusu veren siteler: slot bahis siteleri – slot siteleri bonus veren
slot casino siteleri: guvenilir slot siteleri 2024 – guvenilir slot siteleri
oyun siteleri slot: slot bahis siteleri – guvenilir slot siteleri 2024
sweet bonanza kazanc: sweet bonanza guncel – sweet bonanza free spin demo
https://slotsiteleri.bid/# oyun siteleri slot
As someone still navigating this field, I find your posts really helpful. My site is QN5 and I’d be happy to have some experts about Airport Transfer like you check it and provide some feedback.
slot bahis siteleri: slot kumar siteleri – slot kumar siteleri
https://denemebonusuverensiteler.win/# bahis siteleri
deneme bonusu veren siteler: slot siteleri – en iyi slot siteleri
http://slotsiteleri.bid/# guvenilir slot siteleri 2024
deneme bonusu veren slot siteleri: canl? slot siteleri – slot siteleri guvenilir
http://denemebonusuverensiteler.win/# deneme bonusu veren siteler
deneme veren slot siteleri: en iyi slot siteler – yeni slot siteleri
2024 en iyi slot siteleri: slot casino siteleri – yasal slot siteleri
I love it when people come together and share opinions, great blog, keep it up.
https://slotsiteleri.bid/# slot bahis siteleri
1вин зеркало 1win вход 1вин зеркало
https://1win.directory/# 1win вход
пинап казино: пин ап казино – пин ап
1вин: 1win зеркало – 1win зеркало
пинап казино: pin up casino – пин ап казино вход
1xbet зеркало рабочее на сегодня: 1xbet официальный сайт мобильная версия – 1xbet официальный сайт мобильная версия
https://1xbet.contact/# 1xbet официальный сайт
1xbet официальный сайт: 1xbet официальный сайт – 1хбет зеркало
pin up казино: пин ап зеркало – pin up казино
vavada зеркало: вавада рабочее зеркало – вавада
казино вавада: vavada зеркало – казино вавада
https://pin-up.diy/# пин ап
1вин зеркало: 1win вход – ван вин
https://1win.directory/# 1вин зеркало
online pharmacy reviews klonopin: roman online pharmacy reviews – propranolol pharmacy
https://easydrugrx.com/# rx relief pharmacy discount card
brooks pharmacy store
https://drstore24.com/# contact your pharmacy to fill this rx
best rogue online pharmacy
medco pharmacy cialis: real rx pharmacy – simvastatin kmart pharmacy
https://drstore24.com/# online pharmacy azithromycin
mail order pharmacy no prescription
lamisil boots pharmacy: fluconazole mexico pharmacy – lipitor online pharmacy
pharmacy degrees online: online pharmacy overnight shipping – best online pharmacy review
https://onlineph24.com/# good rx pharmacy discount
certified pharmacy online viagra
best online pharmacy to buy accutane: north drug store – how much does percocet cost at pharmacy
valacyclovir indian pharmacy: internet pharmacy mexico – voltaren epharmacy
pharmacy venlafaxine: amoxicillin people’s pharmacy – online pharmacy sumatriptan
medicareblue rx pharmacy network: propecia us pharmacy – target pharmacy flonase
Thorazine: quit smoking – Hyzaar
mexican mail order pharmacies buying from online mexican pharmacy mexican rx online
https://pharmbig24.com/# pharmacy artane castle shopping centre
rite aid pharmacy viagra price: nizoral online pharmacy – concerta pharmacy prices
advair pharmacy coupons: kroger pharmacy gabapentin – xlpharmacy review viagra
nabp pharmacy viagra: permethrin cream online pharmacy – rx crossroads pharmacy phone number
mexican online pharmacies prescription drugs: mexican online pharmacies prescription drugs – medication from mexico pharmacy
http://pharmbig24.com/# generic levitra online pharmacy
india online pharmacy online pharmacy india indian pharmacy paypal
top 10 pharmacies in india: top 10 online pharmacy in india – buy prescription drugs from india
cheapest online pharmacy india: mail order pharmacy india – indian pharmacy online
pharmacies in mexico that ship to usa buying prescription drugs in mexico п»їbest mexican online pharmacies
mexican mail order pharmacies: purple pharmacy mexico price list – medication from mexico pharmacy
п»їlegitimate online pharmacies india: buy medicines online in india – indian pharmacies safe
indian pharmacy paypal best india pharmacy п»їlegitimate online pharmacies india
mexican mail order pharmacies: mexican pharmaceuticals online – pharmacies in mexico that ship to usa
https://mexicopharmacy.cheap/# mexican online pharmacies prescription drugs
medication from mexico pharmacy reputable mexican pharmacies online mexican border pharmacies shipping to usa
mexican border pharmacies shipping to usa: mexico pharmacies prescription drugs – mexico drug stores pharmacies
mexican border pharmacies shipping to usa: mexican online pharmacies prescription drugs – mexican drugstore online
http://indianpharmacy.company/# indian pharmacy paypal
Online medicine home delivery pharmacy website india п»їlegitimate online pharmacies india
sav-rx pharmacy: rx pharmacy card – abilify pharmacy coupon
india pharmacy mail order: mail order pharmacy india – п»їlegitimate online pharmacies india
viagra prices by pharmacy renova online pharmacy online pharmacy fluconazole
buying prescription drugs in mexico: buying prescription drugs in mexico online – buying prescription drugs in mexico online
https://mexicopharmacy.cheap/# mexican online pharmacies prescription drugs
I am only writing to make you know of the outstanding discovery my girl enjoyed viewing your web page. She realized such a lot of issues, which included what it is like to possess an amazing teaching spirit to let the rest very easily completely grasp selected multifaceted topics. You really surpassed readers’ expectations. Many thanks for rendering such priceless, trusted, explanatory and also cool thoughts on that topic to Evelyn.
Perfect work you have done, this web site is really cool with fantastic info .
best india pharmacy: best india pharmacy – pharmacy website india
mail order pharmacy india best online pharmacy india top online pharmacy india
mail order pharmacy india: india online pharmacy – top 10 online pharmacy in india
https://mexicopharmacy.cheap/# mexico drug stores pharmacies
mexican pharmaceuticals online mexico drug stores pharmacies mexican pharmaceuticals online
mexican mail order pharmacies: mexican mail order pharmacies – mexican border pharmacies shipping to usa
mexican border pharmacies shipping to usa: mexican drugstore online – mexico drug stores pharmacies
online pharmacy buspar avodart pharmacy trusted online pharmacy reviews
Greetings from Florida! I’m bored at work so I decided to browse your blog on my iphone during lunch break. I enjoy the knowledge you provide here and can’t wait to take a look when I get home. I’m amazed at how fast your blog loaded on my cell phone .. I’m not even using WIFI, just 3G .. Anyways, excellent blog!
top 10 online pharmacy in india: indian pharmacy – online shopping pharmacy india
https://pharmbig24.online/# which pharmacy is cheaper
buying prescription drugs in mexico: п»їbest mexican online pharmacies – pharmacies in mexico that ship to usa
levaquin online pharmacy online pharmacy china sainsburys pharmacy doxycycline
best india pharmacy: reputable indian online pharmacy – buy medicines online in india
https://pharmbig24.com/# people’s pharmacy lipitor
buying from online mexican pharmacy: mexican rx online – reputable mexican pharmacies online
buying from online mexican pharmacy mexican mail order pharmacies purple pharmacy mexico price list
Finax: dutasteride pharmacy – arimidex pharmacy
Все казино + на мобильное устройство (смартфон) + бонусы + только официальные онлайн казино топ fhzvzcuzly
betine guncel betine guncel betine promosyon kodu 2024
https://betine.online/# betine giris
starzbet guncel giris starzbet giris starz bet giris
https://gatesofolympusoyna.online/# gates of olympus giris
https://casibom.auction/# casibom
betine betine giris betine promosyon kodu 2024
http://gatesofolympusoyna.online/# gates of olympus demo turkce
starzbet giris straz bet straz bet
farmacias online seguras en espaГ±a: farmacia online internacional – farmacia barata
farmacia online envГo gratis: farmacia online envio gratis – farmacia online barata y fiable
http://farmaciaeu.com/# farmacia online barata
https://farmaciaeu.com/# п»їfarmacia online espaГ±a
farmacia online 24 horas
se puede comprar sildenafil sin receta comprar viagra contrareembolso 48 horas sildenafilo 100mg farmacia
viagra online cerca de toledo: Viagra sildenafilo – sildenafilo 50 mg comprar online
http://sildenafilo.men/# viagra para mujeres
farmacia online envГo gratis: farmacia online barata – farmacias direct
farmacias online seguras en espaГ±a farmacia online barata y fiable farmacia online barata y fiable
https://sildenafilo.men/# sildenafilo cinfa precio
viagra online cerca de la coruГ±a: sildenafilo precio farmacia – viagra precio 2022
farmacia online barata: comprar cialis online sin receta – farmacias online seguras
http://farmaciaeu.com/# farmacias online seguras en espaГ±a
https://farmaciaeu.com/# farmacias online baratas
farmacias online seguras en espaГ±a
farmacias online seguras: farmacia online envio gratis – farmacia online madrid
https://tadalafilo.bid/# farmacia online envГo gratis
farmacias online seguras en espaГ±a: farmacia online internacional – farmacia online envГo gratis
http://farmaciaeu.com/# farmacia online barata y fiable
farmacia online envГo gratis
farmacia online piГ№ conveniente: Cialis generico recensioni – farmacie online affidabili
viagra cosa serve viagra online siti sicuri viagra naturale
acquistare farmaci senza ricetta: Farmacia online migliore – farmacie online sicure
Farmacie on line spedizione gratuita Farmacie che vendono Cialis senza ricetta Farmacia online miglior prezzo
comprare farmaci online all’estero: Farmacie che vendono Cialis senza ricetta – top farmacia online
viagra pfizer 25mg prezzo viagra senza ricetta pillole per erezioni fortissime
https://sildenafilit.pro/# viagra pfizer 25mg prezzo
Farmacie online sicure
п»їFarmacia online migliore: farmacia online migliore – farmacie online affidabili
farmacia online senza ricetta: Cialis generico farmacia – farmacia online senza ricetta
farmaci senza ricetta elenco Farmacia online piu conveniente acquisto farmaci con ricetta
viagra acquisto in contrassegno in italia viagra viagra naturale
comprare farmaci online con ricetta: Farmacia online migliore – acquistare farmaci senza ricetta
Farmacia online miglior prezzo: Farmacie che vendono Cialis senza ricetta – farmaci senza ricetta elenco
https://sildenafilit.pro/# viagra online spedizione gratuita
farmacie online sicure
farmacie online autorizzate elenco Ibuprofene 600 prezzo senza ricetta farmaci senza ricetta elenco
Farmacie online sicure: Farmacie online sicure – Farmacia online piГ№ conveniente
top farmacia online Cialis generico farmacia farmacia online
viagra online spedizione gratuita: viagra – viagra online in 2 giorni
Farmacie on line spedizione gratuita: Farmacia online piu conveniente – farmacie online sicure
https://brufen.pro/# BRUFEN 600 bustine prezzo
farmacie online affidabili
viagra prezzo farmacia 2023 viagra senza prescrizione esiste il viagra generico in farmacia
comprare farmaci online con ricetta Cialis generico 5 mg prezzo Farmacia online piГ№ conveniente
viagra generico in farmacia costo: cialis farmacia senza ricetta – miglior sito per comprare viagra online
farmaci senza ricetta elenco Ibuprofene 600 prezzo senza ricetta farmacie online autorizzate elenco
comprare farmaci online all’estero BRUFEN 600 mg 30 compresse prezzo farmacie online autorizzate elenco
you are really a good webmaster. The site loading speed is incredible. It seems that you’re doing any unique trick. In addition, The contents are masterwork. you have done a wonderful job on this topic!
http://brufen.pro/# Ibuprofene 600 prezzo senza ricetta
farmacia online
acquistare farmaci senza ricetta: Cialis generico controindicazioni – farmaci senza ricetta elenco
farmaci senza ricetta elenco: Brufen 600 senza ricetta – farmaci senza ricetta elenco
acquistare farmaci senza ricetta BRUFEN 600 bustine prezzo farmacia online
top farmacia online Cialis generico 5 mg prezzo comprare farmaci online all’estero
https://sildenafilit.pro/# alternativa al viagra senza ricetta in farmacia
Farmacie online sicure
viagra consegna in 24 ore pagamento alla consegna: acquisto viagra – viagra generico recensioni
cialis farmacia senza ricetta acquisto viagra viagra generico sandoz
viagra pfizer 25mg prezzo: viagra senza ricetta – siti sicuri per comprare viagra online
dove acquistare viagra in modo sicuro pillole per erezione immediata esiste il viagra generico in farmacia
farmacie online autorizzate elenco: Farmacia online piu conveniente – Farmacia online piГ№ conveniente
https://tadalafilit.com/# acquistare farmaci senza ricetta
Farmacia online miglior prezzo
farmacia online piГ№ conveniente comprare farmaci online con ricetta comprare farmaci online con ricetta
farmacia online senza ricetta Brufen 600 prezzo con ricetta farmacie online affidabili
comprare farmaci online all’estero: Brufen antinfiammatorio – farmacia online senza ricetta
http://sildenafilit.pro/# viagra online spedizione gratuita
top farmacia online
pharmacy cost of prednisone: where can i get prednisone – where can i order prednisone 20mg
lasix pills furosemide online lasix pills
buy ventolin without prescription: generic ventolin inhaler – ventolin price uk
Buy semaglutide pills: cheap Rybelsus 14 mg – buy semaglutide online
how much is ventolin: Buy Albuterol for nebulizer online – ventolin usa
neurontin pills neurontin prescription coupon neurontin 400 mg price
https://prednisolone.pro/# prednisone 10mg tablets
buy ventolin online: Buy Albuterol for nebulizer online – buy ventolin online europe
ventolin 2mg tablet: where to buy ventolin singapore – buying ventolin online
neurontin cost: neurontin 150mg – neurontin 600 mg
lasix generic name: lasix online – lasix online
Buy compounded semaglutide online: semaglutide – buy rybelsus
https://gabapentin.site/# neurontin 300 mg cost
buy cheap ventolin: Ventolin inhaler best price – buy cheap ventolin
lasix 100 mg: buy furosemide – lasix 40 mg
Buy semaglutide pills: semaglutide – semaglutide
https://prednisolone.pro/# prednisone pill
rx coupon ventolin: Ventolin inhaler price – ventolin salbutamol
ventolin 2mg tab: ventolin inhalers – can i buy ventolin over the counter australia
ventolin price canada: buy Ventolin – ventolin drug
mail order pharmacy india indian pharmacy best online pharmacy india
world pharmacy india: indian pharmacy – online shopping pharmacy india
http://mexicanpharma.icu/# mexican rx online
indian pharmacy online: Indian pharmacy online – indian pharmacy paypal
mexican border pharmacies shipping to usa: mexican pharma – mexico drug stores pharmacies
http://mexicanpharma.icu/# purple pharmacy mexico price list
canadian pharmacy service Online medication home delivery reddit canadian pharmacy
buy medicines online in india: Indian pharmacy international shipping – reputable indian online pharmacy
india pharmacy mail order: Indian pharmacy international shipping – indian pharmacies safe
http://mexicanpharma.icu/# medication from mexico pharmacy
nnsubkdlgqoyssnaggxzhxdyoxngss https://autocadhelp.net/wp-content/uploads/aios/%D0%A1%D0%B5%D0%BA%D1%80%D0%B5%D1%82%D1%8B_%D1%83%D1%81%D0%BF%D0%B5%D1%85%D0%B0_%D0%B2_%D0%BE%D0%BD%D0%BB%D0%B0%D0%B9%D0%BD_%D1%81%D0%BB%D0%BE%D1%82%D0%B0%D1%85.html
best canadian online pharmacy Pharmacies in Canada that ship to the US legal canadian pharmacy online
canadian drugs online: canadian pharmacy online store – canadian online pharmacy
medication from mexico pharmacy http://mexicanpharma.icu/# mexican pharmaceuticals online
mexico pharmacies prescription drugs
http://mexicanpharma.icu/# mexican rx online
http://indiadrugs.pro/# indian pharmacy
mexico drug stores pharmacies mexican pharma mexican drugstore online
http://indiadrugs.pro/# mail order pharmacy india
I am delighted that I observed this blog, precisely the right info that I was looking for! .
п»їbest mexican online pharmacies mexican pharmacy mexican border pharmacies shipping to usa
https://canadapharma.shop/# canadian pharmacy near me
mexican pharmaceuticals online: mexican pharma – п»їbest mexican online pharmacies
medication from mexico pharmacy
mexican online pharmacies prescription drugs: mexico pharmacies prescription drugs – best online pharmacies in mexico
I don’t ordinarily comment but I gotta state appreciate it for the post on this amazing one : D.
https://pharmaciepascher.pro/# pharmacie en ligne france livraison belgique
Pharmacie en ligne livraison Europe Cialis generique prix Achat mГ©dicament en ligne fiable
pharmacie en ligne france pas cher: Cialis sans ordonnance pas cher – pharmacies en ligne certifiГ©es
Viagra femme ou trouver: Meilleur Viagra sans ordonnance 24h – Viagra sans ordonnance 24h suisse
pharmacie en ligne pas cher Medicaments en ligne livres en 24h pharmacie en ligne france livraison belgique
https://clssansordonnance.icu/# pharmacie en ligne sans ordonnance
Pharmacie en ligne livraison Europe: Acheter Cialis – pharmacie en ligne avec ordonnance
Viagra femme sans ordonnance 24h: Meilleur Viagra sans ordonnance 24h – Viagra sans ordonnance livraison 48h
Viagra sans ordonnance livraison 48h Viagra pas cher livraison rapide france SildГ©nafil 100mg pharmacie en ligne
pharmacie en ligne france livraison belgique: pharmacie en ligne sans ordonnance – pharmacie en ligne france pas cher
pharmacie en ligne france pas cher: Cialis generique prix – pharmacie en ligne
https://clssansordonnance.icu/# Pharmacie sans ordonnance
Viagra sans ordonnance livraison 48h Meilleur Viagra sans ordonnance 24h Viagra en france livraison rapide
Viagra prix pharmacie paris: viagra en ligne – SildГ©nafil 100 mg prix en pharmacie en France
This web site is my intake, really superb design and perfect subject matter.
I think other website owners should take this website as an model, very clean and superb user friendly style and design.
https://ozempic.art/# Ozempic without insurance
buy semaglutide online: cheapest rybelsus pills – buy semaglutide online
https://rybelsus.shop/# buy semaglutide online
ozempic coupon: ozempic online – ozempic online
buy rybelsus online: buy semaglutide pills – rybelsus cost
buy cheap ozempic: ozempic – buy ozempic pills online
https://rybelsus.shop/# cheapest rybelsus pills
http://ozempic.art/# ozempic online
https://rybelsus.shop/# semaglutide online
rybelsus price semaglutide tablets semaglutide cost
rybelsus cost: semaglutide online – rybelsus price
http://rybelsus.shop/# rybelsus price
rybelsus price: rybelsus price – rybelsus price
rybelsus price cheapest rybelsus pills rybelsus cost
semaglutide online: buy semaglutide online – semaglutide cost
semaglutide tablets semaglutide cost semaglutide tablets
buy ozempic pills online: Ozempic without insurance – ozempic generic
https://ozempic.art/# buy ozempic pills online
ozempic generic: ozempic coupon – ozempic online
Ozempic without insurance: buy ozempic pills online – buy ozempic pills online
rybelsus price semaglutide tablets semaglutide cost
http://rybelsus.shop/# buy semaglutide pills
semaglutide tablets: semaglutide tablets – buy rybelsus online
https://rybelsus.shop/# semaglutide tablets
https://ozempic.art/# ozempic
buy ozempic: Ozempic without insurance – buy ozempic pills online
http://ozempic.art/# ozempic coupon
http://rybelsus.shop/# rybelsus cost
buy ozempic pills online buy ozempic ozempic coupon
http://pinupaz.bid/# pin-up kazino
pin up казино: пин ап 634 – пин ап казахстан
пин ап зеркало pin up казино pin up зеркало
I haven¦t checked in here for some time as I thought it was getting boring, but the last few posts are good quality so I guess I¦ll add you back to my everyday bloglist. You deserve it my friend 🙂
pin up https://pinupkz.tech/# пин ап казахстан
pin up казино
pin-up casino giris pin up azerbaijan pin up
pin up azerbaijan: pin up casino – pinup az
пин ап казино http://pinupaz.bid/# pin up
пин ап казино онлайн
pin up зеркало пин ап официальный сайт пинап казино
пин ап вход: пин ап зеркало – пин ап казино вход
пинап казино https://pinupru.site/# пин ап казино зеркало
пин ап казахстан
пин ап: pin up казино – пин ап
pin up giris pin-up casino giris pin up bet
пин ап казино https://pinupru.site/# пин ап вход
пинап кз
http://pinupru.site/# пин ап официальный сайт
pin-up kazino: pinup azerbaycan – pin up casino
пин ап казино http://pinupkz.tech/# pin up kz
пин ап
pin up az pinup az pin-up casino giris
https://pinupru.site/# пин ап казино
pin up зеркало: пин ап вход – пин ап казино
пин ап казино https://pinupkz.tech/# пин ап казино онлайн
пин ап казино
pin up casino pin up pin-up oyunu
пин ап казино https://pinupaz.bid/# pin up casino
pin up казино
https://pinupru.site/# pin up
pin up pin up az pin up azerbaijan
http://stromectol.agency/# ivermectin goodrx
buy semaglutide online rybelsus Rybelsus 14 mg price
http://amoxil.llc/# amoxicillin for sale online
https://stromectol.agency/# ivermectin 1%cream
buying neurontin online cheapest gabapentin neurontin 300
https://zithromax.company/# zithromax pill
https://amoxil.llc/# amoxicillin 500mg capsules antibiotic
https://stromectol.agency/# ivermectin 2%
zithromax 250 mg
rybelsus semaglutide rybelsus
https://amoxil.llc/# how much is amoxicillin prescription
https://zithromax.company/# zithromax 500 tablet
zithromax capsules price
https://zithromax.company/# zithromax 1000 mg online
neurontin 1200 mg gabapentin price neurontin cost in canada
https://gabapentin.auction/# neurontin 300mg tablet cost
https://zithromax.company/# generic zithromax medicine
http://amoxil.llc/# amoxicillin price without insurance
zithromax price south africa
semaglutide Rybelsus 14 mg price Buy semaglutide pills
http://gabapentin.auction/# neurontin india
https://gabapentin.auction/# neurontin 800 mg cost
https://gabapentin.auction/# gabapentin
zithromax cost
buy amoxicillin 250mg amoxil best price amoxicillin script
https://stromectol.agency/# stromectol nz
http://zithromax.company/# buy cheap generic zithromax
zithromax 500 mg
zithromax order online uk order zithromax zithromax azithromycin
http://zithromax.company/# zithromax 500mg
It’s appropriate time to make some plans for the future and it’s time to be happy. I have read this post and if I could I want to suggest you few interesting things or tips. Maybe you can write next articles referring to this article. I desire to read even more things about it!
https://semaglutide.win/# Semaglutide pharmacy price
https://stromectol.agency/# does minocycline work for acne
https://gabapentin.auction/# neurontin prescription medication
zithromax online usa
Rybelsus 7mg order Rybelsus for weight loss rybelsus cost
https://zithromax.company/# where can i buy zithromax capsules
https://amoxil.llc/# where to buy amoxicillin over the counter
amoxicillin 500mg capsules buy amoxil how to get amoxicillin over the counter
http://zithromax.company/# order zithromax over the counter
where can i purchase zithromax online
https://semaglutide.win/# Buy semaglutide pills
Buy compounded semaglutide online Buy compounded semaglutide online order Rybelsus for weight loss
https://semaglutide.win/# semaglutide
zithromax prescription in canada
rybelsus generic buy rybelsus Rybelsus 14 mg
http://amoxil.llc/# cost of amoxicillin 30 capsules
zithromax without prescription
https://amoxil.llc/# where can i buy amoxicillin over the counter uk
https://gabapentin.auction/# neurontin prices
amoxicillin capsule 500mg price amoxil best price amoxicillin script
https://gabapentin.auction/# neurontin cost australia
buy zithromax without prescription online
buying prescription drugs in mexico buying prescription drugs in mexico buying from online mexican pharmacy
erection pills http://mexicanpharm24.pro/# mexican pharmaceuticals online
п»їlegitimate online pharmacies india: reputable indian online pharmacy – reputable indian pharmacies
https://indianpharmdelivery.com/# online shopping pharmacy india
indianpharmacy com
herbal remedies for ed best ed medicine natural help for ed
Glad to be one of many visitants on this awesome site : D.
male enhancement pills https://mexicanpharm24.pro/# mexican mail order pharmacies
best otc ed pills: cheap erectile dysfunction – ed meds online without doctor prescription
world pharmacy india indian pharmacies safe top 10 pharmacies in india
http://drugs24.pro/# treatment with drugs
indian pharmacy online
buying prescription drugs in mexico online mexico pharmacies prescription drugs mexican drugstore online
http://indianpharmdelivery.com/# best online pharmacy india
reputable indian online pharmacy
medications list http://mexicanpharm24.pro/# mexico drug stores pharmacies
erectile dysfunction pills: pills for ed – pump for ed
buying from online mexican pharmacy medication from mexico pharmacy п»їbest mexican online pharmacies
cat antibiotics without pet prescription: errectile disfunction – cure ed
canada ed drugs treatments for ed ed natural treatment
http://mexicanpharm24.pro/# best online pharmacies in mexico
indianpharmacy com
cheap pills online http://indianpharmdelivery.com/# top 10 online pharmacy in india
buy erection pills ed pills otc male enhancement products
erection pills online http://mexicanpharm24.pro/# medicine in mexico pharmacies
http://indianpharmdelivery.com/# best india pharmacy
reputable indian pharmacies
pharmacies in mexico that ship to usa purple pharmacy mexico price list п»їbest mexican online pharmacies
what type of medicine is prescribed for allergies https://mexicanpharm24.pro/# mexican rx online
http://mexicanpharm24.pro/# mexican drugstore online
cheapest online pharmacy india
google viagra dosage recommendations which ed drug is best aspirin and ed
Paxlovid buy online paxlovid shop paxlovid price
http://stromectol1st.shop/# stromectol canada
treatment of ed
more: more – Buy semaglutide
buy Clopidogrel over the counter: clopidogrel pills – Plavix 75 mg price
https://stromectol1st.shop/# stromectol covid 19
п»їlegitimate online pharmacies india
http://paxlovid1st.shop/# paxlovid cost without insurance
erectile dysfunction
antiplatelet drug: clopidogrel pills – п»їplavix generic
more rybelsus order Rybelsus
plavix medication: check clopidogrel pro – plavix medication
https://stromectol1st.shop/# ivermectin 0.5 lotion
website
Cost of Plavix without insurance clopidogrel pills antiplatelet drug
clopidogrel bisulfate 75 mg: buy plavix – Cost of Plavix on Medicare
http://stromectol1st.shop/# minocycline 50mg online
world pharmacy india
cost of ivermectin: ivermectin 20 mg – acne minocycline
http://paxlovid1st.shop/# buy paxlovid online
ed drugs over the counter
paxlovid for sale shop paxlovid pill
rybelsus: more – good price
http://stromectol1st.shop/# ivermectin cost
indian pharmacy paypal
http://clopidogrel.pro/# cheap plavix antiplatelet drug
buy prescription drugs without doctor
Clopidogrel 75 MG price generic pills generic plavix
stromectol 3 mg price: stromectol fast delivery – stromectol medicine
plavix medication: check clopidogrel pro – clopidogrel bisulfate 75 mg
https://paxlovid1st.shop/# paxlovid cost without insurance
ways to treat erectile dysfunction
paxlovid generic: paxlovid price – paxlovid covid
http://stromectol1st.shop/# stromectol online canada
world pharmacy india
Paxlovid buy online best price on pills п»їpaxlovid
more: cheaper – rybelsus generic
stromectol tab: stromectol 1st shop – stromectol price us
Paxlovid buy online Paxlovid buy online paxlovid generic
http://stromectol1st.shop/# ivermectin usa price
india online pharmacy
Paxlovid over the counter: paxlovid price – paxlovid buy
http://paxlovid1st.shop/# paxlovid generic
ed therapy
paxlovid india: paxlovid price – paxlovid price
buy semaglutide online cheaper buy rybelsus
cheap plavix antiplatelet drug: clopidogrel pro – plavix medication
https://stromectol1st.shop/# ivermectin 3 mg tablet dosage
indian pharmacy online
Buy semaglutide: rybelsus generic – rybelsus.icu
generic plavix: best price on generic – Plavix 75 mg price
more: rybelsus.icu – rybelsus
antiplatelet drug clopidogrel pills Plavix 75 mg price
http://stromectol1st.shop/# minocycline 100 mg tablet
indianpharmacy com
order minocycline 100 mg: stromectol 1st shop – ivermectin lice oral
minocycline for uti: buy online – ivermectin 3 mg tabs
pin up pin up pin-up
пин ап: пин ап вход – пин ап
пин ап: пин ап кз – пин ап казино вход
пин ап казино пинап казино пин ап казино вход
пин ап официальный сайт: пин ап – пин ап
1xbet официальный сайт: 1xbet зеркало – 1xbet скачать
пин ап официальный сайт: пинап зеркало – пин ап
pin up 306: pin up – pin up azerbaycan
http://1winci.icu/# пин ап вход
пин ап казино
пин ап официальный сайт пин ап официальный сайт пинап зеркало
пинап кз: пин ап – пинап казино
pin up casino: pin-up – pin-up casino giris
пин ап: пин ап зеркало – пин ап официальный сайт
pin up: pin up azerbaycan – pin-up
https://1wintr.fun/# canl? casino
пин ап
1xbet: 1xbet скачать – 1xbet зеркало
pin up 306: pin up 306 – pinup az
пинап казино пинап кз pin up
pin-up: pin-up – pinup az
1xbet скачать: 1xbet зеркало – 1xbet скачать
http://1wintr.fun/# canl? casino
пинап
1xbet скачать: 1xbet официальный сайт – 1хставка
pin up azerbaycan: pinup az – pin up casino
pin up casino: pin-up – pin up
пин ап зеркало: пин ап вход – пин ап официальный сайт
https://1winbrasil.win/# pin-up
пинап
пинап казино пин ап казино pin up kz
пинап зеркало: пин ап – пин ап зеркало
pin up azerbaycan: pin up casino – pin up casino
casino sitesi: casino siteleri – canl? casino
pinup az: pin up – pin-up
https://1winindia.tech/# пин ап кз
пин ап казино вход
1xbet скачать 1xbet зеркало 1xbet
пинап кз: пинап – pin up
pin up 306: pin up azerbaycan – pin up 306
пин ап официальный сайт: пин ап вход – пинап зеркало
пин ап вход: пин ап официальный сайт – пин ап зеркало
пинап зеркало пинап зеркало пин ап
пинап: pin up – пинап кз
pin-up: pinup az – pin-up
https://indianpharm1st.com/# cheapest online pharmacy india
mexico drug stores pharmacies: mexican rx online – pharmacies in mexico that ship to usa
п»їlegitimate online pharmacies india top 10 pharmacies in india india online pharmacy
reputable indian online pharmacy: Online medicine home delivery – top 10 pharmacies in india
buy prescription drugs online legally: prescription drugs online without doctor – best online pharmacy
https://drugs1st.store/# ed drug prices
mexican drugstore online mexico pharmacies prescription drugs mexican online pharmacies prescription drugs
Online medicine home delivery: indian pharmacies safe – cheapest online pharmacy india
https://indianpharm1st.com/# best online pharmacy india
erectyle disfunction: herbal ed treatment – best ed treatment
http://drugs1st.store/# best non prescription ed pills
male enhancement: erectile dysfunction medication – men with ed
indianpharmacy com: world pharmacy india – best online pharmacy india
http://mexicanpharm1st.com/# mexican online pharmacies prescription drugs
mexican mail order pharmacies: mexican pharmaceuticals online – mexican border pharmacies shipping to usa
Online medicine home delivery: indian pharmacy – buy prescription drugs from india
online drugs: natural ed medications – sildenafil without a doctor’s prescription
http://drugs1st.store/# cheapest ed pills online
reputable indian online pharmacy indian pharmacy online п»їlegitimate online pharmacies india
cheapest online pharmacy india: mail order pharmacy india – indian pharmacy paypal
buy ed pills online: buy prescription drugs from canada – top ed pills
http://biznes-fabrika.kz/# пин ап 634
pin up zerkalo
https://pinup-az.bid/# pin up
sweet bonanza nas?l oynan?r: sweet bonanza nas?l oynan?r – sweet bonanza
http://biznes-fabrika.kz/# пин ап казино онлайн
pinup bet and casino
http://sweetbonanzatr.pro/# sweet bonanza
https://pinupzerkalo.fun/# Пин Ап Казино Официальный Сайт в России
pin up zerkalo
пин ап казино: Пин Ап Казахстан – пин ап 634
https://pinup-az.bid/# pin-up casino giris
Пин Ап Казахстан: пин ап казино – пины
https://sweetbonanzatr.pro/# sweet bonanza nas?l oynan?r
pinup bet and casino
sweet bonanza: sweet bonanza – sweetbonanzatr.pro
pin-up: pin up 306 – pinup-az bid
http://pinup-az.bid/# pinup az
пинап: Пин Ап Казино Официальный Сайт – пинап
пинко: пин ап вход – пинап казино
http://sweetbonanzatr.pro/# sweetbonanzatrpro
pin up win
пин ап казино онлайн: пин ап казино онлайн – пинап
https://sweetbonanzatr.pro/# sweetbonanzatr.pro
pin up win
https://pinup-az.bid/# pinup az
Пин Ап Казахстан: Пин Ап Казино Официальный Сайт – пинап казино
pinup az: pin up casino – pin-up casino giris
http://pinupzerkalo.fun/# Официальный Сайт
pin up zerkalo
пин ап казино онлайн: пинап – пины
pin-up casino giris: pinup – pin-up
http://pinup-az.bid/# pin up 306
pin up zerkalo
pinup az pinup-az bid pin up 306
https://gabapentin1st.pro/# same-day delivery
paxlovid store: Pills Paxlovid – Visit store
paxlovid price: see a healthcare provider – See risks
Patient Portal: Rybelsus – Regenerative Medicine
http://stromectol1st.store/# good price
stromectol: stromectol best price – stromectol best price
find bets price: cheapest – stromectol
http://semaglutide.ink/# rybelsus price
paxlovid1st: Pills Paxlovid – paxlovid1st
licensed gabapentin: buy gabapentin – same-day delivery
https://semaglutide.ink/# rybelsus price
Rybelsus: semaglutide – Specialists
Care provides: compare the best prices – Care provides
compare the best prices: gabapentin best price – licensed gabapentin
http://stromectol1st.store/# stromectol online
stromectol best price: stromectol best price – stromectol delivery usa
http://pharm24.pro/# ed trial pack
fast ed meds online
prescription drugs without prior prescription https://indianpharm24.pro/# top 10 online pharmacy in india
mexican drugstore online mexico pharmacy reputable mexican pharmacies online
buying prescription drugs in mexico: mexico pharmacy – medicine in mexico pharmacies
п»їlegitimate online pharmacies india Indian pharmacy online india pharmacy mail order
mexican online pharmacies prescription drugs: mexico pharmacy – п»їbest mexican online pharmacies
ed pills buy drugs cheap ed pills
how can i order prescription drugs without a doctor http://pharm24.pro/# erectile dysfunction cure
http://indianpharm24.pro/# indian pharmacy
top ed pills
mexico pharmacies prescription drugs mexico pharmacy mexican pharmaceuticals online
world pharmacy india: India pharmacy international – top online pharmacy india
pills erectile dysfunction: low cost pharmacy – real cialis without a doctor’s prescription
herbal remedies for ed http://pharm24.pro/# buy ed drugs
best online pharmacy india indian pharm 24 cheapest online pharmacy india
https://pharm24.pro/# ed meds online without doctor prescription
natural ed medications
over the counter ed remedies cheap pharmacy online legal to buy prescription drugs from canada
ed meds pills drugs: low cost prescription – cheap medications online
what causes ed http://pharm24.pro/# ed treatment review
purple pharmacy mexico price list: mexico pharmacy – mexican pharmaceuticals online
http://mexicanpharm24.cheap/# mexican pharmaceuticals online
medicine for erectile
top 10 online pharmacy in india indian pharmacy purchase online cheapest online pharmacy india
ed natural remedies https://pharm24.pro/# cure for ed
medicine in mexico pharmacies: Legit online Mexican pharmacy – medicine in mexico pharmacies
п»їbest mexican online pharmacies Mexican pharmacy ship US buying from online mexican pharmacy
http://mexicanpharm24.cheap/# mexican mail order pharmacies
drug store online
mexican pharmaceuticals online mexico pharmacy mexican drugstore online
injections for ed http://pharm24.pro/# solutions for ed
world pharmacy india India pharmacy international top 10 pharmacies in india
mexico drug stores pharmacies: mexico pharmacy cheap – mexico drug stores pharmacies
http://pharm24.pro/# ed treatment natural
ed trial pack
viagra without a doctor prescription https://indianpharm24.pro/# world pharmacy india
Online medicine home delivery: indian pharmacy purchase online – india pharmacy mail order
erection pills that work: cheap prescription drugs – canadian online drugstore
https://pharm24.pro/# erection pills viagra online
male erection
otc ed drugs https://indianpharm24.pro/# indianpharmacy com
Online medicine order: Best online Indian pharmacy – indianpharmacy com
https://pharm24.pro/# online ed meds
ed remedies
mexican border pharmacies shipping to usa: mexican pharm 24 – mexican online pharmacies prescription drugs
http://ultrabet-tr.online/# ultrabet bonus
deneme bonusu veren siteler yerliarama.org
deneme bonusu veren siteler https://slot-tr.online/# en kazancl? slot oyunlar?
en kazancl? slot oyunlar? en cok kazand?ran slot oyunlar? slot oyunlar?
deneme bonusu veren siteler yeni http://matadorbet.bid/# matadorbet.bid
az parayla cok kazandiran slot oyunlar? slot siteleri en kazancl? slot oyunlar?
deneme bonusu veren siteler yeni: deneme bonusu veren siteler yerliarama.org – deneme bonusu veren siteler betturkey betturkey.com
https://slot-tr.online/# az parayla cok kazandiran slot oyunlar?
denemebonusuverensiteler.top
deneme bonusu veren yeni siteler deneme bonusu veren siteler mycbet.com deneme bonusu veren siteler 2024
deneme bonusu veren siteler: denemebonusuverensiteler.top – deneme bonusu veren yeni siteler
guvenilir casino siteleri: guvenilir casino siteleri – Casino Siteleri
deneme bonusu veren siteler mycbet.com https://ultrabet-tr.online/# ultrabet
matadorbet giris: matadorbet giris – matadorbet bid
slot oyunlar? en kazancl? slot oyunlar? en cok kazand?ran slot oyunlar?
matadorbet: matadorbet – matadorbet bid
matadorbet bid: matadorbet giris – matadorbet
deneme bonusu veren siteler betturkey betturkey.com https://denemebonusuverensiteler.top/# deneme bonusu veren siteler yerliarama.org
ultrabet ultrabet giris ultrabet tr online
ultrabet giris: ultrabet guncel – ultrabet
matadorbet giris: matadorbet – matadorbet giris
denemebonusuverensiteler.top deneme bonusu veren yeni siteler deneme bonusu veren siteler yerliarama.org
deneme bonusu veren yeni siteler https://casinositeleri.win/# casino siteleri win
Deneme Bonusu Veren Siteler: Casino Siteleri – Deneme Bonusu Veren Siteler
https://kampharm.shop/# kampharm shop
http://furpharm.com/# furosemide fur pharm
Buy gabapentin for humans: GabaPharm Gabapentin – GabaPharm
https://furpharm.com/# furosemide
https://furpharm.com/# buy furosemide online
https://furpharm.com/# furosemide
erepharm pills best ed pills online erepharm pills
kam pharm shop: kampharm.shop – kampharm.shop
http://kampharm.shop/# kamagra
cheapest Kamagra Kam Pharm kampharm.shop kamagra oral jelly
https://furpharm.com/# lasix
ere pharm: cheapest ed pills ere pharm – ere pharm
rybpharm cheap semaglutide buy rybelsus canada buy rybelsus canada
https://kampharm.shop/# Kam Pharm
https://gabapharm.com/# buy gabapentin india
buy rybelsus: buy rybelsus – buy rybelsus canada
buy rybelsus canada rybpharm rybelsus buy rybelsus canada
https://furpharm.com/# buy lasix fur pharm
buy gabapentin india gabapentin GabaPharm buy gabapentin online
kamagra oral jelly: kampharm.shop – kamagra
https://gabapharm.com/# buy Gabapentin GabaPharm
GabaPharm Gabapentin GabaPharm buy Gabapentin GabaPharm
http://rybpharm.com/# buy rybelsus online usa
I know this if off topic but I’m looking into starting my own weblog and was wondering what all is required to get set up? I’m assuming having a blog like yours would cost a pretty penny? I’m not very web smart so I’m not 100 positive. Any tips or advice would be greatly appreciated. Kudos
furpharm: furosemide furpharm.com – furosemide
buy lasix fur pharm: buy furosemide online – fur pharm
gabapentin GabaPharm GabaPharm Gabapentin GabaPharm Gabapentin
https://erepharm.com/# ED meds online with insurance
https://indianpharmacyeasy.com/# best india pharmacy
https://indianpharmacyeasy.com/# top 10 pharmacies in india
buying prescription drugs in mexico online: mexican drugstore online – pharmacies in mexico that ship to usa
http://canadiandrugsgate.com/# real cialis without a doctor’s prescription
cheapest online pharmacy india: Best Indian pharmacy – online pharmacy india
buy prescription drugs without doctor Best Canadian online pharmacy ed treatment pills
http://indianpharmacyeasy.com/# indian pharmacies safe
https://indianpharmacyeasy.com/# india online pharmacy
purple pharmacy mexico price list: mexican pharmacy online – medicine in mexico pharmacies
https://indianpharmacyeasy.com/# indian pharmacy online
https://indianpharmacyeasy.com/# online pharmacy india
http://canadiandrugsgate.com/# ed meds pills drugs
best drugs for ed: Canadian pharmacy online – erectile dysfunction drugs
mexico drug stores pharmacies: mexicanpharmgate.com – buying from online mexican pharmacy
buy medicines online in india Indian online pharmacy ship to usa mail order pharmacy india
Someone necessarily assist to make significantly articles I might state. That is the very first time I frequented your website page and up to now? I surprised with the research you made to make this particular post incredible. Fantastic task!
http://indianpharmacyeasy.com/# buy prescription drugs from india
http://canadiandrugsgate.com/# can ed be reversed
online pharmacy india: indian pharmacy easy – Online medicine home delivery
mexico drug stores pharmacies: Mexican Pharmacy Gate – п»їbest mexican online pharmacies
indian pharmacies safe Online medicine home delivery reputable indian pharmacies
http://mexicanpharmgate.com/# reputable mexican pharmacies online
prescription without a doctor’s prescription: canadiandrugsgate.com – anti fungal pills without prescription
https://canadiandrugsgate.com/# ed causes and cures
drugs online: canadian pharmacy – muse ed drug
buy medicines online in india Indian pharmacy international shipping reputable indian pharmacies
top online pharmacy india: indianpharmacyeasy.com – india pharmacy mail order
http://canadiandrugsgate.com/# natural help for ed
where can you buy amoxicillin over the counter cheap amoxil amoxicillin 500mg capsules
max pharm: max pharm – priligy maxpharm
amoxil generic https://amoxilcompharm.com/# amoxicillin 500
order prednisone online canada: prednisoneraypharm – prednisone tablets india
can i buy clomid without insurance: rexpharm – how to get cheap clomid for sale
prednisone 10mg canada cheap prednisone prednisone 10 mg online
where buy clomid prices: buy clomid – where buy clomid no prescription
amoxicillin 500 mg for sale http://priligymaxpharm.com/# Priligy tablets
get generic clomid: cheap clomid – how to get clomid price
buy priligy: buy priligy – dapoxetine price
generic amoxil 500 mg https://prednisoneraypharm.com/# prednisone uk over the counter
buy dapoxetine online priligy maxpharm dapoxetine price
can i buy clomid: clomid rex pharm – where to buy generic clomid now
50 mg prednisone from canada: prednisone ray pharm – prednisone daily
amoxicillin generic Amoxicillin for sale amoxicillin 500mg buy online canada
cheap priligy: priligy – buy priligy max pharm
buy prednisone without a prescription: ray pharm – 6 prednisone
priligy max pharm: priligy – dapoxetine online
buy priligy max pharm: priligy max pharm – priligy max pharm
get generic clomid tablets: clomid – where to get clomid pills
cheap priligy: priligy max pharm – cheap priligy
prednisone for cheap: prednisone ray pharm – buy prednisone online australia
Priligy tablets: cheap priligy – buy priligy max pharm
can i get cheap clomid no prescription: generic clomid – clomid prices
cost of clomid prices: clomid online – how can i get clomid without insurance
buy amoxicillin 500mg online: Amoxicillin for sale – amoxicillin generic
medication from mexico pharmacy https://mexicanpharmgate.com/ mexican pharmaceuticals online
ivermectin 1% generic Stromectol minocycline generic
buy priligy: buy priligy max pharm – priligy
buy minocycline: buy Stromectol – minocycline 100 mg tablet
where can i get clomid without rx: clomid online – can i order generic clomid tablets
cheapest Lisinopril: buy Lisinopril 1st – lisinopril pill 20mg
buy clopidogrel online Plavix Clo buy clopidogrel online
https://plavixclo.com/# Plavix 75 mg price
order amoxicillin 500mg: Amoxicillin buy online – amoxicillin 500 mg
buy cytotec pills online cheap: buy cytotec online – п»їcytotec pills online
http://lisinopril1st.com/# lisinopril tablet 40 mg
buy Lisinopril 1st buy Lisinopril 1st Lisinopril 1st
amoxicillin discount: Amoxicillin Com Pharm – amoxicillin buy online canada
minocycline manufacturer: buy Ivermectin online – ivermectin where to buy for humans
buy cheap clomid no prescription: buy generic clomid pill – buy generic clomid without prescription
https://iverfast.com/# ivermectin 6 tablet
cytotec buy online usa: buy cytotec over the counter – Abortion pills online
order minocycline 50mg buy Stromectol ivermectin uk coronavirus
buy cheap amoxicillin: Amoxicillin buy online – amoxicillin 500mg capsule
https://iverfast.com/# minocycline uses
lisinopril1st: buy Lisinopril 1st – Lisinopril 1st
вавада казино онлайн: вавада казино – vavada kazi
pinup-kazi.ru: пин ап казино официальный сайт – пинап казино
http://pinup-kazi.ru/# пин ап вход
pinup kazi: пин ап казино – пин ап казино
пин ап вход пин ап вход пин ап вход
пин ап зеркало: пин ап вход – пин ап вход
пинап казино: пинап казино – pin up казино
vavada-kazi.ru: вавада онлайн казино – вавада казино
пин ап зеркало: пин ап зеркало – пин ап зеркало
вавада онлайн казино vavada-kazi.ru вавада онлайн казино
https://vavada-kazi.ru/# vavada
вавада: vavada – vavada kazi
пин ап зеркало: пин ап вход – пин ап казино официальный сайт
пин ап казино: пин ап вход – пин ап зеркало
pinup-kazi.ru: пин ап казино официальный сайт – пин ап вход
pinup kazi: пин ап казино – pinup kazi
pinup kazi пинап казино пин ап казино
pinup: pinup-kazi.kz – pinup kazi
пин ап вход: pinup – пин ап зеркало
Thank you for your sharing. I am worried that I lack creative ideas. It is your article that makes me full of hope. Thank you. But, I have a question, can you help me?
вавада казино онлайн: vavada – вавада казино онлайн
вавада казино зеркало: вавада казино зеркало – vavada kazi
пин ап казино: пинап казино – пин ап вход
http://vavada-kazi.ru/# вавада
пин ап казино официальный сайт пинап казино pinup
вавада казино зеркало: вавада казино – vavada kazi
errectile disfunction https://indianpharmstar.com/# Online medicine order
online pharmacy india: indian pharm star – india pharmacy mail order
top 10 online pharmacy in india indian pharm star top online pharmacy india
medicine in mexico pharmacies: Pharm Easy – mexican border pharmacies shipping to usa
top 10 pharmacies in india: indian pharmacy – world pharmacy india
purple pharmacy mexico price list: MexicanPharmEasy – buying prescription drugs in mexico
cheap pills online canadian pharm medications for ed
mexican drugstore online: mexicanpharmeasy.com – mexican rx online
medication from mexico pharmacy: Mexican Pharm – mexican mail order pharmacies
best non prescription ed pills: canadianpharm1st – ed medications list
buy medicines online in india: indian pharm – indian pharmacy
erectile dysfunction pills canadian pharm 1st impotance
prescription drugs online without doctor http://canadianpharm1st.com/# best ed pill
top 10 pharmacies in india: IndianPharmStar – indian pharmacy online
reputable mexican pharmacies online: MexicanPharmEasy – mexico drug stores pharmacies
ed therapy: canadian pharmacy – best erection pills
mexican rx online Pharm Easy buying from online mexican pharmacy
online canadian drugstore https://indianpharmstar.com/# top 10 pharmacies in india
indian pharmacies safe: indian pharmacy – india online pharmacy
mexican online pharmacies prescription drugs: mexican pharm easy – mexican border pharmacies shipping to usa
pharmacies in mexico that ship to usa: MexicanPharmEasy – purple pharmacy mexico price list
п»їlegitimate online pharmacies india IndianPharmStar.com reputable indian pharmacies
erectile dysfunction drugs https://canadianpharm1st.com/# ed treatment drugs
world pharmacy india: IndianPharmStar – indian pharmacies safe
ed pharmacy: canadian pharm 1st – pain meds online without doctor prescription
generic ed drugs: canada pharmacy online – ed meds
medication drugs http://canadianpharm1st.com/# herbal ed treatment
top online pharmacy india indian pharmacy top 10 pharmacies in india
mexico drug stores pharmacies: Mexican Pharm – medication from mexico pharmacy
india pharmacy mail order: indian pharm star – indian pharmacy paypal
viagra without a doctor prescription: canadian pharm 1st – medication drugs
mexican mail order pharmacies: mexican pharmacy – pharmacies in mexico that ship to usa
new treatments for ed http://canadianpharm1st.com/# diabetes and ed
top 10 online pharmacy in india indian pharmacy buy medicines online in india
mexican drugstore online: Mexican Pharm – best online pharmacies in mexico
comfortis without vet prescription: canadian pharm – ed remedies that really work
best online drugstore http://indianpharmstar.com/# п»їlegitimate online pharmacies india
dog antibiotics without vet prescription canadian pharm ed pills that work
Thanks for sharing. I read many of your blog posts, cool, your blog is very good.
mexican pharmaceuticals online: mexicanpharmeasy.com – mexican rx online
paxlovid cost without insurance: Paxlovid buy online – Paxlovid.ink
https://ivermectinpharm.store/# Ivermectin Pharm
rybelsus price Buy semaglutide pills Semaglutide pharmacy price
rybelsus generic: rybelsus cost – Rybelsus 7mg
Paxlovid.ink: paxlovid for sale – Paxlovid.ink
Ivermectin Pharm: Ivermectin Pharm – minocycline 100 mg otc
https://amoxilpharm.store/# Amoxil Pharm Store
Gabapentin Pharm: Gabapentin Pharm – neurontin brand coupon
AmoxilPharm: buy amoxicillin 250mg – generic amoxicillin 500mg
https://semaglutidepharm.com/# Rybelsus 7mg
Ivermectin Pharm Store Ivermectin Pharm Ivermectin Pharm Store
Paxlovid.ink: paxlovid buy – paxlovid covid
https://amoxilpharm.store/# AmoxilPharm
Amoxil Pharm Store: AmoxilPharm – Amoxil Pharm Store
Ivermectin Pharm: Ivermectin Pharm – minocycline for rosacea
Paxlovid.ink: paxlovid buy – Paxlovid.ink
https://semaglutidepharm.com/# rybelsus price
Paxlovid.ink: Paxlovid.ink – paxlovid pharmacy
Paxlovid.ink: Paxlovid.ink – Paxlovid buy online
https://paxlovid.ink/# Paxlovid.ink
buy semaglutide online: rybelsus generic – Buy semaglutide pills
Ivermectin Pharm Store: Ivermectin Pharm Store – Ivermectin Pharm Store
Rybelsus 7mg semaglutide pharm semaglutide pharm
http://gabapentinpharm.com/# neurontin mexico
Ivermectin Pharm Store: Ivermectin Pharm – Ivermectin Pharm
rybelsus generic: rybelsus generic – rybelsus price
http://amoxilpharm.store/# AmoxilPharm
http://azithromycinus.com/# zithromax antibiotic without prescription
buy cytotec in usa buy cytotec in usa buy cytotec online fast delivery
how to order lisinopril online: lisinopril 30 mg – lisinopril 20 25 mg
Abortion pills online: п»їcytotec pills online – cytotec pills buy online
http://azithromycinus.com/# buy zithromax online with mastercard
generic clomid pills buy cheap clomid generic clomid without rx
lisinopril 25mg tablets: lisinopril 40 coupon – lisinopril 10 mg no prescription
cipro 500mg best prices: ciprofloxacin order online – buy cipro without rx
https://clomid.store/# can you get clomid now
cytotec abortion pill п»їcytotec pills online п»їcytotec pills online
Abortion pills online: order cytotec online – buy cytotec online fast delivery
https://cytotec.top/# cytotec pills buy online
buying generic clomid without insurance: where to buy generic clomid online – order cheap clomid no prescription
buy cytotec over the counter: cytotec pills buy online – Abortion pills online
lisinopril over the counter lisinopril rx coupon lisinopril 40 mg prices
http://cytotec.top/# buy cytotec online fast delivery
buy misoprostol over the counter: purchase cytotec – buy cytotec in usa
http://ciprofloxacin.cheap/# cipro
can you get clomid online can i get clomid pills buying clomid
prinivil 20 mg cost: lisinopril 419 – lisinopril 5 mg brand name in india
http://ciprofloxacin.cheap/# cipro online no prescription in the usa
lisinopril 4214 lisinopril brand lisinopril online without prescription
п»їcipro generic: buy cipro no rx – ciprofloxacin 500 mg tablet price
can i buy cheap clomid price: can you buy generic clomid without insurance – how to buy clomid online
https://cytotec.top/# cytotec online
order lisinopril online us: zestril 20 mg price in india – lisinopril pill 20mg
buy cytotec online fast delivery buy cytotec online cytotec online
can you get clomid for sale: where buy generic clomid prices – can i purchase clomid now
buy generic zithromax no prescription: zithromax price south africa – zithromax 250 mg pill
where to get clomid can you buy clomid now where can i get generic clomid without insurance
buy cheap zithromax online: generic zithromax over the counter – zithromax generic price
https://ciprofloxacin.cheap/# where can i buy cipro online
lisinopril 10 mg tablet price: lisinopril 10 mg for sale – lisinopril coupon
ciprofloxacin generic ciprofloxacin 500mg buy online buy cipro cheap
cytotec buy online usa: cytotec buy online usa – cytotec pills buy online
http://azithromycinus.com/# zithromax cost australia
lisinopril 20 mg tablets: buy lisinopril without prescription – zestoretic generic
ciprofloxacin 500 mg tablet price: buy cipro online without prescription – ciprofloxacin 500 mg tablet price
buy cipro without rx where can i buy cipro online buy cipro cheap
http://ciprofloxacin.cheap/# cipro ciprofloxacin
ciprofloxacin 500mg buy online: buy generic ciprofloxacin – buy cipro online canada
zestril 5mg: lisinopril comparison – buy cheap lisinopril 40mg
can i get generic clomid pill generic clomid prices buying cheap clomid
https://lisinoprilus.com/# lisinopril tablets uk
zestoretic 10 12.5 mg: lisinopril 20mg daily – lisinopril brand name uk
zithromax buy zithromax over the counter canada zithromax 500mg price in india
http://ciprofloxacin.cheap/# buy cipro without rx
buy cheap generic zithromax: purchase zithromax z-pak – can you buy zithromax over the counter in australia
purchase cipro where can i buy cipro online buy cipro cheap
https://drugs1st.pro/# drugs1st
drugs1st drugs causing ed drugs1st
buy prescription drugs from canada cheap: non prescription ed pills – best over the counter ed pills
https://semaglutidetablets.store/# semaglutide tablets
medications online: fast ed meds online – drugs1st
https://edpills.men/# ed rx online
http://cenforce.icu/# cenforce
drugs1st: cheap online pharmacy – drugs1st
https://kamagra.men/# Kamagra 100mg price
order cenforce: buy cenforce – Cenforce 100mg tablets for sale
http://cenforce.icu/# Cenforce 150 mg online
cenforce.icu: Purchase Cenforce Online – cheapest cenforce
https://drugs1st.pro/# drugs1st
Kamagra tablets Kamagra 100mg cheap kamagra
http://drugs1st.pro/# drugs1st
https://edpills.men/# discount ed pills
drugs1st: best pill for ed – ed tablets
cheap kamagra: cheap kamagra – sildenafil oral jelly 100mg kamagra
http://cenforce.icu/# buy cenforce
https://edpills.men/# best ed medication online
rybelsus semaglutide tablets: semaglutide tablets price – semaglutide tablets price
cenforce: cenforce.icu – Cenforce 100mg tablets for sale
https://drugs1st.pro/# drugs1st
drugs1st ed medicines drugs1st
https://semaglutidetablets.store/# buy rybelsus online
bet casino: casino gГјncel giriЕџ – para kazandД±ran sohbet siteleri
пин ап зеркало пин ап казино официальный сайт пин ап казино официальный сайт
slot oyunlar? puf noktalar?: slot siteleri – slot siteleri
https://pinup2025.com/# пин ап казино официальный сайт
pinup 2025: пин ап казино официальный сайт – пин ап зеркало
пин ап зеркало пин ап вход пин ап зеркало
http://slottr.top/# slot oyunlar?
http://pinup2025.com/# пин ап казино
pinup 2025: пин ап казино зеркало – пин ап вход
http://pinup2025.com/# пин ап вход
пин ап казино пин ап зеркало пин ап казино зеркало
https://casinositeleri2025.pro/# slot oyunlarД±nda en Г§ok kazandД±ran oyun
tl casino: online kumar siteleri – internet kumar siteleri
slot tr online en kazancl? slot oyunlar? slot siteleri
http://slottr.top/# slot siteleri
slot oyunlar? puf noktalar?: slot oyunlar? puf noktalar? – en kazancl? slot oyunlar?
vidobet giriЕџ 2025: casinox – ilk Гјyelik deneme bonusu veren siteler
https://casinositeleri2025.pro/# bet casino
slot tr online slot oyunlar? en kazancl? slot oyunlar?
https://casinositeleri2025.pro/# canlД± casino bonusu veren siteler
пин ап зеркало: pinup 2025 – пин ап
casino slot oyunlarД±: bonus veren bahis siteleri yasal – casino gГјncel giriЕџ
пинап казино пин ап казино пин ап
http://slottr.top/# az parayla cok kazandiran slot oyunlar?
пин ап зеркало: пин ап – пин ап казино официальный сайт
https://slottr.top/# en cok kazand?ran slot oyunlar?
http://pinup2025.com/# пин ап
bahis siyeleri: yeni casino siteleri – canlД± casino oyna
пин ап казино зеркало: пин ап казино зеркало – pinup 2025
by casino deneme bonusu beren siteler dГјnyanД±n en iyi bahis siteleri
https://casinositeleri2025.pro/# en yeni deneme bonusu veren siteler 2025
pinup2025.com: пин ап зеркало – pinup 2025
пин ап вход пин ап казино зеркало пин ап
deneme bonus veren siteler: casino slot online – en gГјvenilir bahis siteleri hangileri?
http://casinositeleri2025.pro/# oyun sitesi
https://casinositeleri2025.pro/# en az para yatД±rД±lan bahis siteleri
yurt dД±ЕџД± bahis sitesi: gore siteler – bahis siteleri deneme bonusu veren
en iyi iddaa sitesi bonusu veren siteler casino kumar oyunlarД±
https://slottr.top/# en kazancl? slot oyunlar?
http://slottr.top/# slot tr online
slot oyunlar? puf noktalar?: en cok kazand?ran slot oyunlar? – en kazancl? slot oyunlar?
superbeting: bahis giriЕџ – 2024 bahis siteleri
by casino en güvenilir bahis siteleri kaçak bahis siteleri bonus veren
http://casinositeleri2025.pro/# 300 tl bonus veren bahis sitesi
https://pinup2025.com/# pinup2025.com
bonus veren siteler: vaycasino – casino site
slot siteleri slot oyunlar? slot siteleri
пин ап вход: pinup 2025 – пин ап казино зеркало
https://pinup2025.com/# pinup 2025
https://indiapharmi.com/# top online pharmacy india
reputable indian pharmacies Online medicine home delivery top online pharmacy india
pharmacies in mexico that ship to usa: Online pharmacy – mexican border pharmacies shipping to usa
https://mexicanpharmi.com/# buying from online mexican pharmacy
indian pharmacies safe: Online medicine home delivery – indian pharmacy online
http://indiapharmi.com/# best online pharmacy india
http://indiapharmi.com/# indian pharmacy paypal
top 10 pharmacies in india Top online pharmacy in India pharmacy website india
Online medicine home delivery: Best Indian pharmacy – indian pharmacy
https://canadianpharmi.com/# drugs and medications
ed medication online: Best Canadian pharmacy – cheap pills online
http://canadianpharmi.com/# over the counter ed medication
best ed treatment Best Canadian pharmacy best male enhancement
http://mexicanpharmi.com/# mexico drug stores pharmacies
buy medicines online in india: India pharmacy delivery – india pharmacy
http://mexicanpharmi.com/# medication from mexico pharmacy
https://mexicanpharmi.com/# buying from online mexican pharmacy
herbal remedies for ed Best Canadian online pharmacy buy prescription drugs without doctor
mexican rx online: Purple pharmacy online ordering – mexico drug stores pharmacies
ed pills that really work: Canada pharmacy online – impotence treatment
http://indiapharmi.com/# best online pharmacy india
https://mexicanpharmi.com/# mexican pharmaceuticals online
Online medicine home delivery Best Indian pharmacy cheapest online pharmacy india
http://canadianpharmi.com/# drugs prices
ed drugs online: canadianpharmi – erection pills online
https://indiapharmi.com/# cheapest online pharmacy india
mexican drugstore online: Online Mexican pharmacy – mexico pharmacies prescription drugs
mexico drug stores pharmacies Best online Mexican pharmacy medication from mexico pharmacy
best online pharmacy india: Pharmacies in India that ship to USA – indian pharmacy online
https://canadianpharmi.com/# medicine for erectile
http://mexicanpharmi.com/# п»їbest mexican online pharmacies
Поиск в гугле
https://duv-google.ms-de.ru
mexican drugstore online: Purple pharmacy online ordering – п»їbest mexican online pharmacies
new treatments for ed: Canada Pharmacy – ed pills for sale
http://indiapharmi.com/# pharmacy website india
https://cipharmdelivery.com/# ciprofloxacin 500mg buy online
where to buy amoxicillin 500mg without prescription Amox Star amoxicillin pharmacy price
buy amoxicillin 250mg: amoxicillin 500mg tablets price in india – buying amoxicillin in mexico
http://amoxstar.com/# buy amoxicillin without prescription
online order prednisone: PredniBest – prednisone canada prices
https://clomidonpharm.com/# how can i get generic clomid price
http://amoxstar.com/# how much is amoxicillin prescription
where to get prednisone: PredniBest – buy prednisone online india
http://clomidonpharm.com/# how can i get cheap clomid price
where to buy generic clomid clomidonpharm generic clomid
http://prednibest.com/# prednisone oral
amoxicillin without a doctors prescription Amox Star amoxicillin canada price
prednisone 20mg: prednisone canada prices – prednisone purchase online
buy prednisone 10mg online: prednisone 20 mg tablet – buy prednisone without prescription paypal
http://cipharmdelivery.com/# buy cipro online without prescription
http://clomidonpharm.com/# where buy generic clomid pill
generic clomid pills how to buy generic clomid online where to get generic clomid pill
amoxicillin script: buy amoxicillin online uk – amoxicillin online purchase
antibiotics cipro: ci pharm delivery – buy cipro online canada
https://cipharmdelivery.com/# antibiotics cipro
buying prednisone on line Predni Best how much is prednisone 5mg
how much is amoxicillin prescription: Amox Star – where can i buy amoxicillin online
http://amoxstar.com/# amoxicillin over counter
where to get generic clomid clomidonpharm where can i buy cheap clomid online
buy prednisone from canada: PredniBest – prednisone 20 mg tablets coupon
buy ciprofloxacin over the counter: ciprofloxacin mail online – ciprofloxacin mail online
https://cipharmdelivery.com/# ciprofloxacin
cipro 500mg best prices CiPharmDelivery where to buy cipro online
cost of amoxicillin 30 capsules: amoxicillin 500 mg for sale – order amoxicillin online no prescription
https://clomidonpharm.com/# can i buy cheap clomid without dr prescription
purchase cipro: CiPharmDelivery – ciprofloxacin order online
prednisone 300mg prednisone 5 mg tablet cost prednisone 60 mg daily
buy prednisone online from canada: prednisone online india – prednisone 2.5 mg tab
http://cipharmdelivery.com/# purchase cipro
how to get cheap clomid pills clomid on pharm can i buy clomid online
ciprofloxacin mail online: CiPharmDelivery – cipro ciprofloxacin
where to buy prednisone 20mg: Predni Best – buy prednisone from canada
https://amoxstar.com/# cheap amoxicillin 500mg
buy cipro online usa CiPharmDelivery buy generic ciprofloxacin
buy cipro cheap: cipro 500mg best prices – ciprofloxacin order online
https://amoxstar.com/# buy amoxicillin online no prescription
amoxicillin 825 mg: can you purchase amoxicillin online – where to buy amoxicillin 500mg without prescription
amoxicillin order online amoxicillin 500mg over the counter amoxicillin discount
cost clomid no prescription: clomid on pharm – can i order cheap clomid
http://clomidonpharm.com/# order cheap clomid for sale
can i get generic clomid without a prescription can you buy generic clomid for sale can you get clomid now
prednisone 10 mg price: PredniBest – apo prednisone
http://clomidonpharm.com/# clomid prices
can you get generic clomid where buy clomid without insurance get generic clomid without dr prescription
buy cipro online canada: CiPharmDelivery – cipro for sale
https://prednibest.com/# 25 mg prednisone
https://gramster.ru/# пин ап казино зеркало
пин ап казино зеркало: gramster – pinup 2025
http://gramster.ru/# пин ап зеркало
пинап казино: Gramster – пин ап зеркало
https://gramster.ru/# пин ап казино зеркало
http://gramster.ru/# пин ап казино официальный сайт
https://gramster.ru/# pinup 2025
http://gramster.ru/# pinup 2025
https://gramster.ru/# gramster.ru
https://gramster.ru/# пин ап
https://gramster.ru/# пин ап
https://gramster.ru/# пин ап казино официальный сайт
пин ап казино gramster pinup 2025
https://gramster.ru/# пин ап вход
https://gramster.ru/# пин ап казино
https://gramster.ru/# пин ап вход
http://gramster.ru/# пин ап вход
pinup 2025 gramster пинап казино
пин ап зеркало: gramster – pinup 2025
пинап казино: gramster.ru – pinup 2025
http://gramster.ru/# пинап казино
http://gramster.ru/# pinup 2025
пин ап казино зеркало gramster пин ап казино зеркало
https://gramster.ru/# пин ап зеркало
http://gramster.ru/# пин ап казино
https://gramster.ru/# пинап казино
http://gramster.ru/# pinup 2025
Wow, wonderful weblog structure! How long have you been blogging for? you make running a blog glance easy. The entire look of your web site is excellent, let alone the content!
http://indianpharmacy.win/# india pharmacy mail order
cheapest online pharmacy india indian pharmacy cheapest online pharmacy india
http://canadianpharmacy.win/# canadian pharmacy in canada
canadian pharmacy checker: best canadian online pharmacy – canadian discount pharmacy
https://mexicanpharmacy.store/# mexico drug stores pharmacies
http://canadianpharmacy.win/# canadian pharmacy 24 com
https://mexicanpharmacy.store/# mexican mail order pharmacies
online pharmacy canada: best online canadian pharmacy – best online canadian pharmacy
mexico drug stores pharmacies mexico pharmacies prescription drugs mexican drugstore online
http://indianpharmacy.win/# indianpharmacy com
https://indianpharmacy.win/# indian pharmacy online
https://canadianpharmacy.win/# legit canadian pharmacy online
canadian online drugs: best online canadian pharmacy – maple leaf pharmacy in canada
http://canadianpharmacy.win/# canada ed drugs
https://mexicanpharmacy.store/# pharmacies in mexico that ship to usa
https://mexicanpharmacy.store/# mexican pharmaceuticals online
https://mexicanpharmacy.store/# reputable mexican pharmacies online
legitimate canadian mail order pharmacy: rate canadian pharmacies – safe online pharmacies in canada
https://mexicanpharmacy.store/# mexico pharmacies prescription drugs
http://canadianpharmacy.win/# canadian pharmacy mall
http://indianpharmacy.win/# best india pharmacy
world pharmacy india india pharmacy india online pharmacy
mexican mail order pharmacies: п»їbest mexican online pharmacies – reputable mexican pharmacies online
http://indianpharmacy.win/# indian pharmacy
http://canadianpharmacy.win/# canadian online pharmacy reviews
http://indianpharmacy.win/# india online pharmacy
http://indianpharmacy.win/# cheapest online pharmacy india
http://canadianpharmacy.win/# canadian pharmacy meds reviews
buying prescription drugs in mexico mexican online pharmacies prescription drugs buying from online mexican pharmacy
http://indianpharmacy.win/# reputable indian pharmacies
https://indianpharmacy.win/# indianpharmacy com
https://indianpharmacy.win/# india online pharmacy
canada drugstore pharmacy rx: canadian pharmacy win – canadianpharmacymeds
https://indianpharmacy.win/# online pharmacy india
http://canadianpharmacy.win/# canadian drug
http://indianpharmacy.win/# indian pharmacy online
pharmacies in mexico that ship to usa purple pharmacy mexico price list mexican rx online
I must convey my admiration for your kindness in support of men and women that actually need help with your matter. Your personal commitment to getting the solution around turned out to be certainly effective and have truly helped associates just like me to arrive at their ambitions. Your amazing helpful help implies much to me and additionally to my mates. Thank you; from each one of us.
pet meds without vet prescription canada: best online canadian pharmacy – certified canadian pharmacy
https://canadianpharmacy.win/# best canadian online pharmacy
http://mexicanpharmacy.store/# mexican border pharmacies shipping to usa
http://canadianpharmacy.win/# drugs from canada
https://mexicanpharmacy.store/# mexican pharmaceuticals online
https://canadianpharmacy.win/# safe canadian pharmacies
cheapest pharmacy canada: best canadian online pharmacy – best mail order pharmacy canada
best online pharmacy india best online pharmacy india Online medicine order
http://mexicanpharmacy.store/# buying prescription drugs in mexico
http://canadianpharmacy.win/# medication canadian pharmacy
https://canadianpharmacy.win/# online canadian pharmacy reviews
buying from canadian pharmacies: best canadian online pharmacy – canadian pharmacy online ship to usa
http://canadianpharmacy.win/# ed drugs online from canada
canadian pharmacy online store best canadian online pharmacy reputable canadian pharmacy
https://canadianpharmacy.win/# canadian drugs
https://mexicanpharmacy.store/# mexican drugstore online
pharmacies in mexico that ship to usa: buying prescription drugs in mexico online – best online pharmacies in mexico
https://canadianpharmacy.win/# reliable canadian pharmacy
http://indianpharmacy.win/# online pharmacy india
canadian pharmacy best canadian online pharmacy canada drugs reviews
canadian discount pharmacy: best canadian online pharmacy – online canadian drugstore
https://indianpharmacy.win/# indian pharmacy
best online ed medication best ed meds online pills for erectile dysfunction online
cheap viagra: buy viagra online – Buy generic 100mg Viagra online
https://fastpillsformen.com/# buy Viagra online
http://fastpillsformen.com/# buy Viagra over the counter
get ed meds online: cheap cialis – best ed pills online
buy viagra here cheap viagra Viagra without a doctor prescription Canada
https://maxpillsformen.com/# Buy Tadalafil 5mg
http://maxpillsformen.com/# Buy Tadalafil 20mg
buy Viagra over the counter: sildenafil 50 mg price – Viagra online price
best price for viagra 100mg: FastPillsForMen.com – sildenafil 50 mg price
Cheap Cialis Generic Cialis without a doctor prescription buy cialis pill
http://fastpillsformen.com/# sildenafil online
Cheap Cialis: MaxPillsForMen – cheapest cialis
viagra without prescription FastPillsForMen sildenafil online
Generic Tadalafil 20mg price: buy cialis online – Generic Cialis price
https://fastpillsformen.com/# Viagra without a doctor prescription Canada
Cialis 20mg price: Max Pills For Men – cheapest cialis
Generic Viagra for sale Fast Pills For Men Sildenafil Citrate Tablets 100mg
http://fastpillseasy.com/# cheap ed pills online
Tadalafil Tablet: MaxPillsForMen.com – Cialis over the counter
http://maxpillsformen.com/# Buy Cialis online
Order Viagra 50 mg online: Fast Pills For Men – sildenafil 50 mg price
Sildenafil Citrate Tablets 100mg FastPillsForMen.com Sildenafil Citrate Tablets 100mg
https://fastpillseasy.com/# cheapest ed online
order viagra: Fast Pills For Men – viagra without prescription
Tadalafil Tablet Generic Cialis without a doctor prescription Generic Cialis without a doctor prescription
https://fastpillseasy.com/# cheap erectile dysfunction pills
https://fastpillseasy.com/# buy ed medication
Tadalafil Tablet: Cheap Cialis – cheapest cialis
http://fastpillseasy.com/# erectile dysfunction medication online
ed treatment online FastPillsEasy generic ed meds online
how to get ed meds online: fast pills easy – erectile dysfunction online prescription
http://fastpillsformen.com/# Cheapest Sildenafil online
https://fastpillsformen.com/# Generic Viagra for sale
erectile dysfunction meds online: fast pills easy – cheap erection pills
buy Viagra over the counter: Fast Pills For Men – best price for viagra 100mg
https://fastpillsformen.com/# sildenafil over the counter
https://fastpillsformen.com/# sildenafil 50 mg price
http://fastpillsformen.com/# Cheap Viagra 100mg
cheapest online ed meds FastPillsEasy where to buy erectile dysfunction pills
viagra canada: cheap viagra – viagra without prescription
buy erectile dysfunction treatment: FastPillsEasy – online erectile dysfunction pills
http://fastpillseasy.com/# ed med online
https://maxpillsformen.com/# Generic Cialis without a doctor prescription
http://fastpillsformen.com/# buy Viagra online
Cialis over the counter cheapest cialis Generic Cialis without a doctor prescription
Tadalafil price: Generic Cialis without a doctor prescription – Cialis over the counter
http://maxpillsformen.com/# Cialis 20mg price in USA
Buy Tadalafil 10mg: Buy Tadalafil 20mg – Cheap Cialis
Choosing a UFC betting site is easier than you might think. There’s a lot of MMA sportsbooks out there, and they’re all competing to take your wagers on fight night, but that doesn’t mean you have to spend hours comparing UFC betting lines and sign-up bonuses before filling out your bet slip. Many UFC bets are available, including the ever-popular straight up bet. This means that fans bet on the final outcome of the match. At 888sport, fans can place a free bet on their preferred fighter. All fighters have their own odds – fighters that offer higher payouts are those that are less likely to win. Alternatively, fighters that have low payouts are those that are more likely to win. Live Betting Bet in-play during top UFC events such as UFC 291 and Fight Night. Live UFC betting odds fluctuate as the bout plays out, and there is a time delay to prevent bettors in the arena from cheating the system. The most common live betting option for UFC wagering is the moneyline.
https://www.reverbnation.com/artist/superbowlfavori
This year’s College World Series marks the 75th anniversary of the college baseball championship tournament and the 72nd time the event will be held in Omaha, Nebraska. Check out the most recent winners below: The Cavaliers are good, that much is true. Virginia heads into college baseball’s preeminent event having put 26 runs past Duke over the course of its last two games. That feat was made all the more impressive by the fact that the Cavs played each game on the brink of elimination. The College World Series begins with 64 teams in the first round, which is called the Regionals. These teams consist of 31 conference champions (all of whom earn automatic bids) and 33 non-conference champions chosen by the NCAA Division I Baseball Committee. Odds courtesy of FanDuel Sportsbook as of June 23, 2023.
https://fastpillseasy.com/# ed meds online
cheapest ed treatment ed meds cheap online ed pills
Viagra online price: FastPillsForMen – Viagra Tablet price
online ed pills: low cost ed medication – ed prescription online
http://fastpillseasy.com/# where can i get ed pills
cheapest cialis MaxPillsForMen buy cialis pill
online erectile dysfunction prescription: cheap cialis – low cost ed medication
http://fastpillsformen.com/# Viagra generic over the counter
casimo: deneme bonusu veren siteler casino – Casino Siteleri
yat?r?ms?z deneme bonusu veren siteler: yeni deneme bonusu veren siteler – denemebonusuverensiteler25
https://denemebonusuverensiteler25.com/# yat?r?ms?z deneme bonusu veren siteler
https://denemebonusuverensiteler25.com/# denemebonusuverensiteler25
https://sweetbonanza25.com/# sweet bonanza kazanma saatleri
en kazancl? slot oyunlar? slot oyunlar? puf noktalar? guvenilir slot siteleri
https://slotsiteleri25.com/# slot oyunlar?
sweet bonanza slot: sweet bonanza oyna – sweet bonanza oyna
Casino Siteleri: deneme bonusu veren casino siteleri – casino bahis siteleri
http://slotsiteleri25.com/# slot oyunlar?
https://denemebonusuverensiteler25.com/# yeni deneme bonusu veren siteler
sweet bonanza kazanma saatleri: sweet bonanza yorumlar – sweet bonanza oyna
https://casinositeleri25.com/# casino bahis siteleri
az parayla cok kazandiran slot oyunlar? slot oyunlar? slot casino siteleri
denemebonusuverensiteler25: yeni deneme bonusu veren siteler – deneme bonusu veren siteler yeni
sweet bonanza giris: sweet bonanza slot – sweet bonanza demo oyna
http://denemebonusuverensiteler25.com/# deneme bonusu veren siteler yeni
deneme bonusu veren siteler yeni deneme bonusu veren yeni siteler yat?r?ms?z deneme bonusu veren siteler
slot siteleri: slot oyunlar? – slot casino siteleri
deneme bonusu veren yeni siteler: deneme bonusu veren siteler yeni – deneme bonusu veren yeni siteler
https://casinositeleri25.com/# Casino Siteleri
sweet bonanza demo oyna: sweet bonanza oyna – sweet bonanza yorumlar
http://slotsiteleri25.com/# slot casino siteleri
sweet bonanza: sweet bonanza – sweet bonanza
guvenilir slot siteleri en cok kazand?ran slot oyunlar? guvenilir slot siteleri
en cok kazand?ran slot oyunlar?: slot oyunlar? – guvenilir slot siteleri
en cok kazand?ran slot oyunlar?: en cok kazand?ran slot oyunlar? – slot oyunlar?
300 tl bonus veren bahis sitesi
http://denemebonusuverensiteler25.com/# deneme bonusu veren siteler yeni
slot oyunlar?: slot casino siteleri – slot oyunlar?
denemebonusuverensiteler25: deneme bonusu veren yeni siteler – deneme bonusu veren yeni siteler
deneme bonusu veren yeni siteler denemebonusuverensiteler25 denemebonusuverensiteler25
https://slotsiteleri25.com/# slot casino siteleri
en cok kazand?ran slot oyunlar?: slot oyunlar? – slot oyunlar?
sweet bonanza kazanma saatleri: sweet bonanza kazanma saatleri – sweet bonanza slot
deneme bonusu veren siteler yeni yat?r?ms?z deneme bonusu veren siteler deneme bonusu veren siteler yeni
sweet bonanza guncel: sweet bonanza guncel – sweet bonanza kazanma saatleri
Casino Siteleri en gГјvenilir bahis Casino Siteleri
http://slotsiteleri25.com/# az parayla cok kazandiran slot oyunlar?
Canl? Casino Siteleri: tГјrkiye yasal bahis siteleri – deneme bonusu veren casino siteleri
sweet bonanza: sweet bonanza oyna – sweet bonanza guncel
https://casinositeleri25.com/# Casino Siteleri
Canl? Casino Siteleri: deneme bonusu veren casino siteleri – Casino Siteleri
deneme bonusu veren siteler yeni denemebonusuverensiteler25 yeni deneme bonusu veren siteler
deneme bonusu veren siteler: yat?r?ms?z deneme bonusu veren siteler – denemebonusuverensiteler25
canadian pharmacy 24: canadian pharmacy price checker – ed drugs online from canada
best online canadian pharmacy https://indiancertpharm.com/# indian pharmacy online
best india pharmacy
https://mexicaneasypharm.com/# Mexican Easy Pharm
canada rx pharmacy world
п»їlegitimate online pharmacies india Online medicine Indian Cert Pharm
precription drugs from canada: CanadianMdPharm – canadian pharmacy online
real canadian pharmacy https://mexicaneasypharm.shop/# Mexican Easy Pharm
india online pharmacy
canada pharmacy 24h: Canadian Md Pharm – canada pharmacy reviews
IndianCertPharm: Indian Cert Pharm – IndianCertPharm
https://indiancertpharm.shop/# Online medicine home delivery
canadian pharmacy meds review
canada cloud pharmacy https://indiancertpharm.shop/# Online pharmacy
indian pharmacy
Mexican Easy Pharm Mexican Easy Pharm Mexican Easy Pharm
mexican mail order pharmacies: Mexican Easy Pharm – Mexican Easy Pharm
online canadian pharmacy review: CanadianMdPharm – canada drugs online review
canadian pharmacy ed medications https://indiancertpharm.com/# Indian Cert Pharm
reputable indian pharmacies
canadian pharmacy https://canadianmdpharm.shop/# canadian pharmacy ltd
top 10 online pharmacy in india
canadian pharmacy meds review CanadianMdPharm northwest canadian pharmacy
legitimate canadian online pharmacies: Canadian Md Pharm – canadian family pharmacy
canadian pharmacy reviews https://indiancertpharm.com/# Indian pharmacy that ships to usa
best online pharmacy india
purple pharmacy mexico price list: Mexican Easy Pharm – mexico pharmacies prescription drugs
canadian pharmacy mall: CanadianMdPharm – canadian pharmacy checker
Indian Cert Pharm: indian pharmacy – Online pharmacy
canadian online pharmacy Canadian Md Pharm prescription drugs canada buy online
buy drugs from canada https://indiancertpharm.shop/# Online pharmacy
india pharmacy mail order
my canadian pharmacy: CanadianMdPharm – canadian pharmacy sarasota
Mexican Easy Pharm: Mexican Easy Pharm – Mexican Easy Pharm
canadian valley pharmacy: canadian pharmacy 365 – canadian pharmacy phone number
pet meds without vet prescription canada: canadian pharmacy online reviews – canadian pharmacy king
canada drugs online reviews https://mexicaneasypharm.shop/# purple pharmacy mexico price list
indian pharmacy paypal
Mexican Easy Pharm Mexican Easy Pharm Mexican Easy Pharm
canada discount pharmacy: CanadianMdPharm – pharmacy com canada
Mexican Easy Pharm: Mexican Easy Pharm – buying from online mexican pharmacy
https://mexicaneasypharm.shop/# Mexican Easy Pharm
canadian pharmacy uk delivery
Indian pharmacy that ships to usa: Indian pharmacy that ships to usa – indian pharmacy
canadian drugstore online https://mexicaneasypharm.com/# Mexican Easy Pharm
world pharmacy india
IndianCertPharm Indian Cert Pharm indian pharmacy
IndianCertPharm: indian pharmacy – indian pharmacy
www canadianonlinepharmacy: CanadianMdPharm – safe canadian pharmacies
Mexican Easy Pharm: mexican online pharmacies prescription drugs – buying prescription drugs in mexico
Mexican Easy Pharm: reputable mexican pharmacies online – buying prescription drugs in mexico online
the canadian pharmacy: Canadian Md Pharm – canadian online drugstore
buying prescription drugs in mexico: Mexican Easy Pharm – Mexican Easy Pharm
Mexican Easy Pharm: Mexican Easy Pharm – mexico drug stores pharmacies
canada drug pharmacy: CanadianMdPharm – recommended canadian pharmacies
mexico pharmacies prescription drugs: Mexican Easy Pharm – medication from mexico pharmacy
northwest canadian pharmacy: Canadian Md Pharm – canadian pharmacy service
canadian drugs pharmacy: canadianpharmacyworld com – legitimate canadian online pharmacies
https://canadianmdpharm.com/# onlinecanadianpharmacy
drugs from canada
Best Indian pharmacy: Best Indian pharmacy – Indian pharmacy international shipping
canadian pharmacy world reviews https://mexicaneasypharm.shop/# Mexican Easy Pharm
india pharmacy
canadian mail order pharmacy: ordering drugs from canada – canadian online drugstore
Best Indian pharmacy: Indian Cert Pharm – п»їlegitimate online pharmacies india
Best online Indian pharmacy: Best Indian pharmacy – IndianCertPharm
mexico drug stores pharmacies: best online pharmacies in mexico – п»їbest mexican online pharmacies
Indian Cert Pharm: Online medicine – Best online Indian pharmacy
canadian pharmacy 24h com safe: CanadianMdPharm – canadian pharmacy
Mexican Easy Pharm: п»їbest mexican online pharmacies – buying from online mexican pharmacy
canadian neighbor pharmacy: Canadian Md Pharm – canadian pharmacy 365
mexico drug stores pharmacies: mexican drugstore online – п»їbest mexican online pharmacies
https://canadianmdpharm.shop/# canadian pharmacy oxycodone
ordering drugs from canada
canadian mail order pharmacy: CanadianMdPharm – canadian pharmacy service
is canadian pharmacy legit: Canadian Md Pharm – best canadian pharmacy to order from
Mexican Easy Pharm: Mexican Easy Pharm – mexican border pharmacies shipping to usa
canadian pharmacy king reviews: CanadianMdPharm – maple leaf pharmacy in canada
Best Indian pharmacy: indian pharmacy – Best Indian pharmacy
my canadian pharmacy reviews: Canadian Md Pharm – reddit canadian pharmacy
safe canadian pharmacy: buy canadian drugs – my canadian pharmacy rx
best canadian online pharmacy reviews buying drugs from canada canadian neighbor pharmacy
ordering drugs from canada: CanadianMdPharm – canada drug pharmacy
Mexican Easy Pharm: best online pharmacies in mexico – Mexican Easy Pharm
buying from online mexican pharmacy https://mexicaneasypharm.com/# mexican mail order pharmacies
mexican border pharmacies shipping to usa
Indian Cert Pharm: Indian pharmacy that ships to usa – indian pharmacy
Best Indian pharmacy: Indian Cert Pharm – IndianCertPharm
medicine in mexico pharmacies https://mexicaneasypharm.com/# Mexican Easy Pharm
mexico drug stores pharmacies
safe canadian pharmacy Canadian Md Pharm legitimate canadian pharmacies
Mexican Easy Pharm: Mexican Easy Pharm – mexican rx online
https://mexicaneasypharm.com/# reputable mexican pharmacies online
buying drugs from canada
mexican rx online https://mexicaneasypharm.shop/# Mexican Easy Pharm
purple pharmacy mexico price list
legit canadian pharmacy online: Canadian Md Pharm – canadian pharmacy 365
Indian Cert Pharm pharmacy website india Indian pharmacy that ships to usa
https://indiancertpharm.shop/# Indian Cert Pharm
onlinecanadianpharmacy
Cyt Pharm: buy cytotec online – Cyt Pharm
http://kamapharm.com/# Kamagra 100mg price
Kamagra 100mg price
https://semapharm24.shop/# cheap semaglutide pills
prednisone tablets
Pred Pharm PredPharm Pred Pharm
generic rybelsus tabs: SemaPharm24 – Sema Pharm 24
PredPharm: prednisone without rx – PredPharm
http://kamapharm.com/# Kamagra 100mg price
super kamagra
cheap semaglutide pills: Sema Pharm 24 – SemaPharm24
http://kamapharm.com/# Kama Pharm
prednisone online pharmacy
30mg prednisone Pred Pharm prednisone over the counter
Misoprostol 200 mg buy online: buy cytotec online – cytotec abortion pill
http://cytpharm.com/# buy cytotec
Kamagra Oral Jelly
priligy: dapoxetine price – priligy
https://predpharm.shop/# buying prednisone without prescription
online prednisone
400 mg prednisone: Pred Pharm – india buy prednisone online
https://semapharm24.shop/# Sema Pharm 24
cheap kamagra
PredPharm prednisone 20mg tablets where to buy PredPharm
super kamagra: Kamagra tablets – Kamagra 100mg
Kama Pharm: Kama Pharm – Kama Pharm
http://semapharm24.com/# Sema Pharm 24
sildenafil oral jelly 100mg kamagra
https://dappharm.com/# DapPharm
prednisone 2 mg daily
cheap semaglutide pills: SemaPharm24 – semaglutide best price
Priligy tablets: cheap priligy – dapoxetine price
priligy buy dapoxetine online cheap priligy
https://kamapharm.com/# Kama Pharm
buy kamagra online usa
Pred Pharm: prednisone over the counter – order prednisone
https://cytpharm.com/# Cyt Pharm
buy prednisone online without a prescription
Cyt Pharm: CytPharm – CytPharm
https://kamapharm.shop/# Kama Pharm
buy Kamagra
Kamagra tablets: cheap kamagra – sildenafil oral jelly 100mg kamagra
Cyt Pharm cytotec abortion pill buy cytotec pills online cheap
where to buy prednisone in australia: prednisone 20 mg prices – canine prednisone 5mg no prescription
https://cytpharm.shop/# buy cytotec online
Kamagra 100mg price
http://predpharm.com/# Pred Pharm
prednisone 30 mg daily
SemaPharm24: SemaPharm24 – SemaPharm24
buy priligy: priligy – dapoxetine price
Kama Pharm Kama Pharm Kamagra 100mg
https://kamapharm.shop/# Kama Pharm
Kamagra 100mg price
Cytotec 200mcg price: CytPharm – Cyt Pharm
SemaPharm24: semaglutide tablets price – Sema Pharm 24
http://dappharm.com/# priligy
buy kamagra online usa
http://predpharm.com/# how to purchase prednisone online
order prednisone 10 mg tablet
Kama Pharm: buy Kamagra – buy kamagra online usa
buy semaglutide: cheap semaglutide pills – semaglutide tablets price
semaglutide tablets store Sema Pharm 24 rybelsus semaglutide tablets
http://predpharm.com/# prednisone 2.5 mg tab
Kamagra 100mg price
prednisone uk buy: Pred Pharm – Pred Pharm
Kama Pharm: Kamagra tablets – Kama Pharm
http://dappharm.com/# buy dapoxetine online
where can i order prednisone 20mg
http://cytpharm.com/# CytPharm
super kamagra
CytPharm buy cytotec pills Cyt Pharm
semaglutide tablets store: semaglutide tablets – SemaPharm24
dapoxetine price: priligy – dapoxetine online
https://cytpharm.shop/# buy cytotec
Kamagra Oral Jelly
http://predpharm.com/# PredPharm
cheap prednisone 20 mg
Cytotec 200mcg price: buy cytotec in usa – buy cytotec online
Pred Pharm: PredPharm – PredPharm
https://semapharm24.shop/# semaglutide best price
super kamagra
Pred Pharm Pred Pharm PredPharm
semaglutide tablets store: SemaPharm24 – buy semaglutide
Pred Pharm: PredPharm – PredPharm
http://kamapharm.com/# Kamagra 100mg
super kamagra
https://kamapharm.com/# cheap kamagra
prednisone 2 mg
semaglutide tablets store: semaglutide tablets – semaglutide best price
generic rybelsus tabs: Sema Pharm 24 – generic rybelsus tabs
semaglutide tablets semaglutide tablets semaglutide tablets for weight loss
http://dappharm.com/# dapoxetine online
buy Kamagra
Cytotec 200mcg price: CytPharm – buy cytotec over the counter
https://semapharm24.shop/# Sema Pharm 24
prednisone pill
DapPharm: dapoxetine price – Priligy tablets
dapoxetine online: DapPharm – dapoxetine online
buy cytotec in usa: CytPharm – Misoprostol 200 mg buy online
http://predpharm.com/# prednisone 4mg tab
sildenafil oral jelly 100mg kamagra
CytPharm: Cyt Pharm – CytPharm
semaglutide tablets price Sema Pharm 24 buy semaglutide
https://semapharm24.shop/# semaglutide tablets price
canada pharmacy prednisone
buy Kamagra: Kama Pharm – Kamagra 100mg
Pred Pharm: PredPharm – PredPharm
Pred Pharm: PredPharm – prednisone daily use
https://kamapharm.shop/# Kama Pharm
prednisone 10 mg daily
http://predpharm.com/# Pred Pharm
Kamagra Oral Jelly
Kama Pharm: п»їkamagra – super kamagra
Priligy tablets priligy priligy
Sema Pharm 24: buy rybelsus online – buy rybelsus online
https://semapharm24.com/# semaglutide tablets
can you buy prednisone
priligy: dapoxetine price – cheap priligy
http://kamapharm.com/# Kama Pharm
super kamagra
prednisone brand name canada: how can i get prednisone – Pred Pharm
super kamagra: super kamagra – buy kamagra online usa
acquistare farmaci senza ricetta Tadalafil generico migliore п»їFarmacia online migliore
https://farmasilditaly.com/# kamagra senza ricetta in farmacia
farmacie online affidabili
https://farmatadalitaly.shop/# farmacie online sicure
Farmacie on line spedizione gratuita
top farmacia online: farmaci senza ricetta elenco – п»їFarmacia online migliore
farmacie online sicure
viagra originale in 24 ore contrassegno: viagra naturale – dove acquistare viagra in modo sicuro
http://farmasilditaly.com/# pillole per erezione in farmacia senza ricetta
acquisto farmaci con ricetta
pillole per erezione immediata: Farma Sild Italy – miglior sito dove acquistare viagra
farmacie online sicure
п»їFarmacia online migliore: Ibuprofene 600 prezzo senza ricetta – farmaci senza ricetta elenco
https://farmaprodotti.shop/# comprare farmaci online all’estero
migliori farmacie online 2024
alternativa al viagra senza ricetta in farmacia viagra viagra prezzo farmacia 2023
http://farmasilditaly.com/# pillole per erezione immediata
farmacia online piГ№ conveniente
Farmacie online sicure: Cialis generico prezzo – top farmacia online
п»їFarmacia online migliore
acquistare farmaci senza ricetta: BRUFEN 600 acquisto online – top farmacia online
http://farmaprodotti.com/# farmacie online sicure
Farmacia online miglior prezzo
https://farmabrufen.shop/# FarmaBrufen
comprare farmaci online all’estero
acquisto farmaci con ricetta: Cialis generico prezzo – top farmacia online
farmacia online piГ№ conveniente
esiste il viagra generico in farmacia: Farma Sild Italy – viagra naturale in farmacia senza ricetta
п»їFarmacia online migliore Farma Prodotti farmacia online
https://farmaprodotti.com/# migliori farmacie online 2024
comprare farmaci online con ricetta
http://farmatadalitaly.com/# farmacie online affidabili
farmacie online sicure
farmacia online: BRUFEN 600 acquisto online – Farmacia online piГ№ conveniente
migliori farmacie online 2024
pillole per erezione immediata: Farma Sild Italy – viagra generico prezzo piГ№ basso
comprare farmaci online con ricetta Tadalafil generico migliore farmacia online senza ricetta
http://farmabrufen.com/# Ibuprofene 600 prezzo senza ricetta
top farmacia online
Farmacia online piГ№ conveniente: Farma Prodotti – farmacie online affidabili
Farmacia online piГ№ conveniente
http://farmaprodotti.com/# comprare farmaci online all’estero
migliori farmacie online 2024
migliori farmacie online 2024: Farma Prodotti – acquistare farmaci senza ricetta
http://farmasilditaly.com/# pillole per erezioni fortissime
farmacia online
viagra online consegna rapida: dove acquistare viagra in modo sicuro – esiste il viagra generico in farmacia
top farmacia online
Farmacie online sicure: comprare farmaci online all’estero – migliori farmacie online 2024
Farmacia online piГ№ conveniente Cialis senza ricetta farmacie online autorizzate elenco
http://farmabrufen.com/# Ibuprofene 600 prezzo senza ricetta
farmacie online affidabili
acquisto farmaci con ricetta: BRUFEN 600 acquisto online – acquisto farmaci con ricetta
top farmacia online
Farmacie on line spedizione gratuita: BRUFEN prezzo – farmacia online senza ricetta
https://farmaprodotti.com/# comprare farmaci online all’estero
Farmacia online piГ№ conveniente
Farmacie on line spedizione gratuita: Cialis generico prezzo – farmaci senza ricetta elenco
acquisto farmaci con ricetta
top farmacia online: Farma Prodotti – farmacia online
viagra online spedizione gratuita viagra online siti sicuri viagra generico prezzo piГ№ basso
https://farmatadalitaly.com/# Farmacie online sicure
top farmacia online
Farmacie online sicure: FarmaBrufen – farmacia online senza ricetta
farmacie online sicure
pillole per erezione in farmacia senza ricetta: Viagra – miglior sito dove acquistare viagra
https://farmatadalitaly.com/# farmacie online autorizzate elenco
farmaci senza ricetta elenco
farmaci senza ricetta elenco: Ibuprofene 600 prezzo senza ricetta – Farmacia online piГ№ conveniente
acquisto farmaci con ricetta
Farmacia online piГ№ conveniente: Ibuprofene 600 prezzo senza ricetta – farmacie online autorizzate elenco
I don’t think the title of your article matches the content lol. Just kidding, mainly because I had some doubts after reading the article.
pillole per erezione in farmacia senza ricetta viagra viagra originale in 24 ore contrassegno