In the journey from idea creations to product operations , Documents are vital to every product and every Department but handling such big data conventionally leads to various Document redundancies, it not only consumes unnecessary storage space but also introduces the risk of confusion and errors!
Paving the need for solutions 3DEXPERIENCE Platform provides the collaboration for Microsoft applications a Native app with Revision and Version history can track changes and minimize duplicity, thus regularly cleaning up redundant files and fostering a culture of naming conventions and proper documentation can go a long way in maintaining a professional and efficient workspace. After all, nobody wants to play detective trying to figure out which version of a file is the latest and greatest!
In this guide “An In-Depth guide to the 3DEXPERIENCE app, collaboration for Microsoft applications, work synergistically to manage document integrity.” we will understand the tools and methods to work along with Microsoft Documents.
1. Setting up the essentials:

- Login to your 3DEXPERIENCE Platform.
- Open the compass and select the Collaboration for Microsoft from the Collaborative Industry Innovator role.
- Find the Collaboration for Microsoft and as it being a Native app it should be installed on your system.
2. Understanding what Collaboration for Microsoft really is:

The Create tool within the app offers a convenient way to batch upload both legacy data documents directly into specified bookmarks. Here’s a refined guide:
Uploading Legacy Data Documents Using the Create Tool:
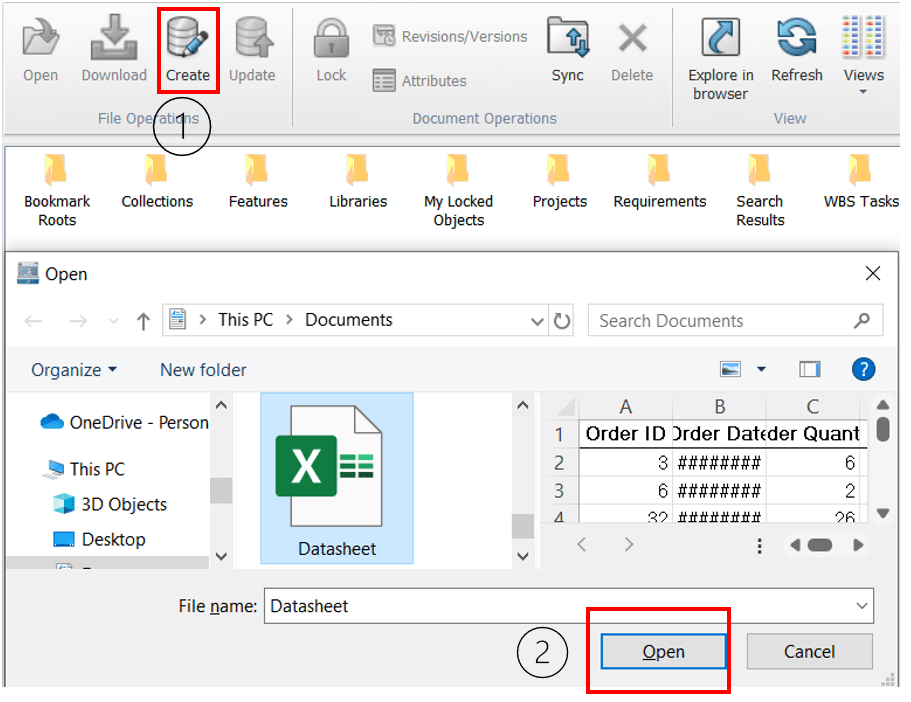
- 1. Access the Create Tool:
- Launch “Collaboration for Microsoft” navigate to the Create tool, typically found in the toolbar or menu.
- 2. Batch Upload Functionality:
- Utilize the Create tool’s batch upload feature designed to upload multiple documents at once.
- 3. Specify Bookmarks:
- Select the specific bookmarks within the platform where you want to upload the documents.
- This ensures that the uploaded files are directly placed into the designated bookmarks.
- 4. Choose Files/Folders:
- Pick the desired files or folders from your device, including both legacy data documents.
- 5. Initiate Batch Upload:
- Start the upload process through the Create tool after selecting the files.
- 6. Confirmation and Verification:
- Confirm that the uploaded documents appear within the specified bookmarks.
- Verify that legacy data files are successfully added.
Step 1: Organise your legacy data!
Here is a step-by-step guide to facilitate batch uploads in the context of file uploads or creation:
Steps to Batch Upload Files to Specified Bookmark:
- 1. Utilize Create Tool:
- Access the Create tool for batch uploading on the 3DEXPERIENCE Platform.
- 2. Batch Upload for Specified Bookmark:
- Choose to upload legacy or recent documents to a specified bookmark within the platform.
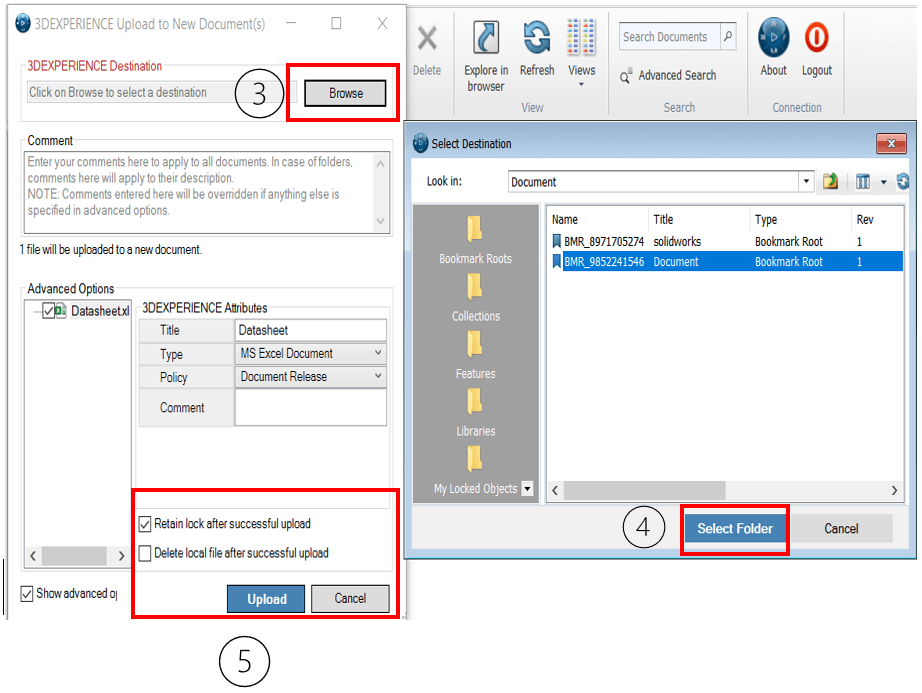
- 3. Access Bookmark Roots:
- Navigate to the Bookmark Roots directory within the platform.
- 4. Choose Respective Bookmark:
- Select the specific bookmark where you want to upload the files.
- 5. Enable Lock Retention (Optional):
- Checkmark the “Retain lock after successful upload” option if you wish to retain file locks post-upload for added File permission control.
- 6. Initiate Upload:
- Use the platform’s upload function to save/upload the files onto the 3DEXPERIENCE Platform.
Step 2: Validation!

Once documents are successfully uploaded by a user, they are reflected in the “Bookmarks” section within the platform. The “Bookmarks” serve as a reference or shortcut to access or view these uploaded documents easily.
Step 3: Understanding Version, Revision& attributes control in the Collaboration for Microsoft
3.1) Creating Versions:

The collaboration features in Microsoft Office applications, including Word, Excel, and PowerPoint, often leverage the integrated version control offered by Collaboration for Microsoft Here’s an overview:
Version Control in Microsoft Office Collaboration:
- 1. Track Changes:
- When you collaborate on documents stored in your 3DEXPERIENCE Platform, version history is automatically maintained.
- Changes made by different collaborators are tracked, allowing you to view and restore previous versions of the document.
- This feature helps manage versions by keeping a log of who made which edits.
- 2. Co-Authoring:
- Real-time co-authoring is supported allowing, Multiple users can work on the same document simultaneously.
- Changes made by each user are visible to others, allowing for concurrent collaboration.
- 3. Version History:
- Users can access version history directly within Office applications. This feature displays a list of previous versions with timestamps and allows users to revert to earlier versions if needed.
- 4. Sharing and Permissions:
- 3DEXPERIENCE Platform provides granular control over document sharing and permissions.
3.2) Reviewing the Versions:

By utilizing the Revisions/Versions tool, users gain access to detailed information about file versions, allowing them to view, download, or access specific versions along with associated details like comments and ownership information.
Checking File Versions and Status:
- 1. Accessing Revisions/Versions Tool:
- Click on the “Revisions/Versions” tool within the platform’s interface.
- 2. Version Information:
- In this tool, users can find details about file versions, including maturity state, locked status, and available versions.
- 3. File Status Details:
- Details such as maturity state, locked status, versions available, owner information, and comments are visible.
- 4. Open or Download Versions:
- Users can open or download specific versions directly from this tool.
3.3) Creating Revisions:

Options for Creating Document Revisions:
- 1. Create Revision Including All Previous Versions and Revisions:
- This option generates a new revision of the document that includes all prior versions and revisions.
- It consolidates and maintains a complete revision history within the newly created version.
- Users opting for this approach ensure that the entire history of the document is carried forward into the new revision.
- 2. Create Revision Excluding All Previous Versions and Revisions:
- This option generates a new revision that starts afresh without including any previous versions or revisions.
- It creates a clean slate, disregarding the document’s historical versions and revisions.
3.4) Validating Revisions:
Ensuring the Right Revision in Microsoft Applications:
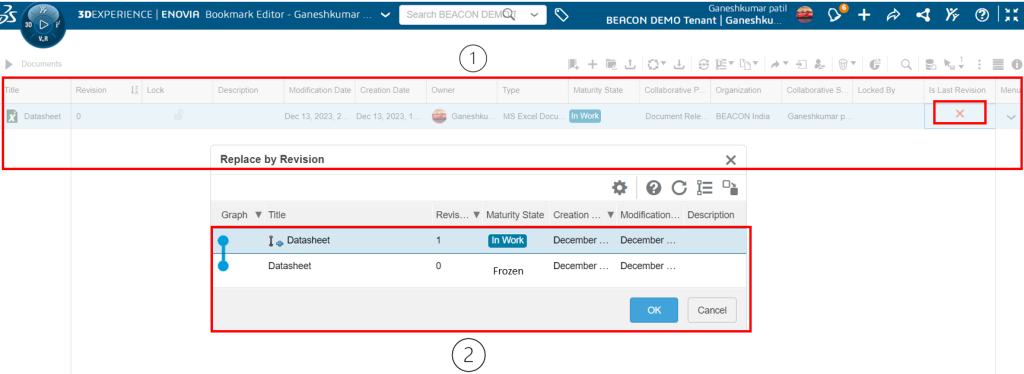
- 1. Close Current File:
- Close the currently open file within any Microsoft application.
- 2. Access “Replace by Revision” Command:
- Use the “Replace by Revision” command within the 3DEXPERIENCE Platform.
- This command allows you to swap the current document with the desired revision.
- 3. Perform Replacement:
- Execute the “Replace by Revision” command to substitute the current document with the intended revision from the platform.
- 4. Open Updated Document:
- After replacement, reopen the updated document from the any Microsoft application, as shown in ref image below.
3.4) Reviewing the Revisions:

*When the “Include previous files with revision” option is selected within the Revisions/Versions tool, it allows users to access the comprehensive revision history of a file, encompassing both the current revision and all prior versions and files associated with it. Here’s an overview:
Accessing Revision History with “Include Previous Files” Option:
- 1. Revisions/Versions Tool:
- Access the Revisions/Versions tool within the applications interface.
- 2. Selecting “Include Previous Files with Revision”:
- Choose the option that includes all previous files with the current revision.
- 3. Accessing Revision History:
- This selection grants access to the complete revision history of the file.
- Users can view, open, and download not only the current revision but also all previous versions files.
3.4.1) Collaboratively Reviewing the Files on 3DExperience Platform:
The “Explore in Browser” tool is a powerful feature that facilitates the analysis of large datasets quickly and efficiently within a platform. Here’s how it aids in assessing datasets, especially with revisions and versions of files:
Analyzing Large Datasets with “Explore in Browser” Tool:
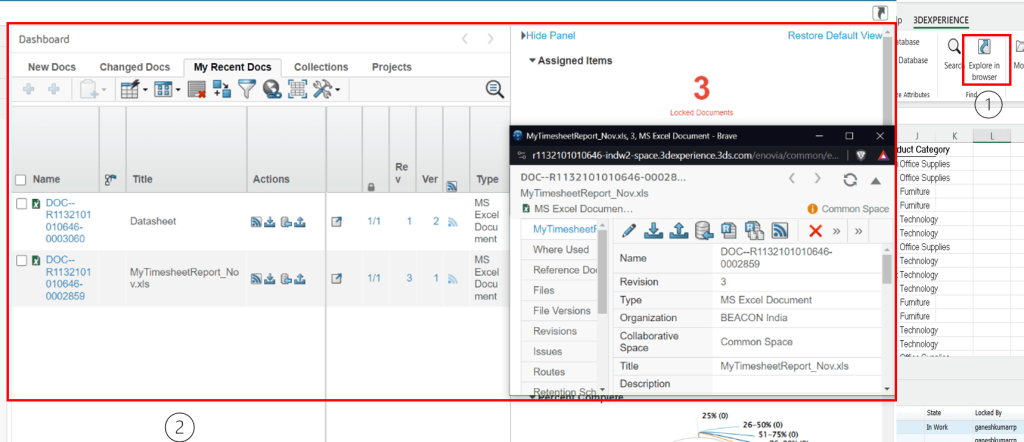
- 1. Data Analysis at a Glance:
- The “Explore in Browser” tool provides a user-friendly interface for analyzing large datasets.
- It offers a quick overview, allowing users to grasp essential information in a concise manner.
- 2. Revision and Version Insights:
- Within this tool, users can access information related to file revisions and versions.
- It presents an overview of file changes, enhancements, or updates across different versions and revisions.
- 3. Efficient Data Assessment:
- Users can efficiently navigate through various versions and revisions of files, aiding in data assessment and comparison.
- 4. Time-Saving Analysis:
- The tool’s interface condenses complex dataset information, enabling rapid analysis without extensive data exploration.
3.5) Attributes handling within Microsoft Applications:
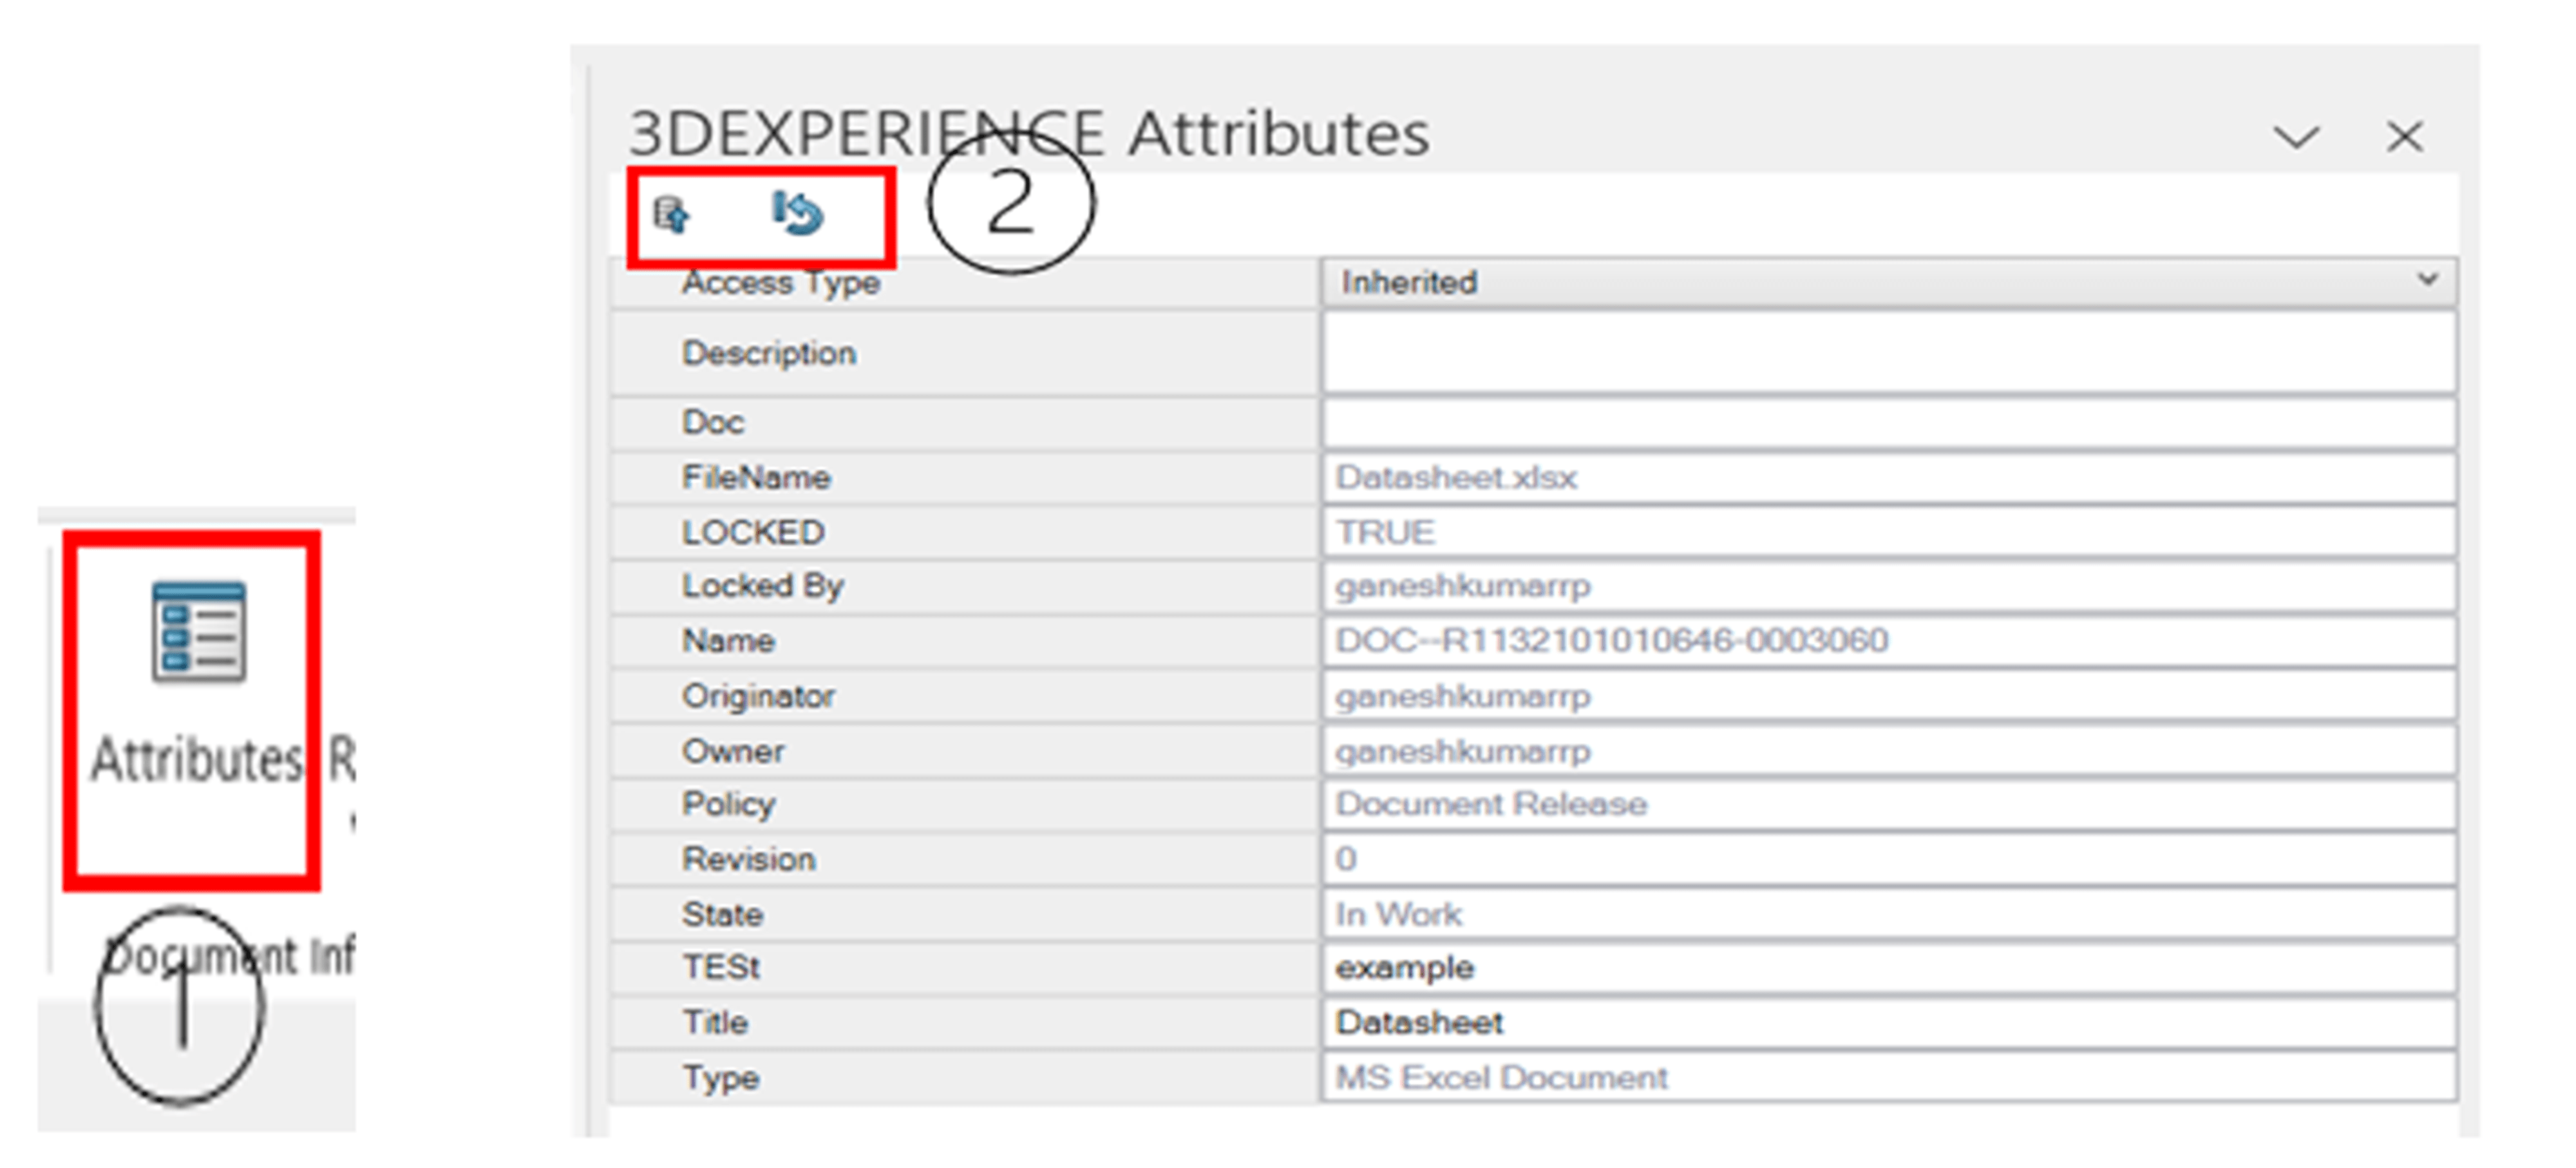
The 3DEXPERIENCE platform integrates with various tools and applications, including Microsoft Office applications like Word, Excel, and PowerPoint. When handling Microsoft documents within the 3DEXPERIENCE platform, attributes can be managed and associated with these documents for better organization and information retrieval.
Attributes in 3DEXPERIENCE for Microsoft Documents:
- 1. Metadata and Attributes:
- The 3DEXPERIENCE platform allows users to assign metadata or attributes to Microsoft Office documents stored within the platform.
- Attributes could include information like document type, author, creation date, Revision, project ID, etc.
- 2. Custom Attributes:
- Users can define custom attributes tailored to their specific needs or industry requirements. These attributes can provide additional context or information about the documents.
- 3. Search and Filtering:
- Attributes associated with documents enable efficient search and filtering within the 3DEXPERIENCE platform.
- Users can search for documents based on specific attributes, simplifying document retrieval and management.
- 4. Integration with PLM Processes:
- Attributes associated with Microsoft documents can be linked to Product Lifecycle Management (PLM) processes within the 3DEXPERIENCE platform.
- This integration ensures that document attributes are aligned with broader product development or project workflows.
- 5. Revision Control and History:
- Attributes can also track document revisions and change history within the 3DEXPERIENCE platform.
- This information can be valuable for traceability and compliance purposes.
The tools and methods within the 3DEXPERIENCE app, coupled with collaboration for Microsoft applications, work synergistically to manage document integrity, organize substantial data, and align with maturity life cycles. Therefore, the 3DEXPERIENCE collaboration for Microsoft applications provides a competitive edge for your company by providing seamless data management and enjoy a new level of growth in your organization.
We Urge You To Call Us For Any Doubts & Clarifications That You May Have. We Are Eager to Talk To You
Call Us: +91 7406663589


