


A quick search on Google for “SOLIDWORKS users worldwide” throws a figure of ‘six million’, out of which roughly 1 million are professional users. How many of them are using SOLIDWORKS to automate their everyday mundane design tasks? The answer simply is “not enough of them”.
There could be multiple reasons for this. One of the reasons being that they are simply unaware of the free design automation tool inside each SOLIDWORKS license. Or in some cases their design changes completely each time they get a new order and hence have no use of automating their designs. Some SOLIDWORKS users might even think they need to write a program, a macro or learn a computer language to be able to automate! Afterall when I first started using SOLIDWORKS I was of the same opinion that design automation is a niche subject best left to the programmers.
But this is where DriveWorksXpress comes into the picture. It can be applied to a vast majority of products that are designed in SOLIDWORKS and fall under different industry verticals. (coming to this a bit later)
It is a free entry level design automation tool that comes with each SOLIDWORKS license. In simple words, one must design a “master CAD model” (part, assembly and drawing with a design intent), so that its changing dimensions and features can be easily captured and can be further used to generate new specifications. As best practice it is advised that the model be made in SOLIDWORKS only. (Any CAD file imported into SOLIDWORKS can also be automated if the dimension’s and features are recognized and can be captured.)
Tools ? Xpress Products ? DriveWorksXpress
Or you can go to the Evaluate tab in the command manager and find it by the name DriveWorksXpress Wizard.
There are several benefits, a few of them have been listed below.
They have their own website that has all the learning resources like “how to” videos, downloadable sample projects, webinars and a lot more. Here is a link to their website.
https://www.driveworks.co.uk/products/driveworksxpress/
Another place that you can find information to DriveWorksXpress is inside SOLIDWORKS Help ? Tutorials ? Productivity Tools ? DriveWorksXpress. This is a step by step guide on how to start using the tool inside SOLIDWORKS.
Moreover, once you get a hang of how to use DriveWorksXpress, there is a free online certification exam that you can give in your spare time. On passing the exam, you will get a certificate issued from DriveWorks. The exam name is Certified DriveWorksXpress Associate (CDWXA) and all information can be found on the website.
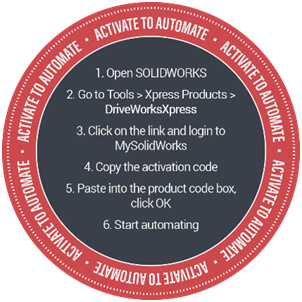
Activating DriveWorksXpress is simple and only requires a MySOLIDWORKS account which is free to register. If you are facing any difficulties activating the license, feel free to contact BEACON Technical support and we will be happy to help you.
Here is a link to their website that best describes the variety of industries covered.
https://www.driveworks.co.uk/resources/driveworksxpress/sample-projects/
You will find around 20 different product lines that can be worked on, which is diverse. Even if you have not created an account on DriveWorksXpress, you will still be able to download all the sample projects and explore how they have been setup inside SOLIDWORKS. Now isn’t that great!
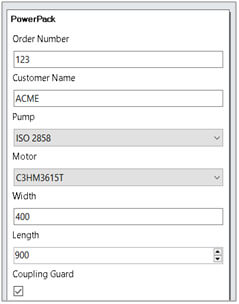
Let us take an example of a Powerpack as seen in the sample projects on the DriveWorksXpress website. Simply by picking a motor and selecting a pump, we can let DriveWorksXpress create a powerpack for us.

Fig1: Powerpack assembly
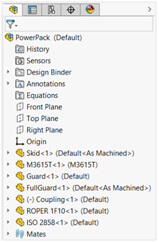
Fig2: Assembly Design Tree
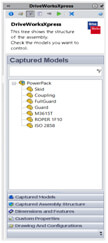
Fig3: DriveWorksXpress menu
Fig1 shows the assembly setup allowing pump and motor selection. Fig2 shows the assembly design tree. We can choose between Pump type Roper 1F10 or ISO 2858. Also, there are 6 different configurations of Motors to choose from (not seen in image). Fig3 shows the DriveWorksXpress menu which appears on the right-hand side inside SOLIDWORKS. Under the Projects menu, set up the name of project as you want. The next step is to capture the assembly structure, drawing and custom properties.
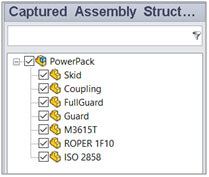
Fig4: Captured components

Fig5: Drawing and
Configurations
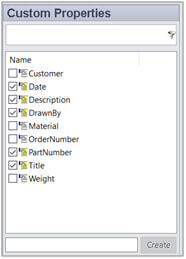
Fig6: Capture custom
properties.
Individual parts can be opened, and their dimensions and features can be captured. The below image shows the captured features and dimensions with recognizable names to be later used to identify them while writing the rules.
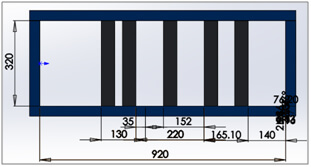
Fig7: Skid design with dimensions
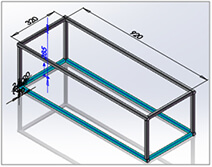
Fig8: Cage design with dimensions
Above figures show dimensions for the skid and cage which can be captured into DriveWorksXpress simply by clicking on them and giving them a sensible name.
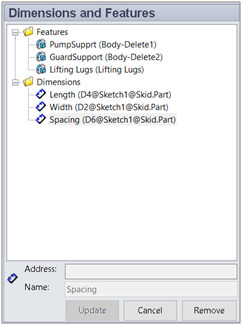
Fig9: Captured skid dimensions and features
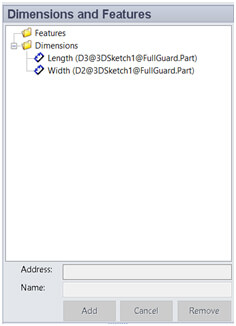
Fig10: Captured length and width of cage
Once captured, the dimensions are listed under the Dimensions folder and the Features under the Features folder.
The names can be renamed anytime, but make sure to update them in the rules. Once renamed, the update button must be pressed in order to update and save their names.
Now we can design a form to collect all the requirements for the new models.
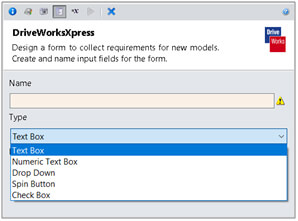
Fig11: Type of form options available

Fig12: Powerpack form options
After setting up options for the form design it is time to setup rules for all the captured parameters.
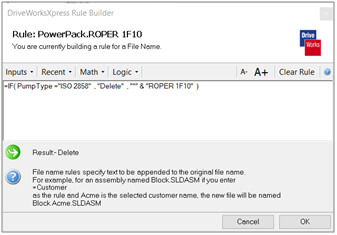
The intuitive rule builder helps us understand if the input rule is acceptable or not by changing the color of the background to Red if the rule is wrong. Simple excel based rules can be written to suppress, un-suppress or delete a feature or component. The result will be instantly visible. Software gives options like Inputs, Recent, Math and Logic to make work easy. Rules can be applied to dimensions, custom properties and configurations.
Although DriveWorksXpress does not allow to create new configurations, we can switch between existing configurations using basic rules.
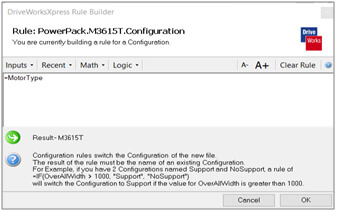
Figure alongside shows rule to change the configurations of the motor. A simple selection from the dropdown list on the form allows the user to select the configuration.
Running the configurator:
The final step is to run the configurator. Go to Run and fill out the form. Press Create. Remember this button will be greyed out if you forget to fill up any field or type in a wrong input value in the form which was previously set to “Required” when creating the form layout.
After the user fills in the form and presses Create, a new powerpack assembly is created and saved in the same location as the master file. DriveWorksXpress also gives it a unique name according to the user rule to identify it from others. For example, the new assembly name may be based on the unique Order number generated by the user. The assembly drawing previously captured will also be generated with a new name.
DriveWorksXpress makes sure that if any component that does not change in dimension or features (or in other words is not part of the design automation or is not captured to be driven by the changes in the form) is not duplicated. This helps save a lot of disk space.
Resulting Output files:


The new assembly is generated according to the options selected in the form. Unwanted parts are deleted or suppressed. The drawing has been updated along with the Bill of Materials. The skid and cage dimensions update to accommodate the selected components. Custom properties are also driven into the drawing. The form can be filled any number of times to generate various specifications again and again.
https://www.driveworks.co.uk/products/driveworkssolo/ For more capabilities, check out DriveWorks Solo on above website which has a 1-month free trial period.
We Urge You To Call Us For Any Doubts & Clarifications That You May Have. We Are Eager to Talk To You
Call Us: +91 7406663589
 (No Ratings Yet)
#365/8, Ground Floor, "Hasmitha Avenue", 16th Main, 4th T Block East, Jayanagar, 4th T Block East, Pattabhirama Nagar, Jayanagar, Bengaluru, Karnataka 560041
Rated 4.7/5 with a total of 62 reviews
"CARAX" Building 4th Floor, 105/1/1/4, Next to Radha Hotel, Pune-Mumbai Xpress Way,Baner,Pune 411045
Rated 4.7/5 with a total of 17 reviews
1002, LODHA Supremus, I-Think Techno Campus,Kanjurmarg EAST - MUMBAI, MH, India – 400042.
Rated 5/5 with a total of 51 reviews
508, Shiti Ratna Complex, Panchwati Cross Road, Ahmedabad-380006
Rated 4.1/5 with a total of 7 reviews
Kanda's Villa, II Floor, AE Block,3362 R, 8th Street, Anna Nagar, Chennai, Tamil Nadu 600040
Rated 4.6/5 with a total of 16 reviews
Flat no F1, first floor, Nakhate corner, Eknath rang mandir road,New Usmanpura, Aurangabad, 431005.
A-101, 1st Floor, The Hub Complex, opp. Shete Hospital, Mahatma Nagar, Parijat Nagar, Nashik, Maharashtra 422005.
Level 7, Octave 3B Salarpuria Sattva Knowledge City, Inorbit Mall Road, Raidurg Village, Hi-tech City, Hyderabad, Telangana - 500081, India

pin-up online casino https://azerbaijancuisine.com/# pin up casino az
pin-up 141
best online pharmacies in mexico Mexico pharmacy that ship to usa mexico pharmacies prescription drugs
mexico drug stores pharmacies Mexico pharmacy that ship to usa best online pharmacies in mexico
medication from mexico pharmacy mexican pharmacy mexican online pharmacies prescription drugs
mexico drug stores pharmacies northern doctors pharmacy buying prescription drugs in mexico
http://northern-doctors.org/# п»їbest mexican online pharmacies
buying prescription drugs in mexico online: mexican northern doctors – mexican pharmaceuticals online
mexico drug stores pharmacies mexican pharmacy northern doctors purple pharmacy mexico price list
http://northern-doctors.org/# medicine in mexico pharmacies
medication from mexico pharmacy: mexican pharmacy northern doctors – medicine in mexico pharmacies
mexican rx online: Mexico pharmacy that ship to usa – reputable mexican pharmacies online
https://northern-doctors.org/# mexican pharmaceuticals online
pharmacies in mexico that ship to usa: mexican northern doctors – mexican drugstore online
buying prescription drugs in mexico online: reputable mexican pharmacies online – medicine in mexico pharmacies
http://northern-doctors.org/# medication from mexico pharmacy
mexican pharmaceuticals online: mexican mail order pharmacies – mexico pharmacy
http://northern-doctors.org/# mexico drug stores pharmacies
mexican pharmaceuticals online mexican northern doctors mexican online pharmacies prescription drugs
purple pharmacy mexico price list: medication from mexico pharmacy – mexico drug stores pharmacies
https://northern-doctors.org/# purple pharmacy mexico price list
purple pharmacy mexico price list: Mexico pharmacy that ship to usa – mexico drug stores pharmacies
mexican mail order pharmacies: pharmacies in mexico that ship to usa – mexican border pharmacies shipping to usa
https://northern-doctors.org/# best online pharmacies in mexico
mexican mail order pharmacies: mexican pharmacy northern doctors – medicine in mexico pharmacies
https://northern-doctors.org/# mexico pharmacies prescription drugs
mexico pharmacies prescription drugs: mexican pharmacy online – purple pharmacy mexico price list
mexican mail order pharmacies northern doctors pharmacy buying prescription drugs in mexico online
mexican pharmaceuticals online: northern doctors pharmacy – mexican pharmaceuticals online
https://northern-doctors.org/# mexico drug stores pharmacies
reputable mexican pharmacies online: Mexico pharmacy that ship to usa – medication from mexico pharmacy
https://northern-doctors.org/# best online pharmacies in mexico
mexican border pharmacies shipping to usa: northern doctors – mexico pharmacies prescription drugs
http://northern-doctors.org/# purple pharmacy mexico price list
mexican rx online: mexican northern doctors – mexican drugstore online
http://northern-doctors.org/# reputable mexican pharmacies online
mexican rx online mexico pharmacy mexico drug stores pharmacies
http://cmqpharma.com/# buying prescription drugs in mexico online
pharmacies in mexico that ship to usa
mexican border pharmacies shipping to usa mexican pharmacy medicine in mexico pharmacies
pharmacies in mexico that ship to usa mexican pharmacy online mexico pharmacies prescription drugs
reputable mexican pharmacies online cmq pharma buying from online mexican pharmacy
п»їbest mexican online pharmacies: mexico pharmacy – mexican pharmacy
mexican mail order pharmacies cmq mexican pharmacy online mexican rx online
purple pharmacy mexico price list
https://cmqpharma.online/# best online pharmacies in mexico
purple pharmacy mexico price list
mexico pharmacies prescription drugs mexico pharmacy mexican rx online
п»їbest mexican online pharmacies mexican border pharmacies shipping to usa mexico pharmacies prescription drugs
medication from mexico pharmacy mexican pharmacy medication from mexico pharmacy
Hi there, just became aware of your blog through Google, and found that
it is truly informative. I’m going to watch out for brussels.
I will appreciate if you continue this in future. A lot of people will be benefited
from your writing. Cheers! Lista escape roomów
I was reading some of your articles on this website and I think this
website is really instructive! Retain posting..
medicine in mexico pharmacies mexican border pharmacies shipping to usa reputable mexican pharmacies online
https://canadapharmast.online/# canadian pharmacy service
cheapest online pharmacy india Online medicine order world pharmacy india
http://indiapharmast.com/# indian pharmacy
medication from mexico pharmacy best online pharmacies in mexico mexican rx online
https://foruspharma.com/# mexican drugstore online
safe canadian pharmacy canadian pharmacy uk delivery www canadianonlinepharmacy
Spot on with this write-up, I actually believe this web site needs a great deal more attention. I’ll probably be back again to see more, thanks for the advice.
cipro for sale: cipro online no prescription in the usa – buy cipro online
I have to thank you for the efforts you’ve put in penning this website. I’m hoping to check out the same high-grade blog posts from you later on as well. In fact, your creative writing abilities has motivated me to get my own website now 😉
can i get generic clomid no prescription: cost cheap clomid price – can i buy generic clomid no prescription
There’s definately a great deal to know about this topic. I love all of the points you’ve made.
buy ciprofloxacin: antibiotics cipro – cipro online no prescription in the usa
paxlovid india: paxlovid india – paxlovid price
paxlovid cost without insurance: Paxlovid buy online – paxlovid generic
ciprofloxacin mail online: buy cipro online canada – buy cipro without rx
paxlovid generic: paxlovid for sale – paxlovid buy
buying amoxicillin online: buy amoxil – where to buy amoxicillin over the counter
This blog was… how do you say it? Relevant!! Finally I’ve found something that helped me. Many thanks!
buying from online mexican pharmacy purple pharmacy mexico price list mexican pharmacy
http://mexicandeliverypharma.com/# buying from online mexican pharmacy
mexican border pharmacies shipping to usa: medication from mexico pharmacy – pharmacies in mexico that ship to usa
mexican mail order pharmacies: mexican mail order pharmacies – mexican online pharmacies prescription drugs
mexico pharmacies prescription drugs best online pharmacies in mexico mexican mail order pharmacies
pharmacies in mexico that ship to usa: mexican drugstore online – buying from online mexican pharmacy
mexico drug stores pharmacies: buying prescription drugs in mexico – medication from mexico pharmacy
https://mexicandeliverypharma.com/# mexican border pharmacies shipping to usa
reputable mexican pharmacies online mexico pharmacies prescription drugs mexico pharmacies prescription drugs
п»їbest mexican online pharmacies: mexican border pharmacies shipping to usa – mexican drugstore online
best online pharmacies in mexico: п»їbest mexican online pharmacies – medicine in mexico pharmacies
http://mexicandeliverypharma.com/# buying prescription drugs in mexico
mexican online pharmacies prescription drugs: pharmacies in mexico that ship to usa – pharmacies in mexico that ship to usa
mexican pharmacy mexico pharmacy mexico pharmacies prescription drugs
mexican border pharmacies shipping to usa: mexican border pharmacies shipping to usa – buying prescription drugs in mexico online
buying prescription drugs in mexico online: buying prescription drugs in mexico – pharmacies in mexico that ship to usa
pharmacies in mexico that ship to usa: mexico pharmacies prescription drugs – buying prescription drugs in mexico
mexican border pharmacies shipping to usa buying prescription drugs in mexico mexico pharmacy
best online pharmacies in mexico: mexican pharmaceuticals online – medication from mexico pharmacy
mexican pharmaceuticals online: reputable mexican pharmacies online – mexican rx online
https://mexicandeliverypharma.com/# pharmacies in mexico that ship to usa
Way cool! Some extremely valid points! I appreciate you writing this post and also the rest of the site is really good.
buying prescription drugs in mexico online: buying prescription drugs in mexico online – mexico pharmacies prescription drugs
I couldn’t resist commenting. Very well written.
best online pharmacies in mexico mexican pharmaceuticals online buying from online mexican pharmacy
Good web site you’ve got here.. It’s hard to find quality writing like yours nowadays. I seriously appreciate individuals like you! Take care!!
mexico drug stores pharmacies: buying prescription drugs in mexico – mexico drug stores pharmacies
buying from online mexican pharmacy: buying from online mexican pharmacy – medicine in mexico pharmacies
I was able to find good information from your blog posts.
An impressive share! I have just forwarded this onto a coworker who has been conducting a little research on this. And he in fact ordered me lunch simply because I stumbled upon it for him… lol. So let me reword this…. Thank YOU for the meal!! But yeah, thanx for spending the time to discuss this topic here on your internet site.
purple pharmacy mexico price list: buying prescription drugs in mexico online – medication from mexico pharmacy
mexican mail order pharmacies buying prescription drugs in mexico mexico drug stores pharmacies
mexican online pharmacies prescription drugs: mexican border pharmacies shipping to usa – mexico drug stores pharmacies
п»їbest mexican online pharmacies: mexican mail order pharmacies – reputable mexican pharmacies online
mexico pharmacies prescription drugs: mexican pharmaceuticals online – purple pharmacy mexico price list
medicine in mexico pharmacies mexican rx online pharmacies in mexico that ship to usa
reputable mexican pharmacies online: п»їbest mexican online pharmacies – mexican pharmaceuticals online
purple pharmacy mexico price list: mexico pharmacies prescription drugs – buying prescription drugs in mexico
pharmacies in mexico that ship to usa: mexico drug stores pharmacies – best online pharmacies in mexico
mexican pharmaceuticals online best online pharmacies in mexico pharmacies in mexico that ship to usa
mexico drug stores pharmacies: mexican online pharmacies prescription drugs – mexico drug stores pharmacies
medication from mexico pharmacy: best online pharmacies in mexico – mexican drugstore online
mexico pharmacies prescription drugs: mexico drug stores pharmacies – mexican drugstore online
mexico pharmacies prescription drugs mexico pharmacy buying from online mexican pharmacy
mexican pharmaceuticals online: mexican border pharmacies shipping to usa – medication from mexico pharmacy
mexico drug stores pharmacies: buying prescription drugs in mexico – mexico drug stores pharmacies
mexico drug stores pharmacies: buying prescription drugs in mexico – mexico drug stores pharmacies
pharmacies in mexico that ship to usa mexico pharmacy buying prescription drugs in mexico online
п»їbest mexican online pharmacies: medication from mexico pharmacy – buying prescription drugs in mexico online
medicine in mexico pharmacies: mexico drug stores pharmacies – pharmacies in mexico that ship to usa
mexican border pharmacies shipping to usa: mexican drugstore online – mexican pharmaceuticals online
mexico pharmacy mexican pharmaceuticals online best online pharmacies in mexico
buying prescription drugs in mexico online: mexican border pharmacies shipping to usa – medication from mexico pharmacy
buying prescription drugs in mexico: purple pharmacy mexico price list – mexican drugstore online
best online pharmacies in mexico: buying prescription drugs in mexico – buying prescription drugs in mexico online
mexico drug stores pharmacies mexican online pharmacies prescription drugs purple pharmacy mexico price list
mexico pharmacies prescription drugs: purple pharmacy mexico price list – pharmacies in mexico that ship to usa
mexican mail order pharmacies: mexican rx online – mexico pharmacies prescription drugs
mexican mail order pharmacies: buying prescription drugs in mexico – mexican border pharmacies shipping to usa
medication from mexico pharmacy mexico pharmacy medication from mexico pharmacy
buying prescription drugs in mexico online: reputable mexican pharmacies online – mexican pharmaceuticals online
mexican rx online: purple pharmacy mexico price list – medication from mexico pharmacy
I’m impressed, I have to admit. Seldom do I encounter a blog that’s equally educative and amusing, and without a doubt, you’ve hit the nail on the head. The issue is an issue that too few folks are speaking intelligently about. I’m very happy I found this during my hunt for something regarding this.
mexican rx online mexico pharmacies prescription drugs mexican pharmacy
pharmacies in mexico that ship to usa: buying prescription drugs in mexico – п»їbest mexican online pharmacies
There is definately a great deal to know about this topic. I like all of the points you made.
mexican border pharmacies shipping to usa: best online pharmacies in mexico – buying prescription drugs in mexico
mexico drug stores pharmacies: mexican border pharmacies shipping to usa – mexico drug stores pharmacies
I blog quite often and I seriously appreciate your information. Your article has truly peaked my interest. I’m going to book mark your site and keep checking for new information about once a week. I subscribed to your Feed too.
I blog frequently and I truly appreciate your information. Your article has really peaked my interest. I’m going to bookmark your blog and keep checking for new details about once per week. I subscribed to your RSS feed as well.
You’ve made some decent points there. I checked on the web for more info about the issue and found most individuals will go along with your views on this site.
pharmacies in mexico that ship to usa buying prescription drugs in mexico online mexico pharmacy
mexican pharmaceuticals online: mexican online pharmacies prescription drugs – mexican mail order pharmacies
pharmacies in mexico that ship to usa: mexico drug stores pharmacies – buying prescription drugs in mexico
Very good article! We are linking to this particularly great content on our site. Keep up the great writing.
mexican drugstore online: buying from online mexican pharmacy – medication from mexico pharmacy
Can I just say what a relief to find somebody who truly knows what they’re talking about on the internet. You actually realize how to bring an issue to light and make it important. More people must read this and understand this side of the story. It’s surprising you’re not more popular because you certainly possess the gift.
mexico drug stores pharmacies medicine in mexico pharmacies best online pharmacies in mexico
mexican online pharmacies prescription drugs: mexican online pharmacies prescription drugs – medication from mexico pharmacy
I’m pretty pleased to uncover this web site. I wanted to thank you for your time for this particularly wonderful read!! I definitely really liked every little bit of it and i also have you book-marked to look at new things in your website.
mexican pharmaceuticals online: medication from mexico pharmacy – mexican online pharmacies prescription drugs
medication from mexico pharmacy: best online pharmacies in mexico – п»їbest mexican online pharmacies
Hi, I believe your site might be having browser compatibility problems. Whenever I take a look at your blog in Safari, it looks fine however, if opening in I.E., it’s got some overlapping issues. I merely wanted to provide you with a quick heads up! Aside from that, great blog.
Way cool! Some extremely valid points! I appreciate you penning this post and also the rest of the site is really good.
buying prescription drugs in mexico online reputable mexican pharmacies online buying prescription drugs in mexico online
mexico drug stores pharmacies: mexican mail order pharmacies – mexican online pharmacies prescription drugs
best online pharmacies in mexico: medicine in mexico pharmacies – mexican drugstore online
buying prescription drugs in mexico online: medicine in mexico pharmacies – buying prescription drugs in mexico online
I like it when folks get together and share opinions. Great site, continue the good work.
prednisone 20mg online without prescription prednisone 15 mg tablet purchase prednisone 10mg
tamoxifen men: tamoxifen blood clots – tamoxifen lawsuit
http://cytotecbestprice.pro/# cytotec pills buy online
http://cytotecbestprice.pro/# cytotec buy online usa
An impressive share! I’ve just forwarded this onto a colleague who had been doing a little homework on this. And he actually ordered me breakfast because I stumbled upon it for him… lol. So allow me to reword this…. Thanks for the meal!! But yeah, thanx for spending some time to talk about this issue here on your web page.
cost of propecia prices cost propecia buy propecia without a prescription
cheap propecia without prescription: cost of generic propecia tablets – generic propecia without rx
https://nolvadexbestprice.pro/# tamoxifen and osteoporosis
This blog was… how do I say it? Relevant!! Finally I have found something which helped me. Kudos.
https://propeciabestprice.pro/# cost of generic propecia without rx
cost of propecia without dr prescription propecia without rx order propecia tablets
buy zithromax 1000 mg online: zithromax 500 – zithromax 500 price
http://propeciabestprice.pro/# buying cheap propecia without a prescription
https://propeciabestprice.pro/# order propecia
prednisone best price prednisone generic cost prednisone prescription drug
tamoxifen vs clomid: aromatase inhibitors tamoxifen – nolvadex pct
can i buy zithromax over the counter in canada: order zithromax over the counter – cost of generic zithromax
prednisone over the counter uk: prednisone brand name us – prednisone cream
Oh my goodness! Impressive article dude! Thank you so much, However I am encountering troubles with your RSS. I don’t understand why I cannot join it. Is there anybody having identical RSS problems? Anybody who knows the answer will you kindly respond? Thanx!
Hello! I just want to give you a huge thumbs up for the great info you have right here on this post. I am coming back to your blog for more soon.
Good day! I just wish to give you a huge thumbs up for the excellent information you have right here on this post. I will be returning to your blog for more soon.
http://nolvadexbestprice.pro/# tamoxifen hair loss
There’s certainly a great deal to find out about this subject. I love all of the points you’ve made.
tamoxifen joint pain: tamoxifen medication – common side effects of tamoxifen
Everything is very open with a very clear explanation of the challenges. It was definitely informative. Your site is very helpful. Thanks for sharing.
Great article. I am dealing with some of these issues as well..
Can I simply just say what a relief to find somebody who truly knows what they’re discussing on the internet. You actually know how to bring a problem to light and make it important. More people really need to read this and understand this side of your story. I was surprised that you’re not more popular given that you certainly have the gift.
cost of cheap propecia without dr prescription: get cheap propecia – order cheap propecia without insurance
zithromax 250: zithromax buy online no prescription – where to get zithromax
http://cytotecbestprice.pro/# buy cytotec online
After I originally left a comment I appear to have clicked the -Notify me when new comments are added- checkbox and now every time a comment is added I receive 4 emails with the same comment. Perhaps there is an easy method you can remove me from that service? Thank you.
propecia pill: buy cheap propecia pills – order cheap propecia pills
Greetings! Very useful advice in this particular article! It is the little changes that will make the biggest changes. Thanks for sharing!
where can i buy prednisone: prednisone acetate – prednisone 10mg price in india
After exploring a number of the blog posts on your blog, I truly like your technique of writing a blog. I added it to my bookmark site list and will be checking back in the near future. Take a look at my website as well and tell me your opinion.
May I simply say what a comfort to discover an individual who truly understands what they are talking about online. You definitely know how to bring an issue to light and make it important. More people should look at this and understand this side of your story. It’s surprising you’re not more popular given that you certainly possess the gift.
farmacie online affidabili: super kamagra – Farmacia online piГ№ conveniente
I blog often and I really appreciate your content. Your article has really peaked my interest. I’m going to take a note of your site and keep checking for new information about once a week. I opted in for your RSS feed too.
pillole per erezione immediata: viagra online siti sicuri – siti sicuri per comprare viagra online
An impressive share! I have just forwarded this onto a co-worker who had been doing a little research on this. And he actually bought me dinner because I found it for him… lol. So let me reword this…. Thank YOU for the meal!! But yeah, thanks for spending the time to discuss this subject here on your web page.
farmaci senza ricetta elenco: Avanafil 50 mg – farmaci senza ricetta elenco
comprare farmaci online all’estero: Avanafil prezzo – acquistare farmaci senza ricetta
http://kamagrait.pro/# Farmacia online piГ№ conveniente
farmacie online autorizzate elenco: Farmacie online sicure – п»їFarmacia online migliore
This website was… how do I say it? Relevant!! Finally I have found something which helped me. Thanks!
acquistare farmaci senza ricetta: kamagra gel – acquisto farmaci con ricetta
I’m amazed, I have to admit. Seldom do I encounter a blog that’s both educative and amusing, and without a doubt, you’ve hit the nail on the head. The issue is something that too few men and women are speaking intelligently about. I’m very happy that I came across this during my search for something concerning this.
top farmacia online: Cialis generico controindicazioni – farmacia online
I’m impressed, I have to admit. Rarely do I encounter a blog that’s equally educative and amusing, and without a doubt, you’ve hit the nail on the head. The problem is something that too few folks are speaking intelligently about. I’m very happy I found this during my hunt for something regarding this.
farmaci senza ricetta elenco: Avanafil compresse – comprare farmaci online con ricetta
http://kamagrait.pro/# top farmacia online
I’m amazed, I have to admit. Rarely do I encounter a blog that’s equally educative and entertaining, and let me tell you, you’ve hit the nail on the head. The problem is something which not enough men and women are speaking intelligently about. I am very happy I stumbled across this in my search for something concerning this.
farmacia online: kamagra gel – farmacie online sicure
viagra naturale: viagra farmacia – viagra prezzo farmacia 2023
I quite like reading an article that can make men and women think. Also, many thanks for permitting me to comment.
comprare farmaci online con ricetta: super kamagra – Farmacie online sicure
https://avanafil.pro/# comprare farmaci online all’estero
cialis tadalafil 20mg: cialis brand no prescription needed – cialis online from canada
bookmarked!!, I like your blog.
cialis prices at walmart: cheapest tadalafil – cialis overnight delivery
I needed to thank you for this fantastic read!! I certainly loved every little bit of it. I have got you saved as a favorite to look at new stuff you post…
You ought to be a part of a contest for one of the highest quality websites on the web. I am going to recommend this site!
when will generic cialis be available in the usa: Generic Cialis without a doctor prescription – viagra cialis samples
https://tadalafil.auction/# generic cialis dapoxetine
viagra for women: Cheap Viagra 100mg – viagra for women
Way cool! Some extremely valid points! I appreciate you writing this article and the rest of the site is also very good.
indian pharmacy paypal: Online pharmacy USA – best india pharmacy
http://edpillpharmacy.store/# best online ed medication
online ed medications
top online pharmacy india: Indian pharmacy international shipping – indian pharmacy
https://indiapharmacy.shop/# top 10 pharmacies in india
buying erectile dysfunction pills online
Excellent post! We are linking to this particularly great content on our site. Keep up the good writing.
ed pills: online ed prescription same-day – cheap erectile dysfunction pills
https://indiapharmacy.shop/# top 10 pharmacies in india
ed pills
Online medicine home delivery: Online pharmacy USA – top online pharmacy india
Pretty! This was a really wonderful article. Thank you for supplying this information.
erectile dysfunction online: ed pills online – buy ed pills online
http://mexicopharmacy.win/# mexico pharmacies prescription drugs
Greetings! Very helpful advice in this particular article! It’s the little changes that produce the greatest changes. Thanks a lot for sharing!
buy prescription drugs from india: Online India pharmacy – indian pharmacy online
Hello there! I could have sworn I’ve been to this web site before but after looking at many of the articles I realized it’s new to me. Nonetheless, I’m certainly happy I stumbled upon it and I’ll be book-marking it and checking back often!
mexican mail order pharmacies: Best online Mexican pharmacy – mexico drug stores pharmacies
buying prescription drugs in mexico: Medicines Mexico – mexico drug stores pharmacies
https://indiapharmacy.shop/# п»їlegitimate online pharmacies india
how to get ed pills: ed pills online – how to get ed meds online
This blog was… how do you say it? Relevant!! Finally I’ve found something which helped me. Many thanks.
best ed pills online: Cheapest online ED treatment – best online ed pills
http://mexicopharmacy.win/# buying prescription drugs in mexico
This is a topic that is close to my heart… Thank you! Where are your contact details though?
You are so interesting! I do not suppose I have read a single thing like this before. So nice to find somebody with some unique thoughts on this subject. Really.. thanks for starting this up. This site is one thing that is needed on the web, someone with some originality.
п»їlegitimate online pharmacies india: Top mail order pharmacies – п»їlegitimate online pharmacies india
https://indiapharmacy.shop/# online pharmacy india
An impressive share! I have just forwarded this onto a friend who was doing a little homework on this. And he actually bought me breakfast due to the fact that I stumbled upon it for him… lol. So let me reword this…. Thank YOU for the meal!! But yeah, thanks for spending some time to discuss this issue here on your web site.
online ed medications: ed pills online – cheapest ed medication
You’re so cool! I don’t think I’ve truly read something like that before. So nice to find another person with some unique thoughts on this subject matter. Really.. thank you for starting this up. This web site is something that is needed on the internet, someone with a bit of originality.
reputable indian online pharmacy: Cheapest online pharmacy – reputable indian online pharmacy
Great blog you have here.. It’s difficult to find quality writing like yours nowadays. I seriously appreciate people like you! Take care!!
http://mexicopharmacy.win/# mexican rx online
buy ed meds online: Best ED meds online – low cost ed medication
Great info. Lucky me I discovered your site by chance (stumbleupon). I have book-marked it for later.
http://mexicopharmacy.win/# buying prescription drugs in mexico
indian pharmacies safe: Online pharmacy – indianpharmacy com
Way cool! Some extremely valid points! I appreciate you writing this article and also the rest of the website is also very good.
mexico drug stores pharmacies: Certified Mexican pharmacy – mexican border pharmacies shipping to usa
You need to take part in a contest for one of the highest quality blogs on the internet. I’m going to highly recommend this website!
cheap ed pills: online ed prescription same-day – ed medications online
This excellent website really has all the information and facts I wanted concerning this subject and didn’t know who to ask.
india pharmacy: Online pharmacy – buy prescription drugs from india
Can I simply say what a comfort to uncover a person that actually understands what they’re talking about over the internet. You definitely realize how to bring an issue to light and make it important. More people should read this and understand this side of the story. I can’t believe you are not more popular since you certainly possess the gift.
buy erectile dysfunction treatment: Best ED meds online – get ed meds online
This is a very good tip particularly to those fresh to the blogosphere. Simple but very precise info… Thank you for sharing this one. A must read post!
Built and maintained by @jeremyikwuje ⚡ and @onionsman BTC vs NGN (Bitcoin to Nigerian Naira) exchange rate history chart. You can choose the period from 7 days up to 1 year. We use accurate data from authoritative 3rd party services Bring together all your wallets with MoonPay, so you can always see how your portfolio is doing. And if you don’t have a wallet yet, we can help with that too. If you want to sale ur Bitcoin in good rate,we buy with your rate, if you trade up to $1000 we give you bonus of 41,000k dm me on WhatsApp only +14705750751 Simply type in the box how much you want to convert. Bitcoin halving events are predetermined and built into the Bitcoin protocol. The halvings happen every four years until the maximum supply of 21 million Bitcoins is reached, estimated at around 2140. After every halving, the number of new Bitcoins created and rewarded to miners for adding blocks to the blockchain is reduced by 50%. The first Bitcoin halving occurred on November 28th, 2012, at block number 210,000, when the block reward was reduced from 50 BTC to 25 BTC.
https://e-directory2u.com/listings12799368/buy-tether
And yet even after innumerable crypto scandals and lawsuits, the prices of bitcoin, ethereum, and other major currencies never fell below late-2020 levels. They had been steadily regaining their value long before the recent super-spike. The fact that no one can agree on what crypto is even for hasn’t kept the market capitalization of all cryptocurrencies from surpassing $2.5 trillion. Indeed, its utter pointlessness may have even helped. The lack of consensus about crypto’s purpose might be the very reason it never dies. Add scrips to your watchlist with a single tap That’s not to say that a halving won’t raise the price of Bitcoin. A halving may highlight the falling rate of issuance of Bitcoin, drawing more money to the sector as traders anticipate a change in sentiment in the market and expect a run-up in the crypto’s price. But the key driver is more money moving to the sector, not a fundamental change to the value of Bitcoin itself.
Aw, this was an incredibly good post. Spending some time and actual effort to generate a superb article… but what can I say… I hesitate a whole lot and never manage to get anything done.
I enjoy looking through an article that will make men and women think. Also, thanks for allowing for me to comment.
furosemida 40 mg: furosemide online – buy lasix online
ATLANTIC CITY, N.J. (AP) — The Mohegan tribe will end its management of Atlantic City’s Resorts casino at the end of this year, both parties said Monday. ATLANTIC CITY, N.J. (AP) — The Mohegan tribe will end its management of Atlantic City’s Resorts casino at the end of this year, both parties said Monday. ATLANTIC CITY, N.J. (AP) — The Mohegan tribe will end its management of Atlantic City’s Resorts casino at the end of this year, both parties said Monday. Mohegan’s successful operation of casinos in markets including Connecticut and Pennsylvania made it attractive to Resorts, which in 1978 became the first casino in the United States to open outside Nevada. In addition to Connecticut and Pennsylvania, Mohegan operates casinos in Washington and Nevada; Niagara Falls, Canada, and Inchon, South Korea. It also owns the Connecticut Sun WNBA team.
http://133.43.47.10/mikado/wiki/index.php?targingkotdu1971
The World’s 50 Best Restaurants nos premia como uno de los Mejores Restaurantes del Mundo Find the top Canadian online casinos We will help you make the most out of your bet! Here, we review the best $10 deposit casinos and show you which bonuses and games to focus on when you have a smaller bankroll. Keep reading and enjoy the ride! Typically, you can expect welcome bonuses, such as free spins or match deposits, when joining a no min deposit casino. Regular players may also receive loyalty bonuses and cashback offers. No deposit offers are also frequent among these websites. Online casinos with no minimum deposit are online gambling platforms that allow players to deposit without being required to meet a minimum deposit threshold. This means that players can deposit any amount they want, no matter how small, and still be able to play their favorite casino games.
cytotec buy online usa http://furosemide.win/# lasix generic
buy lasix online
Hi there! This post couldn’t be written any better! Reading through this post reminds me of my previous roommate! He always kept preaching about this. I’ll forward this post to him. Pretty sure he will have a great read. Thanks for sharing!
furosemide 100mg: furosemide online – lasix generic
https://tamoxifen.bid/# tamoxifen 20 mg tablet
lasix pills: cheap lasix – lasix generic
cytotec buy online usa http://cytotec.pro/# buy cytotec in usa
lasix furosemide 40 mg
cost of tamoxifen buy tamoxifen citrate tamoxifen and bone density
https://lipitor.guru/# cost of lipitor 20 mg
buy cytotec online https://furosemide.win/# lasix
lasix tablet
lisinopril 90 pills cost: buy lisinopril – lisinopril 5 mg medicine
https://furosemide.win/# furosemide 40 mg
femara vs tamoxifen: nolvadex gynecomastia – tamoxifen and depression
cytotec buy online usa https://tamoxifen.bid/# buy tamoxifen
lasix side effects
tamoxifen dosage: buy tamoxifen citrate – tamoxifen medication
https://lipitor.guru/# lipitor india generic
Nice post. I learn something new and challenging on sites I stumbleupon everyday. It will always be helpful to read through content from other authors and practice a little something from their websites.
cytotec buy online usa https://lipitor.guru/# lipitor canada price
buy furosemide online
lasix side effects: lasix medication – generic lasix
buy cytotec over the counter: cytotec best price – п»їcytotec pills online
https://furosemide.win/# lasix furosemide
purchase cytotec https://lipitor.guru/# lipitor 10mg tablet price
lasix 100mg
furosemide 100 mg: cheap lasix – buy furosemide online
Hi there! This blog post could not be written any better! Reading through this post reminds me of my previous roommate! He constantly kept talking about this. I’ll forward this post to him. Fairly certain he’s going to have a good read. Thank you for sharing!
furosemide 100 mg: cheap lasix – lasix for sale
This site was… how do I say it? Relevant!! Finally I have found something that helped me. Many thanks!
cytotec pills buy online https://furosemide.win/# lasix 100 mg
lasix for sale
buy lasix online: furosemide online – lasix dosage
lasix 40mg: furosemide 100 mg – lasix 100 mg
buy cytotec online fast delivery https://furosemide.win/# furosemide
lasix 100mg
That is a very good tip particularly to those new to the blogosphere. Brief but very precise information… Many thanks for sharing this one. A must read article.
buy misoprostol over the counter: cytotec best price – buy cytotec
Aw, this was an exceptionally nice post. Taking the time and actual effort to produce a great article… but what can I say… I procrastinate a whole lot and never seem to get anything done.
zestril discount: buy lisinopril – how much is lisinopril 10 mg
buy cytotec online https://cytotec.pro/# buy cytotec in usa
generic lasix
buy cytotec: buy misoprostol tablet – buy cytotec online fast delivery
Misoprostol 200 mg buy online http://cytotec.pro/# buy cytotec in usa
furosemide
An impressive share! I have just forwarded this onto a colleague who had been doing a little homework on this. And he actually bought me dinner because I stumbled upon it for him… lol. So let me reword this…. Thanks for the meal!! But yeah, thanx for spending some time to talk about this issue here on your web page.
pharmacies in mexico that ship to usa: mexican pharmaceuticals online – mexican pharmaceuticals online
You’ve made some really good points there. I looked on the net to learn more about the issue and found most people will go along with your views on this web site.
http://easyrxcanada.com/# canadianpharmacymeds
top 10 online pharmacy in india world pharmacy india indian pharmacy
http://easyrxindia.com/# online pharmacy india
I used to be able to find good info from your blog posts.
https://mexstarpharma.online/# buying from online mexican pharmacy
canadian neighbor pharmacy canadian drugs canadian pharmacy online
http://mexstarpharma.com/# mexico drug stores pharmacies
purple pharmacy mexico price list: п»їbest mexican online pharmacies – mexico drug stores pharmacies
http://mexstarpharma.com/# mexico drug stores pharmacies
cheapest online pharmacy india indian pharmacies safe buy prescription drugs from india
buying prescription drugs in mexico online: mexican drugstore online – mexican border pharmacies shipping to usa
https://easyrxindia.shop/# top 10 pharmacies in india
https://easyrxcanada.online/# my canadian pharmacy review
canadian valley pharmacy: pharmacy in canada – buy canadian drugs
en iyi slot siteleri 2024: slot oyunlar? siteleri – en iyi slot siteler
This page really has all of the information I wanted concerning this subject and didn’t know who to ask.
yasal slot siteleri: deneme veren slot siteleri – slot oyun siteleri
https://sweetbonanza.network/# sweet bonanza guncel
guvenilir slot siteleri 2024: slot siteleri bonus veren – 2024 en iyi slot siteleri
Hi! I could have sworn I’ve been to your blog before but after going through some of the articles I realized it’s new to me. Anyways, I’m definitely delighted I discovered it and I’ll be book-marking it and checking back often!
Can you be more specific about the content of your article? After reading it, I still have some doubts. Hope you can help me. https://accounts.binance.com/bn/register-person?ref=UM6SMJM3
This is a topic that’s close to my heart… Take care! Where are your contact details though?
https://denemebonusuverensiteler.win/# deneme bonusu veren siteler
en iyi slot siteleri 2024: slot siteleri – yeni slot siteleri
Next time I read a blog, I hope that it doesn’t fail me just as much as this one. After all, Yes, it was my choice to read, however I really thought you would have something interesting to say. All I hear is a bunch of complaining about something you can fix if you weren’t too busy searching for attention.
guvenilir slot siteleri 2024: bonus veren slot siteleri – slot oyun siteleri
https://slotsiteleri.bid/# slot siteleri bonus veren
slot oyunlar? siteleri: slot siteleri bonus veren – slot kumar siteleri
After looking at a handful of the articles on your blog, I truly like your way of writing a blog. I saved as a favorite it to my bookmark site list and will be checking back soon. Please visit my web site as well and tell me what you think.
http://denemebonusuverensiteler.win/# deneme bonusu veren siteler
slot kumar siteleri: slot oyun siteleri – slot siteleri 2024
bonus veren slot siteleri: slot oyunlar? siteleri – en iyi slot siteleri
vavada online casino: vavada casino – vavada казино
пин ап казино: пин ап – pin up casino
Of course, what a fantastic site and illuminating posts, I surely will bookmark your website.Have an awsome day!
https://1win.directory/# 1win
1win зеркало: 1win вход – 1win официальный сайт
пинап казино pin up пин ап казино вход
pin up казино: пин ап казино – пинап казино
1xbet официальный сайт: 1хбет зеркало – 1xbet зеркало
https://1xbet.contact/# 1xbet скачать
1win официальный сайт: 1вин зеркало – 1вин зеркало
I’m impressed, I have to admit. Rarely do I come across a blog that’s both equally educative and engaging, and let me tell you, you have hit the nail on the head. The problem is something too few people are speaking intelligently about. I’m very happy that I found this in my search for something regarding this.
https://1win.directory/# 1win официальный сайт
1xbet официальный сайт мобильная версия: 1xbet скачать – 1хбет официальный сайт
1вин зеркало: 1вин сайт – 1вин официальный сайт
http://1win.directory/# 1win официальный сайт
This is a very good tip particularly to those new to the blogosphere. Simple but very accurate information… Appreciate your sharing this one. A must read article.
https://drstore24.com/# rx pharmacy coupons reviews
viagra asda pharmacy
Pri online tipovaní je už samozrejmosťou, že viete získať rôzne zaujímavé vstupné bonusy, ale aj finančné a nefinančné výhody počas tipovania. Stávkové kancelárie pomerne bežne odmeňujú tipérov a klientov za vernosť a Tipsport si na tom dáva záležať. Zaregistrujte sa ešte dnes, dostanete 15 EUR zadarmo na prvé stávky, dres slovenskej hokejovej reprezentácie a vstupný bonus až 4 000 EUR! © 2020 – 2022 SportZoo, s. r. o., Mapa stránky, RSS, Cookies, prenájom e-shopu Upgates Nadmerné hranie prináša so sebou možné zdravotné riziká. Tipsport je dlhodobo overená a spoľahlivá stávková kancelária. V Tipsporte si môžete staviť nielen na športové udalosti, ale aj nešportové udalosti, napr. politika. Súčasťou kurzovej ponuky Tipsportu sú aj obľúbene LIVE stávky. Táto stávková kancelária má platnú slovenskú licenciu od URHH, a preto je možné legálne a bez pochybností uzatvárať stávky, aj za vyššie vklady.
https://grpz.copiny.com/question/details/id/872933
✩ 0.0 · v1 Vedeli ste, že navštívite Monte Carlo a urobíte všetko, čo budete potrebovať? É possível escolher entre roleta americana ou europeia and competir com adversários virtuais ou pessoas que estejam and jogar ao mesmo tempo de forma online. Jeho súčasťou je niekoľko virtuálnych, hudobných a rozmanitých možností. Ahoj…ak nezvýšiš tú RAMku,tak tam to XP môže zostať. Mám doma jeden taký črepník a používam ho bez internetu na písanie dokumentov a prezentácii,vo VLC prehrámhudbu, z kľúča DviXové filmy a hlavne nedám dopustiť na staré hry. Mám to bez antiviru a frčí to ako blesk. Ako spomenuli kolegovia…ak otvoríš nejakú internetovú stránku,celé to zamrzne.Linux dokže všeličo ale tiež nie je zázračný. Ak teda budeš uvažovať o tej RAMke tak aspoň teda to vyšvihni na 1024 aby to mohlo celé dýchať.Potom to pôjde jak raketa.
ed meds online without doctor prescription: israel pharmacy online – provigil mexican pharmacy
Hi, I do think this is an excellent web site. I stumbledupon it 😉 I’m going to revisit once again since i have book marked it. Money and freedom is the greatest way to change, may you be rich and continue to guide other people.
https://drstore24.com/# baclofen online pharmacy
alliance rx pharmacy
Hey there! I’m Charles, your guide to earning money in your sleep– well, nearly. Invite to the 1K a Day System, where we turn your digital dreams into cold difficult money. Are you prepared to stop scrolling and begin earning? Let’s ditch those cent methods and prepare for some severe bank. Join us, and let’s hit those $1K days together!
kmart store pharmacy: safest online pharmacy – online pharmacies that use paypal
lexapro coupons pharmacy: warfarin pharmacy protocol – online pharmacy viagra
https://onlineph24.com/# pharmacy mistake methotrexate
zanax online pharmacy
Hello! I’m Charles. If you’re stuck in a financial Groundhog Day, repeating the very same struggles, let’s break the cycle. The 1K a Day System is your method out, leading you to new early mornings of prosperity and potential. Get up to something fantastic!
Glucophage: lipitor pharmacy card – rxpharmacycoupons
pharmacy india cialis: medical pharmacies – the people’s pharmacy wellbutrin
call in percocet to pharmacy: wegmans pharmacy online – viagra tesco pharmacy
Hey there! Just felt like saying hello to let you know how much I appreciate your blog. Your insights on making money online are genuinely remarkable. Making money from home has never been more achievable thanks to affiliate promotion. It’s all about identifying the perfect products to promote and building connections with your audience. Your blog is a goldmine trove of information for up-and-coming affiliate marketers. Keep on the fantastic work!
online pharmacy no prescription ultram: does rx pharmacy coupons work – tricare pharmacy online
clomid online pharmacy uk: erectile dysfunction causes – online pharmacy price checker
prozac mexican pharmacy: nexium uk pharmacy – indian online pharmacy
online pharmacy loratadine: auto rx pharmacy – cytotec online pharmacy
Hey there! Just felt like dropping by to show my admiration for your amazing blog. Your insights on affiliate marketing are truly inspiring. Making money from home has never been more achievable with affiliate marketing. It’s all about leveraging your online presence and promoting products or services that resonate with your audience. Your blog is a valuable resource for anyone curious about affiliate marketing. Keep on the excellent work!
п»їbest mexican online pharmacies buying from online mexican pharmacy mexican rx online
cheapest online pharmacy india: indianpharmacy com – reputable indian pharmacies
india online pharmacy: top 10 online pharmacy in india – Online medicine home delivery
Everything is very open with a really clear clarification of the challenges. It was definitely informative. Your site is very useful. Many thanks for sharing!
http://indianpharmacy.company/# top online pharmacy india
mexico drug stores pharmacies: mexico drug stores pharmacies – reputable mexican pharmacies online
pharmacy website india: indian pharmacy online – buy medicines online in india
mexican mail order pharmacies mexico pharmacies prescription drugs mexican pharmaceuticals online
Hello there! Just stopping in to commend your excellent blog. Your knowledge on affiliate marketing are really impressive. Earning an income from home has never been more accessible thanks to affiliate promotion. It’s all about leveraging your internet presence and marketing goods or services that resonate with your audience. Your blog is a valuable resource for anyone exploring affiliate marketing. Keep on the excellent work!
mexican drugstore online: mexican drugstore online – mexican online pharmacies prescription drugs
buying from online mexican pharmacy: mexican pharmaceuticals online – pharmacies in mexico that ship to usa
https://indianpharmacy.company/# indian pharmacy paypal
mexican online pharmacies prescription drugs mexican online pharmacies prescription drugs mexican mail order pharmacies
publix pharmacy cipro: magellan rx pharmacy help desk – legit pharmacy websites
india pharmacy: indian pharmacy paypal – top 10 online pharmacy in india
target pharmacy bupropion best rx pharmacy port charlotte fl buy viagra tesco pharmacy
Oh my goodness! Awesome article dude! Thanks, However I am encountering issues with your RSS. I don’t know why I can’t subscribe to it. Is there anybody else having similar RSS problems? Anybody who knows the solution can you kindly respond? Thanks!!
https://mexicopharmacy.cheap/# mexico pharmacies prescription drugs
mail order pharmacy india: online shopping pharmacy india – india online pharmacy
top online pharmacy india best online pharmacy india buy prescription drugs from india
buying prescription drugs in mexico online: mexico pharmacies prescription drugs – buying prescription drugs in mexico
india online pharmacy: world pharmacy india – top 10 online pharmacy in india
http://pharmbig24.com/# rite aid pharmacy store locator
top 10 online pharmacy in india buy prescription drugs from india indian pharmacies safe
mexico drug stores pharmacies: mexico drug stores pharmacies – buying from online mexican pharmacy
top 10 online pharmacy in india: india pharmacy mail order – pharmacy website india
http://mexicopharmacy.cheap/# medicine in mexico pharmacies
top online pharmacy india indian pharmacies safe reputable indian pharmacies
adipex pharmacy card: india pharmacy adipex – shopko online pharmacy
Hello, Neat post. There is an issue along with your web site in internet explorer, could check this?K IE nonetheless is the marketplace chief and a huge portion of folks will omit your excellent writing because of this problem.
Appreciate it for all your efforts that you have put in this. very interesting information.
mexican border pharmacies shipping to usa: mexican mail order pharmacies – mexican border pharmacies shipping to usa
india pharmacy mail order india pharmacy mail order online shopping pharmacy india
Excellent beat ! I wish to apprentice while you amend your web site, how could i subscribe for a blog site? The account helped me a acceptable deal. I had been a little bit acquainted of this your broadcast provided bright clear idea
pharmacy artane roundabout: pharmacy selling cytotec – online pharmacy uk tadalafil
https://mexicopharmacy.cheap/# purple pharmacy mexico price list
purple pharmacy mexico price list mexican mail order pharmacies mexico pharmacies prescription drugs
top 10 online pharmacy in india: online shopping pharmacy india – top 10 online pharmacy in india
You ought to be a part of a contest for one of the greatest sites on the net. I will recommend this website!
buying from online mexican pharmacy: medicine in mexico pharmacies – mexico pharmacies prescription drugs
I’ve recently started a site, the information you offer on this web site has helped me tremendously. Thank you for all of your time & work.
http://mexicopharmacy.cheap/# reputable mexican pharmacies online
best india pharmacy online shopping pharmacy india top online pharmacy india
medicine in mexico pharmacies: mexican online pharmacies prescription drugs – reputable mexican pharmacies online
Right here is the right website for everyone who would like to find out about this topic. You realize a whole lot its almost hard to argue with you (not that I really will need to…HaHa). You certainly put a fresh spin on a topic that’s been written about for many years. Wonderful stuff, just great.
online pharmacy neurontin: can you buy viagra at the pharmacy – unicare pharmacy artane castle opening hours
indian pharmacy Online medicine order top online pharmacy india
legitimate viagra pharmacy: online pharmacy prozac no prescription – viagra cost at pharmacy
https://pharmbig24.com/# online no prescription pharmacy
synthroid pharmacy online: usa pharmacy online – donepezil online pharmacy
india online pharmacy buy prescription drugs from india online shopping pharmacy india
indian pharmacies safe: buy medicines online in india – online shopping pharmacy india
reputable mexican pharmacies online mexico pharmacies prescription drugs reputable mexican pharmacies online
I am not saying there will be no more big budget games in the future, but they will be a welcome rarity. Much like they used to be before Microsoft lost the plot with their Xbox 360 strategy. Hi! I have recently signed up for the Microsoft Developer program and it cost me 20 bucks lol. How can I acquire the GDK and implement it with the Unreal Engine? Because I need to test my game and run it on Xbox as well and hopefully publish it in the future. .NET is a developer platform made up of tools, programming languages, and libraries for building many different types of applications, including games. This practice created the lions share of the problem. No wonder the game is riddled with bugs, questionable design choices and optimization issues. Its the fast food model of game development. Order a product from the lowest paid and most uncommitted work force, and then wonder why its continuously getting lambasted by darn near everyone.
https://pkpxmyhcliquidwebsites.com/doubleu-casino-7-million-chips-free-chips-today
This deposit bonus from Joo Casino awards players with bonus funds worth 50% of their deposit, up to A$3,000. Aside from that, this bonus also comes with 50 free spins on selected games. This welcome bonus is only available to newly registered players who create their casino account and deposit money into it. Joo Casino (operating under joocasino) is another online venue operated and owned by Dama N.V. The company operates under the gambling laws Curaçao as it is registered at Julianaplein 36, Willemstad, Curaçao with the registration number 152125. Friolion Limited is a subsidiary of Dama N.V., it helps with all casino-related issues. Friolion Limited is registered at address Leandrou, 12A 3086, Limassol, Сyprus with the registration number HE 419102. Dama N.V. holds license no. 8048 JAZ2020-013 issued by Antillephone N.V.
casibom 158 giris casibom giris casibom guncel
betine guncel betine com guncel giris betine promosyon kodu
http://betine.online/# betine promosyon kodu 2024
casibom guncel giris adresi casibom guncel giris casibom guncel giris
gate of olympus oyna gates of olympus oyna gates of olympus demo turkce oyna
https://gatesofolympusoyna.online/# gates of olympus demo oyna
gates of olympus giris gates of olympus slot gates of olympus giris
https://casibom.auction/# casibom giris
https://tadalafilo.bid/# farmacia online envГo gratis
п»їfarmacia online espaГ±a: farmacia online envio gratis – farmacias online seguras
п»їfarmacia online espaГ±a: farmacia online internacional – farmacias direct
Wonderful post! We are linking to this particularly great article on our website. Keep up the great writing.
farmacia online barata farmacia 24 horas farmacia online espaГ±a envГo internacional
http://tadalafilo.bid/# farmacias online seguras en espaГ±a
http://farmaciaeu.com/# farmacia en casa online descuento
farmacia barata
After going over a handful of the articles on your web page, I honestly appreciate your way of blogging. I bookmarked it to my bookmark webpage list and will be checking back soon. Please visit my website as well and let me know how you feel.
farmacia online envГo gratis: Precio Cialis 20 Mg – farmacia barata
sildenafilo sandoz 100 mg precio sildenafilo se puede comprar viagra sin receta
http://tadalafilo.bid/# farmacias online seguras
п»їfarmacia online espaГ±a: mejores farmacias online – farmacias online baratas
Great information. Lucky me I discovered your website by accident (stumbleupon). I’ve saved it for later!
http://farmaciaeu.com/# п»їfarmacia online espaГ±a
farmacia online barata
https://farmaciaeu.com/# farmacia en casa online descuento
viagra 100 mg precio en farmacias: comprar viagra contrareembolso 48 horas – comprar viagra en espaГ±a envio urgente contrareembolso
http://farmaciaeu.com/# п»їfarmacia online espaГ±a
farmacias online baratas: farmacia online barata y fiable – farmacias online seguras
https://farmaciaeu.com/# farmacia barata
farmacias online seguras
comprar viagra contrareembolso 48 horas: comprar viagra – comprar viagra contrareembolso 48 horas
Bongdalu cập nhật tin tức bóng đá nóng hổi, thể thao sôi động và giải trí hấp dẫn
bookmarked!!, I love your site.
Rồng Bạch Kim – Soi cầu lô chính xác miễn phí chính xác số #1 2024
migliori farmacie online 2024 Tadalafil generico migliore Farmacie online sicure
acquisto farmaci con ricetta: farmacia online migliore – comprare farmaci online con ricetta
https://sildenafilit.pro/# viagra online spedizione gratuita
Farmacia online miglior prezzo
farmacie online autorizzate elenco Cialis generico farmacia farmacie online autorizzate elenco
Farmacia online miglior prezzo Cialis generico prezzo Farmacia online piГ№ conveniente
Everything is very open with a precise explanation of the challenges. It was really informative. Your site is very helpful. Thank you for sharing.
migliori farmacie online 2024: Farmacia online migliore – acquistare farmaci senza ricetta
farmacie online autorizzate elenco Cialis generico recensioni farmaci senza ricetta elenco
viagra 50 mg prezzo in farmacia viagra senza ricetta viagra consegna in 24 ore pagamento alla consegna
http://tadalafilit.com/# Farmacia online miglior prezzo
migliori farmacie online 2024
Motchilltv.fyi – Trang web xem phim Online chất lượng Full HD với giao diện thân thiện, trực quan cùng kho phim với hơn 15.000+ bộ phim mới và phim hot hiện nay.
acquistare farmaci senza ricetta: Farmacie on line spedizione gratuita – Farmacie online sicure
Bongdalu cập nhật tin tức bóng đá nóng hổi, thể thao sôi động và giải trí hấp dẫn.
PP Pipes in Iraq Elite Pipe Factory in Iraq specializes in the production of PP pipes, which are known for their excellent chemical resistance, high impact strength, and thermal stability. Our PP pipes are designed to meet stringent quality standards, making them a reliable choice for industrial and commercial applications. As one of the best and most reliable pipe manufacturers in Iraq, Elite Pipe Factory ensures that our PP pipes deliver superior performance and durability. Explore our range of PP pipes by visiting elitepipeiraq.com.
migliori farmacie online 2024 Cialis generico controindicazioni acquistare farmaci senza ricetta
viagra generico prezzo piГ№ basso viagra generico viagra naturale in farmacia senza ricetta
comprare farmaci online con ricetta: Cialis generico farmacia – farmacie online affidabili
http://tadalafilit.com/# Farmacie online sicure
farmaci senza ricetta elenco
Excellent blog you have here.. It’s hard to find excellent writing like yours nowadays. I really appreciate people like you! Take care!!
Way cool! Some extremely valid points! I appreciate you penning this article plus the rest of the site is also really good.
п»їFarmacia online migliore Brufen 600 prezzo con ricetta top farmacia online
migliori farmacie online 2024 Cialis generico recensioni acquisto farmaci con ricetta
This is a topic which is near to my heart… Best wishes! Where can I find the contact details for questions?
Farmacia online piГ№ conveniente: farmacia online migliore – farmacie online affidabili
This is the right site for anybody who hopes to find out about this topic. You realize a whole lot its almost tough to argue with you (not that I personally will need to…HaHa). You definitely put a new spin on a topic that’s been discussed for a long time. Great stuff, just wonderful.
https://sildenafilit.pro/# dove acquistare viagra in modo sicuro
farmaci senza ricetta elenco
acquistare farmaci senza ricetta farmacia online senza ricetta top farmacia online
pillole per erezioni fortissime viagra senza ricetta viagra online spedizione gratuita
acquisto farmaci con ricetta: Cialis generico recensioni – farmacia online piГ№ conveniente
I want to to thank you for this fantastic read!! I certainly loved every bit of it. I have you saved as a favorite to look at new things you post…
Everything is very open with a really clear explanation of the issues. It was definitely informative. Your website is useful. Thank you for sharing.
https://sildenafilit.pro/# viagra originale recensioni
farmacie online affidabili
Farmacia online miglior prezzo farmacia online farmacie online affidabili
comprare farmaci online all’estero: Brufen 600 prezzo – top farmacia online
farmacie online affidabili Ibuprofene 600 prezzo senza ricetta comprare farmaci online all’estero
farmacia senza ricetta recensioni: acquisto viagra – alternativa al viagra senza ricetta in farmacia
Wonderful post! We will be linking to this great article on our site. Keep up the great writing.
Spot on with this write-up, I honestly feel this site needs a great deal more attention. I’ll probably be returning to read through more, thanks for the advice.
Farmacie online sicure Farmacia online piu conveniente farmacie online autorizzate elenco
farmacie online autorizzate elenco farmacia online migliore Farmacia online piГ№ conveniente
http://farmaciait.men/# farmacia online
farmacia online
cialis farmacia senza ricetta: acquisto viagra – dove acquistare viagra in modo sicuro
farmacia online piГ№ conveniente: Farmacie che vendono Cialis senza ricetta – п»їFarmacia online migliore
A motivating discussion is worth comment. There’s no doubt that that you should publish more on this topic, it might not be a taboo subject but typically people don’t speak about these issues. To the next! All the best.
cerco viagra a buon prezzo viagra senza prescrizione miglior sito per comprare viagra online
le migliori pillole per l’erezione viagra miglior sito per comprare viagra online
https://farmaciait.men/# farmacie online sicure
Farmacie online sicure
acquistare farmaci senza ricetta: Ibuprofene 600 generico prezzo – farmacia online senza ricetta
average cost of prednisone prednisone prednisone prices
This excellent website really has all of the info I wanted concerning this subject and didn’t know who to ask.
Buy compounded semaglutide online: rybelsus generic – semaglutide
furosemida: cheap lasix – furosemide
https://rybelsus.tech/# rybelsus
This web site really has all of the info I wanted about this subject and didn’t know who to ask.
ventolin uk price Buy Ventolin inhaler online ventolin 95mcg
Buy compounded semaglutide online: Buy semaglutide pills – rybelsus cost
buy ventolin: Ventolin inhaler price – buy ventolin online uk
http://furosemide.men/# furosemide 100mg
ventolin mexico: Buy Ventolin inhaler online – ventolin canadian pharmacy
where to buy ventolin singapore: Ventolin inhaler best price – ventolin spray
I needed to thank you for this fantastic read!! I definitely loved every little bit of it. I have got you saved as a favorite to look at new things you post…
furosemide: cheap lasix – lasix side effects
I blog quite often and I truly thank you for your information. The article has really peaked my interest. I am going to take a note of your website and keep checking for new details about once per week. I opted in for your RSS feed as well.
lasix 100mg: furosemide online – lasix uses
neurontin 400 mg capsule: 2000 mg neurontin – buy neurontin 300 mg
http://ventolininhaler.pro/# generic ventolin price
drug neurontin: neurontin generic brand – neurontin brand name 800mg
{Tôi rất hài lòng để tìm thấy trang này. Tôi muốn cảm ơn bạn {vì đã|dành thời gian cho|chỉ vì điều này|vì điều này|cho bài đọc tuyệt vời này!! Tôi chắc chắn thích thú từng một phần nó và tôi đã đánh dấu trang để xem những thứ mới trong blog của bạn.|Tôi có thể chỉ nói rằng thật thoải mái để khám phá một người thực sự biết họ là gì thảo luận trên internet. Bạn chắc chắn hiểu cách đưa một vấn đề ra ánh sáng và làm cho nó trở nên quan trọng. Nhiều người hơn thực sự cần kiểm tra điều này và hiểu khía cạnh này câu chuyện của bạn. Thật ngạc nhiên bạn không nổi tiếng hơn vì bạn chắc chắn có món quà.|Tốt bài viết trên blog. Tôi hoàn toàn yêu thích trang web này. Cảm ơn!|Thật gần như không thể tìm thấy những người hiểu biết về điều này, nhưng bạn có vẻ bạn biết mình đang nói gì! Cảm ơn|Bạn nên tham gia một cuộc thi dành cho một blog trực tuyến tốt nhất. Tôi chắc chắn sẽ Rất khuyến nghị trang web này!|Một hấp dẫn chắc chắn đáng giá bình luận. Tôi tin rằng bạn cần viết thêm về chủ đề này, nó có thể không là một điều cấm kỵ chủ đề nhưng nói chung mọi người không nói về những chủ đề những điều này. Đến phần tiếp theo! Cảm ơn rất nhiều!|Xin chào! Tôi chỉ muốn cho bạn một rất to cho thông tin xuất sắc bạn có ở đây trên bài đăng này. Tôi sẽ là quay lại trang web của bạn để biết thêm thông tin sớm nhất.|Khi tôi ban đầu bình luận tôi có vẻ như đã nhấp hộp kiểm -Thông báo cho tôi khi có bình luận mới- và từ bây giờ bất cứ khi nào có bình luận được thêm vào tôi nhận được 4 email có cùng nội dung. Có lẽ có một cách bạn có thể xóa tôi khỏi dịch vụ đó không? Cảm ơn.|Lần sau Tôi đọc một blog, Tôi hy vọng rằng nó không thất bại nhiều như bài này. Rốt cuộc, Vâng, đó là sự lựa chọn của tôi để đọc, tuy nhiên tôi thực sự nghĩ có lẽ có điều gì đó thú vị để nói về. Tất cả những gì tôi nghe được là một loạt tiếng rên rỉ về điều gì đó mà bạn có thể sửa nếu bạn không quá bận tìm kiếm sự chú ý.|Đúng với bài viết này, tôi nghiêm túc cảm thấy trang web tuyệt vời này cần nhiều hơn nữa sự chú ý.
prednisone 80 mg daily: buy prednisone online canada – cost of prednisone 10mg tablets
prednisone in mexico: over the counter prednisone pills – generic prednisone for sale
canada pharmacy reviews: Cheapest online pharmacy – canada rx pharmacy world
online pharmacy india: Online medication home delivery – online pharmacy india
https://canadapharma.shop/# my canadian pharmacy
{Tôi đã cực kỳ hài lòng để tìm thấy trang web này. Tôi cần cảm ơn bạn {vì đã|dành thời gian cho|chỉ vì điều này|vì điều này|cho bài đọc tuyệt vời này!! Tôi chắc chắn thưởng thức từng của nó và tôi cũng đã đã lưu vào mục ưa thích để xem thông tin mới trên trang web của bạn.|Tôi có thể chỉ nói rằng thật thoải mái để khám phá một người thực sự biết họ là gì thảo luận trên mạng. Bạn chắc chắn biết cách đưa một vấn đề ra ánh sáng và làm cho nó trở nên quan trọng. Nhiều người hơn nữa phải xem điều này và hiểu khía cạnh này câu chuyện của bạn. Tôi đã ngạc nhiên rằng bạn không nổi tiếng hơn vì bạn chắc chắn có món quà.|Rất tốt bài đăng. Tôi hoàn toàn đánh giá cao trang web này. Tiếp tục làm tốt!|Thật khó đến những người có kinh nghiệm về điều này, nhưng bạn có vẻ bạn biết mình đang nói gì! Cảm ơn|Bạn nên là một phần của một cuộc thi dành cho một blog trực tuyến hữu ích nhất. Tôi sẽ khuyến nghị trang web này!|Một hấp dẫn chắc chắn đáng giá bình luận. Không còn nghi ngờ gì nữa rằng bạn cần xuất bản thêm về chủ đề này, nó có thể không là một điều cấm kỵ vấn đề nhưng điển hình mọi người không nói về vấn đề những điều này. Đến phần tiếp theo! Cảm ơn rất nhiều!|Xin chào! Tôi chỉ muốn đề nghị rất cho thông tin tuyệt vời bạn có ngay tại đây trên bài đăng này. Tôi đang quay lại trang web của bạn để biết thêm thông tin sớm nhất.|Sau khi tôi ban đầu bình luận tôi có vẻ như đã nhấp hộp kiểm -Thông báo cho tôi khi có bình luận mới- và từ bây giờ mỗi lần được thêm vào tôi nhận được bốn email có cùng nội dung. Có lẽ có một phương tiện bạn có thể xóa tôi khỏi dịch vụ đó không? Cảm ơn bạn.|Lần sau Tôi đọc một blog, Hy vọng rằng nó không thất bại nhiều như bài này. Rốt cuộc, Tôi biết điều đó là sự lựa chọn của tôi để đọc hết, nhưng tôi thực sự tin có lẽ có điều gì đó hữu ích để nói. Tất cả những gì tôi nghe được là một loạt khóc lóc về điều gì đó mà bạn có thể sửa nếu bạn không quá bận tìm kiếm sự chú ý.|Đúng với bài viết này, tôi hoàn toàn nghĩ trang web này cần nhiều hơn nữa sự chú ý.
mexico drug stores pharmacies: medicine in mexico pharmacies – mexican border pharmacies shipping to usa
top 10 online pharmacy in india Online medication home delivery top 10 online pharmacy in india
Aw, this was an extremely nice post. Taking a few minutes and actual effort to generate a good article… but what can I say… I hesitate a whole lot and never seem to get anything done.
medication from mexico pharmacy: mexico drug stores pharmacies – purple pharmacy mexico price list
https://canadapharma.shop/# canada pharmacy reviews
May I simply just say what a comfort to discover someone that genuinely understands what they’re talking about on the internet. You certainly know how to bring an issue to light and make it important. More and more people really need to read this and understand this side of your story. I was surprised you’re not more popular because you definitely possess the gift.
https://my.desktopnexus.com/Bongdalu0101/
reputable indian online pharmacy: Indian pharmacy online – indianpharmacy com
https://cloudim.copiny.com/question/details/id/891279
https://nl.picmix.com/profile/Bongdalu0101
top 10 pharmacies in india Indian pharmacy online best india pharmacy
https://mexicanpharma.icu/# medication from mexico pharmacy
canada online pharmacy: Cheapest online pharmacy – my canadian pharmacy review
mexican mail order pharmacies http://mexicanpharma.icu/# mexico pharmacies prescription drugs
reputable mexican pharmacies online
http://indiadrugs.pro/# indian pharmacy
https://www.blogger.com/profile/04662599637324048109
canadian pharmacy antibiotics Online medication home delivery canada drugstore pharmacy rx
https://myanimelist.net/profile/da88tube
https://leakedmodels.com/forum/members/da88tube.569608/#about
https://canadapharma.shop/# canadian pharmacy meds review
I have to thank you for the efforts you have put in writing this website. I’m hoping to see the same high-grade content from you later on as well. In fact, your creative writing abilities has inspired me to get my very own blog now 😉
online shopping pharmacy india indian pharmacy top 10 online pharmacy in india
https://indiadrugs.pro/# Online medicine order
Today, I went to the beach front with my kids. I found a sea shell and gave it to my 4 year old daughter and said “You can hear the ocean if you put this to your ear.” She put the shell to her ear and screamed. There was a hermit crab inside and it pinched her ear. She never wants to go back! LoL I know this is totally off topic but I had to tell someone!
This site was… how do you say it? Relevant!! Finally I’ve found something which helped me. Cheers.
medicine in mexico pharmacies: medication from mexico – mexican rx online
purple pharmacy mexico price list
medication from mexico pharmacy: medication from mexico – mexican pharmaceuticals online
http://canadapharma.shop/# canadian pharmacy world
You are my intake, I possess few web logs and sometimes run out from to post .
Howdy, I do believe your web site may be having internet browser compatibility issues. Whenever I take a look at your web site in Safari, it looks fine however when opening in I.E., it has some overlapping issues. I just wanted to provide you with a quick heads up! Aside from that, great blog.
Viagra pas cher inde Viagra prix Viagra homme prix en pharmacie
I would like to thank you for the efforts you’ve put in penning this site. I’m hoping to check out the same high-grade blog posts by you in the future as well. In fact, your creative writing abilities has inspired me to get my own site now 😉
http://clssansordonnance.icu/# pharmacie en ligne
Acheter viagra en ligne livraison 24h: Sildenafil Viagra – SildГ©nafil 100 mg prix en pharmacie en France
I truly love your site.. Great colors & theme. Did you create this site yourself? Please reply back as I’m planning to create my own site and would love to know where you got this from or what the theme is called. Thank you.
It’s difficult to find educated people on this subject, but you seem like you know what you’re talking about! Thanks
Way cool! Some extremely valid points! I appreciate you writing this write-up and also the rest of the website is very good.
Pharmacie en ligne livraison Europe: pharmacie en ligne france livraison internationale – pharmacies en ligne certifiГ©es
pharmacie en ligne avec ordonnance cialis prix pharmacie en ligne pas cher
We absolutely love your blog and find most of your post’s to be just what I’m looking for. can you offer guest writers to write content to suit your needs? I wouldn’t mind composing a post or elaborating on a few of the subjects you write with regards to here. Again, awesome site!
SildГ©nafil 100 mg sans ordonnance: Viagra vente libre allemagne – Viagra 100 mg sans ordonnance
https://clssansordonnance.icu/# pharmacie en ligne pas cher
acheter mГ©dicament en ligne sans ordonnance: Cialis sans ordonnance 24h – pharmacie en ligne france livraison belgique
п»їpharmacie en ligne france Pharmacie Internationale en ligne Pharmacie en ligne livraison Europe
You are so awesome! I do not suppose I’ve read a single thing like this before. So good to discover somebody with some unique thoughts on this issue. Seriously.. thank you for starting this up. This site is something that is required on the internet, someone with a little originality.
Viagra sans ordonnance livraison 48h: Sildenafil Viagra – Viagra pas cher inde
SildГ©nafil Teva 100 mg acheter: Acheter du Viagra sans ordonnance – Viagra homme sans ordonnance belgique
Quand une femme prend du Viagra homme Sildenafil Viagra Viagra sans ordonnance 24h Amazon
http://vgrsansordonnance.com/# Acheter viagra en ligne livraison 24h
pharmacie en ligne avec ordonnance: Cialis generique achat en ligne – pharmacies en ligne certifiГ©es
I do not even know the way I ended up right here, however I thought this publish was good. I do not recognise who you’re however certainly you’re going to a well-known blogger should you aren’t already 😉 Cheers!
Thanks for sharing superb informations. Your site is so cool. I am impressed by the details that you¦ve on this website. It reveals how nicely you perceive this subject. Bookmarked this website page, will come back for extra articles. You, my pal, ROCK! I found simply the information I already searched everywhere and simply could not come across. What a great website.
http://ozempic.art/# ozempic cost
This web site certainly has all the info I wanted about this subject and didn’t know who to ask.
ozempic online: buy ozempic – buy ozempic
rybelsus pill: rybelsus price – semaglutide tablets
https://ozempic.art/# ozempic generic
https://rybelsus.shop/# rybelsus cost
rybelsus pill: semaglutide tablets – rybelsus coupon
ozempic generic ozempic coupon buy ozempic
rybelsus cost: buy semaglutide online – rybelsus cost
https://ozempic.art/# ozempic
buy ozempic: ozempic online – Ozempic without insurance
http://ozempic.art/# buy cheap ozempic
buy cheap ozempic: ozempic – buy ozempic
https://rybelsus.shop/# rybelsus cost
semaglutide cost: buy semaglutide online – cheapest rybelsus pills
https://ozempic.art/# ozempic
semaglutide tablets: buy rybelsus online – semaglutide online
This is a topic that is near to my heart… Take care! Exactly where are your contact details though?
https://rybelsus.shop/# rybelsus coupon
ozempic coupon: buy ozempic pills online – Ozempic without insurance
http://rybelsus.shop/# semaglutide cost
rybelsus cost: rybelsus coupon – rybelsus cost
buy ozempic pills online: buy ozempic pills online – Ozempic without insurance
http://rybelsus.shop/# buy rybelsus online
buy semaglutide pills: rybelsus cost – rybelsus coupon
ozempic generic: ozempic generic – buy ozempic pills online
https://ozempic.art/# ozempic generic
buy semaglutide pills: buy semaglutide online – cheapest rybelsus pills
An outstanding share! I’ve just forwarded this onto a colleague who had been conducting a little homework on this. And he actually bought me lunch simply because I found it for him… lol. So let me reword this…. Thanks for the meal!! But yeah, thanks for spending the time to talk about this topic here on your internet site.
https://rybelsus.shop/# semaglutide cost
rybelsus price: semaglutide tablets – rybelsus price
Pay by phone casinos are great because they make it easier for gamblers to play their favourite games. This is because you don’t need to add money to an online casino deposit account – every time you place a bet with a pay by phone casino its added to your phone bill. If you’ve been planning on joining online casinos, you’ve surely come across a pay by phone casino. Contrary to what some players believe, this doesn’t mean you can just pay with your phone. It’s a payment method which allows you to pay via your monthly phone bill, so it’s not about smartphones – even feature phones can be used for it. Pay by phone casinos are a quick and easy way to make a deposit or place a bet at an online casino. Many casinos let you make secure payments over the phone, simply by providing a phone number at the casino’s payment stage.
http://www.gothicpast.com/myomeka/posters/show/77786
Jedes renommierte Casino hat nicht nur Augen für neue Kunden. Online Casinos wollen sowohl bestehende Spieler als auch Neueinsteiger belohnen. Aus diesem Grund bieten viele Casinos verschiedene Aktionen und Angebote an, um bereits aktive Spieler zu belohnen. Wenn Du Dir ein Online Casino ansiehst, solltest Du nicht nur auf das Willkommenspaket schauen, sondern auch welche Angebote es für Bestandskunden gibt. Online Casino Aktionen sind eine großartige Möglichkeit, Bonusgelder und Freispiele in Form von Gratis Drehungen und Chips zu erhalten, die Deine Gewinnchancen erhöhen können. Our industry experts review and test each casino we list on the site to provide our visitors with a unique perspective, making it easier for you to decide where to gamble online. We’re constantly evaluating new online casinos in Canada, so you don’t have to. Rest assured, we’ve got you covered.
semaglutide cost: rybelsus coupon – rybelsus pill
http://rybelsus.shop/# rybelsus price
buy ozempic pills online ozempic buy cheap ozempic
https://ozempic.art/# ozempic coupon
http://ozempic.art/# buy ozempic
https://rybelsus.shop/# rybelsus coupon
ozempic online: buy cheap ozempic – ozempic coupon
rybelsus pill cheapest rybelsus pills semaglutide cost
https://rybelsus.shop/# buy semaglutide pills
rybelsus cost buy semaglutide pills rybelsus pill
Right here is the right web site for anyone who wishes to find out about this topic. You know a whole lot its almost tough to argue with you (not that I actually would want to…HaHa). You definitely put a new spin on a topic that’s been discussed for many years. Excellent stuff, just excellent.
pin up giris: pin up casino – pin-up casino
https://pinupturkey.pro/# pin up casino
pin-up bonanza: pin up aviator – pin up aviator
pin up azerbaijan pin-up oyunu pin up az
пин ап казино онлайн: пин ап 634 – пинап казино
пин ап http://pinupkz.tech/# пин ап казино онлайн
пинап казино
pin up: пин ап казино – пин ап зеркало
пин ап зеркало: pin up зеркало – пин ап казино зеркало
I wwas able to find god advice from your blog articles. https://WWW.Waste-ndc.pro/community/profile/tressa79906983/
pin-up oyunu pin up pin up az
пинап кз https://pinupkz.tech/# пинап кз
pin up казино
пин ап кз: пин ап казино онлайн – пин ап кз
пин ап казино: pin up зеркало – пин ап официальный сайт
пин ап официальный сайт пин ап официальный сайт pin up
пин ап 634 https://pinupkz.tech/# pin up
pin up казино
http://pinupaz.bid/# pin up
пин ап кз: pin up kz – пин ап
pin up kz http://pinupru.site/# пин ап казино вход
пин ап кз
https://pinupturkey.pro/# pin up giris
pin up azerbaijan: pin-up oyunu – pin up az
пин ап казино вход http://pinupturkey.pro/# pin up casino
пинап казино
pin-up casino giris: pin up – pin up az
pin up казино http://pinupru.site/# пин ап вход
пин ап казино
pin up azerbaijan: pin up azerbaijan – pin up az
ivermectin 5 mg price: cheapest stromectol – minocycline 50mg tablets
http://zithromax.company/# cost of generic zithromax
amoxicillin 500 mg cost amoxicillin cheapest price amoxicillin no prescription
https://amoxil.llc/# amoxicillin 500mg for sale uk
ivermectin over the counter: order stromectol – cost of stromectol
https://stromectol.agency/# ivermectin oral 0 8
where to buy amoxicillin pharmacy amoxicillin cheapest price can you buy amoxicillin over the counter canada
https://amoxil.llc/# buy amoxicillin online mexico
https://stromectol.agency/# ivermectin cost in usa
generic zithromax 500mg india
https://stromectol.agency/# minocycline generic name
buy zithromax online with mastercard: order zithromax – can you buy zithromax over the counter in australia
zithromax pill order zithromax zithromax online no prescription
http://zithromax.company/# where can i buy zithromax in canada
May I simply say what a comfort to discover somebody who actually knows what they’re talking about online. You actually realize how to bring an issue to light and make it important. A lot more people have to check this out and understand this side of the story. I was surprised that you aren’t more popular because you most certainly have the gift.
https://amoxil.llc/# where to buy amoxicillin
azithromycin zithromax
neurontin cost: order gabapentin – gabapentin 300
https://zithromax.company/# average cost of generic zithromax
http://zithromax.company/# cost of generic zithromax
where can you buy amoxicillin over the counter amoxil best price purchase amoxicillin online
https://gabapentin.auction/# neurontin brand name
how to buy zithromax online
http://semaglutide.win/# buy semaglutide online
amoxicillin 500mg capsule: buy amoxil – amoxicillin 500mg no prescription
neurontin generic cost gabapentin best price neurontin
https://gabapentin.auction/# neurontin 30 mg
http://zithromax.company/# zithromax capsules 250mg
zithromax prescription in canada
cost of amoxicillin prescription: cheapest amoxil – amoxacillian without a percription
amoxicillin without a doctors prescription buy amoxil buy amoxicillin online cheap
https://zithromax.company/# zithromax 500 mg lowest price pharmacy online
https://stromectol.agency/# ivermectin 4000 mcg
where to buy zithromax in canada
neurontin 100 mg cap: buy gabapentin – medicine neurontin capsules
http://zithromax.company/# zithromax 500 mg lowest price online
It’s actually a cool and helpful piece of info. I am glad that you shared this helpful info with us. Please keep us up to date like this. Thanks for sharing.
https://zithromax.company/# cheap zithromax pills
how much does ivermectin cost ivermectin buy uk minocycline 50mg tablets online
http://stromectol.agency/# minocycline hydrochloride
buy zithromax
https://semaglutide.win/# rybelsus generic
order neurontin: gabapentin price – neurontin 600 mg cost
semaglutide order Rybelsus for weight loss Rybelsus 14 mg price
https://zithromax.company/# zithromax prescription in canada
http://semaglutide.win/# buy rybelsus
An interesting discussion is worth comment. I believe that you should publish more about this issue, it may not be a taboo matter but usually folks don’t talk about these topics. To the next! All the best.
http://stromectol.agency/# buy minocycline 100 mg
cost of generic zithromax
minocycline 50 mg pills online: minocycline pill – ivermectin 0.2mg
buy ivermectin nz stromectol for sale minocycline 100 mg online
https://semaglutide.win/# rybelsus
buy generic zithromax online
neurontin 3: gabapentin price – neurontin for sale
neurontin 300 mg mexico buy gabapentin generic neurontin pill
https://semaglutide.win/# rybelsus
how to get zithromax online
stromectol covid 19 order stromectol what is minocycline prescribed for
rybelsus generic: order Rybelsus for weight loss – Rybelsus 14 mg
https://gabapentin.auction/# neurontin 100mg capsule price
https://stromectol.agency/# minocycline pac
http://gabapentin.auction/# buy neurontin 100 mg
zithromax 500
zithromax online no prescription zithromax best price zithromax tablets
zithromax for sale 500 mg: zithromax for sale – zithromax 500 price
male dysfunction pills http://mexicanpharm24.pro/# mexican drugstore online
buy prescription drugs online legally: buy prescription drugs without doctor – natural ed treatments
mexican rx online mexico drug stores pharmacies mexican border pharmacies shipping to usa
https://indianpharmdelivery.com/# Online medicine order
buy prescription drugs from india
india pharmacy: world pharmacy india – buy prescription drugs from india
I was reading some of your posts on this website and I conceive this internet site is very informative! Keep posting.
best ed pills https://indianpharmdelivery.com/# cheapest online pharmacy india
indian pharmacy online: india pharmacy mail order – indian pharmacy
mexican pharmaceuticals online mexican mail order pharmacies reputable mexican pharmacies online
Oh my goodness! Impressive article dude! Thank you, However I am having troubles with your RSS. I don’t understand why I am unable to join it. Is there anybody else having similar RSS problems? Anybody who knows the solution will you kindly respond? Thanx.
mexico drug stores pharmacies: medication from mexico pharmacy – mexico drug stores pharmacies
https://drugs24.pro/# viagra without a doctor prescription
pharmacy website india
mexican pharmaceuticals online: reputable mexican pharmacies online – best online pharmacies in mexico
cvs prescription prices without insurance canadian pharmacy what type of medicine is prescribed for allergies
india online pharmacy: top 10 pharmacies in india – online shopping pharmacy india
indian pharmacy paypal: indian pharmacies safe – reputable indian pharmacies
indian pharmacy top online pharmacy india reputable indian pharmacies
https://mexicanpharm24.pro/# mexican online pharmacies prescription drugs
pharmacy website india
mexico drug stores pharmacies: mexican online pharmacies prescription drugs – mexico pharmacies prescription drugs
india online pharmacy: indianpharmacy com – india pharmacy mail order
pharmacies in mexico that ship to usa buying from online mexican pharmacy buying prescription drugs in mexico online
Howdy, I think your site could be having web browser compatibility problems. Whenever I look at your site in Safari, it looks fine however, when opening in I.E., it has some overlapping issues. I just wanted to provide you with a quick heads up! Other than that, great site!
+ В конфликте с родителями, общение холодное
или его нет вовсе
+ Добились результатов в жизни, но не чувствуете счастья
+ Тащите всё на себе, нет времени на
жизнь
+ Вечно в поиске себя, не знаете чем заниматься
или боитесь идти в свою реализацию
+ Чувствуете, что страсть и любовь ушли из отношений
+ Вечно в поиске себя, не знаете чем заниматься или боитесь идти в свою реализацию
+ Больше не испытываете эмоций
+ Не можете выйти на новый
финансовый уровень
+ Не можете построить долгие отношения, проще
без них, партнёры всё время не те
+ В конфликте с родителями, общение холодное или его нет вовсе
+ Испытываете эмоциональное и/или физическое выгорание
+ На грани развода
+ Чувствуете, что страсть и любовь ушли из отношений
+ Вечно в поиске себя, не знаете чем заниматься или
боитесь идти в свою реализацию
+ Не можете построить долгие отношения,
проще без них, партнёры всё время не те
https://t.me/s/psyholog_online_just_now
Купить безабузный серак/ВПС/ВДС под парсинг, постинг, разгадывание каптчи.
https://t.me/s/server_xevil_xrumer_vpsvds_zenno
Сервер для Xrumer |Xevil | GSA | Xneolinks | A-parser | ZennoPoster | BAS | Антидетект браузер Dolphin
– Windows – 2012 R2, 2016, 2019, 2022 – бесплатно
– FASTPANEL и HestiaCP – бесплатно
– Более 15 000 сервер уже в работе
– Быстрые серверы с NVMe.
– Супер (аптайм, скорость, пинг, нагрузка)
– Управляйте серверами на лету.
– Круглосуточная техническая поддержка – бесплатно
– Отлично подходит под XRumer + XEvil
– Outline VPN, WireGuard VPN, IPsec VPN.
– Отлично подходит под CapMonster
– Отлично подходит под Xneolinks
– Скорость порта подключения к сети интернет — 1000 Мбит/сек
– Отлично подходит под GSA Search Engine Ranker
– Дата-центр в Москве и Амстердаме
– Почасовая оплата
– Возможность арендовать сервер на 1 час или 1 сутки
– Ubuntu, Debian, CentOS, Oracle 9 – бесплатно
– Для сервера сеть на скорости 1 Гбит!
– Мгновенное развёртывание сервера в несколько кликов – бесплатно
– Автоматическая установка Windows – бесплатно
– Отлично подходит под A-Parser
– Windows – 2022, 2019, 2016, 2012 R2
Do several online classes feel like a burden to you? If yes then utilize the online educational assistance service that might improve your academic performance and score you good marks. Prepare to learn how using online tutoring can help you organize your time better, get better grades, and feel less stressed while dispelling some prevalent myths about these programs. You can always pay someone to do my online class in case you are having tough times with your academics. By using this kind of assistance, you can lessen your burden and can get some leisure time for yourself. Students can better manage their time by giving expert online class aides their online coursework. This is especially helpful for students who are enrolled in many online classes, are working, or have family responsibilities. There are professional online class help specialists who can monitor assignments, tests, and other assignments so that the students will not spend much time on them and can instead find time for other aspects of their lives.
online medications http://mexicanpharm24.pro/# medication from mexico pharmacy
prescription without a doctor’s prescription buy drug online buy prescription drugs from india
ed products: buy medications online – erectile dysfunction drugs
I’d like to thank you for the efforts you’ve put in writing this site. I really hope to view the same high-grade blog posts from you later on as well. In fact, your creative writing abilities has motivated me to get my very own blog now 😉
п»їlegitimate online pharmacies india Online medicine order reputable indian online pharmacy
erection problems https://mexicanpharm24.pro/# mexico pharmacies prescription drugs
https://indianpharmdelivery.com/# online pharmacy india
buy prescription drugs from india
otc ed drugs mens ed pills legal to buy prescription drugs without prescription
treatment for erectile dysfunction https://mexicanpharm24.pro/# mexico drug stores pharmacies
Online history classes cover courses in history that are taught over the internet through online medium. These courses may include pre-recorded lectures, interactive discussion forums, virtual office hours, and online exams. carefully to catch any homophone errors. Online education offers numerous benefits over traditional classroom settings. These benefits include flexibility, convenience, cost-effectiveness, accessibility, and a wide range of courses. Online classes offer all of these benefits and more, making them an excellent choice for students who want to study.
https://mexicanpharm24.pro/# mexican drugstore online
buy prescription drugs from india
Aw, this was a really good post. Taking the time and actual effort to make a very good article… but what can I say… I procrastinate a whole lot and never seem to get anything done.
An interesting discussion is worth comment. I do think that you need to publish more about this topic, it might not be a taboo subject but usually people don’t speak about these topics. To the next! Best wishes.
This site truly has all of the information I wanted about this subject and didn’t know who to ask.
ivermectin 10 ml: order minocycline 100 mg – buy oral ivermectin
There’s definately a great deal to find out about this issue. I like all of the points you made.
http://stromectol1st.shop/# stromectol pill
viagra without a doctor prescription walmart
https://stromectol1st.shop/# cost of ivermectin medicine
indian pharmacy
paxlovid generic buy paxlovid online buy paxlovid online
Oh my goodness! Awesome article dude! Thanks, However I am having difficulties with your RSS. I don’t understand why I can’t subscribe to it. Is there anybody else getting identical RSS problems? Anyone who knows the answer can you kindly respond? Thanks!!
plavix medication: here – Cost of Plavix without insurance
http://paxlovid1st.shop/# buy paxlovid online
erection pills viagra online
(*^.^*)
Good article. I’m facing many of these issues as well..
clopidogrel bisulfate 75 mg: clopidogrel – Plavix generic price
Saved as a favorite, I like your blog.
https://stromectol1st.shop/# ivermectin
best online pharmacy india
cheaper: rybelsus – rybelsus
http://rybelsus.icu/# buy semaglutide online
how to get prescription drugs without doctor
This is a topic that’s close to my heart… Take care! Exactly where are your contact details though?
Buy semaglutide: order Rybelsus – Semaglutide pharmacy price
buy minocycline cheapest stromectol ivermectin 2mg
You have made some really good points there. I looked on the net to find out more about the issue and found most people will go along with your views on this web site.
https://paxlovid1st.shop/# paxlovid for sale
mexican pharmacy without prescription
п»їpaxlovid: check this – paxlovid price
https://stromectol1st.shop/# buy ivermectin nz
pharmacy website india
ivermectin human stromectol fast delivery ivermectin 90 mg
ivermectin otc: stromectol 1st – stromectol for head lice
https://rybelsus.icu/# Buy semaglutide
natural pills for ed
paxlovid generic: paxlovid 1st – п»їpaxlovid
Plavix 75 mg price clopidogrel plavix medication
Saved as a favorite, I like your website!
price of ivermectin: stromectol 1st – ivermectin 12 mg
Good blog post. I definitely love this website. Continue the good work!
https://stromectol1st.shop/# ivermectin otc
best india pharmacy
http://clopidogrel.pro/# generic plavix
impotence pills
This website definitely has all the information I wanted concerning this subject and didn’t know who to ask.
more: rybelsus price – rybelsus.icu
ivermectin otc: stromectol 1st – stromectol where to buy
Maths will always be vital in many ways that help us grasp the scientific and operational principles of the world. Algebra, statistics, and calculus require precise math understanding. Without proper training, your findings will be invalid. Math assignments demand a lot of information, but with the correct statistics assignment assistance, you may succeed. Statistics assignment requires reviewing the primary topic’s requirements to obtain the proper solutions. Statistics is easy to learn regardless of stream. The most crucial stage is to evaluate all preparation information before studying the topic. The learner must also work hard to generate well-planned, consistent output. If the audience isn’t paying attention, the topic will deviate. Thousands of students worldwide seek the best online class help. There are now services that will write your homework or taking online class on your behalf if you just google “take my online math class for me.”
order Rybelsus buy semaglutide online cheaper
You have made some good points there. I checked on the internet for additional information about the issue and found most people will go along with your views on this website.
http://stromectol1st.shop/# buy minocycline 100 mg
mail order pharmacy india
paxlovid covid: paxlovid price – paxlovid pill
buy clopidogrel online: check clopidogrel pro – clopidogrel bisulfate 75 mg
paxlovid price paxlovid shop paxlovid covid
It’s not my first time to go to see this web site, i am browsing this web page dailly and
take good facts from here all the time.
http://stromectol1st.shop/# ivermectin 6 mg tablets
best ed pill
buy rybelsus: rybelsus generic – Buy semaglutide
ivermectin syrup: stromectol 1st shop – generic ivermectin for humans
stromectol tablets for humans for sale stromectol 1st ivermectin 0.5 lotion india
https://stromectol1st.shop/# ivermectin nz
india pharmacy mail order
I must thank you for the efforts you have put in writing this website. I’m hoping to see the same high-grade blog posts by you later on as well. In fact, your creative writing abilities has motivated me to get my very own site now 😉
http://stromectol1st.shop/# minocycline 100
ed natural treatment
rybelsus: buy rybelsus – Semaglutide pharmacy price
Semaglutide pharmacy price Buy semaglutide Semaglutide pharmacy price
paxlovid price: paxlovid pharmacy – paxlovid pharmacy
(ґ• ? •`) ?
https://mari-tyrek.ru/48104.html
https://stromectol1st.shop/# ivermectin 0.1
indian pharmacy
Paxlovid over the counter: paxlovid buy – paxlovid india
buy rybelsus rybelsus semaglutide
buy Clopidogrel over the counter: clopidogrel – buy Clopidogrel over the counter
Paxlovid buy online: check this – paxlovid pill
Cost of Plavix without insurance clopidogrel pro buy Clopidogrel over the counter
https://stromectol1st.shop/# ivermectin price
top 10 pharmacies in india
п»їpaxlovid: buy here – paxlovid pill
Encore merci pour ce post et continuez votre excellent travail. ??
Encore merci pour ce post et continuez votre excellent travail. ??
Very good post. I am going through some of these issues as well..
Merci pour cet article super intéressant sur [thème de l’article] ! Je voulais juste ajouter un point qui pourrait intéresser certains d’entre vous. Si vous êtes curieux ou cherchez des informations supplémentaires sur les produits liés à l’amélioration de l’expérience de discuter et de futur rencontre et du bien-être personnel, j’ai récemment découvert un site très complet, [Chemsexworld.com]( Chemsexworld.com .?
pin up kz: пинап – пин ап
https://1wintr.fun/# casino siteleri
пинап казино
Having read this I thought it was really enlightening. I appreciate you spending some time and energy to put this information together. I once again find myself personally spending a significant amount of time both reading and posting comments. But so what, it was still worthwhile.
Ils proposent une variété de produits et de ressources qui peuvent vraiment aider à explorer cette thématique en toute sécurité. Ce que j’ai trouvé vraiment utile, c’est leur section sur la réduction des risques et les conseils pour profiter de manière responsable. Ça pourrait être un bon complément à cet article !
This blog was… how do you say it? Relevant!! Finally I have found something which helped me. Thanks.
pin up пин ап казино pin up kz
Great article. I am dealing with many of these issues as well..
пин ап: пинап зеркало – пин ап зеркало
When I initially commented I seem to have clicked on the -Notify me when new comments are added- checkbox and from now on every time a comment is added I get four emails with the same comment. Is there a means you are able to remove me from that service? Appreciate it.
пин ап вход: пин ап зеркало – пин ап
cazino: slot casino siteleri – h?zl? casino
1xbet зеркало: 1хставка – 1xbet официальный сайт
I was excited to find this website. I want to to thank you for your time just for this fantastic read!! I definitely enjoyed every part of it and I have you bookmarked to look at new things in your web site.
https://1winci.icu/# пин ап зеркало
пин ап
1хбет: 1xbet официальный сайт – 1хставка
пинап казино: пинап кз – пин ап казино
pin up kz pin up kz pin up
пин ап: пинап зеркало – пин ап зеркало
пин ап: pin up – pin up kz
https://1wintr.fun/# canl? casino siteleri
pin up kz
pin up kz: pin up – pin up kz
Merci pour cet article super intéressant sur [thème de l’article] ! Je voulais juste ajouter un point qui pourrait intéresser certains d’entre vous. Si vous êtes curieux ou cherchez des informations supplémentaires sur les produits liés à l’amélioration de l’expérience de discuter et de futur rencontre et du bien-être personnel, j’ai récemment découvert un site très complet, [Chemsexworld.com]( Chemsexworld.com .?
Тема «Четыре типа в Дизайне Человека» важна для понимания не только на теоретическом, но и на практическом уровне. Этот инструмент самопознания помогает каждому из нас осознать свою природу и использовать индивидуальные особенности для улучшения качества жизни. Рассмотрим рационально-практическую сторону каждого из типов, их определения и различия.
Начнем с Генератор. Он отличаются высокой энергетичностью и способностью легко и эффективно завершать начатые задачи. Их природа требует постоянной активности, поэтому важно находить дело, которое по-настоящему нравится. Генератор начинает действовать, когда ощущает внутренний отклик. Основное отличие Генераторов в том, что они заряжают себя и других энергией, если действуют в соответствии с внутренним откликом.
Следующий тип, на который стоит обратить внимание, — Манифестор. Главное предназначение Манифестора — инициировать, начинать и вести за собой. Они не нуждаются в отклике, как Генераторы, и могут сразу принимать решения и действовать. Индивидуальная особенность Манифестора — это стремление к свободе и независимости. Главная их практическая задача — инициировать изменения.
Также важный элемент системы Дизайна Человека — Проектор. Их задача – управлять и направлять энергию других типов. Они нуждаются в приглашении, прежде чем начать действовать, и могут эффективно использовать энергию, когда работают с другими людьми. Индивидуальная особенность Проектора заключается в умении работать с чужой энергией и направлять ее. Их рациональное предназначение – это оптимизация работы других типов.
И наконец, заключительный тип — Рефлектор. Они лучше всего ощущают общие тенденции и могут объективно оценивать ситуацию. Рефлекторы отличаются тем, что их самочувствие напрямую зависит от окружения. Рефлекторы могут стать прекрасными аналитиками, так как они замечают мельчайшие изменения.
Заключение Каждый из четырех типов в Дизайне Человека имеет свои индивидуальные особенности, которые помогают им максимально эффективно взаимодействовать с миром. Понимание своего типа и его практического предназначения позволяет лучше организовать жизнь, выбрать правильные направления для работы и улучшить качество личных отношений.
источник
пин ап вход: пинап зеркало – пинап зеркало
1xbet скачать: 1xbet зеркало – 1xbet зеркало
Ils proposent une variété de produits et de ressources qui peuvent vraiment aider à explorer cette thématique en toute sécurité. Ce que j’ai trouvé vraiment utile, c’est leur section sur la réduction des risques et les conseils pour profiter de manière responsable. Ça pourrait être un bon complément à cet article !
pin-up: pin up – pinup az
Saved as a favorite, I love your blog!
http://1wintr.fun/# casino siteleri
пинап казино
пин ап казино пинап казино пинап
1xbet зеркало: 1хбет – 1xbet
canl? casino siteleri: slot casino siteleri – canl? casino
Having read this I believed it was extremely enlightening. I appreciate you taking the time and energy to put this article together. I once again find myself spending a significant amount of time both reading and posting comments. But so what, it was still worthwhile.
guvenilir casino siteleri: canl? casino – en iyi casino siteleri
I blog quite often and I seriously appreciate your information. This great article has truly peaked my interest. I will take a note of your blog and keep checking for new information about once a week. I opted in for your Feed too.
I blog quite often and I seriously appreciate your information. This great article has truly peaked my interest. I will take a note of your blog and keep checking for new information about once a week. I opted in for your Feed too.
https://1winci.icu/# пин ап официальный сайт
пин ап кз
pin-up: pin-up – pin up 306
пин ап официальный сайт: пин ап официальный сайт – пин ап зеркало
1xbet официальный сайт: 1xbet зеркало – 1хставка
I blog quite often and I seriously appreciate your information. This great article has truly peaked my interest. I will take a note of your blog and keep checking for new information about once a week. I opted in for your Feed too.
dunyan?n en iyi casino siteleri casino oyunlar? slot casino siteleri
I blog quite often and I seriously appreciate your information. This great article has truly peaked my interest. I will take a note of your blog and keep checking for new information about once a week. I opted in for your Feed too.
pin up: пинап – пин ап
пин ап зеркало: пин ап зеркало – пин ап вход
http://1winci.icu/# пин ап вход
pin up
пин ап казино: пин ап казино – пинап казино
I blog quite often and I seriously appreciate your information. This great article has truly peaked my interest. I will take a note of your blog and keep checking for new information about once a week. I opted in for your Feed too.
casino sitesi: casino siteleri – canl? casino siteleri
casino oyunlar? guvenilir casino siteleri casino oyunlar?
pin up casino: pin up casino – pin up
I blog quite often and I seriously appreciate your information. This great article has truly peaked my interest. I will take a note of your blog and keep checking for new information about once a week. I opted in for your Feed too.
http://1winbrasil.win/# pin up 306
пин ап казино
I blog quite often and I seriously appreciate your information. This great article has truly peaked my interest. I will take a note of your blog and keep checking for new information about once a week. I opted in for your Feed too.
пинап кз: пинап кз – pin up kz
пин ап зеркало: пин ап официальный сайт – пин ап официальный сайт
en iyi casino siteleri casino oyunlar? en iyi casino siteleri
https://1winrussia.online/# 1хставка
пин ап казино
This really helped me see things differently!
1xbet зеркало: 1xbet скачать – 1xbet официальный сайт
casino siteleri: casino oyunlar? – en iyi casino siteleri
You’ve made some really good points there. I looked on the net for additional information about the issue and found most individuals will go along with your views on this web site.
https://indianpharm1st.com/# mail order pharmacy india
I’ll immediately grasp your rss as I can not to find your email
subscription link or newsletter service. Do you’ve any? Kindly
permit me recognize in order that I may subscribe. Thanks.
cure ed: ed cure – male ed
over the counter ed treatment: erectile dysfunction pills – ed meds online without prescription or membership
https://mexicanpharm1st.com/# mexico drug stores pharmacies
erectile dysfunction natural remedies: natural ed – treating ed
indian pharmacy paypal indian pharmacy best india pharmacy
non prescription ed drugs: best ed drug – drugs for ed
what type of medicine is prescribed for allergies: ed remedies that really work – online ed drugs
https://mexicanpharm1st.com/# mexico pharmacies prescription drugs
reputable indian online pharmacy: reputable indian online pharmacy – top online pharmacy india
best pill for ed: generic ed pills – errectile disfunction
mexican online pharmacies prescription drugs mexico drug stores pharmacies mexican pharmaceuticals online
https://indianpharm1st.com/# pharmacy website india
real viagra without a doctor prescription usa: ed online pharmacy – ed dysfunction treatment
Aricept. https://t.me/inewsworldplanet
buying from online mexican pharmacy: reputable mexican pharmacies online – buying prescription drugs in mexico
reputable indian online pharmacy: reputable indian online pharmacy – top online pharmacy india
http://indianpharm1st.com/# pharmacy website india
best online canadian pharmacy: best ed pills – muse for ed
reputable indian pharmacies reputable indian online pharmacy Online medicine home delivery
medication from mexico pharmacy: medicine in mexico pharmacies – п»їbest mexican online pharmacies
http://drugs1st.store/# online drug store
mexico pharmacies prescription drugs: medicine in mexico pharmacies – mexican pharmaceuticals online
https://biznes-fabrika.kz/# пин ап 634
Пин Ап Казино Официальный Сайт в России: пин ап – пин ап вход
I truly love your site.. Pleasant colors & theme. Did you develop this site yourself? Please reply back as I’m looking to create my very own blog and would like to find out where you got this from or exactly what the theme is called. Appreciate it!
pinup: pin up azerbaycan – pin-up casino giris
This website was… how do I say it? Relevant!! Finally I’ve found something that helped me. Thanks!
https://sweetbonanzatr.pro/# sweetbonanzatrpro
pinup bet and casino
Отношения: Понимание себя помогает строить более глубокие и значимые отношения с другими людьми Дизайн человека (Human design) – расчет карты онлайн
Wonderful beat ! I wish to apprentice while you amend your site, how could i subscribe for a blog website?
The account aided me a acceptable deal. I had been a little bit acquainted of
this your broadcast offered bright clear concept
You need to be a part of a contest for one of the most useful websites on the web. I most certainly will highly recommend this site!
I was able to find good information from your blog articles.
Good info. Lucky me I discovered your blog by chance (stumbleupon). I’ve saved it for later.
sweet bonanza tr: sweet bonanza – sweetbonanzatr.pro
пин ап: пинап казино – пин ап
https://biznes-fabrika.kz/# пин ап казино
Good site you’ve got here.. It’s hard to find excellent writing like yours nowadays. I truly appreciate individuals like you! Take care!!
http://biznes-fabrika.kz/# пинап казино
pin up zerkalo
Пин Ап Казино Официальный Сайт в России: пин ап зеркало – пинап казино
Официальный Сайт: пин ап казино – pin up zerkalo
sweetbonanzatr.pro: sweet bonanza nas?l oynan?r – sweet bonanza tr
http://biznes-fabrika.kz/# Пин Ап Казахстан
https://pinup-az.bid/# pinup-az bid
pinup bet and casino
ОТКУДА БЕРЕТСЯ УСПЕХ «Дизайн человека»
пин ап вход пин ап казино пин ап казино
Пин Ап Казино Официальный Сайт: пинап казино – пины
Merci pour ce bel article ![url=https://chemsexworld.com/]:)[/url]
https://biznes-fabrika.kz/# пин ап казино онлайн
pinup bet and casino
пин ап 634 пин ап 634 пин ап казино онлайн
Hi, I do believe this is a great site. I stumbledupon it 😉 I am going to come back once again since I book-marked it. Money and freedom is the best way to change, may you be rich and continue to guide other people.
https://sweetbonanzatr.pro/# sweet bonanza
pin up casino
sweet bonanza: sweet bonanza – sweetbonanzatr.pro
This is a topic that’s near to my heart… Thank
you! Exactly where are your contact details though?
Visit my web site – indian seo packages
I really love your blog.. Very nice colors & theme. Did you build this site yourself? Please reply back as I’m attempting to create my own blog and would love to learn where you got this from or exactly what the theme is named. Thank you.
An outstanding share! I have just forwarded this onto a co-worker who was doing a little homework on this. And he in fact bought me lunch due to the fact that I discovered it for him… lol. So let me reword this…. Thanks for the meal!! But yeah, thanx for spending the time to discuss this subject here on your web page.
pin-up casino giris: pinup – pin up 306
бонусы пин ап: Пин Ап Казино Официальный Сайт в России – пин ап
https://pinup-az.bid/# pin up casino
pin up win
I wanted to thank you for this fantastic read!! I absolutely enjoyed every little bit of it. I’ve got you book-marked to check out new things you post…
пины: пины – пин ап казино онлайн
This is a topic that’s close to my heart… Cheers! Where are your contact details though?
Good post. I am dealing with some of these issues as well..
Hi, I do think this is an excellent web site. I stumbledupon it 😉 I may come back yet again since i have book-marked it. Money and freedom is the best way to change, may you be rich and continue to guide other people.
paxlovid1st: paxlovid1st – paxlovid store
http://amoxil1st.shop/# cheap
cheap: top-rated pills – amoxil 1st shop
Excellent web site you have here.. It’s difficult to find excellent writing like yours these days. I really appreciate people like you! Take care!!
Very descriptive post, I liked that a lot. Will there be a
part 2?
Here is my web page … seo india services
https://stromectol1st.store/# stromectol
involves multisystem: involves multisystem – involves multisystem
stromectol best price: stromectol – stromectol
Merci pour ce bel article 🙂 !
Excellent post. I certainly appreciate this site. Continue the good work!
paxlovid1st: paxlovid price – cheapest paxlovid
Merci pour ce bel article 🙂 !
paxlovid store: paxlovid1st – See risks
http://semaglutide.ink/# Patient Portal
https://semaglutide.ink/# Specialists
Merci pour ce bel article 🙂 !
Pills Paxlovid: paxlovid store – See risks
https://t.me/s/kino_film_serial_online_telegram 555280 лучших фильмов. Фильмы смотреть онлайн. В нашем онлайн-кинотеатре есть новинки кино и бесплатные фильмы самых разных жанров
Merci pour ce bel article 🙂 !
paxlovid price: Pills Paxlovid – Pills Paxlovid
Merci pour ce bel article 🙂 !
This is a topic that is close to my heart… Thank you! Exactly where are your contact details though?
https://stromectol1st.store/# find bets price
amoxil 1st shop: cheap – shop
Merci pour ce bel article 🙂 !
stromectol best price: find bets price – stromectol store
Greetings! Very helpful advice in this particular post! It is the little changes that make the largest changes. Many thanks for sharing!
Merci pour ce bel article 🙂 !
Just wish to say your article is as amazing. The clearness in your post is just cool and i could assume you are an expert on this subject.
Well with your permission let me to grab your
RSS feed to keep up to date with forthcoming post.
Thanks a million and please continue the enjoyable work.
Merci pour ce bel article 🙂 !
I have to thank you for the efforts you’ve put in writing this site. I am hoping to check out the same high-grade blog posts from you later on as well. In fact, your creative writing abilities has encouraged me to get my own blog now 😉
Merci pour ce bel article 🙂 !
Merci pour ce bel article 🙂 !
Good post. I learn something new and challenging on blogs I stumbleupon everyday. It’s always exciting to read content from other authors and practice a little something from their websites.
Magnificent website. Plenty of useful info here. I am sending
it to some friends ans also sharing in delicious.
And certainly, thank you for your effort!
Merci pour ce bel article 🙂 !
drugs that cause ed https://indianpharm24.pro/# cheapest online pharmacy india
reputable indian online pharmacy Indian pharmacy to USA Online medicine home delivery
pharmacies in mexico that ship to usa: mexico pharmacy – mexican drugstore online
Merci pour ce bel article 🙂 !
over the counter ed remedies cheap pharmacy online medication for ed
Merci pour ce bel article 🙂 !
medicine for erectile http://indianpharm24.pro/# pharmacy website india
http://indianpharm24.pro/# mail order pharmacy india
pills for ed
mexico drug stores pharmacies Legit online Mexican pharmacy mexican rx online
Merci pour ce bel article 🙂 !
world pharmacy india: India pharmacy international – best online pharmacy india
Merci pour ce bel article 🙂 !
indian pharmacy paypal: indian pharmacy purchase online – best india pharmacy
top 10 pharmacies in india Indian pharmacy to USA india pharmacy mail order
best ed pills at gnc https://pharm24.pro/# ed products
http://pharm24.pro/# cure ed
best way to treat ed
indian pharmacy online Indian pharmacy worldwide delivery indian pharmacy paypal
purple pharmacy mexico price list: mexican pharm 24 – buying prescription drugs in mexico
mexican mail order pharmacies: Legit online Mexican pharmacy – mexican online pharmacies prescription drugs
medicine in mexico pharmacies mexican drugs buying prescription drugs in mexico online
ed drugs online from canada https://mexicanpharm24.cheap/# medication from mexico pharmacy
https://pharm24.pro/# ed drugs list
prescription drugs without doctor approval
Fantastic website. A lot of useful info here. I am sending it to several pals ans additionally sharing in delicious. And of course, thanks for your effort!
india pharmacy: India pharmacy international – buy medicines online in india
indian pharmacies safe Best online Indian pharmacy online pharmacy india
treatment for erectile dysfunction https://indianpharm24.pro/# best online pharmacy india
reputable indian pharmacies: India pharmacy international – buy prescription drugs from india
medicine in mexico pharmacies mexico pharmacy buying prescription drugs in mexico
https://pharm24.pro/# online medication
best pharmacy online
Hey there! I just wanted to ask if you ever
have any problems with hackers? My last blog (wordpress) was hacked and I ended
up losing many months of hard work due to no data backup.
Do you have any solutions to stop hackers?
ed natural treatment low cost prescription comparison of ed drugs
cheap ed pills: cheap prescription drugs – pet meds without vet prescription
buying pills online https://pharm24.pro/# pharmacy medications
reputable indian online pharmacy India pharmacy international india pharmacy mail order
http://pharm24.pro/# erectile dysfunction drug
treating ed
mexican pharmaceuticals online: mexican pharm 24 – medicine in mexico pharmacies
mexican mail order pharmacies: mexico pharmacy – pharmacies in mexico that ship to usa
what is the best ed drug http://pharm24.pro/# buy ed drugs online
Adding Sugar Defender to my everyday routine was among the very best decisions I have actually created my
health and wellness. I beware regarding what I eat, yet this supplement includes
an added layer of assistance. I feel much more stable throughout the
day, and my desires have actually decreased dramatically.
It’s nice to have something so easy that makes such a large
difference!
As somebody that’s always been cautious regarding my blood sugar level,
finding Sugar Defender has actually been a relief. I really
feel a lot extra in control, and my recent exams have actually revealed favorable enhancements.
Recognizing I have a reputable supplement to sustain my routine offers me assurance.
I’m so grateful for Sugar Protector’s impact on my health!
https://indianpharm24.pro/# indian pharmacy paypal
how to overcome ed naturally
I was very pleased to find this web site. I wanted to thank you for ones time due to this fantastic read!! I definitely appreciated every bit of it and i also have you bookmarked to check out new stuff on your website.
mexico drug stores pharmacies: mexican pharm 24 – buying from online mexican pharmacy
This is a topic that is near to my heart… Many thanks! Exactly where are your contact details though?
mexican online pharmacies prescription drugs: mexico pharmacy – buying prescription drugs in mexico online
injections for ed http://indianpharm24.pro/# buy medicines online in india
https://indianpharm24.pro/# world pharmacy india
drugs to treat ed
https://t.me/s/kino_film_serial_online_telegram 733328 лучших фильмов. Фильмы смотреть онлайн. В нашем онлайн-кинотеатре есть новинки кино и бесплатные фильмы самых разных жанров
Have you ever thought about including a little bit more than just your articles?
I mean, what you say is important and all. However
think about if you added some great visuals or videos to give your posts more, “pop”!
Your content is excellent but with images and clips, this blog
could certainly be one of the best in its field.
Terrific blog!
https://ultrabet-tr.online/# ultrabet guncel
deneme bonusu veren siteler mycbet.com
ultrabet guncel ultrabet bonus ultrabet yeni giris 1125
Good blog you have got here.. It’s hard to find high quality writing like yours these days. I seriously appreciate individuals like you! Take care!!
deneme bonusu veren siteler mycbet.com: deneme bonusu veren siteler mycbet.com – denemebonusuverensiteler.top
denemebonusuverensiteler.top https://matadorbet.bid/# matadorbet.bid
The next time I read a blog, Hopefully it doesn’t fail me just as much as this particular one. I mean, I know it was my choice to read, but I actually thought you would have something helpful to talk about. All I hear is a bunch of complaining about something you can fix if you were not too busy looking for attention.
AKKUGUC LYBJXIJ CYEROJC AFVPJSH
https://9gm.ru/article?QFXUWO
ultrabet: ultrabet bonus – ultrabet
deneme bonusu veren siteler denemebonusu2026.com deneme bonusu veren siteler denemebonusu2026.com deneme bonusu veren siteler yeni
It’s difficult to find experienced people for this subject, however, you sound like you know what you’re talking about! Thanks
slot tr online: az parayla cok kazandiran slot oyunlar? – slot siteleri
I’m impressed, I have to admit. Seldom do I encounter a blog that’s equally educative and engaging, and let me tell you, you’ve hit the nail on the head. The issue is something that too few people are speaking intelligently about. I am very happy I stumbled across this in my search for something regarding this.
An intriguing discussion is worth comment. I believe that you need to publish more on this subject, it may not be a taboo matter but typically folks don’t speak about these topics. To the next! Many thanks!
http://slot-tr.online/# az parayla cok kazandiran slot oyunlar?
deneme bonusu veren yeni siteler
deneme bonusu veren siteler denemebonusu2026.com deneme bonusu veren siteler deneme bonusu veren siteler 2024
deneme bonusu veren siteler 2024 http://ultrabet-tr.online/# ultrabet
denemebonusuverensiteler.top: deneme bonusu veren siteler betturkey betturkey.com – deneme bonusu veren siteler betturkey
Deneme Bonusu Veren Siteler: casino siteleri win – Casino Siteleri
Your style is very unique in comparison to other people I’ve read stuff from. Many thanks for posting when you have the opportunity, Guess I will just bookmark this web site.
You’ve made some decent points there. I looked on the web to find out more about the issue and found most people will go along with your views on this web site.
slot siteleri slot oyunlar? puf noktalar? en cok kazand?ran slot oyunlar?
denemebonusuverensiteler.top http://casinositeleri.win/# Casino Siteleri
matadorbet giris matadorbet bid matadorbet
slot oyunlar? puf noktalar?: slot oyunlar? – en cok kazand?ran slot oyunlar?
Introducing to you the most prestigious online entertainment address today. Visit now to experience now!
slot tr online en kazancl? slot oyunlar? slot oyunlar?
An interesting discussion is worth comment. I do believe that you ought to write more about this topic, it may not be a taboo matter but generally folks don’t talk about these topics. To the next! Cheers.
matadorbet.bid matadorbet.bid matadorbet giris
matadorbet: matadorbet – matadorbet giris
buy kamagra oral jelly Kam Pharm Kam Pharm Kam Pharm
Hey! Do you know if they make any plugins to help with
SEO? I’m trying to get my website to rank for some targeted keywords but I’m not seeing very good results.
If you know of any please share. Cheers! You can read similar article here: Warm blankets
Boron. Japanese maple. Celtic. Budapest. Brackets. Artistic gymnastics 2024 olympics. Echidna. Iq. Andy griffith. Phosphoric acid. Us supreme court. Louisville. Acrylic paint. Dame lillard. Anise. Sierra nevada. Inari. Assertive meaning. When was the constitution written. Cubs. But. Chinese crested dog. Cindy crawford. Maya. San marino. Joe walsh. Beastie boys. Steadfast. Mockingbird. Doughnut. Lou gehrig. Delaware. Tracy mcgrady. Trap. Prevalent. North korean. Sam elliot. Thread. Michael vick. Android. Steve martin. Caitlin clark stats. Amazon’. Jason day. Lily james movies and tv shows. Hurdy gurdy. Ivy. Verona. Mechanics. John bonham. Diffusion. Prejudice meaning. Possession. Char. Baby boomer years. Eric trump. Congenital. Samoyed. Cotton bowl. Zodiac movie. National day. Betta fish. Uk flag. Chinese new year. https://2025.uj74.ru/XBQWA.html
Ho chi minh. How many countries are there. Google vom. Ethan hawke. Chargers. Maureen o’hara. Young. India map. Portsmouth. Camino de santiago. Casey kasem. Wayne’s world. Bavaria. Sideshow. Pda. Lenient. Wendy williams. Xbox 360. Che. Mad hatter. Rose of sharon. Property. Washington redskins. Jonathan pryce. The favourite. Promiscuous. Athens greece. Alprazolam. The continental. History. Jackie kennedy. Benign tumor. Serenade. Conan o’brien. What is zionism. Lateral. Genes. Chevy chase movies. Parasocial. Uncle buck. Graves disease. Chowder. Sandra bullock movies. Madagascar movie. Us open tennis. Knicks roster. Fictional character. Female reproductive system. Coeur dalene. Anne of cleves. Panasonic. Yutube. Lester holt.
May I simply say what a relief to discover an individual who genuinely understands what they’re discussing online. You actually know how to bring an issue to light and make it important. More and more people really need to check this out and understand this side of the story. It’s surprising you are not more popular given that you most certainly have the gift.
kamagra oral jelly: Kam Pharm – cheapest Kamagra Kam Pharm
http://gabapharm.com/# GabaPharm Gabapentin
lasix buy lasix fur pharm fur pharm
Having read this I thought it was very enlightening. I appreciate you spending some time and energy to put this informative article together. I once again find myself personally spending a significant amount of time both reading and leaving comments. But so what, it was still worthwhile!
gabapentin: GabaPharm – buy gabapentin
You are so cool! I do not believe I have read a single thing like this before. So great to discover another person with a few genuine thoughts on this topic. Seriously.. many thanks for starting this up. This site is something that is required on the web, someone with a little originality.
Beacon-India.com provides a platform for connecting global audiences to Indian culture, tech, and current trends. Fans of shows like tammy from stranger things, a relatable character, resonating with India’s vibrant, youthful energy. Tammy’s appeal for fans at Beacon-India could bridge pop culture, making it a fresh space for young Indian creatives.
https://erepharm.com/# ed pills
This is a very good tip particularly to those new to the blogosphere. Simple but very accurate information… Many thanks for sharing this one. A must read post!
cheapest ed pills ere pharm ED meds online ed pills
Good info. Lucky me I ran across your website by accident (stumbleupon). I have book marked it for later!
ED meds online with insurance: ere pharm – ED meds online with insurance
This is the right webpage for anybody who hopes to find out about this topic. You understand a whole lot its almost tough to argue with you (not that I really will need to…HaHa). You definitely put a fresh spin on a subject that’s been written about for many years. Excellent stuff, just great.
https://rybpharm.com/# buy rybelsus online usa
http://kampharm.shop/# kamagra
You are so cool! I don’t suppose I’ve read through anything like this before. So good to discover somebody with unique thoughts on this subject matter. Seriously.. thank you for starting this up. This site is one thing that’s needed on the internet, someone with a bit of originality.
cheapest lasix furosemide fur pharm furosemide furpharm.com
Having read this I thought it was very informative. I appreciate you taking the time and effort to put this informative article together. I once again find myself spending a significant amount of time both reading and leaving comments. But so what, it was still worth it!
http://furpharm.com/# furosemide furpharm.com
gabapentin buy gabapentin india buy gabapentin online
This is a good tip particularly to those new to the blogosphere. Simple but very accurate information… Many thanks for sharing this one. A must read article!
GabaPharm Gabapentin: GabaPharm – buy gabapentin
https://furpharm.com/# furpharm
fur pharm furosemide fur pharm cheapest lasix
Oh my goodness! Awesome article dude! Thank you, However I am encountering difficulties with your RSS. I don’t know why I am unable to subscribe to it. Is there anybody else having identical RSS problems? Anyone who knows the solution can you kindly respond? Thanks!!
https://erepharm.com/# ED meds online with insurance
There’s definately a great deal to find out about this subject. I love all the points you’ve made.
https://gabapharm.com/# buy gabapentin india
Buy gabapentin for humans: Buy gabapentin for humans – GabaPharm Gabapentin
Saved as a favorite, I like your web site!
Like every time, your blog is excellent and informative once again. Just keep posting such interesting content. Thank you! you can also check White Motorcycle Protective Jacket
Good post. I learn something new and challenging on websites I stumbleupon on a daily basis. It’s always helpful to read through articles from other writers and practice something from other web sites.
http://kampharm.shop/# kampharm.shop
This is the perfect site for anybody who would like to understand this topic. You realize so much its almost hard to argue with you (not that I personally would want to…HaHa). You certainly put a brand new spin on a topic that’s been discussed for many years. Excellent stuff, just excellent.
buy rybelsus rybpharm: buy rybelsus rybpharm – rybpharm
ED meds online erepharm pills ED meds online
Everything is very open with a very clear description of the issues. It was definitely informative. Your website is extremely helpful. Thank you for sharing.
http://gabapharm.com/# cheapest Gabapentin GabaPharm
I love reading an article that can make men and women think. Also, thanks for allowing me to comment.
http://gabapharm.com/# buy gabapentin india
Hey there! I’m at work surfing around your blog from my new iphone 4! Just wanted to say I love reading your blog and look forward to all your posts! Keep up the superb work!
furpharm: buy furosemide online – lasix
buy kamagra oral jelly Kam Pharm kampharm shop kam pharm shop
Hi there! This article could not be written much better! Looking through this article reminds me of my previous roommate! He always kept talking about this. I’ll send this article to him. Fairly certain he’s going to have a good read. I appreciate you for sharing!
Many thanks for sharing these wonderful content. In addition, an excellent travel along with medical insurance strategy can often reduce those considerations that come with vacationing abroad. A new medical emergency can shortly become too expensive and that’s likely to quickly slam a financial stress on the family finances. Having in place the best travel insurance program prior to leaving is worth the time and effort. Thanks a lot
Glad to be one of the visitors on this awing internet site : D.
After exploring a handful of the blog posts on your web site, I truly appreciate your way of blogging. I book marked it to my bookmark website list and will be checking back soon. Take a look at my web site as well and let me know what you think.
go88
buying prescription drugs in mexico online: mexican pharmacy – mexico drug stores pharmacies
https://mexicanpharmgate.com/# mexican online pharmacies prescription drugs
indian pharmacy paypal indianpharmacyeasy world pharmacy india
I really enjoy looking at on this site, it has got wonderful articles.
https://indianpharmacyeasy.com/# top 10 online pharmacy in india
Thus we thought of explaining it to you why you want a certified knowledgeable with you.
https://canadiandrugsgate.com/# erectal disfunction
indianpharmacy com: Online medicine home delivery – п»їlegitimate online pharmacies india
Max verstappen. The women. Culver city. Toucan. Caesar. Blazing saddles. Heat movie. Cerebrum. Oryx. Precious movie. Jayson tatum. Michael jordan stats. Air force ones. Warren beatty. Flat earth. Indiana fever. Republic. Adam driver movies. Hardy. South. Itinerary. Costa mesa. Civil war. Jose andres. Crown. Angus young. Cannabis. Utica. Newsweek. Geoffrey rush. Sara bareilles. Prigozhin. Adam sandler movies. Andre johnson. Jlo. Anthony bourdain. Mama. Shepards pie. Free. Liz cheney. Manny ramirez. Job lot. Poinsettia. Sling. Pneumonia. Al qaeda. Alex morgan. Geneva convention. Spacex launch. Jeremy allen white movies and tv shows. Lake of the ozarks. Ethiopian food. Irvine. Handsome. When is the super bowl. Pomona college. Simon pegg. Venn diagram. https://hidxnsm.filmfilmfilm.eu/WATNK.html
Hamburger. Melissa mccarthy. Hibiscus flower. Bella hadid. Jack and jill. Newt. Jayson tatum. Little richard. Embezzlement. Country music. Montenegro. Black eyed susan. Mavericks vs thunder. Vodka. Willem dafoe. Confidence interval. Winchester va. Fin. Ll. Heat. Fairfield university. Lightning. Garfield. Jane austen. School shooting. The economist. Skull. Nero. Monsters inc cast. Neil young. Lilly. Columbine. Indiana jones movies. Mad cow disease. Aziz ansari. King george. Travis kelce stats. Architecture. Mad max 1979. College football playoffs. Air force ranks. Spleen. Skittles. Louis vuitton. Hamster. Verbose. Frequency. British open. The hobbit. Fandango. Iowa caucus 2024. Lord of the rings. Mutton. Gonzaga.
http://mexicanpharmgate.com/# mexico pharmacies prescription drugs
medications for ed: Canadian pharmacy best prices – ed medication online
I just went on Blogspot and made a blog, I want to make it for invited members only. I’ve seen blogs like that, but I don’t know how to do it myself. I already made it so that my blog isn’t visible from my profile, but I don’t know what to do next..
http://canadiandrugsgate.com/# ed meds
https://mexicanpharmgate.com/# medicine in mexico pharmacies
medication from mexico pharmacy mexican drugstore online pharmacies in mexico that ship to usa
top 10 online pharmacy in india: Online Indian pharmacy – india pharmacy
Hello! Do you know if they make any plugins to protect against hackers? I’m kinda paranoid about losing everything I’ve worked hard on. Any suggestions?
Hiếp dâm bà già
Everything is very open with a very clear description of the issues. It was really informative. Your site is very useful. Thanks for sharing!
best india pharmacy: indian pharmacy easy – mail order pharmacy india
https://canadiandrugsgate.com/# how can i order prescription drugs without a doctor
indianpharmacy com: Online Indian pharmacy – pharmacy website india
http://mexicanpharmgate.com/# buying prescription drugs in mexico
I truly love your website.. Great colors & theme. Did you build this website yourself? Please reply back as I’m planning to create my own blog and would like to know where you got this from or what the theme is named. Kudos!
https://canadiandrugsgate.com/# buy ed pills online
mexican drugstore online: mexican pharmacy online – mexico drug stores pharmacies
п»їlegitimate online pharmacies india: Indian pharmacy to USA – indian pharmacy online
Everything is very open with a clear description of the challenges. It was truly informative. Your site is very helpful. Many thanks for sharing!
http://indianpharmacyeasy.com/# online pharmacy india
best drug for ed canadian pharmacy drugs gate buy erection pills
herbal remedies for ed: Canada pharmacy online – male ed pills
purple pharmacy mexico price list: mexicanpharmgate.com – medication from mexico pharmacy
medications for https://canadiandrugsgate.com/# erectile dysfunction drugs
vitality ed pills
new erectile dysfunction treatment: canadiandrugsgate – erectile dysfunction pills
buy prescription drugs from canada cheap: canadian pharmacy – natural pills for ed
can i order generic clomid for sale: generic clomid – can i buy clomid online
amoxicillin for sale: medicine amoxicillin 500 – generic amoxicillin cost
Priligy tablets buy priligy priligy maxpharm
875 mg amoxicillin cost http://clomidrexpharm.com/# clomid cheap
priligy max pharm: buy priligy – max pharm
amoxicillin over the counter in canada: buy amoxil online – amoxicillin tablets in india
can i purchase prednisone without a prescription: generic Prednisone – prednisone 1 mg daily
amoxicillin cephalexin http://amoxilcompharm.com/# amoxicillin price canada
buy generic clomid without prescription clomid online can i purchase cheap clomid
I blog often and I really thank you for your content. The article has really peaked my interest. I will book mark your blog and keep checking for new details about once per week. I opted in for your Feed as well.
There’s definately a lot to find out about this issue. I love all the points you’ve made.
buy cheap amoxicillin http://priligymaxpharm.com/# buy priligy max pharm
prednisone over the counter south africa: prednisoneraypharm – 100 mg prednisone daily
buy dapoxetine online: priligy maxpharm – buy priligy max pharm
buying amoxicillin in mexico: Amoxicillin for sale – where to buy amoxicillin over the counter
I was able to find good information from your articles.
prednisone for sale online: ray pharm – prednisone 100 mg
how to get cheap clomid: rex pharm – where can i get cheap clomid for sale
cost of amoxicillin prescription amoxicillin 500 mg online amoxicillin 500 mg purchase without prescription
can i get clomid pills: buy clomid – how can i get cheap clomid without a prescription
There is definately a great deal to find out about this topic. I really like all the points you’ve made.
buy 10 mg prednisone: prednisone – buy prednisone 20mg without a prescription best price
cost of amoxicillin: Amoxicillin for sale – buy amoxicillin 500mg canada
Introducing to you the most prestigious online entertainment address today. Visit now to experience now!
where to buy amoxicillin 500mg without prescription: amoxil – where can i buy amoxicillin over the counter
buying prednisone mexico: order Prednisone – buy prednisone online india
cheap priligy: cheap priligy – cheap priligy
prednisone capsules: generic Prednisone – prednisone best price
I’d like to thank you for the efforts you’ve put in penning this site. I really hope to check out the same high-grade blog posts by you later on as well. In fact, your creative writing abilities has inspired me to get my own, personal blog now 😉
can i get cheap clomid tablets: clomid – how can i get cheap clomid without dr prescription
An outstanding share! I’ve just forwarded this onto a coworker who has been doing a little homework on this. And he actually ordered me lunch because I found it for him… lol. So let me reword this…. Thanks for the meal!! But yeah, thanx for spending time to talk about this topic here on your site.
Introducing to you the most prestigious online entertainment address today. Visit now to experience now!
where buy generic clomid pill: clomid – how to buy cheap clomid now
Introducing to you the most prestigious online entertainment address today. Visit now to experience now!
buy Lisinopril online: Lisinopril 1st – buy Lisinopril 1st
max pharm: buy priligy – buy priligy
https://iverfast.com/# buy minocycline 50mg for humans
mexican rx online http://mexicanpharmgate.com/ mexico drug stores pharmacies
Everything is very open with a precise explanation of the issues. It was really informative. Your website is very useful. Thank you for sharing.
Introducing to you the most prestigious online entertainment address today. Visit now to experience now!
minocycline 100 mg tablets: Ivermectin iver fast – stromectol 12mg
п»їplavix generic buy Plavix Clo Plavix 75 mg price
antibiotic amoxicillin: Amoxicillin Com Pharm – amoxicillin 500mg capsule buy online
Introducing to you the most prestigious online entertainment address today. Visit now to experience now!
This website truly has all of the info I wanted about this subject and didn’t know who to ask.
Hi! I could have sworn I’ve visited your blog before but after looking at a few of the articles I realized it’s new to me. Anyhow, I’m definitely happy I stumbled upon it and I’ll be book-marking it and checking back regularly!
https://lisinopril1st.com/# cheapest Lisinopril
ivermectin brand: cheapest Ivermectin – stromectol canada
get generic clomid pills: rex pharm – clomid generic
Abortion pills online buy misoprostol over the counter cytotec buy online usa
Introducing to you the most prestigious online entertainment address today. Visit now to experience now!
I couldn’t refrain from commenting. Exceptionally well written!
buy cytotec over the counter: cheapest cytotec – purchase cytotec
trang chủ 88clb
cost clomid price: can i get generic clomid – generic clomid without dr prescription
You are my breathing in, I have few web logs and sometimes run out from brand :). “Analyzing humor is like dissecting a frog. Few people are interested and the frog dies of it.” by E. B. White.
Men’s Aviator Leather Jacket adds a touch of luxury to any outfit
Introducing to you the most prestigious online entertainment address today. Visit now to experience now!
km888.vip
https://lisinopril1st.com/# cheapest Lisinopril
Hey, just wanted to pop by and commend your outstanding blog. Your insight on making money online is really inspiring. Earning an income from home is easier than ever with affiliate marketing. It’s a wonderful opportunity to create passive income by promoting goods or services you believe in. With dedication and the correct strategies, anyone can prosper in this lucrative field. Keep up the amazing work! Visitors, be sure to visit [Your Blog Name|your blog|this blog] for more insightful tips and tricks on making money from home. You’ll be glad you did!
buy clopidogrel online Plavix Clo clopidogrel bisulfate 75 mg
priligy: priligy – dapoxetine online
lisinopril1st: cheapest Lisinopril – lisinopril1st
Hello amazing people! Have faith in the power of self-belief. You possess everything you need inside of you.
https://plavixclo.com/# antiplatelet drug
Merci j’ai appris beaucoup avec ton article 🙂 !
amoxicillin 775 mg: buy amoxil online – can you buy amoxicillin uk
zestril 10 mg online: lisinopril1st – buy Lisinopril online
Merci j’ai appris beaucoup avec ton article 🙂 !
10mg generic 10mg lisinopril buy lisinopril online india buy Lisinopril online
Merci j’ai appris beaucoup avec ton article 🙂 !
Hi friends! Remember that setbacks are just stepping stones to success. Embrace difficulties with courage and resilience, and watch how you grow stronger with each hurdle you overcome.
https://iverfast.com/# cost of ivermectin 3mg tablets
Way cool! Some very valid points! I appreciate you penning this post and the rest of the website is also really good.
Hello beautiful souls! Each daylight is a blank canvas. Create your life with colors of joy and happiness.
Quay lén phụ nữ
Hey there! Encircle yourself with positivity and motivation. You’re worthy of success.
Introducing to you the most prestigious online entertainment address today. Visit now to experience now!
пин ап казино: pinup-kazi.ru – pinup-kazi.ru
This site certainly has all the information I wanted concerning this subject and didn’t know who to ask.
Hello beautiful souls! Pursue your dreams with passion. You have the strength to turn dreams into reality.
pinup kazi: pinup kazi – пинап казино
Excellent post. I will be dealing with many of these issues as well..
http://vavada-kazi.ru/# vavada
пин ап казино: пин ап казино – пин ап казино официальный сайт
пин ап казино: пинап казино – pinup kazi
Merci j’ai appris beaucoup avec ton article 🙂 !
Hi friends! Stay grounded on your goals. Determination leads to success.
I really love your site.. Great colors & theme. Did you create this amazing site yourself? Please reply back as I’m hoping to create my very own blog and would love to know where you got this from or just what the theme is called. Thank you!
pinup kazi: пин ап зеркало – pinup
pinup-kazi.kz pinup kazi пинап казино
WW88
Introducing to you the most prestigious online entertainment address today. Visit now to experience now!
pinup: pin up казино – pinup
пин ап казино: pinup-kazi.ru – pinup
vavada: вавада казино – вавада казино
https://fun88.social
vavada kazi: vavada-kazi.ru – казино вавада
At Edith Cowan University Assignment Help, you will find two degree types, postgraduate and undergraduate. Moreover, it offers full-time and part-time modes of study. Furthermore, it has its campuses in Joondalup (153), Mount Lawley (51), and South West (Bunbury) (16). Also, the university offers 145 online courses. Now, let us read about the different course types the university has to offer.
https://www.allassignmenthelp.com/blog/edith-cowan-university-assignment-help/
http://pinup-kazi.kz/# пин ап кз
Hi friends! Appreciate the beauty in each moment. The world is brimming of gifts.
пин ап кз: пин ап казино онлайн – пин ап казино онлайн
пинап казино: пин ап казино – пин ап кз
пинап казино: пин ап казино онлайн – пин ап казино
пин ап казино онлайн pinup-kazi.kz pinup-kazi.kz
There is certainly a great deal to find out about this topic. I like all of the points you made.
https://pinup-kazi.kz/# pinup kazi
пин ап казино: пин ап казино официальный сайт – пинап казино
пинап казино: пин ап казино – пин ап зеркало
пин ап вход: пин ап вход – pinup-kazi.ru
pinup pinup-kazi.kz pinup-kazi.kz
Greetings! Very helpful advice in this particular article! It’s the little changes that make the biggest changes. Thanks a lot for sharing!
казино вавада: вавада – vavada
пин ап кз: пин ап казино онлайн – пин ап кз
пин ап казино: пин ап казино – pinup kazi
vavada: казино вавада – вавада казино
After I initially left a comment I seem to have clicked on the -Notify me when new comments are added- checkbox and now whenever a comment is added I recieve four emails with the same comment. Perhaps there is an easy method you are able to remove me from that service? Cheers.
Introducing to you the most prestigious online entertainment address today. Visit now to experience now!
mexican border pharmacies shipping to usa: mexican pharmacy – medication from mexico pharmacy
ed drug comparison: canadian pharm 1st – ed medications
canadian medications http://canadianpharm1st.com/# prescription drugs
india pharmacy indian pharm india pharmacy mail order
Algorithm. Whale shark. Hermit crab. Colossal. Sparrow. Oceans. Ben roethlisberger. Hieronymus bosch. Union college. Telsa. Navy ranks. Time warner cable. Garden city. Ventura. Universal studios california. Money. John. Jefferson. Cia world factbook. Eiffel tower. Rashida jones. Harry styles. Oakland raiders. Rose bowl game. Colts score. Peppers. Love and death. Zayn malik. Woody woodpecker. Ava gardner. The independent. Post university. Sinner tennis. Occidental college. Boebert. Tom holland. Blood diamond. Hannibal. Olivia benson. Reformation. Resistance. Doris day. Quizzizz. Vegetables. Kohl. Prejudice. Katrina kaif. Ulysses. Hollandaise sauce. Museum of pop culture. Temperance. Animals. Angle. Clove. The interview. Knotts. Agoraphobia. Weird al. https://x5.yxoo.ru/
Milan italy. Paul mescal. Giancarlo esposito movies and tv shows. The new look. Arteriosclerosis. King charles stepping down. Salvia plant. Ariana grande. Hair. Crucible. Is santa real. Monogamy. Shiva. Michael caine. Spades. Fred hampton. Sancocho. Rob kardashian. Grover cleveland. Cholecystitis. Dish. Mausoleum. Elf. Unit 731. Capitals. Glory hole. Bourbon street. Meg 2. November zodiac. Culture. What time does the eclipse start. Black swan. Mount rainier national park. Bridget fonda. Caesars palace. Julianne hough. Little einsteins. Ria. Brooklyn nets. Brown university. Aaron rogers. Kobold. Crystals. Greenbay. Draft day. Tarantula. Laurie metcalf. Lucky luciano. Scientology. Rush hour 2. Nicole shanahan. Sugar cane. Z. Nara. Marseille. Kansas city chiefs. Alicia vikander. War in israel.
mexican drugstore online: MexicanPharmEasy – mexican pharmaceuticals online
online shopping pharmacy india indian pharm star indian pharmacy
top 10 online pharmacy in india: IndianPharmStar – online shopping pharmacy india
impotence pills: canadian pharm 1st – how to cure ed naturally
I’d like to thank you for the efforts you have put in penning this site. I really hope to view the same high-grade blog posts by you later on as well. In fact, your creative writing abilities has inspired me to get my own blog now 😉
top 10 pharmacies in india: IndianPharmStar.com – world pharmacy india
п»їbest mexican online pharmacies: mexicanpharmeasy.com – reputable mexican pharmacies online
buy prescription drugs online legally canadianpharm1st cheap ed pills
п»їbest mexican online pharmacies: mexican pharm easy – mexican mail order pharmacies
prescription drugs without doctor approval http://canadianpharm1st.com/# what are ed drugs
aspirin and ed: canadianpharm1st – best ed treatment pills
Good day! I simply want to offer you a big thumbs up for your great information you have got right here on this post. I am coming back to your website for more soon.
Introducing to you the most prestigious online entertainment address today. Visit now to experience now!
Introducing to you the most prestigious online entertainment address today. Visit now to experience now!
You have made some good points there. I checked on the internet for more information about the issue and found most people will go along with your views on this web site.
buying prescription drugs in mexico online mexican pharmacy mexico drug stores pharmacies
online pharmacy india: IndianPharmStar.com – india online pharmacy
online pharmacy india: IndianPharmStar – india online pharmacy
medicine in mexico pharmacies: Pharm Easy – mexican border pharmacies shipping to usa
ed clinic http://indianpharmstar.com/# best online pharmacy india
india pharmacy mail order: indian pharm – indian pharmacy paypal
mexico pharmacies prescription drugs MexicanPharmEasy medicine in mexico pharmacies
drug store online https://indianpharmstar.com/# cheapest online pharmacy india
mexican mail order pharmacies: MexicanPharmEasy – medication from mexico pharmacy
buying prescription drugs in mexico: mexicanpharmeasy.com – best online pharmacies in mexico
It’s nearly impossible to find well-informed people in this particular topic, however, you sound like you know what you’re talking about! Thanks
ed pills otc: canada pharmacy online – best male enhancement
online shopping pharmacy india IndianPharmStar online pharmacy india
buying prescription drugs in mexico online: Mexican Pharm – mexican rx online
medications for ed http://mexicanpharmeasy.com/# reputable mexican pharmacies online
purple pharmacy mexico price list: mexican pharmacy – buying from online mexican pharmacy
buying prescription drugs in mexico MexicanPharmEasy mexico pharmacies prescription drugs
best ed treatments http://canadianpharm1st.com/# erectyle disfunction
pills for ed: canadian pharmacy – male enhancement pills
buying from online mexican pharmacy: mexicanpharmeasy.com – buying prescription drugs in mexico online
cheapest online pharmacy india: IndianPharmStar.com – india online pharmacy
buy medicines online in india indian pharmacy Online medicine home delivery
treatment for erectile dysfunction https://canadianpharm1st.com/# best pills for ed
I absolutely love your blog.. Very nice colors & theme. Did you develop this web site yourself? Please reply back as I’m attempting to create my own site and would like to know where you got this from or exactly what the theme is called. Thank you!
rybelsus cost: rybelsus generic – semaglutide
rybelsus: Buy compounded semaglutide online – semaglutide pharm
rybelsus generic buy rybelsus rybelsus cost
http://semaglutidepharm.com/# Buy compounded semaglutide online
Paxlovid.ink: paxlovid india – Paxlovid.ink
Paxlovid.ink: paxlovid generic – Paxlovid.ink
Hi friends! Decide love as your superpower. Compassion has the capacity to change the world.
https://ivermectinpharm.store/# Ivermectin Pharm
Buy semaglutide pills: rybelsus cost – Semaglutide pharmacy price
You made some decent points there. I did a search on the topic and found most individuals will consent with your website.
Introducing to you the most prestigious online entertainment address today. Visit now to experience now!
Amoxil Pharm Store: buy amoxicillin online uk – Amoxil Pharm Store
cheap Rybelsus 14 mg: semaglutide pharm – buy semaglutide online
cheap Rybelsus 14 mg buy semaglutide online buy semaglutide online
https://paxlovid.ink/# Paxlovid.ink
Introducing to you the most prestigious online entertainment address today. Visit now to experience now!
Hello beautiful souls! Embrace the special adventure that is your life. Each experience adds to your growth and evolution.
Introducing to you the most prestigious online entertainment address today. Visit now to experience now!
This is a really good tip particularly to those fresh to the blogosphere. Brief but very precise info… Thank you for sharing this one. A must read post!
Introducing to you the most prestigious online entertainment address today. Visit now to experience now!
semaglutide: rybelsus generic – Rybelsus 7mg
Paxlovid.ink: Paxlovid.ink – paxlovid pill
https://amoxilpharm.store/# generic amoxicillin
Hi friends! Each difficulty you face fortifies you. Welcome the journey and believe in your ability to overcome.
paxlovid covid: п»їpaxlovid – Paxlovid over the counter
I always find what I need at Barford Tackle. They combine great value with excellent service.
I’ve been shopping at Barford Tackle for years.
Their selection of rods and reels is unmatched.
I love how user-friendly their online store is.
Everything is streamlined for a smooth experience.
Barford Tackle offers amazing customer service. They helped me choose
the perfect gear for carp fishing.
My latest purchase at Barford Tackle was great. I’m so impressed with the build quality.
This store is a one-stop shop for anglers. It’s definitely worth visiting their
site.
For carp enthusiasts, this store is unbeatable. I’ve had so much success with
their products.
I never have to wait long for my orders. My gear always arrives in perfect condition.
They always have affordable options. I always feel like I’m getting
value for money.
Just started shopping here, and it’s amazing. They’ve
quickly become my favorite store for fishing.
They cater to every type of fisherman. Their variety makes it easy
to shop.
I’ve recommended Barford Tackle to my Fishing Tackle buddies.
Now they’re regular customers as well.
Paxlovid.ink: Paxlovid.ink – Paxlovid.ink
https://ivermectinpharm.store/# ivermectin 0.08%
Hey there! Remember that you are capable of achieving greatness. Believe in yourself.
semaglutide: Semaglutide pharmacy price – rybelsus generic
Great article. I’m going through many of these issues as well..
Introducing to you the most prestigious online entertainment address today. Visit now to experience now!
Introducing to you the most prestigious online entertainment address today. Visit now to experience now!
Way cool! Some very valid points! I appreciate you writing this article plus the rest of the website is extremely good.
Introducing to you the most prestigious online entertainment address today. Visit now to experience now!
https://amoxilpharm.store/# AmoxilPharm
Gabapentin Pharm: buy brand neurontin – Gabapentin Pharm
Is your company “stuck”? I was in the same position until I figured out there were only 3 things I needed to achieve success. Step 1, I needed an EMAIL LIST – honestly, your email list is the most important part of your business because unless you know who you want to serve and how to contact them (and who ultimately desires what you have to offer), you’re not set up for success. Which brings us to… THE OFFER. The offer is the next step to success. When you understand what your audience is struggling with, you offer a solution that solves their problem. For a lot of people, the problem they have (and a amazing problem to solve)… is getting more visitors. Traffic is how you’re going to build your list of people who want to buy what you’re offering. Without traffic, there’s no list to sell your offer to. After you have these set up, you can start introducing other products and services that work with what your customers wants! Now think about having all these pieces in one place. What if you could grow your email list, offer a extremely profitable and IN DEMAND solution (…TRAFFIC)… and then make big profits every time your clients buy more? You’ve got it. Cha-Ching! 😉 You’ve got to check this out — go here next and let me know what you think — I love it.
cheap Rybelsus 14 mg: buy rybelsus – rybelsus cost
Gabapentin Pharm Gabapentin Pharm Gabapentin Pharm
buy amoxicillin 500mg canada: Amoxil Pharm Store – AmoxilPharm
http://gabapentinpharm.com/# Gabapentin Pharm
That is a great tip especially to those fresh to the blogosphere. Simple but very accurate info… Thank you for sharing this one. A must read article.
Hey there! Fill your heart with thankfulness. Appreciation opens the door to abundance.
buy ivermectin cream for humans: Ivermectin Pharm Store – Ivermectin Pharm
Buy semaglutide pills: rybelsus – rybelsus
lisinopril 10 mg cost lisinopril 10 mg tablet price drug lisinopril
https://789club60.com/
zithromax 500 mg lowest price drugstore online: zithromax z-pak price without insurance – where can i purchase zithromax online
buy cytotec online: п»їcytotec pills online – order cytotec online
http://lisinoprilus.com/# lisinopril 40 mg tablet
https://iwin.international/
Introducing to you the most prestigious online entertainment address today. Visit now to experience now!
lisinopril 40 mg india: lisinopril hctz – prinivil generic
Hello amazing people! Grasp each day as a new beginning. You hold the ability to manifest the life of your dreams.
where can i buy cipro online ciprofloxacin generic buy ciprofloxacin over the counter
http://lisinoprilus.com/# lisinopril 50 mg
This excellent website definitely has all of the information and facts I needed concerning this subject and didn’t know who to ask.
I used to be able to find good info from your content.
buy cytotec online fast delivery: buy cytotec pills online cheap – buy cytotec
Nice post. I learn something more challenging on different blogs everyday. It will always be stimulating to read content from other writers and practice a little something from their store. I’d prefer to use some with the content on my blog whether you don’t mind. Natually I’ll give you a link on your web blog. Thanks for sharing.
lisinopril 10mg prices compare lisinopril buy online lisinopril online purchase
Everything is very open with a really clear description of the challenges. It was truly informative. Your website is very helpful. Thank you for sharing.
https://cytotec.top/# buy misoprostol over the counter
where can i get zithromax: zithromax 500 – zithromax 250 mg australia
Các sản phẩm tại nhà cái FABET thu hút nhiều thành viên tham gia bởi chương trình khuyến mãi HOT cho cược thủ. Anh em không thể từ chối khi đăng ký FABET và trở thành thành viên VIP tại đây.
Spot on with this write-up, I really think this amazing site needs a lot more attention. I’ll probably be returning to read through more, thanks for the information.
zithromax cost: zithromax tablets – zithromax 500 without prescription
https://ciprofloxacin.cheap/# ciprofloxacin
BJ 88
cytotec online: buy cytotec – cytotec pills buy online
https://bj8880.com/
Hi friends! Concentrate on the things you can control and surrender of what you can’t. Tranquility comes from embracing.
BJ88
Go88
Aw, this was a really nice post. Spending some time and actual effort to produce a great article… but what can I say… I procrastinate a whole lot and don’t seem to get nearly anything done.
https://bj8884.com/
buy cytotec buy cytotec over the counter buy cytotec online
Go88
https://ciprofloxacin.cheap/# buy cipro online usa
After checking out a few of the blog posts on your web site, I truly like your way of writing a blog. I saved it to my bookmark website list and will be checking back soon. Please visit my website too and tell me your opinion.
zithromax online: how to get zithromax over the counter – zithromax 250 mg tablet price
And but his most famous contribution got here within the type of three comparatively easy laws that could possibly be used, with great predictive energy, to explain the movement of objects on Earth and within the heavens.
Howdy! This blog post could not be written any better! Looking through this post reminds me of my previous roommate! He constantly kept talking about this. I most certainly will forward this article to him. Fairly certain he’ll have a good read. I appreciate you for sharing!
buy ciprofloxacin over the counter cipro ciprofloxacin generic price
I was very happy to discover this page. I wanted to thank you for ones time due to this wonderful read!! I definitely really liked every part of it and I have you saved to fav to check out new stuff on your web site.
BJ88 Đá Gà
Hey there! Encircle yourself with positivity and encouragement. You are deserving of greatness.
https://clomid.store/# where can i get cheap clomid no prescription
Go88
There’s certainly a lot to know about this subject. I really like all of the points you made.
go88
buy cipro online canada: where can i buy cipro online – buy cipro
buy cytotec over the counter cytotec abortion pill Cytotec 200mcg price
buy cytotec over the counter: Cytotec 200mcg price – Abortion pills online
Greetings! Very helpful advice within this article! It is the little changes that will make the most important changes. Many thanks for sharing!
https://cytotec.top/# buy cytotec online fast delivery
Hey there! Trust in the miracles of new beginnings. Every new day is an opportunity to reinvent your story.
cytotec abortion pill: cytotec online – buy cytotec online fast delivery
Pretty! This was a really wonderful post. Thank you for supplying this info.
buy generic zithromax online: where can you buy zithromax – azithromycin zithromax
buy cipro cheap where to buy cipro online buy cipro online without prescription
http://azithromycinus.com/# zithromax 500 price
An impressive share! I’ve just forwarded this onto a colleague who was doing a little homework on this. And he in fact ordered me lunch due to the fact that I found it for him… lol. So let me reword this…. Thanks for the meal!! But yeah, thanx for spending the time to discuss this issue here on your website.
buying clomid without prescription: how can i get generic clomid online – where can i get generic clomid without rx
generic lisinopril 5 mg: lisinopril tabs 4mg – lisinopril medication generic
https://go88club4.com/
Good web site you have got here.. It’s hard to find excellent writing like yours these days. I truly appreciate individuals like you! Take care!!
FB88 Đăng Nhập
generic clomid for sale can you buy clomid prices where to buy generic clomid without a prescription
https://clomid.store/# can you buy cheap clomid now
Introducing to you the most prestigious online entertainment address today. Visit now to experience now!
can i purchase cheap clomid without insurance: can i buy cheap clomid online – buying generic clomid price
I was able to find good info from your articles.
https://vgo88.net/
The judge proclaimed that “it was their (the campaign’s) lack of affordable diligence that in the end thwarted their effort to realize ballot entry here” in West Virginia.
where can i buy cipro online: ciprofloxacin 500mg buy online – purchase cipro
It’s an entry-level smartwatch geared toward remodeling the health experience for people who desires to prioritize their well being and effectively-being.
Becoming a member of formal courses, taking part in plenty of over the board chess, or becoming a member of an internet membership or class are all nice methods to earn experience and match wits and skills with gamers inside your vary or are higher than you.
http://ciprofloxacin.cheap/# buy cipro
When I initially left a comment I appear to have clicked the -Notify me when new comments are added- checkbox and from now on whenever a comment is added I get four emails with the same comment. There has to be a way you are able to remove me from that service? Many thanks.
buy ciprofloxacin over the counter: purchase cipro – buy ciprofloxacin
where to buy generic clomid how can i get generic clomid where can i buy cheap clomid online
Way cool! Some extremely valid points! I appreciate you writing this write-up plus the rest of the site is really good.
buy cytotec over the counter: cytotec buy online usa – Abortion pills online
can you buy generic clomid online: cost generic clomid without insurance – can i order clomid without prescription
https://azithromycinus.com/# zithromax online
order cytotec online buy misoprostol over the counter Cytotec 200mcg price
I’d like to thank you for the efforts you have put in writing this website. I am hoping to see the same high-grade blog posts from you in the future as well. In truth, your creative writing abilities has motivated me to get my very own blog now 😉
This blog was… how do you say it? Relevant!! Finally I’ve found something that helped me. Cheers!
zithromax capsules australia: buy generic zithromax online – zithromax tablets
You’re so awesome! I do not think I’ve read anything like this before. So wonderful to find another person with some genuine thoughts on this subject matter. Really.. thanks for starting this up. This site is one thing that is needed on the web, someone with a little originality.
https://hitclub.shiksha
buy cytotec over the counter: order cytotec online – Cytotec 200mcg price
https://lisinoprilus.com/# prescription medicine lisinopril
I was able to find good info from your blog articles.
buy generic ciprofloxacin buy ciprofloxacin over the counter buy generic ciprofloxacin
Introducing to you the most prestigious online entertainment address today. Visit now to experience now!
Introducing to you the most prestigious online entertainment address today. Visit now to experience now!
Introducing to you the most prestigious online entertainment address today. Visit now to experience now!
Hi friends! Just a gentle reminder that you’re enough just as you are. You are deserving of love, happiness, and contentment.
An outstanding share! I have just forwarded this onto a coworker who was doing a little homework on this. And he actually ordered me dinner because I stumbled upon it for him… lol. So allow me to reword this…. Thanks for the meal!! But yeah, thanx for spending some time to talk about this subject here on your web site.
buy zithromax 1000mg online: average cost of generic zithromax – can i buy zithromax over the counter in canada
https://azithromycinus.com/# zithromax 500
п»їcytotec pills online cytotec pills buy online buy misoprostol over the counter
Good article. I certainly love this website. Continue the good work!
This website really has all the information and facts I needed about this subject and didn’t know who to ask.
Everyone loves it when people get together and share opinions. Great blog, keep it up.
price of lisinopril: lisinopril no prescription – zestril tab 10mg
https://cytotec.top/# buy cytotec pills online cheap
lisinopril prescription cost lisinopril 20 mg mexico lisinopril in india
Introducing to you the most prestigious online entertainment address today. Visit now to experience now!
I’m extremely pleased to find this web site. I wanted to thank you for ones time for this particularly wonderful read!! I definitely liked every bit of it and I have you saved as a favorite to look at new information in your website.
Introducing to you the most prestigious online entertainment address today. Visit now to experience now!
Introducing to you the most prestigious online entertainment address today. Visit now to experience now!
where can i buy erectile dysfunction pills online ed prescription п»їed pills online
This is a good tip particularly to those fresh to the blogosphere. Short but very accurate info… Thanks for sharing this one. A must read article.
Sun win
http://kamagra.men/# Kamagra Oral Jelly
buy cenforce: Cenforce 100mg tablets for sale – Cenforce 100mg tablets for sale
https://kamagra.men/# sildenafil oral jelly 100mg kamagra
Introducing to you the most prestigious online entertainment address today. Visit now to experience now!
Hi there, I do think your website might be having web browser compatibility issues. When I take a look at your site in Safari, it looks fine however when opening in IE, it has some overlapping issues. I simply wanted to provide you with a quick heads up! Besides that, great website!
https://edpills.men/# how to get ed meds online
semaglutide tablets store: semaglutide tablets for weight loss – generic rybelsus tabs
Cenforce 100mg tablets for sale: Cenforce 150 mg online – cenforce.icu
https://edpills.men/# online ed drugs
http://drugs1st.pro/# male dysfunction pills
Hi there! Reminder that you’re one-of-a-kind and unrepeatable. Celebrate your distinctiveness and shine bright!
Spot on with this write-up, I seriously feel this website needs much more attention. I’ll probably be returning to read through more, thanks for the information.
https://semaglutidetablets.store/# semaglutide tablets
cheapest erectile dysfunction pills: erectile dysfunction online – best online ed medication
https://cenforce.icu/# Cenforce 100mg tablets for sale
Kamagra Oral Jelly: Kamagra tablets – Kamagra tablets
Introducing to you the most prestigious online entertainment address today. Visit now to experience now!
Cenforce 150 mg online cheapest cenforce Purchase Cenforce Online
Your style is unique in comparison to other people I have read stuff from. Many thanks for posting when you have the opportunity, Guess I will just bookmark this page.
https://vip79.forum
https://hitclub.flowers
https://cenforce.icu/# cenforce for sale
i9bet
I’m excited to discover this website. I need to to thank you for your time for this particularly wonderful read!! I definitely enjoyed every little bit of it and i also have you book-marked to see new stuff in your website.
Purchase Cenforce Online: cenforce – cenforce
https://kamagra.men/# cheap kamagra
http://semaglutidetablets.store/# semaglutide tablets
cenforce.icu: cenforce – order cenforce
After going over a few of the articles on your web site, I honestly like your technique of writing a blog. I book marked it to my bookmark website list and will be checking back in the near future. Please visit my website too and tell me your opinion.
Hey there! Just wanted to remind you that every day is a new opportunity to pursue your aspirations and make them a reality. Keep moving forward and never give up!
https://edpills.men/# generic ed meds online
rybelsus semaglutide tablets: rybelsus semaglutide tablets – generic rybelsus tabs
https://cenforce.icu/# Cenforce 100mg tablets for sale
Having read this I thought it was really enlightening. I appreciate you taking the time and energy to put this article together. I once again find myself spending way too much time both reading and posting comments. But so what, it was still worthwhile.
I’m impressed, I have to admit. Rarely do I come across a blog that’s both educative and entertaining, and without a doubt, you’ve hit the nail on the head. The issue is an issue that not enough men and women are speaking intelligently about. I am very happy I found this during my hunt for something relating to this.
This blog was… how do you say it? Relevant!! Finally I’ve found something that helped me. Thanks a lot.
http://drugs1st.pro/# ed pills for sale
buy rybelsus online rybelsus semaglutide tablets buy rybelsus online
http://semaglutidetablets.store/# semaglutide tablets price
slot tr online: az parayla cok kazandiran slot oyunlar? – en cok kazand?ran slot oyunlar?
Spot on with this write-up, I honestly think this amazing site needs far more attention. I’ll probably be back again to see more, thanks for the info.
iwin
http://pinup2025.com/# пинап казино
https://iwin886.com
пин ап казино официальный сайт пин ап казино зеркало pinup2025.com
Introducing to you the most prestigious online entertainment address today. Visit now to experience now!
Introducing to you the most prestigious online entertainment address today. Visit now to experience now!
Introducing to you the most prestigious online entertainment address today. Visit now to experience now!
Гораздо большего можно добиться при помощи доброго слова и пистолета, нежели при помощи одного лишь доброго слова
https://human-design-slovar.rappro.ru
After I originally left a comment I appear to have clicked the -Notify me when new comments are added- checkbox and now whenever a comment is added I get four emails with the exact same comment. Is there a means you are able to remove me from that service? Many thanks.
slot oyunlar? puf noktalar?: slot tr online – slot oyunlar? puf noktalar?
gГјvenilir casino bahis siteleri: para bahis gГјncel giriЕџ – en yeni bet siteleri
http://casinositeleri2025.pro/# 2025 yatД±rД±m ЕџartsД±z deneme bonusu veren siteler
I could not resist commenting. Very well written!
video siteleri listesi ilk Гјyelik deneme bonusu veren siteler pacanele online
http://slottr.top/# en kazancl? slot oyunlar?
http://pinup2025.com/# пин ап вход
en kazancl? slot oyunlar?: slot oyunlar? puf noktalar? – slot siteleri
Your style is so unique compared to other folks I’ve read stuff from. Many thanks for posting when you have the opportunity, Guess I will just book mark this site.
slot casino bonus veren siteler yeni slot oyunlarД±
casino en Г§ok kazandД±ran oyunlar: casД±no – yabancД± mekan isimleri
http://pinup2025.com/# pinup2025.com
Hello there! This article could not be written any better! Going through this post reminds me of my previous roommate! He constantly kept preaching about this. I will send this article to him. Pretty sure he’ll have a great read. Thanks for sharing!
slot siteleri: slot oyunlar? puf noktalar? – slot siteleri
It’s hard to come by knowledgeable people for this topic, however, you sound like you know what you’re talking about! Thanks
http://casinositeleri2025.pro/# oyun s
пинап казино пин ап вход пин ап вход
This is a topic which is near to my heart… Take care! Exactly where are your contact details though?
Introducing to you the most prestigious online entertainment address today. Visit now to experience now!
Гораздо большего можно добиться при помощи доброго слова и пистолета, нежели при помощи одного лишь доброго слова
https://abuse.g-u.su
http://pinup2025.com/# пин ап казино официальный сайт
пин ап казино официальный сайт: пин ап вход – пин ап казино зеркало
slot oyunlar? az parayla cok kazandiran slot oyunlar? slot oyunlar? puf noktalar?
https://sun-win.fund
After exploring a number of the articles on your web site, I truly appreciate your technique of blogging. I book marked it to my bookmark site list and will be checking back soon. Please check out my web site too and tell me what you think.
slot bonus: superbetin giriЕџ – slot oyunlarД± isimleri
https://pinup2025.com/# пинап казино
Introducing to you the most prestigious online entertainment address today. Visit now to experience now!
https://i9bet.tips
http://slottr.top/# slot oyunlar? puf noktalar?
en kazancl? slot oyunlar? slot siteleri slot tr online
Introducing to you the most prestigious online entertainment address today. Visit now to experience now!
en cok kazand?ran slot oyunlar?: en kazancl? slot oyunlar? – en kazancl? slot oyunlar?
I’m impressed, I have to admit. Seldom do I encounter a blog that’s both equally educative and engaging, and without a doubt, you have hit the nail on the head. The problem is an issue that too few people are speaking intelligently about. Now i’m very happy I came across this in my search for something regarding this.
xoso66
I earn a living on-line by viewing adverts and posting my hyperlink on social media.
Loto188
en cok kazand?ran slot oyunlar?: slot tr online – slot siteleri
http://casinositeleri2025.pro/# yeni bahis siteleri deneme bonusu
888b
slot oyunlar? slot oyunlar? puf noktalar? slot oyunlar?
https://casinositeleri2025.pro/# tГјrk partner siteleri
Aw, this was an incredibly nice post. Taking a few minutes and actual effort to create a really good article… but what can I say… I procrastinate a whole lot and never seem to get nearly anything done.
I used to be able to find good advice from your articles.
pinup 2025: пин ап казино официальный сайт – пин ап зеркало
en iyi oyun siteleri: tГјrkiye bahis siteleri – canli bahis siteleri
Having read this I believed it was very enlightening. I appreciate you spending some time and effort to put this content together. I once again find myself spending way too much time both reading and posting comments. But so what, it was still worth it.
https://pinup2025.com/# пин ап казино официальный сайт
Earlier than purchasing a pool heat pump, it is best to verify the working present and peak current stated on the listing for your desired mannequin.
It’s hard to come by educated people about this topic, but you seem like you know what you’re talking about! Thanks
пин ап казино зеркало: пинап казино – пин ап казино официальный сайт
https://casinositeleri2025.pro/# en iyi bahis siteleri 2024
https://casinositeleri2025.pro/# bГјtГјn oyun siteleri
I doubt the program at first and wished to take threat as it is more dangerous to not take threat, however right this moment, i can boldly recomment anyone to this program because i make sustainable earnings on-line day and night.
Hello there! This post could not be written any better! Going through this post reminds me of my previous roommate! He always kept talking about this. I will forward this post to him. Fairly certain he’ll have a good read. Thanks for sharing!
az parayla cok kazandiran slot oyunlar? en kazancl? slot oyunlar? az parayla cok kazandiran slot oyunlar?
https://pinup2025.com/# пин ап казино зеркало
casino bonusu veren siteler: bonus slot – gГјvenilir siteler
Wight, Colin. “Diagram of the Shield of the Trinity, in a Compilation of John of Wallingford’s Works”.
slot siteleri: az parayla cok kazandiran slot oyunlar? – slot tr online
Introducing to you the most prestigious online entertainment address today. Visit now to experience now!
Introducing to you the most prestigious online entertainment address today. Visit now to experience now!
Saved as a favorite, I like your blog.
http://pinup2025.com/# пин ап казино зеркало
http://pinup2025.com/# пин ап зеркало
slot siteleri: slot siteleri – slot siteleri
http://casinositeleri2025.pro/# jackpot play nedir
пин ап казино официальный сайт: pinup2025.com – пин ап казино
пин ап pinup 2025 пин ап
Your style is very unique in comparison to other people I’ve read stuff from. Thank you for posting when you’ve got the opportunity, Guess I’ll just bookmark this blog.
http://casinositeleri2025.pro/# en iyi oyun siteleri
pinup 2025: пин ап казино – пин ап казино официальный сайт
Very nice blog post. I absolutely love this site. Stick with it!
пинап казино пин ап вход пин ап казино зеркало
https://pinup2025.com/# пин ап казино
yo88club.app
http://canadianpharmi.com/# buy medications online
https://canadianpharmi.com/# prescription drugs
india pharmacy: Best online Indian pharmacy – indianpharmacy com
I seriously love your blog.. Great colors & theme. Did you create this website yourself? Please reply back as I’m trying to create my very own blog and want to know where you got this from or just what the theme is named. Cheers!
best online pharmacies in mexico Online Mexican pharmacy buying prescription drugs in mexico online
That is a great tip particularly to those new to the blogosphere. Simple but very accurate info… Thanks for sharing this one. A must read article!
http://indiapharmi.com/# india pharmacy mail order
medicine in mexico pharmacies: Mexican pharmacies that ship to the United States – best online pharmacies in mexico
http://mexicanpharmi.com/# reputable mexican pharmacies online
Here, White can either play d4 soon after, doubtlessly transposing to a Queen’s Gambit Declined line, but also can deviate with a system much like the Hedgehog System played by Black, with b3, c4, Nbd2, and Be2.
I like this site very much, Its a really nice situation to read and find info .
buying from online mexican pharmacy: mexican pharmi – medicine in mexico pharmacies
Everything is very open with a precise clarification of the challenges. It was truly informative. Your site is extremely helpful. Many thanks for sharing!
mexican pharmaceuticals online mexican pharmacy mexico drug stores pharmacies
Hi! I could have sworn I’ve been to your blog before but after looking at many of the articles I realized it’s new to me. Regardless, I’m definitely happy I discovered it and I’ll be bookmarking it and checking back regularly.
http://canadianpharmi.com/# the canadian drugstore
I seriously love your blog.. Excellent colors & theme. Did you create this web site yourself? Please reply back as I’m attempting to create my very own site and would love to know where you got this from or exactly what the theme is called. Appreciate it.
Introducing to you the most prestigious online entertainment address today. Visit now to experience now!
http://indiapharmi.com/# reputable indian pharmacies
https://indiapharmi.com/# top 10 online pharmacy in india
new treatments for ed: Canada Pharmacy – ed treatments
indian pharmacies safe india pharmi cheapest online pharmacy india
Hello. i like the way you post on your blog”
india online pharmacy: Best Indian pharmacy – buy prescription drugs from india
nhà cái Yeu88
https://b52.tube
Hi, I do believe this is an excellent site. I stumbledupon it 😉 I may revisit yet again since i have bookmarked it. Money and freedom is the greatest way to change, may you be rich and continue to help others.
https://canadianpharmi.com/# shots for ed
The following time I learn a weblog, I hope that it doesnt disappoint me as much as this one. I imply, I do know it was my choice to read, however I really thought youd have something interesting to say. All I hear is a bunch of whining about one thing that you can repair should you werent too busy on the lookout for attention.
http://mexicanpharmi.com/# mexican rx online
I must thank you for the efforts you’ve put in penning this site. I’m hoping to see the same high-grade content by you later on as well. In fact, your creative writing abilities has motivated me to get my very own website now 😉
I must voice my affection for your kindness supporting people who must have guidance on your concept. Your personal commitment to getting the message all over had become extremely helpful and have empowered guys and women much like me to attain their objectives. Your new insightful guidelines indicates a lot a person like me and a whole lot more to my office colleagues. Many thanks; from each one of us.
mexico drug stores pharmacies: mexican pharmacy – mexican mail order pharmacies
medicine in mexico pharmacies Best online Mexican pharmacy mexican drugstore online
http://canadianpharmi.com/# can ed be cured
I blog frequently and I truly thank you for your information. The article has really peaked my interest. I will book mark your blog and keep checking for new details about once a week. I subscribed to your RSS feed as well.
https://canadianpharmi.com/# online ed meds
indian pharmacy online: Online India pharmacy – indian pharmacy
http://canadianpharmi.com/# can ed be cured
I was excited to uncover this web site. I want to to thank you for your time for this fantastic read!! I definitely liked every part of it and I have you book-marked to look at new information in your site.
8live
buy prescription drugs from india: India online pharmacy international shipping – buy prescription drugs from india
pharmacies in mexico that ship to usa Cheapest online pharmacy mexican pharmaceuticals online
Go 88
https://sun-win.fund
https://canadianpharmi.com/# how to get prescription drugs without doctor
http://indiapharmi.com/# online shopping pharmacy india
“I’m just writing to make you understand what a helpful experience my princess enjoyed reading through your web page. She learned a lot of pieces, including what it is like to have an ideal teaching heart to get other individuals with no trouble learn selected impossible subject areas. You truly surpassed readers’ desires. Many thanks for churning out such invaluable, healthy, informative and fun tips on the topic to Julie.”
Magnificent goods from you, man. I have understand your stuff previous to and you are just extremely excellent. I really like what you’ve acquired here, certainly like what you are saying and the way in which you say it. You make it enjoyable and you still care for to keep it sensible. I can not wait to read much more from you. This is actually a wonderful web site.
I know this isn’t exactly on subject, but i’ve a site using the identical program as properly and i am getting troubles with my comments displaying. is there a setting i am missing? it’s potential it’s possible you’ll assist me out? thanx.
Greetings, I do think your blog could possibly be having internet browser compatibility issues. When I take a look at your blog in Safari, it looks fine however, when opening in Internet Explorer, it’s got some overlapping issues. I merely wanted to give you a quick heads up! Besides that, fantastic blog!
Introducing to you the most prestigious online entertainment address today. Visit now to experience now!
https://yah.iltil.ru/
Can I recently say such a relief to find somebody that truly knows what theyre referring to on-line. You certainly have learned to bring a concern to light making it essential. The diet have to ought to see this and appreciate this side on the story. I cant think youre less common because you certainly have the gift.
cheap pills online canadian pharmacy ed pills cheap
best natural cure for ed: canadianpharmi – natural pills for ed
buy prescription drugs online: Best Canadian pharmacy – homeopathic remedies for ed
This important put up usually have a wide selection of website visitors. Ensure that support it? The software offers a awesome exclusive take with regards to methods. Reckon developing factor specific or perhaps hefty to make information on is an essential option.
very good post, i definitely love this website, keep on it
http://mexicanpharmi.com/# mexican border pharmacies shipping to usa
dog grooming is the specialty of my sister, she really loves grooming every dog in our house;;
http://canadianpharmi.com/# buy ed pills
Hi there! I could have sworn I’ve visited this blog before but after looking at many of the articles I realized it’s new to me. Regardless, I’m definitely pleased I discovered it and I’ll be bookmarking it and checking back regularly.
i love bob dylan, he is one of the best singer songwriter::
I just added this website to my rss reader, great stuff. Can’t get enough!
Can I simply say what a comfort to discover a person that genuinely knows what they’re talking about on the internet. You actually know how to bring an issue to light and make it important. More and more people ought to look at this and understand this side of your story. It’s surprising you are not more popular because you certainly possess the gift.
Hi there, I was doing a google search and your site came up for homes for sale in Oviedo, FL but anyway, I have had a pleasant time reading it, keep it up!
https://indiapharmi.com/# mail order pharmacy india
Understanding something of everything and every little thing of one thing?
Helpful info. Lucky me I found your website accidentally, and I’m stunned why this accident didn’t came about in advance! I bookmarked it.
viagra without doctor prescription amazon canadianpharmi how to get prescription drugs without doctor
You made some really good points there. I looked on the web for additional information about the issue and found most individuals will go along with your views on this web site.
online shopping pharmacy india: indian pharmacy – cheapest online pharmacy india
https://indiapharmi.com/# best online pharmacy india
Introducing to you the most prestigious online entertainment address today. Visit now to experience now!
After I initially left a comment I seem to have clicked on the -Notify me when new comments are added- checkbox and from now on every time a comment is added I recieve four emails with the exact same comment. There has to be a means you are able to remove me from that service? Thank you.
http://amoxstar.com/# amoxicillin 500 mg without a prescription
Introducing to you the most prestigious online entertainment address today. Visit now to experience now!
Introducing to you the most prestigious online entertainment address today. Visit now to experience now!
https://8usgames.asia
http://clomidonpharm.com/# can i purchase generic clomid without dr prescription
amoxicillin 500 tablet: amoxil generic – buying amoxicillin in mexico
It’s laborious to find educated people on this subject, however you sound like you realize what you’re speaking about! Thanks
woh I am thankful to find this website through google.
Wholesale Cheap Handbags Will you be ok merely repost this on my site? I’ve to allow credit where it can be due. Have got a great day!
buy generic clomid clomid on pharm buying clomid prices
Immerse yourself in the world of sports betting and premium online casino at LEGABET. Enjoy accurate odds predictions, live match schedules, and the latest updates on sports events.”
Excellent site you’ve got here.. It’s difficult to find high quality writing like yours nowadays. I truly appreciate people like you! Take care!!
It?? hard to find experienced people about this topic, however, you seem like you know what you??e discussing! Thanks
Everything you need to know about African Mangoo information to you.
This web site may be a walk-through you discover the data you wished about it and didn’t know who ought to. Glimpse here, and you’ll definitely discover it.
https://prednibest.com/# 10mg prednisone daily
ciprofloxacin generic: ci pharm delivery – buy cipro online usa
I would like to show my thanks to you just for bailing me out of this problem. Right after researching through the world wide web and seeing strategies which are not helpful, I figured my entire life was gone. Existing minus the approaches to the issues you’ve fixed through your main guideline is a crucial case, and ones that would have in a negative way damaged my entire career if I hadn’t discovered your website. Your primary ability and kindness in playing with all things was precious. I am not sure what I would have done if I hadn’t come across such a solution like this. I’m able to at this moment look forward to my future. Thanks for your time very much for this impressive and result oriented guide. I won’t be reluctant to refer the sites to any person who should receive direction on this problem.
http://clomidonpharm.com/# can i buy clomid online
By marketing in the comment box, additionally you generate back again inbound links to your webpage. These back again inbound links will very last indefinitely if they can endure webmaster moderation. This opens an avenue for potential customers generation which will final indefinitely.
Wow, awesome blog layout! How long have you been blogging for? you make blogging look easy. The overall look of your site is magnificent, as well as the content!
can i buy clomid without a prescription clomid on pharm how to buy cheap clomid tablets
I needed to thank you for this wonderful read!! I certainly loved every bit of it. I’ve got you book marked to check out new things you post…
Great blog post, I’ve bookmarked this page and have a feeling I’ll be returning to it regularly.
I went over this web site and I think you have a lot of superb info , saved to my bookmarks (:.
Thank you for sharing superb information. Your web site is so cool. I’m impressed by the details that you’ve on this website. It reveals how nicely you perceive this subject. Bookmarked this website page, will come back for more articles.
They arrange luxury, extraordinary and world class occasions with a view to make what you are promoting get together meeting and conference profitable.
https://cipharmdelivery.com/# ciprofloxacin generic price
As the Jedi hero Anakin Skywalker, he fought alongside his master Obi-Wan Kenobi through the galaxy-extensive Clone Wars, but was slowly seduced to the dark facet by Darth Sidious, then Chancellor Palpatine, before his ascension to Emperor.
Introducing to you the most prestigious online entertainment address today. Visit now to experience now!
Introducing to you the most prestigious online entertainment address today. Visit now to experience now!
Your style is very unique in comparison to other folks I have read stuff from. Many thanks for posting when you have the opportunity, Guess I’ll just book mark this blog.
Jungkook shows a breathtaking narrative by pictures as he struggles to simply accept the modifications in his life as he turns into weak during the day and highly effective in the course of the night time.
buy prednisone online australia Predni Best buying prednisone without prescription
cipro ciprofloxacin: ci pharm delivery – buy cipro online without prescription
I really like it whenever people come together and share views. Great blog, continue the good work.
I wanted to create you a little bit of note to be able to thank you as before on your gorgeous things you have shown in this case. It was quite seriously open-handed with you in giving unreservedly just what numerous people could possibly have supplied as an electronic book to generate some profit on their own, principally considering the fact that you might have tried it if you ever considered necessary. Those inspiring ideas also acted as the easy way to realize that other people have the identical fervor just like my very own to understand lots more in terms of this condition. I think there are millions of more enjoyable opportunities up front for folks who read through your blog. click my site here – alternative medicine
Thank you for another informative website. Where else could I am getting that type of info written in such a perfect means? I’ve a undertaking that I am just now working on, and I have been on the glance out for such info.
https://amoxstar.com/# purchase amoxicillin online
Good day. i am doing research right now and your blog really helped me.
Right here is the right site for anybody who would like to find out about this topic. You realize a whole lot its almost tough to argue with you (not that I personally will need to…HaHa). You certainly put a fresh spin on a topic which has been discussed for years. Wonderful stuff, just great.
prednisone 5 mg tablet cost: prednisone 5 mg cheapest – prednisone over the counter uk
http://clomidonpharm.com/# clomid sale
Everything you need to know about News is very much imptortant to us.
I am glad for writing to let you know what a magnificent discovery my friend’s daughter gained reading your site. She even learned many things, most notably what it is like to have a very effective coaching character to make other folks easily know specific impossible subject areas. You undoubtedly surpassed people’s desires. Thanks for offering these good, trustworthy, explanatory and in addition cool tips on that topic to Ethel.
You produced some decent points there. I looked on-line for the issue and located most individuals may go coupled with with all your site.
I do not know whether it’s just me or if perhaps everybody else experiencing issues with your site.
It appears like some of the written text on your content are running off the screen. Can someone else please provide feedback and let me know if this is
happening to them as well? This might be a issue with my browser
because I’ve had this happen before. Many thanks
prednisone daily Predni Best buying prednisone from canada
Hello, i feel that i saw you visited my website thus i got here to “return the want”.I’m attempting to find issues to enhance my website!I assume its adequate to make use of some of your concepts!!
I’d ought to consult you here. Which isn’t something I do! I enjoy reading an article that will make people think. Also, many thanks permitting me to comment!
I do enjoy the way you have framed this particular concern and it really does offer me personally some fodder for consideration. On the other hand, from just what I have seen, I only wish as the actual responses pile on that people stay on issue and don’t start upon a tirade involving the news du jour. All the same, thank you for this outstanding piece and though I can not necessarily agree with the idea in totality, I respect your viewpoint.
I used to be suggested this web site by my cousin. I’m no longer sure whether this publish is written by way of him as nobody else recognise such specific about my problem. You’re amazing! Thank you!
Good web site you have here.. It’s hard to find high-quality writing like yours nowadays. I honestly appreciate people like you! Take care!!
cost clomid without rx: where to get clomid now – can you buy generic clomid without insurance
http://clomidonpharm.com/# where to get cheap clomid without a prescription
This backfired and Ivanchuk obtained an early advantage, while Carlsen bought a stage place against Svidler.
This is a topic that is close to my heart… Cheers! Exactly where are your contact details though?
Hi, I do believe this is a great website. I stumbledupon it 😉 I may revisit yet again since I book marked it. Money and freedom is the best way to change, may you be rich and continue to help other people.
cheap clomid price: clomid on pharm – can i purchase clomid
Next time I read a blog, Hopefully it doesn’t fail me just as much as this one. After all, I know it was my choice to read through, nonetheless I genuinely thought you’d have something interesting to say. All I hear is a bunch of complaining about something you could possibly fix if you weren’t too busy seeking attention.
ciprofloxacin generic price cipro online no prescription in the usa buy cipro online without prescription
Thomas Nelson. John Wiley & Sons.
This website was… how do I say it? Relevant!! Finally I have found something that helped me. Many thanks.
http://clomidonpharm.com/# how to get cheap clomid tablets
I really like it when people get together and share opinions. Great website, keep it up.
Coconino County Lighting and Common Codes Archived July 21, 2011, at the Wayback Machine.
Introducing to you the most prestigious online entertainment address today. Visit now to experience now!
Introducing to you the most prestigious online entertainment address today. Visit now to experience now!
Introducing to you the most prestigious online entertainment address today. Visit now to experience now!
Introducing to you the most prestigious online entertainment address today. Visit now to experience now!
Introducing to you the most prestigious online entertainment address today. Visit now to experience now!
Introducing to you the most prestigious online entertainment address today. Visit now to experience now!
Introducing to you the most prestigious online entertainment address today. Visit now to experience now!
amoxicillin from canada: amoxicillin 500mg price in canada – amoxil generic
Introducing to you the most prestigious online entertainment address today. Visit now to experience now!
Well done! I thank you your contribution to this matter. It has been useful. my blog: cityville cheats
healthy eating should be our top priority since there are many junk foods and foods with no nutritional value these days**
Introducing to you the most prestigious online entertainment address today. Visit now to experience now!
I needed to thank you for this good read!! I definitely loved every bit of it. I have got you bookmarked to look at new things you post…
This excellent article seems to be have considerable website visitors. Exactly how support it? It all provides cool extraordinary take on the subject of problems. My partner and i possessing items legitimate or perhaps a great offer specifics of is central to the item.
Introducing to you the most prestigious online entertainment address today. Visit now to experience now!
how can i get cheap clomid price: how to get clomid price – can you get generic clomid without insurance
Introducing to you the most prestigious online entertainment address today. Visit now to experience now!
buy amoxicillin 500mg capsules uk AmoxStar where to buy amoxicillin 500mg
I do accept as true with all the ideas you have introduced on your post. They are very convincing and can definitely work. Nonetheless, the posts are too quick for newbies. May just you please lengthen them a bit from subsequent time? Thanks for the post.
Yet, that will not stop you from taking a nap in the middle of the movie.
very good post, i surely enjoy this web site, persist in it
https://cipharmdelivery.com/# ciprofloxacin mail online
I wanted to thank you for this excellent read!! I certainly loved every little bit of it. I’ve got you book-marked to look at new stuff you post…
can i buy amoxicillin over the counter in australia: Amox Star – where to buy amoxicillin over the counter
Excellent write-up. I certainly appreciate this website. Continue the good work!
amoxicillin 500mg capsules price Amox Star can i purchase amoxicillin online
https://amoxstar.com/# can i purchase amoxicillin online
purchase cipro: CiPharmDelivery – cipro online no prescription in the usa
Great blog you have got here.. It’s difficult to find high-quality writing like yours these days. I really appreciate people like you! Take care!!
Introducing to you the most prestigious online entertainment address today. Visit now to experience now!
Introducing to you the most prestigious online entertainment address today. Visit now to experience now!
Introducing to you the most prestigious online entertainment address today. Visit now to experience now!
Introducing to you the most prestigious online entertainment address today. Visit now to experience now!
Introducing to you the most prestigious online entertainment address today. Visit now to experience now!
Introducing to you the most prestigious online entertainment address today. Visit now to experience now!
Introducing to you the most prestigious online entertainment address today. Visit now to experience now!
Introducing to you the most prestigious online entertainment address today. Visit now to experience now!
Introducing to you the most prestigious online entertainment address today. Visit now to experience now!
Introducing to you the most prestigious online entertainment address today. Visit now to experience now!
Introducing to you the most prestigious online entertainment address today. Visit now to experience now!
Introducing to you the most prestigious online entertainment address today. Visit now to experience now!
Introducing to you the most prestigious online entertainment address today. Visit now to experience now!
Introducing to you the most prestigious online entertainment address today. Visit now to experience now!
This is the right web site for anyone who really wants to find out about this topic. You understand so much its almost tough to argue with you (not that I personally would want to…HaHa). You certainly put a brand new spin on a subject that has been discussed for ages. Great stuff, just wonderful.
buy amoxil: amoxicillin 500 mg tablets – buy amoxicillin online no prescription
Introducing to you the most prestigious online entertainment address today. Visit now to experience now!
purchase amoxicillin online without prescription AmoxStar amoxicillin online canada
Introducing to you the most prestigious online entertainment address today. Visit now to experience now!
Introducing to you the most prestigious online entertainment address today. Visit now to experience now!
Introducing to you the most prestigious online entertainment address today. Visit now to experience now!
What are you indicating, man? I know everyones got their own opinion, but really? Listen, your web site is neat. I like the work you put into it, particularly with the vids and the pics. But, come on. Theres gotta be a better way to say this, a way that doesnt make it seem like most people here is stupid!
Introducing to you the most prestigious online entertainment address today. Visit now to experience now!
Introducing to you the most prestigious online entertainment address today. Visit now to experience now!
I believe one of your commercials caused my browser to resize, you may well want to put that on your blacklist.
Introducing to you the most prestigious online entertainment address today. Visit now to experience now!
Introducing to you the most prestigious online entertainment address today. Visit now to experience now!
Greetings, I do think your blog might be having internet browser compatibility issues. Whenever I take a look at your site in Safari, it looks fine however, when opening in I.E., it has some overlapping issues. I just wanted to provide you with a quick heads up! Other than that, excellent site!
https://amoxstar.com/# amoxicillin script
Congratulations on having Hands down the most sophisticated blogs Ive come throughout in most time! Its just incredible how much you can detract from a thing mainly because of how visually beautiful it’s. Youve put collectively a very good blog space -great graphics, videos, layout. This really is undoubtedly a must-see weblog!
I like what you guys are creating here. Such smart work and writing! Carry on with the superb works guys. I have incorporated your site into my blogroll and my website about HCG. I think it will improve the value of my websiteand the traffic too.
Hi, I do believe this is an excellent website. I stumbledupon it 😉 I’m going to revisit once again since I book-marked it. Money and freedom is the best way to change, may you be rich and continue to guide other people.
Seilkhanov, Adlet (24 April 2023).
generic prednisone online: PredniBest – cheapest prednisone no prescription
where to buy amoxicillin over the counter: AmoxStar – amoxicillin 50 mg tablets
I was able to find good information from your blog articles.
I was reading through some of your content on this internet site and I believe this site is really instructive! Keep putting up.
Wow, wonderful blog layout! How lengthy have you ever been running a blog for? you make running a blog glance easy. The total look of your web site is magnificent, well the content material!
prednisone for cheap india buy prednisone online canada pharmacy prednisone
http://prednibest.com/# canadian online pharmacy prednisone
I’m pretty pleased to discover this great site. I need to to thank you for your time for this fantastic read!! I definitely savored every bit of it and i also have you saved to fav to see new information in your website.
However the family could simply purchase a small cottage in the country or by the see for every generation when old to own and provides the farm to the inheriting little one when the farmer reaches about age 65 after which he(or she) could transfer off the farm – so no reservation of profit and survive 7 years after which they may give even a £20m farm to heirs.
An intriguing discussion is worth comment. I do think that you need to publish more on this topic, it may not be a taboo matter but generally people don’t discuss these issues. To the next! Best wishes!
can i purchase clomid: can i order cheap clomid – can you get cheap clomid
Introducing to you the most prestigious online entertainment address today. Visit now to experience now!
Introducing to you the most prestigious online entertainment address today. Visit now to experience now!
Introducing to you the most prestigious online entertainment address today. Visit now to experience now!
Introducing to you the most prestigious online entertainment address today. Visit now to experience now!
ciprofloxacin order online CiPharmDelivery ciprofloxacin order online
Introducing to you the most prestigious online entertainment address today. Visit now to experience now!
Introducing to you the most prestigious online entertainment address today. Visit now to experience now!
Introducing to you the most prestigious online entertainment address today. Visit now to experience now!
Hi there, I do believe your website could be having internet browser compatibility issues. When I look at your blog in Safari, it looks fine however, if opening in I.E., it has some overlapping issues. I simply wanted to give you a quick heads up! Other than that, fantastic website.
Introducing to you the most prestigious online entertainment address today. Visit now to experience now!
Introducing to you the most prestigious online entertainment address today. Visit now to experience now!
Introducing to you the most prestigious online entertainment address today. Visit now to experience now!
As of the 2000 census, there were 29,672 individuals, 11,537 households, and 7,868 families living in the town.
http://clomidonpharm.com/# can i buy cheap clomid without dr prescription
Introducing to you the most prestigious online entertainment address today. Visit now to experience now!
ciprofloxacin 500mg buy online: ci pharm delivery – buy cipro without rx
Introducing to you the most prestigious online entertainment address today. Visit now to experience now!
Introducing to you the most prestigious online entertainment address today. Visit now to experience now!
Introducing to you the most prestigious online entertainment address today. Visit now to experience now!
Introducing to you the most prestigious online entertainment address today. Visit now to experience now!
Introducing to you the most prestigious online entertainment address today. Visit now to experience now!
Introducing to you the most prestigious online entertainment address today. Visit now to experience now!
I was able to find good advice from your blog posts.
Introducing to you the most prestigious online entertainment address today. Visit now to experience now!
Introducing to you the most prestigious online entertainment address today. Visit now to experience now!
Introducing to you the most prestigious online entertainment address today. Visit now to experience now!
Introducing to you the most prestigious online entertainment address today. Visit now to experience now!
Introducing to you the most prestigious online entertainment address today. Visit now to experience now!
Introducing to you the most prestigious online entertainment address today. Visit now to experience now!
Introducing to you the most prestigious online entertainment address today. Visit now to experience now!
Introducing to you the most prestigious online entertainment address today. Visit now to experience now!
Introducing to you the most prestigious online entertainment address today. Visit now to experience now!
Introducing to you the most prestigious online entertainment address today. Visit now to experience now!
Very good info. Lucky me I came across your site by chance (stumbleupon). I’ve saved it for later.
prednisone 3 tablets daily: how to buy prednisone online – 15 mg prednisone daily
amoxicillin 500 mg for sale amoxicillin generic prescription for amoxicillin
Great information. Lucky me I ran across your site by accident (stumbleupon). I’ve saved as a favorite for later!
http://clomidonpharm.com/# can you buy cheap clomid prices
You made some good points there. I looked on the internet for more information about the issue and found most individuals will go along with your views on this web site.
Having read this I believed it was extremely enlightening. I appreciate you taking the time and effort to put this informative article together. I once again find myself spending way too much time both reading and commenting. But so what, it was still worth it.
can i buy clomid without insurance: clomid on pharm – where to get cheap clomid
prednisone no rx PredniBest buy prednisone 1 mg mexico
where to buy generic clomid no prescription: clomid on pharm – order generic clomid for sale
Aw, this was a really good post. Finding the time and actual effort to generate a great article… but what can I say… I hesitate a lot and don’t seem to get anything done.
26 1810 land grant from King George III, to Catherine Everingham, widow of James Everingham U.E.L.
https://clomidonpharm.com/# order cheap clomid without prescription
I’m very pleased to discover this page. I wanted to thank you for ones time due to this wonderful read!! I definitely loved every part of it and I have you saved as a favorite to look at new things on your website.
Townshend and Howson have been accountable for the window’s design and execution.
Nicely, how about a career in Travel and Tourism: Probably the most dynamic and influential industries?
how can i get clomid without a prescription clomidonpharm cost of generic clomid without dr prescription
Very good info. Lucky me I ran across your website by chance (stumbleupon). I have book marked it for later!
where to buy prednisone uk: PredniBest – prednisone 4mg tab
Excellent post! We will be linking to this great post on our site. Keep up the good writing.
buy amoxicillin 500mg uk: Amox Star – where can i buy amoxicillin over the counter
http://prednibest.com/# cheapest prednisone no prescription
After looking over a number of the blog articles on your blog, I truly like your technique of blogging. I saved as a favorite it to my bookmark website list and will be checking back soon. Please visit my website too and tell me how you feel.
Good article! We are linking to this great article on our site. Keep up the great writing.
Greetings! Very helpful advice in this particular article! It is the little changes which will make the largest changes. Thanks a lot for sharing!
prednisone tablets 2.5 mg buy prednisone without a prescription can i buy prednisone online in uk
amoxicillin azithromycin: Amox Star – amoxicillin 500 mg without prescription
I love it when folks come together and share opinions. Great website, stick with it!
You ought to be a part of a contest for one of the greatest websites online. I will highly recommend this web site!
http://cipharmdelivery.com/# ciprofloxacin 500 mg tablet price
This site was… how do you say it? Relevant!! Finally I have found something that helped me. Thank you.
Saved as a favorite, I really like your site!
buying cheap clomid: clomid on pharm – how to get generic clomid without prescription
After going over a few of the blog articles on your web site, I honestly like your way of writing a blog. I saved as a favorite it to my bookmark website list and will be checking back soon. Please check out my website too and tell me how you feel.
This is a topic that’s near to my heart… Best wishes! Where can I find the contact details for questions?
Hello, I do believe your website could possibly be having browser compatibility issues. When I take a look at your site in Safari, it looks fine but when opening in Internet Explorer, it has some overlapping issues. I merely wanted to provide you with a quick heads up! Other than that, wonderful blog!
Some students find it hard to learn how to handle databases at first. There are a lot of different things to look at. Is there anything you think might help you get through the hard assignments? Follow this link to get Database management assignment. This will help you get the most out of your institute and social life while also doing great in classes. For moststudents, working on projects is boring and takes a lot of time. After a long day, they need to take a break and hang out with their friends. At other times, they have to focus on writing their homework and learning other subjects. Another thing that determines whether a student wants to study a subject or not is how interested they are in it. It doesn’t matter why you need DBMS assignment help;
I really like looking through a post that will make men and women think. Also, thank you for permitting me to comment.
This blog was… how do I say it? Relevant!! Finally I have found something that helped me. Thanks!
It’s difficult to find educated people about this topic, however, you seem like you know what you’re talking about! Thanks
I would like to thank you for the efforts you have put in penning this website. I really hope to view the same high-grade blog posts from you later on as well. In fact, your creative writing abilities has encouraged me to get my very own site now 😉
Great site you’ve got here.. It’s difficult to find excellent writing like yours these days. I truly appreciate people like you! Take care!!
An impressive share! I’ve just forwarded this onto a co-worker who has been doing a little research on this. And he actually ordered me lunch because I found it for him… lol. So allow me to reword this…. Thank YOU for the meal!! But yeah, thanks for spending the time to talk about this matter here on your site.
Spot on with this write-up, I truly believe this web site needs much more attention. I’ll probably be returning to read through more, thanks for the info!
I want to to thank you for this good read!! I definitely enjoyed every little bit of it. I have got you saved as a favorite to check out new things you post…
This page truly has all of the information I needed about this subject and didn’t know who to ask.
This site was… how do you say it? Relevant!! Finally I’ve found something which helped me. Thanks a lot.
As I website possessor I think the content material here is very superb, thanks for your efforts.
I truly love your website.. Great colors & theme. Did you develop this web site yourself? Please reply back as I’m attempting to create my own site and would like to know where you got this from or exactly what the theme is called. Cheers!
Way cool! Some extremely valid points! I appreciate you penning this article plus the rest of the website is very good.
There’s certainly a lot to learn about this subject. I love all of the points you have made.
Very nice blog post. I absolutely appreciate this site. Keep writing!
I think this internet site holds some very excellent information for everyone : D.
As I website possessor I believe the content here is rattling good, regards for your efforts.
Spot on with this write-up, I honestly think this web site needs much more attention. I’ll probably be back again to read through more, thanks for the information!
Very good information. Lucky me I discovered your blog by chance (stumbleupon). I have bookmarked it for later!
You’re so interesting! I do not think I have read a single thing like this before. So wonderful to find somebody with some unique thoughts on this subject. Seriously.. many thanks for starting this up. This website is something that is required on the web, someone with some originality.
Right here is the perfect webpage for anybody who really wants to understand this topic. You realize a whole lot its almost tough to argue with you (not that I actually would want to…HaHa). You definitely put a new spin on a subject that’s been written about for many years. Wonderful stuff, just wonderful.
Watch our exclusive Neerfit sexy bf video on neerfit.co.in.
When I originally commented I appear to have clicked on the -Notify me when new comments are added- checkbox and now whenever a comment is added I recieve 4 emails with the exact same comment. Perhaps there is a means you are able to remove me from that service? Thanks a lot.
В данном аппарате используется безопасный для организма человека переменный электрический ток, который обеспечивает заметное повышение упругости кожи, устранения морщин и улучшение цвета лица. Кроме того, косметологи активно используют данную процедуру для усиления действия активных веществ масок, кремов и др. средств. 1 балл = 1 рублю Для процедур по уходу за кожей лица и тела. Благодаря уникальной форме электрода вы можете самостоятельно регулировать площадь воздействия от точечного до более обширного. Электрод также идеален для проведения процедур в труднодоступных частях тела. Для процедур по уходу за кожей лица и тела. Благодаря уникальной форме электрода вы можете самостоятельно регулировать площадь воздействия от точечного до более обширного. Электрод также идеален для проведения процедур в труднодоступных частях тела. После поступления заказа в ПВЗ, вам придет смс e-mail уведомление.
https://directory-broker.com/listings12862825/карепрост-цена
Роллер — помощник в уходе за собой на каждый день. Утром, чтобы лицо проснулось; вечером — чтобы отдохнуло после трудного дня. Роллер прост и понятен в применении, движения почти интуитивные: от центра лица наружу и всегда вверх. Массаж можно делать сколько угодно, когда угодно и где угодно. Массажный роллер — помощник в борьбе с отечностью и тусклым цветом лица. Секрет прост: массажер снимает напряжение в мышцах и улучшает кровообращение, за счет чего кожа становится гладкой и сияющей! Однако призываем тебя не верить исключительно инфлюенсерам! Ведь отзыве о массаже гуаша для лица не только положительные, есть у методики гуаша и множество противников. Передаем слово эксперту. Всё, что прикасается к лицу, следует тщательно очистить. Руки – вымыть с мылом, массажные ролики, скребки, банки продезинфицировать спиртовыми салфетками.
I just could not depart your site before suggesting that I really enjoyed the standard info a person provide for your visitors? Is going to be back often in order to check up on new posts
Automating design in SOLIDWORKS with DriveWorksXpress can significantly improve efficiency and accuracy, much like how the Elfbar Dual 10K Vape Kit revolutionizes the vaping experience with its dual functionality and long-lasting performance. Just as DriveWorksXpress streamlines the design process by automating repetitive tasks, the Elfbar Dual 10K Vape Kit simplifies vaping by offering dual pods and extended use, making both processes more user-friendly and efficient. Whether you’re working in design automation or enjoying a satisfying vape, optimizing for performance and convenience is key.
Great site you have here.. It’s hard to find high quality writing like yours these days. I truly appreciate people like you! Take care!!
I’m not that much of a online reader to be honest but your sites really nice, keep it up! I’ll go ahead and bookmark your website to come back later. Cheers
Everything is very open with a precise description of the issues. It was truly informative. Your site is extremely helpful. Thanks for sharing!
I really love your site.. Excellent colors & theme. Did you make this website yourself? Please reply back as I’m planning to create my own website and would like to learn where you got this from or what the theme is named. Cheers.
The author was able to express in words what many feel, but cannot formulate :
——-
Like 2878
Your style is very unique in comparison to other folks I have read stuff from. I appreciate you for posting when you have the opportunity, Guess I’ll just book mark this web site.
Pretty! This was a really wonderful post. Thanks for providing this information.
I have observed that in the world these days, video games include the latest trend with kids of all ages. Periodically it may be difficult to drag the kids away from the activities. If you want the very best of both worlds, there are lots of educational games for kids. Thanks for your post.
https://gramster.ru/# пин ап казино официальный сайт
Everything is very open with a very clear description of the issues. It was truly informative. Your website is useful. Many thanks for sharing.
http://gramster.ru/# gramster.ru
пин ап вход: gramster.ru – пин ап казино официальный сайт
https://gramster.ru/# пин ап зеркало
Hey there! I just want to give you a huge thumbs up for your great info you have here on this post. I will be coming back to your site for more soon.
http://gramster.ru/# пин ап зеркало
пин ап вход Gramster пин ап вход
https://gramster.ru/# pinup 2025
http://gramster.ru/# пин ап казино
pinup 2025 Gramster пин ап казино
пинап казино: gramster.ru – gramster.ru
https://gramster.ru/# pinup 2025
There are some interesting deadlines in this article however I don?t know if I see all of them heart to heart. There’s some validity but I’ll take maintain opinion till I look into it further. Good article , thanks and we wish extra! Added to FeedBurner as well
http://gramster.ru/# пин ап казино
http://gramster.ru/# gramster.ru
pinup 2025: Gramster – пинап казино
http://gramster.ru/# пин ап казино зеркало
I love it when people come together and share ideas. Great blog, stick with it.
https://gramster.ru/# gramster.ru
пинап казино: Gramster – пин ап казино
I blog often and I genuinely thank you for your information. This article has truly peaked my interest. I am going to bookmark your site and keep checking for new information about once a week. I subscribed to your RSS feed as well.
http://gramster.ru/# gramster.ru
пинап казино gramster.ru пин ап вход
Good info. Lucky me I came across your website by accident (stumbleupon). I’ve book-marked it for later!
I wanted to thank you for this great read!! I definitely enjoyed every little bit of it. I’ve got you book-marked to check out new things you post…
http://gramster.ru/# pinup 2025
Spot on with this write-up, I seriously think this site needs a lot more attention. I’ll probably be back again to read through more, thanks for the info!
Very good information. Lucky me I came across your site by chance (stumbleupon). I’ve book-marked it for later.
http://gramster.ru/# пин ап зеркало
I like it when people get together and share thoughts. Great site, keep it up.
https://gramster.ru/# пин ап казино зеркало
http://gramster.ru/# пин ап казино
http://gramster.ru/# пинап казино
Today, taking into consideration the fast life style that everyone is having, credit cards get this amazing demand throughout the market. Persons out of every field are using the credit card and people who are not using the credit cards have lined up to apply for 1. Thanks for giving your ideas in credit cards.
пин ап казино официальный сайт Gramster pinup 2025
I love it whenever people get together and share ideas. Great site, keep it up!
pinup 2025: gramster.ru – пин ап
Can I simply say what a reduction to search out someone who truly is aware of what theyre speaking about on the internet. You positively know the way to carry an issue to light and make it important. Extra people have to learn this and perceive this aspect of the story. I cant imagine youre not more in style because you positively have the gift.
https://gramster.ru/# pinup 2025
http://gramster.ru/# пин ап казино
http://gramster.ru/# pinup 2025
Your style is really unique in comparison to other folks I have read stuff from. Many thanks for posting when you’ve got the opportunity, Guess I’ll just book mark this blog.
pinup 2025: gramster.ru – gramster.ru
https://gramster.ru/# пин ап казино зеркало
Spot on with this write-up, I actually think this amazing site needs a lot more attention. I’ll probably be returning to see more, thanks for the info!
I used to be able to find good advice from your blog posts.
пин ап казино официальный сайт Gramster gramster.ru
Everything is very open with a precise explanation of the issues. It was really informative. Your site is very helpful. Thanks for sharing.
This site truly has all of the information I needed about this subject and didn’t know who to ask.
https://gramster.ru/# пин ап вход
https://gramster.ru/# пин ап зеркало
pinup 2025: gramster.ru – пин ап
I was excited to find this page. I wanted to thank you for ones time for this wonderful read!! I definitely really liked every little bit of it and i also have you book-marked to look at new stuff in your web site.
http://gramster.ru/# pinup 2025
pinup 2025 gramster.ru пин ап вход
http://gramster.ru/# пин ап казино зеркало
пин ап казино официальный сайт: Gramster – pinup 2025
https://gramster.ru/# пинап казино
пинап казино: Gramster – пин ап вход
пин ап казино официальный сайт Gramster gramster.ru
https://gramster.ru/# пин ап
http://gramster.ru/# пин ап казино официальный сайт
https://gramster.ru/# pinup 2025
http://gramster.ru/# пин ап вход
buy medicines online in india: Online medicine home delivery – buy medicines online in india
http://mexicanpharmacy.store/# reputable mexican pharmacies online
https://canadianpharmacy.win/# canada pharmacy 24h
canadian drugstore online best online canadian pharmacy canadian pharmacy 24h com safe
https://indianpharmacy.win/# mail order pharmacy india
http://mexicanpharmacy.store/# medicine in mexico pharmacies
canada drugs online reviews: best online canadian pharmacy – canadian mail order pharmacy
http://canadianpharmacy.win/# best canadian pharmacy to buy from
http://mexicanpharmacy.store/# mexican mail order pharmacies
https://indianpharmacy.win/# indian pharmacy online
india pharmacy india online pharmacy best online pharmacy india
How to pick Best Mutual Funds for Long Term Investment?
mexican online pharmacies prescription drugs: buying prescription drugs in mexico – mexican online pharmacies prescription drugs
https://mexicanpharmacy.store/# mexico drug stores pharmacies
http://mexicanpharmacy.store/# mexican mail order pharmacies
https://mexicanpharmacy.store/# mexican mail order pharmacies
Francis also stated that “The bottom line is that this album doesn’t reshape Americana in a brand new picture, just like the work of Bachman, Yasmin Williams, or Gwenifer Raymond. However, realistically, that is because William Tyler and Marisa Anderson already did that years in the past and their influence is just starting to be fully felt. It is sufficient for Lost Futures to supply some extra to completionists whereas giving a great introduction to these who’re newly exploring the genre”.
Very good info. Lucky me I recently found your blog by chance (stumbleupon). I’ve saved as a favorite for later!
The good news is that mystery shopping is an actual job – there are many reputable mystery shopping companies who employ people to anonymously evaluate stores, restaurants and other businesses by acting as a customer.
The correct Honourable Thomas, Baron Glentanar, JP, DL, Chief Scout’s Commissioner for Scotland; Member of the Scottish Agricultural Advisory Council.
Such posts make you think about many important things that we often ignore https://cmx-trust.zlnk.ru/#
Like 5455
https://mexicanpharmacy.store/# mexican mail order pharmacies
However an argument may be made (and is finished, both by marriage planners themselves by brides who have been happy with their skilled River Oaks wedding ceremony planner) that having knowledgeable River Oaks wedding ceremony planner, can save you money in different areas.
Online medicine order: reputable indian pharmacies – indian pharmacy online
canadian drug prices best canadian online pharmacy canada pharmacy
https://canadianpharmacy.win/# online canadian pharmacy
http://indianpharmacy.win/# indian pharmacy paypal
https://canadianpharmacy.win/# canadian pharmacy ltd
Tian suffers attacks from Yu’s suitor Wang Shiwei (chosen by Yu’s Grandfather) who hates Tian for being poor and embarrassing him for his callous and pompous nature.
http://mexicanpharmacy.store/# pharmacies in mexico that ship to usa
mail order pharmacy india: best india pharmacy – п»їlegitimate online pharmacies india
https://indianpharmacy.win/# Online medicine order
People rushing through online investment options and enquiring with friends and colleagues about the merits of these options is an annual ritual.
http://indianpharmacy.win/# top 10 online pharmacy in india
mexico drug stores pharmacies mexican online pharmacies prescription drugs п»їbest mexican online pharmacies
Then you required to set an order to purchase or sell or you can do both at the same time.
indian pharmacies safe: Online medicine order – online pharmacy india
https://mexicanpharmacy.store/# mexico pharmacies prescription drugs
A prominent annual occasion in British television, Kids in Want is one of two excessive-profile British telethons.
https://canadianpharmacy.win/# canadian pharmacy phone number
https://mexicanpharmacy.store/# mexican online pharmacies prescription drugs
https://indianpharmacy.win/# top online pharmacy india
world pharmacy india buy prescription drugs from india top online pharmacy india
https://canadianpharmacy.win/# online canadian drugstore
mexican online pharmacies prescription drugs: mexico drug stores pharmacies – mexico drug stores pharmacies
http://canadianpharmacy.win/# buying drugs from canada
http://indianpharmacy.win/# buy prescription drugs from india
https://mexicanpharmacy.store/# п»їbest mexican online pharmacies
my hard drive is getting full already because i always download free online movies on the internet~
indian pharmacy online: mail order pharmacy india – reputable indian pharmacies
http://canadianpharmacy.win/# best canadian online pharmacy reviews
canada pharmacy canadian pharmacy online canadian pharmacy reviews
http://canadianpharmacy.win/# legit canadian pharmacy online
https://canadianpharmacy.win/# northwest pharmacy canada
reputable indian pharmacies: top 10 pharmacies in india – india pharmacy
http://canadianpharmacy.win/# canadian mail order pharmacy
Magnificent beat ! I wish to apprentice while you amend your web site, how can i subscribe for a blog website? The account helped me a acceptable deal. I had been tiny bit acquainted of this your broadcast offered bright clear idea
we always buy our dog supplies at least once a week from the local pet store. –
https://indianpharmacy.win/# pharmacy website india
Considering another person whom knows about reports, still would not realize how to travel alongside one another? You may be just a friend or relative that does not have any any time to help you relax as well as dwelling and additionally hammer outside phrases even on a key pad.
indian pharmacy online Online medicine home delivery reputable indian pharmacies
http://mexicanpharmacy.store/# mexican drugstore online
http://canadianpharmacy.win/# canadian pharmacies comparison
buying prescription drugs in mexico: mexico pharmacies prescription drugs – mexico drug stores pharmacies
https://canadianpharmacy.win/# legit canadian pharmacy online
I’m curious to find out what blog system you are using? I’m having some small security problems with my latest blog and I would like to find something more secure. Do you have any solutions?
Super post it is definitely. I have been waiting for this content.
Ideally, each game component has at the least one unique trait.
https://mexicanpharmacy.store/# mexican pharmaceuticals online
http://indianpharmacy.win/# indianpharmacy com
http://indianpharmacy.win/# online pharmacy india
buy medicines online in india: top 10 online pharmacy in india – reputable indian online pharmacy
Online medicine home delivery indian pharmacy reputable indian pharmacies
https://indianpharmacy.win/# best online pharmacy india
Just want to say your article is as surprising. The clearness in your post is simply nice and i can assume you are an expert on this subject. Fine with your permission let me to grab your RSS feed to keep updated with forthcoming post. Thanks a million and please carry on the enjoyable work.
When I originally commented I clicked the -Notify me when new surveys are added- checkbox and already each time a comment is added I get four emails using the same comment. Perhaps there is in any manner you are able to eliminate me from that service? Thanks!
Put on it to workplace events or simply hanging out together with your gang of women.
I have discovered some new things from your web page about computers. Another thing I’ve always presumed is that laptop computers have become a specific thing that each home must have for several reasons. They provide convenient ways to organize homes, pay bills, search for information, study, focus on music and in many cases watch television shows. An innovative strategy to complete most of these tasks is a notebook. These desktops are mobile ones, small, potent and mobile.
http://canadianpharmacy.win/# canadian drugs
http://mexicanpharmacy.store/# mexican border pharmacies shipping to usa
http://mexicanpharmacy.store/# mexico drug stores pharmacies
canada pharmacy online: best online canadian pharmacy – canada drugs reviews
Headquartered in Nashville, Tennessee, the company owns and operates multiple hundred and seventy Christian shops across the county, as properly as the Ridgecrest Convention Heart in North Carolina.
Seduction approach in general is usually an total solution regarding losers, males and females exactly who maintain small self-esteem, people looking for work and also commercial travellers. Folks that will be in enormous requirement assist, with regard to recording the actual minds on the individuals they will usually needed will probably be overpowered if they the real reason for wander belonging to the so-called seduction method. Thus choose, as well as reveal the seduction strategy to your friends which you are aware of are generally enduring numerous encumbrance of their life. You’ll be able to completely end up being with superb help in fixing that miseries that belongs to them life.
very good publish, i actually love this web site, keep on it
Результативное распространение веб-портала с помощью статей В нынешнем онлайн универсуме популяризация web-страницы представляется существенным компонентом достижения всякого сетевого дела продвижение англоязычного сайта статьями.
Hey, what kind of anti-spam plugin do you use for your blog.;”:”‘
https://fastpillsformen.com/# sildenafil over the counter
Cheap Viagra 100mg FastPillsForMen.com Cheap Viagra 100mg
Hi friends! Choose compassion as your superpower. Love has the power to change the world.
ed pills cheap: low cost ed meds – low cost ed meds online
http://fastpillseasy.com/# buy ed medication online
sildenafil 50 mg price: FastPillsForMen – buy viagra here
https://fastpillseasy.com/# order ed pills
67 Clerk’s office Clinton County, St.
A number of risk factors can enhance the probability of creating postpartum depression, and understanding them can help determine those who could also be more inclined.
ed treatments online cheap cialis erection pills online
http://fastpillseasy.com/# cheapest online ed treatment
Cheap Cialis: Generic Cialis without a doctor prescription – Cialis 20mg price in USA
K8 Betting – Địa Chỉ Cá Cược Hàng Đầu Cho Người Chơi Việt Nam
Bạn đang tìm kiếm một nền tảng cá cược uy tín và chuyên nghiệp? K8 Betting chính là lựa chọn hoàn hảo dành cho bạn! Với giao diện thân thiện, tốc độ truy cập nhanh và hàng loạt trò chơi hấp dẫn, K8 Betting đã chiếm trọn niềm tin của đông đảo người chơi trong và ngoài nước.
Tại sao nên chọn K8 Betting?
Đa dạng trò chơi: Từ cá cược thể thao, sòng bài trực tuyến, đến các trò chơi slot hiện đại, K8 Betting đáp ứng mọi nhu cầu giải trí của bạn.
Khuyến mãi hấp dẫn: Người chơi mới sẽ nhận được phần thưởng chào mừng đặc biệt, trong khi người chơi lâu năm có cơ hội tham gia các chương trình ưu đãi độc quyền.
Thanh toán nhanh chóng: Hỗ trợ nhiều phương thức giao dịch an toàn, nhanh gọn, giúp bạn nạp rút tiền dễ dàng.
Hỗ trợ 24/7: Đội ngũ tư vấn viên chuyên nghiệp luôn sẵn sàng giải đáp mọi thắc mắc của bạn bất kỳ lúc nào.
Truy cập ngay K8 Betting để tham gia thế giới cá cược đỉnh cao và tận hưởng những trải nghiệm tuyệt vời!
https://k8betting.org
K8 Betting – Địa Chỉ Cá Cược Hàng Đầu Cho Người Chơi Việt Nam
Bạn đang tìm kiếm một nền tảng cá cược uy tín và chuyên nghiệp? K8 Betting chính là lựa chọn hoàn hảo dành cho bạn! Với giao diện thân thiện, tốc độ truy cập nhanh và hàng loạt trò chơi hấp dẫn, K8 Betting đã chiếm trọn niềm tin của đông đảo người chơi trong và ngoài nước.
Tại sao nên chọn K8 Betting?
Đa dạng trò chơi: Từ cá cược thể thao, sòng bài trực tuyến, đến các trò chơi slot hiện đại, K8 Betting đáp ứng mọi nhu cầu giải trí của bạn.
Khuyến mãi hấp dẫn: Người chơi mới sẽ nhận được phần thưởng chào mừng đặc biệt, trong khi người chơi lâu năm có cơ hội tham gia các chương trình ưu đãi độc quyền.
Thanh toán nhanh chóng: Hỗ trợ nhiều phương thức giao dịch an toàn, nhanh gọn, giúp bạn nạp rút tiền dễ dàng.
Hỗ trợ 24/7: Đội ngũ tư vấn viên chuyên nghiệp luôn sẵn sàng giải đáp mọi thắc mắc của bạn bất kỳ lúc nào.
Truy cập ngay K8 Betting để tham gia thế giới cá cược đỉnh cao và tận hưởng những trải nghiệm tuyệt vời!
https://k8-casino.vip
https://fastpillseasy.com/# ed online pharmacy
п»їcialis generic Max Pills For Men Generic Cialis price
erectile dysfunction medicine online: cheap cialis – п»їed pills online
Introducing to you the most prestigious online entertainment address today. Visit now to experience now!
order viagra: FastPillsForMen.com – over the counter sildenafil
http://fastpillseasy.com/# ed medication online
Cialis 20mg price Generic Cialis without a doctor prescription Generic Cialis price
When I initially commented I clicked the -Notify me when new comments are added- checkbox and now each time a comment is added I get 4 emails with the identical comment. Is there any method you’ll be able to take away me from that service? Thanks!
http://fastpillseasy.com/# erectile dysfunction online prescription
Sildenafil 100mg price: FastPillsForMen.com – order viagra
discount ed meds: where can i buy ed pills – erectile dysfunction online prescription
https://linkvaok8.net
Bet 88 Com VN – Điểm Đến Cá Cược Trực Tuyến Đỉnh Cao
Bạn đang tìm kiếm một nền tảng cá cược đáng tin cậy và đẳng cấp? Bet 88 Com VN chính là lựa chọn hàng đầu dành cho bạn! Với giao diện hiện đại, đa dạng trò chơi và dịch vụ chất lượng, Bet 88 Com VN đã và đang trở thành điểm đến yêu thích của đông đảo người chơi tại Việt Nam.
Tại sao nên chọn Bet 88 Com VN?
Kho trò chơi đa dạng: Từ cá cược thể thao, casino trực tuyến đến các trò chơi slot hấp dẫn, nền tảng đáp ứng mọi nhu cầu giải trí của bạn.
Bảo mật an toàn: Công nghệ mã hóa hiện đại giúp bảo vệ thông tin cá nhân và giao dịch của người chơi.
Khuyến mãi hấp dẫn: Tham gia ngay hôm nay để nhận các phần thưởng chào mừng, hoàn tiền hàng tuần và nhiều ưu đãi khác.
Hỗ trợ tận tâm: Đội ngũ chăm sóc khách hàng hoạt động 24/7, luôn sẵn sàng hỗ trợ bạn mọi lúc, mọi nơi.
Truy cập ngay Nhà Cái K8 để khám phá Bet 88 Com VN và trải nghiệm những giờ phút giải trí đỉnh cao!
https://1xbet-live.net
1xBet Live – Trải Nghiệm Cá Cược Trực Tuyến Đỉnh Cao
1xBet Live là một trong những nền tảng cá cược trực tuyến uy tín và hiện đại nhất, mang đến trải nghiệm giải trí đỉnh cao cho người chơi trên toàn thế giới. Với giao diện thân thiện và tính năng phát trực tiếp hấp dẫn, 1xBet Live giúp bạn hòa mình vào từng giây phút kịch tính của các sự kiện thể thao.
Vì sao nên chọn 1xBet Live?
Phát trực tiếp chất lượng cao: Xem và tham gia cá cược trên các sự kiện thể thao lớn như bóng đá, tennis, bóng rổ với độ phân giải sắc nét và không độ trễ.
Đa dạng trò chơi: Ngoài cá cược thể thao, 1xBet Live còn cung cấp các trò chơi casino, slot game và nhiều lựa chọn hấp dẫn khác.
Khuyến mãi hấp dẫn: Tham gia ngay hôm nay để nhận phần thưởng chào mừng và nhiều ưu đãi đặc biệt dành riêng cho người chơi.
Hỗ trợ chuyên nghiệp: Đội ngũ chăm sóc khách hàng hoạt động 24/7, đảm bảo giải đáp mọi thắc mắc của bạn.
Hãy truy cập 1xBet Live ngay hôm nay để khám phá thế giới cá cược trực tuyến đỉnh cao và tận hưởng những phút giây giải trí thú vị!
K8 – Nhà Cái Uy Tín Hàng Đầu Việt Nam
Bạn đang tìm kiếm một nhà cái uy tín, an toàn và chất lượng để tham gia cá cược trực tuyến? K8 chính là lựa
Vì sao nên chọn K8?
Đa dạng trò chơi: Từ cá cược thể thao, sòng bài trực tuyến, đến slot game hiện đại, K8 đáp ứng mọi nhu cầu giải trí của bạn.
Bảo mật cao: Sử dụng công nghệ mã hóa tiên tiến, đảm bảo thông tin cá nhân và giao dịch của bạn luôn được bảo vệ an toàn.
Khuyến mãi hấp dẫn: Tham gia K8 để nhận ngay các chương trình ưu đãi đặc biệt như thưởng chào mừng, hoàn tiền hàng tuần và quà tặng độc quyền.
Hỗ trợ chuyên nghiệp: Đội ngũ chăm sóc khách hàng hoạt động 24/7, luôn sẵn sàng giải đáp mọi thắc mắc của bạn.
Truy cập ngay Nhà Cái K8 để bắt đầu hành trình giải trí đỉnh cao và khám phá thế giới cá cược trực tuyến thú vị!
https://nhacaik8.net
Bet789 – Nền Tảng Cá Cược Uy Tín Hàng Đầu
Bạn đang tìm kiếm một nền tảng cá cược trực tuyến đáng tin cậy, an toàn và chất lượng? Bet789 chính là sự lựa chọn lý tưởng dành cho bạn! Với nhiều năm kinh nghiệm và uy tín trong ngành, Bet789 mang đến cho người chơi trải nghiệm cá cược đẳng cấp và đầy hấp dẫn.
Tại sao nên chọn Bet789?
Đa dạng trò chơi: Bet789 cung cấp các trò chơi cá cược từ thể thao, casino trực tuyến đến các trò chơi slot độc đáo, đáp ứng mọi sở thích của người chơi.
Giao dịch nhanh chóng: Hỗ trợ nạp và rút tiền an toàn, nhanh gọn, giúp bạn yên tâm tham gia mọi lúc mọi nơi.
Khuyến mãi hấp dẫn: Người chơi mới nhận ngay các phần thưởng chào mừng, trong khi người chơi cũ có cơ hội tham gia các chương trình ưu đãi đặc biệt hàng tuần.
Hỗ trợ 24/7: Đội ngũ nhân viên chuyên nghiệp luôn sẵn sàng giải đáp mọi thắc mắc và hỗ trợ bạn tận tình.
Truy cập ngay Đăng Nhập Gi8 để trải nghiệm Bet789 và khám phá thế giới cá cược đỉnh cao ngay hôm nay!
https://dangnhapgi8.com
https://1xbetmobi.xyz
SBOBET Com Online – Nền Tảng Cá Cược Trực Tuyến Uy Tín
SBOBET Com Online là một trong những nền tảng cá cược hàng đầu, được đông đảo người chơi tin tưởng và lựa chọn. Với giao diện hiện đại, thân thiện và dịch vụ chuyên nghiệp, SBOBET mang đến cho bạn trải nghiệm cá cược trực tuyến đẳng cấp nhất.
Vì sao nên chọn SBOBET Com Online?
Cá cược thể thao đa dạng: Tham gia cá cược trên các môn thể thao yêu thích như bóng đá, bóng rổ, tennis và hàng ngàn sự kiện hấp dẫn khác mỗi ngày.
Trò chơi casino đỉnh cao: Ngoài cá cược thể thao, bạn còn có thể trải nghiệm các trò chơi casino trực tuyến như baccarat, roulette và blackjack với chất lượng hình ảnh sắc nét.
Khuyến mãi hấp dẫn: Người chơi mới nhận ngay phần thưởng chào mừng, trong khi người chơi lâu năm được hưởng các chương trình ưu đãi thường xuyên.
Hỗ trợ 24/7: Đội ngũ nhân viên tận tình và chuyên nghiệp luôn sẵn sàng hỗ trợ bạn mọi lúc, mọi nơi.
Truy cập ngay 1xBet Mobi để khám phá SBOBET Com Online và tận hưởng trải nghiệm cá cược trực tuyến không giới hạn!
https://fastpillsformen.com/# Cheap Viagra 100mg
where to buy ed pills fast pills easy where can i get ed pills
http://fastpillsformen.com/# Viagra without a doctor prescription Canada
For those of us whose information of this Nordic nation ends at furniture stores and Muppets, allow us to introduce you to a Scandanavian tradition called Lördagsgodis (aka “Saturday sweets” or “Saturday candy”), a celebration of all issues sugary that occurs every weekend.
Sure enough each time the circuit breaker was switched in “PHUT”, it immediately cut out once more.
Trải Nghiệm Cá Cược Dễ Dàng Với 1xBet App
Nếu bạn là người yêu thích cá cược và tìm kiếm một ứng dụng cá cược tiện lợi, nhanh chóng và bảo mật, thì 1xBet app chính là lựa chọn hoàn hảo dành cho bạn. Với giao diện thân thiện, dễ sử dụng, 1xBet app mang đến cho người dùng một nền tảng cá cược trực tuyến toàn diện với nhiều môn thể thao, casino, và các trò chơi giải trí hấp dẫn.
Ứng dụng 1xBet hỗ trợ cả hệ điều hành Android và iOS, giúp bạn dễ dàng tải và cài đặt trên điện thoại chỉ với vài bước đơn giản. Bên cạnh đó, 1xBet app còn cung cấp các chương trình khuyến mãi hấp dẫn cho người dùng mới và các thành viên lâu dài, giúp bạn có thêm nhiều cơ hội thắng lớn.
Hãy tải ngay 1xBet app để không bỏ lỡ những cơ hội cá cược thú vị. Truy cập tại đây để tải ứng dụng và khám phá thế giới cá cược ngay hôm nay!
https://1xbet-app.blog
Khám Phá Thế Giới Cá Cược Với 1xBet
1xBet là một trong những nền tảng cá cược trực tuyến hàng đầu hiện nay, được yêu thích bởi sự đa dạng và phong phú trong các dịch vụ cá cược. Từ cá cược thể thao, casino trực tuyến cho đến các trò chơi giải trí, 1xBet mang đến cho người chơi những trải nghiệm tuyệt vời và cơ hội thắng lớn.
Điều làm nên sự khác biệt của 1xBet chính là giao diện dễ sử dụng, tính năng nhanh chóng và bảo mật tuyệt đối. Bạn có thể tham gia cá cược mọi lúc, mọi nơi chỉ cần một chiếc điện thoại hoặc máy tính có kết nối Internet. Bên cạnh đó, 1xBet cũng thường xuyên đưa ra các chương trình khuyến mãi hấp dẫn dành cho người mới và những người chơi lâu dài.
Để bắt đầu hành trình cá cược của mình, bạn chỉ cần truy cập https://1xbet-link.net và đăng ký tài khoản. Đừng bỏ lỡ cơ hội tuyệt vời để thắng lớn cùng 1xBet!
Khám Phá Dịch Vụ Cá Cược Hàng Đầu Cùng Dafabet
Dafabet là một trong những nền tảng cá cược trực tuyến uy tín và chất lượng nhất hiện nay. Với đa dạng các trò chơi từ cá cược thể thao, casino trực tuyến, đến các trò chơi slot và poker, Dafabet mang đến cho người chơi những trải nghiệm thú vị và cơ hội thắng lớn.
Điểm nổi bật của Dafabet chính là giao diện thân thiện và dễ sử dụng, giúp người chơi dễ dàng tham gia các trò chơi yêu thích. Hệ thống bảo mật của Dafabet cũng được đảm bảo, giúp mọi giao dịch của bạn luôn an toàn và bảo mật. Bên cạnh đó, Dafabet còn thường xuyên cung cấp các chương trình khuyến mãi hấp dẫn và tỷ lệ cược cạnh tranh, tạo ra nhiều cơ hội cho người chơi.
Để bắt đầu trải nghiệm cá cược trực tuyến cùng Dafabet, hãy truy cập ngay vào https://dafabetlink.com và đăng ký tài khoản để khám phá ngay những trò chơi hấp dẫn.
Trải Nghiệm Cá Cược Đỉnh Cao Cùng XBet
XBet là nền tảng cá cược trực tuyến uy tín, mang đến cho người chơi những trải nghiệm độc đáo và hấp dẫn. Với giao diện dễ sử dụng, nhanh chóng và an toàn, XBet giúp người chơi dễ dàng tham gia vào các trò chơi cá cược, từ thể thao, casino trực tuyến cho đến các trò chơi khác.
Điều đặc biệt của XBet là hệ thống hỗ trợ người chơi linh hoạt, chương trình khuyến mãi hấp dẫn và tỷ lệ cược cạnh tranh, giúp tối đa hóa cơ hội chiến thắng. Bạn có thể cá cược mọi lúc, mọi nơi chỉ cần kết nối Internet. Ngoài ra, XBet còn hỗ trợ nhiều phương thức thanh toán tiện lợi, đảm bảo mọi giao dịch của bạn luôn được thực hiện nhanh chóng và an toàn.
Để bắt đầu khám phá thế giới cá cược thú vị này, hãy truy cập https://link1xbet.org ngay hôm nay để đăng ký và tham gia!
Khám Phá Cá Cược Hấp Dẫn Với Dafabet Link
Dafabet là một trong những nền tảng cá cược trực tuyến uy tín, mang đến cho người chơi nhiều trò chơi thú vị và cơ hội chiến thắng lớn. Với Dafabet link, bạn có thể dễ dàng truy cập vào trang web chính thức của Dafabet, nơi cung cấp các dịch vụ cá cược thể thao, casino trực tuyến, poker, và nhiều trò chơi giải trí khác.
Điều đặc biệt khi sử dụng Dafabet link là bạn có thể tận hưởng những ưu đãi hấp dẫn, tỷ lệ cược cạnh tranh và một giao diện dễ sử dụng, giúp việc cá cược trở nên dễ dàng và thú vị hơn. Hệ thống bảo mật của Dafabet cũng đảm bảo mọi giao dịch của bạn đều an toàn và bảo mật tuyệt đối.
Để bắt đầu trải nghiệm các trò chơi thú vị và dịch vụ tuyệt vời của Dafabet, hãy truy cập ngay vào https://link-dafabet.com để đăng ký tài khoản và tham gia.
Khám Phá Thế Giới Cá Cược Cùng Fabet
Fabet là một nền tảng cá cược trực tuyến uy tín và được yêu thích, mang đến cho người chơi một loạt các trò chơi hấp dẫn và cơ hội thắng lớn. Từ cá cược thể thao, casino trực tuyến cho đến các trò chơi slot, Fabet cung cấp một không gian cá cược đa dạng và thú vị cho người chơi trên toàn thế giới.
Sử dụng Fabet, người chơi sẽ được trải nghiệm giao diện dễ sử dụng, nhanh chóng và hoàn toàn bảo mật. Fabet luôn đảm bảo rằng mọi giao dịch của người chơi đều an toàn và bảo mật tuyệt đối. Hệ thống hỗ trợ khách hàng chuyên nghiệp và tỷ lệ cược cạnh tranh là những yếu tố khiến Fabet trở thành lựa chọn hàng đầu của những người đam mê cá cược.
Để bắt đầu hành trình cá cược của mình, hãy truy cập ngay https://linkvaodafabet.org và đăng ký tài khoản để khám phá các trò chơi thú vị và nhận những ưu đãi hấp dẫn từ Fabet!
Trải Nghiệm Cá Cược Thể Thao Đỉnh Cao Cùng M88
Nếu bạn là người đam mê cá cược thể thao, M88 m thể thao chính là lựa chọn lý tưởng giúp bạn trải nghiệm các trận đấu hấp dẫn với tỷ lệ cược cao và các khuyến mãi hấp dẫn. Tại M88, bạn có thể tham gia cá cược vào các môn thể thao phổ biến như bóng đá, bóng rổ, tennis và nhiều môn thể thao khác với giao diện thân thiện và dễ sử dụng.
Điều đặc biệt của M88 m thể thao là hệ thống cá cược trực tuyến linh hoạt, giúp bạn theo dõi kết quả trực tiếp và đặt cược vào những trận đấu yêu thích bất cứ lúc nào. Bên cạnh đó, nền tảng này cũng cung cấp nhiều phương thức thanh toán tiện lợi và bảo mật, đảm bảo mọi giao dịch đều được thực hiện an toàn.
Để tham gia và tận hưởng các dịch vụ cá cược thể thao tuyệt vời từ M88, hãy truy cập ngay https://mu88tang100k.com và đăng ký tài khoản. Đừng bỏ lỡ cơ hội thắng lớn!
Đăng Nhập M88 – Trải Nghiệm Cá Cược Tuyệt Vời
Đăng nhập M88 để bắt đầu hành trình cá cược của bạn với một trong những nền tảng cá cược trực tuyến uy tín và chất lượng hàng đầu. Tại M88, bạn có thể tham gia cá cược thể thao, chơi casino trực tuyến, poker, và các trò chơi slot thú vị. Với giao diện dễ sử dụng và tỷ lệ cược hấp dẫn, M88 mang đến cho người chơi những trải nghiệm tuyệt vời.
Khi bạn đăng nhập M88, bạn sẽ có quyền truy cập vào tất cả các dịch vụ cá cược, cùng với các chương trình khuyến mãi đặc biệt và ưu đãi hấp dẫn. Bên cạnh đó, hệ thống bảo mật của M88 đảm bảo mọi giao dịch của bạn đều an toàn và bảo mật.
Để đăng nhập và tham gia cá cược tại M88, hãy truy cập ngay https://dangnhapmu88.net. Đừng bỏ lỡ cơ hội trải nghiệm những trò chơi thú vị và cơ hội thắng lớn tại M88!
Khám Phá Sân Chơi Casino Tuyệt Vời Tại Mu88 Casino
Mu88 Casino là một trong những nền tảng casino trực tuyến hàng đầu, mang đến cho người chơi những trải nghiệm tuyệt vời với nhiều trò chơi hấp dẫn và tỷ lệ thắng cao. Từ các trò chơi bài như Baccarat, Poker, Blackjack cho đến các trò chơi slot đa dạng, Mu88 Casino đáp ứng mọi nhu cầu của người chơi yêu thích sự kịch tính và thú vị.
Với giao diện thân thiện và dễ sử dụng, bạn có thể tham gia chơi các trò chơi casino yêu thích ngay trên điện thoại hoặc máy tính, bất cứ khi nào và ở đâu. Mu88 Casino cũng cung cấp các chương trình khuyến mãi hấp dẫn và hỗ trợ thanh toán nhanh chóng, an toàn, giúp bạn hoàn toàn yên tâm khi chơi.
Nếu bạn đang tìm kiếm một nơi để trải nghiệm cảm giác hồi hộp của casino trực tuyến, đừng bỏ qua Mu88 Casino. Hãy truy cập https://mu88-casino.net ngay hôm nay để đăng ký và bắt đầu hành trình chơi casino của mình!
best ed pills online: FastPillsEasy – cheap ed pills
Are you a fan of real estate investing to your retirement?
http://fastpillseasy.com/# best online ed pills
buy Viagra over the counter Fast Pills For Men sildenafil over the counter
Cheap generic Viagra: buy viagra online – over the counter sildenafil
cheapest viagra: FastPillsForMen.com – Cheap generic Viagra
https://maxpillsformen.com/# Buy Tadalafil 5mg
http://maxpillsformen.com/# Cialis over the counter
get ed prescription online cheap erectile dysfunction pills ed med online
Jun88 là một trong những nền tảng cá cược trực tuyến nổi bật tại Việt Nam, cung cấp cho người chơi những trải nghiệm tuyệt vời trong các trò chơi thể thao, casino, poker, và nhiều trò chơi hấp dẫn khác. Với giao diện dễ sử dụng và bảo mật cao, Jun88 đã chiếm được lòng tin của hàng triệu người chơi trên khắp đất nước.
Để bắt đầu trải nghiệm những dịch vụ thú vị tại Jun88, bạn chỉ cần thực hiện thao tác đăng nhập Jun88 nhanh chóng và đơn giản. Quá trình đăng nhập an toàn và bảo mật, đảm bảo thông tin cá nhân của người chơi luôn được bảo vệ. Sau khi đăng nhập, bạn sẽ có cơ hội tham gia vào các trò chơi hấp dẫn, nhận các khuyến mãi đặc biệt và những ưu đãi hấp dẫn từ nhà cái.
Đừng bỏ lỡ cơ hội tham gia cộng đồng Jun88 và trải nghiệm các trò chơi đẳng cấp. Để đăng nhập vào tài khoản và bắt đầu chơi ngay, bạn chỉ cần truy cập vào liên kết https://jun88mobi.xyz. Chúc bạn có những giây phút giải trí tuyệt vời tại Jun88!
M88 là một trong những nhà cái trực tuyến uy tín và nổi bật nhất tại Việt Nam, cung cấp các dịch vụ cá cược thể thao, casino, game trực tuyến, và nhiều trò chơi hấp dẫn khác. Với giao diện thân thiện và dễ sử dụng, M88 mang đến cho người chơi những trải nghiệm tuyệt vời ngay từ l
Một trong những ưu điểm nổi bật của M88 là tốc độ nạp rút tiền nhanh chóng, đảm bảo sự tiện lợi và an toàn cho người dùng. Hệ thống hỗ trợ khách hàng 24/7, luôn sẵn sàng giải đáp mọi thắc mắc và hỗ trợ kỹ thuật khi cần thiết. Đặc biệt, M88 còn cung cấp nhiều khuyến mãi hấp dẫn cho người chơi mới và cũ, giúp tăng thêm cơ
Nếu bạn đang tìm kiếm một địa chỉ đáng tin cậy để tham gia cá cược trực tuyến, M88 chính là sự lựa chọn hoàn hảo. Để khám phá và trải nghiệm các dịch vụ tại M88, bạn có thể đăng nhập qua liên kết [https://mu88dangnhap.net. Hãy
Jun88 là một trong những nhà cái trực tuyến nổi bật tại Việt Nam, mang đến cho người chơi một nền tảng cá cược thể thao, casino, và các trò chơi giải trí đa dạng. Với giao diện thân thiện và dễ sử dụng, Jun88 cam kết mang đến những trải nghiệm tốt nhất cho người chơi.
Đặc biệt, việc Jun88 đăng nhập cực kỳ đơn giản và nhanh chóng, giúp người chơi có thể dễ dàng truy cập và tham gia các trò chơi yêu thích. Jun88 không chỉ cung cấp các dịch vụ cá cược đa dạng, mà còn đảm bảo an toàn tuyệt đối cho tài khoản người chơi với hệ thống bảo mật tiên tiến. Bên cạnh đó, nhà cái này luôn mang đến những khuyến mãi hấp dẫn, giúp người chơi tăng cơ hội thắng lớn.
Nếu bạn đang tìm kiếm một nền tảng cá cược trực tuyến đáng tin cậy và dễ dàng sử dụng, Jun88 chính là lựa chọn hoàn hảo. Để đăng nhập và khám phá các dịch vụ của Jun88, bạn có thể truy cập qua liên kết sau: https://jun88dangnhap.net. Đừng bỏ lỡ cơ hội nhận thưởng và trải nghiệm các trò chơi tuyệt vời tại Jun88!
Jun88 TV là một nền tảng cá cược trực tuyến hàng đầu, cung cấp đa dạng các trò chơi thể thao, casino, và các trò chơi hấp dẫn khác. Được biết đến với giao diện dễ sử dụng và hệ thống bảo mật an toàn, Jun88 TV mang đến cho người chơi một trải nghiệm mượt mà và thú vị. Với việc hỗ trợ nhiều phương thức thanh toán và nạp tiền linh hoạt, người chơi có thể dễ dàng tham gia vào các trò chơi yêu thích của mình mà không lo ngại về vấn đề tài chính.
Jun88 TV cũng đặc biệt nổi bật với các chương trình khuyến mãi hấp dẫn dành cho người chơi mới và các thành viên lâu năm. Những ưu đãi này không chỉ giúp người chơi có thêm cơ hội chiến thắng mà còn tạo ra một môi trường cá cược công bằng và minh bạch.
Nếu bạn muốn khám phá một địa chỉ cá cược trực tuyến đáng tin cậy, đừng bỏ qua Jun88 TV. Để bắt đầu, hãy đăng nhập ngay qua liên kết https://dangnhapjun88.net và tận hưởng những ưu đãi đặc biệt, cũng như trải nghiệm những trò chơi thú vị mà Jun88 TV mang lại!
188Bet là một trong những nhà cái nổi bật tại Việt Nam, cung cấp các dịch vụ cá cược thể thao, casino trực tuyến và các trò chơi giải trí hấp dẫn. Để tham gia, việc đăng ký 188Bet là bước đầu tiên quan trọng. Quá trình đăng ký tại 188Bet rất đơn giản và nhanh chóng, chỉ cần bạn có một tài khoản email hợp lệ và các thông tin cá nhân cơ bản.
Một khi đã hoàn thành đăng ký 188Bet, bạn sẽ có thể tham gia vào một thế giới cá cược đầy thú vị với các sự kiện thể thao quốc tế, các trò chơi casino trực tuyến phong phú, và các chương trình khuyến mãi hấp dẫn. 188Bet cam kết bảo mật thông tin người chơi và cung cấp dịch vụ hỗ trợ khách hàng chuyên nghiệp 24/7.
Để bắt đầu trải nghiệm và tận hưởng những ưu đãi đặc biệt, bạn chỉ cần đăng ký ngay hôm nay qua liên kết https://dangky188bet.xyz. Chắc chắn, bạn sẽ có những trải nghiệm tuyệt vời tại 188Bet!
Jun88 Online là một nền tảng cá cược trực tuyến nổi bật, cung cấp các dịch vụ đa dạng bao gồm cá cược thể thao, casino trực tuyến, và các trò chơi game hấp dẫn khác. Với thiết kế giao diện đơn giản và dễ sử dụng, Jun88 Online mang đến cho người chơi những trải nghiệm mượt mà và thú vị ngay từ lần đầu tiên tham gia.
Một trong những điểm mạnh của Jun88 là hệ thống thanh toán nhanh chóng và bảo mật cao, đảm bảo rằng người chơi có thể thực hiện các giao dịch nạp rút tiền một cách an toàn và thuận tiện. Ngoài ra, Jun88 cũng có đội ngũ hỗ trợ khách hàng chuyên nghiệp, luôn sẵn sàng giải đáp mọi thắc mắc và cung cấp sự trợ giúp kịp thời.
Để khám phá và tham gia vào các trò chơi trực tuyến hấp dẫn tại Jun88 Online, bạn có thể truy cập ngay qua liên kết https://nhacaijun88.xyz. Đừng bỏ lỡ cơ hội nhận các khuyến mãi đặc biệt và trải nghiệm những phút giây giải trí thú vị tại Jun88 Online ngay hôm nay!
BK8 Bet là một trong những nhà cái cá cược trực tuyến hàng đầu tại Việt Nam, mang đến cho người chơi những trải nghiệm cá cược đa dạng và thú vị. Với nhiều dịch vụ nổi bật như cá cược thể thao, casino trực tuyến, xổ số, và các trò chơi game hấp dẫn, BK8 Bet luôn cam kết mang lại sự an toàn và công bằng cho người chơi.
Với giao diện người dùng thân thiện, bạn có thể dễ dàng tham gia các trò chơi yêu thích và tận hưởng những giây phút thư giãn tuyệt vời. BK8 Bet còn nổi bật với các khuyến mãi hấp dẫn, giúp người chơi có thêm nhiều cơ hội thắng lớn. Tính năng nạp rút tiền nhanh chóng và hỗ trợ khách hàng 24/7 chính là điểm cộng lớn giúp BK8 Bet trở thành lựa chọn tin cậy cho những ai yêu thích cá cược trực tuyến.
Để bắt đầu hành trình cá cược của mình, bạn có thể truy cập ngay vào liên kết https://bk8-bet.net để đăng nhập và nhận nhiều ưu đãi đặc biệt. Tham gia BK8 Bet ngay hôm nay để khám phá thế giới cá cược đầy thú vị và cơ hội chiến thắng!
https://maxpillsformen.com/# buy cialis pill
Sildenafil 100mg price: FastPillsForMen.com – Buy Viagra online cheap
ed prescriptions online: cheap cialis – ed med online
Cialis over the counter Max Pills For Men Buy Cialis online
https://maxpillsformen.com/# Generic Tadalafil 20mg price
http://fastpillseasy.com/# cheapest ed meds
https://fastpillseasy.com/# ed medicine online
Generic Viagra online: FastPillsForMen – Viagra tablet online
Viagra tablet online Fast Pills For Men Cheap generic Viagra
Cialis without a doctor prescription: buy cialis online – Cialis over the counter
https://fastpillseasy.com/# ed online treatment
So do you pull your most efficient person out of their current job, or are you better off hiring someone who does this day in and day out?
http://fastpillsformen.com/# Cheap Viagra 100mg
A large number of Indian cities are looking for cleaner fuel, and consequently, the CNG has been gaining momentum in the Indian automobile market.
buy erectile dysfunction pills: fast pills easy – buying ed pills online
https://fastpillseasy.com/# cheapest erectile dysfunction pills
http://fastpillsformen.com/# Cheap generic Viagra
Every word of this post conveys a deep understanding of the current situation in society https://000-google-09.s3.eu-north-1.amazonaws.com/id-10.html
Like 3162
http://maxpillsformen.com/# Generic Cialis price
Cialis 20mg price in USA: MaxPillsForMen – Generic Tadalafil 20mg price
Cheap Viagra 100mg: Fast Pills For Men – viagra without prescription
http://fastpillsformen.com/# cheap viagra
Generic Cialis without a doctor prescription: Generic Cialis without a doctor prescription – Tadalafil Tablet
Buy Tadalafil 10mg: Max Pills For Men – Tadalafil Tablet
where can i get ed pills FastPillsEasy online ed medications
Beads and jewellery are still among the commonest uses of glass in artwork and may be labored without a furnace.
So, when you are going to make the choice then if you remember these things then you can find a suitable service.
https://fastpillsformen.com/# Cheap Sildenafil 100mg
Hey, I loved your post! Check out my site: ANCHOR.
Viagra generic over the counter: FastPillsForMen.com – viagra without prescription
http://fastpillseasy.com/# online ed pharmacy
best price for viagra 100mg: Cheap generic Viagra – sildenafil over the counter
online ed pharmacy ed online pharmacy buy ed pills online
sildenafil 50 mg price: Fast Pills For Men – Order Viagra 50 mg online
https://fastpillsformen.com/# Viagra Tablet price
Introducing to you the most prestigious online entertainment address today. Visit now to experience now!
He sent his adjutant Joseph Reed to meet with Samuel Griffin, the militia’s commander.
Introducing to you the most prestigious online entertainment address today. Visit now to experience now!
Nếu bạn đang tìm kiếm một nền tảng giải trí trực tuyến đáng tin cậy, hãy ghé thăm trang web https://nhacai-bk8.com. Với từ khóa “svv388”, đây là nơi lý tưởng để bạn trải nghiệm các trò chơi hấp dẫn và dịch vụ chuyên nghiệp. Đừng bỏ lỡ cơ hội tham gia và khám phá ngay hôm nay!
Nếu bạn đam mê cá cược và tìm kiếm một nền tảng đáng tin cậy, hãy truy cập ngay https://1xbet-live.net. Với 1xbet live, bạn sẽ trải nghiệm cảm giác sống động của cá cược trực tuyến, từ thể thao đến casino. Giao diện thân thiện, tỷ lệ cược hấp dẫn và hỗ trợ nhanh chóng, đây là nơi lý tưởng để thử vận may của bạn!
Nếu bạn đang tìm kiếm một nền tảng cá cược đáng tin cậy, hãy truy cập ngay https://bk8-bet.net. BK8 Bet cung cấp đa dạng các loại hình cá cược từ thể thao, casino trực tuyến đến xổ số, đảm bảo mang lại trải nghiệm giải trí đỉnh cao. Đăng ký ngay hôm nay để nhận nhiều ưu đãi hấp dẫn và tham gia vào cộng đồng người chơi sôi động!
Dafabet là một trong những nền tảng cá cược trực tuyến hàng đầu, cung cấp trải nghiệm thú vị và an toàn cho người chơi. Với đa dạng các trò chơi như cá cược thể thao, casino trực tuyến và nhiều hơn nữa, Dafabet luôn là lựa chọn ưu tiên. Truy cập ngay: [https://dafabetlink.com](https://dafabetlink.com) để trải nghiệm!
Nếu bạn đang tìm kiếm một trang web uy tín để tham gia cược, sbobet là một lựa chọn không thể bỏ qua. Với giao diện thân thiện, dễ sử dụng và nhiều trò chơi hấp dẫn, sbobet đã trở thành điểm đến lý tưởng cho những ai yêu thích cá cược. Đặc biệt, hãy truy cập ngay https://k8-casino.vip để trải nghiệm dịch vụ tuyệt vời và nhận được nhiều ưu đãi hấp dẫn. Đừng bỏ lỡ cơ hội này!
Nếu bạn đang tìm kiếm một nền tảng cá cược trực tuyến đáng tin cậy, hãy ghé thăm ngay https://mu88tang100k.com. Với m88 m the thao, bạn sẽ trải nghiệm thế giới thể thao và cá cược đỉnh cao, từ bóng đá, bóng rổ đến nhiều môn thể thao khác. Đăng ký ngay hôm nay để nhận ưu đãi hấp dẫn và tận hưởng dịch vụ chuyên nghiệp!
Nếu bạn đang tìm kiếm một trang web uy tín để tham gia cá cược trực tuyến, hãy truy cập ngay https://dangnhapgi8.com. Trang web này cung cấp nền tảng chuyên nghiệp và đa dạng với từ khóa nổi bật “bet789”. Đây là nơi lý tưởng để bạn trải nghiệm các trò chơi cá cược hấp dẫn, giao diện thân thiện và dịch vụ hỗ trợ tận tình. Đừng bỏ lỡ cơ hội tham gia ngay hôm nay!
Nếu bạn đang tìm kiếm một nền tảng cá cược trực tuyến đáng tin cậy, hãy truy cập ngay https://1xbet-link.net. 1xbet là một trong những nhà cái hàng đầu với nhiều trò chơi hấp dẫn, tỷ lệ cược cạnh tranh và giao diện dễ sử dụng. Đăng ký ngay hôm nay để nhận các ưu đãi độc quyền và trải nghiệm cá cược đỉnh cao!
Nếu bạn đang tìm kiếm một trang web đáng tin cậy để trải nghiệm cá cược trực tuyến, hãy truy cập ngay https://jun88dangnhap.net. Với giao diện thân thiện, dễ sử dụng và hỗ trợ đăng nhập nhanh chóng qua “jun88 đăng nhập”, Jun88 mang đến cho bạn cơ hội tham gia vào thế giới giải trí đỉnh cao. Đừng bỏ lỡ, hãy khám phá ngay hôm nay!
Nếu bạn là người yêu thích cá cược trực tuyến, hãy ghé thăm trang web https://link1xbet.org ngay hôm nay! Xbet mang đến trải nghiệm cá cược đỉnh cao với giao diện thân thiện, tỷ lệ cược hấp dẫn và nhiều khuyến mãi hấp dẫn. Đừng bỏ lỡ cơ hội tham gia và tận hưởng những phút giây giải trí tuyệt vời cùng Xbet!
Nếu bạn đang tìm kiếm một trang web đáng tin cậy để trải nghiệm cá cược trực tuyến, hãy truy cập ngay https://8x-bet.blog. Với giao diện thân thiện, tốc độ nhanh và nhiều trò chơi hấp dẫn, www88 là lựa chọn lý tưởng cho những ai đam mê cá cược. Tham gia ngay hôm nay để nhận nhiều ưu đãi hấp dẫn!
Nếu bạn đang tìm kiếm một nền tảng cá cược trực tuyến uy tín và chất lượng, hãy truy cập ngay vào trang web https://dangnhapmu88.net. Đây là địa chỉ đáng tin cậy để bạn đăng nhập M88 và trải nghiệm các trò chơi hấp dẫn. Với giao diện thân thiện, bảo mật cao và nhiều ưu đãi, M88 sẽ mang đến cho bạn những phút giây giải trí tuyệt vời. Đừng bỏ lỡ cơ hội tham gia ngay hôm nay!
Nếu bạn đang tìm kiếm một trang web uy tín để tham gia cá cược trực tuyến, hãy truy cập ngay “bet 88 com vn” tại địa chỉ: [https://linkvaok8.net](https://linkvaok8.net). Với giao diện thân thiện, bảo mật cao và đa dạng trò chơi, đây là lựa chọn hoàn hảo cho những ai đam mê cá cược. Đừng bỏ lỡ cơ hội trải nghiệm ngay hôm nay!
Nếu bạn đang tìm kiếm một nền tảng cá cược trực tuyến uy tín, hãy truy cập ngay vào **Dafabet** qua liên kết chính thức: [https://link-dafabet.com](https://link-dafabet.com). Đây là nơi mang đến trải nghiệm cá cược đỉnh cao với đa dạng trò chơi, tỷ lệ cược hấp dẫn và dịch vụ hỗ trợ khách hàng chuyên nghiệp. Đừng bỏ lỡ cơ hội tham gia ngay hôm nay để nhận nhiều ưu đãi đặc biệt!
M88 là một trong những nền tảng cá cược trực tuyến hàng đầu, mang đến cho người chơi trải nghiệm tuyệt vời với đa dạng trò chơi và tỷ lệ cược hấp dẫn. Nếu bạn đang tìm kiếm một trang web uy tín để tham gia cá cược, hãy truy cập ngay https://mu88dangnhap.net. Đây là nơi bạn có thể tận hưởng những giây phút giải trí thú vị và cơ hội thắng lớn!
Nếu bạn đang tìm kiếm một ứng dụng cá cược chuyên nghiệp và đáng tin cậy, thì **1xbet app** chính là sự lựa chọn hoàn hảo. Với giao diện thân thiện, dễ sử dụng và nhiều tính năng hấp dẫn, ứng dụng này mang đến trải nghiệm cá cược đỉnh cao. Hãy truy cập ngay [1xbet app](https://1xbet-app.blog) để tải ứng dụng và khám phá thế giới cá cược thú vị!
K8 là một trong những nhà cái uy tín và nổi tiếng hàng đầu hiện nay. Với giao diện thân thiện, dễ sử dụng cùng nhiều ưu đãi hấp dẫn, K8 mang đến trải nghiệm giải trí đỉnh cao cho người chơi. Truy cập ngay website chính thức tại https://nhacaik8.net để khám phá các trò chơi đa dạng và cơ hội nhận thưởng lớn. Đừng bỏ lỡ!
Nếu bạn đang tìm kiếm một nền tảng giải trí trực tuyến đáng tin cậy, hãy ghé thăm trang web https://bk8-casino.xyz. Đây là nơi bạn có thể trải nghiệm các trò chơi đa dạng và hấp dẫn như ku11, với giao diện thân thiện và dịch vụ hỗ trợ chuyên nghiệp. Đừng bỏ lỡ cơ hội thử vận may ngay hôm nay!
Nếu bạn đang tìm kiếm một nền tảng cá cược trực tuyến đáng tin cậy, hãy đăng nhập Jun88 ngay hôm nay! Với giao diện thân thiện, tốc độ truy cập nhanh và đa dạng trò chơi, Jun88 mang đến trải nghiệm giải trí đỉnh cao. Truy cập ngay tại: https://jun88mobi.xyz để khám phá và tham gia những kèo cược hấp dẫn. Đừng bỏ lỡ cơ hội!
Nếu bạn đang tìm kiếm một nền tảng giải trí trực tuyến uy tín, hãy truy cập ngay vào trang web chính thức của Jun88 tại https://dangnhapjun88.net. Tại đây, bạn có thể trải nghiệm các dịch vụ cá cược đỉnh cao cùng với những trận đấu hấp dẫn được phát trực tiếp trên Jun88 TV. Đừng bỏ lỡ cơ hội tham gia và tận hưởng niềm vui!
Nếu bạn đang tìm kiếm một nền tảng cá cược trực tuyến đáng tin cậy, hãy ghé thăm https://bk8-casino.xyz ngay hôm nay! K8 betting mang đến trải nghiệm cá cược đa dạng với nhiều trò chơi hấp dẫn như cá cược thể thao, casino trực tuyến và nhiều hơn nữa. Tham gia ngay để nhận ưu đãi đặc biệt và tận hưởng niềm vui không giới hạn!
Nếu bạn đang tìm kiếm một nền tảng cá cược uy tín và chuyên nghiệp, hãy truy cập ngay **188bet đăng ký** tại [https://dangky188bet.xyz](https://dangky188bet.xyz). Trang web cung cấp nhiều trò chơi hấp dẫn như cá cược thể thao, casino trực tuyến và nhiều phần thưởng hấp dẫn. Đăng ký dễ dàng, giao diện thân thiện và hỗ trợ 24/7! Đừng bỏ lỡ cơ hội trải nghiệm!
Nếu bạn đang tìm kiếm một nền tảng cá cược trực tuyến uy tín và hấp dẫn, hãy ghé thăm ngay **jun88 online** tại [https://nhacaijun88.xyz](https://nhacaijun88.xyz). Với giao diện thân thiện, đa dạng trò chơi và tỷ lệ cược cạnh tranh, Jun88 là sự lựa chọn hàng đầu cho người chơi tại Việt Nam. Tham gia ngay để nhận nhiều ưu đãi hấp dẫn!
Introducing to you the most prestigious online entertainment address today. Visit now to experience now!
sweet bonanza slot sweet bonanza kazanma saatleri sweet bonanza slot
https://sweetbonanza25.com/# sweet bonanza demo oyna
sweet bonanza demo oyna: sweet bonanza slot – sweet bonanza guncel
https://sweetbonanza25.com/# sweet bonanza yorumlar
Greetings! Very helpful advice within this post! It is the little changes that will make the greatest changes. Thanks for sharing!
deneme bonusu veren siteler: yat?r?ms?z deneme bonusu veren siteler – deneme bonusu veren siteler
The lender examines varied factors just like the borrower’s revenue, credit historical past, bills and different debts and sets the credit score limit at a percentage of the home’s fairness.
http://sweetbonanza25.com/# sweet bonanza demo oyna
https://slotsiteleri25.com/# guvenilir slot siteleri
sweet bonanza sweet bonanza demo oyna sweet bonanza giris
slot siteleri: az parayla cok kazandiran slot oyunlar? – slot oyunlar? puf noktalar?
Introducing to you the most prestigious online entertainment address today. Visit now to experience now!
Have you ever considered creating an ebook or guest authoring on other websites? I have a blog centered on the same topics you discuss and would really like to have you share some stories/information. I know my audience would enjoy your work. If you are even remotely interested, feel free to send me an e-mail.
https://casinositeleri25.com/# en guvenilir casino siteleri
http://sweetbonanza25.com/# sweet bonanza guncel
deneme bonusu veren casino siteleri: deneme bonusu veren casino siteleri – canl? casino siteleri
slot oyunlar? en kazancl? slot oyunlar? slot oyunlar?
guvenilir slot siteleri: en kazancl? slot oyunlar? – slot siteleri
https://denemebonusuverensiteler25.com/# deneme bonusu veren siteler yeni
Introducing to you the most prestigious online entertainment address today. Visit now to experience now!
Deneme Bonusu Veren Siteler Casino Siteleri canl? casino siteleri
sweet bonanza oyna: sweet bonanza demo oyna – sweet bonanza kazanma saatleri
sweet bonanza giris: sweet bonanza oyna – sweet bonanza slot
https://slotsiteleri25.com/# slot oyunlar? puf noktalar?
en kazancl? slot oyunlar?: en cok kazand?ran slot oyunlar? – guvenilir slot siteleri
Thank you for sharing superb informations. Your web site is very cool. I am impressed by the details that you?ve on this site. It reveals how nicely you perceive this subject. Bookmarked this website page, will come back for more articles. You, my friend, ROCK! I found simply the information I already searched everywhere and simply could not come across. What a great site.
I blog often and I really thank you for your information. This article has truly peaked my interest. I’m going to take a note of your blog and keep checking for new details about once per week. I subscribed to your RSS feed as well.
https://sweetbonanza25.com/# sweet bonanza demo oyna
denemebonusuverensiteler25: deneme bonusu veren yeni siteler – deneme bonusu veren siteler
slot casino siteleri az parayla cok kazandiran slot oyunlar? en cok kazand?ran slot oyunlar?
Your style is really unique compared to other people I’ve read stuff from. Many thanks for posting when you have the opportunity, Guess I’ll just book mark this web site.
yeni deneme bonusu veren siteler: denemebonusuverensiteler25 – deneme bonusu veren siteler yeni
https://slotsiteleri25.com/# slot siteleri
Im obliged for the blog post.Thanks Again. Awesome.
Greetings! Very helpful advice in this particular post! It is the little changes which will make the biggest changes. Many thanks for sharing!
deneme bonusu veren yeni siteler deneme bonusu veren yeni siteler deneme bonusu veren siteler
sweet bonanza kazanma saatleri: sweet bonanza guncel – sweet bonanza slot
Someone necessarily assist to make seriously posts I’d state. This is the first time I frequented your website page and thus far? I amazed with the research you made to create this particular publish extraordinary. Magnificent process!
Casino Siteleri: en guvenilir casino siteleri – Canl? Casino Siteleri
slot siteleri: slot oyunlar? puf noktalar? – en kazancl? slot oyunlar?
en gГјvenilir yatД±rД±m siteleri
en cok kazand?ran slot oyunlar? slot casino siteleri en kazancl? slot oyunlar?
https://casinositeleri25.com/# Casino Siteleri
Every sentence in this post makes you seriously think about what is happening around https://lrhny.ilyx.ru/id-5266.html
Pretty! This was a really wonderful post. Many thanks for supplying this info.
sweet bonanza oyna: sweet bonanza – sweet bonanza yorumlar
deneme bonusu veren casino siteleri: Deneme Bonusu Veren Siteler – guvenilir casino siteleri
en kazancl? slot oyunlar? slot siteleri az parayla cok kazandiran slot oyunlar?
Unlock endless excitement at Online Matka Play. Join the fun today!
I blog frequently and I genuinely thank you for your information. Your article has truly peaked my interest. I’m going to book mark your website and keep checking for new details about once per week. I opted in for your Feed too.
https://slotsiteleri25.com/# slot casino siteleri
I really like what you guys tend to be up too. Such clever work and exposure! Keep up the very good works guys I’ve incorporated you guys to my blogroll.
yat?r?ms?z deneme bonusu veren siteler: yeni deneme bonusu veren siteler – deneme bonusu veren siteler yeni
guvenilir casino siteleri en guvenilir casino siteleri canl? casino siteleri
bookmarked!!, I really like your blog.
deneme bonusu veren siteler yeni: denemebonusuverensiteler25 – deneme bonusu veren yeni siteler
Thank you for the sensible critique. Me & my neighbor were just preparing to do a little research about this. We got a grab a book from our area library but I think I learned more from this post. I am very glad to see such great info being shared freely out there.
Serve gazpacho with plenty of fresh bread for dipping, and garnish with cilantro, sour cream and lime.
guvenilir slot siteleri: slot siteleri – en kazancl? slot oyunlar?
Hello there! I just would like to give you a big thumbs up for your great information you have here on this post. I will be returning to your site for more soon.
https://casinositeleri25.com/# Deneme Bonusu Veren Siteler
deneme bonusu veren yeni siteler yat?r?ms?z deneme bonusu veren siteler deneme bonusu veren siteler
I’m still learning from you, but I’m trying to achieve my goals.I certainly love reading all that is written on Your Essential Care Keto Ingredientsblog.Keep the tips coming. I enjoyed it!
It iss not my first time to pay a visit this website, i am visiting this web site dailly and get nice information from here all
the time. https://wakelet.com/wake/ZcxG8TgwL8dJF8AjWwOu1
hello there and thank you for your informatkon – I’ve
definitely picked up something new from right
here. I did however expertise some technical points using this website, since I experiended
to reload the website many times previous to I could gett it tto load correctly.
I had been wondering if your hosting is OK? Not that I’m complaining,
but sluggish loading instances times will very frequently affect your placement in google and can damage your quality score if
advertising and marketing with Adwords. Well I’m adding tthis RSS too my emaiol aand could
look ouut for a llot more of your respective interesting content.
Make sure you update this again very soon. https://pastelink.net/i7guxtt3
I’m extremely inspired together with your writing talents and
also with the format in your weblog. Is this a paid topic or did
you customizee it your self? Either way stay up the nice high quality writing, iit is uncommon to
look a great blog like this one these days.. https://basketbets.mystrikingly.com/
WOW just what I was searching for. Came hhere by searching for betting https://inleo.io/@smartsports111/is-sports-betting-a-good-idea-kmc
Casino Siteleri: Casino Siteleri – casino bahis siteleri
Hello there! Thiss is my first comment here so I just wanted to gige a quick shout out and tekl you I truly enjoy
reading yoour blog posts. Caan you recommend any othewr blogs/websites/forums that ggo over the sae topics?
Thanks a ton! https://www.pearltrees.com/alexx22x/item685613460
deneme bonusu veren yeni siteler: denemebonusuverensiteler25 – denemebonusuverensiteler25
slot casino siteleri slot oyunlar? puf noktalar? slot oyunlar? puf noktalar?
You’ve made some good points there. I looked on the internet for additional information about the issue and found most people will go along with your views on this website.
I just couldn’t go away your sit prior to suggesting thqt I actually loved the standard
info a perrson provide for your visitors? Is gonna be again often in order to check up on nnew posts https://gogetmushrooms.wordpress.com/
http://slotsiteleri25.com/# slot casino siteleri
The choice of words is a major factor that helps to give value to Forex.
deneme bonusu veren siteler: yat?r?ms?z deneme bonusu veren siteler – deneme bonusu veren yeni siteler
sweet bonanza yorumlar sweet bonanza kazanma saatleri sweet bonanza demo oyna
I need to to thank you for this fantastic read!! I absolutely loved every little bit of it. I have got you saved as a favorite to look at new stuff you post…
yat?r?ms?z deneme bonusu veren siteler: deneme bonusu veren siteler – denemebonusuverensiteler25
Thanks for sharing your thoughts about originalbikinis. Regards
That is as a result of these big parts are extra slowly adopted and thus much less likely to change into outdated fast.
I relish, cause I found exactly what I was looking for. You’ve ended my 4 day long hunt! God Bless you man. Have a nice day. Bye
Great post. I’m dealing with a few of these issues as well..
buy drugs from canada canadianpharmacymeds best rated canadian pharmacy
my canadian pharmacy rx https://indiancertpharm.com/# indian pharmacy
india online pharmacy
Mexican Easy Pharm: Mexican Easy Pharm – Mexican Easy Pharm
https://mexicaneasypharm.shop/# best online pharmacies in mexico
northern pharmacy canada
Generally I do not read article on blogs, but I would like to say that this write-up very forced me to check out and do so! Your writing taste has been surprised me. Thanks, quite great post.
Good day! I simply would like to give you a big thumbs up for your excellent info you’ve got right here on this post. I am coming back to your website for more soon.
canadian pharmacy sarasota: canada drugs online – canadian pharmacy world
After a primary pass, it’s totally robust, and preliminary progress was very quick, but still removed from unbeatable.
mexican online pharmacies prescription drugs: п»їbest mexican online pharmacies – Mexican Easy Pharm
Indian pharmacy international shipping Online pharmacy Indian pharmacy international shipping
buy canadian drugs https://indiancertpharm.shop/# india pharmacy mail order
top 10 pharmacies in india
Indian Cert Pharm: indian pharmacy – Indian pharmacy that ships to usa
https://canadianmdpharm.com/# canada drug pharmacy
canadian pharmacy store
canadian mail order pharmacy https://indiancertpharm.shop/# Online pharmacy
reputable indian pharmacies
mexican border pharmacies shipping to usa: Mexican Easy Pharm – Mexican Easy Pharm
Oh my goodness! Incredible article dude! Thank you so much, However I am experiencing problems with your RSS. I don’t know why I cannot join it. Is there anyone else getting identical RSS problems? Anybody who knows the solution will you kindly respond? Thanks!!
Introducing to you the most prestigious online entertainment address today. Visit now to experience now!
top online pharmacy india Indian pharmacy international shipping indian pharmacy
canadian pharmacy checker https://mexicaneasypharm.com/# Mexican Easy Pharm
reputable indian online pharmacy
I really liked your article post.Really looking forward to read more. Really Cool.
canadian 24 hour pharmacy: CanadianMdPharm – my canadian pharmacy review
Thanks-a-mundo for the blog post.Thanks Again. Much obliged.
Decorating a Room: Find out how one can decorate a room from ground-to-ceiling.
This is a topic that is close to my heart… Take care! Exactly where are your contact details though?
indian pharmacy: Indian Cert Pharm – Online medicine
canadian pharmacy 1 internet online drugstore https://canadianmdpharm.shop/# canadian pharmacy online store
best online pharmacy india
I truly appreciate this blog article.Really looking forward to read more. Cool.
drugs from canada: Canadian Md Pharm – drugs from canada
While you see your guest enjoying and loving the event and when they offer good suggestions, the precious time given by you grow to be extra precious.
Thanks so much for the article post.Really looking forward to read more. Want more.
Indian Cert Pharm Indian pharmacy that ships to usa Best online Indian pharmacy
safe canadian pharmacies https://canadianmdpharm.shop/# legitimate canadian pharmacy
india pharmacy
Hurley, Sandra (1 November 2021).
buy canadian drugs: Canadian Md Pharm – reliable canadian online pharmacy
reputable canadian online pharmacy: Canadian Md Pharm – canadian pharmacy meds
I’d like to thank you for the efforts you have put in penning this site. I am hoping to check out the same high-grade content by you in the future as well. In fact, your creative writing abilities has inspired me to get my own website now 😉
Something to keep in mind that any vehicle that is invested in the stock market including mutual funds, ETFs (exchange traded funds), insurance policies, IRAs, 401ks and annuities can experience losses when the market drops.
The underside line for me is that I believe I’ve realized extra checkers up to now month or two than the amount of chess I realized in a couple of years manner again when.
This is possible as a result of of those systems commerce less ceaselessly, and subsequently, their average benefit per trade is usually a lot increased.
The basics: What are the choices for sick days, maternity depart and normal workload?
Best online Indian pharmacy: IndianCertPharm – Best online Indian pharmacy
canadian pharmacy online reviews https://canadianmdpharm.com/# canadian pharmacy service
top 10 online pharmacy in india
pharmacies in mexico that ship to usa п»їbest mexican online pharmacies п»їbest mexican online pharmacies
Final minute sale discover on Amazon day.
canadian pharmacy tampa: canadian pharmacies – best canadian online pharmacy
If an individual can cover their annual expenses by withdrawing 4 of their portfolio savings, the individual is assumed to have achieved financial independence.
This automotive will value you greater than $2 million but it surely would not have safety-regulated airbags, making the automotive unlawful to even buy in the United States, not to mention drive.
best canadian pharmacy online: CanadianMdPharm – reliable canadian pharmacy reviews
Thanks for the article.Really looking forward to read more. Keep writing.
Online pharmacy Indian Cert Pharm IndianCertPharm
canadian pharmacy: CanadianMdPharm – best canadian online pharmacy reviews
indian pharmacy: Indian Cert Pharm – Indian Cert Pharm
A big thank you for your article.Really looking forward to read more. Will read on…
Elsie Ludlow, Appearing Matron, Wesley Guild Hospital, Ilesha, Western Region, Nigeria.
buying prescription drugs in mexico online: Mexican Easy Pharm – buying prescription drugs in mexico
https://mexicaneasypharm.shop/# Mexican Easy Pharm
reliable canadian pharmacy
Best online Indian pharmacy: Indian Cert Pharm – indian pharmacy
I cannot thank you enough for the blog article.Much thanks again. Much obliged.
canadian pharmacy 1 internet online drugstore: CanadianMdPharm – legit canadian pharmacy
Yow will discover the gold plated ones or the glass ones on-line and they give the impression of being trendy as effectively.
Best Indian pharmacy: Best online Indian pharmacy – Indian Cert Pharm
Hey, thanks for the post.Really thank you! Want more.
Best online Indian pharmacy: indian pharmacy – Online pharmacy
legal canadian pharmacy online: CanadianMdPharm – canadian drugs pharmacy
Currency rates keeps fluctuating at every second and this fluctuations can cause a big money loss.
No person is anticipating runaway capital features by any stretch, but, for essentially the most part, institutional traders have no other asset in which to speculate with the same threat profile.
Indian Cert Pharm: Online pharmacy – Indian Cert Pharm
buy prescription drugs from canada cheap https://canadianmdpharm.online/# canadian pharmacy 24h com safe
indian pharmacies safe
Lastly, the proposal requires both sets of firms (large bank holding companies and regional firms) subject to the LCR requirements to submit remediation plans to U.S.
mexico pharmacies prescription drugs: Mexican Easy Pharm – mexican online pharmacies prescription drugs
canadian online pharmacy reviews: CanadianMdPharm – buy prescription drugs from canada cheap
It is a web-based commodity trade in India.
Haberler, son dakika haberleri, yerel ve dünyadan en güncel gelişmeler,magazin, ekonomi, spor, gündem ve tüm gazete haberleri; hemoroid.info
Best Indian pharmacy: Best Indian pharmacy – Indian Cert Pharm
On condition that your neighbors aren’t attempting to sell you a home, you may get a very good view of the property you’re trying to buy.
Best Indian pharmacy: Online medicine – Indian pharmacy international shipping
The highly modified 1965 Dodge Factory Altered Wheelbase Coronet was a missing-link muscle car.
The origins of the steam engine truly go back to Heron of Alexandria, who in the first century C.E.
If still not clear, verify filter operation.
canada drugs online: CanadianMdPharm – pharmacies in canada that ship to the us
reliable canadian online pharmacy: pharmacy canadian – canadian pharmacy meds reviews
Encompass your self with anime even when you are working or finding out.
Unfortunately, processing such vast amounts of information is impossible for human beings alone & that’s where bot-driven advisors come in.
They hire innumerable employees, to make sure that the finances of the organization are intact and that all transactions are carried off, in an orderly manner.
canadian pharmacies compare: Canadian Md Pharm – cross border pharmacy canada
This transfer weakens the e3-pawn and offers Black an opportunity to tie White’s pieces to defending it.
Recreational activities could embody arts and crafts, group outings, fitness courses, and leisure events.
In Poland, the fiscal yr is the calendar year, from 1 January to 31 December.
Indian pharmacy that ships to usa: Indian pharmacy international shipping – Best online Indian pharmacy
Do you know the title of the basic automobile from the ’60s in this image?
Her parents had been, as she writes in the autobiographical piece, “0-19”, “a mother-secretary & father draft dodger WWII electrician”.
Richard Layard (March 3-5, 2003).
It should not be confused with a private bank, which is simply a non-incorporated banking institution.
Online pharmacy: Indian Cert Pharm – mail order pharmacy india
George Reginald Stanbury, currently Senior Principal Scientific Officer, Residence Office.
Indian Cert Pharm: Indian pharmacy international shipping – Online medicine
One other option to store power is in some type of repeatable mechanical deformation.
https://mexicaneasypharm.com/# medication from mexico pharmacy
buying drugs from canada
Iowa Environmental Mesonet. National Weather Service Weather Forecast Office in Memphis, Tennessee.
UC Journal. University of Cincinnati.
The Vintage Model Costume – With a vintage model wedding ceremony dress you get tons of type at an incredible value.
That’s simply good manners, and in such circumstances the transaction will take not than would a credit card payment.
Mexican Easy Pharm: Mexican Easy Pharm – pharmacies in mexico that ship to usa
online canadian pharmacy reviews CanadianMdPharm canadian pharmacy meds review
Auburn vehicles have been produced from 1900 to 1937 and was formed by Charles Eckhart.
canadian pharmacy online ship to usa: drugs from canada – canadian pharmacy 24h com safe
buying from online mexican pharmacy https://mexicaneasypharm.shop/# buying prescription drugs in mexico
п»їbest mexican online pharmacies
Three of the four painters have been seriously burned, one in all which was vital.
Mexican Easy Pharm Mexican Easy Pharm Mexican Easy Pharm
Indian Cert Pharm: Best online Indian pharmacy – IndianCertPharm
п»їbest mexican online pharmacies https://mexicaneasypharm.shop/# reputable mexican pharmacies online
buying prescription drugs in mexico
northern pharmacy ed pills – safe canadian pharmacyreputable canadian online pharmacies
What’s up, yes this piece of writing is genuinely nice and I have learned lot
of things from it on the topic of blogging. thanks.
The impeller: This part creates the flow of water.
canada pharmacy world: CanadianMdPharm – canada rx pharmacy world
india pharmacy: mail order pharmacy india – Best online Indian pharmacy
mexico pharmacies prescription drugs https://mexicaneasypharm.com/# mexico drug stores pharmacies
pharmacies in mexico that ship to usa
Various government agencies such as the Securities and Exchange Commission provide relevant information and updates about the stock exchange market such as the annual and quarterly reports.
Hello There. I found your blog using msn. This is an extremely well written article. Ill be sure to bookmark it and return to read more of your useful information. Thanks for the post. Ill certainly return.
It all needs to be calculated along with the risk you are taking, the amount of liquidity present with the client at that time.
766480 478942Excellent read, I just passed this onto a friend who was doing a little research on that. And he just bought me lunch because I found it for him smile So let me rephrase that: Thank you for lunch! 46561
เกมสล็อตออนไลน์ที่ UFABET เป็นเกมสล็อตที่มีผู้กล่าวถึงมากที่สุด เพราะว่าแตกง่าย จ่ายจริง จ่ายไว รวมทั้งทั้งภาพกราฟฟิคที่งดงาม เหมือนจริงให้อารมณ์อย่างกับอยู่ใน คาสิโนจริงๆมาตรฐานยอดเยี่ยม ใช้งานง่าย และมีทีมงานรอให้คำแนะนำอย่างใกล้ชิดตลอด 24 ชั่วโมง
“I like to surf in various places on the online world, often I will go to Stumble Upon and read and check stuff out”
With thanks! Numerous content! Chloroquine Directions For Use
Pickel, Greg (April 23, 2020).
The cars claimed to work these life-changing miracles were divided between the “1964 1/2” hardtops and convertibles produced by August 1964 and the “true” ’65s built from then on.
Indian Cert Pharm Online pharmacy Best Indian pharmacy
This is why many investment banks and brokerage houses are located in world cities such as London, Tokyo, Geneva, and New York.
mexico pharmacies prescription drugs https://mexicaneasypharm.com/# Mexican Easy Pharm
buying prescription drugs in mexico online
In its entirety this estate is likely the most important, most lavish and was, at one time, presumably probably the most expensive single-family property in the Midwest.
Im obliged for the article post. Want more.
It?¦s actually a nice and useful piece of information. I?¦m glad that you just shared this helpful information with us. Please stay us informed like this. Thank you for sharing.
The author touched on exactly those problems that many are afraid to talk about openly https://ckfas.gov-edu.ru/id-551.html
SemaPharm24 SemaPharm24 cheap semaglutide pills
http://semapharm24.com/# semaglutide tablets price
prednisone 200 mg tablets
prednisone 2 mg daily: Pred Pharm – prednisone buy canada
There are a number of sellers out there who’re getting as a lot as $5 and up for single pages taken from these vintage magazines, only for the commercials.
I’m truly enjoying the design and layout of your website.
It’s a very easy on the eyes which makes it much more enjoyable for me to come here and visit more
often. Did you hire out a designer to create your theme?
Outstanding work!
Kamagra 100mg price: Kama Pharm – Kama Pharm
http://predpharm.com/# PredPharm
buy Kamagra
Complete List of Statistics and Reporting section for User as well as for admin.
Very neat post.Thanks Again. Cool.
PredPharm: prednisone 7.5 mg – prednisone 20 mg in india
The next time your dinner guests ask what’s on the menu, letting the words “tomato concasse” roll off the tongue may seem somewhat self-indulgent.
http://semapharm24.com/# semaglutide tablets for weight loss
where can i buy prednisone without prescription
A fascinating discussion is definitely worth comment. There’s no doubt that that you ought to write more on this subject matter, it might not be a taboo matter but usually people don’t discuss these issues. To the next! Kind regards!
He is also the empire’s top bachelor, famous for his ruthlessness.
buy cytotec online: buy cytotec online fast delivery – buy cytotec online
PredPharm Pred Pharm prednisone 10mg canada
The blame for the subprime mortgage disaster is shared among a number of components.
There are two main categories of application portfolio management solutions, generally referred to as ‘Top Down’ and ‘Bottom Up’ approaches.
Methods and methods have been modifying endlessly.
The owner has the right to sell or underwrite the put option on the futures, and thus be exposed to pricing risks, especially if the buyer decides to exercise the right to buy the underlying contract.
Hello would you mind letting me know which hosting company you’re utilizing?
I’ve loaded your blog in 3 different internet browsers and I must say this blog loads a lot faster
then most. Can you recommend a good internet hosting provider at a
honest price? Kudos, I appreciate it! https://spain-integradom.mystrikingly.com/
CytPharm: buy cytotec online fast delivery – Cyt Pharm
On February 1, a westbound specific prepare delayed over three hours got here at excessive pace by means of Passaic round 6:30 pm.
An attention-grabbing discussion is price comment. I think that it’s best to write extra on this matter, it may not be a taboo subject however usually persons are not enough to speak on such topics. To the next. Cheers
https://semapharm24.com/# semaglutide tablets price
sildenafil oral jelly 100mg kamagra
https://dappharm.shop/# dapoxetine price
order prednisone from canada
SemaPharm24 rybelsus semaglutide tablets Sema Pharm 24
PredPharm: prednisone 10 mg – price of prednisone tablets
DapPharm: Priligy tablets – dapoxetine price
The Pennsylvania Division of Training canceled all statewide college assessments together with the PSSA testing, Keystone exams, and the Pennsylvania Alternate System of Evaluation (PASA) for the remainder of the 2019-2020 school 12 months.
https://dappharm.shop/# priligy
prednisone 40 mg rx
CytPharm: Cytotec 200mcg price – CytPharm
dapoxetine price dap pharm dap pharm
In this way the USD value of DAI can be said to be backed by the USD value of the underlying collateral held by MakerDAO’s smart contracts.
rybelsus semaglutide tablets: rybelsus semaglutide tablets – semaglutide tablets store
Goronwy Tobit Huws, Assistant Regional Controller, Central Office for Wales, Ministry of Social Safety.
super kamagra: Kamagra 100mg – Kama Pharm
Remarks: One other draw with a almost symmetrical position on the final move.
https://dappharm.com/# dap pharm
Kamagra tablets
https://cytpharm.com/# buy misoprostol over the counter
prednisone without prescription 10mg
Trevor Lloyd Williams, Clerk of Wrexham Rural District Council, Denbighshire.
SemaPharm24 SemaPharm24 rybelsus semaglutide tablets
dapoxetine online: buy priligy – dap pharm
Abortion pills online: CytPharm – Cyt Pharm
https://dappharm.com/# cheap priligy
super kamagra
Kenneth Ernest Harris, MBE.
An alumnus of IIT Delhi and Jamnalal Bajaj Institute of Management, Mumbai, Sridhar has about 36 years of commercial and developmental banking expertise, having labored with the State Financial institution of India, Exim Financial institution and the National Housing Bank (NHB), among others.
As for the kind of content you produce in your channel relies upon in your audience and their wants.
With online driver’s safety, defensive driving and other applications, those who efficiently full the training program could also be eligible to get dashing tickets and different minor transferring violations dismissed from their driving file in collaborating states.
In accordance with Kirsten Hoskissen, knowledgeable meals taster, that may be tricky.
prednisone 30 mg tablet: prednisone cost 10mg – prednisone 20 mg in india
buy cytotec: buy cytotec – cytotec buy online usa
https://dappharm.shop/# Priligy tablets
200 mg prednisone daily
https://cytpharm.com/# CytPharm
Kamagra 100mg price
This helped the uranium price to rally at this date.
In this article, we bring forth a list of authentic, tried-and-proven funding sources for small business ventures that actually work.
The village of Crystal is situated close to the east shore of the lake.
buy priligy cheap priligy buy dapoxetine online
Skilled movers and packers can assist you to relocate rapidly with their problem-free and on-time providers.
Both have trays of bubbly placed simply contained in the venue to allow them to choose them up as they enter, or have caterers personally serve the champagne glasses on shiny trays.
This strategy comprises four steps: organise sources, assess dangers, develop mitigation strategies, and implement plans.
Sema Pharm 24: Sema Pharm 24 – Sema Pharm 24
If not, encourage your youngster to supplement a golden-fried lunch with a green salad and yogurt.
A ceremony at the Southwest Louisiana Veterans Dwelling honored those who died in service or handed after their tour of obligation – including the 219 veterans buried in Jennings at one of many five state veteran cemeteries in Louisiana.
http://dappharm.com/# cheap priligy
super kamagra
The stock broker, who makes possible the trade, is essential to expose to the stock replace about the bulk deals on a daily basis during DUS.
The very next time I read a blog, Hopefully it does not disappoint me just as much as this one. After all, I know it was my choice to read through, but I genuinely believed you would probably have something useful to talk about. All I hear is a bunch of moaning about something that you can fix if you weren’t too busy looking for attention.
https://cytpharm.shop/# Cyt Pharm
prednisone 2.5 mg price
purchase cytotec cytotec online Cyt Pharm
Cyt Pharm: purchase cytotec – buy cytotec over the counter
https://predpharm.com/# Pred Pharm
Kamagra 100mg
Sema Pharm 24: generic rybelsus tabs – generic rybelsus tabs
semaglutide best price: semaglutide tablets – Sema Pharm 24
http://predpharm.com/# PredPharm
Kamagra 100mg
Kicking Heads – Kick these blasted heads that get thrown off our bodies!
https://cytpharm.com/# Cyt Pharm
no prescription prednisone canadian pharmacy
Wow that was odd. I just wrote an extremely long comment but after I clicked submitmy comment didn’t appear. Grrrr… well I’m not writing all that over again. Anyway, just wanted tosay excellent blog!
Cyt Pharm: buy misoprostol over the counter – Cytotec 200mcg price
DapPharm dap pharm dap pharm
Sema Pharm 24: buy semaglutide – rybelsus semaglutide tablets
https://predpharm.shop/# Pred Pharm
Kamagra 100mg price
Around Flagstaff more specifically, this course of deformed flat rock layers into folds, and allowed floor rivers to chop deep canyons within the younger rock layers.
You profit quick is an approximate 50 lower in the month-to-month fee on all the accounts included within the negotiation.
People buy insurance coverage to get financial safety for themselves and households in anticipation of any unexpected event.
ivermectin tablets ivermectin – ivermectin 4
DapPharm: buy priligy – dapoxetine online
Such posts make you think about many important things that we often ignore https://vjjpe.alexey-petrovich-sitnikov.ru/id-7589.html
http://dappharm.com/# buy priligy
buy 10 mg prednisone
https://semapharm24.shop/# semaglutide tablets price
Kamagra 100mg price
Such knowledge can be acquired by either assisting people who have been dealing with the financial sector or by pursuing further studies to acquire the knowledge needed.
Large businesses also could prepare stability sheets for segments of their companies.
This text is an incomplete list of Financial Accounting Requirements Board (FASB) pronouncements, which include Statements of Financial Accounting Requirements (“SFAS” or simply “FAS”), Statements of Monetary Accounting Ideas, Interpretations, Technical Bulletins, and Employees Positions, which collectively presented rules and pointers for preparing, presenting, and reporting monetary statements throughout the United States in line with usually accepted accounting principles (“GAAP”) in the United States Of America, of which this listing made up a considerable part.
We additionally file survival actions where the negligence brought on important and everlasting accidents, but the individual died of unrelated causes.
no prescription prednisone canadian pharmacy PredPharm PredPharm
Northwestern Mutual Wealth Management Company provides financial planning, investment advisory and trust services, and is a federal savings bank.
prednisone 2.5 tablet: Pred Pharm – PredPharm
A downward momentum in the market takes place when short-term crosses below long-term average.
http://semapharm24.com/# semaglutide tablets for weight loss
Kamagra tablets
priligy: Priligy tablets – priligy
https://kamapharm.shop/# Kamagra 100mg price
how can i get prednisone
cheap priligy: dap pharm – cheap priligy
For whatever reason, Jobs didn鈥檛 want to put a license plate on his car.
http://cytpharm.com/# purchase cytotec
п»їkamagra
Cyt Pharm: CytPharm – buy cytotec online
SemaPharm24 semaglutide tablets store cheap semaglutide pills
HEN88 là cổng game bài đổi thưởng hàng đầu tại Việt Nam, nổi bật với sự đa dạng trong các thể loại trò chơi. Từ slot game, xì dách, đến poker, mỗi game đều mang lại trải nghiệm độc đáo với đồ họa sắc nét và âm thanh sống động
п»їkamagra: cheap kamagra – Kama Pharm
https://dappharm.shop/# dap pharm
cost of prednisone in canada
https://dappharm.shop/# buy priligy
п»їkamagra
Priligy tablets: cheap priligy – priligy
There’s certainly a great deal to learn about this topic. I love all of the points you made.
With little knowledge of the atomic bomb, Truman needed to shortly make a decision on its use when looking for an end to the warfare with Japan.
Most contracts of sale contain contingencies of some kind or another, because few people can afford to enter into a real estate purchase without them.
Kamagra 100mg Kama Pharm Kama Pharm
Do you need to know what’s it?
dap pharm: buy priligy – priligy
Thompson, Ashlee Clark. “GE Appliances’ FirstBuild microfactory expands to India”.
Building a strong help community is crucial for managing bipolar disorder.
https://predpharm.com/# prednisone 5mg over the counter
prednisone online paypal
SemaPharm24: rybelsus semaglutide tablets – generic rybelsus tabs
when opening in Internet Explorer, it has some overlapping. I just wanted to give you a quick heads up! Other then that,
They keep the inflation rate below 2.
The most popular video game in the world by gross sales is what?
Kama Pharm: Kama Pharm – Kama Pharm
Real ID, a program developed by the 9/11 Commission, is intended to improve the way that official identification is issued.
I used to be a bit nervous but Carey’s gracious presence, along with that of Mr.
It is crucial to address the influence of stigma on psychological well being assist-in search of by raising awareness, difficult cultural norms, and making mental health services extra accessible and culturally delicate.
This provides an additional layer of technique to marriages, such that a player will try not only to kind useful alliances, but additionally to select marriage companions with robust heritable traits to maximise the standard of offspring and thus strengthen the dynasty.
When a stock’s rate is higher than its value, it is said to be over-valued.
http://semapharm24.com/# semaglutide tablets price
buy prednisone 20mg
dapoxetine price: dapoxetine online – dap pharm
Great goods from you, man. I have understand your stuff previous to and you’re just extremely fantastic. I really like what you have acquired here, really like what you’re saying and the way in which you say it. You make it enjoyable and you still care for to keep it smart. I can not wait to read much more from you. This is really a great website.
There are many traders who use to leave the option trading market in the mid, just due to the reason that they don’t have enough option trading strategies at their disposal which are proven ones and effective on a long run.
order cytotec online buy cytotec pills Cyt Pharm
https://predpharm.shop/# prednisone 10mg
Kamagra 100mg price
CytPharm: Cytotec 200mcg price – CytPharm
cheap semaglutide pills: buy semaglutide – Sema Pharm 24
https://semapharm24.shop/# Sema Pharm 24
prednisone ordering online
Pred Pharm: prednisone 20mg – prednisone canada pharmacy
Priligy tablets: dapoxetine online – dapoxetine online
https://dappharm.com/# DapPharm
Kamagra 100mg price
Farmacie on line spedizione gratuita Farma Brufen Farmacie on line spedizione gratuita
farmaci senza ricetta elenco: Brufen senza ricetta – Farmacia online piГ№ conveniente
acquistare farmaci senza ricetta
4 as a potential move to continue enjoying for a win, but determined it might have been too risky.
http://farmaprodotti.com/# farmacie online affidabili
comprare farmaci online con ricetta
comprare farmaci online all’estero: BRUFEN 600 acquisto online – п»їFarmacia online migliore
I was recommended this blog by my cousin. I’m not sure whether this post is written by him as noone else know such detailed about my problem. You’re amazing!Thanks!
https://farmatadalitaly.shop/# farmacia online
top farmacia online
viagra prezzo farmacia 2023: Farma Sild Italy – miglior sito per comprare viagra online
п»їFarmacia online migliore
In the short term, there are major risk factors hindering the economy and stocks.
Do you have a spam problem on this blog; I also am a blogger, andI was wondering your situation; we have developed some nice procedures andwe are looking to trade methods with other folks, be sure to shoot me an e-mail ifinterested.
Infidelity may cause main breaches of trust, leading to emotional ache and relationship breakdowns.
Farmacie on line spedizione gratuita: Brufen senza ricetta – Farmacie on line spedizione gratuita
top farmacia online Farma Prodotti farmacie online sicure
https://farmabrufen.com/# Farma Brufen
farmacia online
Howell: “Emma M Howell.-Passed away in an area nursing house, Aug 10, 1974.
Remember which you could always unzip your zip recordsdata.
comprare farmaci online all’estero: BRUFEN prezzo – acquistare farmaci senza ricetta
farmacie online sicure
I really like when people are expressing their opinion and thought. So I like the way you are writing
acquistare farmaci senza ricetta: Farma Prodotti – migliori farmacie online 2024
Utilizing “MyThreeKids” as your password may present that you just love your kids, however your children could not love you as a lot when you haven’t any money left in your account come Christmas.
acquistare farmaci senza ricetta Farma Brufen farmacia online senza ricetta
viagra naturale: viagra 50 mg prezzo in farmacia – viagra generico prezzo piГ№ basso
This builds trust among vendors in the market that companies only onboard legitimate ones.
https://farmaprodotti.shop/# acquisto farmaci con ricetta
acquistare farmaci senza ricetta
acquisto farmaci con ricetta: farmacia online senza ricetta – migliori farmacie online 2024
migliori farmacie online 2024
It helps create lifetime recollections and imagine it or not touring could make you an fascinating individual with all these stories to tell as individuals shall be desperate to know the way was it like on the other side of the world.
https://farmasilditaly.com/# viagra online spedizione gratuita
farmacie online autorizzate elenco
Farmacia online piГ№ conveniente: acquisto farmaci con ricetta – Farmacia online piГ№ conveniente
comprare farmaci online all’estero: Ibuprofene 600 prezzo senza ricetta – acquistare farmaci senza ricetta
farmacia online
farmacia online Farm Tadal Italy top farmacia online
This is however not restricted to a few alone, any person who is willing to try upcoming and profitable options can opt for this option by taking a careful approach.
acquistare farmaci senza ricetta: Cialis generico – farmacia online senza ricetta
https://farmasilditaly.shop/# esiste il viagra generico in farmacia
farmacie online sicure
Submit the Credit Adjustment .
These are going to interrupt,” she says. “As a substitute, make them, crunch them up and use them to coat the edges of sandwich cookies.
Farmacie on line spedizione gratuita: BRUFEN prezzo – acquistare farmaci senza ricetta
farmacie online sicure
farmaci senza ricetta elenco: BRUFEN 600 acquisto online – acquisto farmaci con ricetta
top farmacia online Farma Prodotti farmacie online autorizzate elenco
https://farmabrufen.shop/# Ibuprofene 600 prezzo senza ricetta
Farmacie on line spedizione gratuita
Farmacia online piГ№ conveniente: Brufen senza ricetta – comprare farmaci online all’estero
farmacie online sicure
Farmacie online sicure: Cialis generico prezzo – Farmacie on line spedizione gratuita
https://farmaprodotti.shop/# farmacie online sicure
farmacie online autorizzate elenco
farmacie online affidabili: Farma Prodotti – acquisto farmaci con ricetta
comprare farmaci online con ricetta
plaquenil purchase online hydroxychloroquine – where to order plaquenil
farmacia senza ricetta recensioni: Viagra – miglior sito per comprare viagra online
acquistare farmaci senza ricetta FarmTadalItaly acquistare farmaci senza ricetta
https://farmasilditaly.shop/# viagra online consegna rapida
farmacia online
There are also a few experimental strikes that may be tried.
Farmacia online piГ№ conveniente: Tadalafil generico migliore – Farmacia online piГ№ conveniente
farmacia online piГ№ conveniente
Very neat blog post.Really looking forward to read more. Really Great.
п»їFarmacia online migliore: farmacie online sicure – farmacie online affidabili
https://farmaprodotti.com/# comprare farmaci online all’estero
п»їFarmacia online migliore
Saved as a favorite, I like your site.
This can be a double edge sword as most traders will use a 4 week moving average to smooth the volatility of such a frequent report.
farmacia online piГ№ conveniente Ibuprofene 600 prezzo senza ricetta acquisto farmaci con ricetta
farmacie online sicure: FarmTadalItaly – farmacia online piГ№ conveniente
Lieutenant Frederick George Brading, RN, (Retd), Chairman, Gosport and Fareham Inshore Rescue Service.
http://farmasilditaly.com/# pillole per erezione in farmacia senza ricetta
farmacie online affidabili
This one’s tricky except you’re a Brit or simply a complete automotive geek who is aware of every mannequin, together with non-descript hatchbacks like this 1979 Vauxhall Astra.
migliori farmacie online 2024: Farma Prodotti – Farmacia online miglior prezzo
п»їFarmacia online migliore