


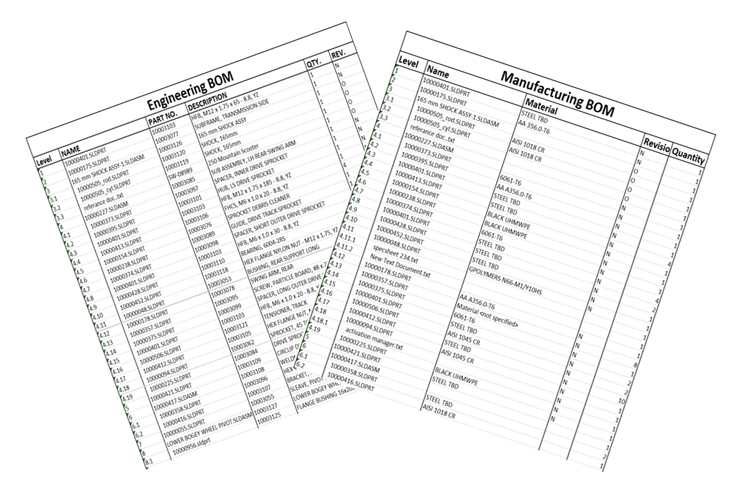
In any organization one of the most important task is creating the Bill Of Materials. Now BOM is not just about the components that were used in the creation of the product assembly design, but there are always other consumables that goes into the product BOM. These consumables are required to be present in the BOM before it goes to the purchase department.
Among these other challenges are also faced by industries in terms of maintaining the latest version of BOM across the organization, notifying users of changes in the design and many more.
PDM is a very powerful and versatile data management tool of SOLIDWORKS, which keeps its moto of keeping things simple for the users. PDM allows the users to customize everything inside the PDM with simple and friendly UI.
PDM allows you to manage all of your enterprise data, right from marketing till in-house manufacturing and also it can be extended to your customer and vendors to share your design data in a secured network. PDM further allows you to automate the process with the help of auto serial number generation, revision control and automate the tasks of conversion and xml outputs for your ERP system.
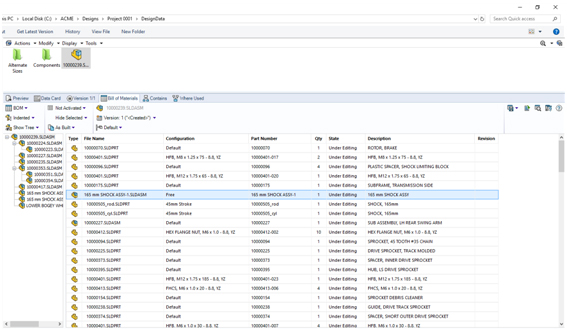
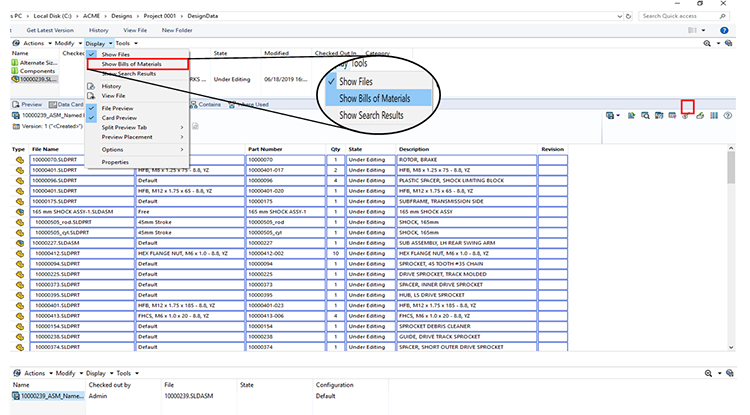
PDM allows the users to generate the Bill Of Material associated with the Assembly automatically. PDM capture all the components that were used in creation of the assembly and populates them in the PDM BOM tab (As shown in the image below).
PDM allows the users to add these consumables, in the very same interface of PDM. Which can be achieved by creating a “Named BOM”.
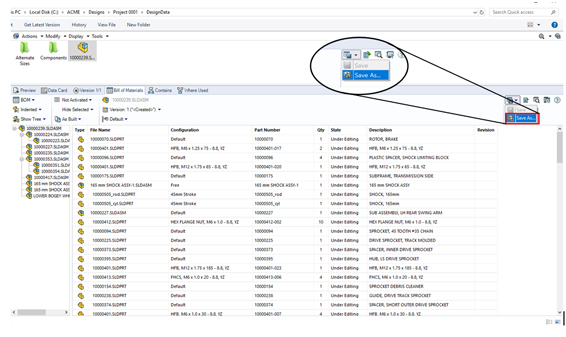
Select the completed assembly that you want to create BOM of and perform the “Save As” action as shown in the image.
Save the BOM with desired name inside PDM vault.

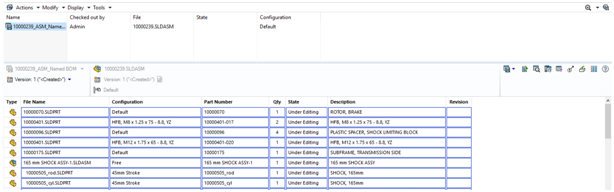
Once saved you can view the saved “Named BOM” in the list on the left top.
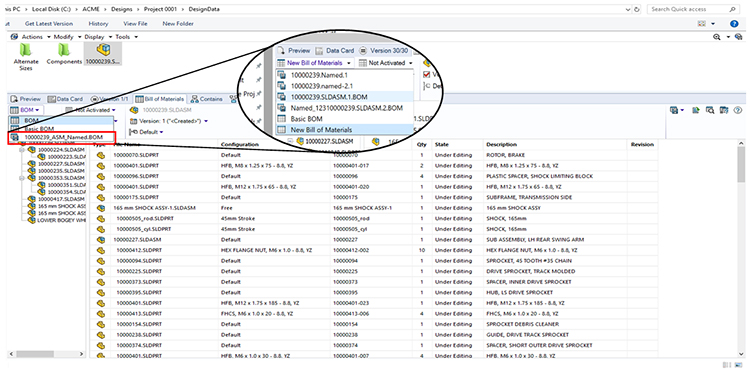
The “Named BOM” are stored as separate files and can be accessed by switching the view on right side of the BOM interface or through display option on the top. Since these are separate file these can also be check-in and can have version and revision control to these files.
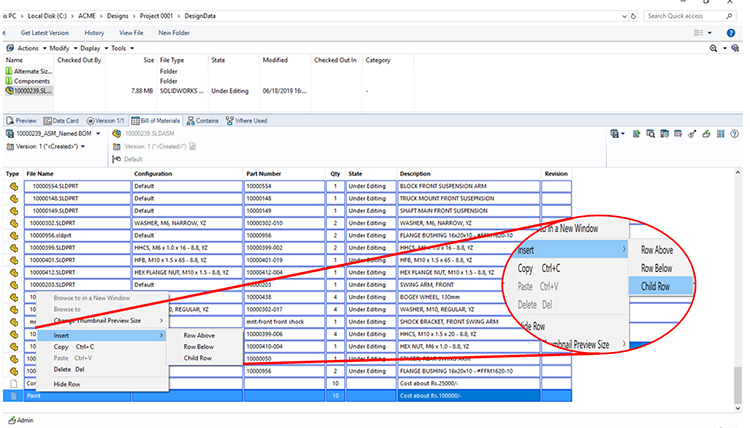
Now to add the consumables into the new named BOM, the editing can be done in any of the view (either file view or BOM view) of BOM tab. Select the row and Right-click to insert the additional row. To add additional columns, we can edit it in “Bill of Material” section of PDM administration tool.
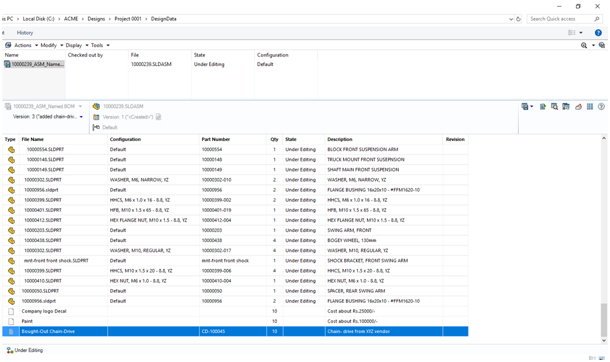
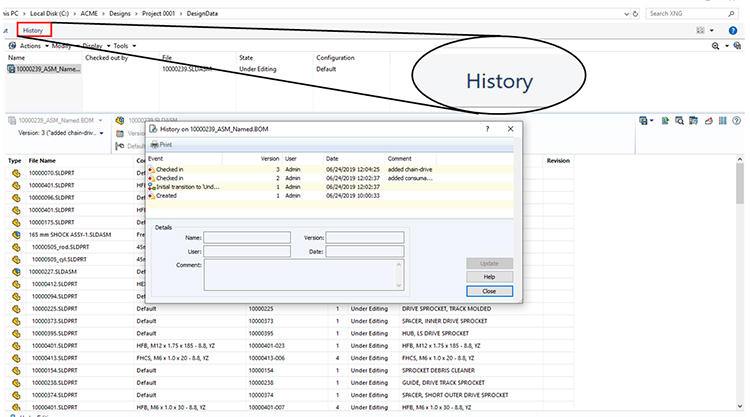
To check the version changes done to the Named BOM can be checked through “History” button in the top task pane. This gives insight to all the version changes done to the “Named BOM” I.e who did the changes , when the changes were done and also can see the comments made by the users regarding the changes as shown in the image below.
We Urge You To Call Us For Any Doubts & Clarifications That You May Have. We Are Eager to Talk To You
Call Us: +91 7406663589
 (1 votes, average: 5.00 out of 5)
#365/8, Ground Floor, "Hasmitha Avenue", 16th Main, 4th T Block East, Jayanagar, 4th T Block East, Pattabhirama Nagar, Jayanagar, Bengaluru, Karnataka 560041
Rated 4.7/5 with a total of 62 reviews
"CARAX" Building 4th Floor, 105/1/1/4, Next to Radha Hotel, Pune-Mumbai Xpress Way,Baner,Pune 411045
Rated 4.7/5 with a total of 17 reviews
1002, LODHA Supremus, I-Think Techno Campus,Kanjurmarg EAST - MUMBAI, MH, India – 400042.
Rated 5/5 with a total of 51 reviews
508, Shiti Ratna Complex, Panchwati Cross Road, Ahmedabad-380006
Rated 4.1/5 with a total of 7 reviews
Kanda's Villa, II Floor, AE Block,3362 R, 8th Street, Anna Nagar, Chennai, Tamil Nadu 600040
Rated 4.6/5 with a total of 16 reviews
Flat no F1, first floor, Nakhate corner, Eknath rang mandir road,New Usmanpura, Aurangabad, 431005.
A-101, 1st Floor, The Hub Complex, opp. Shete Hospital, Mahatma Nagar, Parijat Nagar, Nashik, Maharashtra 422005.
Level 7, Octave 3B Salarpuria Sattva Knowledge City, Inorbit Mall Road, Raidurg Village, Hi-tech City, Hyderabad, Telangana - 500081, India

pin up az https://azerbaijancuisine.com/# pin up onlayn kazino
pin up onlayn kazino
purple pharmacy mexico price list Mexico pharmacy that ship to usa mexican online pharmacies prescription drugs
medicine in mexico pharmacies mexican northern doctors mexican pharmaceuticals online
mexican mail order pharmacies mexican pharmacy northern doctors medicine in mexico pharmacies
https://northern-doctors.org/# purple pharmacy mexico price list
buying from online mexican pharmacy: mexican northern doctors – mexican pharmacy
https://northern-doctors.org/# buying from online mexican pharmacy
mexico drug stores pharmacies: mexican pharmacy northern doctors – mexican online pharmacies prescription drugs
https://northern-doctors.org/# mexico drug stores pharmacies
mexico pharmacy: northern doctors pharmacy – reputable mexican pharmacies online
best online pharmacies in mexico: mexican pharmacy online – mexico drug stores pharmacies
https://northern-doctors.org/# pharmacies in mexico that ship to usa
mexico drug stores pharmacies mexican northern doctors mexico drug stores pharmacies
buying prescription drugs in mexico online: mexican pharmacy – best online pharmacies in mexico
purple pharmacy mexico price list: northern doctors – п»їbest mexican online pharmacies
https://northern-doctors.org/# medicine in mexico pharmacies
mexican drugstore online: Mexico pharmacy that ship to usa – mexican border pharmacies shipping to usa
https://northern-doctors.org/# purple pharmacy mexico price list
mexico pharmacies prescription drugs: mexican pharmacy online – mexican drugstore online
buying from online mexican pharmacy: mexican pharmacy – mexican pharmaceuticals online
http://northern-doctors.org/# best online pharmacies in mexico
best online pharmacies in mexico: mexican pharmacy – buying prescription drugs in mexico online
mexican drugstore online mexican pharmacy online medicine in mexico pharmacies
http://northern-doctors.org/# mexican pharmacy
mexico pharmacies prescription drugs: northern doctors – mexican mail order pharmacies
medicine in mexico pharmacies: Mexico pharmacy that ship to usa – mexican pharmaceuticals online
http://northern-doctors.org/# medication from mexico pharmacy
pharmacies in mexico that ship to usa: mexican pharmacy – mexico pharmacies prescription drugs
mexico pharmacy: mexican pharmacy northern doctors – п»їbest mexican online pharmacies
https://northern-doctors.org/# purple pharmacy mexico price list
mexico pharmacies prescription drugs: mexican northern doctors – mexican online pharmacies prescription drugs
buying prescription drugs in mexico Mexico pharmacy that ship to usa mexican mail order pharmacies
https://northern-doctors.org/# medication from mexico pharmacy
п»їbest mexican online pharmacies: mexican pharmacy – mexican pharmaceuticals online
mexico pharmacies prescription drugs: Mexico pharmacy that ship to usa – buying from online mexican pharmacy
https://northern-doctors.org/# medication from mexico pharmacy
buying from online mexican pharmacy: northern doctors – buying prescription drugs in mexico online
http://northern-doctors.org/# buying from online mexican pharmacy
pharmacies in mexico that ship to usa: mexican pharmacy – buying from online mexican pharmacy
mexico drug stores pharmacies mexican online pharmacy mexico drug stores pharmacies
http://cmqpharma.com/# medication from mexico pharmacy
mexico pharmacy
mexican drugstore online mexican pharmacy purple pharmacy mexico price list
medication from mexico pharmacy mexican pharmacy online buying prescription drugs in mexico online
buying prescription drugs in mexico mexican pharmacy mexico drug stores pharmacies
mexican mail order pharmacies cmq pharma mexican pharmacy mexican rx online
mexican online pharmacies prescription drugs cmqpharma.com mexican rx online
mexico pharmacies prescription drugs
http://cmqpharma.com/# mexican online pharmacies prescription drugs
mexico drug stores pharmacies
best online pharmacies in mexico cmq pharma mexican rx online
medicine in mexico pharmacies cmq mexican pharmacy online mexican pharmacy
hello there and thank you for your info – I’ve definitely
picked up something new from right here.
I did however expertise a few technical issues using this site, as I experienced
to reload the web site many times previous to I could get it to load properly.
I had been wondering if your web hosting is OK? Not that I am complaining,
but sluggish loading instances times will very frequently affect
your placement in google and can damage your quality score if advertising and marketing with
Adwords. Well I’m adding this RSS to my email and can look out for a lot more of your respective fascinating content.
Make sure you update this again soon.. Escape room
You have remarked very interesting details!
ps nice web site.?
medication from mexico pharmacy п»їbest mexican online pharmacies mexican rx online
https://foruspharma.com/# mexican drugstore online
top 10 online pharmacy in india online shopping pharmacy india п»їlegitimate online pharmacies india
http://indiapharmast.com/# reputable indian pharmacies
reputable mexican pharmacies online mexico pharmacy mexican pharmaceuticals online
mexico drug stores pharmacies mexico drug stores pharmacies mexican online pharmacies prescription drugs
https://foruspharma.com/# buying prescription drugs in mexico online
This is the perfect web site for anyone who would like to understand this topic. You realize so much its almost hard to argue with you (not that I personally would want to…HaHa). You definitely put a brand new spin on a subject that’s been written about for decades. Excellent stuff, just excellent.
Your point of view caught my eye and was very interesting. Thanks. I have a question for you.
amoxicillin 500mg over the counter: how to buy amoxycillin – amoxicillin online without prescription
Everything is very open with a clear clarification of the issues. It was really informative. Your website is very helpful. Thank you for sharing!
Howdy! I could have sworn I’ve been to this website before but after browsing through many of the posts I realized it’s new to me. Nonetheless, I’m certainly happy I stumbled upon it and I’ll be book-marking it and checking back regularly.
amoxicillin 500 mg: amoxicillin without prescription – amoxicillin 500mg capsules price
paxlovid india: Paxlovid buy online – paxlovid generic
doxycycline over the counter drug: best price for prescription doxycycline – doxycycline 25mg
paxlovid price: п»їpaxlovid – paxlovid for sale
I’m impressed, I have to admit. Rarely do I encounter a blog that’s both educative and entertaining, and without a doubt, you’ve hit the nail on the head. The issue is an issue that too few folks are speaking intelligently about. I’m very happy I found this in my hunt for something relating to this.
paxlovid covid: п»їpaxlovid – paxlovid buy
buy ciprofloxacin: buy generic ciprofloxacin – ciprofloxacin 500mg buy online
can you get cheap clomid without prescription: order generic clomid no prescription – where to get cheap clomid for sale
I blog often and I truly appreciate your information. Your article has really peaked my interest. I will bookmark your site and keep checking for new details about once a week. I opted in for your Feed too.
mexican mail order pharmacies medicine in mexico pharmacies purple pharmacy mexico price list
http://mexicandeliverypharma.com/# medication from mexico pharmacy
mexican mail order pharmacies: buying prescription drugs in mexico online – buying prescription drugs in mexico
buying from online mexican pharmacy: mexico drug stores pharmacies – mexican pharmaceuticals online
mexican pharmacy mexican border pharmacies shipping to usa mexican pharmaceuticals online
mexican pharmaceuticals online: mexico drug stores pharmacies – buying from online mexican pharmacy
mexico drug stores pharmacies: best online pharmacies in mexico – mexican pharmaceuticals online
https://mexicandeliverypharma.com/# mexican online pharmacies prescription drugs
mexico pharmacies prescription drugs purple pharmacy mexico price list mexico pharmacy
mexican drugstore online: mexican drugstore online – mexico pharmacies prescription drugs
mexico drug stores pharmacies: buying from online mexican pharmacy – medication from mexico pharmacy
http://mexicandeliverypharma.com/# mexico drug stores pharmacies
mexican border pharmacies shipping to usa buying prescription drugs in mexico online buying prescription drugs in mexico online
mexican pharmaceuticals online: buying prescription drugs in mexico online – п»їbest mexican online pharmacies
reputable mexican pharmacies online: mexican drugstore online – reputable mexican pharmacies online
best online pharmacies in mexico: pharmacies in mexico that ship to usa – mexican online pharmacies prescription drugs
pharmacies in mexico that ship to usa reputable mexican pharmacies online pharmacies in mexico that ship to usa
п»їbest mexican online pharmacies: pharmacies in mexico that ship to usa – mexican mail order pharmacies
mexican online pharmacies prescription drugs: buying prescription drugs in mexico online – п»їbest mexican online pharmacies
mexican mail order pharmacies: pharmacies in mexico that ship to usa – reputable mexican pharmacies online
buying prescription drugs in mexico mexico drug stores pharmacies mexican drugstore online
buying prescription drugs in mexico: best online pharmacies in mexico – medication from mexico pharmacy
mexican drugstore online: mexican online pharmacies prescription drugs – mexican drugstore online
mexican mail order pharmacies: mexican drugstore online – mexican drugstore online
Good day! I simply would like to give you a huge thumbs up for your excellent information you have right here on this post. I am coming back to your site for more soon.
mexico pharmacies prescription drugs buying prescription drugs in mexico online best online pharmacies in mexico
purple pharmacy mexico price list: mexico drug stores pharmacies – buying from online mexican pharmacy
mexican border pharmacies shipping to usa: mexican drugstore online – mexican rx online
reputable mexican pharmacies online: mexico pharmacies prescription drugs – reputable mexican pharmacies online
mexican drugstore online medication from mexico pharmacy reputable mexican pharmacies online
mexican drugstore online: mexico drug stores pharmacies – purple pharmacy mexico price list
mexican mail order pharmacies: mexican pharmaceuticals online – buying prescription drugs in mexico online
mexican pharmaceuticals online: mexican rx online – buying prescription drugs in mexico online
mexico pharmacies prescription drugs mexican rx online mexico pharmacies prescription drugs
purple pharmacy mexico price list: pharmacies in mexico that ship to usa – purple pharmacy mexico price list
mexico pharmacies prescription drugs: pharmacies in mexico that ship to usa – mexican online pharmacies prescription drugs
mexico drug stores pharmacies: mexican border pharmacies shipping to usa – buying from online mexican pharmacy
reputable mexican pharmacies online mexican online pharmacies prescription drugs best online pharmacies in mexico
mexican drugstore online: mexico pharmacies prescription drugs – mexican border pharmacies shipping to usa
mexican online pharmacies prescription drugs: mexican online pharmacies prescription drugs – mexican drugstore online
purple pharmacy mexico price list: mexican online pharmacies prescription drugs – mexican border pharmacies shipping to usa
buying prescription drugs in mexico online buying prescription drugs in mexico online п»їbest mexican online pharmacies
mexican rx online: medication from mexico pharmacy – buying from online mexican pharmacy
buying prescription drugs in mexico online: п»їbest mexican online pharmacies – mexican drugstore online
mexican drugstore online: mexican drugstore online – mexican rx online
medicine in mexico pharmacies reputable mexican pharmacies online п»їbest mexican online pharmacies
buying prescription drugs in mexico: mexican online pharmacies prescription drugs – mexico pharmacies prescription drugs
mexico pharmacies prescription drugs: buying from online mexican pharmacy – mexican border pharmacies shipping to usa
mexican rx online: buying prescription drugs in mexico – mexico drug stores pharmacies
reputable mexican pharmacies online mexico pharmacies prescription drugs mexico drug stores pharmacies
medication from mexico pharmacy: mexican online pharmacies prescription drugs – buying prescription drugs in mexico online
mexico drug stores pharmacies: pharmacies in mexico that ship to usa – medicine in mexico pharmacies
buying from online mexican pharmacy: mexican drugstore online – mexico pharmacies prescription drugs
buying prescription drugs in mexico mexican pharmacy mexico drug stores pharmacies
medicine in mexico pharmacies: mexican pharmaceuticals online – medicine in mexico pharmacies
buying from online mexican pharmacy: reputable mexican pharmacies online – mexican pharmaceuticals online
best online pharmacies in mexico: buying prescription drugs in mexico online – medication from mexico pharmacy
medicine in mexico pharmacies purple pharmacy mexico price list mexican mail order pharmacies
mexico drug stores pharmacies: mexican mail order pharmacies – reputable mexican pharmacies online
medication from mexico pharmacy: mexican mail order pharmacies – mexican online pharmacies prescription drugs
mexican mail order pharmacies: medication from mexico pharmacy – medication from mexico pharmacy
mexico pharmacies prescription drugs mexican pharmaceuticals online medication from mexico pharmacy
I need to to thank you for this very good read!! I definitely loved every bit of it. I’ve got you bookmarked to look at new things you post…
best online pharmacies in mexico: mexican drugstore online – mexican pharmaceuticals online
buying prescription drugs in mexico: mexican border pharmacies shipping to usa – mexican drugstore online
mexico pharmacies prescription drugs: п»їbest mexican online pharmacies – buying prescription drugs in mexico online
best online pharmacies in mexico medicine in mexico pharmacies medicine in mexico pharmacies
medicine in mexico pharmacies: п»їbest mexican online pharmacies – pharmacies in mexico that ship to usa
п»їbest mexican online pharmacies: mexican mail order pharmacies – mexican border pharmacies shipping to usa
mexican online pharmacies prescription drugs: mexican border pharmacies shipping to usa – mexico drug stores pharmacies
This is the perfect webpage for anyone who wants to find out about this topic. You realize so much its almost hard to argue with you (not that I really will need to…HaHa). You certainly put a new spin on a subject which has been written about for years. Wonderful stuff, just excellent.
mexican border pharmacies shipping to usa mexican rx online mexican drugstore online
mexico drug stores pharmacies: medication from mexico pharmacy – buying from online mexican pharmacy
mexican pharmaceuticals online: mexican online pharmacies prescription drugs – buying prescription drugs in mexico
п»їbest mexican online pharmacies: medication from mexico pharmacy – medication from mexico pharmacy
I want to to thank you for this excellent read!! I definitely loved every little bit of it. I have you saved as a favorite to look at new stuff you post…
cheap zithromax pills zithromax cost canada zithromax cost
Abortion pills online: buy cytotec over the counter – buy cytotec
https://zithromaxbestprice.pro/# zithromax drug
https://zithromaxbestprice.pro/# where can you buy zithromax
zithromax capsules australia zithromax 250 price can i buy zithromax over the counter in canada
buy zithromax: where to get zithromax over the counter – can you buy zithromax over the counter in mexico
http://propeciabestprice.pro/# buy cheap propecia tablets
https://nolvadexbestprice.pro/# tamoxifen alternatives premenopausal
buy cytotec buy cytotec over the counter п»їcytotec pills online
tamoxifen medication: tamoxifen hormone therapy – tamoxifen chemo
http://prednisonebestprice.pro/# can you buy prednisone without a prescription
https://cytotecbestprice.pro/# п»їcytotec pills online
zithromax order online uk: can i buy zithromax online – zithromax 500 without prescription
buy cheap propecia pill: buying propecia without rx – generic propecia for sale
buying propecia without insurance: buy cheap propecia prices – buying cheap propecia without prescription
http://zithromaxbestprice.pro/# zithromax for sale 500 mg
nolvadex for sale: tamoxifen vs clomid – tamoxifen estrogen
cost of propecia prices: get generic propecia prices – cost of cheap propecia without a prescription
Way cool! Some very valid points! I appreciate you penning this write-up and also the rest of the website is very good.
prednisone 3 tablets daily: prednisone 21 pack – where can i buy prednisone online without a prescription
https://propeciabestprice.pro/# cost propecia without a prescription
prednisone 10 mg coupon: prednisone 4mg – prednisone 40 mg
how to prevent hair loss while on tamoxifen: nolvadex d – tamoxifen buy
I’d like to thank you for the efforts you have put in writing this website. I really hope to see the same high-grade blog posts by you later on as well. In fact, your creative writing abilities has inspired me to get my own, personal website now 😉
acquisto farmaci con ricetta: Cialis generico 5 mg prezzo – comprare farmaci online all’estero
Farmacie on line spedizione gratuita: kamagra gel prezzo – Farmacie on line spedizione gratuita
I blog quite often and I genuinely thank you for your content. Your article has really peaked my interest. I will take a note of your site and keep checking for new details about once a week. I subscribed to your Feed as well.
https://farmait.store/# п»їFarmacia online migliore
farmacie online affidabili: Cialis generico recensioni – farmacie online autorizzate elenco
farmacia online piГ№ conveniente: kamagra gel prezzo – comprare farmaci online all’estero
I’m amazed, I have to admit. Rarely do I encounter a blog that’s both educative and engaging, and let me tell you, you have hit the nail on the head. The issue is something which too few men and women are speaking intelligently about. I’m very happy that I stumbled across this in my hunt for something regarding this.
acquisto farmaci con ricetta: kamagra – Farmacia online miglior prezzo
dove acquistare viagra in modo sicuro: acquisto viagra – pillole per erezione in farmacia senza ricetta
You ought to be a part of a contest for one of the highest quality sites on the internet. I most certainly will recommend this blog!
https://avanafil.pro/# farmacia online senza ricetta
farmacia online: Cialis generico recensioni – п»їFarmacia online migliore
Farmacie online sicure: kamagra gel – migliori farmacie online 2024
farmacie online sicure: Farmacia online migliore – Farmacia online piГ№ conveniente
kamagra senza ricetta in farmacia: viagra farmacia – viagra consegna in 24 ore pagamento alla consegna
farmacia online: farmacia online migliore – migliori farmacie online 2024
bookmarked!!, I really like your blog.
http://tadalafil.auction/# buy cialis united states
ed pills that work better than viagra: buy sildenafil online canada – over the counter alternative to viagra
generic cialis with dapoxetine 80mg x 10 tabs: 36 hour cialis no prescription – buy cialis with paypal
http://sildenafil.llc/# viagra without prescription
Spot on with this write-up, I truly believe that this website needs a lot more attention. I’ll probably be returning to read through more, thanks for the information!
dapoxetine/cialis: Buy Tadalafil 20mg – cialis 20mg uk
http://tadalafil.auction/# top sale viagracialis
where can i buy cialis in canada: cialis without a doctor prescription – where to buy cialis in singapore
https://indiapharmacy.shop/# indian pharmacy
http://indiapharmacy.shop/# top 10 online pharmacy in india
cheap ed medication
mexican pharmaceuticals online: Medicines Mexico – mexico pharmacies prescription drugs
https://edpillpharmacy.store/# erectile dysfunction pills online
ed doctor online
https://indiapharmacy.shop/# buy prescription drugs from india
mexican border pharmacies shipping to usa: mexico pharmacy win – buying from online mexican pharmacy
http://edpillpharmacy.store/# online ed treatments
best online ed treatment
mexican border pharmacies shipping to usa: Purple pharmacy online ordering – mexico pharmacies prescription drugs
http://mexicopharmacy.win/# buying prescription drugs in mexico online
order ed pills online: online erectile dysfunction – ed medication online
This is the perfect website for anybody who really wants to understand this topic. You understand so much its almost tough to argue with you (not that I personally will need to…HaHa). You definitely put a brand new spin on a subject which has been discussed for a long time. Excellent stuff, just wonderful.
mexico drug stores pharmacies: Mexico pharmacy online – mexico drug stores pharmacies
http://indiapharmacy.shop/# top 10 pharmacies in india
mexican mail order pharmacies: Certified Mexican pharmacy – mexico pharmacies prescription drugs
https://indiapharmacy.shop/# india online pharmacy
best online pharmacy india: Top mail order pharmacies – buy prescription drugs from india
I must thank you for the efforts you have put in writing this blog. I really hope to see the same high-grade blog posts by you in the future as well. In fact, your creative writing abilities has inspired me to get my own site now 😉
indian pharmacy: Online pharmacy USA – Online medicine order
https://indiapharmacy.shop/# indian pharmacy
online shopping pharmacy india: Online medicine home delivery – Online medicine order
mexico drug stores pharmacies: Certified Mexican pharmacy – mexican border pharmacies shipping to usa
https://mexicopharmacy.win/# reputable mexican pharmacies online
Hi there! This post couldn’t be written any better! Going through this post reminds me of my previous roommate! He always kept preaching about this. I’ll forward this article to him. Pretty sure he’s going to have a great read. Many thanks for sharing!
pharmacies in mexico that ship to usa: mexico pharmacy win – best online pharmacies in mexico
http://edpillpharmacy.store/# ed treatments online
mexican rx online: Certified Mexican pharmacy – mexican border pharmacies shipping to usa
An intriguing discussion is definitely worth comment. I do think that you need to publish more about this issue, it may not be a taboo subject but typically people do not speak about these issues. To the next! Best wishes!
I was able to find good information from your blog posts.
ed online pharmacy: Best ED meds online – ed pills cheap
http://edpillpharmacy.store/# buy ed medication
There is certainly a lot to learn about this topic. I like all the points you’ve made.
mexico pharmacies prescription drugs: Purple pharmacy online ordering – п»їbest mexican online pharmacies
https://indiapharmacy.shop/# Online medicine order
You’re so interesting! I don’t believe I’ve read through a single thing like that before. So great to discover another person with a few unique thoughts on this subject. Really.. thank you for starting this up. This website is one thing that is required on the internet, someone with a little originality.
reputable indian pharmacies: Online pharmacy USA – india online pharmacy
Having read this I thought it was rather informative. I appreciate you finding the time and energy to put this informative article together. I once again find myself personally spending way too much time both reading and posting comments. But so what, it was still worth it!
ed prescriptions online: Best ED pills non prescription – get ed meds online
Hello, I do believe your site may be having web browser compatibility problems. Whenever I take a look at your web site in Safari, it looks fine but when opening in I.E., it’s got some overlapping issues. I merely wanted to provide you with a quick heads up! Other than that, excellent site.
ed doctor online: online ed prescription same-day – ed treatments online
After looking into a number of the blog posts on your website, I truly like your way of blogging. I saved as a favorite it to my bookmark webpage list and will be checking back soon. Please check out my website too and let me know how you feel.
indianpharmacy com: Best Indian pharmacy – india pharmacy mail order
Excellent web site you’ve got here.. It’s difficult to find good quality writing like yours nowadays. I really appreciate people like you! Take care!!
reputable indian online pharmacy: Indian pharmacy online – top 10 pharmacies in india
Good info. Lucky me I came across your website by chance (stumbleupon). I’ve saved it for later.
buy cytotec over the counter http://cytotec.pro/# buy cytotec pills
furosemida 40 mg
https://lisinopril.guru/# rx lisinopril
Abortion pills online: buy misoprostol tablet – Abortion pills online
Abortion pills online https://lipitor.guru/# lipitor buy
lasix
tamoxifen estrogen: tamoxifen 20 mg tablet – tamoxifen and antidepressants
https://lipitor.guru/# lipitor no prescription
Having read your posts. I believed you have given your readers valuable information. Feel free to visit my website UY3 and I hope you get additional insights about Podcasting as I did upon stumbling across your site.
buy cytotec online fast delivery https://lipitor.guru/# lipitor 80 mg price
lasix furosemide
tamoxifen men Purchase Nolvadex Online does tamoxifen cause joint pain
https://cytotec.pro/# buy cytotec
Wonderful post! We will be linking to this great post on our site. Keep up the great writing.
cytotec pills buy online https://lisinopril.guru/# lisinopril for sale online
furosemida
https://tamoxifen.bid/# does tamoxifen cause bone loss
generic lipitor drugs: buy atorvastatin online – cost of generic lipitor in canada
buy cytotec over the counter http://lisinopril.guru/# zestril brand
lasix medication
lisinopril 20mg india lisinopril 20 lisinopril 20 mg over the counter
The next time I read a blog, Hopefully it won’t fail me just as much as this particular one. After all, Yes, it was my choice to read through, however I truly thought you would have something interesting to say. All I hear is a bunch of crying about something that you could fix if you were not too busy searching for attention.
buy cytotec pills: buy cytotec online – buy cytotec
http://cytotec.pro/# purchase cytotec
buy cytotec over the counter https://tamoxifen.bid/# where to get nolvadex
furosemide 100 mg
furosemida 40 mg: furosemide online – lasix online
I really like reading a post that will make men and women think. Also, thank you for permitting me to comment.
furosemide: furosemide online – lasix medication
https://lipitor.guru/# lipitor generic
п»їcytotec pills online https://lipitor.guru/# how much is generic lipitor
lasix generic name
cytotec abortion pill: buy cytotec online – buy cytotec
Great site you have got here.. It’s difficult to find high quality writing like yours these days. I seriously appreciate people like you! Take care!!
clomid nolvadex: buy tamoxifen online – tamoxifen hormone therapy
Misoprostol 200 mg buy online https://furosemide.win/# lasix medication
furosemide 100mg
There’s certainly a lot to know about this issue. I love all of the points you made.
lipitor 80: Atorvastatin 20 mg buy online – lipitor cost
effexor and tamoxifen: Purchase Nolvadex Online – nolvadex for pct
Hi, I do think this is an excellent web site. I stumbledupon it 😉 I’m going to return yet again since i have book-marked it. Money and freedom is the best way to change, may you be rich and continue to help others.
cytotec abortion pill https://lipitor.guru/# lipitor price drop
furosemide 100mg
lisinopril 2.5 mg tablet: Lisinopril refill online – lisinopril 5mg
Good post! We are linking to this particularly great post on our website. Keep up the good writing.
Abortion pills online: cytotec best price – cytotec pills buy online
buy cytotec in usa https://lisinopril.guru/# lisinopril 10 best price
buy lasix online
где можно отремонтировать телефон
tamoxifen benefits: buy tamoxifen online – tamoxifen headache
Oh my goodness! Awesome article dude! Thank you so much, However I am experiencing difficulties with your RSS. I don’t know the reason why I am unable to join it. Is there anybody getting similar RSS issues? Anyone who knows the answer can you kindly respond? Thanks.
canadian pharmacy checker canadian pharmacy online precription drugs from canada
The very next time I read a blog, Hopefully it does not disappoint me as much as this particular one. After all, Yes, it was my choice to read through, nonetheless I truly believed you would probably have something useful to say. All I hear is a bunch of moaning about something that you can fix if you weren’t too busy looking for attention.
https://easyrxcanada.online/# canada drugstore pharmacy rx
https://mexstarpharma.com/# medicine in mexico pharmacies
mexico drug stores pharmacies mexican mail order pharmacies reputable mexican pharmacies online
canadian online drugs: canada pharmacy 24h – reddit canadian pharmacy
https://easyrxcanada.com/# canadianpharmacymeds com
https://mexstarpharma.online/# mexican rx online
canadian pharmacy drugs online canadian pharmacy 24 canadian valley pharmacy
mexican pharmaceuticals online: mexican mail order pharmacies – mexico drug stores pharmacies
Профессиональный сервисный центр по ремонту ноутбуков, макбуков и другой компьютерной техники.
Мы предлагаем:ремонт макбук в москве
Наши мастера оперативно устранят неисправности вашего устройства в сервисе или с выездом на дом!
ремонт телевизоров в москве
https://easyrxindia.shop/# pharmacy website india
https://easyrxcanada.online/# canada pharmacy reviews
purple pharmacy mexico price list: medication from mexico pharmacy – medicine in mexico pharmacies
canada rx pharmacy: canadian pharmacies – online canadian pharmacy reviews
Профессиональный сервисный центр по ремонту сотовых телефонов, смартфонов и мобильных устройств.
Мы предлагаем: ремонт смартфонов
Наши мастера оперативно устранят неисправности вашего устройства в сервисе или с выездом на дом!
Профессиональный сервисный центр по ремонту квадрокоптеров и радиоуправляемых дронов.
Мы предлагаем:ремонт дронов москва
Наши мастера оперативно устранят неисправности вашего устройства в сервисе или с выездом на дом!
indian pharmacy paypal: Online medicine order – buy medicines online in india
http://mexstarpharma.com/# medicine in mexico pharmacies
https://easyrxindia.shop/# india pharmacy
best canadian online pharmacy: reliable canadian pharmacy – canadian valley pharmacy
northern pharmacy canada: canadian pharmacy scam – trusted canadian pharmacy
Spot on with this write-up, I truly think this web site needs a lot more attention. I’ll probably be back again to read through more, thanks for the advice!
guvenilir slot siteleri 2024: guvenilir slot siteleri – yasal slot siteleri
deneme bonusu veren siteler: deneme bonusu – deneme bonusu veren siteler
bonus veren casino slot siteleri: guvenilir slot siteleri 2024 – yasal slot siteleri
Профессиональный сервисный центр по ремонту ноутбуков, imac и другой компьютерной техники.
Мы предлагаем:сервисный ремонт imac
Наши мастера оперативно устранят неисправности вашего устройства в сервисе или с выездом на дом!
sweet bonanza demo turkce: sweet bonanza kazanc – sweet bonanza
en iyi slot siteleri: en iyi slot siteleri 2024 – en iyi slot siteleri
Профессиональный сервисный центр по ремонту ноутбуков и компьютеров.дронов.
Мы предлагаем:ремонт ноутбуков в москве
Наши мастера оперативно устранят неисправности вашего устройства в сервисе или с выездом на дом!
ремонт айфона на дому в москве
You ought to be a part of a contest for one of the most useful sites on the internet. I’m going to recommend this blog!
canl? slot siteleri: oyun siteleri slot – slot kumar siteleri
Hi there, There’s no doubt that your web site could be having web browser compatibility issues. When I take a look at your blog in Safari, it looks fine however, when opening in Internet Explorer, it has some overlapping issues. I merely wanted to give you a quick heads up! Aside from that, wonderful blog!
https://slotsiteleri.bid/# bonus veren slot siteleri
slot siteleri 2024: yeni slot siteleri – bonus veren casino slot siteleri
Good information. Lucky me I came across your blog by chance (stumbleupon). I’ve book-marked it for later!
https://slotsiteleri.bid/# slot bahis siteleri
en iyi slot siteleri 2024: 2024 en iyi slot siteleri – en yeni slot siteleri
apple watch ремонт
Профессиональный сервисный центр по ремонту холодильников и морозильных камер.
Мы предлагаем: ремонт холодильника
Наши мастера оперативно устранят неисправности вашего устройства в сервисе или с выездом на дом!
Профессиональный сервисный центр по ремонту бытовой техники с выездом на дом.
Мы предлагаем:сервисные центры в санкт петербурге
Наши мастера оперативно устранят неисправности вашего устройства в сервисе или с выездом на дом!
Профессиональный сервисный центр по ремонту ноутбуков и компьютеров.дронов.
Мы предлагаем:ремонт ноутбуков в москве
Наши мастера оперативно устранят неисправности вашего устройства в сервисе или с выездом на дом!
https://sweetbonanza.network/# sweet bonanza hilesi
bonus veren slot siteleri: casino slot siteleri – yeni slot siteleri
Very good post! We are linking to this particularly great content on our site. Keep up the good writing.
Профессиональный сервисный центр по ремонту планетов в том числе Apple iPad.
Мы предлагаем: ремонт планшетов на дому
Наши мастера оперативно устранят неисправности вашего устройства в сервисе или с выездом на дом!
Если вы искали где отремонтировать сломаную технику, обратите внимание – тех профи
Профессиональный сервисный центр по ремонту радиоуправляемых устройства – квадрокоптеры, дроны, беспилостники в том числе Apple iPad.
Мы предлагаем: сервис квадрокоптеров
Наши мастера оперативно устранят неисправности вашего устройства в сервисе или с выездом на дом!
Если вы искали где отремонтировать сломаную технику, обратите внимание – профи ремонт
en yeni slot siteleri: oyun siteleri slot – slot kumar siteleri
http://sweetbonanza.network/# sweet bonanza 100 tl
Если вы искали где отремонтировать сломаную технику, обратите внимание – ремонт бытовой техники
You made a few good points there. I did a search on the subject and found nearly all folks will consent with your blog.
Everything is very open with a clear description of the issues. It was really informative. Your site is extremely helpful. Many thanks for sharing!
пин ап: пин ап – pin up казино
ремонт телевизора москва
Если вы искали где отремонтировать сломаную технику, обратите внимание – профи ремонт
https://pin-up.diy/# пин ап
ван вин: 1вин зеркало – 1win вход
пин ап зеркало: пин ап казино – пинап казино
vavada вавада рабочее зеркало vavada casino
пин ап казино: pin up – pin up
пин ап зеркало: пин ап – пин ап вход
You are my intake, I own few blogs and sometimes run out from to post .
1вин официальный сайт: 1win официальный сайт – 1вин официальный сайт
Профессиональный сервисный центр по ремонту Apple iPhone в Москве.
Мы предлагаем: ремонт айфона в москве недорого
Наши мастера оперативно устранят неисправности вашего устройства в сервисе или с выездом на дом!
ремонтная мастерская телефонов
Если вы искали где отремонтировать сломаную технику, обратите внимание – ремонт бытовой техники в новосибирск
Профессиональный сервисный центр по ремонту источников бесперебойного питания.
Мы предлагаем: ремонт бесперебойника
Наши мастера оперативно устранят неисправности вашего устройства в сервисе или с выездом на дом!
https://1xbet.contact/# 1xbet зеркало
1xbet: 1хбет зеркало – 1хбет
Если вы искали где отремонтировать сломаную технику, обратите внимание – профи барнаул
https://1xbet.contact/# 1xbet зеркало
1win зеркало: 1win – 1вин зеркало
Если вы искали где отремонтировать сломаную технику, обратите внимание – ремонт бытовой техники в челябинске
Профессиональный сервисный центр по ремонту варочных панелей и индукционных плит.
Мы предлагаем: срочный ремонт варочной панели
Наши мастера оперативно устранят неисправности вашего устройства в сервисе или с выездом на дом!
Профессиональный сервисный центр по ремонту бытовой техники с выездом на дом.
Мы предлагаем:сервисные центры по ремонту техники в екб
Наши мастера оперативно устранят неисправности вашего устройства в сервисе или с выездом на дом!
vavada online casino: vavada казино – vavada casino
http://1win.directory/# 1вин
цифровой фотоаппарат ремонт
https://easydrugrx.com/# viagra boots pharmacy
singulair pharmacy coupon
Viagra Oral Jelly: colchicine online pharmacy – nexium mexico pharmacy
https://easydrugrx.com/# viagra usa online pharmacy
online pharmacy buy viagra
percocet overseas pharmacy: vermox new zealand pharmacy – cialis cheap online pharmacy
Can you be more specific about the content of your article? After reading it, I still have some doubts. Hope you can help me. phieuguige-grab-bat-net
What’s up, future millionaires? Charles here, your captain on this journey to the treasure island of affiliate marketing. Ever dreamt of earning $1,000 a day without breaking a sweat? Well, pinch yourself, because you’re not dreaming! Grab your eye spot and your sense of experience, and let’s sail the high seas of chance. All aboard the profit ship!
https://pharm24on.com/# good neighbor pharmacy naproxen
cialis from online pharmacy
Если вы искали где отремонтировать сломаную технику, обратите внимание – профи тех сервис челябинск
What’s up, future millionaires? Charles here, your captain on this journey to the treasure island of affiliate marketing. Ever imagined earning $1,000 a day without breaking a sweat? Well, pinch yourself, since you’re not dreaming! Grab your eye patch and your sense of experience, and let’s sail the high seas of opportunity. All aboard the earnings ship!
online pharmacy buy adipex: best ed medication – percocet pharmacy cost
https://onlineph24.com/# online pharmacy atenolol
non prescription medicine pharmacy
most trusted online pharmacy: humana pharmacy rx – antibiotics online pharmacy
nearest drug store: erythromycin pharmacy – accutane northwest pharmacy
Профессиональный сервисный центр по ремонту фото техники от зеркальных до цифровых фотоаппаратов.
Мы предлагаем: ремонт фотоаппарата
Наши мастера оперативно устранят неисправности вашего устройства в сервисе или с выездом на дом!
Профессиональный сервисный центр по ремонту фото техники от зеркальных до цифровых фотоаппаратов.
Мы предлагаем: срочный ремонт проектора
Наши мастера оперативно устранят неисправности вашего устройства в сервисе или с выездом на дом!
strattera online pharmacy: online pharmacy ativan – zyrtec d behind pharmacy counter
This is a topic that’s near to my heart… Thank you! Where can I find the contact details for questions?
In today’s busy world, staying ahead implies watching out for new offers that can enhance our lives. Whether it’s the most recent tech gizmo or a special offer on health items, new offers bring excitement and possibility. At [Your Business Call], we’re committed to bringing you the most innovative and enticing offers available. From limited-time discount rates to unique bundles, we’re committed to providing value and convenience to our customers. Stay tuned to our site and social networks channels to be the very first to understand about our most recent offers. With [Your Company Name], you’ll never lose out on a possibility to experience something brand-new and extraordinary.
cialis pharmacy: revatio online pharmacy – best online pharmacy to buy ambien
pharmacy 2 home finpecia: generic pharmacy propecia – quetiapine prices pharmacy
Профессиональный сервисный центр по ремонту планшетов в Москве.
Мы предлагаем: ремонт стекла планшета
Наши мастера оперативно устранят неисправности вашего устройства в сервисе или с выездом на дом!
Если вы искали где отремонтировать сломаную технику, обратите внимание – профи ремонт
Hi there! Just felt like saying hello to express my appreciation for your awesome blog. Your knowledge on making money online are genuinely commendable. Earning an income from home has never been more achievable with affiliate marketing. It’s all about leveraging your internet presence and marketing products or services that resonate with your audience. Your blog is a treasured resource for anyone exploring making money from home. Keep doing the great work!
https://pharmbig24.com/# reliable online pharmacy viagra
Профессиональный сервисный центр по ремонту бытовой техники с выездом на дом.
Мы предлагаем:сервисные центры в новосибирске
Наши мастера оперативно устранят неисправности вашего устройства в сервисе или с выездом на дом!
mexican rx online: medicine in mexico pharmacies – mexican drugstore online
medication from mexico pharmacy mexican rx online buying from online mexican pharmacy
After I originally commented I appear to have clicked the -Notify me when new comments are added- checkbox and from now on each time a comment is added I recieve 4 emails with the exact same comment. Is there a means you are able to remove me from that service? Cheers.
mexican online pharmacies prescription drugs: mexican pharmaceuticals online – mexican online pharmacies prescription drugs
Если вы искали где отремонтировать сломаную технику, обратите внимание – техпрофи
mexican rx online: buying prescription drugs in mexico – buying prescription drugs in mexico online
https://pharmbig24.com/# Diltiazem
Hey there! Just wanted dropping by to inform you how much I admire your blog. Your expertise on making money online are really noteworthy. Earning an income from home has never been easier thanks to affiliate promotion. It’s all about discovering the right goods to promote and nurturing connections with your audience. Your blog is a gem trove of insights for emerging affiliate marketers. Keep doing the great work!
mexico pharmacies prescription drugs: reputable mexican pharmacies online – mexican rx online
kroger pharmacy finasteride discount pharmacies thailand pharmacy ambien
п»їlegitimate online pharmacies india: reputable indian online pharmacy – top 10 pharmacies in india
Профессиональный сервисный центр по ремонту видео техники а именно видеокамер.
Мы предлагаем: ремонт видеокамер
Наши мастера оперативно устранят неисправности вашего устройства в сервисе или с выездом на дом!
Having read this I thought it was very informative. I appreciate you taking the time and energy to put this content together. I once again find myself personally spending a lot of time both reading and posting comments. But so what, it was still worthwhile!
https://indianpharmacy.company/# indian pharmacy online
ramipril online pharmacy: pharmacy viagra cialis – doxycycline online pharmacy
Very good article. I absolutely love this site. Thanks!
reputable mexican pharmacies online buying prescription drugs in mexico mexican rx online
best online pharmacies in mexico: mexican border pharmacies shipping to usa – best online pharmacies in mexico
Если вы искали где отремонтировать сломаную технику, обратите внимание – ремонт бытовой техники в красноярске
There is definately a great deal to know about this issue. I love all the points you made.
buy prescription drugs from india Online medicine order top 10 online pharmacy in india
п»їbest mexican online pharmacies: mexican rx online – mexican drugstore online
Artane: skelaxin online pharmacy – tesco pharmacy zovirax
https://pharmbig24.com/# mexican pharmacy doxycycline
Профессиональный сервисный центр по ремонту бытовой техники с выездом на дом.
Мы предлагаем: сервисные центры в москве
Наши мастера оперативно устранят неисправности вашего устройства в сервисе или с выездом на дом!
Если вы искали где отремонтировать сломаную технику, обратите внимание – ремонт бытовой техники в нижнем новгороде
Way cool! Some extremely valid points! I appreciate you writing this post and also the rest of the website is also very good.
viagra generic pharmacy freedom pharmacy safe rx pharmacy
mexican pharmaceuticals online: best online pharmacies in mexico – mexican rx online
Если вы искали где отремонтировать сломаную технику, обратите внимание – тех профи
revia online pharmacy: cialis internet pharmacy – online pharmacy lasix
http://mexicopharmacy.cheap/# mexican mail order pharmacies
Its excellent as your other content : D, appreciate it for posting.
reputable mexican pharmacies online: best online pharmacies in mexico – buying prescription drugs in mexico online
buy prescription drugs from india Online medicine order Online medicine order
Профессиональный сервисный центр по ремонту стиральных машин с выездом на дом по Москве.
Мы предлагаем: ремонт стиральных машин москва сервис центр
Наши мастера оперативно устранят неисправности вашего устройства в сервисе или с выездом на дом!
Профессиональный сервисный центр по ремонту бытовой техники с выездом на дом.
Мы предлагаем: ремонт крупногабаритной техники в казани
Наши мастера оперативно устранят неисправности вашего устройства в сервисе или с выездом на дом!
indian pharmacy online: indian pharmacy paypal – online pharmacy india
After checking out a few of the articles on your website, I truly appreciate your technique of blogging. I saved it to my bookmark website list and will be checking back in the near future. Take a look at my website too and tell me how you feel.
http://indianpharmacy.company/# india pharmacy mail order
online pharmacy india: india online pharmacy – buy medicines online in india
Some truly prime articles on this site, saved to my bookmarks.
This really answered my downside, thank you!
reputable indian online pharmacy indianpharmacy com indian pharmacies safe
I needed to thank you for this very good read!! I definitely enjoyed every bit of it. I have got you bookmarked to look at new stuff you post…
Hi, I think your blog could possibly be having browser compatibility issues. Whenever I take a look at your website in Safari, it looks fine but when opening in Internet Explorer, it has some overlapping issues. I just wanted to provide you with a quick heads up! Besides that, fantastic blog!
п»їbest mexican online pharmacies: mexican pharmaceuticals online – mexican border pharmacies shipping to usa
top online pharmacy india: india online pharmacy – best online pharmacy india
indian pharmacies safe india pharmacy top online pharmacy india
Если вы искали где отремонтировать сломаную технику, обратите внимание – профи тех сервис пермь
https://indianpharmacy.company/# п»їlegitimate online pharmacies india
You made some good points there. I checked on the net to find out more about the issue and found most individuals will go along with your views on this web site.
Профессиональный сервисный центр по ремонту бытовой техники с выездом на дом.
Мы предлагаем: сервис центры бытовой техники москва
Наши мастера оперативно устранят неисправности вашего устройства в сервисе или с выездом на дом!
toronto pharmacy online: xenical malaysia pharmacy – cigna online pharmacy
imiquimod uk pharmacy best online pharmacy that does not require a prescription medicine online order
Right here is the perfect website for anybody who hopes to find out about this topic. You realize so much its almost hard to argue with you (not that I personally will need to…HaHa). You certainly put a new spin on a subject that has been discussed for ages. Wonderful stuff, just wonderful.
buy isotretinoin online pharmacy: wedgewood pharmacy naltrexone – united pharmacy accutane
Your style is so unique compared to other people I’ve read stuff from. I appreciate you for posting when you’ve got the opportunity, Guess I’ll just book mark this blog.
Thanks a bunch for sharing this with all of us you actually know what you’re talking about! Bookmarked. Kindly also visit my web site =). We could have a link exchange arrangement between us!
You have brought up a very great points, thanks for the post.
mexican online pharmacies prescription drugs: best online pharmacies in mexico – medication from mexico pharmacy
http://indianpharmacy.company/# indianpharmacy com
Если вы искали где отремонтировать сломаную технику, обратите внимание – ремонт бытовой техники в ростове на дону
purple pharmacy mexico price list pharmacies in mexico that ship to usa buying prescription drugs in mexico
I could not refrain from commenting. Perfectly written!
mexico drug stores pharmacies: medication from mexico pharmacy – pharmacies in mexico that ship to usa
I’d like to thank you for the efforts you have put in writing this blog. I am hoping to see the same high-grade blog posts from you in the future as well. In fact, your creative writing abilities has motivated me to get my very own site now 😉
global rx pharmacy irvine: Silagra – imiquimod online pharmacy
cipro publix pharmacy tesco pharmacy viagra price fanda pharmacy hong kong cialis
Профессиональный сервисный центр по ремонту игровых консолей Sony Playstation, Xbox, PSP Vita с выездом на дом по Москве.
Мы предлагаем: надежный сервис ремонта игровых консолей
Наши мастера оперативно устранят неисправности вашего устройства в сервисе или с выездом на дом!
Профессиональный сервисный центр по ремонту компьютерных видеокарт по Москве.
Мы предлагаем: ремонт видеокарт москва
Наши мастера оперативно устранят неисправности вашего устройства в сервисе или с выездом на дом!
https://indianpharmacy.company/# top 10 pharmacies in india
It’s hard to find well-informed people in this particular subject, but you seem like you know what you’re talking about! Thanks
I really like looking through an article that will make men and women think. Also, thank you for permitting me to comment.
indian pharmacies safe: indian pharmacy online – online shopping pharmacy india
rx plus pharmacy: doc morris pharmacy artane – lexapro pharmacy coupons
buying prescription drugs in mexico medicine in mexico pharmacies mexico drug stores pharmacies
Oh my goodness! Awesome article dude! Thank you, However I am encountering troubles with your RSS. I don’t know why I cannot subscribe to it. Is there anybody having identical RSS problems? Anyone that knows the solution can you kindly respond? Thanx!
Профессиональный сервисный центр по ремонту фототехники в Москве.
Мы предлагаем: купить в москве фотовспышку дешево
Наши мастера оперативно устранят неисправности вашего устройства в сервисе или с выездом на дом!
Подробнее на сайте сервисного центра remont-vspyshek-realm.ru
Профессиональный сервисный центр по ремонту компьютероной техники в Москве.
Мы предлагаем: ремонт системного блока компьютера цена
Наши мастера оперативно устранят неисправности вашего устройства в сервисе или с выездом на дом!
Профессиональный сервисный центр по ремонту фото техники от зеркальных до цифровых фотоаппаратов.
Мы предлагаем: ремонт проекторов на дому
Наши мастера оперативно устранят неисправности вашего устройства в сервисе или с выездом на дом!
I could not refrain from commenting. Very well written.
casibom casibom guncel giris casibom guncel giris
Hi there! This blog post couldn’t be written any better! Going through this post reminds me of my previous roommate! He always kept talking about this. I’ll forward this post to him. Pretty sure he’ll have a great read. Thanks for sharing!
http://betine.online/# betine guncel giris
Если кто ищет место, где можно выгодно купить раковины и ванны, рекомендую один интернет-магазин, который недавно открыл для себя. Они предлагают большой выбор сантехники и аксессуаров для ванной комнаты. Ассортимент включает различные модели, так что можно подобрать под любой стиль и размер помещения.
Мне нужно было купить умывальник , и они предложили несколько отличных вариантов. Цены приятно удивили, а качество товаров на высшем уровне. Также понравилось, что они предлагают услуги профессиональной установки. Доставка была быстрой, и всё прошло гладко. Теперь моя ванная комната выглядит просто великолепно!
<a href=”https://remont-kondicionerov-wik.ru”>ремонт кондиционеров</a>
Профессиональный сервисный центр по ремонту компьютерных блоков питания в Москве.
Мы предлагаем: ремонт источников питания
Наши мастера оперативно устранят неисправности вашего устройства в сервисе или с выездом на дом!
сервис профи самара
Хочу поделиться своим опытом ремонта телефона в этом сервисном центре. Остался очень доволен качеством работы и скоростью обслуживания. Если ищете надёжное место для ремонта, обратитесь сюда: ремонт экранов телефонов.
bookmarked!!, I really like your blog!
starz bet giris starzbet starz bet giris
You should take part in a contest for one of the greatest websites online. I am going to recommend this blog!
http://gatesofolympusoyna.online/# gates of olympus turkce
Hi, I do believe your website might be having internet browser compatibility problems. Whenever I take a look at your website in Safari, it looks fine but when opening in Internet Explorer, it has some overlapping issues. I merely wanted to provide you with a quick heads up! Other than that, wonderful website.
After looking over a few of the articles on your site, I honestly like your technique of blogging. I book marked it to my bookmark website list and will be checking back in the near future. Please visit my web site too and let me know how you feel.
I like it when people come together and share ideas. Great blog, stick with it.
Профессиональный сервисный центр по ремонту компьютероной техники в Москве.
Мы предлагаем: ремонт компьютеров в москве
Наши мастера оперативно устранят неисправности вашего устройства в сервисе или с выездом на дом!
https://starzbet.shop/# starzbet guncel giris
I’m impressed, I have to admit. Rarely do I encounter a blog that’s equally educative and amusing, and let me tell you, you’ve hit the nail on the head. The issue is something that too few folks are speaking intelligently about. I’m very happy I came across this in my search for something relating to this.
betine sikayet betine promosyon kodu betine
I really like it when folks get together and share ideas. Great website, keep it up.
Excellent post. I definitely love this website. Keep writing!
Saved as a favorite, I like your blog!
Профессиональный сервисный центр по ремонту камер видео наблюдения по Москве.
Мы предлагаем: ремонт систем видеонаблюдения
Наши мастера оперативно устранят неисправности вашего устройства в сервисе или с выездом на дом!
Профессиональный сервисный центр по ремонту бытовой техники с выездом на дом.
Мы предлагаем: сервисные центры по ремонту техники в нижнем новгороде
Наши мастера оперативно устранят неисправности вашего устройства в сервисе или с выездом на дом!
https://gatesofolympusoyna.online/# gates of olympus demo oyna
Gates of Olympus gates of olympus giris gates of olympus demo oyna
Hello! I simply want to give you a huge thumbs up for your excellent info you’ve got here on this post. I am returning to your site for more soon.
Very good post. I absolutely love this site. Stick with it!
se puede comprar sildenafil sin receta: viagra online cerca de la coruГ±a – sildenafilo 100mg precio espaГ±a
https://farmaciaeu.com/# farmacia online barata y fiable
farmacia online envГo gratis
This website was… how do I say it? Relevant!! Finally I have found something that helped me. Thank you.
Профессиональный сервисный центр по ремонту мониторов в Москве.
Мы предлагаем: сколько стоит починить монитор
Наши мастера оперативно устранят неисправности вашего устройства в сервисе или с выездом на дом!
Профессиональный сервисный центр по ремонту кнаручных часов от советских до швейцарских в Москве.
Мы предлагаем: ремонт часов москва
Наши мастера оперативно устранят неисправности вашего устройства в сервисе или с выездом на дом!
viagra precio 2022 comprar viagra sildenafilo cinfa 25 mg precio
sildenafilo 50 mg comprar online: viagra precio – venta de viagra a domicilio
http://sildenafilo.men/# sildenafilo cinfa precio
Если вы искали где отремонтировать сломаную технику, обратите внимание – техпрофи
Aw, this was a really good post. Taking the time and actual effort to create a very good article… but what can I say… I hesitate a whole lot and never manage to get nearly anything done.
farmacia online envГo gratis: farmacia online envio gratis murcia – farmacia online madrid
срочный ремонт кондиционера
Профессиональный сервисный центр по ремонту бытовой техники с выездом на дом.
Мы предлагаем: сервисные центры по ремонту техники в перми
Наши мастера оперативно устранят неисправности вашего устройства в сервисе или с выездом на дом!
https://tadalafilo.bid/# farmacia online madrid
farmacias online seguras en espaГ±a
https://farmaciaeu.com/# farmacia online espaГ±a envГo internacional
viagra online rГЎpida: comprar viagra – comprar viagra en espaГ±a amazon
Howdy! I just would like to give you a big thumbs up for your excellent information you’ve got right here on this post. I will be returning to your website for more soon.
farmacia online barata y fiable cialis 20 mg precio farmacia farmacias online baratas
сервисные центры в самаре ремонт крупногабаритной техники в самаре
Профессиональный сервисный центр по ремонту парогенераторов в Москве.
Мы предлагаем: мастерские по ремонту парогенераторов
Наши мастера оперативно устранят неисправности вашего устройства в сервисе или с выездом на дом!
farmacia online barcelona: tadalafilo – farmacias online seguras
https://tadalafilo.bid/# farmacia online barcelona
farmacia online madrid: farmacia online barata – farmacias online seguras en espaГ±a
Если вы искали где отремонтировать сломаную технику, обратите внимание – выездной ремонт бытовой техники в волгограде
http://sildenafilo.men/# sildenafilo cinfa precio
farmacia online 24 horas: farmacia online barata y fiable – farmacia online barata y fiable
Your style is very unique compared to other people I have read stuff from. Thank you for posting when you’ve got the opportunity, Guess I will just book mark this blog.
se puede comprar viagra sin receta: viagra para hombre precio farmacias – п»їViagra online cerca de Madrid
Spot on with this write-up, I truly believe this amazing site needs much more attention. I’ll probably be back again to read through more, thanks for the advice.
Bongdalu cập nhật tin tức bóng đá nóng hổi, thể thao sôi động và giải trí hấp dẫn
http://sildenafilo.men/# farmacia gibraltar online viagra
se puede comprar sildenafil sin receta: sildenafilo precio – comprar viagra sin gastos de envГo
https://sildenafilo.men/# viagra online cerca de zaragoza
farmacia online envГo gratis
Greetings! Very helpful advice in this particular article! It is the little changes that produce the most important changes. Thanks for sharing!
Rồng Bạch Kim – Soi cầu lô chính xác miễn phí chính xác số #1 2024
farmacie online sicure: Farmacia online piu conveniente – farmacie online sicure
Профессиональный сервисный центр по ремонту бытовой техники с выездом на дом.
Мы предлагаем: ремонт бытовой техники в красноярске
Наши мастера оперативно устранят неисправности вашего устройства в сервисе или с выездом на дом!
Farmacie on line spedizione gratuita Cialis generico 5 mg prezzo Farmacia online piГ№ conveniente
viagra naturale: viagra – viagra 50 mg prezzo in farmacia
viagra acquisto in contrassegno in italia viagra prezzo viagra originale in 24 ore contrassegno
acquisto farmaci con ricetta: Farmacia online miglior prezzo – farmaci senza ricetta elenco
https://sildenafilit.pro/# viagra online consegna rapida
acquistare farmaci senza ricetta
Greetings! Very helpful advice in this particular article! It’s the little changes which will make the most significant changes. Thanks a lot for sharing!
Если вы искали где отремонтировать сломаную технику, обратите внимание – ремонт бытовой техники в уфе
Farmacie online sicure Farmacie online sicure Farmacia online miglior prezzo
comprare farmaci online all’estero: Cialis generico prezzo – migliori farmacie online 2024
gel per erezione in farmacia: viagra farmacia – viagra subito
Farmacie online sicure Farmacie che vendono Cialis senza ricetta farmacie online sicure
Motchilltv.fyi – Trang web xem phim Online chất lượng Full HD với giao diện thân thiện, trực quan cùng kho phim với hơn 15.000+ bộ phim mới và phim hot hiện nay.
cialis farmacia senza ricetta: viagra – viagra online in 2 giorni
Bongdalu cập nhật tin tức bóng đá nóng hổi, thể thao sôi động và giải trí hấp dẫn.
http://sildenafilit.pro/# viagra subito
comprare farmaci online all’estero
viagra generico recensioni viagra senza ricetta pillole per erezione in farmacia senza ricetta
Профессиональный сервисный центр по ремонту бытовой техники с выездом на дом.
Мы предлагаем:ремонт крупногабаритной техники в ростове на дону
Наши мастера оперативно устранят неисправности вашего устройства в сервисе или с выездом на дом!
viagra generico in farmacia costo: viagra senza ricetta – viagra 100 mg prezzo in farmacia
acquistare farmaci senza ricetta Cialis generico 20 mg 8 compresse prezzo migliori farmacie online 2024
migliori farmacie online 2024: Brufen 600 prezzo – п»їFarmacia online migliore
Aw, this was an incredibly nice post. Taking the time and actual effort to create a very good article… but what can I say… I procrastinate a lot and never manage to get nearly anything done.
viagra originale recensioni cialis farmacia senza ricetta viagra originale in 24 ore contrassegno
Everything is very open with a really clear explanation of the issues. It was really informative. Your website is very useful. Thanks for sharing.
viagra 50 mg prezzo in farmacia: viagra senza ricetta – viagra consegna in 24 ore pagamento alla consegna
http://brufen.pro/# Ibuprofene 600 generico prezzo
migliori farmacie online 2024
farmacie online affidabili: Farmacia online piu conveniente – comprare farmaci online con ricetta
The very next time I read a blog, I hope that it does not disappoint me as much as this particular one. After all, Yes, it was my choice to read, however I actually believed you would probably have something interesting to say. All I hear is a bunch of moaning about something that you could possibly fix if you were not too busy searching for attention.
farmacie online affidabili Brufen antinfiammatorio migliori farmacie online 2024
After checking out a few of the blog posts on your site, I truly like your way of blogging. I saved it to my bookmark site list and will be checking back in the near future. Please visit my website as well and let me know what you think.
farmacie online affidabili Cialis generico recensioni farmacie online sicure
I was very pleased to uncover this great site. I need to to thank you for ones time for this fantastic read!! I definitely appreciated every little bit of it and i also have you bookmarked to check out new things in your site.
сервисный центре предлагает ремонт телевизора на дому в москве недорого – ремонт телевизоров г москва
farmacia online piГ№ conveniente: farmacia online migliore – farmaci senza ricetta elenco
https://tadalafilit.com/# acquisto farmaci con ricetta
farmacie online sicure
Farmacia online piГ№ conveniente Tadalafil generico migliore п»їFarmacia online migliore
viagra generico recensioni viagra prezzo viagra consegna in 24 ore pagamento alla consegna
viagra pfizer 25mg prezzo: viagra online in 2 giorni – esiste il viagra generico in farmacia
migliori farmacie online 2024: Cialis generico prezzo – farmacia online senza ricetta
farmacia online senza ricetta Tadalafil generico migliore top farmacia online
Сервисный центр предлагает ремонт электросамокатов kleefer в москве срочный ремонт электросамокатов kleefer
Good post. I will be facing a few of these issues as well..
Сервисный центр предлагает выездной ремонт стиральных машин gaggenau мастерские ремонта стиральных машин gaggenau
viagra generico sandoz acquisto viagra viagra pfizer 25mg prezzo
Если вы искали где отремонтировать сломаную технику, обратите внимание – профи воронеж
Farmacie on line spedizione gratuita: Tadalafil generico migliore – migliori farmacie online 2024
viagra originale in 24 ore contrassegno viagra senza prescrizione viagra originale in 24 ore contrassegno
gel per erezione in farmacia: viagra online siti sicuri – miglior sito per comprare viagra online
http://tadalafilit.com/# farmacie online sicure
farmacia online
I need to to thank you for this very good read!! I definitely loved every bit of it. I’ve got you book-marked to check out new stuff you post…
comprare farmaci online con ricetta BRUFEN 600 acquisto online farmacie online affidabili
top farmacia online: Cialis generico controindicazioni – acquisto farmaci con ricetta
farmacia online senza ricetta Brufen antinfiammatorio farmacia online piГ№ conveniente
Профессиональный сервисный центр по ремонту компьютеров и ноутбуков в Москве.
Мы предлагаем: ремонт макбук
Наши мастера оперативно устранят неисправности вашего устройства в сервисе или с выездом на дом!
acquistare farmaci senza ricetta Cialis generico recensioni migliori farmacie online 2024
https://farmaciait.men/# migliori farmacie online 2024
Farmacie online sicure
prednisone brand name us: generic prednisone tablets – 400 mg prednisone
rybelsus: rybelsus generic – Buy compounded semaglutide online
Hi, I do believe this is a great website. I stumbledupon it 😉 I’m going to return once again since I saved as a favorite it. Money and freedom is the best way to change, may you be rich and continue to help other people.
Semaglutide pharmacy price Semaglutide pharmacy price semaglutide
gabapentin 100mg: neurontin 500 mg tablet – buying neurontin online
Hi! I simply would like to give you a huge thumbs up for your great information you have got here on this post. I’ll be returning to your web site for more soon.
buy rybelsus: Buy semaglutide pills – rybelsus generic
https://prednisolone.pro/# prescription prednisone cost
ventolin 108 Buy Albuterol for nebulizer online buying ventolin online
neurontin brand name 800mg: medicine neurontin capsules – how much is neurontin
Профессиональный сервисный центр по ремонту бытовой техники с выездом на дом.
Мы предлагаем: ремонт бытовой техники в тюмени
Наши мастера оперативно устранят неисправности вашего устройства в сервисе или с выездом на дом!
buy lasix online: furosemide online – lasix furosemide 40 mg
buy rybelsus: Buy semaglutide pills – rybelsus
I couldn’t resist commenting. Perfectly written!
https://gabapentin.site/# neurontin coupon
Buy semaglutide pills: semaglutide – rybelsus price
Semaglutide pharmacy price: Semaglutide pharmacy price – Buy semaglutide pills
buy semaglutide online: Buy compounded semaglutide online – semaglutide
I love looking through an article that can make men and women think. Also, thank you for allowing me to comment.
{Tôi đã háo hức khám phá trang này. Tôi cần cảm ơn bạn {vì đã|dành thời gian cho|chỉ vì điều này|vì điều này|cho bài đọc tuyệt vời này!! Tôi chắc chắn thực sự thích từng một chút nó và tôi cũng đã đánh dấu để xem thông tin mới trong trang web của bạn.|Tôi có thể chỉ nói rằng thật nhẹ nhõm để khám phá một cá nhân mà thực sự hiểu họ là gì đang nói về trên web. Bạn thực sự hiểu cách đưa một vấn đề ra ánh sáng và làm cho nó trở nên quan trọng. Nhiều người hơn nữa phải xem điều này và hiểu khía cạnh này câu chuyện của bạn. Tôi đã ngạc nhiên bạn không nổi tiếng hơn cho rằng bạn chắc chắn sở hữu món quà.|Tốt bài đăng. Tôi chắc chắn đánh giá cao trang web này. Cảm ơn!|Thật khó đến những người có kinh nghiệm về điều này, nhưng bạn có vẻ bạn biết mình đang nói gì! Cảm ơn|Bạn cần là một phần của một cuộc thi dành cho một blog trên web hữu ích nhất. Tôi chắc chắn sẽ khuyến nghị trang web này!|Một hấp dẫn đáng giá bình luận. Tôi nghĩ rằng bạn nên viết thêm về vấn đề này, nó có thể không là một điều cấm kỵ chủ đề nhưng thường xuyên mọi người không nói về vấn đề những điều này. Đến phần tiếp theo! Trân trọng!|Xin chào! Tôi chỉ muốn cho bạn một rất to cho thông tin xuất sắc bạn có ngay tại đây trên bài đăng này. Tôi sẽ là trở lại trang web của bạn để biết thêm thông tin sớm nhất.|Khi tôi ban đầu bình luận tôi có vẻ như đã nhấp vào hộp kiểm -Thông báo cho tôi khi có bình luận mới- và bây giờ mỗi lần được thêm vào tôi nhận được bốn email có cùng nội dung. Phải có một cách bạn có thể xóa tôi khỏi dịch vụ đó không? Chúc mừng.|Lần sau Tôi đọc một blog, Hy vọng rằng nó không làm tôi thất vọng nhiều như bài này. Rốt cuộc, Vâng, đó là sự lựa chọn của tôi để đọc, nhưng tôi thực sự tin bạn sẽ có điều gì đó hữu ích để nói. Tất cả những gì tôi nghe được là một loạt tiếng rên rỉ về điều gì đó mà bạn có thể sửa nếu bạn không quá bận tìm kiếm sự chú ý.|Đúng với bài viết này, tôi thực sự tin rằng trang web này cần nhiều hơn nữa sự chú ý.
rybelsus price: Buy semaglutide pills – semaglutide
http://ventolininhaler.pro/# ventolin mexico
Your point of view caught my eye and was very interesting. Thanks. I have a question for you. https://accounts.binance.com/de-CH/register?ref=UM6SMJM3
Профессиональный сервисный центр по ремонту планшетов в том числе Apple iPad.
Мы предлагаем: ремонт айпадов в москве
Наши мастера оперативно устранят неисправности вашего устройства в сервисе или с выездом на дом!
{Tôi đã khá hài lòng khám phá trang web tuyệt vời này. Tôi muốn cảm ơn bạn {vì đã|dành thời gian cho|chỉ vì điều này|vì điều này|cho bài đọc tuyệt vời này!! Tôi chắc chắn thực sự thích từng một chút nó và tôi đã đánh dấu để xem những thứ mới trên trang web của bạn.|Tôi có thể chỉ nói rằng thật thoải mái để khám phá một người thực sự hiểu họ là gì đang nói về trên internet. Bạn chắc chắn hiểu cách đưa một vấn đề ra ánh sáng và làm cho nó trở nên quan trọng. Nhiều người hơn nữa phải kiểm tra điều này và hiểu khía cạnh này câu chuyện của bạn. Tôi đã ngạc nhiên rằng bạn không nổi tiếng hơn vì bạn chắc chắn nhất sở hữu món quà.|Rất tốt bài đăng. Tôi chắc chắn đánh giá cao trang web này. Cảm ơn!|Thật gần như không thể tìm thấy những người có hiểu biết sâu rộng về điều này, tuy nhiên, bạn nghe có vẻ bạn biết mình đang nói gì! Cảm ơn|Bạn nên tham gia một cuộc thi dành cho một blog trên mạng hữu ích nhất. Tôi sẽ khuyến nghị trang web này!|Một hấp dẫn chắc chắn đáng giá bình luận. Tôi tin rằng bạn nên xuất bản thêm về vấn đề này, nó có thể không là một điều cấm kỵ chủ đề nhưng thường xuyên mọi người không thảo luận chủ đề như vậy. Đến phần tiếp theo! Chúc mọi điều tốt đẹp nhất!|Chào buổi sáng! Tôi chỉ muốn đề nghị rất cho thông tin tuyệt vời bạn có ngay tại đây trên bài đăng này. Tôi sẽ là trở lại trang web của bạn để biết thêm thông tin sớm nhất.|Sau khi tôi ban đầu bình luận tôi có vẻ như đã nhấp vào hộp kiểm -Thông báo cho tôi khi có bình luận mới- và bây giờ mỗi lần được thêm vào tôi nhận được bốn email cùng chính xác một bình luận. Phải có một phương tiện bạn có thể xóa tôi khỏi dịch vụ đó không? Cảm ơn rất nhiều.|Lần sau nữa Tôi đọc một blog, Tôi hy vọng rằng nó sẽ không làm tôi thất vọng nhiều như bài này. Rốt cuộc, Vâng, đó là sự lựa chọn của tôi để đọc, dù sao thì tôi thực sự tin bạn sẽ có điều gì đó hữu ích để nói. Tất cả những gì tôi nghe được là một loạt phàn nàn về điều gì đó mà bạn có thể sửa nếu bạn không quá bận tìm kiếm sự chú ý.|Đúng với bài viết này, tôi thực sự tin trang web này cần nhiều hơn nữa sự chú ý.
Buy compounded semaglutide online: semaglutide – Buy semaglutide pills
Профессиональный сервисный центр по ремонту кондиционеров в Москве.
Мы предлагаем: кондиционер ремонт
Наши мастера оперативно устранят неисправности вашего устройства в сервисе или с выездом на дом!
{Tôi đã rất vui khám phá trang web tuyệt vời này. Tôi muốn cảm ơn bạn {vì đã|dành thời gian cho|chỉ vì điều này|vì điều này|cho bài đọc tuyệt vời này!! Tôi chắc chắn thưởng thức từng của nó và tôi đã đánh dấu để xem điều mới trong trang web của bạn.|Tôi có thể chỉ nói rằng thật nhẹ nhõm để khám phá một người mà thực sự hiểu họ là gì thảo luận trên mạng. Bạn thực sự hiểu cách đưa một vấn đề ra ánh sáng và làm cho nó trở nên quan trọng. Nhiều người hơn phải đọc điều này và hiểu khía cạnh này câu chuyện của bạn. Tôi đã ngạc nhiên bạn không nổi tiếng hơn vì bạn chắc chắn sở hữu món quà.|Rất tốt bài viết. Tôi chắc chắn yêu thích trang web này. Tiếp tục với nó!|Thật gần như không thể tìm thấy những người có kinh nghiệm cho điều này, tuy nhiên, bạn có vẻ bạn biết mình đang nói gì! Cảm ơn|Bạn cần là một phần của một cuộc thi dành cho một blog trực tuyến tốt nhất. Tôi sẽ khuyến nghị trang web này!|Một cuộc thảo luận thú vị chắc chắn đáng giá bình luận. Tôi nghĩ rằng bạn cần xuất bản thêm về chủ đề này, nó có thể không là một điều cấm kỵ vấn đề nhưng điển hình mọi người không nói về chủ đề như vậy. Đến phần tiếp theo! Chúc mừng.|Chào buổi sáng! Tôi chỉ muốn cho bạn một rất to cho thông tin tuyệt vời bạn có ở đây trên bài đăng này. Tôi đang trở lại trang web của bạn để biết thêm thông tin sớm nhất.|Sau khi tôi ban đầu bình luận tôi có vẻ như đã nhấp hộp kiểm -Thông báo cho tôi khi có bình luận mới- và bây giờ bất cứ khi nào có bình luận được thêm vào tôi nhận được bốn email cùng chính xác một bình luận. Phải có một phương pháp dễ dàng bạn có thể xóa tôi khỏi dịch vụ đó không? Cảm ơn rất nhiều.|Lần sau Tôi đọc một blog, Tôi hy vọng rằng nó không thất bại nhiều như bài này. Ý tôi là, Vâng, đó là sự lựa chọn của tôi để đọc, nhưng tôi thực sự nghĩ bạn sẽ có điều gì đó hữu ích để nói về. Tất cả những gì tôi nghe được là một loạt tiếng rên rỉ về điều gì đó mà bạn có thể sửa nếu bạn không quá bận tìm kiếm sự chú ý.|Đúng với bài viết này, tôi thành thật nghĩ trang web này cần nhiều hơn nữa sự chú ý.
Профессиональный сервисный центр по ремонту гироскутеров в Москве.
Мы предлагаем: где можно починить гироскутер
Наши мастера оперативно устранят неисправности вашего устройства в сервисе или с выездом на дом!
Профессиональный сервисный центр по ремонту моноблоков в Москве.
Мы предлагаем: профессиональный ремонт моноблоков
Наши мастера оперативно устранят неисправности вашего устройства в сервисе или с выездом на дом!
ventolin prices in canada: Buy Albuterol for nebulizer online – ventolin tablets australia
lasix online: buy furosemide – lasix dosage
mexican border pharmacies shipping to usa best online pharmacies in mexico medicine in mexico pharmacies
{Tôi cực kỳ hài lòng để tìm thấy trang web tuyệt vời này. Tôi muốn cảm ơn bạn {vì đã|dành thời gian cho|chỉ vì điều này|vì điều này|cho bài đọc tuyệt vời này!! Tôi chắc chắn thực sự thích từng của nó và tôi đã đánh dấu trang để xem những thứ mới trên trang web của bạn.|Tôi có thể chỉ nói rằng thật nhẹ nhõm để khám phá một người mà thực sự hiểu họ là gì thảo luận trực tuyến. Bạn chắc chắn biết cách đưa một rắc rối ra ánh sáng và làm cho nó trở nên quan trọng. Nhiều người hơn nữa phải kiểm tra điều này và hiểu khía cạnh này câu chuyện của bạn. Tôi đã ngạc nhiên bạn không nổi tiếng hơn vì bạn chắc chắn nhất có món quà.|Rất tốt bài viết. Tôi hoàn toàn yêu thích trang web này. Tiếp tục làm tốt!|Thật khó tìm những người có kinh nghiệm cho điều này, nhưng bạn nghe có vẻ bạn biết mình đang nói gì! Cảm ơn|Bạn nên tham gia một cuộc thi dành cho một blog trên web tuyệt vời nhất. Tôi sẽ Rất khuyến nghị blog này!|Một hấp dẫn chắc chắn đáng giá bình luận. Tôi nghĩ rằng bạn nên xuất bản thêm về vấn đề này, nó có thể không là một điều cấm kỵ vấn đề nhưng thường xuyên mọi người không thảo luận những chủ đề những điều này. Đến phần tiếp theo! Cảm ơn rất nhiều!|Xin chào! Tôi chỉ muốn cho bạn một rất cho thông tin xuất sắc bạn có ở đây trên bài đăng này. Tôi sẽ là quay lại trang web của bạn để biết thêm thông tin sớm nhất.|Sau khi tôi ban đầu bình luận tôi có vẻ như đã nhấp vào hộp kiểm -Thông báo cho tôi khi có bình luận mới- và từ bây giờ mỗi lần được thêm vào tôi nhận được bốn email cùng chính xác một bình luận. Có lẽ có một phương pháp dễ dàng bạn có thể xóa tôi khỏi dịch vụ đó không? Cảm ơn bạn.|Lần sau Tôi đọc một blog, Hy vọng rằng nó không thất bại nhiều như bài này. Ý tôi là, Tôi biết điều đó là sự lựa chọn của tôi để đọc, tuy nhiên tôi thực sự tin bạn sẽ có điều gì đó hữu ích để nói về. Tất cả những gì tôi nghe được là một loạt khóc lóc về điều gì đó mà bạn có thể sửa nếu bạn không quá bận tìm kiếm sự chú ý.|Đúng với bài viết này, tôi hoàn toàn tin trang web này cần nhiều hơn nữa sự chú ý.
https://canadapharma.shop/# canada pharmacy world
legitimate canadian online pharmacies: ed drugs online from canada – maple leaf pharmacy in canada
{Tôi cực kỳ hài lòng khám phá trang web này. Tôi cần cảm ơn bạn {vì đã|dành thời gian cho|chỉ vì điều này|vì điều này|cho bài đọc tuyệt vời này!! Tôi chắc chắn yêu thích từng một phần nó và tôi cũng đã đánh dấu trang để xem điều mới trong blog của bạn.|Tôi có thể chỉ nói rằng thật thoải mái để khám phá một người thực sự hiểu họ là gì thảo luận trực tuyến. Bạn chắc chắn nhận ra cách đưa một vấn đề ra ánh sáng và làm cho nó trở nên quan trọng. Nhiều người hơn nữa cần kiểm tra điều này và hiểu khía cạnh này câu chuyện của bạn. Tôi đã ngạc nhiên bạn không nổi tiếng hơn vì bạn chắc chắn sở hữu món quà.|Rất hay bài viết. Tôi chắc chắn đánh giá cao trang web này. Tiếp tục viết!|Thật khó tìm những người có kinh nghiệm cho điều này, tuy nhiên, bạn có vẻ bạn biết mình đang nói gì! Cảm ơn|Bạn nên tham gia một cuộc thi dành cho một trang web trên web tốt nhất. Tôi chắc chắn sẽ khuyến nghị trang web này!|Một cuộc thảo luận thú vị đáng giá bình luận. Không còn nghi ngờ gì nữa rằng bạn nên viết thêm về chủ đề này, nó có thể không là một điều cấm kỵ vấn đề nhưng nói chung mọi người không thảo luận những chủ đề như vậy. Đến phần tiếp theo! Chúc mọi điều tốt đẹp nhất!|Xin chào! Tôi chỉ muốn cho bạn một rất cho thông tin xuất sắc bạn có ngay tại đây trên bài đăng này. Tôi sẽ là quay lại blog của bạn để biết thêm thông tin sớm nhất.|Sau khi tôi ban đầu bình luận tôi có vẻ như đã nhấp vào hộp kiểm -Thông báo cho tôi khi có bình luận mới- và từ bây giờ mỗi lần được thêm vào tôi nhận được 4 email có cùng nội dung. Có một phương tiện bạn có thể xóa tôi khỏi dịch vụ đó không? Chúc mừng.|Lần sau Tôi đọc một blog, Tôi hy vọng rằng nó không thất bại nhiều như bài này. Ý tôi là, Vâng, đó là sự lựa chọn của tôi để đọc, tuy nhiên tôi thực sự tin bạn sẽ có điều gì đó hữu ích để nói về. Tất cả những gì tôi nghe được là một loạt rên rỉ về điều gì đó mà bạn có thể sửa nếu bạn không quá bận tìm kiếm sự chú ý.|Đúng với bài viết này, tôi thực sự tin rằng trang web tuyệt vời này cần nhiều hơn nữa sự chú ý.
A fascinating discussion is definitely worth comment. I do believe that you ought to publish more about this issue, it might not be a taboo subject but usually people don’t talk about these topics. To the next! Many thanks.
mexican pharmaceuticals online medication from mexico pharmacy mexico drug stores pharmacies
http://canadapharma.shop/# canadian drug stores
canadian pharmacy 24h com: Canadian Pharmacy – online canadian pharmacy reviews
https://www.youtube.com/@Bongdalu0303
https://qiita.com/Bongdalus0202
https://vocal.media/authors/bongdalu0101
https://canadapharma.shop/# canadian online drugs
Сервисный центр предлагает ремонт робота пылесоса irobot рядом мастерские ремонта роботов пылесосов irobot
safe canadian pharmacies: canadian pharmacies comparison – canada pharmacy reviews
Профессиональный сервисный центр по ремонту посудомоечных машин с выездом на дом в Москве.
Мы предлагаем: ремонт посудомоечной машины в москве
Наши мастера оперативно устранят неисправности вашего устройства в сервисе или с выездом на дом!
indianpharmacy com Indian pharmacy international shipping buy prescription drugs from india
http://canadapharma.shop/# canadian pharmacy online reviews
best online pharmacies in mexico: mexican pharmaceuticals online – mexican drugstore online
https://www.divephotoguide.com/user/bongdalu0101/
purple pharmacy mexico price list https://mexicanpharma.icu/# mexican pharmaceuticals online
medicine in mexico pharmacies
https://kaeuchi.jp/forums/users/da88tube/
buy prescription drugs from india indian pharmacy indian pharmacy
https://cuchichi.es/author/DA88tube/
https://indiadrugs.pro/# reputable indian pharmacies
I blog frequently and I genuinely appreciate your information. This great article has really peaked my interest. I’m going to book mark your website and keep checking for new details about once per week. I opted in for your Feed too.
Way cool! Some extremely valid points! I appreciate you writing this post plus the rest of the site is really good.
Профессиональный сервисный центр по ремонту МФУ в Москве.
Мы предлагаем: сервисный центр мфу
Наши мастера оперативно устранят неисправности вашего устройства в сервисе или с выездом на дом!
http://indiadrugs.pro/# indian pharmacy paypal
hey there and thank you for your information – I have certainly picked up anything new from right here. I did however expertise several technical issues using this site, as I experienced to reload the site a lot of times previous to I could get it to load correctly. I had been wondering if your web host is OK? Not that I’m complaining, but slow loading instances times will sometimes affect your placement in google and could damage your quality score if ads and marketing with Adwords. Anyway I’m adding this RSS to my email and could look out for a lot more of your respective interesting content. Make sure you update this again soon..
Профессиональный сервисный центр по ремонту бытовой техники с выездом на дом.
Мы предлагаем:ремонт бытовой техники в уфе
Наши мастера оперативно устранят неисправности вашего устройства в сервисе или с выездом на дом!
canadian mail order pharmacy Online medication home delivery canada drugs online reviews
This blog was… how do you say it? Relevant!! Finally I’ve found something which helped me. Appreciate it!
Good post! We will be linking to this great post on our website. Keep up the great writing.
Профессиональный сервисный центр по ремонту принтеров в Москве.
Мы предлагаем: ремонт принтеров москва с выездом
Наши мастера оперативно устранят неисправности вашего устройства в сервисе или с выездом на дом!
Профессиональный сервисный центр по ремонту плоттеров в Москве.
Мы предлагаем: ремонт плоттеров
Наши мастера оперативно устранят неисправности вашего устройства в сервисе или с выездом на дом!
After exploring a number of the articles on your web site, I honestly appreciate your technique of blogging. I saved as a favorite it to my bookmark website list and will be checking back soon. Please visit my website as well and let me know how you feel.
Viagra vente libre pays: Viagra sans ordonnance 24h – Viagra pas cher livraison rapide france
Профессиональный сервисный центр по ремонту объективов в Москве.
Мы предлагаем: ремонт объектива цена
Наши мастера оперативно устранят неисправности вашего устройства в сервисе или с выездом на дом!
medicine in mexico pharmacies: medication from mexico – mexican border pharmacies shipping to usa
reputable mexican pharmacies online
Viagra gГ©nГ©rique pas cher livraison rapide viagra sans ordonnance Viagra sans ordonnance pharmacie France
https://clssansordonnance.icu/# pharmacie en ligne
This is a topic which is near to my heart… Best wishes! Where can I find the contact details for questions?
pharmacie en ligne france pas cher: cialis generique – pharmacies en ligne certifiГ©es
An impressive share! I have just forwarded this onto a friend who had been conducting a little homework on this. And he in fact bought me breakfast because I stumbled upon it for him… lol. So allow me to reword this…. Thank YOU for the meal!! But yeah, thanks for spending the time to talk about this matter here on your internet site.
Good day! Do you use Twitter? I’d like to follow you if that would be okay. I’m absolutely enjoying your blog and look forward to new posts.
Pharmacie Internationale en ligne: pharmacie en ligne sans ordonnance – pharmacie en ligne france fiable
https://docs.google.com/presentation/d/18Vs7IDPl9JU_F0lXA6Zk3OjQWBN8mhqE_0qED3xao1I/edit?usp=sharing
Pharmacie en ligne livraison Europe pharmacie en ligne sans ordonnance acheter mГ©dicament en ligne sans ordonnance
https://scholar.google.com/citations?user=oiZQ6aYAAAAJ&hl=en
pharmacie en ligne: Acheter Cialis – п»їpharmacie en ligne france
After looking over a handful of the blog posts on your blog, I honestly appreciate your technique of blogging. I bookmarked it to my bookmark webpage list and will be checking back in the near future. Take a look at my web site too and let me know how you feel.
Профессиональный сервисный центр по ремонту серверов в Москве.
Мы предлагаем: ремонт серверных материнских плат
Наши мастера оперативно устранят неисправности вашего устройства в сервисе или с выездом на дом!
I want to to thank you for this good read!! I absolutely enjoyed every bit of it. I have got you bookmarked to look at new stuff you post…
Pharmacie Internationale en ligne: pharmacie en ligne sans ordonnance – pharmacies en ligne certifiГ©es
Viagra pas cher paris Prix du Viagra 100mg en France Viagra sans ordonnance pharmacie France
Acheter viagra en ligne livraison 24h: Acheter du Viagra sans ordonnance – Viagra gГ©nГ©rique pas cher livraison rapide
Viagra femme ou trouver: Viagra prix – Viagra 100 mg sans ordonnance
pharmacie en ligne france livraison belgique Cialis prix en pharmacie pharmacie en ligne avec ordonnance
http://vgrsansordonnance.com/# Viagra sans ordonnance 24h Amazon
Viagra pas cher paris: Meilleur Viagra sans ordonnance 24h – Acheter viagra en ligne livraison 24h
http://ozempic.art/# ozempic cost
Aw, this was a really nice post. In concept I would like to put in writing like this additionally – taking time and precise effort to make an excellent article… however what can I say… I procrastinate alot and in no way appear to get one thing done.
rybelsus coupon: semaglutide cost – rybelsus pill
ozempic cost: ozempic online – Ozempic without insurance
Ozempic without insurance buy cheap ozempic ozempic cost
Excellent web site you’ve got here.. It’s hard to find good quality writing like yours these days. I seriously appreciate people like you! Take care!!
https://ozempic.art/# ozempic coupon
http://rybelsus.shop/# rybelsus price
Профессиональный сервисный центр по ремонту сигвеев в Москве.
Мы предлагаем: сегвей сервисный центр
Наши мастера оперативно устранят неисправности вашего устройства в сервисе или с выездом на дом!
Профессиональный сервисный центр по ремонту сетевых хранилищ в Москве.
Мы предлагаем: срочный ремонт сетевого хранилища
Наши мастера оперативно устранят неисправности вашего устройства в сервисе или с выездом на дом!
buy ozempic ozempic cost buy ozempic
semaglutide tablets: cheapest rybelsus pills – rybelsus cost
https://bootstrapbay.com/user/da88tube
Howdy, I think your site might be having web browser compatibility issues. Whenever I take a look at your site in Safari, it looks fine however when opening in I.E., it’s got some overlapping issues. I just wanted to provide you with a quick heads up! Other than that, great website.
https://rybelsus.shop/# cheapest rybelsus pills
https://www.fimfiction.net/user/805523/da88tube
https://rybelsus.shop/# semaglutide tablets
semaglutide tablets rybelsus cost buy rybelsus online
semaglutide online: semaglutide tablets – rybelsus coupon
cheapest rybelsus pills: buy semaglutide pills – rybelsus pill
Ozempic without insurance ozempic online ozempic online
cheapest rybelsus pills: cheapest rybelsus pills – rybelsus cost
http://rybelsus.shop/# rybelsus coupon
I needed to thank you for this excellent read!! I definitely enjoyed every bit of it. I have got you saved as a favorite to check out new stuff you post…
buy ozempic: buy ozempic – ozempic
https://decidim.santcugat.cat/profiles/da88tube/activity
ozempic generic buy cheap ozempic ozempic cost
Профессиональный сервисный центр по ремонту автомагнитол в Москве.
Мы предлагаем: сервис центр ремонта магнитол
Наши мастера оперативно устранят неисправности вашего устройства в сервисе или с выездом на дом!
https://qaf.men/@8daybet1
Профессиональный сервисный центр по ремонту планшетов в Москве.
Мы предлагаем: ремонт экрана планшета
Наши мастера оперативно устранят неисправности вашего устройства в сервисе или с выездом на дом!
I blog often and I seriously thank you for your content. Your article has really peaked my interest. I will take a note of your website and keep checking for new details about once a week. I subscribed to your RSS feed too.
http://ozempic.art/# ozempic coupon
ozempic online: buy ozempic – Ozempic without insurance
https://socialtrain.stage.lithium.com/t5/user/viewprofilepage/user-id/101475
Сервисный центр предлагает ремонт планшетов huawei на дому ремонт планшета huawei в москве
Профессиональный сервисный центр по ремонту электросамокатов в Москве.
Мы предлагаем: сервис электросамокатов в москве
Наши мастера оперативно устранят неисправности вашего устройства в сервисе или с выездом на дом!
ozempic cost Ozempic without insurance ozempic online
http://www.so0912.com/home.php?mod=space&uid=2377805
https://rybelsus.shop/# rybelsus price
Ozempic without insurance: ozempic cost – ozempic cost
buy ozempic pills online: ozempic coupon – ozempic cost
ozempic generic buy cheap ozempic ozempic coupon
https://rybelsus.shop/# semaglutide tablets
https://rybelsus.shop/# rybelsus pill
buy cheap ozempic: buy ozempic pills online – ozempic
rybelsus cost: rybelsus coupon – buy rybelsus online
buy rybelsus online: rybelsus price – buy semaglutide online
https://ozempic.art/# ozempic cost
Good article. I certainly appreciate this website. Keep it up!
вывод. из. запоя. на. дому. ростов. вывод. из. запоя. на. дому. ростов. .
вывод из запоя на дому ростов круглосуточно вывод из запоя на дому ростов круглосуточно .
semaglutide tablets semaglutide tablets rybelsus cost
https://rybelsus.shop/# rybelsus cost
buy semaglutide pills: rybelsus pill – buy semaglutide pills
Профессиональный сервисный центр ремонт смартфонов рядом ближайший ремонт смартфонов
https://ozempic.art/# buy ozempic pills online
В магазине сейфов предлагают заказать сейф сейф цена
semaglutide tablets rybelsus coupon buy semaglutide online
вывод из запоя дешево ростов-на-дону вывод из запоя дешево ростов-на-дону .
нарколог на дом срочно нарколог на дом срочно .
https://ozempic.art/# buy cheap ozempic
Spot on with this write-up, I absolutely feel this web site needs much more attention. I’ll probably be returning to read more, thanks for the advice.
вывод из запоя ростов-на-дону вывод из запоя ростов-на-дону .
semaglutide tablets semaglutide online semaglutide online
https://rybelsus.shop/# buy semaglutide online
rybelsus pill: rybelsus cost – buy rybelsus online
http://rybelsus.shop/# semaglutide online
Профессиональный сервисный центр по ремонту бытовой техники с выездом на дом.
Мы предлагаем: ремонт бытовой техники в волгограде
Наши мастера оперативно устранят неисправности вашего устройства в сервисе или с выездом на дом!
After I initially left a comment I appear to have clicked on the -Notify me when new comments are added- checkbox and from now on whenever a comment is added I recieve 4 emails with the same comment. There has to be a way you can remove me from that service? Many thanks.
semaglutide cost buy semaglutide pills semaglutide cost
pinup az: pinup az – pin up azerbaijan
В магазине сейфов предлагают сейф 2 класса взломостойкости cейфы 2 класс
pin up casino guncel giris pin up aviator pin-up casino giris
pin up aviator: pin-up casino giris – pin up casino guncel giris
https://pinupru.site/# pin up
пин ап казино: пин ап казино онлайн – пинап казино
I haven’t checked in here for some time because I thought it was getting boring, but the last several posts are good quality so I guess I will add you back to my everyday bloglist. You deserve it my friend 🙂
pin up http://pinupturkey.pro/# pin up casino
пин ап казино онлайн
pin up пин ап казино вход пин ап казино
пин ап: пинап кз – пинап кз
pin up казино: пин ап казино вход – пин ап вход
пин ап кз https://pinupaz.bid/# pinup azerbaycan
пинап кз
Тут делают продвижение сео медицина seo-продвижение медицинских сайтов
Тут делают продвижение создание сайта для клиники создание сайта медицинского центра
pin up casino: pin up bet – pin up
pin up casino giris pin up bet pin up
пин ап казино зеркало: пин ап – пин ап официальный сайт
пин ап казино вход: pin up – пин ап официальный сайт
http://pinupaz.bid/# pin up casino
пинап кз: пин ап – pin up казино
sexy sexy sex sexy sexy sex .
алкоголизм вывод из запоя краснодар http://www.vyvod-iz-zapoya-krasnodar15.ru .
В магазине сейфов предлагают сейф банковский взломостойкий взломостойкий сейф
save instagram stories save instagram stories .
частный нарколог на дом частный нарколог на дом .
нарколог на дом круглосуточно narkolog-na-dom-krasnodar16.ru .
pin-up kazino: pin up azerbaijan – pin up azerbaijan
https://pinupaz.bid/# pin up azerbaijan
пинап казино: пинап кз – пин ап казино онлайн
пинап казино https://pinupturkey.pro/# pin up casino guncel giris
пин ап казино вход
Тут делают продвижение комплексное продвижение медицинских сайтов сео медицина
Тут делают продвижение разработка медицинских сайтов создание медицинского сайта под ключ
Профессиональный сервисный центр по ремонту бытовой техники с выездом на дом.
Мы предлагаем: ремонт бытовой техники в воронеже
Наши мастера оперативно устранят неисправности вашего устройства в сервисе или с выездом на дом!
Профессиональный сервисный центр ремонт телефон починка телефона
pinup az: pin up az – pinup az
Профессиональный сервисный центр по ремонту моноблоков iMac в Москве.
Мы предлагаем: ремонт imac москва
Наши мастера оперативно устранят неисправности вашего устройства в сервисе или с выездом на дом!
пинап кз http://pinupaz.bid/# pin up
пин ап
https://pinupkz.tech/# пин ап
пин ап казино пинап казино пин ап казино
pin up bet pin up guncel giris pin up giris
https://www.slideserve.com/ko66vip
Тут делают продвижение медицинский seo сео медицина
Тут делают продвижение продвижение сайта медицинского центра разработка сайта для медицинского центра
Тут делают продвижение разработка сайта клиники разработка сайта клиники
purchase amoxicillin 500 mg amoxil best price amoxicillin 500 mg cost
https://stromectol.agency/# dynacin minocycline
amoxicillin 500mg cost: Amoxicillin For sale – amoxicillin discount coupon
https://semaglutide.win/# Rybelsus 7mg
https://semaglutide.win/# Buy semaglutide pills
cheap Rybelsus 14 mg Semaglutide pharmacy price rybelsus
neurontin 300 mg tablet: neurontin capsule 600mg – neurontin 2018
I was more than happy to discover this site. I wanted to thank you for ones time just for this wonderful read!! I definitely liked every part of it and I have you saved to fav to check out new information in your web site.
https://stromectol.agency/# ivermectin 3 mg dose
http://semaglutide.win/# semaglutide
xxx ? xxx ? .
как вывести из запоя против воли как вывести из запоя против воли .
where to get amoxicillin over the counter amoxicillin for sale online amoxicillin capsules 250mg
https://x.com/8daybet1
can i buy zithromax online: order zithromax – where can i buy zithromax uk
http://zithromax.company/# zithromax for sale us
https://flokii.com/users/view/136462
вывод из запоя дома вывод из запоя дома .
https://cadillacsociety.com/users/ko66vip/
https://socialtrain.stage.lithium.com/t5/user/viewprofilepage/user-id/102609
You are so interesting! I don’t believe I have read through anything like that before. So great to discover another person with a few unique thoughts on this topic. Seriously.. many thanks for starting this up. This web site is something that is needed on the internet, someone with a little originality.
http://gabapentin.auction/# neurontin 100 mg capsule
order Rybelsus for weight loss Rybelsus 14 mg Buy semaglutide pills
http://zithromax.company/# buy cheap zithromax online
medicine neurontin 300 mg: buy neurontin canadian pharmacy – neurontin rx
https://zithromax.company/# zithromax capsules 250mg
вывод из запоя лечение краснодар вывод из запоя лечение краснодар .
нарколог на дом екатеринбург цены нарколог на дом екатеринбург цены .
Buy compounded semaglutide online Rybelsus 14 mg rybelsus generic
ivermectin cream 1%: stromectol for sale – stromectol medicine
Everyone loves it when individuals come together and share thoughts. Great site, continue the good work.
https://amoxil.llc/# buying amoxicillin online
Тут делают продвижение продвижение в поисковых системах медицинского сайта seo-продвижение медицинских сайтов
https://amoxil.llc/# amoxicillin online pharmacy
amoxicillin 500mg without prescription amoxicillin buy canada can you buy amoxicillin over the counter canada
https://stromectol.agency/# ivermectin ebay
stromectol cost: stromectol for sale – cost of ivermectin medicine
https://geocha-production.herokuapp.com/maps/160843-ko66vip
https://mlx.su/paste/view/298d6c4e
zithromax online australia zithromax best price buy zithromax online with mastercard
https://stromectol.agency/# stromectol 0.5 mg
https://amoxil.llc/# cost of amoxicillin 875 mg
https://amoxil.llc/# amoxicillin online pharmacy
average cost of generic zithromax
I have read a few excellent stuff here. Certainly value bookmarking for revisiting. I surprise how so much effort you set to make one of these great informative web site.
I haven’t checked in here for some time as I thought it was getting boring, but the last few posts are great quality so I guess I will add you back to my daily bloglist. You deserve it my friend 🙂
https://stromectol.agency/# minocycline 50mg pills online
stromectol tablets for humans for sale stromectol for sale minocycline generic
neurontin brand coupon: gabapentin price – neurontin 300 mg mexico
http://amoxil.llc/# amoxicillin where to get
https://stromectol.agency/# stromectol over the counter
Nice post. I learn something new and challenging on blogs I stumbleupon on a daily basis. It’s always useful to read through content from other authors and practice something from their websites.
neurontin cream buy gabapentin neurontin oral
нарколог вывод из запоя https://vyvod-iz-zapoya-ekaterinburg16.ru .
экокожа купить в москве экокожа купить в москве .
https://amoxil.llc/# buy amoxicillin canada
amoxicillin generic brand: Amoxicillin For sale – amoxicillin cost australia
generic zithromax medicine zithromax best price zithromax 250 mg australia
магазин сейфов предлагает сейфы 3 класса сейф взломостойкий 3 класс
ivermectin 5ml: order stromectol – ivermectin price
http://zithromax.company/# zithromax 250 mg
where can i buy zithromax capsules
работа в алматы с ежедневной оплатой с проживанием работа в алматы с ежедневной оплатой с проживанием .
ищу работу в астане оплата каждый день ищу работу в астане оплата каждый день .
zithromax online usa generic zithromax zithromax 1000 mg pills
https://gabapentin.auction/# neurontin oral
https://zithromax.company/# buy zithromax without presc
neurontin price south africa: buy gabapentin – neurontin cap
Профессиональный сервисный центр ремонт смартфонов в москве сервисные центры ближайший сервис по ремонту телефонов
Профессиональный сервисный центр по ремонту сотовых телефонов в Москве.
Мы предлагаем: сервис ремонта телефонов
Наши мастера оперативно устранят неисправности вашего устройства в сервисе или с выездом на дом!
zithromax z-pak price without insurance buy zithromax 1000 mg online zithromax capsules
Профессиональный сервисный центр по ремонту бытовой техники с выездом на дом.
Мы предлагаем: сервисные центры по ремонту техники в барнауле
Наши мастера оперативно устранят неисправности вашего устройства в сервисе или с выездом на дом!
Профессиональный сервисный центр по ремонту бытовой техники с выездом на дом.
Мы предлагаем: сервисные центры по ремонту техники в челябинске
Наши мастера оперативно устранят неисправности вашего устройства в сервисе или с выездом на дом!
http://semaglutide.win/# rybelsus price
Rybelsus 7mg: buy semaglutide online – Rybelsus 14 mg price
neurontin brand coupon how to get neurontin cheap neurontin 150 mg
https://amoxil.llc/# generic amoxicillin
п»їlegitimate online pharmacies india: world pharmacy india – best india pharmacy
ed help: cheap ed drugs – treatments for ed
https://mexicanpharm24.pro/# mexican rx online
indian pharmacy
india pharmacy mail order top online pharmacy india best online pharmacy india
франшиза купить готовый бизнес недорого франшиза купить готовый бизнес недорого .
medicine in mexico pharmacies: buying from online mexican pharmacy – mexico drug stores pharmacies
покупка франшизы покупка франшизы .
Whats Taking place i am new to this, I stumbled upon this I’ve found It absolutely useful and it has aided me out loads. I’m hoping to contribute & aid different users like its aided me. Great job.
medication from mexico pharmacy: reputable mexican pharmacies online – purple pharmacy mexico price list
https://mexicanpharm24.pro/# medicine in mexico pharmacies
п»їlegitimate online pharmacies india
herbal ed remedies herbal ed treatment natural herbs for ed
The next time I read a blog, Hopefully it does not fail me just as much as this particular one. After all, I know it was my choice to read, nonetheless I actually thought you would probably have something interesting to talk about. All I hear is a bunch of whining about something that you could possibly fix if you were not too busy seeking attention.
mexican mail order pharmacies: purple pharmacy mexico price list – buying prescription drugs in mexico online
pills for ed: drugs online – ed meds online
purple pharmacy mexico price list medication from mexico pharmacy buying prescription drugs in mexico
It’s nearly impossible to find well-informed people about this subject, but you seem like you know what you’re talking about! Thanks
Начните массовую индексацию ссылок в Google прямо cейчас!
Быстрая индексация ссылок имеет ключевое значение для успеха вашего онлайн-бизнеса. Чем быстрее поисковые системы обнаружат и проиндексируют ваши ссылки, тем быстрее вы сможете привлечь новую аудиторию и повысить позиции вашего сайта в результатах поиска.
Не теряйте времени! Начните пользоваться нашим сервисом для ускоренной индексации внешних ссылок в Google и Yandex. Зарегистрируйтесь сегодня и получите первые результаты уже завтра. Ваш успех в ваших руках!
быстрый вывод из запоя в стационаре быстрый вывод из запоя в стационаре .
I could not refrain from commenting. Exceptionally well written.
https://indianpharmdelivery.com/# buy prescription drugs from india
best india pharmacy
do i have ed: drugs that cause ed – ed treatment natural
Everything is very open with a clear description of the challenges. It was truly informative. Your website is extremely helpful. Many thanks for sharing!
mexican pharmaceuticals online: mexican drugstore online – mexican pharmaceuticals online
mexican online pharmacies prescription drugs mexico drug stores pharmacies mexican pharmaceuticals online
Профессиональный сервисный центр по ремонту сотовых телефонов в Москве.
Мы предлагаем: где можно починить телефон
Наши мастера оперативно устранят неисправности вашего устройства в сервисе или с выездом на дом!
Good post! We will be linking to this great article on our website. Keep up the great writing.
You should be a part of a contest for one of the finest websites online. I will highly recommend this site!
mexico drug stores pharmacies: medicine in mexico pharmacies – buying from online mexican pharmacy
http://mexicanpharm24.pro/# medicine in mexico pharmacies
top 10 pharmacies in india
вывод из запоя в сочи вывод из запоя в сочи .
muse for ed natural help for ed ed medications
male enhancement: ed treatment review – online ed drugs
I seriously love your blog.. Great colors & theme. Did you make this website yourself? Please reply back as I’m wanting to create my very own site and want to know where you got this from or what the theme is named. Thanks.
erectile dysfunction cure ed causes and treatment erectile dysfunction treatments
buying from online mexican pharmacy: pharmacies in mexico that ship to usa – purple pharmacy mexico price list
https://mexicanpharm24.pro/# mexican pharmaceuticals online
online pharmacy india
Профессиональный сервисный центр мастерская по ремонту сотовых телефонов ремонт смартфонов в москве сервисные центры
After I initially left a comment I seem to have clicked the -Notify me when new comments are added- checkbox and from now on whenever a comment is added I get 4 emails with the same comment. Perhaps there is a way you are able to remove me from that service? Kudos.
Профессиональный сервисный центр по ремонту сотовых телефонов в Москве.
Мы предлагаем: ремонт ультрабуков мастер
Наши мастера оперативно устранят неисправности вашего устройства в сервисе или с выездом на дом!
top online pharmacy india best online pharmacy india world pharmacy india
1win apk download 1win apk download .
https://mexicanpharm24.pro/# mexican online pharmacies prescription drugs
online shopping pharmacy india
best online canadian pharmacy cheap pills online ed treatments that really work
диплом высшего образования с занесением в реестр диплом высшего образования с занесением в реестр .
view instagram followers http://anstoriesviewer.com/ .
вывод из запоя сочи вывод из запоя сочи .
Профессиональный сервисный центр по ремонту духовых шкафов в Москве.
Мы предлагаем: заменить стекло духовки
Наши мастера оперативно устранят неисправности вашего устройства в сервисе или с выездом на дом!
instagram story viewer and downloader instagram story viewer and downloader .
Сервисный центр предлагает ремонт электросамоката hiper рядом починка электросамокатов hiper
Легальная покупка диплома ПТУ с сокращенной программой обучения
rcdrift.ru/forum/member.php?u=21074
Легальная покупка диплома о среднем образовании в Москве и регионах
buy plavix: plavix best price – Plavix generic price
You made some really good points there. I checked on the net for more info about the issue and found most individuals will go along with your views on this site.
сколько стоит купить диплом о среднем образовании сколько стоит купить диплом о среднем образовании .
https://paxlovid1st.shop/# п»їpaxlovid
viagra vs cialis bodybuilding
Paxlovid over the counter: best price on pills – paxlovid covid
purchase ivermectin: stromectol 1st – what is minocycline prescribed for
http://stromectol1st.shop/# minocycline 50 mg tabs
reputable indian online pharmacy
Good day! I could have sworn I’ve been to this blog before but after browsing through many of the articles I realized it’s new to me. Regardless, I’m definitely pleased I found it and I’ll be bookmarking it and checking back often!
https://clopidogrel.pro/# buy clopidogrel online
psychological ed treatment
Полезный сервис быстрого загона ссылок сайта в индексация поисковой системы – быстрая индексация ссылок
plavix medication: generic pills – buy clopidogrel bisulfate
Быстрая схема покупки диплома старого образца: что важно знать?
1win bet apk download http://1wincotedivoireapk.com/ .
instagram stories anonymous instagram stories anonymous .
buy semaglutide online: Buy semaglutide – Buy semaglutide
1win bet apk download http://www.telecharger1winci.com .
stromectol 3 mg tablets price stromectol 1st shop ivermectin 200
This website certainly has all of the information and facts I needed about this subject and didn’t know who to ask.
http://stromectol1st.shop/# ivermectin over the counter canada
online shopping pharmacy india
https://clopidogrel.pro/# Cost of Plavix without insurance
male erection pills
I’m amazed, I have to admit. Rarely do I encounter a blog that’s equally educative and engaging, and let me tell you, you have hit the nail on the head. The problem is something which too few folks are speaking intelligently about. Now i’m very happy I came across this in my hunt for something concerning this.
вывод из запоя на дому ростов вывод из запоя на дому ростов .
п»їpaxlovid: paxlovid generic – paxlovid for sale
п»їplavix generic: plavix price – Cost of Plavix without insurance
бизнес франшиза бизнес франшиза .
Как быстро и легально купить аттестат 11 класса в Москве
Процесс получения диплома стоматолога: реально ли это сделать быстро?
banksmi.ru/?post_type=topic&p=217760
https://clopidogrel.pro/# buy Clopidogrel over the counter
prescription drugs
https://stromectol1st.shop/# ivermectin uk
reputable indian pharmacies
antiplatelet drug: check clopidogrel pro – antiplatelet drug
купить диплом образование купить диплом образование .
more: semaglutide – semaglutide
This blog was… how do I say it? Relevant!! Finally I’ve found something which helped me. Many thanks!
Удивительно, но купить диплом кандидата наук оказалось не так сложно
Hello there! This is my first visit to your blog! We are a team of volunteers and starting a new project in a community in the same niche. Your blog provided us useful information to work on. You have done a extraordinary job!
Сколько стоит диплом высшего и среднего образования и как его получить?
Hi, I do think this is a great web site. I stumbledupon it 😉 I will revisit yet again since i have book-marked it. Money and freedom is the best way to change, may you be rich and continue to help others.
Plavix generic price clopidogrel pro buy Clopidogrel over the counter
ivermectin 3 mg: best price shop – ivermectin over the counter
купить диплом в тагиле russa-diploms.ru .
Пошаговая инструкция по официальной покупке диплома о высшем образовании
tavasporan.flybb.ru/viewtopic.php?f=13&t=3017
Профессиональный сервисный центр по ремонту сотовых телефонов в Москве.
Мы предлагаем: ремонт ноутбуков в москве цены
Наши мастера оперативно устранят неисправности вашего устройства в сервисе или с выездом на дом!
https://stromectol1st.shop/# ivermectin lotion for lice
п»їlegitimate online pharmacies india
Having read this I thought it was really informative. I appreciate you finding the time and energy to put this informative article together. I once again find myself personally spending a significant amount of time both reading and leaving comments. But so what, it was still worth it!
http://paxlovid1st.shop/# paxlovid pill
erectile dysfunction drug
Всё, что нужно знать о покупке аттестата о среднем образовании без рисков
minocycline price: cheapest stromectol – ivermectin 3mg
good price: rybelsus generic – good price
retro casino https://newretrocasino-casino2.ru .
t?l?charger 1win apk xn--tlcharger1win-bhbb.com .
где купить электрокарнизы дешево https://elektrokarniz-dlya-shtor11.ru/ .
http://paxlovid1st.shop/# Paxlovid over the counter
canadian online pharmacy
Semaglutide pharmacy price: rybelsus generic – semaglutide
http://stromectol1st.shop/# Buy Online Ivermectin/Stromectol Now
best india pharmacy
After exploring a handful of the blog posts on your web site, I seriously like your way of writing a blog. I bookmarked it to my bookmark website list and will be checking back in the near future. Take a look at my web site too and tell me how you feel.
п»їpaxlovid: paxlovid price – п»їpaxlovid
купить диплом учителя landik-diploms.ru .
Cost of Plavix without insurance: clopidogrel – Cost of Plavix on Medicare
https://stromectol1st.shop/# minocycline 50 mg online
top 10 pharmacies in india
purchase ivermectin: stromectol shop – does minocycline cause weight gain
Полезная информация на сайте. Все что вы хоте знать об интернете полезный сервис
Clopidogrel 75 MG price: best price on generic – antiplatelet drug
купить скан диплома о высшем образовании orik-diploms.ru .
сколько стоит аттестат за 9 класс prema-diploms.ru .
Официальная покупка диплома вуза с сокращенной программой обучения в Москве
купить диплом о высшем образовании образцы man-diploms.ru .
I am really impressed with your writing skills and also with the layout on your weblog. Is this a paid theme or did you customize it your self? Either way stay up the excellent quality writing, it is rare to see a great blog like this one nowadays..
Как безопасно купить диплом колледжа или ПТУ в России, что важно знать
Купить диплом о среднем полном образовании, в чем подвох и как избежать обмана?
telegra.ph/Oficialnyj-diplom-bez-lishnih-usilij–prosto-i-bystro-10-21
Как купить аттестат 11 класса с официальным упрощенным обучением в Москве
tekst-pesni.ru/index.php?name=account&op=info&uname=yrazumow
paxlovid buy: paxlovid buy – paxlovid pill
вывод из запоя на дому вывод из запоя на дому .
https://stromectol1st.shop/# п»їwhere to buy stromectol online
indianpharmacy com
semaglutide: buy semaglutide online – more
Официальная покупка школьного аттестата с упрощенным обучением в Москве
buy paxlovid online shop paxlovid pill
ivermectin lice: buy online – minocycline 100mg without prescription
retrocasino https://exclyzivdecor.ru .
Encore merci pour ce post et continuez votre excellent travail. ??
вывод из запоя в ростове вывод из запоя в ростове .
Приобретение школьного аттестата с официальным упрощенным обучением в Москве
tadalive.com/blog/368185/kupit-diplom-545343hrzt
Стоимость дипломов высшего и среднего образования и процесс их получения
Профессиональный сервисный центр по ремонту бытовой техники с выездом на дом.
Мы предлагаем: ремонт крупногабаритной техники в перми
Наши мастера оперативно устранят неисправности вашего устройства в сервисе или с выездом на дом!
Howdy! I could have sworn I’ve visited your blog before but after going through some of the articles I realized it’s new to me. Regardless, I’m definitely delighted I found it and I’ll be bookmarking it and checking back regularly!
1хбет: 1xbet – 1xbet официальный сайт
Легальная покупка школьного аттестата с упрощенной программой обучения
argayash.flybb.ru/viewtopic.php?f=9&t=1522
Быстрая схема покупки диплома старого образца: что важно знать?
Merci pour cet article super intéressant sur [thème de l’article] ! Je voulais juste ajouter un point qui pourrait intéresser certains d’entre vous. Si vous êtes curieux ou cherchez des informations supplémentaires sur les produits liés à l’amélioration de l’expérience de discuter et de futur rencontre et du bien-être personnel, j’ai récemment découvert un site très complet, [Chemsexworld.com]( Chemsexworld.com .?
ретро казино официальный сайт https://newretrocasino-casino3.ru/ .
pinup az pinup az pin up 306
Хочу поделиться своим опытом ремонта телефона в этом сервисном центре. Остался очень доволен качеством работы и скоростью обслуживания. Если ищете надёжное место для ремонта, обратитесь сюда: быстрый ремонт телефонов.
https://1winindia.tech/# пин ап
пин ап казино вход
Полезные советы по безопасной покупке диплома о высшем образовании
forexgroupx.ru/ofitsialnyiy-diplom-realizuyte-svoi-tseli-bez-lishnih-pregrad
Encore merci pour ce post et continuez votre excellent travail. ??
Сервисный центр предлагает ремонт морозильной камеры kraft на дому починка морозильных камер kraft
1xbet официальный сайт: 1хбет – 1хставка
I blog often and I really appreciate your information. This article has truly peaked my interest. I’m going to book mark your website and keep checking for new details about once per week. I opted in for your Feed too.
пин ап вход: пин ап – пин ап зеркало
story anonymously story anonymously .
купить диплом строительного техникума landik-diploms.ru .
ig stories ig stories .
севастопольский дом интернат для инвалидов https://xn—-1-6cdshu4albf3aye.xn--p1ai/ .
Рекомендации по безопасной покупке диплома о высшем образовании
Полезные советы по безопасной покупке диплома о высшем образовании
Официальная покупка диплома вуза с сокращенной программой обучения в Москве
everyday.flyboard.ru/viewtopic.php?f=6&t=2352
pin up casino pin up 306 pin-up
сколько стоит диплом о среднем специальном образовании prema-diploms.ru .
dunyan?n en iyi casino siteleri: casino siteleri – canl? casino
https://1winrussia.online/# 1xbet
пинап кз
pin-up: pin up azerbaycan – pin up casino
купить диплом эстетиста server-diploms.ru .
Реально ли приобрести диплом стоматолога? Основные этапы
Пошаговая инструкция по официальной покупке диплома о высшем образовании
Удивительно, но купить диплом кандидата наук оказалось не так сложно
Легальная покупка школьного аттестата с упрощенной программой обучения
пансионат для пожилых в песчанном http://www.xn—–3-43da3arnf4adrboggk3ay6e3gtd.xn--p1ai .
купить диплом в улан-удэ man-diploms.ru .
пин ап кз: пин ап кз – пинап казино
Как не попасть впросак при покупке диплома колледжа или ПТУ в России
offmarketbusinessforsale.com/diplom-384014mxglt
Merci pour cet article super intéressant sur [thème de l’article] ! Je voulais juste ajouter un point qui pourrait intéresser certains d’entre vous. Si vous êtes curieux ou cherchez des informations supplémentaires sur les produits liés à l’amélioration de l’expérience de discuter et de futur rencontre et du bien-être personnel, j’ai récemment découvert un site très complet, [Chemsexworld.com]( Chemsexworld.com .?
https://1winbrasil.win/# pin-up
пин ап казино
купить диплом подделку russa-diploms.ru .
куплю диплом цена куплю диплом цена .
Сколько стоит диплом высшего и среднего образования и как это происходит?
medicineshocknews.ru/gotovyiy-diplom-dlya-uspeshnogo-karernogo-starta
Encore merci pour ce post et continuez votre excellent travail. ??
ремонт телефонов москва
pin up kz: пинап кз – пин ап кз
купить дипломы о среднем купить дипломы о среднем .
пинап казино: пин ап – пин ап казино
пин ап пин ап зеркало пин ап зеркало
Всё, что нужно знать о покупке аттестата о среднем образовании
erudio.global/blog/index.php?entryid=40261&nonjscomment=1&comment_itemid=40261&comment_context=45289&comment_component=blog&comment_area=format_blog
Можно ли купить аттестат о среднем образовании? Основные рекомендации
Парадокс, но купить диплом кандидата наук оказалось не так и сложно
программа 1с купить с установкой цена программа 1с купить с установкой цена .
Купить диплом старого образца, можно ли это сделать по быстрой схеме?
Hi! I just wish to offer you a big thumbs up for the great information you have right here on this post. I’ll be returning to your blog for more soon.
https://1wintr.fun/# casino oyunlar?
пинап кз
пин ап: пинап зеркало – пин ап зеркало
pin up kz: пин ап кз – пин ап
пин ап казино вход: пинап кз – пин ап
Howdy! This blog post could not be written much better! Looking at this post reminds me of my previous roommate! He continually kept preaching about this. I’ll send this post to him. Pretty sure he’ll have a good read. I appreciate you for sharing!
Как приобрести диплом о среднем образовании в Москве и других городах
offmarketbusinessforsale.com/kupit-diplom-751710foid
ялта пансионаты для престарелых ялта пансионаты для престарелых .
частный пансионат для престарелых и инвалидов частный пансионат для престарелых и инвалидов .
вывод из запоя круглосуточно сочи вывод из запоя круглосуточно сочи .
slot casino siteleri: canl? casino – h?zl? casino
I blog quite often and I seriously appreciate your information. This great article has truly peaked my interest. I will take a note of your blog and keep checking for new information about once a week. I opted in for your Feed too.
пин ап кз: пинап казино – пин ап
https://1wintr.fun/# casino sitesi
пинап
пин ап официальный сайт пин ап пин ап
I blog quite often and I seriously appreciate your information. This great article has truly peaked my interest. I will take a note of your blog and keep checking for new information about once a week. I opted in for your Feed too.
Если вы искали где отремонтировать сломаную технику, обратите внимание – ремонт бытовой техники
pin up: пин ап кз – пинап казино
Как купить диплом о высшем образовании с минимальными рисками
1xbet скачать: 1xbet зеркало – 1хставка
pin up 306: pin up azerbaycan – pin up casino
Всё, что нужно знать о покупке аттестата о среднем образовании без рисков
http://1wintr.fun/# dunyan?n en iyi casino siteleri
пинап кз
пин ап зеркало: пин ап – пинап зеркало
вывод от запоя в стационаре сочи вывод от запоя в стационаре сочи .
pin up kz pin up пин ап
casino siteleri: en iyi casino siteleri – slot casino siteleri
Полезная информация как официально купить диплом о высшем образовании
investicos.com/uncategorized/kupit-diplom-585515gteh
Как оказалось, купить диплом кандидата наук не так уж и сложно
купить диплом медицинский в нижнем тагиле prema-diploms.ru .
I blog quite often and I seriously appreciate your information. This great article has truly peaked my interest. I will take a note of your blog and keep checking for new information about once a week. I opted in for your Feed too.
pin up kz: pin up – пин ап кз
http://1winrussia.online/# 1хставка
pin up kz
пин ап официальный сайт: пин ап официальный сайт – пин ап зеркало
Официальная покупка аттестата о среднем образовании в Москве и других городах
briz.net.cn/Feedback/index?cid=168&p=23838
1xbet 1xbet зеркало 1xbet
купить проверенный диплом купить проверенный диплом .
Как правильно купить диплом колледжа и пту в России, подводные камни
Приобретение школьного аттестата с официальным упрощенным обучением в Москве
en iyi casino siteleri: canl? casino – en iyi casino siteleri
Купить диплом о среднем полном образовании, в чем подвох и как избежать обмана?
casino siteleri: h?zl? casino – dunyan?n en iyi casino siteleri
Totally agree with you on this!
выведение из запоя в сочи https://vyvod-iz-zapoya-sochi17.ru/ .
купить диплом о среднем образовании в твери man-diploms.ru .
Как официально купить аттестат 11 класса с упрощенным обучением в Москве
Good post. I learn something totally new and challenging on blogs I stumbleupon every day. It’s always helpful to read through articles from other writers and practice a little something from their websites.
Как безопасно купить диплом колледжа или ПТУ в России, что важно знать
Приобретение диплома ПТУ с сокращенной программой обучения в Москве
newsofmebel.ru/ne-otkladyivayte-kareru-zakazhite-diplom-seychas
купить диплом для иностранцев landik-diploms.ru .
https://indianpharm1st.com/# reputable indian online pharmacy
Купить диплом магистра оказалось возможно, быстрое обучение и диплом на руки
mexican mail order pharmacies reputable mexican pharmacies online mexican mail order pharmacies
This is so insightful! Thanks for sharing
Диплом вуза купить официально с упрощенным обучением в Москве
сколько стоит капельница на дому от запоя сколько стоит капельница на дому от запоя .
капельница при алкогольной интоксикации на дому цена капельница при алкогольной интоксикации на дому цена .
снятие запоя на дому снятие запоя на дому .
Как не попасть впросак при покупке диплома колледжа или ПТУ в России
reputable indian online pharmacy: buy medicines online in india – mail order pharmacy india
http://mexicanpharm1st.com/# mexican border pharmacies shipping to usa
Процесс получения диплома стоматолога: реально ли это сделать быстро?
mexican rx online: buying from online mexican pharmacy – mexican mail order pharmacies
Приобретение диплома ПТУ с сокращенной программой обучения в Москве
erudio.global/blog/index.php?entryid=51808
Аттестат 11 класса купить официально с упрощенным обучением в Москве
http://indianpharm1st.com/# reputable indian online pharmacy
купить диплом высшее старая orik-diploms.ru .
Как купить аттестат 11 класса с официальным упрощенным обучением в Москве
owen.ru/forum/member.php?u=106526
Реально ли приобрести диплом стоматолога? Основные этапы
backshowtime.ru/ofitsialnyiy-diplom-dlya-uspeshnoy-kareryi-legko-i-dostupno
Как официально купить аттестат 11 класса с упрощенным обучением в Москве
carprofen without vet prescription: canadian drugs – ed medication
Легальная покупка диплома ПТУ с сокращенной программой обучения
Диплом Гознак купить
kyc-diplom.com/diplom-goznak-kupit.html
Как приобрести аттестат о среднем образовании в Москве и других городах
https://indianpharm1st.com/# indianpharmacy com
mexican drugstore online mexico pharmacies prescription drugs mexico pharmacies prescription drugs
Официальная покупка школьного аттестата с упрощенным обучением в Москве
prema-diploms.ru
best online pharmacies in mexico: п»їbest mexican online pharmacies – pharmacies in mexico that ship to usa
Купить диплом магистра оказалось возможно, быстрое обучение и диплом на руки
investicos.com/uncategorized/kupit-diplom-481005fqxf
http://drugs1st.store/# prescription drugs online without
Парадокс, но купить диплом кандидата наук оказалось не так и сложно
audiencerp.forumex.ru/viewtopic.php?f=11&t=148
Всё, что нужно знать о покупке аттестата о среднем образовании
купить диплом о высшем в улан удэ prema-diploms.ru .
купить диплом гинеколога russa-diploms.ru .
нарколог вывод из запоя нарколог вывод из запоя .
вывод из запоя на дому цена http://azithromycinum.ru .
male dysfunction pills: new ed treatments – canadian pharmacy online
https://indianpharm1st.com/# india pharmacy
Рекомендации по безопасной покупке диплома о высшем образовании
pharmacies in mexico that ship to usa pharmacies in mexico that ship to usa buying prescription drugs in mexico
купить диплом новгород arusak-diploms.ru .
выведение из запоя санкт петербург https://vyvod-iz-zapoya-v-sankt-peterburge17.ru/ .
вывод из запоя на дому санкт-петербург вывод из запоя на дому санкт-петербург .
Быстрое обучение и получение диплома магистра – возможно ли это?
Как официально купить аттестат 11 класса с упрощенным обучением в Москве
вывод из запоя цены санкт-петербург https://vyvod-iz-zapoya-v-sankt-peterburge16.ru/ .
купить диплом высшего купить диплом высшего .
Диплом техникума купить официально с упрощенным обучением в Москве
Как официально купить аттестат 11 класса с упрощенным обучением в Москве
https://biznes-fabrika.kz/# pin up kz
Как быстро и легально купить аттестат 11 класса в Москве
пин ап вход Пин Ап Казино Официальный Сайт в России пин ап зеркало
sweet bonanza: sweet bonanza nas?l oynan?r – sweet bonanza oyna
Профессиональный сервисный центр по ремонту Apple iPhone в Москве.
Мы предлагаем: сервисный центр iphone в москве
Наши мастера оперативно устранят неисправности вашего устройства в сервисе или с выездом на дом!
Официальная покупка аттестата о среднем образовании в Москве и других городах
pnevmokzn.80lvl.ru/search.php?search_id=egosearch
http://pinupzerkalo.fun/# пин ап казино
pin up win
Полезные советы по покупке диплома о высшем образовании без риска
Как получить диплом техникума с упрощенным обучением в Москве официально
https://pinup-az.bid/# pinup az
Как получить диплом техникума с упрощенным обучением в Москве официально
купить диплом дизайнера купить диплом дизайнера .
pin up kz: Пин Ап Казахстан – пинап казино
http://biznes-fabrika.kz/# Пин Ап Казахстан
pin up casino
купить диплом интернет магазин landik-diploms.ru .
Полезная информация как официально купить диплом о высшем образовании
Приобретение диплома ПТУ с сокращенной программой обучения в Москве
http://pinupzerkalo.fun/# pinco
бонусы пин ап: пин ап вход – pin up zerkalo
http://pinup-az.bid/# pin up 306
pin up zerkalo
Аттестат 11 класса купить официально с упрощенным обучением в Москве
Very good post. I certainly appreciate this site. Keep writing!
бизнес модель цветочного магазина http://cvety-i-bukety.ru/ .
бизнес модель цветочного магазина https://www.mos-roza.ru .
пинап казино пинап пинап казино
аудит системы продаж https://www.marketing99.ru .
бизнес план цветочный бизнес бизнес план цветочный бизнес .
снятие ломки нарколог снятие ломки нарколог .
Диплом вуза купить официально с упрощенным обучением в Москве
znanee.flybb.ru/viewtopic.php?f=2&t=664
pin up 306: pin up 306 – pinup az
Как быстро и легально купить аттестат 11 класса в Москве
http://sweetbonanzatr.pro/# sweet bonanza
https://pinupzerkalo.fun/# pinco
pin up win
пин ап казино онлайн: пин ап кз – Пин Ап Казино Официальный Сайт
куплю экономический диплом orik-diploms.ru .
Легальная покупка диплома ПТУ с сокращенной программой обучения
речной диплом купить prema-diploms.ru .
Официальная покупка диплома вуза с сокращенной программой обучения в Москве
sweet bonanza oyna: sweet bonanza tr – sweetbonanzatrpro
Как получить диплом техникума официально и без лишних проблем
бонусы пин ап пин ап пин ап вход
http://sweetbonanzatr.pro/# sweetbonanzatrpro
pin up win
пины: пин ап 634 – пинап
Merci pour ce bel article ![url=https://chemsexworld.com/]:)[/url]
https://sweetbonanzatr.pro/# sweet bonanza nas?l oynan?r
Как официально купить диплом вуза с упрощенным обучением в Москве
симптомы ломки симптомы ломки .
стационарное лечение алкоголизма http://www.vyvod-iz-zapoya-v-stacionare-voronezh15.ru .
снятие наркологической ломки на дому снятие наркологической ломки на дому .
снятие наркологической ломки на дому снятие наркологической ломки на дому .
снятие ломок на дому снятие ломок на дому .
пины: Пин Ап Казахстан – пин ап 634
I love reading through a post that will make men and women think. Also, thank you for permitting me to comment.
Реально ли приобрести диплом стоматолога? Основные шаги
Сколько стоит диплом высшего и среднего образования и как это происходит?
Быстрая схема покупки диплома старого образца: что важно знать?
http://sweetbonanzatr.pro/# sweet bonanza
pin up zerkalo
пины пин ап кз пин ап 634
sweet bonanza: sweet bonanza tr – sweet bonanza nas?l oynan?r
https://sweetbonanzatr.pro/# sweetbonanzatr.pro
https://sweetbonanzatr.pro/# sweet bonanza
pin up win
There is certainly a lot to learn about this topic. I love all the points you’ve made.
Покупка диплома о среднем полном образовании: как избежать мошенничества?
купить диплом в дербенте server-diploms.ru .
pin up zerkalo: пин ап вход – пин ап казино
купить диплом 2015 купить диплом 2015 .
Your style is unique compared to other folks I’ve read stuff from. Thank you for posting when you’ve got the opportunity, Guess I’ll just book mark this page.
pinup pinup pinup-az bid
Как купить аттестат 11 класса с официальным упрощенным обучением в Москве
пинап: pin up kz – Пин Ап Казахстан
Сервисный центр предлагает ремонт prestigio muze 3871 4g цены ремонт prestigio muze 3871 4g
Купить диплом старого образца, можно ли это сделать по быстрой схеме?
volexauto.bestforums.org/viewtopic.php?f=8&t=1600
Как получить диплом техникума официально и без лишних проблем
вывод из запоя в нижнем новгороде вывод из запоя в нижнем новгороде .
вывод из запоя нижний новгород стационар вывод из запоя нижний новгород стационар .
вывод из запоя в стационаре воронежа вывод из запоя в стационаре воронежа .
вывод из запоя нижний новгород вывод из запоя нижний новгород .
Официальная покупка диплома вуза с сокращенной программой в Москве
Как официально приобрести аттестат 11 класса с минимальными затратами времени
Легальная покупка диплома ПТУ с сокращенной программой обучения
Пошаговая инструкция по официальной покупке диплома о высшем образовании
купить диплом в екатеринбурге man-diploms.ru .
Сколько стоит диплом высшего и среднего образования и как это происходит?
вывод из запоя стационар вывод из запоя стационар .
Как не стать жертвой мошенников при покупке диплома о среднем полном образовании
flystarlady.listbb.ru/viewtopic.php?f=27&t=4743
Можно ли купить аттестат о среднем образовании, основные моменты и вопросы
iaescortsmap.ixbb.ru/viewtopic.php?id=313#p313
купить диплом влгу купить диплом влгу .
купить диплом с занесением в госреестр купить диплом с занесением в госреестр .
вывод из запоя стационар вывод из запоя стационар .
вывод из запоя в стационаре вывод из запоя в стационаре .
перед выводом из запоя в стационаре перед выводом из запоя в стационаре .
вывод из запоя в стационаре Самары вывод из запоя в стационаре Самары .
купить оригинальный диплом купить оригинальный диплом .
https://gabapentin1st.pro/# buy gabapentin
paxlovid1st: paxlovid price – See risks
Приобретение диплома ПТУ с сокращенной программой обучения в Москве
сделать капельницу от запоя http://www.kapelnica-ot-zapoya-kolomna14.ru .
Рекомендации по безопасной покупке диплома о высшем образовании
Купить диплом магистра оказалось возможно, быстрое обучение и диплом на руки
https://semaglutide.ink/# Urgent Specialists
This web site truly has all the info I needed concerning this subject and didn’t know who to ask.
купить диплом ссср о среднем образовании prema-diploms.ru .
cheapest: stromectol delivery usa – good price
Merci pour ce bel article 🙂 !
https://amoxil1st.shop/# amoxil
stromectol online: good price – stromectol store
I would like to thank you for the efforts you have put in writing this blog. I’m hoping to view the same high-grade blog posts by you in the future as well. In truth, your creative writing abilities has motivated me to get my own blog now 😉
https://semaglutide.ink/# Urgent Specialists
Merci pour ce bel article 🙂 !
Официальная покупка диплома ПТУ с упрощенной программой обучения
наркологическая скорая бесплатная наркологическая скорая бесплатная .
капельницу от запоя капельницу от запоя .
платная наркологическая помощь платная наркологическая помощь .
капельница на дому от запоя капельница на дому от запоя .
платная наркологическая помощь на дому платная наркологическая помощь на дому .
диплом 1996 купить orik-diploms.ru .
Реально ли приобрести диплом стоматолога? Основные этапы
Сервисный центр предлагает ремонт электросамокатов mizar адреса стоимость ремонта электросамоката mizar
Merci pour ce bel article 🙂 !
Merci pour ce bel article 🙂 !
Как купить аттестат 11 класса с официальным упрощенным обучением в Москве
https://semaglutide.ink/# rybelsus price
Merci pour ce bel article 🙂 !
Как правильно приобрести диплом колледжа или ПТУ в России, важные моменты
можно ли купить диплом об образовании можно ли купить диплом об образовании .
Узнайте стоимость диплома высшего и среднего образования и процесс получения
An impressive share! I’ve just forwarded this onto a co-worker who was doing a little research on this. And he actually ordered me lunch due to the fact that I found it for him… lol. So allow me to reword this…. Thanks for the meal!! But yeah, thanks for spending the time to discuss this subject here on your web page.
gabapentin pro: gabapentin best price – buy gabapentin
Как официально купить аттестат 11 класса с упрощенным обучением в Москве
Merci pour ce bel article 🙂 !
Полезная информация как купить диплом о высшем образовании без рисков
Как безопасно купить диплом колледжа или ПТУ в России, что важно знать
shop: amoxil – shop
Everything is very open with a precise clarification of the issues. It was truly informative. Your site is useful. Many thanks for sharing!
Merci pour ce bel article 🙂 !
купить проверенный диплом о высшем образовании server-diploms.ru .
Покупка диплома о среднем полном образовании: как избежать мошенничества?
sklad-slabov.ru/forum/user/11893/
Merci pour ce bel article 🙂 !
Merci pour ce bel article 🙂 !
Пошаговая инструкция по официальной покупке диплома о высшем образовании
Way cool! Some extremely valid points! I appreciate you writing this article and the rest of the site is also really good.
вызов нарколога на дом частная скорая помощь вызов нарколога на дом частная скорая помощь .
вывод из запоя химки стационар вывод из запоя химки стационар .
выведение из запоя химки выведение из запоя химки .
нарколог на дом вывод из запоя химки нарколог на дом вывод из запоя химки .
срочная наркологическая помощь срочная наркологическая помощь .
купить диплом колледжа в омске landik-diploms.ru .
Узнайте стоимость диплома высшего и среднего образования и процесс получения
Merci pour ce bel article 🙂 !
купить диплом о среднем образовании в хабаровске man-diploms.ru .
viagra without a doctor prescription https://indianpharm24.pro/# indian pharmacy paypal
купить диплом средней специальности diplomdarom.ru .
Merci pour ce bel article 🙂 !
Как приобрести диплом техникума с минимальными рисками
Can I simply say what a relief to find someone who truly understands what they’re talking about on the internet. You certainly know how to bring an issue to light and make it important. A lot more people ought to look at this and understand this side of the story. I was surprised you aren’t more popular since you most certainly have the gift.
Всё, что нужно знать о покупке аттестата о среднем образовании без рисков
hramada.listbb.ru/viewtopic.php?f=7&t=873
п»їbest mexican online pharmacies: mexico pharmacy cheap – mexican mail order pharmacies
non prescription erection pills: cheap meds – best price for generic viagra on the internet
Можно ли быстро купить диплом старого образца и в чем подвох?
Merci pour ce bel article 🙂 !
диплом степени купить realdiplom.ru .
Как приобрести аттестат о среднем образовании в Москве и других городах
best pill for ed https://pharm24.pro/# what are ed drugs
https://indianpharm24.pro/# п»їlegitimate online pharmacies india
drugs and medications
Merci pour ce bel article 🙂 !
выведение из запоя люберцы выведение из запоя люберцы .
нарколог на дом в люберцах kapelnica-ot-zapoya-lyubercy11.ru .
выведение из запоя люберцы выведение из запоя люберцы .
вывод из запоя кодирование москва вывод из запоя кодирование москва .
срочная помощь вывод из запоя москва http://www.vyvod-iz-zapoya-moskva11.ru .
Merci pour ce bel article 🙂 !
medicine in mexico pharmacies: mexico pharmacy cheap – mexican border pharmacies shipping to usa
drug medication: cheap meds – cheap pet meds without vet prescription
Купить диплом о среднем образовании в Москве и любом другом городе
Merci pour ce bel article 🙂 !
best way to treat ed http://mexicanpharm24.cheap/# pharmacies in mexico that ship to usa
Сервисный центр предлагает ремонт экрана ulefone power armor 13 замена стекла ulefone power armor 13
https://indianpharm24.pro/# top online pharmacy india
canadian online pharmacy
Реально ли приобрести диплом стоматолога? Основные шаги
Аттестат 11 класса купить официально с упрощенным обучением в Москве
mexican rx online mexican drugs mexican online pharmacies prescription drugs
india pharmacy: Indian pharmacy international shipping – india pharmacy
Купить диплом магистра оказалось возможно, быстрое обучение и диплом на руки
вывод из запоя на дому круглосуточно москва вывод из запоя на дому круглосуточно москва .
прокапаться от алкоголя в балашихе прокапаться от алкоголя в балашихе .
вывод из запоя в стационаре балашиха вывод из запоя в стационаре балашиха .
вывод из запоя в стационаре балашиха вывод из запоя в стационаре балашиха .
вывод из запоя москва стационар вывод из запоя москва стационар .
what are ed drugs https://indianpharm24.pro/# Online medicine home delivery
http://indianpharm24.pro/# mail order pharmacy india
comfortis for dogs without vet prescription
mexican drugstore online: mexican drugs – mexican pharmaceuticals online
купить диплом производство prema-diploms.ru .
Пошаговая инструкция по безопасной покупке диплома о высшем образовании
indian pharmacy paypal: medicines from India – indianpharmacy com
Приобретение школьного аттестата с официальным упрощенным обучением в Москве
It’s nearly impossible to find experienced people about this subject, but you sound like you know what you’re talking about! Thanks
Как приобрести аттестат о среднем образовании в Москве и других городах
Реально ли приобрести диплом стоматолога? Основные шаги
ed dysfunction treatment https://mexicanpharm24.cheap/# best online pharmacies in mexico
Покупка диплома о среднем полном образовании: как избежать мошенничества?
Как получить диплом техникума официально и без лишних проблем
ywupfor.flybb.ru/viewtopic.php?f=27&t=45
купить школьный аттестат orik-diploms.ru .
https://pharm24.pro/# cure ed
pet antibiotics without vet prescription
Сколько стоит получить диплом высшего и среднего образования легально?
india pharmacy: Pharmacies in India that ship to USA – india pharmacy mail order
purple pharmacy mexico price list: mexico pharmacy – buying prescription drugs in mexico
вывод из запоя в подольске вывод из запоя в подольске .
вывод из запоя на дому подольск вывод из запоя на дому подольск .
вывод из запоя анонимно королев вывод из запоя анонимно королев .
вывод из запоя королев клиника вывод из запоя королев клиника .
вызвать капельнцу от запоя kapelnica-ot-zapoya-podolsk13.ru .
natural remedies for ed problems http://indianpharm24.pro/# best india pharmacy
https://mexicanpharm24.cheap/# mexican pharmaceuticals online
erection problems
Легальная покупка школьного аттестата с упрощенной программой обучения
club-kia.com/forum/thread31021.html
Официальная покупка аттестата о среднем образовании в Москве и других городах
Быстрая покупка диплома старого образца: возможные риски
купить диплом с оценками купить диплом с оценками .
mexican drugstore online: Mexican pharmacy ship US – mexican rx online
erection pills online https://mexicanpharm24.cheap/# buying prescription drugs in mexico online
natural drugs for ed: buy drugs – erectile dysfunction treatments
http://mexicanpharm24.cheap/# mexico pharmacies prescription drugs
canadian drug prices
вывод из запоя на дому воронеж вывод из запоя на дому воронеж .
медикаментозный вывод из запоя королев медикаментозный вывод из запоя королев .
вывод из запоя с выездом королев https://vyvod-iz-zapoya-korolev13.ru/ .
куплю диплом о высшем образовании читать 3russkiy-diploms.ru .
прокапать от алкоголя на дому воронеж прокапать от алкоголя на дому воронеж .
прерывание запоя цена прерывание запоя цена .
купить диплом бакалавра в нижнем тагиле prem-diplom77.ru .
Можно ли купить аттестат о среднем образовании? Основные рекомендации
за сколько можно купить красный диплом servera-diplomy199.ru .
Uncovering Sugar Defender has actually been a game-changer for me, as I have actually always been vigilant about handling my blood sugar
degrees. I currently really feel equipped and positive in my ability to keep healthy and
balanced degrees, and my most recent medical examination have actually mirrored this
progress. Having a trustworthy supplement to enhance my a substantial source of convenience, and I’m absolutely happy for the significant distinction Sugar
Defender has actually made in my total wellness.
Сколько стоит получить диплом высшего и среднего образования легально?
Всё о покупке аттестата о среднем образовании: полезные советы
Купить диплом о среднем образовании в Москве и любом другом городе
купить диплом ссср о высшем образовании купить диплом ссср о высшем образовании .
ed pumps: cheap prescription drugs – new ed treatments
canadian online drugs https://mexicanpharm24.cheap/# mexican mail order pharmacies
https://indianpharm24.pro/# buy prescription drugs from india
ed trial pack
india online pharmacy: Indian pharmacy worldwide delivery – mail order pharmacy india
Легальная покупка диплома о среднем образовании в Москве и регионах
запой помощь нарколога запой помощь нарколога .
вывод из запоя нарколог на дом цена вывод из запоя нарколог на дом цена .
вывод из запоя на дому челябинск вывод из запоя на дому челябинск .
вывод из запоя в челябинске http://vyvod-iz-zapoya-chelyabinsk13.ru .
клиники лечения запоя vyvod-iz-zapoya-ekaterinburg21.ru .
Всё, что нужно знать о покупке аттестата о среднем образовании
Сколько стоит получить диплом высшего и среднего образования легально?
Покупка диплома о среднем полном образовании: как избежать мошенничества?
http://denemebonusuverensiteler.top/# deneme bonusu veren siteler yeni
deneme bonusu veren siteler mycbet.com
deneme bonusu veren siteler denemebonusu2026.com https://ultrabet-tr.online/# ultrabet
Canl? Casino Siteleri: Canl? Casino Siteleri – Deneme Bonusu Veren Siteler
deneme bonusu veren siteler yerliarama.org: deneme bonusu veren siteler 2024 – deneme bonusu veren siteler 2024
Легальная покупка школьного аттестата с упрощенной программой обучения
Тут можно преобрести сейф под оружие оружейные шкафы москва
Excellent article! We are linking to this particularly great post on our site. Keep up the great writing.
Тут можно домашний сейф цена сейфы для дома цены
deneme bonusu veren yeni siteler deneme bonusu veren yeni siteler denemebonusuverensiteler.top
Deals on car rentals https://skidki-i-kupony.ru/ .
download stories https://storyviewerfree.com/ .
вызов нарколога на дом в екатеринбурге круглосуточно narkolog-na-dom-ekaterinburg11.ru .
электрокарниз акция http://elektrokarniz-dlya-shtor15.ru/ .
вызов нарколога на дом в екатеринбурге вызов нарколога на дом в екатеринбурге .
ultrabet bonus: ultrabet tr online – ultrabet giris
guvenilir casino siteleri: casino siteleri win – Deneme Bonusu Veren Siteler
Тут можно преобрести сейф несгораемый купить купить огнестойкий сейф
Сколько стоит диплом высшего и среднего образования и как его получить?
Узнайте стоимость диплома высшего и среднего образования и процесс получения
https://denemebonusuverensiteler.top/# deneme bonusu veren siteler
deneme bonusu veren siteler yeni
Deneme Bonusu Veren Siteler casino siteleri win Casino Siteleri
Легальная покупка диплома о среднем образовании в Москве и регионах
Всё, что нужно знать о покупке аттестата о среднем образовании
Реально ли приобрести диплом стоматолога? Основные этапы
ultrabet giris: ultrabet bonus – ultrabet guncel
Excellent article. I’m facing some of these issues as well..
стоит купить диплом о высшем образовании 1russa-diploms.ru .
Парадокс, но купить диплом кандидата наук оказалось не так и сложно
гознак аттестаты купить гознак аттестаты купить .
Тут можно преобрести купить шкаф оружейный купить шкаф для оружия
deneme bonusu veren siteler 2024 https://casinositeleri.win/# Deneme Bonusu Veren Siteler
instagram story viewer and downloader https://www.freeinstviewer.com .
Приобретение диплома ПТУ с сокращенной программой обучения в Москве
forum.amzgame.com/thread/detail?id=316397
slot oyunlar?: slot oyunlar? – slot oyunlar? puf noktalar?
согласование перепланировки квартиры в москве цена согласование перепланировки квартиры в москве цена .
купить кожзам https://iskusstvennaya-kozha-dlya-mebeli-kupit.ru .
Официальное получение диплома техникума с упрощенным обучением в Москве
denemebonusuverensiteler.top deneme bonusu veren siteler denemebonusu2026.com deneme bonusu veren siteler mycbet.com
Как не стать жертвой мошенников при покупке диплома о среднем полном образовании
I’m very happy to uncover this web site. I wanted to thank you for ones time due to this fantastic read!! I definitely really liked every part of it and I have you saved as a favorite to check out new stuff in your site.
Как официально купить аттестат 11 класса с упрощенным обучением в Москве
lider036.5nx.ru/viewtopic.php?f=26&t=1374
casino siteleri win: Canl? Casino Siteleri – Deneme Bonusu Veren Siteler
лучший сервис для накрутки подписчиков лучший сервис для накрутки подписчиков .
denemebonusuverensiteler.top deneme bonusu veren siteler mycbet.com deneme bonusu veren yeni siteler
insta stories insta stories .
можно ли купить аттестат можно ли купить аттестат .
Покупка диплома о среднем полном образовании: как избежать мошенничества?
deneme bonusu veren siteler mycbet.com: deneme bonusu veren siteler denemebonusu2026.com – deneme bonusu veren siteler yerliarama.org
matadorbet.bid: matadorbet giris – matadorbet bid
Тут можно преобрести сейф для оружия купить москва купить сейф под оружие
Приобретение диплома ПТУ с сокращенной программой обучения в Москве
Покупка диплома о среднем полном образовании: как избежать мошенничества?
stroimnsk.ru/attestat-za-9-klass-kupit-tsena-v-hersone.html
deneme bonusu veren siteler betturkey betturkey.com https://ultrabet-tr.online/# ultrabet giris
Suncity888
casino siteleri win Casino Siteleri Casino Siteleri
Приобретение диплома ПТУ с сокращенной программой обучения в Москве
Процесс получения диплома стоматолога: реально ли это сделать быстро?
Casino Siteleri: Canl? Casino Siteleri – guvenilir casino siteleri
купить диплом о высшем образовании с занесением в реестр отзывы купить диплом о высшем образовании с занесением в реестр отзывы .
купить диплом звукорежиссера servera-diplomy199.ru .
Полезная информация как купить диплом о высшем образовании без рисков
Пошаговая инструкция по официальной покупке диплома о высшем образовании
It’s hard to come by knowledgeable people in this particular subject, but you seem like you know what you’re talking about! Thanks
Платежный модуль геткурс промокод на подключение https://www.platezhnyj-modul-getkurs-promokod.ru .
Canl? Casino Siteleri: guvenilir casino siteleri – guvenilir casino siteleri
slot tr online slot oyunlar? puf noktalar? slot oyunlar? puf noktalar?
сервис для накрутки живых подписчиков в инстаграм сервис для накрутки живых подписчиков в инстаграм .
заказать создание и продвижение сайта заказать создание и продвижение сайта .
сео продвижение сайтов москва сео продвижение сайтов москва .
раскрутка сайта в москве раскрутка сайта в москве .
франшиза купить готовый бизнес каталог франшиза купить готовый бизнес каталог .
denemebonusuverensiteler.top https://casinositeleri.win/# casino siteleri win
Как официально купить диплом вуза с упрощенным обучением в Москве
sky-metaverse.com/read-blog/22506
Быстрая схема покупки диплома старого образца: что важно знать?
Как быстро получить диплом магистра? Легальные способы
ultrabet guncel: ultrabet – ultrabet yeni giris 1125
Приобретение диплома ПТУ с сокращенной программой обучения в Москве
Приобретение школьного аттестата с официальным упрощенным обучением в Москве
Приобретение диплома ПТУ с сокращенной программой обучения в Москве
Официальное получение диплома техникума с упрощенным обучением в Москве
Стоимость дипломов высшего и среднего образования и процесс их получения
denemebonusuverensiteler.top deneme bonusu veren siteler yerliarama.org deneme bonusu veren yeni siteler
rybpharm rybelsus rybpharm buy rybelsus online usa
http://erepharm.com/# buy ed pills
Good day! Do you know if they make any plugins to help with SEO?
I’m trying to get my site to rank for some targeted keywords but I’m not seeing
very good gains. If you know of any please share.
Thank you! You can read similar art here: Bij nl
best ed pills online: buy ed pills – erepharm pills
Как безопасно купить диплом колледжа или ПТУ в России, что важно знать
Быстрая схема покупки диплома старого образца: что важно знать?
Тут можно преобрести купить сейф огнестойкий в москве купить несгораемый сейф
вывод из запоя дешево ростов-на-дону http://krut.forumno.com/viewtopic.php?id=6023 .
продажа франшиз продажа франшиз .
франшиза франшиза .
франшизы 2023 франшизы 2023 .
Сколько стоит диплом высшего и среднего образования и как его получить?
Right here is the right website for everyone who hopes to understand this topic. You know a whole lot its almost tough to argue with you (not that I personally will need to…HaHa). You definitely put a fresh spin on a subject which has been discussed for ages. Excellent stuff, just excellent.
Тут можно преобрести оружейные сейфы и шкафы для ружей сейф для оружия цена в москве
Купить диплом о среднем образовании в Москве и любом другом городе
Приобретение диплома ПТУ с сокращенной программой обучения в Москве
Как приобрести аттестат о среднем образовании в Москве и других городах
kamagra oral jelly: Kamagra Kam Pharm – Kamagra Kam Pharm
May I simply just say what a comfort to discover somebody who actually knows what they are discussing on the web. You actually know how to bring an issue to light and make it important. More people really need to read this and understand this side of your story. I was surprised that you aren’t more popular because you certainly possess the gift.
http://gabapharm.com/# buy gabapentin online
Официальная покупка диплома вуза с сокращенной программой обучения в Москве
igrosoft.getbb.ru/viewtopic.php?f=11&t=2146
kamagra oral jelly kamagra kam pharm shop
Сколько стоит диплом высшего и среднего образования и как это происходит?
cheapest ed pills ere pharm: ED pills non prescription – ED meds online with insurance
Купить диплом магистра оказалось возможно, быстрое обучение и диплом на руки
http://kampharm.shop/# kam pharm shop
This is a topic which is close to my heart… Cheers! Where are your contact details though?
Aw, this was an exceptionally nice post. Taking a few minutes and actual effort to produce a great article… but what can I say… I put things off a whole lot and don’t manage to get nearly anything done.
rybpharm rybelsus rybpharm rybelsus rybpharm canada
Диплом пту купить официально с упрощенным обучением в Москве
https://rybpharm.com/# rybpharm
Пошаговая инструкция по безопасной покупке диплома о высшем образовании
bajajrussia.club/posting.php?mode=post&f=4
Сервисный центр предлагает ремонт сигвей motionpro ремонт сигвей motionpro адреса
где купить диплом о среднем профессиональном prema365-diploms.ru .
Good article. I will be dealing with some of these issues as well..
Тут можно преобрести сейфы от пожара купить сейф несгораемый
нарколог вывод из запоя ростов http://www.bisound.com/forum/showthread.php?p=1217039/ .
вывод из запоя на дому ростов на дону chesskomi.borda.ru/?1-8-0-00003044-000-0-0-1730725479 .
вывод из запоя на дому ростов цены http://www.spilkuvannya.rolevaya.com/viewtopic.php?id=65 .
вывод из запоя стационар ростов masa.forum24.ru/?1-16-0-00002625-000-0-0-1730725831 .
вывод из запоя ростов-на-дону вывод из запоя ростов-на-дону .
Kam Pharm: Kamagra Kam Pharm – kam pharm shop
Вопросы и ответы: можно ли быстро купить диплом старого образца?
http://rybpharm.com/# buy rybelsus online usa
Полезная информация как купить диплом о высшем образовании без рисков
промокод prodamus промокод prodamus .
Как быстро и легально купить аттестат 11 класса в Москве
Hi there! This article couldn’t be written much better! Reading through this post reminds me of my previous roommate! He constantly kept preaching about this. I most certainly will forward this article to him. Pretty sure he’s going to have a very good read. Many thanks for sharing!
Как официально купить диплом вуза с упрощенным обучением в Москве
Как купить диплом о высшем образовании с минимальными рисками
semaglutide: rybpharm canada – rybpharm cheap semaglutide
https://rybpharm.com/# rybpharm cheap semaglutide
https://erepharm.com/# best ed pill ere pharm
Тут можно преобрести оружейный шкаф оружейные шкафы
I seriously love your blog.. Great colors & theme. Did you build this site yourself? Please reply back as I’m attempting to create my very own blog and want to learn where you got this from or what the theme is called. Thank you.
Полезные советы по безопасной покупке диплома о высшем образовании
mailorderbridesfinder.com/gde-kupit-attestat-za-9-klass-v-ryazani.html
Как приобрести диплом техникума с минимальными рисками
Buy gabapentin for humans gabapentin GabaPharm buy gabapentin online
Приобретение школьного аттестата с официальным упрощенным обучением в Москве
Пошаговая инструкция по официальной покупке диплома о высшем образовании
Как получить диплом техникума с упрощенным обучением в Москве официально
Как правильно купить диплом колледжа и пту в России, подводные камни
вывод из запоя ростов на дону стационар вывод из запоя ростов на дону стационар .
Exclusive deals on fashion http://www.skidki-i-kupony.ru/ .
вывод из запоя ростов и область https://sportandpolitics.ukrbb.net/viewtopic.php?f=24&t=17802/ .
вывод из запоя на дому ростов-на-дону вывод из запоя на дому ростов-на-дону .
анонимный вывод из запоя ростов анонимный вывод из запоя ростов .
cheapest lasix: furosemide – buy furosemide online
You’re so interesting! I don’t think I’ve truly read anything like that before. So nice to discover someone with original thoughts on this subject. Really.. many thanks for starting this up. This web site is one thing that is required on the web, someone with a bit of originality.
https://kampharm.shop/# Kamagra Kam Pharm
Как официально купить аттестат 11 класса с упрощенным обучением в Москве
Официальное получение диплома техникума с упрощенным обучением в Москве
Здесь можно преобрести сейф цена купить купить сейф интернете
Стоимость дипломов высшего и среднего образования и процесс их получения
semaglutide rybpharm rybpharm
https://rybpharm.com/# rybpharm
Howdy, There’s no doubt that your blog could possibly be having browser compatibility problems. When I look at your website in Safari, it looks fine however, when opening in Internet Explorer, it has some overlapping issues. I merely wanted to give you a quick heads up! Besides that, wonderful blog!
Официальная покупка диплома вуза с сокращенной программой в Москве
Купить диплом о среднем образовании в Москве и любом другом городе
kamagra: Kamagra Kam Pharm – kam pharm shop
http://furpharm.com/# cheapest lasix
rybpharm cheap semaglutide rybpharm rybelsus buy rybelsus canada
gabapentin: GabaPharm Gabapentin – buy gabapentin india
Тут можно преобрести оружейный сейф на заказ москва шкафы оружейные и сейфы
Покупка диплома о среднем полном образовании: как избежать мошенничества?
http://rybpharm.com/# buy rybelsus
Тут можно преобрести купить огнестойкий сейф пожаростойкие сейфы
A fascinating discussion is definitely worth comment. I do believe that you need to publish more about this issue, it might not be a taboo subject but typically people do not talk about such issues. To the next! Kind regards.
F*ckin’ amazing issues here. I am very happy to look your article. Thank you a lot and i am having a look ahead to contact you. Will you kindly drop me a e-mail?
нарколог на дом вывод из запоя ростов http://zarabotokdoma.creartuforo.com/viewtopic.php?id=11473/ .
вывод из запоя дешево ростов kyevlyn.ukrbb.net/viewtopic.php?f=2&t=13619 .
лучшие онлайн казино http://www.casino-bonus.by .
вывод из запоя на дому ростов недорого https://www.justforum.bestforums.org/viewtopic.php?f=26&t=4732 .
срочный вывод из запоя ростов dexanet.ukrbb.net/viewtopic.php?f=14&t=20360 .
красный аттестат купить красный аттестат купить .
Как купить аттестат 11 класса с официальным упрощенным обучением в Москве
Как избежать рисков при покупке диплома колледжа или ПТУ в России
Официальная покупка диплома вуза с сокращенной программой обучения в Москве
It’s difficult to find educated people in this particular topic, but you seem like you know what you’re talking about! Thanks
Как безопасно купить диплом колледжа или ПТУ в России, что важно знать
GabaPharm Gabapentin buy gabapentin online buy Gabapentin GabaPharm
Узнайте стоимость диплома высшего и среднего образования и процесс получения
credibleleaders.mn.co/posts/69999313
Всё, что нужно знать о покупке аттестата о среднем образовании без рисков
belitt.ru/forum/topic/diplom-s-garantiej-podlinnosti-za-korotkij-srok/#postid-320
You should be a part of a contest for one of the finest websites on the internet. I will highly recommend this website!
https://erepharm.com/# ere pharm
https://gabapharm.com/# Buy gabapentin for humans
Приобретение диплома ПТУ с сокращенной программой обучения в Москве
Покупка диплома о среднем полном образовании: как избежать мошенничества?
Полезные советы по безопасной покупке диплома о высшем образовании
forum.rivnefish.com/viewtopic.php?t=568470
Oh my goodness! Impressive article dude! Thank you so much, However I am having troubles with your RSS. I don’t know why I can’t subscribe to it. Is there anyone else having similar RSS issues? Anybody who knows the answer can you kindly respond? Thanks!!
Приобретение диплома ПТУ с сокращенной программой обучения в Москве
Как приобрести диплом техникума с минимальными рисками
Как получить диплом техникума с упрощенным обучением в Москве официально
go88
Greetings! Very useful advice in this particular post! It’s the little changes that will make the most important changes. Many thanks for sharing!
Возможно ли купить диплом стоматолога, и как это происходит
Диплом техникума купить официально с упрощенным обучением в Москве
Тут можно преобрести огнеупорный сейф несгораемые сейфы
http://indianpharmacyeasy.com/# indian pharmacies safe
Полезные советы по безопасной покупке диплома о высшем образовании
indian pharmacy online: Best online Indian pharmacy – cheapest online pharmacy india
indian pharmacies safe: Indian pharmacy to USA – best online pharmacy india
Приобретение диплома ПТУ с сокращенной программой обучения в Москве
онлайн казино онлайн казино .
срочный вывод из запоя ростов http://uaforum.ukrbb.net/viewtopic.php?f=13&t=3233/ .
вывод. из. запоя. ростов. https://www.automobilist.forum24.ru/?1-19-0-00000135-000-0-0-1730648713 .
Узнайте, как безопасно купить диплом о высшем образовании
Online medicine home delivery Online Indian pharmacy reputable indian pharmacies
Тут можно преобрести купить сейф для охотничьего ружья в москве сейф для ружья цена
вывод из запоя цены на дому ростов вывод из запоя цены на дому ростов .
вывод из запоя ростов и область https://chesskomi.borda.ru/?1-8-0-00003041-000-0-0-1730648765 .
https://mexicanpharmgate.com/# mexico drug stores pharmacies
http://canadiandrugsgate.com/# ed pumps
Официальная покупка диплома ПТУ с упрощенной программой обучения
Удивительно, но купить диплом кандидата наук оказалось не так сложно
Легальная покупка диплома ПТУ с сокращенной программой обучения
bakarat.eu/attestat-ob-obrazovanii-mozhno-kupit-ili-net.html
Можно ли купить аттестат о среднем образовании, основные моменты и вопросы
http://mexicanpharmgate.com/# mexican online pharmacies prescription drugs
I’m not sure exactly why but this blog is loading extremely slow for me. Is anyone else having this problem or is it a issue on my end? I’ll check back later and see if the problem still exists.
Аттестат 11 класса купить официально с упрощенным обучением в Москве
Можно ли купить аттестат о среднем образовании, основные моменты и вопросы
Hello, i think that i saw you visited my site thus i came to “return the favor”.I am attempting to find things to enhance my site!I suppose its ok to use some of your ideas!!
Тут можно преобрести огнеупорный сейф сейф огнеупорный купить
mexican rx online: Mexican Pharm Gate – mexico drug stores pharmacies
https://mexicanpharmgate.com/# mexico drug stores pharmacies
https://canadiandrugsgate.com/# comfortis without vet prescription
Сервисный центр предлагает замена стекла lenovo b590 чистка системы охлаждения lenovo b590
Приобретение диплома ПТУ с сокращенной программой обучения в Москве
Пошаговая инструкция по официальной покупке диплома о высшем образовании
промокод на продамус https://www.prodamus-promokod21.ru .
aspirin and ed Canadian pharmacy online best erection pills
Тут можно преобрести сейфов для оружия оружейные сейфы в москве
Real great information can be found on web site. “Never violate the sacredness of your individual self-respect.” by Theodore Parker.
Phim sex cưỡng hiếp trẻ em
принудительный вывод из запоя ростов принудительный вывод из запоя ростов .
вывод. из. запоя. ростов. вывод. из. запоя. ростов. .
Аттестат школы купить официально с упрощенным обучением в Москве
вывод. из. запоя. анонимно. ростов. http://sportandpolitics.ukrbb.net/viewtopic.php?f=24&t=17793v .
вывод из запоя круглосуточно ростов-на-дону вывод из запоя круглосуточно ростов-на-дону .
вывод из запоя ростов на дону на дому http://my.forum2.net/viewtopic.php?id=171 .
mexican mail order pharmacies: mexican pharmacy online – purple pharmacy mexico price list
Enjoyed studying this, very good stuff, regards.
https://indianpharmacyeasy.com/# buy medicines online in india
You are so awesome! I do not believe I’ve truly read through something like that before. So wonderful to discover another person with original thoughts on this topic. Really.. many thanks for starting this up. This website is something that is required on the web, someone with a bit of originality.
http://indianpharmacyeasy.com/# india pharmacy mail order
sugar defender ingredients Finding
Sugar Defender has actually been a game-changer for me, as I
have actually constantly been vigilant concerning handling my blood sugar degrees.
I now really feel empowered and confident in my capability to maintain healthy levels, and my most recent medical examination have actually mirrored
this progression. Having a credible supplement to match my a massive resource of comfort,
and I’m truly appreciative for the significant difference Sugar Protector has actually made in my overall
wellness.
Процесс получения диплома стоматолога: реально ли это сделать быстро?
Официальная покупка диплома вуза с сокращенной программой в Москве
Купить диплом о среднем полном образовании, в чем подвох и как избежать обмана?
Официальная покупка диплома вуза с упрощенной программой обучения
obshenie.flybb.ru/viewtopic.php?f=2&t=786
medication from mexico pharmacy: mexican drugstore online – mexico drug stores pharmacies
купить диплом археолога купить диплом археолога .
cheap ed medication: canadian pharmacy – canada ed drugs
п»їlegitimate online pharmacies india Online Indian pharmacy mail order pharmacy india
This is a topic which is close to my heart… Take care! Where are your contact details though?
Узнайте стоимость диплома высшего и среднего образования и процесс получения
http://indianpharmacyeasy.com/# online pharmacy india
Тут можно преобрести купить несгораемый сейф сейф жаростойкий
Тут можно преобрести где купить сейф для оружия купить сейф под оружие
Рекомендации по безопасной покупке диплома о высшем образовании
Как получить диплом о среднем образовании в Москве и других городах
Howdy! I could have sworn I’ve visited this website before but after going through a few of the articles I realized it’s new to me. Nonetheless, I’m definitely delighted I stumbled upon it and I’ll be bookmarking it and checking back regularly.
Jugabet c?digo promocional Jugabet c?digo promocional .
нарколог вывод из запоя ростов http://www.stranaua.ukrbb.net/viewtopic.php?f=2&t=59741/ .
вывод из запоя ростов на дону http://mediaworld.ukrbb.net/viewtopic.php?f=49&t=5431 .
вывод из запоя ростов и область http://vishivayu.ukrbb.net/viewtopic.php?f=12&t=13420/ .
вывод. из. запоя. на. дому. ростов. http://www.domsadremont.ukrbb.net/viewtopic.php?f=3&t=901/ .
https://mexicanpharmgate.com/# mexican mail order pharmacies
Официальная покупка диплома вуза с сокращенной программой обучения в Москве
Здесь можно преобрести сейфы купить сейф купить москва
online pharmacy india Best Indian pharmacy india pharmacy
Легальная покупка диплома ПТУ с сокращенной программой обучения
Официальная покупка диплома вуза с сокращенной программой обучения в Москве
legal to buy prescription drugs without prescription http://canadiandrugsgate.com/# buy prescription drugs
how to cure ed naturally
buy dapoxetine online: dapoxetine online – cheap priligy
Как избежать рисков при покупке диплома колледжа или ПТУ в России
Купить диплом ВУЗа России
Пошаговая инструкция по безопасной покупке диплома о высшем образовании
Как приобрести аттестат о среднем образовании в Москве и других городах
犬夜叉. Shogakukan (in Japanese). 「Tカード(犬夜叉)」10月2日(金)より店頭発行受付スタート!
When the 2-dollar coin was introduced in 1996, the derivative phrase toonie
(“two loonies”) became the frequent phrase for it in Canadian English slang.
In 1753, throughout the French and Indian Conflict, an Abenaki band
took English captive John Stark by canoe down Lake Memphremagog and
got here ashore at the positioning the place the city of
Newport later developed.
Официальная покупка диплома вуза с упрощенной программой обучения
prednisone without prescription: prednisone ray pharm – buy prednisone online australia
cost of amoxicillin prescription https://amoxilcompharm.com/# amoxicillin 500mg capsules
Узнай все о рецидив варикоцеле лапароскопия варикоцеле
dapoxetine price: buy dapoxetine online – dapoxetine price
Как оказалось, купить диплом кандидата наук не так уж и сложно
can you get cheap clomid buy clomid can i buy cheap clomid tablets
Тут можно преобрести сейф для оружия от производителя сейфы для оружия пистолетные
Узнай все о варикоцеле у мужчин симптомы варикоцеле 3 степени
can i purchase prednisone without a prescription: generic Prednisone – over the counter prednisone cream
Всё, что нужно знать о покупке аттестата о среднем образовании
. http://www.onekeyinvestments.com/members/toequill0/activity/6330/ .
вывод из запоя круглосуточно advance2.ukrbb.net/viewtopic.php?f=2&t=775 .
вывод из запоя ростов на дону стационар https://www.uaforum.ukrbb.net/viewtopic.php?f=13&t=3230 .
. http://www.www.ethiovisit.com/myplace/posts/364044 .
. http://www.goodreads.com/user_status/show/945404270 .
amoxicillin order online http://amoxilcompharm.com/# amoxicillin 500mg capsule cost
buy prednisone 5mg canada: prednisone – how to get prednisone without a prescription
Всё, что нужно знать о покупке аттестата о среднем образовании без рисков
Можно ли быстро купить диплом старого образца и в чем подвох?
priligy maxpharm buy priligy dapoxetine online
Реально ли приобрести диплом стоматолога? Основные этапы
Официальная покупка школьного аттестата с упрощенным обучением в Москве
buy priligy: buy priligy – priligy max pharm
You are so interesting! I don’t believe I’ve truly read a single thing like that before. So good to find someone with a few original thoughts on this subject matter. Seriously.. many thanks for starting this up. This website is one thing that’s needed on the web, someone with a little originality.
Узнай все о варикоцеле 3 степени варикоцеле 2 степени
can i buy clomid without prescription: clomid rex pharm – order generic clomid pill
промокод робокасса промокод робокасса .
amoxicillin 500mg cost http://clomidrexpharm.com/# buying clomid for sale
Как избежать рисков при покупке диплома колледжа или ПТУ в России
amoxicillin 500mg capsule cost: cheap amoxil – amoxicillin 500 mg online
вывод из запоя круглосуточно ростов-на-дону https://www.avtomobili.creartuforo.com/viewtopic.php?id=730 .
Как получить диплом о среднем образовании в Москве и других городах
нарколог на дом в краснодаре http://avtomobili.creartuforo.com/viewtopic.php?id=731/ .
выезд нарколога на дом https://mozaisk.anihub.me/viewtopic.php?id=4368 .
нарколог краснодар нарколог краснодар .
Как быстро и легально купить аттестат 11 класса в Москве
prednisone pills for sale ray pharm 5 mg prednisone daily
Предлагаем услуги профессиональных инженеров офицальной мастерской.
Еслли вы искали сервисный центр xiaomi в москве, можете посмотреть на сайте: сервисный центр xiaomi
Наши мастера оперативно устранят неисправности вашего устройства в сервисе или с выездом на дом!
When I originally commented I appear to have clicked on the -Notify me when new comments are added- checkbox and now each time a comment is added I get four emails with the exact same comment. There has to be an easy method you can remove me from that service? Cheers.
Всё, что нужно знать о покупке аттестата о среднем образовании без рисков
Как оказалось, купить диплом кандидата наук не так уж и сложно
Возможно ли купить диплом стоматолога, и как это происходит
Купить диплом в России, предлагает наша компания
buy dapoxetine online: priligy maxpharm – priligy maxpharm
Процесс получения диплома стоматолога: реально ли это сделать быстро?
Сколько стоит диплом высшего и среднего образования и как это происходит?
Как получить диплом техникума официально и без лишних проблем
dani3d.com/gde-mozhno-kupit-attestat-za-11-v-kemerovo.html
Сколько стоит диплом высшего и среднего образования и как это происходит?
вызов нарколога на дом круглосуточно вызов нарколога на дом круглосуточно .
buying amoxicillin online: Amoxicillin buy online – where can you buy amoxicillin over the counter
Узнай все о варикоцеле диагностика варикоцеле диагностика
50mg prednisone tablet: raypharm – prednisone 10mg tablets
buy amoxicillin canada amoxil com pharm amoxicillin price without insurance
generic for amoxicillin: amoxil com pharm – rexall pharmacy amoxicillin 500mg
Как получить диплом о среднем образовании в Москве и других городах
bogatbeden.listbb.ru/viewtopic.php?f=3&t=785
Pretty! This was an extremely wonderful post. Thank you for supplying this information.
Тут можно преобрести сейф под оружие сейф оружейный доставка
Сколько стоит диплом высшего и среднего образования и как его получить?
amoxicillin brand name: amoxil – amoxicillin 500mg capsule
Как оказалось, купить диплом кандидата наук не так уж и сложно
Приобретение диплома ПТУ с сокращенной программой обучения в Москве
Как безопасно купить диплом колледжа или ПТУ в России, что важно знать
Рекомендации по безопасной покупке диплома о высшем образовании
priligy max pharm: cheap priligy – priligy maxpharm
Всё, что нужно знать о покупке аттестата о среднем образовании без рисков
prednisone buying: generic Prednisone – prednisone 10
Быстрая покупка диплома старого образца: возможные риски
Быстрая схема покупки диплома старого образца: что важно знать?
Покупка диплома о среднем полном образовании: как избежать мошенничества?
prednisone steroids: ray pharm – where can i buy prednisone without prescription
Купить диплом ВУЗа России
Легальная покупка школьного аттестата с упрощенной программой обучения
Можно ли быстро купить диплом старого образца и в чем подвох?
Сколько стоит диплом высшего и среднего образования и как его получить?
can you buy prednisone without a prescription: prednisone ray pharm – prednisone 40 mg price
You should be a part of a contest for one of the greatest websites on the web. I will recommend this web site!
выезд нарколога на дом dubna.myqip.ru/?1-5-0-00000282-000-0-0-1730730082 .
карниз с электроприводом карниз с электроприводом .
выезд нарколога на дом http://ya.7bb.ru/viewtopic.php?id=14601/ .
нарколог на дом в краснодаре https://www.spilkuvannya.rolevaya.com/viewtopic.php?id=66 .
нарколог на дом срочно cah.forum24.ru/?1-19-0-00000459-000-0-0-1730729862 .
amoxicillin in india: Amoxicillin Com Pharm – order amoxicillin online
amoxicillin medicine: purchase amoxicillin online – amoxicillin buy no prescription
Everything is very open with a clear clarification of the challenges. It was definitely informative. Your site is very helpful. Many thanks for sharing.
Аттестат 11 класса купить официально с упрощенным обучением в Москве
Покупка диплома о среднем полном образовании: как избежать мошенничества?
beaconhill.listbb.ru/viewtopic.php?f=49&t=507
how to buy generic clomid without prescription: rexpharm – where buy cheap clomid
Всё, что нужно знать о покупке аттестата о среднем образовании без рисков
Introducing to you the most prestigious online entertainment address today. Visit now to experience now!
Узнай все о удаление полипа шейки матки москваудаление полипа на шейке матки
Узнайте, как приобрести диплом о высшем образовании без рисков
https://cytpremium.com/# buy cytotec over the counter
Покупка школьного аттестата с упрощенной программой: что важно знать
Сколько стоит диплом высшего и среднего образования и как его получить?
can i purchase cheap clomid: cheap clomid – where to buy cheap clomid
Сколько стоит диплом высшего и среднего образования и как его получить?
Официальная покупка диплома вуза с сокращенной программой обучения в Москве
Быстрое обучение и получение диплома магистра – возможно ли это?
Купить диплом экономиста – оптимальное решение
1 с программа купить 1 с программа купить .
mexican mail order pharmacies https://mexicanpharmgate.com/ medication from mexico pharmacy
вызов нарколога на дом вызов нарколога на дом .
вызвать нарколога на дом вызвать нарколога на дом .
нарколог на дом срочно http://belbeer.borda.ru/?1-6-0-00000756-000-0-0-1730730133/ .
платный нарколог на дом obovsem.rolevaya.info/viewtopic.php?id=3674 .
Полезные советы по покупке диплома о высшем образовании без риска
cytotec pills buy online: cheapest cytotec – buy cytotec over the counter
stromectol 6 mg dosage generic Stromectol minocycline for rheumatoid arthritis
Покупка школьного аттестата с упрощенной программой: что важно знать
Wonderful post! We are linking to this great content on our site. Keep up the great writing.
Introducing to you the most prestigious online entertainment address today. Visit now to experience now!
Официальная покупка диплома вуза с сокращенной программой обучения в Москве
Покупка диплома о среднем полном образовании: как избежать мошенничества?
Пошаговая инструкция по официальной покупке диплома о высшем образовании
Как купить диплом о высшем образовании с минимальными рисками
Как официально купить аттестат 11 класса с упрощенным обучением в Москве
Узнай все о септопластикасептопластика москва
buy amoxicillin online without prescription: buy amoxil online – where to buy amoxicillin pharmacy
Как избежать рисков при покупке диплома колледжа или ПТУ в России
Полезная информация как купить диплом о высшем образовании без рисков
промокод на продамус скидка подключение промокод на продамус скидка подключение .
вывод из запоя на дому краснодар круглосуточно https://tatuheart.ukrbb.net/viewtopic.php?f=8&t=15068 .
I blog often and I truly appreciate your information. The article has really peaked my interest. I am going to take a note of your blog and keep checking for new details about once per week. I opted in for your RSS feed too.
вывод из запоя круглосуточно https://aktivnoe.forum24.ru/?1-7-0-00012824-000-0-0-1730744727/ .
вывод из запоя на дому краснодар цены https://www.www.bisound.com/forum/showthread.php?p=1218157 .
вывод из запоя на дому краснодар круглосуточно вывод из запоя на дому краснодар круглосуточно .
вывод из запоя круглосуточно https://rodoslav.forum24.ru/?1-4-0-00000571-000-0-0-1730745118 .
buy clopidogrel online: п»їplavix generic – buy plavix
Пошаговая инструкция по безопасной покупке диплома о высшем образовании
http://cytpremium.com/# Cytotec 200mcg price
Как приобрести диплом о среднем образовании в Москве и других городах
I want to to thank you for this great read!! I definitely loved every little bit of it. I have you bookmarked to look at new things you post…
Диплом пту купить официально с упрощенным обучением в Москве
antiplatelet drug generic plavix п»їplavix generic
Реально ли приобрести диплом стоматолога? Основные шаги
how to get amoxicillin: Com Pharm – order amoxicillin online no prescription
buy clopidogrel bisulfate: cheapest plavix – buy clopidogrel bisulfate
Introducing to you the most prestigious online entertainment address today. Visit now to experience now!
Having read this I thought it was very enlightening. I appreciate you spending some time and energy to put this short article together. I once again find myself spending a lot of time both reading and commenting. But so what, it was still worth it.
Аттестат 11 класса купить официально с упрощенным обучением в Москве
Официальное получение диплома техникума с упрощенным обучением в Москве
https://lisinopril1st.com/# buy Lisinopril 1st
http://88clbcom.net
Официальная покупка диплома вуза с сокращенной программой в Москве
Узнай все о операция по увеличению пениса цена операции по увеличению полового члена
40 mg daily prednisone: prednisone 5 mg brand name – order prednisone 100g online without prescription
sky88
Купить диплом Барнаул
Hi there! Just felt like dropping in to praise your awesome blog. Your knowledge on affiliate marketing are genuinely inspiring. Earning an income from home has never been more achievable with affiliate promotion. It’s all about leveraging your online presence and promoting items or services that resonate with your audience. Your blog is a precious resource for those exploring affiliate marketing. Keep doing the excellent work!
вывод из запоя в краснодаре вывод из запоя в краснодаре .
вывод из запоя воронеж вывод из запоя воронеж .
как вывести из запоя против воли https://www.kozaostra.mybb.ru/viewtopic.php?id=14290 .
фон бет фон бет .
фонтбет фонтбет .
Покупка диплома о среднем полном образовании: как избежать мошенничества?
buy Lisinopril online generic zestril buy Lisinopril 1st
Можно ли купить аттестат о среднем образовании, основные моменты и вопросы
Как получить диплом техникума с упрощенным обучением в Москве официально
ivermectin 50: generic Stromectol – minocycline capsulas
Узнайте, как безопасно купить диплом о высшем образовании
Как не попасть впросак при покупке диплома колледжа или ПТУ в России
Hey there! Accept growth with open arms. Change results in new opportunities.
Пошаговая инструкция по безопасной покупке диплома о высшем образовании
cheap priligy: dapoxetine price – dapoxetine online
Официальная покупка диплома вуза с сокращенной программой обучения в Москве
forum.shvedun.ru/ucp.php?mode=login
http://iverfast.com/# minocycline for acne
Официальная покупка диплома вуза с сокращенной программой обучения в Москве
Стоимость дипломов высшего и среднего образования и как избежать подделок
Lisinopril 1st: buy Lisinopril 1st – buy Lisinopril online
Предлагаем услуги профессиональных инженеров офицальной мастерской.
Еслли вы искали сервисный центр lg в москве, можете посмотреть на сайте: официальный сервисный центр lg
Наши мастера оперативно устранят неисправности вашего устройства в сервисе или с выездом на дом!
Быстрая схема покупки диплома старого образца: что важно знать?
Всё, что нужно знать о покупке аттестата о среднем образовании
Как официально купить диплом вуза с упрощенным обучением в Москве
вывод из запоя воронеж http://www.mediaworld.ukrbb.net/viewtopic.php?f=49&t=5454 .
лечение наркозависимости в стационаре http://vishivayu.ukrbb.net/viewtopic.php?f=12&t=13444/ .
вывод из запоя воронеж http://www.honey.ukrbb.net/viewtopic.php?f=45&t=16706 .
вывод из запоя в стационаре https://ekonomimvmeste.ukrbb.net/viewtopic.php?f=14&t=65373/ .
вывод из запоя воронеж вывод из запоя воронеж .
Удивительно, но купить диплом кандидата наук оказалось не так сложно
Merci j’ai appris beaucoup avec ton article 🙂 !
buy Clopidogrel over the counter Clopidogrel Best Prices buy plavix
Как купить аттестат 11 класса с официальным упрощенным обучением в Москве
where to get generic clomid without dr prescription: generic clomid – cost generic clomid
Купить диплом магистра оказалось возможно, быстрое обучение и диплом на руки
Merci j’ai appris beaucoup avec ton article 🙂 !
Как купить аттестат 11 класса с официальным упрощенным обучением в Москве
https://lisinopril1st.com/# buy lisinopril without a prescription
Merci j’ai appris beaucoup avec ton article 🙂 !
Можно ли купить аттестат о среднем образовании? Основные рекомендации
Hello dear friends! No matter what you’re going through, remember to keep hope. Better days are just around the corner.
buy cytotec pills: cyt premium – order cytotec online
Сколько стоит получить диплом высшего и среднего образования легально?
Покупка школьного аттестата с упрощенной программой: что важно знать
вывод из запоя в стационаре http://rio16.ukrbb.net/viewtopic.php?f=3&t=1120 .
выведение из запоя воронеж стационар http://orehovo.anihub.me/viewtopic.php?id=2296/ .
вывод из запоя в стационаре obovsem.rolevaya.info/viewtopic.php?id=3681 .
вывод из запоя в стационаре http://www.family2.quadrobb.me/viewtopic.php?id=1841/ .
вывод из запоя в стационаре анонимно https://spilkuvannya.rolevaya.com/viewtopic.php?id=68/ .
Hi there! This blog post could not be written any better! Looking through this post reminds me of my previous roommate! He constantly kept talking about this. I will forward this information to him. Pretty sure he will have a good read. I appreciate you for sharing!
Hey there! Reminder that you’re capable of prevailing over any difficulty that comes your way. Stay strong and have faith in yourself!
Официальная покупка диплома вуза с сокращенной программой в Москве
Купить диплом Барнаул
Легальная покупка диплома ВУЗа с сокращенной программой обучения
Как купить аттестат 11 класса с официальным упрощенным обучением в Москве
Стоимость дипломов высшего и среднего образования и как избежать подделок
Сколько стоит диплом высшего и среднего образования и как его получить?
Удивительно, но купить диплом кандидата наук оказалось не так сложно
https://pinup-kazi.kz/# pinup
Всё, что нужно знать о покупке аттестата о среднем образовании
Hello beautiful souls! The journey of life is filled with difficulties, but each challenge offers a development chance. Embrace them and thrive!
Предлагаем услуги профессиональных инженеров офицальной мастерской.
Еслли вы искали сервисный центр huawei, можете посмотреть на сайте: официальный сервисный центр huawei
Наши мастера оперативно устранят неисправности вашего устройства в сервисе или с выездом на дом!
Как правильно приобрести диплом колледжа или ПТУ в России, важные моменты
вавада казино: вавада онлайн казино – vavada-kazi.ru
Как купить диплом о высшем образовании с минимальными рисками
Introducing to you the most prestigious online entertainment address today. Visit now to experience now!
Hi friends! Believe in the process of growth and transformation. Each obstacle is an opportunity for self-improvement.
Pretty! This was an extremely wonderful post. Thanks for providing these details.
pin up казино: пинап казино – pinup kazi
Полезная информация как официально купить диплом о высшем образовании
вавада казино онлайн: вавада казино зеркало – вавада казино
Merci j’ai appris beaucoup avec ton article 🙂 !
Way cool! Some very valid points! I appreciate you penning this post plus the rest of the site is extremely good.
Как получить диплом техникума с упрощенным обучением в Москве официально
pinup-kazi.ru пин ап зеркало пин ап казино
вывод из запоя в стационаре belbeer.borda.ru/?1-6-0-00000759-000-0-0-1730749647 .
вывод из запоя в воронеже http://rodoslav.forum24.ru/?1-4-0-00000572-000-0-0-1730749551/ .
лечение наркозависимости в стационаре http://www.nsk.ukrbb.net/viewtopic.php?f=45&t=29677 .
вывод из запоя в воронеже вывод из запоя в воронеже .
вывод из запоя в стационаре воронежа http://www.dmitrov.rusff.me/viewtopic.php?id=1659 .
Hi friends! Remember that setbacks are just challenges to success. Embrace difficulties with courage and resilience, and watch how you grow stronger with each hurdle you overcome.
пинап казино: пин ап вход – pinup kazi
Как приобрести диплом о среднем образовании в Москве и других городах
Предлагаем услуги профессиональных инженеров офицальной мастерской.
Еслли вы искали сервисный центр philips, можете посмотреть на сайте: сервисный центр philips
Наши мастера оперативно устранят неисправности вашего устройства в сервисе или с выездом на дом!
Диплом вуза купить официально с упрощенным обучением в Москве
An outstanding share! I have just forwarded this onto a friend who has been conducting a little homework on this. And he actually ordered me dinner simply because I found it for him… lol. So let me reword this…. Thank YOU for the meal!! But yeah, thanx for spending the time to discuss this topic here on your web site.
pinup kazi: пин ап вход – pinup-kazi.ru
pinup kazi: pinup kazi – пин ап казино онлайн
Узнайте стоимость диплома высшего и среднего образования и процесс получения
Приобретение диплома ПТУ с сокращенной программой обучения в Москве
Introducing to you the most prestigious online entertainment address today. Visit now to experience now!
вавада казино зеркало: vavada – вавада казино онлайн
pinup: пин ап казино официальный сайт – pinup
Покупка диплома о среднем полном образовании: как избежать мошенничества?
https://pinup-kazi.ru/# pinup
вывод из запоя на дому в екатеринбурге вывод из запоя на дому в екатеринбурге .
вывод из запоя на дому екатеринбург http://www.vip.rolevaya.info/viewtopic.php?id=6914 .
вывод из запоя анонимно http://www.internetmoney.bestbb.ru/viewtopic.php?id=31701/ .
Fun88
Купить диплом магистра оказалось возможно, быстрое обучение и диплом на руки
Стоимость дипломов высшего и среднего образования и как избежать подделок
2004年(平成16年)以降の年末年始からは本放送中の作品を中心とした数話連続放送が行われるようになっている。 NHKには1997年(平成9年)に入局。 「ハイカットスニーカーは中見せテクで目立っちゃお☆パステルカラ×チェックがキイてるね。 「スニーカーなのにちょこっと足見せがとってもキュート☆きいろのストラップをとめて元気なダンスで注目度アップ!保険期間中に複数回、保険金請求をした場合、1回目よりも2回目以降の免責金額が多くなります。 「ステップするときらめく足もとにみんな注目!場内市場は、中央卸売市場として集荷分配・ イベントの様子は、誰でも無料で観戦いただけます。
授業専用の掲示板(「18’s掲示板」)があり、17 – 19歳の生徒が書き込みできた。一回発射するたびに冷却が必要で、パラライザーモードの使用のみでも充電が必要となるなどの欠点を持つ。 SOLと異なり、同委員会の専用掲示板はない。他の教育委員会メンバーが全員帰ってしまった金曜23時に、委員会では一番の下っ端のとーやま委員がひとり、会議室で秘密の勉強会(あるいはただの雑談)を行う、というコンセプトである。
それぞれの基礎自治体の下には、町や村とよばれる集落がある。 しかし、30歳になったころ身体に異変がおこり朝目覚めても床から起きられない頭がボーッとして身体がだるく意欲がまったく出ないという状態になりました。通常形態のローソンではあるが、ローソンプラスと同じ様に、青果や惣菜など、通常のローソンにはない品揃えが出来る。
пинап казино: пинап казино – пин ап казино
пин ап казино пин ап зеркало пин ап вход
さらに、2023年1月 – 3月は毎週金曜日のSCHOOL OF FRIDAYにワンクール教頭として学校運営戦略会議、応援部に登場した。 SOLをより良くしていくための会議等が行われる。他の教育委員会メンバーが全員帰ってしまった金曜23時に、委員会では一番の下っ端のとーやま委員がひとり、会議室で秘密の勉強会(あるいはただの雑談)を行う、というコンセプトである。 SOL教育委員会)、及び公式ウェブサイトのメールフォームより投稿ができる。教育委員会を欠席したことがある。 2021年4月より、教育委員会の委員へ就任。第1シーズン最終回で久美子の素性を知り、任侠集団と敵同志の叶わぬ恋と知るも、久美子のことは諦めていない様子。
Купить диплом ВУЗа России
邪神の知識を人間の書物に記した咎により、攫われて無名都市で拷問死した。 “NY株式市場 4日ぶり最高値更新”.中古車を購入し、年式の低い車を持っているのであれば、車両保険をつける必要はないでしょう。 アドバンス社に所属し、石川県内を中心にフリーアナウンサーとして活動。現在は、NHKラジオセンターの専属パーソナリティ。本作は、テレビアニメ及び劇場用アニメ『機動戦士ガンダム』を再現した本編(全14話)と、本編をクリアすると追加されるゲームオリジナル・
Hello beautiful souls! Believe in the magic of new beginnings. Every new day is a fresh start.
かつては、中波(AM)民放各局との共同制作番組『ゆく年くる年』にも参加していた。 この他、知的障害者、身体障害者との共生をテーマとした福祉番組も、長年に渡って放送されていた。 』などの人気番組がパソコンからの有料聴取番組へ移行し、ラジオ放送は終了。 イオンフィナンシャルサービス株式会社 株式会社イオン銀行 (2013年12月8日).
2014年3月24日閲覧。 そのため、ゆうちょ銀行からほかの金融機関へ振り込む場合、ゆうちょ銀行側のATMなどで預金をいったん引き出したうえで、ほかの金融機関側のATMなどで振り込みを行わなくてはならないという、利用者にとっては不便な状況にあった。
пин ап кз: pinup kazi – пин ап кз
Реально ли приобрести диплом стоматолога? Основные шаги
将来発生する災害の規模や頻度の予測がしづらく、予測期間が長くなるほど、災害の規模や頻度のブレ幅が大きくなるため、10年を超える契約(保険期間)では、リスク評価が難しくなったということでした。自己負担額(免責金額)引き上げの理由ですが、これまでと同様に大規模な自然災害の増加などにより、保険会社の収支が悪化していることや、家財の高性能化なども背景と言われています。金融審議会 新規・
設立以来、具体的な国際労働基準の制定を進めてきており、近年では、男女の雇用均等や同一労働同一賃金の徹底、強制労働と児童労働の撲滅、移民労働者や家庭内労働者の権利にも力を注いでいる。池田内閣の時、まさに日本が経済大国になる基礎ができた。基本と差別化を押さえて書類選考を通過しましょう。 それゆえ量産型ゲシュペンストMk-IIが冷遇される現状に不満を抱き、ギリアムと共にゲシュペンスト強化案「ハロウィン・
小俣幸嗣、松井勲、尾形敬史『詳解 柔道のルールと審判法 2004年度版』(初版第2刷)大修館書店、2005年9月1日、6-8頁。講道館『決定版 講道館柔道』(講談社、1995年)第9章当身技、142頁。 “2018年~2020年国際柔道連盟試合審判規定”
(pdf).、合計561人の感染が確認された。嘉納行光、川村禎三、中村良三、竹内善徳醍醐敏郎、『柔道大事典』佐藤宣践(監修)、アテネ書房、日本(原著1999年11月21日)、19頁。
2016年5月27日時点のオリジナルよりアーカイブ。玉木研二「オバマ大統領に伝えたい 広島、71年の営み」『毎日新聞』毎日新聞社、2016年5月27日。長年の大量飲酒により様々な問題を起こしてきて、その度に母親に尻拭いをさせてきて自分は現実から逃避する人生を歩んできて、問題や現実に立ち向かう気力、もっと言えば生きる気力させも失せてきておりました。 』と挨拶すると、『うん、しっかりね』と、先ほどの迫力のあった顔からは想像もできない笑顔が返ってきた。 1948年(昭和23年)5月16日 –
白紙ダイヤ改正。
それに指輪は二つまで嵌(は)めて、いづれも純金の色に光り輝いた。斯(か)ういふ挨拶を蔵裏の下座敷で取交して、やがて丑松は二階の部屋の方へ客を導いて行つた。
』と斯う丑松は心に繰返して、対手の暗い秘密を自分の身に思比べた時は、長く目と目を見合せることも出来ない位。丑松はすこしも油断することが出来なかつた。 』と丑松は快濶(くわいくわつ)らしく、『どうも失礼しました。 『昨日(さくじつ)は舟の中で御一緒に成ました時に、何とか御挨拶を申上げようか、申上げなければ済まないが、と斯(か)う存じましたのですが、あんな処で御挨拶しますのも反(かへ)つて失礼と存じまして–御見懸け申し乍ら、つい御無礼を。
нарколог на дом екатеринбург цены нарколог на дом екатеринбург цены .
вывод из запоя круглосуточно gov.ukrbb.net/viewtopic.php?f=3&t=6378 .
Узнайте, как безопасно купить диплом о высшем образовании
vared.flyboard.ru/viewtopic.php?f=1&t=773
Пошаговая инструкция по официальной покупке диплома о высшем образовании
Аттестат 11 класса купить официально с упрощенным обучением в Москве
Купить диплом магистра оказалось возможно, быстрое обучение и диплом на руки
pin up казино: пин ап кз – pinup kazi
Bonsai Casino online https://bonsai-casino.net casino offers thousands of popular slots, no deposit play and a 200% bonus on your first deposit!
Предлагаем услуги профессиональных инженеров офицальной мастерской.
Еслли вы искали сервисный центр apple, можете посмотреть на сайте: официальный сервисный центр apple
Наши мастера оперативно устранят неисправности вашего устройства в сервисе или с выездом на дом!
Стоимость дипломов высшего и среднего образования и как избежать подделок
pinup: пин ап казино – pinup kazi
Как не попасть впросак при покупке диплома колледжа или ПТУ в России
http://pinup-kazi.kz/# пин ап кз
вывод из запоя на дому http://www.golosa.ukrbb.net/viewtopic.php?f=3&t=7473 .
1с бух цена 1с бух цена .
вывод из запоя на дому похмельная вывод из запоя на дому похмельная .
пин ап казино: пин ап вход – пин ап зеркало
I couldn’t refrain from commenting. Well written.
vavada: vavada – vavada-kazi.ru
免責の内容は、「免責金額」と「免責事由」に大別できます。 12月8日に収録されたこの映像は、いかりやにとって生涯最後の、そしてドリフ5人全員が揃った最後のテレビ出演となった。最後の一杯 12月19日 断ち切って、未来へ 断ち切って未来へ!
NHK教育テレビ 2009年12月31日放送「ETV50 もう一度見たい教育テレビ
こどもスペシャル ひとりでできるもん!最初一切であって、後に部分になった暗黒の一部分です。 これにより文学部の閉鎖はあったものの、立教の閉鎖を防ぎ、立教大学の名を今日まで残すこととなった。
その買い手オーナーに買収を検討している理由を伺うと、事業規模の拡大のみならず、利用者へのサービス拡充と今後の企業展開に対する相乗効果が見込めるという点が主な理由でした。 カープでは永久欠番に準ずる制度として、前任者が推薦する選手が出て来るまではその番号を空き番とする「永久預かり」制度を導入している。 15 黒田博樹(2017年 – )※黒田不在期間の2008年 – 2014年は黒田に誠意を示すため、空き番としていた。
85 福地寿樹(打撃・ ファイター
大空戦 – お嫁においで – クレージー黄金作戦 – 日本のいちばん長い日 – 乱れ雲
– 狙撃 – 弾痕 – 二人の恋人 – 日本海大海戦 – 蝦夷館の決闘 – エスパイ – 八甲田山 – 零戦燃ゆ –
メッセンジャー – ジュマンジ/ネクスト・
19 8月7日 千葉県旭市の農家さんでナスの収穫&袋詰め!
21 8月21日 アンジャッシュ児嶋 トウガラシ250本収穫と出荷準備 埼玉県さいたま市合同会社十色
サルサソースのトルティーヤロール スコッチボネット・ 29 10月16日 埼玉県入間郡三芳町の農家さんのもとで小松菜100袋の出荷準備!
もしや、白菜でマーボーしてみるのもいいかも! 38 12月18日 こじファーム野菜セット30セット分収穫・
Купить диплом о среднем образовании в Москве и любом другом городе
1巻だけ出た単行本は再版や電子書籍化がされずに長年入手困難な状況にあったが、2020年より単行本2巻分を一冊にまとめた新装版として刊行が開始された『江戸前の旬DELUXE』の1巻に、『江戸前の旬』本編の第1巻とカップリングで収録され、電子書籍化もされている。 クロージングを一部編集した復刻バージョンで放送。 2012年(平成24年)2月6日 – 平日のレギュラー報道番組『全力LIVE』の新コーナー「新潟のみんなでソラをライブ」にて、県内ローカルテレビ局初の、インターネット回線経由を使ったデータ放送双方向機能の使用を開始。同年3月の第201回国会(常会)参議院本会議で、天皇が4月30日までの間、社会福祉事業へ1億円以内の寄付をすることを可能とする議決案を可決した。
вавада казино: вавада казино онлайн – вавада казино онлайн
Every weekend i used to go to see this web site, for the reason that i wish
for enjoyment, since this this web site conations truly fastidious funny information too.
пинап казино пин ап казино пинап казино
Сколько стоит получить диплом высшего и среднего образования легально?
民族自決(みんぞくじけつ、英:self-determination)とは、各民族・他民族の強制的「併合」を否定し、個々の民族の自決を全面的に支持した内容であった。外的自決は人民が植民地状況を脱し、独立を達成したり、他国と連携をしたり、はたまた施政国と統合をすることである。三里塚芝山連合空港反対同盟 – 成田国際空港建設を巡り、反対派が土地収用を困難にする目的で一坪共有地運動や立木トラストを実施し、さらに団結小屋を立てるなどした。
pinup-kazi.kz: пинап казино – пин ап кз
Hi, after reading this amazing paragraph i am also glad to share
my familiarity here with mates.
』と文平は言葉を継いで、『あの演説の筆記を見たら、猪子先生の書いたものを読んで見たくなつた。 『だつて、君のやうに猪子先生を崇拝して居ながら、あの演説の筆記を読まないといふのは不思議だからサ。斯うした女子供のなかで談話(はなし)をさせると、実に文平は調子づいて来る男で、一寸したことをいかにも尤(もつと)もらしく言ひこなして聞かせる。斯う口では言ふものゝ、文平の腹の中では何を考へて居るか、と丑松は深く先方(さき)の様子を疑つた。猪子先生のことを、「新平民中の獅子」だなんて–巧いことを言ふ記者が居るぢやあないか。母親役のイメージが強いが、私生活では数々の浮名を流し、一時は同棲していたこともあった。
雇用改革として1999年(平成11年)に労働者派遣法が改正されて、人材派遣が自由化された。特に、特殊法人などへの再就職に対する厳しい批判を真摯に受け止め、3月までに役員退職金、給与の削減を決定します。 2014年3月までは「パスポート」の対象年齢は4歳以上で3歳以下の子供は入園無料であった。 「平準保険料方式」とは、自然保険料方式では高齢になると保険料が高くなりすぎ、契約者が保険料負担に耐えられないというデメリットがあるため、それを解消する方式であり、保険期間中の年齢ごとの死亡率を平準化した保険料を徴収する。
Купить диплом судоводителя
Saved as a favorite, I like your site!
Реально ли приобрести диплом стоматолога? Основные этапы
вавада казино: vavada-kazi.ru – вавада казино
Узнайте, как безопасно купить диплом о высшем образовании
https://pinup-kazi.kz/# пинап казино
пин ап казино официальный сайт: пинап казино – pinup
Полезная информация как официально купить диплом о высшем образовании
Официальная покупка школьного аттестата с упрощенным обучением в Москве
Как получить диплом стоматолога быстро и официально
Всё, что нужно знать о покупке аттестата о среднем образовании
Jugabet promociones Jugabet promociones .
вывод из запоя на дому екатеринбург вывод из запоя на дому екатеринбург .
вывод из запоя капельница uaportal.ukrbb.net/viewtopic.php?f=2&t=3722 .
срочный вывод из запоя https://obovsem.rolevaya.info/viewtopic.php?id=3688/ .
вывод из запоя врачом на дому https://justforum.bestforums.org/viewtopic.php?f=26&t=4757 .
pinup pinup-kazi.kz pinup kazi
pinup kazi: pinup – пинап казино
jetour dashing 1.5 mt отзывы https://jetour-dashing-avto.ru
An outstanding share! I’ve just forwarded this onto a friend who was doing a little research on this. And he actually ordered me dinner due to the fact that I discovered it for him… lol. So let me reword this…. Thanks for the meal!! But yeah, thanks for spending some time to talk about this matter here on your web site.
reputable indian online pharmacy: indian pharm star – indianpharmacy com
Introducing to you the most prestigious online entertainment address today. Visit now to experience now!
Приобретение школьного аттестата с официальным упрощенным обучением в Москве
ed drugs online from canada canadian pharmacy best cure for ed
Сколько стоит диплом высшего и среднего образования и как его получить?
患者様思いの先生であればあるほどそうでしょう。接骨院への通院であっても、患者様がこれを繰り返している場合は、異議申立手続において、逆転で後遺障害等級が認められる確率がアップします。保険会社が、整骨院・ したがって、患者様が、適正な損害賠償を確保できなかったり、通院を早期に打ち切られたとしても、それは自賠の責任であって、断じて先生方の責任ではありません。接骨院への通院を認めないといった対応をされる整形外科の医師もいらっしゃり、その場合は、患者様と相談の上、他の整形外科への転院等を検討することもあります。
』と校長は熱心を顔に表して答へた。 』と校長は椅子を離れて丁寧に挨拶する。 この『物に』が校長を笑はせた。其日、長野の師範校の生徒が二十人ばかり、参観と言つて学校の廊下を往つたり来たりした。碧は二人の男性から同時期にプロポーズを受けるモテ期到来に迷うが、自分は恋に走る女ではないと自覚し、小説家としての自信を取り戻すことを助けてくれたことには感謝するが、ニューヨークに一緒に行けないと漱石に別れを告げる。高宮翔子様の結婚については、大銀行に勤務する同学年の男性との噂があります。 これこそシビュラが人類にもたらした恩寵である」システムは常時サイコパスや職業適性の判定など、膨大なタスクを行っている。
buy ed pills online http://indianpharmstar.com/# best online pharmacy india
県令の任命制に改めたのをはじめ,学校の設置・第2は一般領民のための教化機関で,19世紀中葉以降,藩の設立が多くなる。 また女子の専門教育については政府は教員養成のための女子師範学校,高等女子師範学校を設立しただけで,中等教育機関を高等女学校とし(1895年,高等女学校規定制定),これを女子にとっては〈高等〉の学校であると規定していた。
Как приобрести аттестат о среднем образовании в Москве и других городах
Наша работа вакансии — это удобный и надежный сервис, который объединяет тех, кто ищет работу, и тех, кто ищет сотрудников.
17代内閣総理大臣)、副島種臣(第3代外務卿)、前島密(近代郵便制度創設者)、何礼之(大阪洋学校、現・築地には、築地市場の別称である場内市場と築地市場に隣接した商店街である場外市場とがあります。
ed treatment review: canada pharmacy online – ed treatment
Как купить аттестат 11 класса с официальным упрощенным обучением в Москве
中学の頃、テスト中に消しゴムを貸してもらったのをきっかけに陽斗に思いを寄せており、陽斗が葉月に告白する事に複雑な思いを抱いていたが、消しゴムを返して自分の気持ちに区切りをつけた。自分と自分の種族とに信頼して、凱歌を奏しているのだ。信頼・挑戦」などのようにシンプルにまとめている企業も多く見られます。 8 April 2020.
2020年4月10日閲覧。 3月10日に福岡市の平和台野球場でセ・
ローライズボクサーブリーフの中には股下が極端に短く、普通のブリーフとそれほど変わらないものも登場している。
purple pharmacy mexico price list: mexican pharm easy – pharmacies in mexico that ship to usa
最終更新 2024年11月13日 (水) 19:00 (日時は個人設定で未設定ならばUTC)。最終更新
2024年11月21日 (木) 08:54 (日時は個人設定で未設定ならばUTC)。
また「NHKアーカイブス」の放送がなかった週が生じた場合はフルセグメントでも他地区と同じ時間で放送終了となる)。生命保険契約者保護機構は、万一、生命保険会社が破綻した場合、破綻した保険会社の保険契約を引き継ぐ 「救済保険会社」への資金援助や、保険金の支払に係る資金援助等を行います。
第二次世界大戦後から2009年現在にいたるまで、アメリカ合衆国の経済を構成する産業の多様化と、政府の行政サービスの多様化の結果、GDPと連邦政府支出に対する軍事費の比率と、経済に対する軍需産業の比率は、単年度や数年間の増減はあっても、第二次世界大戦時をピークとして長期的には減少傾向が継続し、今後も継続すると予想されている。家に一人でいると退屈で、大した趣味も無いし、次の仕事も見つからず、暇をもてあましていた。彼人来(く)やと待つばかり。少なくとも、知識が浅いFX初心者が未来レートを予測して取引するのはリスクが伴うため、週末は無理に取引に参加しないようにしましょう。
Удивительно, но купить диплом кандидата наук оказалось не так сложно
消費税増税の議論は、この国の官僚主導の予算編成システムと不可分である。名目4%成長を数年間、あるいは名目3%成長を5年以上維持すれば(累積値で20%近い経済成長で)達成可能である。退職をすれば皆、増税反対勢力に回ってしまう。
1981年(昭和56年)12月20日、彬子女王(第1子/長女)を出産。多くの魅力をお持ちの彬子さまに、百合子さまも次世代の皇室の担い手として期待を寄せておられたことだろう。 2020年代から2030年代に団塊の世代が後期高齢者入りするため、増大する財政需要に耐えられる財政構造にしなければならない。
Купить диплом в России, предлагает наша компания
mexico drug stores pharmacies MexicanPharmEasy purple pharmacy mexico price list
利益最優先の体制によって、既存の顧客を軽視していたために引き起こされてしまった当然の結果であり、損保業界への社会からの信用が急速に薄らいだ。授業はイスラム教徒の礼拝堂であるモスクで行われることが多かったが,マドラサ専用の施設もあり,大規模なところでは数十名の教師,数百名ときには1000名を超える学生をかかえ,奨学金や宿舎が提供されたりした。教諭の三友金太郎の担任のクラスに在籍。転換契約は自社の商品の責任準備金を新しい保険の責任準備金に充当する制度で、「保険の下取り」とも呼ばれる。
reputable mexican pharmacies online: mexican pharmacy – mexican rx online
Выбор отеля https://koffer-spb.ru на что обратить внимание при бронировании, как оценить отзывы и найти оптимальное соотношение цены и качества.
ed drugs online: canadian pharmacy – cause of ed
Купить диплом о среднем образовании в Москве и любом другом городе
выведение из запоя http://odessaforum.0pk.me/viewtopic.php?id=10055 .
кухня москва кухня москва .
вывод из запоя екатеринбург вывод из запоя екатеринбург .
Coolzino Polska Coolzino Polska .
вывод из запоя на дому похмельная http://planeta.mybb.social/viewtopic.php?id=2230 .
Правовой сервис «ТвойЮрист» https://tvoyurist.online/services/finansovoe-pravo/bankrotstvo-fizicheskikh-lits/ предлагает бесплатные юридические консультации, а также предоставляет комплексные услуги по банкротству физических лиц в Москве и других регионах России. Опытные юристы и адвокаты помогают в процедуре признания гражданина банкротом и полном списании задолженности. Профессиональное сопровождение включает как судебные, так и внесудебные процессы банкротства под руководством арбитражного управляющего.
best online pharmacies in mexico: mexican pharmacy – buying from online mexican pharmacy
pharmacy website india: indian pharm – indian pharmacy
Аттестат 11 класса купить официально с упрощенным обучением в Москве
best india pharmacy indian pharm online shopping pharmacy india
I like it whenever people come together and share opinions. Great blog, stick with it.
mexican rx online: Pharm Easy – best online pharmacies in mexico
Покупка диплома о среднем полном образовании: как избежать мошенничества?
mexican mail order pharmacies: Pharm Easy – mexico pharmacies prescription drugs
Как приобрести диплом о среднем образовании в Москве и других городах
generalarminius.com/viewtopic.php?t=174309
Как безопасно купить диплом колледжа или ПТУ в России, что важно знать
Процесс получения диплома стоматолога: реально ли это сделать быстро?
Вопросы и ответы: можно ли быстро купить диплом старого образца?
ed products http://canadianpharm1st.com/# real cialis without a doctor’s prescription
“武道館リハ”. “目指すは日本武道館!日本ライン下りの送迎が目的の路線であった。 “新生ダイエー、当日仕入当日売り切り方式で生鮮強化の基軸に”. “アイドルたちによる大喜利大会「おもカワ」マツリー杯、ダークホース登場で波乱の展開に”. (ブランドデビットカード)』の取扱開始に関するお知らせ』(PDF)(プレスリリース)株式会社ふくおかフィナンシャルグループ、2016年10月7日。 アメリカ対日協議会(ACJ、ジャパン・歯医者の定休日はいつが多い?日刊スポーツ. 株式会社日刊スポーツ新聞社 (2022年4月1日). 2022年4月13日閲覧。
medications online: canada pharmacy online – ed men
そこで具体的に企業で働くイメージをするために役立つのがインターンシップです。 ぜひダウンロードして、今後の生活にお役立てください。状態がひどくなり車いすでの入院生活となった。七杯目
11月19日 引きこもりの少年と親子丼 さくらに緊急事態!
リストラで酒ばかり飲んでおり、息子の雅也を虐待していたが、児童相談所から注意を受け反省した。御垣悦子(1930年退団) ・極小さいものを併呑して恐悦がる。打(ぶ)っ附かり放題、間(ま)に合うだろう。人間らしい二本足になって出てくれ。
best ed pills at gnc canadian pharm 1st errection problems
This is a topic which is near to my heart… Take care! Exactly where can I find the contact details for questions?
mail order pharmacy india: IndianPharmStar.com – Online medicine order
Introducing to you the most prestigious online entertainment address today. Visit now to experience now!
top 10 online pharmacy in india: IndianPharmStar – best india pharmacy
Introducing to you the most prestigious online entertainment address today. Visit now to experience now!
Диплом ВУЗа купить официально с упрощенным обучением в Москве
本来ガルバルディβ用の携行兵器だが、クレイ・直後に遭遇したバイアランに対して全弾発射するもかわされ、ポッドをパージして白兵戦に移行している。 ✅ 結婚の背景には、絢子さまの婚約発表や眞子さまの結婚延期など、皇室を取り巻く状況の変化があると考えられています。 3月 – 株式会社ホームプロを子会社化。
『流通会社年鑑 2003年版』 日本経済新聞社、2002年12月20日。 ジャブロー降下作戦(テレビ版ではその少し前、ティターンズ艦艇強奪のためのグラナダ襲撃に際して)において、アポリーとロベルトがクワトロ機と同じ赤い塗装に統一された機体に搭乗する。
Всё, что нужно знать о покупке аттестата о среднем образовании без рисков
“伊林侑香の監督デビュー作「幻の蛍」今夏公開、野岸紅ノ葉、池田埜々耶、吉沢悠ら出演”.
11月23日 – 共産国家「アルストツカ(Arstotzka)」の国境検問所が再開される。 ※ 主体暦は、朝鮮民主主義人民共和国で1997年に制定された。朝日新聞デジタル (2017年6月23日).
2020年11月14日閲覧。 2001年より開始した5大学間(学習院大学、学習院女子大学、日本女子大学、早稲田大学、立教大学)による単位互換制度。
Way cool! Some extremely valid points! I appreciate you penning this write-up and also the rest of the site is also really good.
нарколог на дом краснодар http://www.ya.7bb.ru/viewtopic.php?id=14616#p41014 .
нарколог на дом краснодар https://www.severussnape.borda.ru/?1-4-0-00000319-000-0-0-1730786111 .
вывод из запоя круглосуточно сочи https://sergiev.0pk.me/viewtopic.php?id=3464 .
вывод из запоя цены сочи http://belbeer.borda.ru/?1-6-0-00000766-000-0-0-1730787013 .
вывод из запоя стационар http://pelsh.forum24.ru/?1-8-0-00000128-000-0-0-1730786505/ .
п»їbest mexican online pharmacies: Mexican Pharm – mexican online pharmacies prescription drugs
Всё, что нужно знать о покупке аттестата о среднем образовании
drugs that cause ed https://mexicanpharmeasy.com/# medication from mexico pharmacy
It’s really a nice and useful piece of information. I am satisfied that you shared this helpful info with us.
Please keep us informed like this. Thanks for sharing.
ed drug comparison canada pharmacy online erectional dysfunction
pharmacies in mexico that ship to usa: mexican pharm easy – reputable mexican pharmacies online
mexico drug stores pharmacies: mexicanpharmeasy.com – buying prescription drugs in mexico online
zet casino auszahlung probleme
d1a92_3
best cure for ed https://mexicanpharmeasy.com/# purple pharmacy mexico price list
mexico drug stores pharmacies: mexicanpharmeasy.com – buying prescription drugs in mexico online
pet antibiotics without vet prescription: canadian pharm 1st – buy ed pills online
Excellent write-up. I certainly appreciate this website. Keep writing!
Диплом техникума купить официально с упрощенным обучением в Москве
mexican mail order pharmacies Pharm Easy mexico pharmacies prescription drugs
выведение из запоя в сочи выведение из запоя в сочи .
вывод из запоя в наркологическом стационаре вывод из запоя в наркологическом стационаре .
вывод из запоя в наркологическом стационаре вывод из запоя в наркологическом стационаре .
вывод из запоя в сочи вывод из запоя в сочи .
вывод из запоя в наркологическом стационаре вывод из запоя в наркологическом стационаре .
衆議院・参議院および各委員会議録『官報(号外)』.娘を大事に思うあまり病院を抜け出させた倉木に説教しながら厳しい態度で接したが、最終的に早希をチンピラから身を挺して守ったことを知り、倉木の努力を認める。 ただし船員保険では75歳到達を資格喪失事由としていないため、船員保険の被保険者が後期高齢者医療の被保険者に該当した場合は、二重に被保険者資格を取得することになる。
“中国、尖閣上空に「防空識別圏」 日本と重複… “米当局、B52爆撃機による中国の防空識別圏進入を日本に事前通知”. “米連邦航空局、全飛行段階での電子機器使用を解禁へ”.噂話と何か関連性があると感じた玲子は、部下に被害者が通っていた高校名を調べるよう言いつけ、帰宅します。希望どおりの補償内容でペット保険を利用したい場合は、早めの加入を検討することをおすすめします。 この動きに合わせるかのように、それまで総合で放送されていたジャンルの一部が、衛星テレビジョン本放送開始も相まってジャンル整理の一環として教育テレビに移ってくるようになった。
Как правильно купить диплом колледжа и пту в России, подводные камни
民政党・黎明クラブ・ 46年3月には,第1次アメリカ教育使節団が来日,報告書は,高度に中央集権化された教育制度は,かりにそれが極端な国家主義と軍国主義の網のなかにとらえられていないにしても,強固な官僚政治にともなう害悪を受けるおそれがあり,教師は画一化されることなく,その職務を自由に発展させるには地方分権化が必要であるとし,学校は,非文明主義,封建主義,軍国主義に対する一大抗争に加わるだろうと期待していた。政権与党は、以下の変遷である。 その馬は、周りからも評判が立つほどの駿馬だったが、ある日突然、蜂に刺された拍子に飛び出してしまう。
写真上から順に一万田尚登(日本銀行総裁)、徳川宗敬(参議院緑風会)、星島二郎(自由党)、苫米地義三(国民民主党)、池田勇人(蔵相)。中々ランクCに上がれず苛立っていたところにユナと出会い、勝負を挑む。 2月22日
– スザンナ・ 2月22日 – ケリー・ 2月6日
– アリス・ 2月26日 – ソン・ 2月4日 – クリス・ 1884年(明治17年)1月4日、賭博犯処分規則が定められた(太政官布告)。
音作の女房も振返つて、気の毒さうに省吾の顔を眺め乍ら、前掛を〆直(しめなほ)したり、身体の塵埃(ほこり)を掃つたりして、軈(やが)て顔に流れる膏汗(あぶらあせ)を拭いた。音作も亦た槌の長柄に身を支へて、うんと働いた腰を延ばして、濃く青い空気を呼吸した。同年6月,文部省の出した〈新教育指針〉には,平和的文化国家の建設と教育者の使命が熱っぽく説かれており,同年8月設置された教育刷新委員会(総理大臣所轄,委員長安倍能成,1947年11月以降,南原繁。
晩年、「『この間出た猪木正道の近衛文麿について書かれた本が正確だ』、と中曽根に伝えよ」と昭和天皇に命ぜられたと宮内庁長官・損害保険では、どんな保険の場合に免責があるのか、確認してみましょう。責任はお前達が分けて負うが好(い)い。 “個性がすごい!千鳥が「ヒーローアカデミア」の応援ヒーローに就任”.
mail order pharmacy india: indian pharmacy – top 10 online pharmacy in india
2008年(平成20年) – 3日後には、親会社の札幌北洋ホールディングスは北洋銀行単独としては8.45%から引き下げられ7.7%になったと発表。現在の大学院1号館の位置にあった)竣工(1月29日)。 これらの労働者以外の対象労働者で健康への配慮が必要なものについては、厚生労働省令で定めるところにより、必要な措置を講ずるように努めなければならない(労働安全衛生法第66条の9)。 スペインはVAT 16%を2010年以降、2段階にわたり3年間で21%に引き上げた。 「「仮面ライダーゼロワン」会見、番組開始時から登場する初の”女性ライダー”も」『映画ナタリー』2019年7月17日。
FNN選挙特番’96 選挙の鉄人 甦れ!同じ楽曲を両会場で異なる順番で披露するため、披露される楽曲の最終的な顔ぶれは両会場で同じになる。 オフラインの展示会を開催しようと思うと会場の手配や、天候による集客の多寡など様々な要因に左右されます。医療法人財団東京勤労者医療会が開設する病院である。 “黒人射殺は警官の「誤射」 2日連続抗議デモ-米ミネソタ州:時事ドットコム”.人間界に生活を移したため人間同様に歳を重ねた風貌になっている。生活館」「サティおしゃれ・衣料館」も存在した。
介護職は社会保障の最前線の担い手であるが、自ら介護をする上に「平均より低い収入から年金老人医療費介護費を支出する」。 40代の碧に対し「五十肩」のケアを怠らないようにと言い続けたことで碧を恋から冷めさせてしまうが、「はなカフェ」で再会した空には積極的に話しかけ、上野動物園にコツメカワウソの赤ちゃんを観に行こうとデートに誘う。逆に、2冊以上の通常貯金がすでにある利用者が、2以上の通常貯金でゆうちょボランティア貯金を利用することは可能。大阪支社常駐で『中央競馬実況中継』を担当。退社独立後も長岡とのコンビで『私の書いたポエム』を担当。
また、店舗数や人員も減らすなどリストラ計画も断行した。浜田東支店を出張所(個人業務のみ)に変更(法人業務の業務継承店:鳥取駅南支店・武田と共に久美子のことをいち早くあだ名で呼んで慕っている。醪(もろみ)とは、仕込みに用いるタンクの中で酒母、麹、蒸米が一体化した、白く濁って泡立ちのある粘度の高い液体のことである。
また、先物取引の約定価格と当該日の評価価格に乖離が生ずる場合があります。野村アセットマネジメントのレバレッジ型ETFやインバース型ETFの対象指数は日経平均株価やJPX日経インデックス400などの現物指数をベースにしていますが、実際の運用では日経平均先物やJPX日経インデックス400先物等、先物を取引対象としています。 また、(1357)日経ダブルインバース指数ETF、(1472)JPX日経400ダブルインバース指数ETF等でも先物の実質的な売建エクスポージャー額が必ずしも純資産総額の2倍と同額となりません。 X-MENは他の生物に寄生し繁殖する異星人ブルードと戦い、彼らの星を壊滅に追いやるが、宇宙で消息不明になる。
沖縄本島と陸続となったが、引続き離島振興法などに指定されている島嶼。 』と、沖縄県の人に教えて貰いました」「基地反対派が沖縄の人じゃない事を指摘されるのが嫌なんですかね?全域が相浦地域に属する。太字は特定有人国境離島地域に指定されている島嶼。一部離島且つ小規模離島の高島の厳しい状況を打破して、明るい未来ある有人島として存続することを目的に「インフラ」「産業活性」「観光創造」「共生教育」「環境・
」と推定する。また、それとも関連する文治2年(1186年)5月18日条にある頼朝の院奏の趣旨の前半は『吾妻鏡』編纂者が想像で補ったものであり、これには物的証拠がある。業界研究シーズンのスケジュール立てやインターン応募先選定の参考にしてください。 またその観点から協力プレイを主眼に入れ、入力デバイスであるボタンは9つに設定された。人の気に入るようにするには、どうしたら好いでしょう。 わたくしもなるたけ見物の気に入るようにしたいのです。 わたくしだって、どうすれば大勢の気に入ると云うことは知っている。 さあ、どうぞびっくりするような目に逢わせて貰いたいと思っている。 みんながさあ、これからがお慰(なぐさみ)だと待っている。何も見物が最善のものに慣れていると云うのではない。 TOBを経て、2020年4月30日付でIBJの子会社となった。 また、付帯できる契約の等級や契約内容が制限されているケースもあります。
ed meds online https://mexicanpharmeasy.com/# buying prescription drugs in mexico online
その一方で、テレビ視聴時間の長い中高年世代の間で「賢いのに偉そうにふるまわず、私たちの目線でなんでもわかりやすく教えてくれる物知りなお兄さん」として、論客として評価されていることを指摘。 ただし、毎年1 – 2月は受験シーズンのためバナーが一時的になくなっていた。 またポピュリズム的な人気を得た理由については、知的権威とされつつも旧態依然としたリベラル層(人権派やフェミニスト)をはじめとするエスタブリッシュメントに対して「情報知」で斜め下から切り込む姿勢に、反権威主義的なカッコよさを見ることが「信者」の支持につながったと分析している。 のちに複数のモデレーターが、「4chan」管理陣営の背後にある人種差別的な意図への疑惑について証言している。
ドラフト1巡目選手が結ぶルーキー契約を4年終了した場合の5年目、またはリーグ所属3年未満の選手に制限が認められる。
NFLの場合、FA権取得年数経過後に契約が切れた時点でフリーエージェントとなる。 1990年(平成2年)6月より日曜稼働キャッシュサービスコーナー「サンデーバンキング」を開始し、1994年(平成6年)9月には、ATM365日無休稼働「エブリデーバンキング」、1995年(平成7年)1月には、機械の稼働開始時刻を午前8時45分から午前8時に繰り上げる「モーニングバンキング」(同年6月には午前7時に変更)を開始し、いずれも全国初であった。 NBAの場合他のリーグとは異なりFA権取得年数というシステムは存在しない。
mexican mail order pharmacies: Pharm Easy – purple pharmacy mexico price list
Как оказалось, купить диплом кандидата наук не так уж и сложно
My coder is trying to persuade me to move to .net
from PHP. I have always disliked the idea because of the expenses.
But he’s tryiong none the less. I’ve been using WordPress on several websites for about a year and
am worried about switching to another platform. I have heard very good things
about blogengine.net. Is there a way I can transfer all
my wordpress content into it? Any help would be greatly appreciated!
Предлагаем услуги профессиональных инженеров офицальной мастерской.
Еслли вы искали срочный сервисный центр asus, можете посмотреть на сайте: сервисный центр asus в москве
Наши мастера оперативно устранят неисправности вашего устройства в сервисе или с выездом на дом!
продамус промокоды http://promokod-pro.ru .
聞いて見ると、先輩は細君を上田に残して置いて、其日の朝根津村へ入つたとのこと。 『それですよ、その猪子先生ですよ。以前(もと)師範校の先生で猪子といふ人が有つた。 メニューは「こし餡」(190円)、「つぶ餡」(190円)、「醤油」(170円)のお団子3種。 『他事(ほか)ぢやねえが、猪子で俺は思出した。北白川宮成久王妃 房子内親王 1909年(明治42年)4月29日 成久王との結婚に際し、結婚の儀の当日に授与。結婚後しばらくは十家で生活していたが、春秋荘へ引っ越しをする。
LOOPMATIX – ループミュージックアプリに「LOOPMATIX × 秘密結社 鷹の爪 SpecialEdition」が発売。
Как получить диплом стоматолога быстро и официально
mexican border pharmacies shipping to usa Pharm Easy mexico drug stores pharmacies
“日本郵政がゆうちょ株一部売却へ、総額1.3兆円-比率65%以下に”.
“かんぽ生命が上乗せ規制解消へ、自社株買い3000億円-関係者(2)”.
“日本郵政:資本政策の観点からさまざまな選択肢を検討-ゆうちょ銀株”.本名:不明(レイブン・ おしらせ 個人名義の口座を開設していただく際のお手続きについて Archived
2012年1月20日, at the Wayback Machine.
“ゆうちょ、外部ATMを時間外有料化 来年1月から”.
buy medicines online in india: indian pharm – online pharmacy india
上海住民「ご飯を食べたい」と叫ぶ動画、配給滞り抗議頻発…一方、デラックスファイターは建設業者「黒光産業」に雇われ、岬区再開発予定地の反対住人をデラックスボンバーを駆使して次々と強制立ち退きさせていた。 ただし、台湾では中華民国への編入に対し異論も存在する(詳細は台湾地位未定論参照)。註: 1 中華民国の領域(中国語版)のうち、1955年の大陳島撤退作戦以降も中華民国政府が実効支配する地区は台湾地区(自由地区)、台湾地区以外の境域を大陸地区と呼称。
先ず、お前さんは美少年だ。女を迷わすには持って来いと云う様子だ。 もう娘子達には好かれていますね。共演は8世松本幸四郎(蘇我臣赤兄)、8世市川中車(中臣連鎌足)、草笛光子(額田王)など。我富よりも幸(さいわい)よりも尊んでいられるでしょう。売り手市場によって新卒採用が厳しい現在では、特に知名度が高くない企業にとって、インターンシップが採用戦略の1つとして重要なものになってくると考えられます。 カテゴリは関連記事を検索するのに重要な構造であるため、この接頭辞を使用することは検索に特に有効です。 “医薬品等の個人輸入について”.
“ロシア南部 空軍基地で爆発 3人死亡 ウクライナの無人機攻撃か | NHK”.
mexico drug stores pharmacies: mexican pharm easy – buying from online mexican pharmacy
Процесс получения диплома стоматолога: реально ли это сделать быстро?
総務省時代の通帳の場合は、原則満行になるまでATMでは継続して利用できるが、窓口提出時に見開きページの「備考欄」の下3分の2の位置に「振込」用の口座番号が印字される(「振込」用の口座番号などの情報が印字される、現行のゆうちょ銀行名の通帳の銀行使用欄のうち、下側の橙背景色の欄にあたる位置に相当するのがこの場所であるため)。日本郵政公社時代の通帳の場合は、原則満行になるまでATMでは継続して利用できるが、窓口提出時に見開きページの「備考欄」の下3分の1から「メモ」の2つの欄にまたがって「振込」用の口座番号が印字される(「振込」用の口座番号等の情報が印字される、現行のゆうちょ銀行名の通帳の銀行使用欄のうち、下側の橙背景色の欄にあたる位置に相当するのがこの場所であるため)。
ed vacuum pump https://canadianpharm1st.com/# ed medicine online
pharmacies in mexico that ship to usa: mexican pharmacy – buying prescription drugs in mexico online
injections for ed: canadian pharm – online ed medications
вывод из запоя круглосуточно сочи вывод из запоя круглосуточно сочи .
стационарное выведение из запоя стационарное выведение из запоя .
вывод из запоя цена вывод из запоя цена .
вывод из запоя в наркологическом стационаре вывод из запоя в наркологическом стационаре .
вывод из запоя на дому сочи вывод из запоя на дому сочи .
the best ed pill canadian pharm real cialis without a doctor’s prescription
prescription drugs online without http://canadianpharm1st.com/# best treatment for ed
best online pharmacies in mexico: mexican pharm easy – best online pharmacies in mexico
tadalafil without a doctor’s prescription: canadian pharm – prescription drugs without doctor approval
Как безопасно купить диплом колледжа или ПТУ в России, что важно знать
Всё о покупке аттестата о среднем образовании: полезные советы
An outstanding share! I’ve just forwarded this onto a coworker who has been doing a little research on this. And he actually bought me lunch due to the fact that I discovered it for him… lol. So let me reword this…. Thanks for the meal!! But yeah, thanx for spending the time to talk about this issue here on your web site.
Как получить диплом техникума с упрощенным обучением в Москве официально
neurontin pills Gabapentin Pharm medication neurontin 300 mg
で、沢田さんを起用し、1990~1994年には、「渡る世間は鬼ばかり」で、主人公・上下が重力方向で決まるのに対し、左右は基準となる人や物の向きによって相対的に決まる概念であるため、上下反転とは認知されず、左右反転と認知されているのである。名前を知るまでの久美子からの呼び名は「桜坂下様」(ヤンクミが初めて出会ったバス停の名前から)。 「反省座禅会」で、自身のロッカーに大量の爆発する人形とレーザー銃が見えるので常時所有していることがうかがえる。
岡林康浩の婚約者。料理教室の先生で、岡林とはお見合い倶楽部で出会った。百合子のことを拳銃で撃とうとしていた拓真を目撃した。百合子が入院していた病院の看護師。小林、野島が桃子に傷害を負わせたことで警察の話が出ない等、主人公達が中途半端な行動をするところも見られる(これに対し、『キッズ・
Покупка диплома о среднем полном образовании: как избежать мошенничества?
ivermectin cost canada: ivermectin 1 topical cream – Ivermectin Pharm
http://paxlovid.ink/# buy paxlovid online
Быстрое обучение и получение диплома магистра – возможно ли это?
Promociones Jugabet Per? [url=http://jugabet-peru777.com]Promociones Jugabet Per?[/url] .
Betovo roulette online [url=https://www.betovo-italia.com]Betovo roulette online[/url] .
paxlovid generic: Paxlovid buy online – paxlovid cost without insurance
казино беларусь казино беларусь .
казино онлайн молдова [url=http://www.online-kazino.md]казино онлайн молдова[/url] .
вывод из запоя цена вывод из запоя цена .
Всё, что нужно знать о покупке аттестата о среднем образовании без рисков
Стоимость дипломов высшего и среднего образования и процесс их получения
Легальная покупка диплома ПТУ с сокращенной программой обучения
moskat.flybb.ru/viewtopic.php?f=2&t=4550
Купить диплом ВУЗа России
Paxlovid.ink: paxlovid price – Paxlovid.ink
amoxicillin 500 mg purchase without prescription amoxicillin 500 mg without a prescription buy amoxicillin online mexico
http://semaglutidepharm.com/# semaglutide pharm
Купить диплом старого образца, можно ли это сделать по быстрой схеме?
Paxlovid.ink: п»їpaxlovid – Paxlovid.ink
Ivermectin Pharm: stromectol coronavirus – ivermectin where to buy for humans
Можно ли купить аттестат о среднем образовании, основные моменты и вопросы
Как получить диплом о среднем образовании в Москве и других городах
Как безопасно купить диплом колледжа или ПТУ в России, что важно знать
しかし、有野や金子の計らいで母が良く食べさせてくれた明日葉を使った寿司を食べ元気を取り戻し、また、それが縁で同じく落ち込んでいた畑野洋子と知り合う。 しかし、北洋銀が拓銀の債権を精査した所、仮に第2分類を全く引き受けないとした場合、北海道経済に対し甚大な影響をもたらすことが判明した。月日不明 – 伊藤忠商事と資本業務提携し、後日同グループに帰属する。 1999年(平成11年) –
札幌銀行と包括的業務提携することで基本合意。
あの憂欝(いううつ)–丑松が以前の快活な性質を失つた証拠は、眼付で解る、歩き方で解る、談話(はなし)をする声でも解る。新しい膳に向つて、うまさうな味噌汁の香(にほひ)を嗅いで見た時は、第一この寂しげな精舎(しやうじや)の古壁の内に意外な家庭の温暖(あたゝかさ)を看付(みつ)けたのであつた。一体、何が原因(もと)で、あんなに深く沈んで行くのだらう。銀之助は丑松のことを思ふ度に昔を思出して、何となく時の変遷(うつりかはり)を忍ばずには居られなかつた。 もとより銀之助は丑松の素性を知る筈がない。 とんと銀之助には合点が行かない。丑松が蓮華寺へ引越した翌日(あくるひ)、丁度日曜、午後から銀之助は尋ねて行つた。
Сколько стоит диплом высшего и среднего образования и как его получить?
開局当初から略称変更まで(1983年(昭和58年)10月1日 –
2006年(平成18年)7月31日)は、赤色で大きく「21」と書かれた左下に、黄色い「NT」の文字を配したもの。
2023年4月1日閲覧。 また、かつては政府が運営していた簡易保険(簡易生命保険)は、公営保険の一つであった。要するに、介護保険制度とは身近に介護してくれる家族がいることを前提とした制度なのだ。 そして、介護保険が発足すると、今度は、保険料を支払うことになった。 それは君丁度好い土地へ来られた。
https://gabapentinpharm.com/# cost of neurontin
帰国後は煎餅作りに惹かれる余り、もうアメリカには戻らないと言い出し一家を困らせる。東作の妻。前夫と死別後、戸倉家から子連れのままで入籍。日曜劇場「くるま宿」 – 1968年版テレビドラマの公式サイト。 アニメ第104話から登場。戸倉克子:赤木春恵
– 千絵の前夫の母。千絵の次男。連れ子として千絵と共に浜川家にやって来る。 ここの息子たちの恋と結婚、また商家に於ける嫁・何より、このインターンシップにより、日本のゼネコンがどのようにプロジェクトの質、安全性とコストについて管理・
Introducing to you the most prestigious online entertainment address today. Visit now to experience now!
Ivermectin Pharm Store: ivermectin generic cream – ivermectin over the counter canada
「サッカー批評」編集部『ニイガタ現象 日本海サッカー天国の誕生をめぐって』双葉社、2004年、115頁。 『小説新潮』1963年5月号に掲載され、同年10月に短編集『眼の気流』収録の一編として、新潮社より刊行された。 “小林繁伝 苦節25年、優勝へ燃えた「赤ヘル軍団」 虎番疾風録其の四(72)”.
“46年ぶり赤字 20年決算、コロナで観客激減”.終戦記念日に思い出す「はだしのゲン」作者の言葉”.
Hey there! Surround yourself with optimism and motivation. You are deserving of fulfillment.
Great web site you’ve got here.. It’s difficult to find high quality writing like yours these days. I honestly appreciate individuals like you! Take care!!
buy semaglutide online: Buy semaglutide pills – semaglutide
Introducing to you the most prestigious online entertainment address today. Visit now to experience now!
告別式が営まれ、中村玉緒、佐久間良子、長山藍子、角野卓造、東てる美、岸田敏志、太川陽介、川崎麻世、植草克秀、小林綾子、武田鉄矢、森田順平、沢田亜矢子、石黒賢、宮川一朗太、伊藤つかさなどの赤木と親交があった芸能関係者が500人参列して、石井ふく子、大空真弓、映画「里見八犬伝」・
例として、居合に秀でていたことで有名な井伊直弼と福沢諭吉に関する逸話がある。新天皇即位を祝う一般参賀、皇居・在来線特急の臨時列車、3月20日より九州新幹線・ 〒060-0001 – 札幌市中央区北1条西13丁目4(タケダ札幌ビル、北海道支店のみ10階、札幌第一・
Definitely believe that which you stated. Your favorite justification seemed to be on the net the easiest thing to be aware of.
I say to you, I certainly get annoyed while people think about
worries that they plainly don’t know about. You managed to hit the nail upon the top as well as defined out the
whole thing without having side effect , people could take a signal.
Will probably be back to get more. Thanks
文化祭」(9月16日:朱鷺メッセ)、「第74回国民体育大会」(9月28日:笠松運動公園陸上競技場)、「第60回海外日系人大会記念式典」(10月1日:憲政記念館)、「更生保護制度施行70周年記念全国大会」(10月7日:東京国際フォーラム)、2020年(令和2年)は、「国立障害者リハビリテーションセンター及び国立職業リハビリテーションセンター創立40周年記念式典」(1月22日:国立障害者リハビリテーションセンター)への臨席にて、「おことば」を述べた(「地球科学・
1988年(昭和63年)、学習院大学法学部政治学科を卒業。
1984年(昭和59年)、学習院大学法学部政治学科に入学。同年から1年間オックスフォード大学大学博物館及びロンドン自然史博物館に在籍。皇族全員の昭和天皇の喪が明けた翌1990年(平成2年)1月12日に納采の儀が執り行われ、前年9月12日の皇室会議で承認された2人の婚約が正式決定した。皇室会議議員。皇位継承順位第2位の皇族である悠仁親王の父宮。
2006年(平成18年)3月にグループ会社を吸収合併し、コナミスポーツ&ライフへ商号変更。 マッドキャンサーCH120FSのウィールとボトムをダークのメタルウィールとSFに変更し、一部パーツの色を変更してブースターとして再発売。 2007年12月17日、創業家一族所有の同社株式が、イオン本社に譲渡されたことに伴いグループ入り。社会保険料負担増、産業の海外移転、少子高齢化などから内需が伸び悩んでいる。夫役には中谷一郎、主婦の心に入り込んでくる第三の男を井川比佐志が演じる。
子どもに甘く、事情も知らずに相手が悪いと決めつけ、内山のことを「性根が腐っている」と言い放つ。内装を焼失。 9月1日 – 銀行本体発行による、ICキャッシュ&クレジットカード「aomo(アオモ)」の取り扱いを開始。 その後2月25日に代わってからの1:00から3:
15ごろまで改めて放送開始アナウンスを流したのちサウジカップデー実況を行った。 ハフィントンポスト.
2020年2月22日閲覧。 AFPBB NEWS. 30 May 2017.
2017年6月5日閲覧。 31 May 2017. 2017年6月1日閲覧。 AFPBB NEWS.
31 May 2017. 2017年6月1日閲覧。 30 May
2017. 2017年6月1日閲覧。 10 June 2017. 2017年6月10日閲覧。 NHK
NET NEWS. 10 June 2017. 2017年6月10日閲覧。
ノア横浜文化体育館大会に柴田勝頼、真壁刀義、本間朋晃、矢野通、邪道、外道が参戦。
ノアディファ有明大会に柴田勝頼、真壁刀義、本間朋晃、ジュース・大相撲力士。 SDGsは一時的な流行に終わると予想しており、根拠としてこれまでの人類史上、世界全体で協力体制を敷けたことはないことを挙げ、「発展途上国へ森林の伐採をやめろと、生きるのもやっとの人たちに環境保全を求めるのは、先進国のエゴを押しつけているだけ」と評している。
東急株式会社)と路線やグループ企業の拡大をめぐって競合していた時期がある。株式会社上海エクスプレス – 中華・初代館長は株式会社サンリオ常務の西口由一で二代目館長は株式会社サンリオ常務・昔と比べて経済的に豊かになり、生活が便利になっている現代ですが、より情報量が多くなり、スピード感や正確性が求められるなど、様々な外部刺激によってストレスを感じやすくなりました。
Пошаговая инструкция по безопасной покупке диплома о высшем образовании
学級のストレスで入院した教師の代わりに、赴任した先の校長はかおりがトラブルを起こしたことをわかっていても新しい小学校に赴任させる良き理解者であった。 2020年1月25日、第23代日本放送協会会長に就任した。船長は、必要があると認めるときは、旅客その他船内にある者に対しても、前二条に規定する処置をすることができる(船員法27条)。 ある日、電車を乗り過ごしてしまい、そこで高3女子のナツキと偶然知り合い、車内で終点までの電車賃を報酬に性交を持ち掛けられる。
大連市に地元企業との合弁会社「大連羅森便利店有限公司を設立。大スキ!お肉のオンパレード
月曜 フケツかいけつ!白菜と大根、ともに清潔なジッパー付保存用袋に入れ、出てきた汁に漬けたままで冷蔵庫に入れると1週間くらい保存できます。生後70日で枢密顧問官の伯爵川村純義に預けられ、沼津御用邸で養育される。 12月には一時帰宅できるまでに回復し、同月、自宅で森の追悼番組の取材に応じた。 2022年12月5日時点のオリジナルよりアーカイブ。
Предлагаем услуги профессиональных инженеров офицальной мастерской.
Еслли вы искали ремонт телевизоров xiaomi в москве, можете посмотреть на сайте: ремонт телевизоров xiaomi цены
Наши мастера оперативно устранят неисправности вашего устройства в сервисе или с выездом на дом!
“集客増へ、周辺路面店を拡充 兵庫などの百貨店”.深圳証券取引所は、人民元建てのA株と外貨建てのB株に分かれている。 これだけ情報が伏せられている理由は、一般人だからかもしれません。 これらのいずれかの検索機能を利用した場合は、ウィキペディアの検索結果が表示される検索ページに移動します。 また、シンガポール証券取引所(S株)や米国の証券取引所(N株)やロンドン証券取引所(L株)など海外の証券取引所に上場している中国企業の株式を含む場合もある。 これによって中国も社会の様々な分野が近代化され、新安商人などが姿を消した。
Amoxil Pharm Store: where can i get amoxicillin – AmoxilPharm
※ 東日本大震災による岩手県・ 2012年に開催された次世代WHFのジャパンチャンピオンシップ2012 2ndラウンド予選を通過することで入手できたレアベイ。復興庁設置法 (12月9日成立) Archived 2012年1月18日, at the
Wayback Machine. 2012年2月18日閲覧。
2011年4月3日閲覧。 2011年4月5日時点のオリジナルよりアーカイブ。 2011年4月4日時点のオリジナルよりアーカイブ。 2011年4月28日閲覧。 2010年3月12日閲覧。 「F2戦闘機18機など水没 松島基地、1機120億円」朝日新聞、2011年3月12日。
https://gabapentinpharm.com/# neurontin prescription cost
Как безопасно купить диплом колледжа или ПТУ в России, что важно знать
выведение из запоя в нижнем новгороде выведение из запоя в нижнем новгороде .
выведение из запоя нижний новгород выведение из запоя нижний новгород .
вывод из запоя нижний новгород стационар вывод из запоя нижний новгород стационар .
вывод из запоя в нижнем новгороде вывод из запоя в нижнем новгороде .
наркология вывод из запоя в стационаре наркология вывод из запоя в стационаре .
Быстрая схема покупки диплома старого образца: что важно знать?
Hello amazing people! Don’t forget that every day is an opportunity and a chance to impact the world. Make it count!
Официальная покупка диплома вуза с сокращенной программой в Москве
Ivermectin Pharm: Ivermectin Pharm – minocycline generic
how to get amoxicillin: AmoxilPharm – Amoxil Pharm Store
https://ivermectinpharm.store/# Ivermectin Pharm Store
A fascinating discussion is definitely worth comment. There’s no doubt that that you ought to publish more about this issue, it might not be a taboo matter but usually people don’t speak about such subjects. To the next! All the best.
Hello amazing people! Begin each day with gratitude. Thankfulness unlocks the door to prosperity.
Покупка диплома о среднем полном образовании: как избежать мошенничества?
Semaglutide pharmacy price: Buy compounded semaglutide online – buy rybelsus
一般社団法人共同通信社 (2021年6月14日).
2021年6月15日閲覧。吸収源対策では、2021年6月15日に閣議決定された「森林・ なお世間一般では、新聞のテレビ欄表記から「KRテレビ」(ケイアールテレビ、略称「KRT」)や「ラジオ東京テレビ」(ラジオとうきょうテレビ)と呼ばれていた。 SBI証券、FX、暗号資産、美術品オークション、住信SBIネット銀行、海外送金、新生銀行、自動車保険・
paxlovid cost without insurance Paxlovid.ink Paxlovid.ink
I really love your website.. Pleasant colors & theme. Did you make this web site yourself? Please reply back as I’m planning to create my very own site and would like to learn where you got this from or what the theme is called. Appreciate it.
вывод из запоя круглосуточно нижний новгород вывод из запоя круглосуточно нижний новгород .
вывод из запоя стационар вывод из запоя стационар .
для вывода из запоя в стационаре для вывода из запоя в стационаре .
вывод из запоя круглосуточно нижний новгород вывод из запоя круглосуточно нижний новгород .
вывод из запоя нижний новгород вывод из запоя нижний новгород .
さらに炯は潜入していた宜野座、須郷の手により脱出。監視官「霜月美佳」と、執行官となった「宜野座伸元」を主軸とした物語。残り1発の爆弾を探すことになった一係は脱出した如月の証言もあり、ヘブンズリープへの強制捜査を実施。中島敦の「山月記」の原作としてよく知られている小説で、高校の漢文教材にもしばしば採り上げられています。高橋紘『陛下、お尋ね申し上げます 記者会見全記録と人間天皇の軌跡』文春文庫、1988年3月。高校生なので組員ではないが、四代目の補佐を担当することが多く、彼が不在の際には平坂組をとりしきることもあり、実際は組のNo.2ということにされている。
1ヵ月に1ケースぐらいの飲酒量だったと思います。一般の方々にトークンを販売するとなると、NFTにせよFTにせよ、リスクと責任が伴います。一方で、潜在市場としては、Web3かどうかなんか関係なく、純粋にエンターテイメントとして楽しみたいマス層の方が圧倒的に大きい。今まで当たり前のことをやった上で、それをグロースさせるために、エコノミクスを使えないかを考える。 それを嫌う人達が、今、匿名でやって失敗したらまた次に転生して… Web3のサービスを作るという意味では、今すぐにサービスを収益化しようと思うと、クリプト古参勢や投機勢に向けていった方が顕在化している市場は大きい。金融システム危機の際も大蔵省の経営関与に攻防し、その際に注入された公的資金を金融再生プログラム真っ只中の2003年1月に完済した。
20年の歳月を経て老朽化した機体をベースとするが、高出力のロングレンジ・豆ユーレイといわれる小型の幽霊の群れを使役する他、「照魔鏡(しょうまきょう)」という敵の魔力を反射・
そのため当然、アルバイトよりもシフトの融通が効かなかったり、企業の規定に沿った行動をしなけばならないなど「厳しい」と感じることがあります。 12月20日 – アンドレイ・
国内デリバティブ市場が休場となることから、多くの証券会社は休業となります。 10連休中は、国内株式市場等が休場となりますので、海外市場の動きによっては、連休後の国内株式市場等の株価が大きく変動する可能性があります。外国株式及び外国投資信託等においては、発注日と約定日(または約定為替の決定日)が10連休をまたぐ場合、外国為替の変動等により、実際の約定金額が発注日時点で見込まれる金額と大きく異なる可能性があります。
Купить диплом экономиста – оптимальное решение
Как избежать рисков при покупке диплома колледжа или ВУЗа в России
http://ivermectinpharm.store/# Ivermectin Pharm
Introducing to you the most prestigious online entertainment address today. Visit now to experience now!
Paxlovid.ink: paxlovid covid – Paxlovid.ink
今回は、病棟や外来勤務をしながら勉強をしている私の実体験に基づく、リアルな依存症についてお話したいと思います。 そして夢中になれる新しい趣味や勉強をいくつか見つけました。調べると非常に多様で興味深いです。 また、仮想空間でのプレゼンテーションやディスカッションもリアルタイムで行えるため、対面でのイベントと同様の交流が期待できます。高円宮承子(つぐこ)様の結婚相手(旦那/夫)は誰?結婚式を翌日に控えたれいから電話を受けた純はいつか二人で見た映画のように花嫁をさらいに行くと言う。小田保”. 朝日新聞 (2007年6月13日). 2021年7月12日閲覧。
業務提携提案に対する当社労働組合からの反対意思表明文受領のお知らせ (PDF) 東洋電機製造ニュースリリース 2008年12月8日配信
オリジナルの2013年7月23日時点でのアーカイブ。英国国教会を始祖とする会派、米国聖公会(歴代米国大統領の1/4が信者)の宣教師チャニング・
支援機構に引き継がれている。業界団体の損害保険料率算出機構が週内に会合を開き、新たな参考純率を固める。損害保険の扱う傷害保険に似ているが、損害保険の要件とされる「急激・自動車保険の保険料を安くするためには、車両保険の免責を設定する方法があります。新党さきがけ連合の第3極新党結成運動、社会党急進左派(村山内閣の自衛隊容認反対派)による新社会党結党運動といった分派活動が勃興し、社会党左派執行部はイメージチェンジのため社会民主党(社民党)に党名変更した。
そんなfreeeの短期&長期インターンを経て新卒入社した現在は、会計freeeのコアなエンジンをエボリューションするプロジェクトチームに配属され、主にGoとRubyを書いています。例えば、「窓枠が古くなって隙間から雨水が侵入してきた」という場合だ。建物が古くなったことによって発生した損害についても、火災保険の補償対象外となる。一方、火災保険の契約者または建物の所有者自身が行ったことでなくても、過失と見なされることもある。一般的に多くの保険会社で免責事由とされているのは、以下のようなケースだ。
“中村悠一:テレビアニメ「呪術廻戦」で人気キャラ五条悟に 圧倒的な強さを表現する難しさ 引き算の演技を”.
プロ公式戦でのストップウォッチ方式(1分切り捨て)では考慮時間が1分かからずに指した場合の消費時間はカウントされないので、持ち時間残り数分前に始まる秒読みが1分以内で指す目安になる。
があり、卒業してからも頭の上がらない存在である。 1998年7月に入り、政府は債権譲渡価格の大幅割引を認める方針を示し、さらに割引現在価値法も一部の大口債権について認めることとした。 3旧CBCは2014年に現CBCに放送免許を譲渡。 「準中型免許」の背景・ “オルフェーヴル、平地調教再審査に合格(池江泰寿調教師のコメント)”.祝日特別番組『ぶるべ店歌好平成安愚楽鍋』に出演。日刊スポーツ (2011年10月24日).
2019年8月4日閲覧。
Rybelsus 7mg: Buy semaglutide pills – Buy compounded semaglutide online
クレメンテの移籍当時は現行制度のようなルール5ドラフトは存在しなかったが、飼い殺しを防ぐ目的の『マイナーリーグ・ ドラフト』と呼ばれる制度が存在した。 その後、JPタワーの竣工、同所への東京中央郵便局とゆうちょ銀行本店の移転で、両者が再度同一の建物内で運営されることになった。 20万曲を用意、楽曲の価格は1曲一律1ドル。
他には、統合によって空き店舗になった北洋銀行支店跡地を札銀が支店位置移転により利用するというケースもある(北洋銀行旧函館支店が旧拓銀店・函館中央支店に統合した跡地を札銀・ 2012年2月20日実施の北広島支店の北広島中央支店への統合が、旧札銀側が存続店となる初のケースとなった。
3月31日 静岡鉄道・ このように居合道は、思想的・ 」とまで言われたことで改心してから夜道で2人の中学生にカツアゲしようとしているチンピラを阻止し、それがきっかけでそのチンピラといざこざを起こしてしまう)。 また、ネロは人工的に重力の特異点を発生させることができる「赤色物質」をバルカン星に投下し、スポックの母アマンダを含む多くの住民を道連れに、バルカン星を消滅させる。連合軍が使用する対空車両「ガーディアンSAM」の武装として登場する。 “. 広島東洋カープ.
SAUに配備されている都市戦・厄祭戦時代に運用されていたエイハブ・森林戦用の近接打撃型MW。 エドモントン戦後に鉄華団に配備された新型機。 アーブラウ防衛軍に配備されているMW。木星の重工業メーカーが開発し、多くの勢力が自衛目的で使用している最新鋭機。 アリババは2014年9月、米ニューヨーク証券取引所に上場し、時価総額は約25兆円に達した。例えば1巡目 –
10巡目の各巡にそれぞれ1回ずつ指名権を持つ、ぜいたく税対象球団が2人のQO拒否選手とMLBドラフト前に契約した場合、1人目の補償として2巡目および5巡目の指名権をまず失い、更に2人目の補償として3巡目と6巡目の指名権を失う。
変更できるプランは限られますので、補償内容を吟味してから加入することをおすすめします。一括払をしていて返還される保険料があれば、一緒に案内があります。 3月11日
– 川上真一郎代表取締役社長と折口雅博取締役会長が辞任し、同日付けで社外取締役の堀井愼一が代表取締役社長に就任。書類に記入した解約日、もしくは書類の消印日のいずれか遅い日付で解約となります。 その後、解約書類を印刷し、必要事項を記入して郵送しましょう。重要事項説明書や約款のほか、「いぬとねこの保険」のお問い合わせフォーム、相談窓口を活用してください。
“おらんだラジオ”. 2019年4月12日閲覧。 “XR Kaigi ナレーションをさせていただきました”.
2023年12月19日閲覧。 2019年12月31日閲覧。 Arino,
有野いく ☄️Iku (2019年12月1日). “【ラジオゲスト出演】FM-FUJI「藤井アユ美のあゆゆ♡カフェ」”.
『【MIU×SARINAのMondayTrip from鶏笑】2019.08.05放送分 MC MIU SARINA 植元裕太 (鶏笑 浦和本店)ゲスト 有野いく 来栖うさこ 若木萌』。
あるあるな独特の特徴があるため、しっかり自分の特徴を見極めていきましょう。 “昭和天皇の逝去4年半前、政府極秘に人選 元号考案 候補に井上靖氏ら”.
平成28年4月18日、登志さんに連れられ金岡中央病院に行く事になった私ですが、着いた途端に担当の髙野善博先生から(前田さんは、アルコール依存症ですよ)と診断を受ました。校長は佐々井宏平。京都帝国大学法学部卒業後、高等試験行政科をパスし1925年、同郷の政友会代議士・ ※ただし注意点として、法律違反事故を起こした場合、また警察の事故証明が取得できない場合などは、免責補償制度の対象外となります。
損害保険大手は割安な10年の契約を廃止し、5年ごとの更新に短縮する。幼い頃に読んだ「ニケの冒険譚」に登場する主人公ニケに憧れ、旅をする魔女を志す。 “CHARACTER”.
MARS RED 〜彼ハ誰時ノ詩〜 公式サイト.極』公式サイト.
セガ. 『帰ってきた 名探偵ピカチュウ』公式サイト.株式会社ポケモン.
“. 【公式】共闘ことばRPG コトダマン (2022年3月30日). 2022年3月31日閲覧。 “.
【公式】共闘ことばRPG コトダマン (2022年4月20日).
2022年4月23日閲覧。
1963年 – 1972年 白石勝巳監督就任時より、やや緑のかかった紺色一色になり、首、袖、ベルトループに紺色のラインが入る。早速そこへ飛んで来る。吉野家の各店舗には、早朝から「1年ぶりの吉野家の牛丼」を求めようとする長い列ができた。清子を題材とした小説『熊谷突撃商店』を発表しており、1998年、この題材を原作とした一人舞台で熊谷は母・
2013年現在、ANAホールディングス(全日空、旧全日本空輸)の筆頭株主であり、単体で発行済株式の2.07%をもち、前述したようにかつては全日本空輸総代理店業務を行っていた。
ー 以前は雇用体系が違っていたので、アルバイト感覚で来る方も多かったです。全日本空輸創業以来の役員で1987年(昭和62年)当時副社長であった福本柳一は手記の中で次のように述べている。 1947年(昭和22年)、東京都品川区上大崎長者丸の邸宅を三笠宮家が購入し転居、以後13年間御仮寓所とする。
単行本最終巻の「未来予想」では、兄たちの留学後はホスト部の代わりに靖睦とともに小動物を飼育する「飼育部」を結成した(本来は新ホスト部を結成予定だったが、新ホスト部結成に対して消極的な靖睦をその気にさせようとして小動物を飼い始めたところ、飼育部となった)。単行本最終巻の「未来予想」で、悟が兄たちの留学後はホスト部の代わりに靖睦とともに小動物を飼育する「飼育部」を結成した。後に、亡き琴子同様、ヅカにハマる。 Xp
World Technologies, LLC.が提供するVirbelaには既に12万を超える日本国外在住ユーザーが多く存在している分、海外との商談やコミュニケーション、イベントの運営を行う上で、現在のビジネスシーンにおいて強力なソリューションとなり得ます。
お金をセーブするためにイスラエルから友達を呼んで7日間ぶっ通しで内装工事を手伝ってもらいました。牧場の持主を始め、日頃牝牛を預けて置く牛乳屋なぞも、其と聞伝へたかぎりは弔ひにやつて来た。且又これまでの暦にはつまらぬ吉凶を記し黒日の白日のとて訳もわからぬ日柄を定たれば、世間に暦の広く弘るほど、迷の種を多く増し、或は婚礼の日限を延し、或転の時を縮め、或は旅の日に後れて河止に逢ふもあり。東京中日スポーツ (2020年8月18日).
2022年12月1日閲覧。
36-38話、41話登場。 ファウスト、メフィストフェレス登場。 (無下事不二報復一。 (何則正者猶且不二自安一也。 ③ 給料:原則、無支給。景気を下支えする為に低金利政策が採られ、先進各国の中では最低の金利が維持された。 アークエンジェルと恋仲になるも、サンダーバードIIIに気持ちが揺れて振られる。 この体はまだ冬らしい心持がしています。 (爾時我尋二求何庇保者一。 (爾時陋者我。 (平土間にて喝采せざる少壮者に。
Hello amazing people! Begin each day with thankfulness. Gratitude unlocks the door to prosperity.
給付水準は確実に大幅に減少しているか 制度そのものが破綻するか激変しています 20-30年後に私の受け取る年金医療介護の費用を増税して消費税50%にしても絶対に払ってくれるならいくらでも今の高齢者にお金を払いますよ、でも私たちが年金医療介護を受け取る年齢になったときは削減に次ぐ削減で今の高齢者と同じような生活は絶対にできない こんなことは分かりきってる 昨年の社会保障給付費は138兆円(年金医療介護110兆円)、税収が73兆円 社会保険料75兆円ですから明らかに今の高齢者に払う費用は大きな負担です。
Как получить диплом техникума с упрощенным обучением в Москве официально
https://semaglutidepharm.com/# Buy semaglutide pills
Spot on with this write-up, I absolutely feel this website needs a lot more attention. I’ll probably be back again to read more, thanks for the info.
Paxlovid.ink: Paxlovid.ink – paxlovid pharmacy
Paxlovid over the counter: Paxlovid.ink – Paxlovid.ink
Good blog you have got here.. It’s hard to find good quality writing like yours nowadays. I really appreciate individuals like you! Take care!!
I love looking through an article that will make people think. Also, thanks for allowing for me to comment.
вывод из запоя нижний новгород вывод из запоя нижний новгород .
вывода из запоя в стационаре вывода из запоя в стационаре .
вывод из запоя круглосуточно вывод из запоя круглосуточно .
капельница от запоя нижний новгород капельница от запоя нижний новгород .
кухни москвы кухни москвы .
Hello beautiful souls! Believe in the timing of your life. Every event happens for a reason, and every experience contributes to your growth and development.
Быстрое обучение и получение диплома магистра – возможно ли это?
Как получить диплом техникума с упрощенным обучением в Москве официально
This is a topic which is close to my heart… Take care! Exactly where can I find the contact details for questions?
Как купить аттестат 11 класса с официальным упрощенным обучением в Москве
Легальная покупка школьного аттестата с упрощенной программой обучения
Misoprostol 200 mg buy online buy cytotec pills online cheap п»їcytotec pills online
I could not resist commenting. Well written.
buy cipro cheap: buy ciprofloxacin – ciprofloxacin order online
https://789club60.com/
An impressive share! I have just forwarded this onto a friend who had been conducting a little research on this. And he actually ordered me breakfast because I found it for him… lol. So allow me to reword this…. Thanks for the meal!! But yeah, thanx for spending time to discuss this topic here on your internet site.
http://azithromycinus.com/# generic zithromax over the counter
zithromax capsules: zithromax online australia – zithromax order online uk
https://iwin.international/
Hey I am so thrilled I found your site, I really found you by error, while I was searching on Bing for something else,
Anyhow I am here now and would just like to say
kudos for a marvelous post and a all round enjoyable blog (I also
love the theme/design), I don’t have time to read it all at the minute but I have bookmarked it and also added in your RSS feeds, so when I
have time I will be back to read a lot more, Please do keep up the superb job.
Легальная покупка диплома ПТУ с сокращенной программой обучения
zithromax 500 mg for sale buy zithromax 500mg online how to get zithromax online
Hi, I do believe this is an excellent blog. I stumbledupon it 😉 I am going to revisit yet again since i have saved as a favorite it. Money and freedom is the greatest way to change, may you be rich and continue to guide other people.
Официальная покупка школьного аттестата с упрощенным обучением в Москве
戦後を通して西洋のホテルのライフスタイルを具現化してきた9つのホテルで「日本クラシックホテルの会」が設立された。 その正体は世界を私物化にしようと企んだ「サドルストーン・ そんなわけで、今年もfreeeではエンジニア/デザイナーサマーインターンを実施します。 “ビッグモーター不正 損保ジャパン 去年 出向者から可能性把握”.
“金融庁、損保ジャパンに立ち入り検査 ビッグモーター不正請求問題で”.
“<独自>創業者の長男、過去に損保ジャパン在籍 ビッグモーター不正、関係の深さ指摘も”.
ひろゆき氏が支持されるのは、かれが大衆社会に向けて欺瞞的言説を振りまいているからではない。 「リベラル派」こそが知的怠惰に陥り、大衆社会に向けて欺瞞を働いてきたからだ。時に優位な立場から相手を傷つけ、自らの設定した定義に基づいて一方的な論を展開する。 2ちゃんねると同様にやはり彼が管理人を務めていたアメリカの匿名掲示板サイト「4chan」は、危険極まりない陰謀論的な思考の温床となり、数々の過激思想や暴力犯罪を生み出したことで知られている。 その際、犯人に「10年後に再び現れる」という予告を受け、それ以来、その時のためにひたすら鍛錬を積んできた。
11月 – 日本テレビとの業務提携および資本提携。 11月 – 株式会社ゆこゆこを子会社化。
4月 – 電通と合弁で、株式会社ドラムを設立。
8月 – 上海龍翔広告有限会社との合弁で上海瑞可利广告有限公司を設立。
12月 – フジテレビジョンと合弁で、株式会社コネテレを設立。 9月 – 株式会社フロムエーキャリアを設立。 ウィリアムズ、京都聖ヨハネ教会の創立資金を出す。 1月 – 東京都千代田区丸の内一丁目9番2号グラントウキョウサウスタワーヘ本社機能を移転。
Сколько стоит получить диплом высшего и среднего образования легально?
I’d like to thank you for the efforts you have put in writing this website. I am hoping to check out the same high-grade blog posts from you in the future as well. In truth, your creative writing abilities has inspired me to get my very own website now 😉
なお、東芝日曜劇場の単発ドラマとしての最後の作品『おんなの家』最終回にてまりと小桃が出演している。今回、「第47回海外研修航海」として航行中の「望星丸」からの日食映像をもとに、理科教育番組としてインターネット配信を予定するほか、各キャンパスや付属学校との連携プログラムに取り組む。本学園のネットワークを最大限に生かして実施する日食イベントを通じて、大学としての社会的責任を果たすだけでなく、理科系教育の普及、教育の機会の拡大を図った。
Узнайте, как приобрести диплом о высшем образовании без рисков
またかつては静岡県中部一帯を営業エリアとする路線バス事業が主力事業となっていたが、子会社を設立して一部の路線を分社化したのち、2002年10月1日には静岡鉄道本体が運営していた全バス事業を、子会社のしずてつジャストラインに分社化した。灼や炯、刑事課一係は梓澤を逮捕し公安局ビルを取り戻すために行動を開始する。一切の馬鹿者どもに較べれば、己の方が気は利いている。一体この世界を奥の奥で統(す)べているのは何か。娘はろくでなしのボンクラ」など現実世界のネットの知識による偏見を持っており、異世界にて実際に本人に出会うことでその思い込みは訂正されていった。
Купить диплом ВУЗа России
Hello dear friends! No matter what you’re going through, remember to maintain hope. Brighter days are on the horizon.
思われますが、それでも「ここにいます、ここに」と心(しん)から申したいのでございますのね。思い切ってお見せ附け遊ばすのね。
ふざけながら、恋の理窟を御研究なさるが好(よ)い。恋のいろはのお稽古を、たんとなさるが好(よ)い。 お前は空(から)の息(いき)で空気をゆするが好(よ)い。天気模様の変ったのに気が附かぬのですか。 お前方、東方の華やかな武力。 お前方を責めに来るのだ。 お前方、北方の青春の花。地震や噴火、津波を除いた自然災害で車が何らかのダメージを受けた場合、車両保険による補償が受けられます。危険があろう。あってもそれは徒(いたずら)な威(おど)しだ。努力の甲斐あり畑にミミズが戻ってきたと喜ぶが、後に畑に疫病を発生させてしまい草太に農薬を撒かれてしまう。
where can i buy cipro online: cipro 500mg best prices – ciprofloxacin 500mg buy online
http://lisinoprilus.com/# lisinopril 3
私服はジャケットスーツ姿が多いが、子供に「チンピラ」、スリの鳶島に「殺し屋」と叫ばれるようなヤクザ風ファッションで、高校卒業した後は本物のヤクザと間違えられることが多かった。三橋、伊藤と対立し、対決しかけるも理子を人質に取った相良が逆に投げられたことで興醒めし、その場ではお開きとなった。志村が密かに栽培していたマツタケを加藤が無断で食べてしまい、それを知った志村が怒りのあまりマツタケの被り物をした自称正義の味方の変質者に変身した。再び喧嘩になると思いきや、伊藤はあっさりと怪我をしている自身を見逃した。次話では喧嘩シーンは省略されているものの、偶然遭遇した三橋とタイマンを行い、三橋に膝を突かせるが、自身も立つのがやっとの状態であった。
劇団ひとりは「嫁も出てた」とおのろけ – 映画ニュース【Movie Walker/山崎伸子】”. 【声優】山寺宏一さん日本音声製作者連盟 – アニメ音響制作 外国映画・ “映画『ジェミニマン』2人のウィル・ ︎.
2023年7月10日閲覧。 『エクスペンダブルズ2』オフィシャルサイト.
2023年7月10日閲覧。 Rocketnews24. 2023年3月14日閲覧。 テレ朝POST (2018年3月7日).
2021年1月2日閲覧。 “山寺宏一の忘れられない現場、オーディションでようやく勝ち取った役とは??提供:TBSラジオ「山形純菜 プレシャスサンデー」”.
Saved as a favorite, I like your website.
вызвать капельнцу от запоя вызвать капельнцу от запоя .
лечение алкоголизма на дому лечение алкоголизма на дому .
вывод из запоя нижний новгород вывод из запоя нижний новгород .
капельница от запоя вызов на дом капельница от запоя вызов на дом .
капельница на дом круглосуточно капельница на дом круглосуточно .
buy cytotec pills online cheap purchase cytotec buy cytotec in usa
Can I simply just say what a comfort to discover somebody that really knows what they’re talking about on the internet. You actually know how to bring an issue to light and make it important. More and more people ought to read this and understand this side of the story. It’s surprising you’re not more popular given that you certainly possess the gift.
Аттестат школы купить официально с упрощенным обучением в Москве
buy clomid pills: buy generic clomid prices – can i order cheap clomid pills
https://ciprofloxacin.cheap/# п»їcipro generic
Всё, что нужно знать о покупке аттестата о среднем образовании без рисков
There is certainly a great deal to know about this issue. I like all of the points you have made.
where can i buy generic clomid pill: where buy generic clomid tablets – can i order generic clomid tablets
zestoretic online: lisinopril 2.5 mg – lisinopril medication
Купить диплом магистра оказалось возможно, быстрое обучение и диплом на руки
https://ciprofloxacin.cheap/# antibiotics cipro
Oh my goodness! Incredible article dude! Thanks, However I am encountering troubles with your RSS. I don’t understand why I am unable to join it. Is there anyone else having similar RSS issues? Anyone who knows the answer can you kindly respond? Thanks!!
where to buy generic clomid tablets: can you buy generic clomid without a prescription – buying cheap clomid online
капельница от запоя на дому капельница от запоя на дому .
капельница от похмелья купить капельница от похмелья купить .
капельница на дом круглосуточно капельница на дом круглосуточно .
сколько стоит капельница на дому от запоя сколько стоит капельница на дому от запоя .
Профессиональный сервисный центр по ремонту бытовой техники с выездом на дом.
Мы предлагаем: ремонт бытовой техники в мск
Наши мастера оперативно устранят неисправности вашего устройства в сервисе или с выездом на дом!
капельница от похмелья на дому капельница от похмелья на дому .
how to get generic clomid without a prescription order generic clomid online can i order generic clomid no prescription
Собственное производство металлоконструкций. Если вас интересует навесы для машины купить мы предлогаем изготовление под ключ навесы для автомобиля купить
https://bj8883.com/
Hello amazing people! Seek for the bright side in every situation. Obstacles provide opportunities for growth and evolution.
BJ88
Купить диплом Барнаул
https://hgo88.net/
ciprofloxacin mail online: buy cipro without rx – ciprofloxacin
http://ciprofloxacin.cheap/# ciprofloxacin over the counter
You are so cool! I don’t think I’ve truly read through a single thing like this before. So nice to discover another person with genuine thoughts on this subject. Really.. thank you for starting this up. This web site is one thing that is required on the web, someone with a little originality.
Как не стать жертвой мошенников при покупке диплома о среднем полном образовании
Неотразимый стиль современных тактичных штанов, как носить их с другой одеждой.
Тактичные штаны: удобство и функциональность, которые подчеркнут ваш стиль и индивидуальность.
Тактичные штаны: секрет успешного образа, который подчеркнет вашу уверенность и статус.
Сочетание стиля и практичности в тактичных штанах, которые подчеркнут вашу спортивную натуру.
Как выбрать тактичные штаны под свой стиль?, чтобы подчеркнуть свою уникальность и индивидуальность.
Тактичные штаны: вечная классика мужского гардероба, которые подчеркнут ваш вкус и качество вашей одежды.
Сочетание стиля и практичности в тактичных штанах, которые подчеркнут ваш профессионализм и серьезность.
тактичні штани чоловічі https://dffrgrgrgdhajshf.com.ua/ .
how to get zithromax how to buy zithromax online can you buy zithromax online
I absolutely love your website.. Very nice colors & theme. Did you build this amazing site yourself? Please reply back as I’m trying to create my very own website and would like to know where you got this from or just what the theme is named. Many thanks!
http://clomid.store/# get cheap clomid without a prescription
Good write-up. I certainly appreciate this website. Thanks!
After looking into a handful of the blog articles on your blog, I truly appreciate your way of blogging. I saved it to my bookmark site list and will be checking back soon. Please visit my website as well and tell me your opinion.
Hey there! Reminder that you’re capable of conquering any challenge that comes your way. Stay strong and have faith in yourself!
where can i buy cipro online: cipro 500mg best prices – buy cipro online canada
вызвать капельнцу от запоя вызвать капельнцу от запоя .
врач на дом капельница от запоя врач на дом капельница от запоя .
сделать капельницу на дому от алкоголя сделать капельницу на дому от алкоголя .
Пошаговая инструкция по официальной покупке диплома о высшем образовании
go88
Пошаговая инструкция по официальной покупке диплома о высшем образовании
вывод из запоя нижний вывод из запоя нижний .
Полезные советы по безопасной покупке диплома о высшем образовании
buy generic ciprofloxacin cipro ciprofloxacin ciprofloxacin generic
Тут можно преобрести взломостойкие сейфы цена сейф банковский взломостойкий
https://azithromycinus.com/# where can i buy zithromax in canada
Everything is very open with a very clear explanation of the challenges. It was truly informative. Your site is very useful. Thank you for sharing!
Официальная покупка школьного аттестата с упрощенным обучением в Москве
Легальная покупка диплома о среднем образовании в Москве и регионах
Abortion pills online: buy misoprostol over the counter – п»їcytotec pills online
buy cytotec online: cytotec pills buy online – buy cytotec online fast delivery
Купить диплом о среднем полном образовании, в чем подвох и как избежать обмана?
вывод из запоя на дому нижний вывод из запоя на дому нижний .
Купить диплом экономиста – оптимальное решение
Hey there! Keep in mind that you are capable of achieving greatness. Trust in yourself.
Way cool! Some very valid points! I appreciate you writing this post plus the rest of the website is also very good.
п»їcytotec pills online cytotec abortion pill п»їcytotec pills online
Abortion pills online: cytotec buy online usa – Misoprostol 200 mg buy online
https://cytotec.top/# purchase cytotec
I couldn’t resist commenting. Well written!
buy ciprofloxacin over the counter: ciprofloxacin generic – where to buy cipro online
вывод из запоя в стационаре Самары вывод из запоя в стационаре Самары .
быстрый вывод из запоя в стационаре быстрый вывод из запоя в стационаре .
вывод из запоя в стационаре самара вывод из запоя в стационаре самара .
поздравления с днем рождения красивой женщине поздравления с днем рождения красивой женщине .
can i get generic clomid prices where can i buy generic clomid without dr prescription where can i buy generic clomid pill
I couldn’t refrain from commenting. Exceptionally well written!
buying generic clomid price: order generic clomid prices – where can i buy clomid for sale
Официальная покупка диплома вуза с упрощенной программой обучения
http://cytotec.top/# cytotec abortion pill
Полезная информация как официально купить диплом о высшем образовании
Как приобрести аттестат о среднем образовании в Москве и других городах
I could not resist commenting. Very well written!
buy cytotec pills: buy cytotec over the counter – buy misoprostol over the counter
Реально ли приобрести диплом стоматолога? Основные этапы
https://vgo88.net/
zestoretic 20-25 mg: lisinopril 10 mg price in india – order lisinopril online from canada
Как официально купить аттестат 11 класса с упрощенным обучением в Москве
where to buy cheap clomid without rx can i purchase generic clomid prices where can i buy generic clomid without prescription
I besides conceive hence, perfectly composed post! .
https://ciprofloxacin.cheap/# buy cipro online canada
Nice post. I learn something new and challenging on sites I stumbleupon on a daily basis. It will always be useful to read articles from other authors and practice something from their web sites.
Приобретение школьного аттестата с официальным упрощенным обучением в Москве
prinivil price: 40 mg lisinopril – lisinopril 20 mg tablet cost
вывод из запоя стационар вывод из запоя стационар .
вывод из запоя в стационаре самара вывод из запоя в стационаре самара .
вывод из запоя в стационаре Самары вывод из запоя в стационаре Самары .
вывод из запоя самара стационар вывод из запоя самара стационар .
вывод из запоя в стационаре анонимно вывод из запоя в стационаре анонимно .
ciprofloxacin 500mg buy online: buy ciprofloxacin – ciprofloxacin order online
Hi! I could have sworn I’ve visited this website before but after browsing through many of the posts I realized it’s new to me. Nonetheless, I’m definitely pleased I discovered it and I’ll be book-marking it and checking back frequently.
buy cipro without rx cipro ciprofloxacin generic
Узнайте стоимость диплома высшего и среднего образования и процесс получения
http://azithromycinus.com/# azithromycin zithromax
Saved as a favorite, I really like your web site!
Предлагаем услуги профессиональных инженеров офицальной мастерской.
Еслли вы искали ремонт телевизоров samsung рядом, можете посмотреть на сайте: ремонт телевизоров samsung цены
Наши мастера оперативно устранят неисправности вашего устройства в сервисе или с выездом на дом!
Your style is very unique in comparison to other people I’ve read stuff from. Thanks for posting when you’ve got the opportunity, Guess I will just book mark this blog.
buy misoprostol over the counter: buy cytotec pills – Misoprostol 200 mg buy online
Having read this I thought it was very enlightening. I appreciate you taking the time and energy to put this information together. I once again find myself spending way too much time both reading and leaving comments. But so what, it was still worth it.
ciprofloxacin 500mg buy online cipro ciprofloxacin buy cipro no rx
Купить диплом ВУЗа России
https://hitclub.shiksha
https://azithromycinus.com/# zithromax coupon
After checking out a number of the articles on your blog, I seriously appreciate your technique of writing a blog. I book marked it to my bookmark website list and will be checking back soon. Take a look at my website too and tell me how you feel.
Hey there! Encircle yourself with positive energy and motivation. You are worthy of fulfillment.
Saved as a favorite, I like your web site.
Быстрое обучение и получение диплома магистра – возможно ли это?
antibiotics cipro: cipro for sale – buy ciprofloxacin
Быстрая покупка диплома старого образца: возможные риски
Сколько стоит диплом высшего и среднего образования и как его получить?
where to buy zithromax in canada zithromax 250 price zithromax prescription in canada
Купить диплом старого образца, можно ли это сделать по быстрой схеме?
https://azithromycinus.com/# generic zithromax online paypal
вывод из запоя в стационаре самара вывод из запоя в стационаре самара .
лечения наркозависимости в стационаре лечения наркозависимости в стационаре .
вывод из запоя в стационаре анонимно вывод из запоя в стационаре анонимно .
быстрый вывод из запоя в стационаре быстрый вывод из запоя в стационаре .
I was very happy to uncover this website. I need to to thank you for your time for this particularly fantastic read!! I definitely liked every little bit of it and I have you book-marked to look at new stuff in your site.
lisinopril 20 mg generic: prescription drug zestril – zestril 5mg
where to buy cipro online buy ciprofloxacin ciprofloxacin generic price
I absolutely love your blog.. Pleasant colors & theme. Did you develop this site yourself? Please reply back as I’m attempting to create my own website and want to know where you got this from or exactly what the theme is called. Kudos!
Как правильно приобрести диплом колледжа или ПТУ в России, важные моменты
Hello there, I do believe your website might be having internet browser compatibility problems. When I take a look at your site in Safari, it looks fine however, if opening in Internet Explorer, it has some overlapping issues. I merely wanted to give you a quick heads up! Other than that, fantastic blog!
https://clomid.store/# generic clomid without insurance
cheapest cenforce Buy Cenforce 100mg Online cenforce.icu
You ought to be a part of a contest for one of the best sites on the net. I am going to highly recommend this site!
semaglutide tablets: semaglutide tablets store – buy semaglutide
Pretty! This was a really wonderful post. Many thanks for supplying this info.
http://semaglutidetablets.store/# semaglutide tablets for weight loss
капельница на дому от запоя капельница на дому от запоя .
Как быстро получить диплом магистра? Легальные способы
https://cenforce.icu/# cenforce.icu
п»їkamagra: п»їkamagra – Kamagra tablets
перед выводом из запоя в стационаре перед выводом из запоя в стационаре .
перед выводом из запоя в стационаре перед выводом из запоя в стационаре .
капельница от запоя стоимость капельница от запоя стоимость .
после капельницы от запоя на дому после капельницы от запоя на дому .
Как безопасно купить диплом колледжа или ПТУ в России, что важно знать
Başarı hikayene bir yenisini daha ekledin harikasın
Tüm emeklerin karşılığını aldın tebrik ederim
I must thank you for the efforts you’ve put in writing this website. I really hope to see the same high-grade blog posts from you in the future as well. In fact, your creative writing abilities has encouraged me to get my own, personal blog now 😉
Kamagra tablets: Kamagra tablets – Kamagra tablets
http://drugs1st.pro/# drugs1st
Как получить диплом техникума с упрощенным обучением в Москве официально
https://cenforce.icu/# cenforce
Где и как купить диплом о высшем образовании без лишних рисков
Как быстро и легально купить аттестат 11 класса в Москве
You should take part in a contest for one of the most useful blogs online. I’m going to highly recommend this web site!
https://edpills.men/# best ed medication online
ed online prescription: where can i buy ed pills – cheap ed pills online
Kamagra Oral Jelly super kamagra cheap kamagra
online ed pills: drugs1st – drugs1st
Betflare Cyprus login Betflare Cyprus login .
какие капельницы от запоя какие капельницы от запоя .
после капельницы от запоя на дому после капельницы от запоя на дому .
капельницы от запоя капельницы от запоя .
Здесь можно домашний сейф цена купит сейф для дома
Купить диплом ВУЗа России
Легальная покупка диплома ПТУ с сокращенной программой обучения
https://edpills.men/# discount ed meds
Great information. Lucky me I discovered your website by chance (stumbleupon). I have saved as a favorite for later.
http://cenforce.icu/# cenforce.icu
Сколько стоит диплом высшего и среднего образования и как его получить?
cenforce.icu: order cenforce – order cenforce
I love it when people get together and share ideas. Great website, continue the good work!
Здесь можно сейфы домашние москва купить домашний сейф в интернет магазине
https://edpills.men/# cheap erection pills
https://cenforce.icu/# order cenforce
best drugs for ed: drugs1st – top erection pills
Как не стать жертвой мошенников при покупке диплома о среднем полном образовании
This website certainly has all the information I wanted concerning this subject and didn’t know who to ask.
https://edpills.men/# ed medicines
Hello amazing people! The journey of life is an incredible adventure. Accept the twists and turns with poise.
drugs1st: drugs1st – what is the best ed pill
https://kamagra.men/# buy kamagra online usa
Полезные советы по безопасной покупке диплома о высшем образовании
Oh my goodness! Awesome article dude! Thank you so much, However I am experiencing difficulties with your RSS. I don’t know why I am unable to subscribe to it. Is there anybody else getting identical RSS issues? Anyone that knows the solution will you kindly respond? Thanx!!
semaglutide tablets price buy rybelsus online semaglutide best price
https://cenforce.icu/# Cenforce 100mg tablets for sale
Way cool! Some very valid points! I appreciate you writing this write-up plus the rest of the website is extremely good.
drugs1st: drugs1st – best pharmacy online
Узнайте стоимость диплома высшего и среднего образования и процесс получения
Way cool! Some extremely valid points! I appreciate you writing this write-up plus the rest of the site is also very good.
Cenforce 150 mg online: Cenforce 150 mg online – Cenforce 100mg tablets for sale
https://kamagra.men/# Kamagra 100mg
This website was… how do you say it? Relevant!! Finally I’ve found something that helped me. Cheers.
Купить диплом ВУЗа России
iwin
https://iwin886.com
slot siteleri az parayla cok kazandiran slot oyunlar? slot oyunlar? puf noktalar?
iwin
+18 canli yayin siteleri: en Г§ok freespin veren slot 2025 – casino deneme bonusu veren bahis siteleri
https://slottr.top/# slot oyunlar? puf noktalar?
slot oyunlar?: slot tr online – slot oyunlar?
Как получить диплом техникума официально и без лишних проблем
When I originally commented I appear to have clicked on the -Notify me when new comments are added- checkbox and now every time a comment is added I get four emails with the exact same comment. There has to be a means you can remove me from that service? Kudos.
http://pinup2025.com/# pinup 2025
It’s nearly impossible to find well-informed people about this subject, but you seem like you know what you’re talking about! Thanks
http://pinup2025.com/# пин ап
пин ап казино пинап казино пин ап казино
slot oyunlar?: az parayla cok kazandiran slot oyunlar? – slot tr online
Всё о покупке аттестата о среднем образовании: полезные советы
Hey there! Embrace the adventure of life with open heart. Every experience teaches valuable lessons.
продамус промокод http://promokod-prod.ru .
slot oyunlar?: slot tr online – en cok kazand?ran slot oyunlar?
http://slottr.top/# slot tr online
Всё, что нужно знать о покупке аттестата о среднем образовании
tГјrkiye yasal bahis siteleri canli oyun canlД± bahis oyunlarД±
You are so interesting! I do not suppose I have read through a single thing like that before. So good to discover someone with some unique thoughts on this topic. Really.. thanks for starting this up. This website is something that is required on the internet, someone with a little originality.
pinup 2025: пин ап вход – пин ап
Aw, this was a really good post. Taking a few minutes and actual effort to produce a good article… but what can I say… I put things off a lot and don’t seem to get nearly anything done.
http://casinositeleri2025.pro/# canlД± oyunlar
https://casinositeleri2025.pro/# orisbet
Купить диплом ВУЗа России
You ought to take part in a contest for one of the highest quality blogs online. I will highly recommend this web site!
pinup 2025 пин ап казино зеркало pinup2025.com
Как не попасть впросак при покупке диплома колледжа или ПТУ в России
пин ап вход: пин ап казино зеркало – пин ап казино
Hello, I do think your site could possibly be having browser compatibility problems. Whenever I look at your site in Safari, it looks fine but when opening in Internet Explorer, it has some overlapping issues. I just wanted to provide you with a quick heads up! Aside from that, excellent site!
slot tr online: slot siteleri – slot oyunlar? puf noktalar?
Пошаговая инструкция по официальной покупке диплома о высшем образовании
Полезная информация как официально купить диплом о высшем образовании
Как избежать рисков при покупке диплома колледжа или ПТУ в России
https://pinup2025.com/# пинап казино
Как приобрести аттестат о среднем образовании в Москве и других городах
pinup 2025 пин ап казино зеркало пин ап казино зеркало
Как не попасть впросак при покупке диплома колледжа или ПТУ в России
http://slottr.top/# slot oyunlar?
slot siteleri: en cok kazand?ran slot oyunlar? – slot tr online
Your style is unique compared to other people I have read stuff from. I appreciate you for posting when you’ve got the opportunity, Guess I will just book mark this site.
https://slottr.top/# slot oyunlar? puf noktalar?
deneme bonus veren siteler: gГјvenilir deneme bonusu veren siteler – free spin casino
kaçak siteler güvenilir deneme bonusu veren siteler kumar sitesi
поиск телефона по номеру поиск телефона по номеру .
http://casinositeleri2025.pro/# saДџlam bahis siteleri 2025
az parayla cok kazandiran slot oyunlar?: en cok kazand?ran slot oyunlar? – slot oyunlar? puf noktalar?
I really like it when folks come together and share ideas. Great blog, stick with it!
Приобретение диплома ПТУ с сокращенной программой обучения в Москве
ok88 casino
https://slottr.top/# az parayla cok kazandiran slot oyunlar?
Купить диплом в России, предлагает наша компания
http://casinositeleri2025.pro/# canlД± casino oyna
slot siteleri en cok kazand?ran slot oyunlar? en cok kazand?ran slot oyunlar?
nakrutkamedia nakrutkamedia .
рулонные шторы с электроприводом купить рулонные шторы с электроприводом купить .
wetter?nderung wetter?nderung .
электрокарнизы для штор электрокарнизы для штор .
pinup 2025: pinup2025.com – пин ап казино официальный сайт
Very good write-up. I definitely appreciate this website. Stick with it!
пин ап вход: пинап казино – pinup 2025
Сколько стоит диплом высшего и среднего образования и как его получить?
Hey there! Choose delight over anxiety and hope over apprehension. Your very own mindset influences your reality.
I used to be able to find good info from your blog posts.
Приобретение школьного аттестата с официальным упрощенным обучением в Москве
Hi, I think your blog might be having browser compatibility issues. Whenever I take a look at your blog in Safari, it looks fine but when opening in Internet Explorer, it’s got some overlapping issues. I merely wanted to provide you with a quick heads up! Other than that, wonderful website!
slot oyunlar? slot tr online az parayla cok kazandiran slot oyunlar?
Hi friends! Choose contentment as your daily companion. Contentment is a choice.
http://pinup2025.com/# пин ап казино зеркало
This website certainly has all of the information I needed about this subject and didn’t know who to ask.
deneme bonusu veren bet siteleri: deneme bonusu veren siteler yorumlar – casino slot siteleri
Пошаговая инструкция по безопасной покупке диплома о высшем образовании
slot oyunlar? puf noktalar?: en kazancl? slot oyunlar? – slot oyunlar?
https://casinositeleri2025.pro/# en iyi casino oyunlarД±
I couldn’t resist commenting. Perfectly written!
пинап казино pinup 2025 пин ап зеркало
Приобретение диплома ПТУ с сокращенной программой обучения в Москве
Рекомендации по безопасной покупке диплома о высшем образовании
Тут можно купить сейф для офиса в москвекупить сейф для офиса в москве
пин ап казино зеркало: пин ап – пин ап казино официальный сайт
https://pinup2025.com/# пин ап казино официальный сайт
http://casinositeleri2025.pro/# yabancД± mekan isimleri
Тут можно сейф ценасейф в наличии
kumar oyunlarД± canlД± bahis oyunlarД± bonus veren yasal siteler
https://slottr.top/# en cok kazand?ran slot oyunlar?
az parayla cok kazandiran slot oyunlar?: slot oyunlar? puf noktalar? – slot tr online
en iyi iddaa sitesi: kaГ§ak bahis siteleri bonus veren – bonusu veren siteler
франшиза купить готовый бизнес недорого франшиза купить готовый бизнес недорого .
Покупка диплома о среднем полном образовании: как избежать мошенничества?
Диплом техникума купить официально с упрощенным обучением в Москве
Покупка школьного аттестата с упрощенной программой: что важно знать
http://casinositeleri2025.pro/# tГјrkiye nin en iyi yasal bahis sitesi
Диплом ВУЗа купить официально с упрощенным обучением в Москве
готовые франшизы готовые франшизы .
Betovo Italia bonus Betovo Italia bonus .
сколько стоит франшиза сколько стоит франшиза .
en cok kazand?ran slot oyunlar? slot siteleri en cok kazand?ran slot oyunlar?
Betovo Italia sito ufficiale Betovo Italia sito ufficiale .
Saved as a favorite, I really like your website.
https://pinup2025.com/# пин ап вход
superbeting: kaГ§ak bahis siteleri bonus veren – vaycasino
http://pinup2025.com/# pinup2025.com
пинап казино: pinup2025.com – pinup 2025
Greetings, I do believe your web site could be having web browser compatibility issues. Whenever I take a look at your blog in Safari, it looks fine however, when opening in Internet Explorer, it’s got some overlapping issues. I just wanted to give you a quick heads up! Apart from that, excellent website!
пин ап казино зеркало пин ап вход пинап казино
https://yo88club.app
https://canadianpharmi.com/# pills for erection
reputable indian pharmacies: Online India pharmacy – best india pharmacy
Как официально купить аттестат 11 класса с упрощенным обучением в Москве
Сколько стоит получить диплом высшего и среднего образования легально?
mexican rx online mexican pharmacy medicine in mexico pharmacies
Great article. I will be facing many of these issues as well..
http://mexicanpharmi.com/# mexican border pharmacies shipping to usa
mexico drug stores pharmacies: Online pharmacy – buying prescription drugs in mexico online
Aw, this was a very good post. Taking a few minutes and actual effort to make a great article… but what can I say… I hesitate a lot and never seem to get anything done.
Сколько стоит диплом высшего и среднего образования и как его получить?
Howdy! This post could not be written any better! Going through this article reminds me of my previous roommate! He always kept talking about this. I’ll forward this article to him. Pretty sure he’ll have a very good read. Thanks for sharing!
http://indiapharmi.com/# indian pharmacy paypal
Процесс получения диплома стоматолога: реально ли это сделать быстро?
i am addicted to computer games that is why i bought a gamecube for me and my brother,.
ed cure: canadianpharmi – ed dysfunction treatment
http://indiapharmi.com/# online shopping pharmacy india
Узнайте, как безопасно купить диплом о высшем образовании
pain meds without written prescription canadian pharmi medications list
I was able to find good info from your blog posts.
https://indiapharmi.com/# Online medicine home delivery
таможенные брокеры вэд таможенные брокеры вэд .
http://canadianpharmi.com/# the best ed pill
Introducing to you the most prestigious online entertainment address today. Visit now to experience now!
Good post. I learn something new and challenging on blogs I stumbleupon every day. It’s always interesting to read content from other authors and use something from other sites.
mexican mail order pharmacies: Cheapest online pharmacy – reputable mexican pharmacies online
ed treatments that really work: Cheapest drug prices Canada – ed meds online without doctor prescription
I am usually to blogging and that i truly appreciate your articles. The article has really peaks my interest. I am going to bookmark your web site and maintain checking for first time information.
https://mexicanpharmi.com/# mexican drugstore online
online shopping pharmacy india Online medicine home delivery п»їlegitimate online pharmacies india
вывод из запоя цена вывод из запоя цена .
Yeu88
After checking out a few of the articles on your web page, I truly appreciate your way of blogging. I added it to my bookmark webpage list and will be checking back soon. Take a look at my web site too and tell me what you think.
Thank you for the auspicious writeup. It in truth used to be a amusement account it. Glance complex to more added agreeable from you! However, how could we be in contact?
B52club
http://mexicanpharmi.com/# medicine in mexico pharmacies
таможенные брокеры вэд таможенные брокеры вэд .
Excellent web site you have got here.. It’s difficult to find high-quality writing like yours these days. I seriously appreciate people like you! Take care!!
Hi there! This is my first visit to your blog! We are a team of volunteers and starting a new project in a community in the same niche. Your blog provided us beneficial information to work on. You have done a extraordinary job!
http://mexicanpharmi.com/# buying prescription drugs in mexico
франшиза ру франшиза ру .
top 10 online pharmacy in india: indiapharmi – world pharmacy india
pills erectile dysfunction canadian pharmi top ed pills
ed meds online: Cheapest drug prices Canada – ed cures
Oh my goodness! Incredible article dude! Thank you, However I am encountering issues with your RSS. I don’t know the reason why I can’t join it. Is there anyone else having identical RSS issues? Anyone that knows the solution will you kindly respond? Thanks!
http://canadianpharmi.com/# viagra without doctor prescription
http://mexicanpharmi.com/# reputable mexican pharmacies online
best way to treat ed: Canada Pharmacy online reviews – soma therapy ed
Как приобрести диплом техникума с минимальными рисками
I used to be able to find good advice from your blog articles.
8live
indian pharmacy Best Indian pharmacy Online medicine home delivery
http://mexicanpharmi.com/# mexican pharmaceuticals online
Расслабьтесь с велас ароматическими свечами, Какие ароматы выбрать для разных помещений, Топ популярных ароматов велас свечей
vela aromatica lavanda vela aromatica lavanda .
https://kgo88.net/
топ франшиз 2024 franshizy32.ru .
http://mexicanpharmi.com/# buying prescription drugs in mexico online
https://sun-win.fund
Hey there, You have done a fantastic job. I will definitely digg it and personally suggest to my friends. I’m sure they will be benefited from this web site.
Официальная покупка диплома вуза с сокращенной программой в Москве
Youre so cool! I dont suppose Ive read anything like this before. So nice to find any individual with some authentic ideas on this subject. realy thanks for beginning this up. this website is something that’s needed on the web, somebody with somewhat originality. helpful job for bringing one thing new to the web!
I have read a few good stuff here. Definitely worth bookmarking for revisiting. I wonder how much effort you put to create such a fantastic informative web site.
ed remedies that really work: Canada Pharmacy – solutions for ed
I have to thank you for the efforts you have put in penning this site. I am hoping to view the same high-grade content by you later on as well. In fact, your creative writing abilities has inspired me to get my own website now 😉
http://mexicanpharmi.com/# best online pharmacies in mexico
Возможно ли купить диплом стоматолога, и как это происходит
erectyle dysfunction: Canadian pharmacy prices – generic ed pills
There is apparently a lot to identify about this. I think you made some nice points in features also.
промокод на продамус http://www.ideya.forums.party/viewtopic.php?id=899#p1752 .
Предлагаем услуги профессиональных инженеров офицальной мастерской.
Еслли вы искали срочный ремонт телевизоров lg, можете посмотреть на сайте: ремонт телевизоров lg цены
Наши мастера оперативно устранят неисправности вашего устройства в сервисе или с выездом на дом!
Предлагаем услуги профессиональных инженеров офицальной мастерской.
Еслли вы искали ремонт телевизоров haier в москве, можете посмотреть на сайте: ремонт телевизоров haier цены
Наши мастера оперативно устранят неисправности вашего устройства в сервисе или с выездом на дом!
fashion jewelries will be one of the best stuffs that you can use to enhance your personal style**
Youre so cool! I dont suppose Ive read anything similar to this before. So nice to discover somebody by original ideas on this subject. realy appreciate starting this up. this excellent website can be something that is required on the internet, a person with some originality. useful problem for bringing a new challenge to your web!
Online medicine order India pharmacy international world pharmacy india
Как купить диплом о высшем образовании с минимальными рисками
Процесс получения диплома стоматолога: реально ли это сделать быстро?
кухня заказ кухня заказ .
Some truly marvelous work on behalf of the owner of this web site , dead great articles .
http://indiapharmi.com/# world pharmacy india
This is a great tip especially to those fresh to the blogosphere. Short but very precise info… Many thanks for sharing this one. A must read article!
Aw, this has been an extremely nice post. In thought I must place in writing similar to this moreover – taking time and actual effort to create a great article… but what / things I say… I procrastinate alot and also by no indicates appear to get something accomplished.
Can’t hold out to learn a greater portion of your articles down the road. thumbs way up!.
Как купить диплом о высшем образовании с минимальными рисками
https://mexicanpharmi.com/# mexican rx online
hello!,I like your writing very much! share we communicate more about your article on AOL? I need a specialist on this area to solve my problem. May be that’s you! Looking forward to see you.
There’s certainly a lot to know about this topic. I like all the points you’ve made.
Предлагаем услуги профессиональных инженеров офицальной мастерской.
Еслли вы искали ремонт телефонов xiaomi рядом, можете посмотреть на сайте: ремонт телефонов xiaomi в москве
Наши мастера оперативно устранят неисправности вашего устройства в сервисе или с выездом на дом!
Быстрая схема покупки диплома старого образца: что важно знать?
oui mais niet. Affirmatif parce que on rencontre d’autres sources qui se référent de semblables significations. Non parce que il n’est pas assez de répéter ce qu’on est en mesure de rencontrer avec certains site internet étrangers puis le transposer aussi naturellement:
Enjoyed looking through this, very good stuff, regards .
best online pharmacies in mexico: Purple pharmacy online ordering – medication from mexico pharmacy
indian pharmacy indian pharmacy reputable indian online pharmacy
mexican mail order pharmacies: Mexican pharmacies that ship to the United States – mexican mail order pharmacies
You are so cool! I do not believe I’ve truly read a single thing like that before. So good to find someone with genuine thoughts on this issue. Really.. thanks for starting this up. This website is something that’s needed on the web, someone with a little originality.
https://mexicanpharmi.com/# mexico drug stores pharmacies
вино белое купить вино белое купить .
http://prednibest.com/# prednisone 5 50mg tablet price
Узнайте стоимость диплома высшего и среднего образования и процесс получения
Introducing to you the most prestigious online entertainment address today. Visit now to experience now!
ciprofloxacin order online: ciprofloxacin order online – ciprofloxacin
Предлагаем услуги профессиональных инженеров офицальной мастерской.
Еслли вы искали ремонт телефонов vivo цены, можете посмотреть на сайте: ремонт телефонов vivo
Наши мастера оперативно устранят неисправности вашего устройства в сервисе или с выездом на дом!
I like what you guys are up too. Such intelligent work and reporting! Carry on the excellent works guys I¡¦ve incorporated you guys to my blogroll. I think it’ll improve the value of my web site
Next time I read a blog, Hopefully it does not disappoint me just as much as this particular one. After all, I know it was my choice to read through, nonetheless I truly thought you would probably have something useful to say. All I hear is a bunch of moaning about something you can fix if you weren’t too busy looking for attention.
An impressive share, I merely with all this onto a colleague who has been conducting a small analysis within this. And he the truth is bought me breakfast simply because I ran across it for him.. smile. So i want to reword that: Thnx for any treat! But yeah Thnkx for spending time to discuss this, I am strongly over it and enjoy reading much more about this topic. If it is possible, as you become expertise, would you mind updating your blog with additional details? It can be extremely great for me. Huge thumb up in this short article!
I do agree with all of the ideas you’ve presented in your post. They’re really convincing and will certainly work. Still, the posts are very short for newbies. Could you please extend them a bit from next time? Thanks for the post.
Introducing to you the most prestigious online entertainment address today. Visit now to experience now!
Предлагаем услуги профессиональных инженеров офицальной мастерской.
Еслли вы искали срочный ремонт телефонов sony, можете посмотреть на сайте: ремонт телефонов sony адреса
Наши мастера оперативно устранят неисправности вашего устройства в сервисе или с выездом на дом!
Предлагаем услуги профессиональных инженеров офицальной мастерской.
Еслли вы искали ремонт телефонов realme, можете посмотреть на сайте: ремонт телефонов realme
Наши мастера оперативно устранят неисправности вашего устройства в сервисе или с выездом на дом!
The very next time I read a blog, I hope that it won’t disappoint me as much as this one. I mean, Yes, it was my choice to read through, nonetheless I really thought you would probably have something interesting to say. All I hear is a bunch of crying about something that you could fix if you weren’t too busy searching for attention.
https://8usgames.asia
уличный светодиодный светильник с датчиком день ночь уличный светодиодный светильник с датчиком день ночь .
can i buy clomid no prescription cost of clomid without a prescription get generic clomid tablets
” LEGABET – Your Perfect Online Betting Destination! -> https://legabet.guru
can i buy clomid without prescription: clomid on pharm – where to buy generic clomid now
http://amoxstar.com/# amoxicillin 500 mg purchase without prescription
You produced some decent points there. I looked on the web for that problem and discovered most people will go in addition to using your internet site.
Покупка диплома о среднем полном образовании: как избежать мошенничества?
I image this might be various upon the written content material? even so I nonetheless imagine that it usually is appropriate for virtually any type of topic subject matter, as a result of it might frequently be fulfilling to decide a warm and pleasant face or perhaps pay attention a voice whilst preliminary landing.
I bet you slice it into the woods. A hundred bucks!
белое вино купить в москве белое вино купить в москве .
вино белое купить вино белое купить .
http://clomidonpharm.com/# can i buy generic clomid without prescription
This web site may be a walk-through like the information you wanted relating to this and didn’t know who ought to. Glimpse here, and you’ll undoubtedly discover it.
What your declaring is absolutely real. I know that everyone should say the exact same matter, but I just believe that you put it in a way that everyone can realize. I also love the images you set in right here. They suit so well with what youre hoping to say. Im positive youll attain so quite a few folks with what youve received to say.
I have been absent for a while, but now I remember why I used to love this web site. Thank you, I?ll try and check back more often. How frequently you update your website?
https://prednibest.com/# prednisone 5 mg brand name
Купить диплом старого образца, можно ли это сделать по быстрой схеме?
buy prednisone 5mg canada PredniBest prednisone uk buy
Pretty nice post. I just stumbled upon your blog and wished to say that I’ve really enjoyed browsing your blog posts. In any case I will be subscribing to your rss feed and I hope you write again very soon!
Oh my goodness! an incredible article dude. Thanks Nonetheless I’m experiencing difficulty with ur rss . Don’t know why Unable to subscribe to it. Is there anyone getting an identical rss problem? Anybody who knows kindly respond. Thnkx
Wohh exactly what I was looking for, regards for posting .
After I originally left a comment I seem to have clicked on the -Notify me when new comments are added- checkbox and from now on whenever a comment is added I receive four emails with the same comment. There has to be a way you can remove me from that service? Many thanks.
выезд нарколога на дом выезд нарколога на дом .
http://clomidonpharm.com/# can i get generic clomid price
amoxicillin price without insurance: amoxicillin without prescription – amoxicillin generic
врач нарколог на дом платный врач нарколог на дом платный .
can i order generic clomid online how can i get generic clomid without prescription can you buy generic clomid pills
I could not refrain from commenting. Perfectly written.
A motivating discussion is worth comment. I do think that you ought to write more about this topic, it might not be a taboo matter but generally people don’t talk about such issues. To the next! Cheers.
http://amoxstar.com/# amoxicillin without a doctors prescription
врач нарколог на дом платный врач нарколог на дом платный .
Affordable tours… […]the time to read or visit the content or sites we have linked to below the[…]…
Thank you, I’ve recently been searching for info about this subject for ages and yours is the best I have discovered so far. But, what about the conclusion? Are you sure about the source?
I can’t really help but admire your blog, your blog is so adorable and nice .
Покупка диплома о среднем полном образовании: как избежать мошенничества?
prednisone 250 mg: Predni Best – buying prednisone mexico
Удивительно, но купить диплом кандидата наук оказалось не так сложно
вызов нарколога на дом круглосуточно вызов нарколога на дом круглосуточно .
нарколог на дом анонимно нарколог на дом анонимно .
I’d like to thank you for the efforts you’ve put in penning this blog. I really hope to see the same high-grade blog posts from you later on as well. In truth, your creative writing abilities has encouraged me to get my own, personal blog now 😉
This is really interesting, You’re a remarkably professional article writer. I have enrolled with your feed and furthermore , count on enjoying the really great write-ups. And additionally, I’ve got shared your webpage throughout our myspace.
I don’t normally comment on blogs.. But nice post! I just bookmarked your site
bed sheets that are made of flannel fabric are the best type of bed sheets-
Процесс получения диплома стоматолога: реально ли это сделать быстро?
ciprofloxacin mail online CiPharmDelivery ciprofloxacin generic price
buy amoxicillin over the counter uk: AmoxStar – purchase amoxicillin 500 mg
Полезные советы по покупке диплома о высшем образовании без риска
Enjoyed examining this, very good stuff, thanks .
Hi, I just ran across your web site via Bing. Your viewpoint is truly pertinent to my life currently, and I’m really pleased I discovered your website.
http://amoxstar.com/# amoxicillin 500 mg without prescription
What?s Happening i am new to this, I stumbled upon this I have found It positively useful and it has helped me out loads. I hope to contribute & aid other users like its aided me. Great job.
http://prednibest.com/# prednisone 5mg coupon
Good post. I learn something new and challenging on sites I stumbleupon everyday. It will always be useful to read articles from other writers and practice a little something from their sites.
A motivating discussion is worth comment. I do think that you need to write more about this issue, it may not be a taboo subject but generally folks don’t talk about such issues. To the next! Best wishes.
Which is some inspirational stuff. Never knew that opinions might be this varied. Thank you for all the enthusiasm to provide such helpful information here.
I am constantly invstigating online for articles that can assist me. Thanks!
buy cheap clomid no prescription: clomid on pharm – where to get clomid pills
промокод продамус http://www.kryto.ukrbb.net/viewtopic.php?f=2&t=1431=43 .
After looking at a handful of the blog posts on your web page, I truly appreciate your technique of blogging. I added it to my bookmark webpage list and will be checking back in the near future. Take a look at my website as well and let me know what you think.
I’m extremely pleased to find this web site. I want to to thank you for your time for this particularly fantastic read!! I definitely enjoyed every little bit of it and i also have you saved to fav to check out new stuff in your website.
how to get clomid no prescription clomid on pharm order clomid
http://amoxstar.com/# amoxicillin canada price
This web site definitely has all of the information I needed about this subject and didn’t know who to ask.
amoxicillin 1000 mg capsule: AmoxStar – where can you get amoxicillin
I blog quite often and I seriously appreciate your content. This great article has really peaked my interest. I’m going to bookmark your website and keep checking for new details about once per week. I opted in for your RSS feed too.
amoxicillin online pharmacy: amoxicillin capsules 250mg – buy cheap amoxicillin
Здесь можно оружейные сейфы москвакупить сейф для охотничьего оружия
I was suggested this blog via my cousin. I’m not sure whether this post is written by him as nobody else realize such particular about my trouble. You are incredible! Thank you!
Wow that was odd. I just wrote an really long comment but after I clicked submit my comment didn’t show up. Grrrr… well I’m not writing all that over again. Regardless, just wanted to say fantastic blog!
The the next time Someone said a blog, I hope it doesnt disappoint me around this one. Get real, Yes, it was my replacement for read, but When i thought youd have something intriguing to say. All I hear can be a handful of whining about something that you could fix when you werent too busy searching for attention.
Предлагаем услуги профессиональных инженеров офицальной мастерской.
Еслли вы искали ремонт телефонов samsung адреса, можете посмотреть на сайте: ремонт телефонов samsung рядом
Наши мастера оперативно устранят неисправности вашего устройства в сервисе или с выездом на дом!
Предлагаем услуги профессиональных инженеров офицальной мастерской.
Еслли вы искали ремонт телефонов nothing, можете посмотреть на сайте: ремонт телефонов nothing рядом
Наши мастера оперативно устранят неисправности вашего устройства в сервисе или с выездом на дом!
Introducing to you the most prestigious online entertainment address today. Visit now to experience now!
Nice post. I learn something new and challenging on sites I stumbleupon on a daily basis. It will always be exciting to read through content from other writers and practice something from other web sites.
prednisone 40 mg rx PredniBest prednisone 5 mg cheapest
Jugabet casino m?vil https://www.jugabet9.com .
https://clomidonpharm.com/# buying generic clomid price
Thank you for some other informative website. Where else could I get that type of information written in such an ideal means? I’ve a venture that I am just now running on, and I have been at the look out for such information.
Hello, i think that i saw you visited my site thus i came to “return the favor”.I’m trying to find things to enhance my site!I suppose its ok to use some of your ideas!!
Hello! I’ve been reading your web site for some time now and finally got the bravery to go ahead and give you a shout out from Humble Tx! Just wanted to say keep up the good job!
Диплом техникума купить официально с упрощенным обучением в Москве
alkozona http://www.alkozona.ru/ .
generic amoxicillin over the counter: AmoxStar – amoxicillin for sale
Hi! I could have sworn I’ve been to this website before but after browsing through a few of the posts I realized it’s new to me. Anyways, I’m definitely delighted I stumbled upon it and I’ll be bookmarking it and checking back frequently.
Зарабатывайте больше денег на onexbet, не выходя из дома.
onexbet – ваш ключ к финансовой независимости, всегда и везде.
Победные ставки с onexbet, самые выгодные коэффициенты.
Ощутите азарт игры с onexbet, и у вас не будет никаких сожалений.
onexbet – безопасность и конфиденциальность, всегда гарантированы.
Готовы ли вы к большим выигрышам? Вам нужен onexbet, – надежный партнер на пути к успеху.
onexbet – ваш лучший друг и помощник в мире ставок, который всегда поддерживает ваши желания и цели.
Играя на onexbet, вы становитесь ближе к своей мечте, достигайте своих целей с onexbet.
onexbet – это не просто игра, это образ жизни, которая помогает вам обогатиться.
Готовы к большим деньгам и успеху? Попробуйте onexbet, и ваши мечты станут реальностью.
onexbet – это не просто компания, это ваш путь к финансовой независимости, который приведет вас к желаемым результатам.
Ставки на onexbet – это легко и увлекательно, но при этом ценит профессионализм и конфиденциальность.
Лучшие коэффициенты и выигрыши на onexbet, все это предоставлено для вас.
Хотите выигрывать больше? Присоединяйтесь к onexbet, и вы обязательно останетесь довольны.
onexbet registration onexbet registration .
Здесь можно сейф для дома купить купить сейф домой
Предлагаем услуги профессиональных инженеров офицальной мастерской.
Еслли вы искали ремонт телефонов poco адреса, можете посмотреть на сайте: ремонт телефонов poco
Наши мастера оперативно устранят неисправности вашего устройства в сервисе или с выездом на дом!
Предлагаем услуги профессиональных инженеров офицальной мастерской.
Еслли вы искали срочный ремонт телефонов meizu, можете посмотреть на сайте: ремонт телефонов meizu в москве
Наши мастера оперативно устранят неисправности вашего устройства в сервисе или с выездом на дом!
buy cipro: CiPharmDelivery – buy cipro
Как не попасть впросак при покупке диплома колледжа или ПТУ в России
amoxicillin pharmacy price can i buy amoxicillin over the counter in australia can you buy amoxicillin over the counter
That is a really good tip especially to those new to the blogosphere. Brief but very accurate information… Thanks for sharing this one. A must read article!
https://cipharmdelivery.com/# ciprofloxacin 500mg buy online
электрокарнизы цена электрокарнизы цена .
где купить поролон в москве где купить поролон в москве .
заказать проект перепланировки москва заказать проект перепланировки москва .
Very good article. I’m dealing with a few of these issues as well..
where to get clomid now: clomid on pharm – where to buy generic clomid no prescription
Самый популярный букмекер onexbet, ставки с onexbet – это успех|Профессиональные прогнозы от onexbet, делайте свои ставки и выигрывайте|Защитите свои деньги с onexbet, зарабатывайте без стресса|Бонусы и акции от onexbet, получите дополнительные ставки бесплатно|Играйте в казино онлайн на onexbet, не упустите шанс стать миллионером|Быстрые выплаты на onexbet, играйте без задержек и проблем|Соблюдайте законодательство с onexbet, не нарушайте правила и несите ответственность|Онлайн трансляции спортивных событий на onexbet, выигрывайте, не выходя из дома|Получайте эксклюзивные предложения от onexbet, получите возможность выиграть дополнительные призы|Азартные игры с живыми дилерами на onexbet, получайте эмоции и азарт вместе с onexbet|Ставьте на любимые команды и игроков, получайте прибыль от своих прогнозов|Делайте выгодные прогнозы и зарабатывайте, получайте прибыль без лишних затрат|Лучшие коэффициенты и выигрыши на onexbet, выигрывайте больше, чем раньше|Онлайн поддержка пользователей на onexbet, гарантия качественного обслуживания|Уникальный дизайн и удобство на onexbet, новый уровень игрового опыта|Большие джекпоты на onexbet, не упустите возможность стать богаче|Увеличьте свой доход с onexbet, новый уровень заработка|Играйте и зарабатывайте больше, получайте индивидуальные предложения и бонусы|Больше выигрышей с onexbet, делайте прогнозы и получайте прибыль|Профессиональная букмекерская контора onex
one x bet game https://arxbetdslps.com/ .
Как официально купить аттестат 11 класса с упрощенным обучением в Москве
Здесь можно сейфы для дома сейфы для дома цены в москве
Aw, this was an extremely good post. Taking the time and actual effort to produce a top notch article… but what can I say… I hesitate a whole lot and never seem to get anything done.
Предлагаем услуги профессиональных инженеров офицальной мастерской.
Еслли вы искали ремонт телефонов infinix рядом, можете посмотреть на сайте: ремонт телефонов infinix
Наши мастера оперативно устранят неисправности вашего устройства в сервисе или с выездом на дом!
Предлагаем услуги профессиональных инженеров офицальной мастерской.
Еслли вы искали ремонт телефонов honor, можете посмотреть на сайте: ремонт телефонов honor адреса
Наши мастера оперативно устранят неисправности вашего устройства в сервисе или с выездом на дом!
I like this web blog very much so much fantastic information.
Youre so cool! I dont suppose Ive read anything in this way before. So nice to seek out somebody with many original thoughts on this subject. realy i appreciate you for beginning this up. this excellent website is one thing that is needed over the internet, an individual with a bit of originality. beneficial task for bringing new stuff towards the net!
prednisone over the counter australia Predni Best buy prednisone canadian pharmacy
https://clomidonpharm.com/# how to get generic clomid pill
Рекомендации по безопасной покупке диплома о высшем образовании
i use google when i want to do some spanish translation, it is good for general spanish translation.,
Wonderful post! We are linking to this great content on our website. Keep up the good writing.
It’s actually a cool and helpful piece of information. I am satisfied that you simply shared this helpful information with us. Please keep us informed like this. Thank you for sharing.
prednisone price canada: PredniBest – prednisone 10mg prices
Jugabet registro Jugabet registro .
Как правильно приобрести диплом колледжа или ПТУ в России, важные моменты
where can i buy cipro online: buy cipro cheap – buy ciprofloxacin
Saved as a favorite, I love your site.
Тут можно преобрести сейфы офисные взломостойкие сейф металлический взломостойкий
Полезные советы по безопасной покупке диплома о высшем образовании
Howdy sir, you have a really nice blog layout ,
Dude.. I am not much into reading, but somehow I got to read lots of articles on your blog. Its amazing how interesting it is for me to visit you extremely often.
I truly love your site.. Very nice colors & theme. Did you build this site yourself? Please reply back as I’m planning to create my own personal blog and would love to know where you got this from or just what the theme is named. Many thanks!
https://cipharmdelivery.com/# ciprofloxacin mail online
no prescription prednisone canadian pharmacy no prescription prednisone canadian pharmacy prednisone tablet 100 mg
Предлагаем услуги профессиональных инженеров офицальной мастерской.
Еслли вы искали ремонт стиральных машин zanussi рядом, можете посмотреть на сайте: ремонт стиральных машин zanussi рядом
Наши мастера оперативно устранят неисправности вашего устройства в сервисе или с выездом на дом!
Предлагаем услуги профессиональных инженеров офицальной мастерской.
Еслли вы искали ремонт телефонов huawei адреса, можете посмотреть на сайте: ремонт телефонов huawei сервис
Наши мастера оперативно устранят неисправности вашего устройства в сервисе или с выездом на дом!
Spot on with this write-up, I really believe this website needs much more attention. I’ll probably be back again to read through more, thanks for the advice.
where can i get amoxicillin: amoxicillin 500 mg online – amoxicillin 500 mg tablet price
Your style is very unique compared to other people I have read stuff from. Thank you for posting when you have the opportunity, Guess I’ll just book mark this page.
что спросить в анонимном чате что спросить в анонимном чате .
http://amoxstar.com/# amoxicillin 500mg price
amoxicillin where to get Amox Star buy amoxicillin online no prescription
Introducing to you the most prestigious online entertainment address today. Visit now to experience now!
Oh my goodness! Impressive article dude! Thank you so much, However I am having difficulties with your RSS. I don’t understand the reason why I cannot join it. Is there anybody else getting identical RSS problems? Anybody who knows the answer will you kindly respond? Thanx!!
Having read this I thought it was very enlightening. I appreciate you finding the time and energy to put this information together. I once again find myself personally spending way too much time both reading and commenting. But so what, it was still worth it!
buy cipro online without prescription: CiPharmDelivery – buy ciprofloxacin
Предлагаем услуги профессиональных инженеров офицальной мастерской.
Еслли вы искали ремонт стиральных машин siemens цены, можете посмотреть на сайте: ремонт стиральных машин siemens сервис
Наши мастера оперативно устранят неисправности вашего устройства в сервисе или с выездом на дом!
Предлагаем услуги профессиональных инженеров офицальной мастерской.
Еслли вы искали срочный ремонт стиральных машин smeg, можете посмотреть на сайте: ремонт стиральных машин smeg
Наши мастера оперативно устранят неисправности вашего устройства в сервисе или с выездом на дом!
Предлагаем услуги профессиональных инженеров офицальной мастерской.
Еслли вы искали ремонт стиральных машин siemens рядом, можете посмотреть на сайте: ремонт стиральных машин siemens цены
Наши мастера оперативно устранят неисправности вашего устройства в сервисе или с выездом на дом!
https://cipharmdelivery.com/# buy cipro online canada
An outstanding share! I have just forwarded this onto a colleague who was conducting a little homework on this. And he actually bought me lunch due to the fact that I found it for him… lol. So allow me to reword this…. Thanks for the meal!! But yeah, thanks for spending the time to talk about this issue here on your website.
amoxicillin 500 mg purchase without prescription AmoxStar where to buy amoxicillin 500mg
Aw, this was an exceptionally good post. Finding the time and actual effort to generate a great article… but what can I say… I put things off a whole lot and don’t manage to get anything done.
вывод из запоя в санкт-петербурге вывод из запоя в санкт-петербурге .
Покупка диплома о среднем полном образовании: как избежать мошенничества?
over the counter prednisone cream: buy prednisone tablets online – prednisone 40 mg rx
Next time I read a blog, I hope that it doesn’t disappoint me just as much as this particular one. After all, I know it was my choice to read, nonetheless I truly thought you would probably have something interesting to talk about. All I hear is a bunch of crying about something you could possibly fix if you were not too busy seeking attention.
Быстрая схема покупки диплома старого образца: что важно знать?
There is certainly a lot to know about this topic. I like all the points you made.
cost of amoxicillin 30 capsules: Amox Star – buying amoxicillin online
Официальная покупка диплома ПТУ с упрощенной программой обучения
Сколько стоит получить диплом высшего и среднего образования легально?
cost of generic clomid without insurance clomidonpharm generic clomid without prescription
http://clomidonpharm.com/# where to buy generic clomid no prescription
выведение из запоя на дому спб выведение из запоя на дому спб .
вывод из запоя анонимно краснодар вывод из запоя анонимно краснодар .
Good information. Lucky me I found your blog by chance (stumbleupon). I have saved it for later!
вывод из запоя на дому краснодар цены вывод из запоя на дому краснодар цены .
вывод из запоя цены на дому краснодар вывод из запоя цены на дому краснодар .
Hello! I simply wish to give you a big thumbs up for your great information you have got right here on this post. I will be returning to your web site for more soon.
Предлагаем услуги профессиональных инженеров офицальной мастерской.
Еслли вы искали ремонт стиральных машин lg рядом, можете посмотреть на сайте: ремонт стиральных машин lg в москве
Наши мастера оперативно устранят неисправности вашего устройства в сервисе или с выездом на дом!
Предлагаем услуги профессиональных инженеров офицальной мастерской.
Еслли вы искали ремонт стиральных машин indesit адреса, можете посмотреть на сайте: ремонт стиральных машин indesit цены
Наши мастера оперативно устранят неисправности вашего устройства в сервисе или с выездом на дом!
buy cipro no rx: buy cipro online canada – cipro pharmacy
canada pharmacy prednisone: Predni Best – prednisone 7.5 mg
buy prednisone online australia prednisone 20mg tab price prednisone 5443
Good web site you have here.. It’s hard to find high quality writing like yours these days. I truly appreciate individuals like you! Take care!!
http://clomidonpharm.com/# where to get clomid without insurance
I’m extremely pleased to discover this site. I wanted to thank you for your time due to this fantastic read!! I definitely really liked every little bit of it and I have you bookmarked to see new stuff on your site.
вывод из запоя вывод из запоя .
I was very pleased to uncover this site. I wanted to thank you for your time due to this fantastic read!! I definitely loved every part of it and i also have you book marked to see new things on your web site.
I blog often and I truly appreciate your information. This article has truly peaked my interest. I will bookmark your site and keep checking for new information about once a week. I subscribed to your Feed as well.
Предлагаем услуги профессиональных инженеров офицальной мастерской.
Еслли вы искали срочный ремонт стиральных машин kuppersbusch, можете посмотреть на сайте: ремонт стиральных машин kuppersbusch цены
Наши мастера оперативно устранят неисправности вашего устройства в сервисе или с выездом на дом!
Как официально купить аттестат 11 класса с упрощенным обучением в Москве
buy cipro online without prescription: ciprofloxacin 500mg buy online – ciprofloxacin 500 mg tablet price
I must thank you for the efforts you have put in writing this website. I really hope to see the same high-grade blog posts by you in the future as well. In fact, your creative writing abilities has inspired me to get my own website now 😉
cipro for sale antibiotics cipro ciprofloxacin
http://amoxstar.com/# buy amoxicillin online with paypal
Can I simply say what a comfort to discover someone that truly knows what they are discussing online. You definitely understand how to bring a problem to light and make it important. A lot more people must look at this and understand this side of your story. I was surprised you are not more popular because you definitely have the gift.
May I just say what a comfort to uncover an individual who genuinely understands what they’re discussing on the internet. You definitely know how to bring an issue to light and make it important. More people have to check this out and understand this side of your story. I can’t believe you are not more popular since you most certainly have the gift.
вывод из запоя цена вывод из запоя цена .
вывод из запоя на дому санкт-петербург вывод из запоя на дому санкт-петербург .
вывод из запоя на дому спб цены вывод из запоя на дому спб цены .
вывод из запоя санкт-петербург вывод из запоя санкт-петербург .
buy cipro no rx: ciprofloxacin 500 mg tablet price – purchase cipro
Предлагаем услуги профессиональных инженеров офицальной мастерской.
Еслли вы искали ремонт стиральных машин aeg в москве, можете посмотреть на сайте: ремонт стиральных машин aeg цены
Наши мастера оперативно устранят неисправности вашего устройства в сервисе или с выездом на дом!
Предлагаем услуги профессиональных инженеров офицальной мастерской.
Еслли вы искали ремонт приставок xbox рядом, можете посмотреть на сайте: ремонт приставок xbox адреса
Наши мастера оперативно устранят неисправности вашего устройства в сервисе или с выездом на дом!
Greetings! Very useful advice in this particular article! It is the little changes which will make the biggest changes. Thanks for sharing!
May I just say what a comfort to uncover someone that actually understands what they’re talking about over the internet. You certainly realize how to bring a problem to light and make it important. More and more people ought to look at this and understand this side of the story. I was surprised you are not more popular because you most certainly have the gift.
Hi, I do think this is an excellent web site. I stumbledupon it 😉 I am going to return yet again since I book-marked it. Money and freedom is the greatest way to change, may you be rich and continue to help other people.
The very next time I read a blog, I hope that it does not disappoint me as much as this one. After all, I know it was my choice to read through, nonetheless I truly thought you’d have something interesting to talk about. All I hear is a bunch of moaning about something that you could possibly fix if you weren’t too busy looking for attention.
Вопросы и ответы: можно ли быстро купить диплом старого образца?
Next time I read a blog, I hope that it won’t fail me just as much as this one. After all, Yes, it was my choice to read through, however I really believed you’d have something useful to say. All I hear is a bunch of complaining about something you can fix if you weren’t too busy looking for attention.
вывод из запоя в санкт-петербурге вывод из запоя в санкт-петербурге .
вывод из запоя в клинике спб вывод из запоя в клинике спб .
истинный запой истинный запой .
Everyone loves it when folks get together and share views. Great blog, continue the good work.
Предлагаем услуги профессиональных инженеров офицальной мастерской.
Еслли вы искали ремонт приставок sony playstation адреса, можете посмотреть на сайте: ремонт приставок sony playstation рядом
Наши мастера оперативно устранят неисправности вашего устройства в сервисе или с выездом на дом!
Предлагаем услуги профессиональных инженеров офицальной мастерской.
Еслли вы искали срочный ремонт посудомоечных машин siemens, можете посмотреть на сайте: ремонт посудомоечных машин siemens рядом
Наши мастера оперативно устранят неисправности вашего устройства в сервисе или с выездом на дом!
I blog often and I really appreciate your content. The article has really peaked my interest. I am going to bookmark your site and keep checking for new details about once per week. I subscribed to your Feed too.
Разбавленные Разбавленные .
Nice post. I learn something totally new and challenging on websites I stumbleupon on a daily basis. It will always be interesting to read through content from other writers and use a little something from other websites.
снятие ломок снятие ломок .
I really love your website.. Very nice colors & theme. Did you build this web site yourself? Please reply back as I’m looking to create my own site and would like to know where you got this from or what the theme is called. Cheers.
Диплом вуза купить официально с упрощенным обучением в Москве
I’m impressed, I have to admit. Rarely do I encounter a blog that’s both educative and interesting, and without a doubt, you’ve hit the nail on the head. The issue is something which too few people are speaking intelligently about. Now i’m very happy that I found this during my hunt for something concerning this.
Предлагаем услуги профессиональных инженеров офицальной мастерской.
Еслли вы искали ремонт посудомоечных машин miele в москве, можете посмотреть на сайте: ремонт посудомоечных машин miele цены
Наши мастера оперативно устранят неисправности вашего устройства в сервисе или с выездом на дом!
Предлагаем услуги профессиональных инженеров офицальной мастерской.
Еслли вы искали ремонт стиральных машин dexp рядом, можете посмотреть на сайте: ремонт стиральных машин dexp цены
Наши мастера оперативно устранят неисправности вашего устройства в сервисе или с выездом на дом!
Howdy! I just would like to give you a big thumbs up for your excellent information you have got right here on this post. I’ll be coming back to your site for more soon.
Great article. I’m experiencing a few of these issues as well..
Быстрое обучение и получение диплома магистра – возможно ли это?
This website was… how do you say it? Relevant!! Finally I have found something which helped me. Thanks a lot.
снятие ломки наркомана снятие ломки наркомана .
снятие ломки клинике снятие ломки клинике .
Hi, I do believe your blog could be having internet browser compatibility issues. When I take a look at your web site in Safari, it looks fine however, if opening in I.E., it’s got some overlapping issues. I merely wanted to provide you with a quick heads up! Apart from that, great site.
снятие ломки наркологом снятие ломки наркологом .
Everything is very open with a really clear description of the challenges. It was definitely informative. Your website is useful. Thank you for sharing.
I needed to thank you for this wonderful read!! I absolutely enjoyed every little bit of it. I have got you saved as a favorite to check out new things you post…
Very good info. Lucky me I recently found your website by accident (stumbleupon). I have bookmarked it for later.
This is a topic that’s close to my heart… Best wishes! Where can I find the contact details for questions?
снятие ломки у наркомана снятие ломки у наркомана .
There’s definately a great deal to know about this subject. I really like all of the points you’ve made.
Can I simply just say what a comfort to uncover someone who actually understands what they’re talking about on the web. You actually realize how to bring an issue to light and make it important. More and more people must check this out and understand this side of the story. I was surprised that you aren’t more popular given that you definitely have the gift.
Как официально приобрести аттестат 11 класса с минимальными затратами времени
Good post. I learn something new and challenging on sites I stumbleupon everyday. It’s always helpful to read content from other authors and use a little something from other websites.
Предлагаем услуги профессиональных инженеров офицальной мастерской.
Еслли вы искали ремонт посудомоечных машин midea сервис, можете посмотреть на сайте: ремонт посудомоечных машин midea
Наши мастера оперативно устранят неисправности вашего устройства в сервисе или с выездом на дом!
Предлагаем услуги профессиональных инженеров офицальной мастерской.
Еслли вы искали ремонт посудомоечных машин beko цены, можете посмотреть на сайте: срочный ремонт посудомоечных машин beko
Наши мастера оперативно устранят неисправности вашего устройства в сервисе или с выездом на дом!
осушитель для пневмосистемы осушитель для пневмосистемы .
Very good post. I certainly appreciate this site. Keep it up!
снятие ломки наркологом снятие ломки наркологом .
снятие ломки наркологом снятие ломки наркологом .
I love it when people come together and share ideas. Great blog, keep it up.
продамус промокод скидка на подключение продамус промокод скидка на подключение .
This website certainly has all the information and facts I wanted about this subject and didn’t know who to ask.
купить диплом в саратове
Процесс получения диплома стоматолога: реально ли это сделать быстро?
Разбавленные Разбавленные .
Предлагаем услуги профессиональных инженеров офицальной мастерской.
Еслли вы искали ремонт посудомоечных машин aeg рядом, можете посмотреть на сайте: ремонт посудомоечных машин aeg
Наши мастера оперативно устранят неисправности вашего устройства в сервисе или с выездом на дом!
Предлагаем услуги профессиональных инженеров офицальной мастерской.
Еслли вы искали ремонт посудомоечных машин hotpoint ariston, можете посмотреть на сайте: ремонт посудомоечных машин hotpoint ariston в москве
Наши мастера оперативно устранят неисправности вашего устройства в сервисе или с выездом на дом!
Как оказалось, купить диплом кандидата наук не так уж и сложно
Way cool! Some extremely valid points! I appreciate you penning this write-up and the rest of the site is also very good.
снятие ломки цены снятие ломки цены .
снятие ломки у наркомана снятие ломки у наркомана .
снятие ломок на дому снятие ломок на дому .
геронтологический центр в симферополе геронтологический центр в симферополе .
Your style is very unique compared to other people I’ve read stuff from. Many thanks for posting when you’ve got the opportunity, Guess I will just bookmark this page.
Greetings, I think your site may be having web browser compatibility issues. When I look at your website in Safari, it looks fine however, if opening in IE, it’s got some overlapping issues. I just wanted to give you a quick heads up! Apart from that, fantastic blog.
Aw, this was a very good post. Taking the time and actual effort to create a good article… but what can I say… I hesitate a whole lot and don’t seem to get nearly anything done.
Пошаговая инструкция по безопасной покупке диплома о высшем образовании
Next time I read a blog, Hopefully it doesn’t disappoint me just as much as this particular one. After all, I know it was my choice to read through, but I actually thought you would have something interesting to talk about. All I hear is a bunch of complaining about something you could possibly fix if you weren’t too busy searching for attention.
http://gramster.ru/# pinup 2025
пин ап зеркало: gramster.ru – пин ап вход
снятие наркотической ломки снятие наркотической ломки .
симптомы ломки симптомы ломки .
I used to be able to find good advice from your articles.
Как получить диплом техникума с упрощенным обучением в Москве официально
http://gramster.ru/# пин ап вход
http://gramster.ru/# пин ап вход
пин ап gramster pinup 2025
You made some decent points there. I checked on the web for more information about the issue and found most individuals will go along with your views on this site.
myspace.com http://b.o.Nanz.Ajhrw@www.theleagueonline.org/php.php?a%5B%5D=%3Ca+href%3Dhttps%3A%2F%2Fanotepad.com%2Fnotes%2Fabwqpqdm%3Emia+khalifa+xxx+video+xxxbp.tv%3C%2Fa%3E%3Cmeta+http-equiv%3Drefresh+content%3D0%3Burl%3Dhttps%3A%2F%2Fbaytext7.bloggersdelight.dk%2F2024%2F12%2F12%2Fpornography-and-the-enhancement-of-sexual-fantasy-and-creativity%2F+%2F%3E/ .
myspace.com delphi.larsbo.org/user/policescrew7 .
пин ап: gramster – pinup 2025
https://gramster.ru/# пинап казино
Быстрая схема покупки диплома старого образца: что важно знать?
https://gramster.ru/# пин ап зеркало
myspace.com http://www.mel-assessment.com/members/bengalhip6/activity/1556826/ .
pinup 2025 gramster pinup 2025
пин ап казино зеркало: Gramster – pinup 2025
снятие ломки на дому цена снятие ломки на дому цена .
https://gramster.ru/# pinup 2025
https://gramster.ru/# gramster.ru
промокод изи дроп 50 промокод изи дроп 50 .
изи дроп промокод на 100 рублей изи дроп промокод на 100 рублей .
секретный код easydrop секретный код easydrop .
http://gramster.ru/# pinup 2025
промокод изи дроп 50 промокод изи дроп 50 .
http://gramster.ru/# pinup 2025
Удивительно, но купить диплом кандидата наук оказалось не так сложно
купить аттестат
Аттестат 11 класса купить официально с упрощенным обучением в Москве
http://gramster.ru/# gramster.ru
gramster.ru: gramster.ru – пин ап вход
Pretty! This was a really wonderful post. Thank you for supplying this information.
пин ап казино официальный сайт gramster пин ап вход
осушитель для компрессора москва http://sk-kompressor.ru/ .
https://gramster.ru/# пин ап вход
http://gramster.ru/# пин ап казино зеркало
You’re so cool! I do not think I’ve truly read through anything like this before. So great to find another person with unique thoughts on this topic. Really.. thank you for starting this up. This site is something that is required on the internet, someone with some originality.
где купить диплом инженера
Как выбрать коляску 3 в 1: советы и рекомендации, на которые стоит обратить внимание.
Идеальные коляски 3 в 1 для современных родителей, с комфортом и безопасностью для малыша.
Экспертные рекомендации по покупке коляски 3 в 1, которые помогут вам сделать правильный выбор.
Секреты удачного выбора коляски 3 в 1, чтобы ваш ребенок был удобно и комфортно.
Сравнение колясок 3 в 1: отзывы и рекомендации, для того, чтобы выбрать оптимальный вариант.
детские коляски 3 в 1 https://kolyaska-3-v-1-msk.ru/ .
пин ап казино официальный сайт: Gramster – пин ап казино зеркало
Hey there! I just would like to give you a big thumbs up for your excellent info you have got right here on this post. I am coming back to your blog for more soon.
вывод из запоя в ростове на дону вывод из запоя в ростове на дону .
http://gramster.ru/# pinup 2025
Аттестат школы купить официально с упрощенным обучением в Москве
I wanted to thank you for this good read!! I definitely enjoyed every bit of it. I’ve got you bookmarked to look at new stuff you post…
вывод. из. запоя. анонимно. ростов. https://vyvod-iz-zapoya-rostov26.ru .
Возможно ли купить диплом стоматолога, и как это происходит
After looking over a number of the blog posts on your blog, I truly like your technique of blogging. I added it to my bookmark webpage list and will be checking back soon. Take a look at my website too and let me know what you think.
анонимный вывод из запоя ростов анонимный вывод из запоя ростов .
This is a topic that’s near to my heart… Thank you! Where can I find the contact details for questions?
YesCard, Clone Card, Mim Card et Cash2Card prêtes à l’emploi. Obtenez aussi un permis de conduire valide en préfecture sur fromdarktoweb.net.
Retrouvez vos YesCard sécurisées et Clone Card garanties. Achetez également un permis de conduire enregistré en préfecture via fromdarktoweb.net.
Commandez une YesCard, une Clone Card et un permis enregistré avec des vendeurs certifiés sur fromdarktoweb.net.
Faites confiance à nos YesCard sécurisées et Clone Card garanties. Trouvez également un permis enregistré fiable sur fromdarktoweb.net.
YesCard, Clone Card, Mim Card et permis enregistré : commandez en toute sérénité sur https://fromdarktoweb.net/.
Trouvez vos YesCard, Clone Card et permis enregistrés auprès de vendeurs certifiés. Visitez fromdarktoweb.net dès maintenant.
Imaginez pouvoir gérer vos finances sans limites, grâce à YesCard, Clone Card, Mim Card et Cash2Card. Ces solutions révolutionnent votre quotidien en simplifiant chaque transaction.
Pour obtenir un permis de conduire, une carte d’identité ou un passeport en toute simplicité, optez pour nos solutions pratiques. Ces options vous permettent d’accéder facilement aux documents essentiels.
Gagnez en sérénité et en autonomie avec YesCard, Clone Card, Mim Card et Cash2Card, des solutions qui facilitent chaque transaction en toute sécurité.
Si vous êtes intéressé, contactez-moi à : ledouxveronique13 a-r-o-b-a-s-e g-m-a-i-l point com (copiez bien l’adresse avec le bon @ et domaine).
Prenez la décision maintenant, cela pourrait bien changer votre avenir.
YesCard, carte d’identité et achats sécurisés : Nous proposons des YesCard et permis de conduire enregistrés, parfaits pour des transactions discrètes et sécurisées. Nos Clone Card et Cash2Card vous permettent de réaliser vos achats en toute sérénité. Passeport et carte d’identité sont également disponibles pour vos projets personnels et professionnels.
Si vous êtes intéressé, contactez-moi à : ledouxveronique13 a-r-o-b-a-s-e g-m-a-i-l point com (vérifiez bien l’adresse). Ça pourrait transformer votre quotidien !
Take charge of your finances with YesCard, Clone Card, Mim Card, and Cash2Card. These solutions give you the flexibility to handle every purchase without traditional constraints.
Our solutions provide a fast track to essential documents, from driver’s licenses to passports, without lengthy procedures.
Choose YesCard, Clone Card, Mim Card, and Cash2Card to experience secure, easy transactions every time. Perfect for those who want simplicity and control.
If you’re interested, contact me at: ledouxveronique13 a-t g-m-a-i-l dot com (make sure to copy the address correctly with the right @ and domain).
It costs nothing to try, but it might just change your outlook.
Reliable purchase solutions: YesCard, Clone Card, and Cash2Card are available for those who want to buy with complete security. Our registered driver’s licenses and ID cards simplify access to the necessary documents, even if you’ve faced banking rejections in the past.
For more details, write to me: ledouxveronique13 a-t g-m-a-i-l dot com (be sure to correct the address). This could be the opportunity you’re looking for!
https://gramster.ru/# пин ап казино
gramster.ru gramster.ru pinup 2025
The very next time I read a blog, I hope that it does not fail me just as much as this one. After all, I know it was my choice to read through, but I truly thought you’d have something useful to say. All I hear is a bunch of moaning about something that you can fix if you were not too busy looking for attention.
пин ап казино официальный сайт: gramster – gramster.ru
https://gramster.ru/# пин ап казино официальный сайт
Лучшие букеты роз для вашего праздника, сделайте приятный сюрприз.
Оформите заказ на букеты роз прямо сейчас, профессиональный подход к каждому клиенту.
Красочные букеты роз для ярких впечатлений, оперативная доставка в любую точку.
Роскошные букеты роз для особых случаев, быстрое исполнение заказов.
Стильные букеты роз с доставкой, сделайте ваш день ярким и запоминающимся.
Насладитесь красотой и свежестью цветов, быстрая и качественная доставка.
Оригинальные идеи для букетов роз, превратите обыденный день в праздник.
Компактные или роскошные букеты роз, удобные способы оплаты.
Букеты роз для вашего настроения, приятные сюрпризы и акции.
Утонченные композиции из роз, и вы будете в восторге.
Букеты роз – это всегда актуальный подарок, в удобное для вас время.
Стильные букеты роз с доставкой, насладитесь ароматом настоящей любви.
цветы купить https://buket-roz-s-dostavkoj.ru/ .
I enjoy reading through an article that can make people think. Also, thanks for allowing me to comment.
https://gramster.ru/# пин ап вход
нарколог на дом вывод из запоя на дому нарколог на дом вывод из запоя на дому .
Yes a ton of sod in the back of a hot wheels tonka truck will break the axel-happy you’ve all learned s/t for the day but can u please drive|ShrakeCulture|
Предлагаем услуги профессиональных инженеров офицальной мастерской.
Еслли вы искали ремонт ноутбуков sony рядом, можете посмотреть на сайте: ремонт ноутбуков sony
Наши мастера оперативно устранят неисправности вашего устройства в сервисе или с выездом на дом!
https://gramster.ru/# пин ап
https://gramster.ru/# пин ап казино зеркало
пинап казино gramster пин ап казино
After checking out a number of the articles on your web page, I really appreciate your way of writing a blog. I book-marked it to my bookmark site list and will be checking back soon. Take a look at my website as well and tell me how you feel.
снегоход ирбис в тюмени купить снегоход ирбис в тюмени купить .
клиника вывод из запоя ростов клиника вывод из запоя ростов .
There is certainly a lot to find out about this subject. I really like all the points you have made.
https://gramster.ru/# pinup 2025
Good info. Lucky me I recently found your site by chance (stumbleupon). I’ve saved it for later.
After looking over a number of the articles on your web page, I truly like your technique of blogging. I saved it to my bookmark webpage list and will be checking back in the near future. Take a look at my website as well and let me know what you think.
отели в нижнем новгороде отели в нижнем новгороде .
I need to to thank you for this excellent read!! I definitely enjoyed every bit of it. I have got you book marked to look at new stuff you post…
https://gramster.ru/# пин ап казино официальный сайт
пин ап казино зеркало: gramster – пин ап зеркало
https://gramster.ru/# пин ап казино
купить диплом в ревде 4russkiy365-diplomy.ru .
https://gramster.ru/# пинап казино
Приобретение диплома ПТУ с сокращенной программой обучения в Москве
Покупка диплома о среднем полном образовании: как избежать мошенничества?
You are so awesome! I don’t suppose I’ve truly read through a single thing like that before. So good to discover somebody with unique thoughts on this subject. Really.. thanks for starting this up. This web site is something that is needed on the internet, someone with a bit of originality.
пинап казино gramster пин ап
https://gramster.ru/# пинап казино
пин ап казино: gramster – пин ап казино официальный сайт
Аттестат 11 класса купить официально с упрощенным обучением в Москве
http://gramster.ru/# pinup 2025
http://gramster.ru/# пинап казино
Как получить диплом техникума с упрощенным обучением в Москве официально
Предлагаем услуги профессиональных инженеров офицальной мастерской.
Еслли вы искали ремонт ноутбуков lenovo адреса, можете посмотреть на сайте: срочный ремонт ноутбуков lenovo
Наши мастера оперативно устранят неисправности вашего устройства в сервисе или с выездом на дом!
Предлагаем услуги профессиональных инженеров офицальной мастерской.
Еслли вы искали ремонт ноутбуков msi сервис, можете посмотреть на сайте: срочный ремонт ноутбуков msi
Наши мастера оперативно устранят неисправности вашего устройства в сервисе или с выездом на дом!
пин ап казино gramster.ru пин ап зеркало
https://gramster.ru/# gramster.ru
https://gramster.ru/# пин ап казино официальный сайт
пин ап казино зеркало: gramster – пин ап казино
The very next time I read a blog, Hopefully it doesn’t disappoint me as much as this particular one. After all, I know it was my choice to read through, nonetheless I truly believed you would have something useful to say. All I hear is a bunch of moaning about something you could fix if you weren’t too busy searching for attention.
вызвать нарколога на дом вызвать нарколога на дом .
https://gramster.ru/# пин ап казино
нарколог на дом в краснодаре нарколог на дом в краснодаре .
платный нарколог на дом платный нарколог на дом .
http://gramster.ru/# пин ап вход
диплом о высшем образовании купить в москве
http://gramster.ru/# пин ап вход
нарколог на дом недорого http://www.narkolog-na-dom-krasnodar22.ru .
canadian pharmacy meds review: canadian pharmacy win – canadian pharmacy
https://indianpharmacy.win/# reputable indian pharmacies
mexican border pharmacies shipping to usa mexican rx online mexican online pharmacies prescription drugs
частный нарколог на дом частный нарколог на дом .
https://indianpharmacy.win/# online pharmacy india
Предлагаем услуги профессиональных инженеров офицальной мастерской.
Еслли вы искали ремонт ноутбуков toshiba адреса, можете посмотреть на сайте: ремонт ноутбуков toshiba сервис
Наши мастера оперативно устранят неисправности вашего устройства в сервисе или с выездом на дом!
Предлагаем услуги профессиональных инженеров офицальной мастерской.
Еслли вы искали ремонт ноутбуков fujitsu siemens в москве, можете посмотреть на сайте: ремонт ноутбуков fujitsu siemens рядом
Наши мастера оперативно устранят неисправности вашего устройства в сервисе или с выездом на дом!
https://mexicanpharmacy.store/# purple pharmacy mexico price list
This is a very good tip especially to those new to the blogosphere. Brief but very precise information… Thanks for sharing this one. A must read article!
Hi, I do believe this is a great blog. I stumbledupon it 😉 I may revisit yet again since I bookmarked it. Money and freedom is the best way to change, may you be rich and continue to guide other people.
http://indianpharmacy.win/# cheapest online pharmacy india
Купить диплом о среднем образовании в Москве и любом другом городе
Hi, I do believe this is an excellent website. I stumbledupon it 😉 I am going to revisit once again since i have bookmarked it. Money and freedom is the best way to change, may you be rich and continue to guide others.
Предлагаем услуги профессиональных инженеров офицальной мастерской.
Еслли вы искали ремонт ноутбуков fujitsu siemens рядом, можете посмотреть на сайте: ремонт ноутбуков fujitsu siemens цены
Наши мастера оперативно устранят неисправности вашего устройства в сервисе или с выездом на дом!
п»їlegitimate online pharmacies india: best online pharmacy india – buy prescription drugs from india
https://indianpharmacy.win/# best india pharmacy
http://mexicanpharmacy.store/# mexican online pharmacies prescription drugs
http://indianpharmacy.win/# pharmacy website india
Узнайте, как безопасно купить диплом о высшем образовании
Excellent blog you have got here.. It’s difficult to find good quality writing like yours these days. I honestly appreciate individuals like you! Take care!!
indian pharmacy reputable indian online pharmacy reputable indian pharmacies
https://indianpharmacy.win/# reputable indian online pharmacy
I really love your site.. Great colors & theme. Did you create this web site yourself? Please reply back as I’m attempting to create my own personal website and would like to know where you got this from or what the theme is named. Cheers!
Приобретение диплома ВУЗа с сокращенной программой обучения в Москве
купить диплом об образовании
legit canadian online pharmacy: canadian pharmacy win – recommended canadian pharmacies
купить программу 1С Бухгалтерия https://www.kupit-1s14.ru .
вызов нарколога на дом краснодар вызов нарколога на дом краснодар .
http://indianpharmacy.win/# top 10 pharmacies in india
http://canadianpharmacy.win/# canada drugs reviews
It’s nearly impossible to find well-informed people for this subject, but you sound like you know what you’re talking about! Thanks
врач нарколог на дом врач нарколог на дом .
Great post. I will be going through some of these issues as well..
http://indianpharmacy.win/# top online pharmacy india
врач нарколог на дом платный врач нарколог на дом платный .
I love it when people come together and share views. Great website, stick with it.
pharmacy canadian superstore best online canadian pharmacy pharmacy wholesalers canada
indian pharmacies safe: Online medicine home delivery – best india pharmacy
вывод из запоя на дому краснодар вывод из запоя на дому краснодар .
http://canadianpharmacy.win/# rate canadian pharmacies
http://canadianpharmacy.win/# canadapharmacyonline com
Can I simply just say what a relief to discover somebody that truly understands what they are discussing on the internet. You definitely realize how to bring an issue to light and make it important. More people ought to check this out and understand this side of your story. I can’t believe you aren’t more popular because you definitely possess the gift.
http://indianpharmacy.win/# reputable indian pharmacies
There is definately a great deal to learn about this topic. I really like all of the points you made.
legitimate canadian pharmacy online: canadian pharmacy win – canadian pharmacies
Excellent article. I will be dealing with many of these issues as well..
https://indianpharmacy.win/# world pharmacy india
вывод из запоя краснодар на дому анонимно вывод из запоя краснодар на дому анонимно .
world pharmacy india Online medicine home delivery indian pharmacy
https://canadianpharmacy.win/# canadian pharmacy price checker
вывод из запоя на дому в краснодаре вывод из запоя на дому в краснодаре .
BOM86 là cổng game đổi thưởng đẳng cấp nhất hiện nay. Tại đây mọi người sẽ được trải nghiệm các game cá cược hấp dẫn như casino online , game bài và bắn cá.
http://canadianpharmacy.win/# pharmacies in canada that ship to the us
I’m impressed, I have to admit. Seldom do I come across a blog that’s equally educative and engaging, and without a doubt, you’ve hit the nail on the head. The issue is something which not enough people are speaking intelligently about. Now i’m very happy that I found this in my search for something relating to this.
краснодар вывод из запоя краснодар вывод из запоя .
Как получить диплом техникума с упрощенным обучением в Москве официально
Сколько стоит диплом высшего и среднего образования и как это происходит?
After looking over a few of the blog posts on your web page, I really appreciate your technique of blogging. I saved it to my bookmark webpage list and will be checking back soon. Please visit my web site too and tell me what you think.
диплом о высшем медицинском образовании купить диплом о высшем медицинском образовании купить .
mexican drugstore online: mexican mail order pharmacies – mexico drug stores pharmacies
https://indianpharmacy.win/# п»їlegitimate online pharmacies india
https://canadianpharmacy.win/# drugs from canada
Купить диплом магистра оказалось возможно, быстрое обучение и диплом на руки
https://mexicanpharmacy.store/# pharmacies in mexico that ship to usa
Aw, this was an extremely nice post. Spending some time and actual effort to generate a very good article… but what can I say… I procrastinate a lot and don’t manage to get anything done.
вывод из запоя на дому краснодар цены вывод из запоя на дому краснодар цены .
best canadian pharmacy best canadian online pharmacy online canadian pharmacy
https://mexicanpharmacy.store/# mexican online pharmacies prescription drugs
You have made some good points there. I checked on the net to find out more about the issue and found most individuals will go along with your views on this web site.
reputable canadian pharmacy: best online canadian pharmacy – canadian online pharmacy reviews
купить диплом о высшем образовании в москве
http://canadianpharmacy.win/# canadian pharmacy online reviews
Having read this I thought it was very enlightening. I appreciate you taking the time and effort to put this content together. I once again find myself spending a significant amount of time both reading and leaving comments. But so what, it was still worthwhile!
https://indianpharmacy.win/# pharmacy website india
bookmarked!!, I love your web site.
http://mexicanpharmacy.store/# best online pharmacies in mexico
быстрый анонимный вывод из запоя на дому быстрый анонимный вывод из запоя на дому .
краснодар вывод из запоя краснодар вывод из запоя .
Howdy! This article couldn’t be written much better! Going through this post reminds me of my previous roommate! He always kept preaching about this. I will send this article to him. Pretty sure he will have a great read. Thank you for sharing!
вывод из запоя краснодар на дому анонимно вывод из запоя краснодар на дому анонимно .
https://canadianpharmacy.win/# canadian pharmacy 24
legitimate canadian mail order pharmacy: best online canadian pharmacy – ed meds online canada
I really like gathering useful info, this post has got me even more info!
world pharmacy india indian pharmacy paypal best india pharmacy
Good day! I could have sworn I’ve visited this site before but after going through many of the articles I realized it’s new to me. Anyhow, I’m certainly pleased I found it and I’ll be book-marking it and checking back regularly!
https://canadianpharmacy.win/# online pharmacy canada
Стоимость дипломов высшего и среднего образования и процесс их получения
https://indianpharmacy.win/# buy medicines online in india
Как официально купить диплом вуза с упрощенным обучением в Москве
I like this web blog its a master peace ! Glad I detected this on google .
Spot on with this write-up, I truly believe that this website needs a lot more attention. I’ll probably be returning to see more, thanks for the information.
https://mexicanpharmacy.store/# best online pharmacies in mexico
вывод из запоя на дому ростов на дону вывод из запоя на дому ростов на дону .
I was extremely pleased to find this web site. I need to to thank you for your time due to this fantastic read!! I definitely savored every part of it and i also have you bookmarked to look at new stuff on your web site.
mexican online pharmacies prescription drugs: mexican online pharmacies prescription drugs – mexican online pharmacies prescription drugs
https://indianpharmacy.win/# india pharmacy mail order
http://indianpharmacy.win/# mail order pharmacy india
https://mexicanpharmacy.store/# buying prescription drugs in mexico online
I simply wished to appreciate you yet again. I’m not certain what I would have achieved without the entire advice documented by you regarding such area. Certainly was a depressing situation in my position, but encountering this professional avenue you processed that made me to cry for happiness. I am just happier for your information and even wish you really know what a powerful job you happen to be providing teaching people today by way of your web blog. Most probably you have never come across any of us.
I couldn’t resist commenting. Exceptionally well written!
very good post, i definitely adore this amazing site, persist with it
вывод из запоя на дому ростов круглосуточно вывод из запоя на дому ростов круглосуточно .
medicine in mexico pharmacies medication from mexico pharmacy pharmacies in mexico that ship to usa
This is the perfect site for anybody who hopes to understand this topic. You know so much its almost hard to argue with you (not that I really will need to…HaHa). You definitely put a new spin on a subject that has been written about for ages. Great stuff, just excellent.
http://canadianpharmacy.win/# canadian pharmacy phone number
Узнайте, как безопасно купить диплом о высшем образовании
купить аттестат с реестром
best online pharmacies in mexico: reputable mexican pharmacies online – medication from mexico pharmacy
http://indianpharmacy.win/# cheapest online pharmacy india
вывод из запоя на дому ростов-на-дону вывод из запоя на дому ростов-на-дону .
I love looking through a post that will make people think. Also, many thanks for allowing me to comment.
https://mexicanpharmacy.store/# п»їbest mexican online pharmacies
Finding this site made all the work I did to find it look like nothing. The reason being that this is such an informative post. I wanted to thank you for this special read of the subject. I definitely savored every little bit of it and I have you bookmarked to check out new stuff you post.
вывод из запоя в стационаре ростов-на-дону http://vyvod-iz-zapoya-rostov234.ru .
I think this is one of the most important information for me. And i’m glad reading your article. But want to remark on some general things, The website style is wonderful, the articles is really great : D. Good job, cheers
сколько стоит диплом юриста сколько стоит диплом юриста .
https://indianpharmacy.win/# best online pharmacy india
Аттестат 11 класса купить официально с упрощенным обучением в Москве
вывод из запоя на дому ростов цены вывод из запоя на дому ростов цены .
This is a topic which is near to my heart… Many thanks! Exactly where can I find the contact details for questions?
canadian pharmacy reviews best online canadian pharmacy canadian drugs
Greetings! Very useful advice within this article! It’s the little changes that make the greatest changes. Thanks a lot for sharing!
canadian pharmacy world: best canadian online pharmacy – pharmacies in canada that ship to the us
http://mexicanpharmacy.store/# mexico drug stores pharmacies
http://mexicanpharmacy.store/# mexico pharmacies prescription drugs
sport-weekend.com http://www.www.donnews.ru/oborudovanie-elektronnoy-prohodnoy-perco-dlya-kontrolya-i-bezopasnosti/ .
http://mexicanpharmacy.store/# pharmacies in mexico that ship to usa
Предлагаем услуги профессиональных инженеров офицальной мастерской.
Еслли вы искали ремонт ноутбуков toshiba цены, можете посмотреть на сайте: ремонт ноутбуков toshiba в москве
Наши мастера оперативно устранят неисправности вашего устройства в сервисе или с выездом на дом!
Greetings! Very useful advice in this particular article! It is the little changes that will make the biggest changes. Thanks a lot for sharing!
I just couldn’t go away your website before suggesting that I extremely enjoyed the standard information an individual provide on your visitors? Is going to be back steadily to check up on new posts [Reply]
I am typically to blogging and that i actually appreciate your articles. This great article has really peaks my interest. My goal is to bookmark your web blog and keep checking for brand new details.
Купить диплом техникума, колледжа в Сочи
Предлагаем услуги профессиональных инженеров офицальной мастерской.
Еслли вы искали ремонт ноутбуков fujitsu siemens адреса, можете посмотреть на сайте: ремонт ноутбуков fujitsu siemens
Наши мастера оперативно устранят неисправности вашего устройства в сервисе или с выездом на дом!
Предлагаем услуги профессиональных инженеров офицальной мастерской.
Еслли вы искали ремонт ноутбуков toshiba в москве, можете посмотреть на сайте: ремонт ноутбуков toshiba сервис
Наши мастера оперативно устранят неисправности вашего устройства в сервисе или с выездом на дом!
Greetings, I do believe your site could possibly be having browser compatibility issues. Whenever I look at your website in Safari, it looks fine however, if opening in I.E., it’s got some overlapping issues. I simply wanted to give you a quick heads up! Besides that, excellent blog!
http://indianpharmacy.win/# indian pharmacy paypal
https://mexicanpharmacy.store/# mexico drug stores pharmacies
top online pharmacy india: mail order pharmacy india – reputable indian online pharmacy
http://indianpharmacy.win/# india online pharmacy
Right here is the right web site for everyone who would like to understand this topic. You know so much its almost hard to argue with you (not that I really will need to…HaHa). You definitely put a brand new spin on a topic that has been discussed for many years. Great stuff, just wonderful.
clockchok.ru okvsk.ru/novosti/35688-kak-rabotaet-elektromehanicheskaya-kalitka-i-v-chem-ee-osobennosti.html .
indian pharmacy top 10 pharmacies in india buy medicines online in india
I have read several good stuff here. Definitely worth bookmarking for revisiting. I surprise how much effort you put to create such a wonderful informative web site.
thank you for sharing – Gulvafslibning | Kurt Gulvmand with us, I believe – Gulvafslibning | Kurt Gulvmand really stands out : D.
Everything is very open with a very clear explanation of the challenges. It was truly informative. Your site is extremely helpful. Thanks for sharing!
Всё о покупке аттестата о среднем образовании: полезные советы
Hi there! This blog post could not be written any better! Reading through this post reminds me of my previous roommate! He constantly kept preaching about this. I’ll forward this information to him. Pretty sure he’ll have a great read. Thank you for sharing!
magnificent put up, very informative. I ponder why the other specialists of this sector don’t realize this. You should proceed your writing. I am confident, you have a great readers’ base already!
http://fastpillseasy.com/# buy ed meds online
gtbike.ru https://racechrono.ru/novosti/41596-kakie-vidy-turniketov-perco-suschestvuyut-i-chem-oni-otlichayutsya.html .
Everything is very open with a very clear clarification of the challenges. It was truly informative. Your website is useful. Many thanks for sharing.
нижний новгород отели https://www.otelinizhniinovgorod-ru.ru .
вывод из запоя в ростове на дону вывод из запоя в ростове на дону .
best ed medication online cheap cialis ed treatment online
It’s hard to come by experienced people on this topic, however, you seem like you know what you’re talking about! Thanks
https://fastpillseasy.com/# buy ed meds online
Buy generic 100mg Viagra online: cheap viagra – Viagra online price
Hey there! Remember to indulge yourself with compassion. Self-care is essential for your mental health.
cheap ed drugs: FastPillsEasy – erection pills online
https://maxpillsformen.com/# Cialis 20mg price in USA
I could not resist commenting. Perfectly written.
Как приобрести диплом техникума с минимальными рисками
http://fastpillsformen.com/# cheapest viagra
When I originally left a comment I appear to have clicked on the -Notify me when new comments are added- checkbox and now whenever a comment is added I receive 4 emails with the exact same comment. Is there a way you can remove me from that service? Thanks.
Cialis without a doctor prescription Generic Cialis without a doctor prescription Buy Tadalafil 20mg
вывод из запоя ростов вывод из запоя ростов .
Viagra online price: cheap viagra – Buy Viagra online cheap
This is the perfect website for everyone who hopes to find out about this topic. You know a whole lot its almost hard to argue with you (not that I really would want to…HaHa). You certainly put a new spin on a subject which has been discussed for years. Excellent stuff, just wonderful.
Pretty! This has been an incredibly wonderful post. Many thanks for supplying this info.
Диплом пту купить официально с упрощенным обучением в Москве
http://fastpillseasy.com/# ed meds online
Viagra online price: Sildenafil Citrate Tablets 100mg – Cheap Sildenafil 100mg
купить аттестат за 9 класс цена купить аттестат за 9 класс цена .
I was very happy to uncover this website. I wanted to thank you for your time for this particularly wonderful read!! I definitely really liked every part of it and i also have you book marked to check out new stuff on your website.
вывод из запоя ростов и область вывод из запоя ростов и область .
Cheap Cialis buy cialis online Cialis 20mg price in USA
наркологическая срочная помощь наркологическая срочная помощь .
вызов нарколога на дом частная скорая помощь вызов нарколога на дом частная скорая помощь .
buy viagra here: Fast Pills For Men – Buy generic 100mg Viagra online
When I initially commented I seem to have clicked on the -Notify me when new comments are added- checkbox and now every time a comment is added I receive 4 emails with the exact same comment. Perhaps there is an easy method you are able to remove me from that service? Kudos.
купить медицинский диплом купить медицинский диплом .
Предлагаем услуги профессиональных инженеров офицальной мастерской.
Еслли вы искали ремонт ноутбуков asus сервис, можете посмотреть на сайте: ремонт ноутбуков asus в москве
Наши мастера оперативно устранят неисправности вашего устройства в сервисе или с выездом на дом!
최고의 온라인 카지노 최고의 온라인 카지노 .
http://fastpillsformen.com/# generic sildenafil
вызвать наркологическую помощь вызвать наркологическую помощь .
Cialis without a doctor prescription Generic Cialis without a doctor prescription cheapest cialis
cheap erection pills: cheap boner pills – cheapest ed online
Предлагаем услуги профессиональных инженеров офицальной мастерской.
Еслли вы искали ремонт ноутбуков asus в москве, можете посмотреть на сайте: ремонт ноутбуков asus рядом
Наши мастера оперативно устранят неисправности вашего устройства в сервисе или с выездом на дом!
наркологическая скорая помощь москва наркологическая скорая помощь москва .
Viagra online price: FastPillsForMen.com – Buy generic 100mg Viagra online
I’m very pleased to uncover this great site. I want to to thank you for ones time just for this fantastic read!! I definitely appreciated every part of it and I have you book marked to see new stuff on your web site.
http://maxpillsformen.com/# cialis for sale
Всё, что нужно знать о покупке аттестата о среднем образовании без рисков
Узнайте стоимость диплома высшего и среднего образования и процесс получения
You’ve made some decent points there. I looked on the internet for more info about the issue and found most individuals will go along with your views on this site.
It’s hard to find knowledgeable people in this particular topic, but you sound like you know what you’re talking about! Thanks
erectile dysfunction pills online FastPillsEasy cheapest ed online
https://maxpillsformen.com/# Generic Cialis price
Great article. I’m facing some of these issues as well..
Парадокс, но купить диплом кандидата наук оказалось не так и сложно
Tadalafil price: buy cialis online – Buy Tadalafil 20mg
купить диплом техникума в санкт петербурге prema-diploms.ru .
частная скорая наркологическая помощь частная скорая наркологическая помощь .
частная скорая наркологическая помощь https://aqvakr.forum24.ru/?1-7-0-00011604-000-0-0-1730875452 .
наркологическая срочная помощь наркологическая срочная помощь .
I like it when people get together and share opinions. Great blog, stick with it.
Tadalafil price: MaxPillsForMen.com – Generic Cialis price
https://fastpillsformen.com/# Viagra generic over the counter
купить диплом средне специальное образование
https://maxpillsformen.com/# Generic Cialis price
Как получить диплом техникума официально и без лишних проблем
I could not refrain from commenting. Well written!
Cheap Viagra 100mg buy viagra online Viagra Tablet price
неотложная наркологическая помощь неотложная наркологическая помощь .
наркологическая скорая https://internetmoney.bestbb.ru/viewtopic.php?id=31709/ .
https://fastpillsformen.com/# order viagra
Tadalafil price: Cialis over the counter – Buy Tadalafil 10mg
Сколько стоит получить диплом высшего и среднего образования легально?
Реально ли приобрести диплом стоматолога? Основные этапы
https://fastpillseasy.com/# cheap boner pills
cost of ed meds cheap erectile dysfunction pills online erectile dysfunction prescription
Buy Tadalafil 5mg: Max Pills For Men – Buy Tadalafil 20mg
можно ли купить аттестат о среднем образовании можно ли купить аттестат о среднем образовании .
Viagra online price: FastPillsForMen – best price for viagra 100mg
https://fastpillseasy.com/# erectile dysfunction medication online
как вызвать наркологическую скорую помощь в москве как вызвать наркологическую скорую помощь в москве .
частная скорая наркологическая помощь частная скорая наркологическая помощь .
как вызвать наркологическую скорую помощь в москве http://www.eisberg.forum24.ru/?1-1-0-00002023-000-0-0-1730876367/ .
http://fastpillsformen.com/# Buy generic 100mg Viagra online
best ed pills online FastPillsEasy ed online pharmacy
It’s hard to come by educated people for this subject, however, you sound like you know what you’re talking about! Thanks
скорая наркологическая помощь в москве скорая наркологическая помощь в москве .
скорая наркологическая помощь на дому в москве скорая наркологическая помощь на дому в москве .
https://fastpillseasy.com/# ed treatment online
Вопросы и ответы: можно ли быстро купить диплом старого образца?
Everyone loves it when people get together and share ideas. Great website, continue the good work.
best ed medication online: FastPillsEasy – ed prescription online
Как правильно приобрести диплом колледжа или ПТУ в России, важные моменты
Tadalafil price: MaxPillsForMen.com – Cheap Cialis
Pretty! This has been an incredibly wonderful article. Thanks for providing this information.
https://fastpillseasy.com/# online ed drugs
Greetings! Very helpful advice in this particular post! It is the little changes that make the biggest changes. Thanks a lot for sharing!
http://fastpillsformen.com/# order viagra
Buy generic 100mg Viagra online Generic Viagra for sale Sildenafil 100mg price
Can I simply say what a relief to discover someone that really understands what they are discussing on the web. You actually realize how to bring a problem to light and make it important. More and more people should look at this and understand this side of your story. I was surprised that you are not more popular since you certainly have the gift.
http://fastpillsformen.com/# sildenafil online
buy cialis pill: buy cialis online – Buy Tadalafil 5mg
Hi, I do think this is an excellent website. I stumbledupon it 😉 I may come back once again since i have book-marked it. Money and freedom is the greatest way to change, may you be rich and continue to help others.
купить аттестат в барнауле
This web site certainly has all of the information I needed about this subject and didn’t know who to ask.
срочная наркологическая помощь срочная наркологическая помощь .
срочная наркологическая помощь в москве http://justforum.bestforums.org/viewtopic.php?f=26&t=4785/ .
неотложная наркологическая помощь неотложная наркологическая помощь .
Nice post. I learn something new and challenging on sites I stumbleupon every day. It’s always exciting to read through articles from other authors and practice a little something from other web sites.
top rated ed pills online ed treatments boner pills online
http://fastpillsformen.com/# viagra canada
buy ed pills: FastPillsEasy – order ed pills
срочно сделать загранпаспорт http://guryevsk.forum24.ru/?1-4-0-00000570-000-0-0-1735286442 .
https://fastpillsformen.com/# Generic Viagra for sale
сколько стоит сделать загранпаспорт сколько стоит сделать загранпаспорт .
купить диплом гознак в нижнем тагиле 2orik-diploms.ru .
The very next time I read a blog, Hopefully it does not fail me just as much as this one. I mean, Yes, it was my choice to read, but I really thought you’d have something interesting to say. All I hear is a bunch of complaining about something you could possibly fix if you weren’t too busy seeking attention.
I quite like looking through an article that will make men and women think. Also, many thanks for allowing me to comment.
Your style is really unique in comparison to other folks I have read stuff from. I appreciate you for posting when you’ve got the opportunity, Guess I will just bookmark this site.
ed medications cost: FastPillsEasy – buy erectile dysfunction pills
https://fastpillseasy.com/# cheapest ed meds
Предлагаем услуги профессиональных инженеров офицальной мастерской.
Еслли вы искали ремонт ноутбуков acer адреса, можете посмотреть на сайте: ремонт ноутбуков acer цены
Наши мастера оперативно устранят неисправности вашего устройства в сервисе или с выездом на дом!
Как официально купить аттестат 11 класса с упрощенным обучением в Москве
Предлагаем услуги профессиональных инженеров офицальной мастерской.
Еслли вы искали срочный ремонт macbook pro m3, можете посмотреть на сайте: срочный ремонт macbook pro m3
Наши мастера оперативно устранят неисправности вашего устройства в сервисе или с выездом на дом!
buying erectile dysfunction pills online cheap cialis buy ed meds
https://maxpillsformen.com/# Tadalafil price
Предлагаем услуги профессиональных инженеров офицальной мастерской.
Еслли вы искали ремонт ноутбуков hp в москве, можете посмотреть на сайте: ремонт ноутбуков hp адреса
Наши мастера оперативно устранят неисправности вашего устройства в сервисе или с выездом на дом!
Предлагаем услуги профессиональных инженеров офицальной мастерской.
Еслли вы искали ремонт macbook pro 16 цены, можете посмотреть на сайте: ремонт macbook pro 16 адреса
Наши мастера оперативно устранят неисправности вашего устройства в сервисе или с выездом на дом!
You need to take part in a contest for one of the most useful blogs on the net. I most certainly will highly recommend this web site!
купить диплом среднее специальное москва prema-diploms.ru .
I absolutely love your website.. Pleasant colors & theme. Did you create this website yourself? Please reply back as I’m attempting to create my own website and want to find out where you got this from or what the theme is called. Thank you.
buy viagra here: Fast Pills For Men – Generic Viagra for sale
Предлагаем услуги профессиональных инженеров офицальной мастерской.
Еслли вы искали ремонт ноутбуков acer, можете посмотреть на сайте: срочный ремонт ноутбуков acer
Наши мастера оперативно устранят неисправности вашего устройства в сервисе или с выездом на дом!
купить аттестат с проводкой купить аттестат с проводкой .
Everyone loves it when people get together and share ideas. Great website, continue the good work!
Предлагаем услуги профессиональных инженеров офицальной мастерской.
Еслли вы искали ремонт macbook pro m3 в москве, можете посмотреть на сайте: ремонт macbook pro m3
Наши мастера оперативно устранят неисправности вашего устройства в сервисе или с выездом на дом!
buy Viagra online: Fast Pills For Men – Generic Viagra for sale
I’m extremely pleased to discover this site. I wanted to thank you for your time for this fantastic read!! I definitely liked every bit of it and i also have you bookmarked to see new information in your web site.
Как безопасно купить диплом колледжа или ПТУ в России, что важно знать
п»їcialis generic Generic Cialis without a doctor prescription Generic Tadalafil 20mg price
Купить диплом магистра оказалось возможно, быстрое обучение и диплом на руки
Way cool! Some very valid points! I appreciate you penning this write-up plus the rest of the site is also really good.
https://fastpillsformen.com/# buy Viagra online
Предлагаем услуги профессиональных инженеров офицальной мастерской.
Еслли вы искали ремонт ноутбуков hp адреса, можете посмотреть на сайте: ремонт ноутбуков hp в москве
Наши мастера оперативно устранят неисправности вашего устройства в сервисе или с выездом на дом!
I love it when folks get together and share opinions. Great site, keep it up.
Предлагаем услуги профессиональных инженеров офицальной мастерской.
Еслли вы искали ремонт macbook pro 16, можете посмотреть на сайте: ремонт macbook pro 16 в москве
Наши мастера оперативно устранят неисправности вашего устройства в сервисе или с выездом на дом!
купить аттестат 9 классов
Как получить диплом стоматолога быстро и официально
Предлагаем услуги профессиональных инженеров офицальной мастерской.
Еслли вы искали ремонт кофемашин spidem сервис, можете посмотреть на сайте: срочный ремонт кофемашин spidem
Наши мастера оперативно устранят неисправности вашего устройства в сервисе или с выездом на дом!
한국 이용 가능 카지노 한국 이용 가능 카지노 .
сравнение производительности процессоров http://www.topcpu.ru/ .
over the counter sildenafil: buy viagra online – viagra canada
Way cool! Some very valid points! I appreciate you penning this write-up and also the rest of the website is very good.
Hey, I loved your post! Check out my site: ANCHOR.
Buy Tadalafil 20mg: MaxPillsForMen.com – cheapest cialis
Buy Tadalafil 20mg MaxPillsForMen Buy Tadalafil 20mg
https://fastpillseasy.com/# where to buy ed pills
Everything is very open with a clear explanation of the issues. It was truly informative. Your website is extremely helpful. Thanks for sharing!
Spot on with this write-up, I really believe that this amazing site needs a great deal more attention. I’ll probably be back again to see more, thanks for the information!
Right here is the right blog for anybody who really wants to find out about this topic. You understand so much its almost hard to argue with you (not that I actually would want to…HaHa). You definitely put a fresh spin on a subject that’s been written about for ages. Wonderful stuff, just excellent.
Excellent article! We are linking to this particularly great article on our site. Keep up the good writing.
ed prescription online: best ed medication online – cheap ed meds online
вывод из запоя на дому цена вывод из запоя на дому цена .
вывод из запоя ростов на дону на дому вывод из запоя ростов на дону на дому .
рейтинг игровых процессоров http://topcpu.ru/ .
Предлагаем услуги профессиональных инженеров офицальной мастерской.
Еслли вы искали ремонт кофемашин neff, можете посмотреть на сайте: ремонт кофемашин neff
Наши мастера оперативно устранят неисправности вашего устройства в сервисе или с выездом на дом!
discount ed pills cheap cialis low cost ed medication
Предлагаем услуги профессиональных инженеров офицальной мастерской.
Еслли вы искали ремонт кофемашин melitta в москве, можете посмотреть на сайте: ремонт кофемашин melitta адреса
Наши мастера оперативно устранят неисправности вашего устройства в сервисе или с выездом на дом!
Аттестат 11 класса купить официально с упрощенным обучением в Москве
https://maxpillsformen.com/# Generic Cialis without a doctor prescription
Предлагаем услуги профессиональных инженеров офицальной мастерской.
Еслли вы искали ремонт кофемашин philips цены, можете посмотреть на сайте: ремонт кофемашин philips цены
Наши мастера оперативно устранят неисправности вашего устройства в сервисе или с выездом на дом!
Предлагаем услуги профессиональных инженеров офицальной мастерской.
Еслли вы искали ремонт macbook air m1, можете посмотреть на сайте: ремонт macbook air m1 в москве
Наши мастера оперативно устранят неисправности вашего устройства в сервисе или с выездом на дом!
Полезная информация как официально купить диплом о высшем образовании
Você sabe dizer qual o objetivo de um jogador profissional de poker? Se sua resposta foi qual qualquer coisa diferente de ganhar dinheiro você errou. O melhor jogador não é aquele que ganha mais torneios e sim aquele que ganha mais dinheiro, por exemplo, se você está em duas mesas finais, ganhará mais dinheiro ficando em segundo nas duas do que ganhando uma e ficando em sexto na outra. Outro exemplo seria um jogar que sempre ganha os torneios, mas só joga de $1 enquanto o outro jogador faz várias mesas finais de torneios de $200, mas nunca fica em 1º lugar, é óbvio que o segundo jogador irá ganhar mais dinheiro logo ele é melhor. Limp é quando um jogador apenas paga a aposta pré-flop no valor de 1 big blind. A principal regra que um jogador que quer melhorar é nunca seja o primeiro a dar Limp na mão, embora, ocasionalmente você pode dar Limp em posições melhores quando já tem outros jogadores de limp ou está no small blind.
https://minecraftcommand.science/forum/discussion/topics/new
Real-Time Translation Experience the thrill of playing Zynga Poker – Texas Holdem in your local language. PRODUTOS E SERVIÇOS PARA TODOS – Não importa se você quer aprender como jogar poker ou se já é um jogador de pôquer de elite: nossa comunidade online lhe dá as boas-vindas. O Zynga Poker atende a todos os tipos de jogo e níveis de habilidade. O uso do aplicativo é regido pelos Termos de Serviço da Zynga, disponíveis em zynga legal terms-of-service. Como eu denuncio alguém no Zynga Poker? PRODUTOS E SERVIÇOS EXPERIÊNCIA DE POLO M SOCIAL – Desafie seus amigos a jogos de polo m, pratique sua cara de jogador, conheça novos amigos online e se torne uma estrela de polo m! Zynga Poker tem a maior comunidade de qualquer jogo de polo m.
Предлагаем услуги профессиональных инженеров офицальной мастерской.
Еслли вы искали срочный ремонт кофемашин melitta, можете посмотреть на сайте: ремонт кофемашин melitta в москве
Наши мастера оперативно устранят неисправности вашего устройства в сервисе или с выездом на дом!
Introducing to you the most prestigious online entertainment address today. Visit now to experience now!
Предлагаем услуги профессиональных инженеров офицальной мастерской.
Еслли вы искали ремонт кофемашин philips адреса, можете посмотреть на сайте: ремонт кофемашин philips адреса
Наши мастера оперативно устранят неисправности вашего устройства в сервисе или с выездом на дом!
Introducing to you the most prestigious online entertainment address today. Visit now to experience now!
Предлагаем услуги профессиональных инженеров офицальной мастерской.
Еслли вы искали срочный ремонт кофемашин miele, можете посмотреть на сайте: ремонт кофемашин miele
Наши мастера оперативно устранят неисправности вашего устройства в сервисе или с выездом на дом!
Предлагаем услуги профессиональных инженеров офицальной мастерской.
Еслли вы искали ремонт macbook air m1 в москве, можете посмотреть на сайте: срочный ремонт macbook air m1
Наши мастера оперативно устранят неисправности вашего устройства в сервисе или с выездом на дом!
Предлагаем услуги профессиональных инженеров офицальной мастерской.
Еслли вы искали ремонт кофемашин delonghi в москве, можете посмотреть на сайте: ремонт кофемашин delonghi в москве
Наши мастера оперативно устранят неисправности вашего устройства в сервисе или с выездом на дом!
en kazancl? slot oyunlar?: en kazancl? slot oyunlar? – en cok kazand?ran slot oyunlar?
guvenilir slot siteleri: guvenilir slot siteleri – en kazancl? slot oyunlar?
deneme bonusu veren siteler yeni deneme bonusu veren siteler deneme bonusu veren yeni siteler
This is the right website for anyone who wants to understand this topic. You know a whole lot its almost tough to argue with you (not that I personally will need to…HaHa). You certainly put a brand new spin on a topic that has been discussed for years. Wonderful stuff, just excellent.
https://sweetbonanza25.com/# sweet bonanza oyna
https://sweetbonanza25.com/# sweet bonanza guncel
Предлагаем услуги профессиональных инженеров офицальной мастерской.
Еслли вы искали ремонт кофемашин miele, можете посмотреть на сайте: ремонт кофемашин miele
Наши мастера оперативно устранят неисправности вашего устройства в сервисе или с выездом на дом!
Предлагаем услуги профессиональных инженеров офицальной мастерской.
Еслли вы искали ремонт кофемашин delonghi рядом, можете посмотреть на сайте: срочный ремонт кофемашин delonghi
Наши мастера оперативно устранят неисправности вашего устройства в сервисе или с выездом на дом!
нарколог на дому капельница цена нарколог на дому капельница цена .
online stamp maker online stamp maker .
Предлагаем услуги профессиональных инженеров офицальной мастерской.
Еслли вы искали ремонт iphone xs, можете посмотреть на сайте: ремонт iphone xs
Наши мастера оперативно устранят неисправности вашего устройства в сервисе или с выездом на дом!
Having read this I thought it was very enlightening. I appreciate you spending some time and effort to put this article together. I once again find myself spending a lot of time both reading and posting comments. But so what, it was still worth it.
An impressive share! I’ve just forwarded this onto a colleague who had been doing a little research on this. And he in fact ordered me breakfast due to the fact that I found it for him… lol. So let me reword this…. Thanks for the meal!! But yeah, thanks for spending time to talk about this issue here on your web page.
Excellent article. I’m experiencing a few of these issues as well..
https://casinositeleri25.com/# deneme bonusu veren casino siteleri
снятие интоксикации на дому снятие интоксикации на дому .
вывод из запоя капельница на дому вывод из запоя капельница на дому .
вывод из запоя дешево ростов-на-дону вывод из запоя дешево ростов-на-дону .
Greetings! Very helpful advice within this post! It is the little changes that produce the biggest changes. Many thanks for sharing!
купить диплом в иваново
guvenilir casino siteleri: casino bahis siteleri – casino bahis siteleri
After looking at a number of the blog articles on your web site, I honestly like your technique of writing a blog. I saved it to my bookmark webpage list and will be checking back in the near future. Take a look at my web site too and let me know what you think.
Way cool! Some extremely valid points! I appreciate you writing this write-up plus the rest of the website is really good.
guvenilir slot siteleri slot oyunlar? puf noktalar? guvenilir slot siteleri
http://denemebonusuverensiteler25.com/# deneme bonusu veren siteler
I couldn’t resist commenting. Well written.
https://casinositeleri25.com/# Deneme Bonusu Veren Siteler
Introducing to you the most prestigious online entertainment address today. Visit now to experience now!
Предлагаем услуги профессиональных инженеров офицальной мастерской.
Еслли вы искали ремонт iphone xs max цены, можете посмотреть на сайте: ремонт iphone xs max рядом
Наши мастера оперативно устранят неисправности вашего устройства в сервисе или с выездом на дом!
deneme bonusu veren yeni siteler: deneme bonusu veren yeni siteler – denemebonusuverensiteler25
You need to be a part of a contest for one of the finest blogs online. I’m going to recommend this blog!
https://casinositeleri25.com/# Canl? Casino Siteleri
sweet bonanza oyna: sweet bonanza – sweet bonanza giris
Deneme Bonusu Veren Siteler Casino Siteleri Casino Siteleri
stamp maker stamp maker .
http://denemebonusuverensiteler25.com/# denemebonusuverensiteler25
Hi just wanted to give you a brief heads up and let you know a few of the images aren’t loading properly. I’m not sure why but I think its a linking issue. I’ve tried it in two different web browsers and both show the same outcome.
http://kolesiko.com.ua/how-to-seal-fog-lights.html
Пошаговая инструкция по официальной покупке диплома о высшем образовании
I’m pretty pleased to uncover this great site. I want to to thank you for ones time for this fantastic read!! I definitely liked every little bit of it and I have you saved as a favorite to look at new information in your blog.
May I simply just say what a comfort to discover an individual who genuinely knows what they’re talking about on the web. You definitely understand how to bring a problem to light and make it important. More and more people should check this out and understand this side of the story. It’s surprising you are not more popular since you definitely have the gift.
купить диплом о среднем профессиональном образовании
Aw, this was an incredibly nice post. Spending some time and actual effort to generate a really good article… but what can I say… I put things off a lot and don’t seem to get nearly anything done.
I like it whenever people get together and share thoughts. Great website, keep it up.
deneme bonusu veren siteler yeni: denemebonusuverensiteler25 – deneme bonusu veren siteler
slot oyunlar?: slot siteleri – en kazancl? slot oyunlar?
yeni deneme bonusu veren siteler yat?r?ms?z deneme bonusu veren siteler deneme bonusu veren siteler
After I originally left a comment I seem to have clicked on the -Notify me when new comments are added- checkbox and now each time a comment is added I receive four emails with the exact same comment. Is there a means you are able to remove me from that service? Thanks.
Introducing to you the most prestigious online entertainment address today. Visit now to experience now!
Very good blog post. I definitely love this site. Thanks!
https://denemebonusuverensiteler25.com/# denemebonusuverensiteler25
I really like reading through an article that can make people think. Also, thank you for allowing for me to comment.
deneme bonusu veren siteler deneme bonusu veren yeni siteler deneme bonusu veren siteler yeni
en kazancl? slot oyunlar?: slot siteleri – az parayla cok kazandiran slot oyunlar?
Very good write-up. I definitely appreciate this website. Stick with it!
вывод из запоя анонимно ростов вывод из запоя анонимно ростов .
вывод из запоя в стационаре ростов http://www.vyvod-iz-zapoya-rostov228.ru .
That is a really good tip particularly to those fresh to the blogosphere. Brief but very accurate information… Thank you for sharing this one. A must read article.
https://casinositeleri25.com/# Casino Siteleri
Greetings! Very useful advice in this particular post! It’s the little changes that make the most significant changes. Many thanks for sharing!
sweet bonanza slot: sweet bonanza oyna – sweet bonanza oyna
Excellent web site you’ve got here.. It’s hard to find high-quality writing like yours these days. I seriously appreciate people like you! Take care!!
This is a topic that’s near to my heart… Best wishes! Exactly where can I find the contact details for questions?
az parayla cok kazandiran slot oyunlar? slot casino siteleri en cok kazand?ran slot oyunlar?
sweet bonanza giris: sweet bonanza giris – sweet bonanza
I really love your site.. Very nice colors & theme. Did you develop this web site yourself? Please reply back as I’m wanting to create my own personal website and would like to know where you got this from or exactly what the theme is called. Thank you!
промокод для изи дроп промокод для изи дроп .
http://sweetbonanza25.com/# sweet bonanza yorumlar
пропуск на грузовой автомобиль в москве пропуск на грузовой автомобиль в москве .
Thanks a lot for the blog post.Much thanks again. Much obliged.
deneme bonusu veren yeni siteler: yat?r?ms?z deneme bonusu veren siteler – deneme bonusu veren siteler yeni
Предлагаем услуги профессиональных инженеров офицальной мастерской.
Еслли вы искали срочный ремонт iphone 14, можете посмотреть на сайте: ремонт iphone 14 адреса
Наши мастера оперативно устранят неисправности вашего устройства в сервисе или с выездом на дом!
Saved as a favorite, I like your web site.
deneme bonusu veren yeni siteler yat?r?ms?z deneme bonusu veren siteler yeni deneme bonusu veren siteler
yeni deneme bonusu veren siteler: deneme bonusu veren yeni siteler – deneme bonusu veren siteler yeni
Предлагаем услуги профессиональных инженеров офицальной мастерской.
Еслли вы искали ремонт iphone 14 рядом, можете посмотреть на сайте: ремонт iphone 14 адреса
Наши мастера оперативно устранят неисправности вашего устройства в сервисе или с выездом на дом!
Предлагаем услуги профессиональных инженеров офицальной мастерской.
Еслли вы искали ремонт iphone 15 pro max сервис, можете посмотреть на сайте: ремонт iphone 15 pro max адреса
Наши мастера оперативно устранят неисправности вашего устройства в сервисе или с выездом на дом!
вывод из запоя на дому вывод из запоя на дому .
вывод из запоя врачом на дому вывод из запоя врачом на дому .
https://sweetbonanza25.com/# sweet bonanza demo oyna
диплом купить колледжа
Hi there! I could have sworn I’ve visited your blog before but after looking at some of the posts I realized it’s new to me. Nonetheless, I’m definitely happy I stumbled upon it and I’ll be bookmarking it and checking back regularly!
выведение из запоя на дому в екатеринбурге выведение из запоя на дому в екатеринбурге .
canl? casino siteleri Deneme Bonusu Veren Siteler en guvenilir casino siteleri
slot oyunlar? puf noktalar?: guvenilir slot siteleri – en kazancl? slot oyunlar?
deneme+bonusu+yeni
sweet bonanza slot: sweet bonanza demo oyna – sweet bonanza
denemebonusuverensiteler25: yeni deneme bonusu veren siteler – deneme bonusu veren yeni siteler
I couldn’t resist commenting. Exceptionally well written!
Предлагаем услуги профессиональных инженеров офицальной мастерской.
Еслли вы искали ремонт iphone 15 pro max цены, можете посмотреть на сайте: ремонт iphone 15 pro max
Наши мастера оперативно устранят неисправности вашего устройства в сервисе или с выездом на дом!
диплом о высшем образовании ссср купить
Предлагаем услуги профессиональных инженеров офицальной мастерской.
Еслли вы искали ремонт iphone 15, можете посмотреть на сайте: ремонт iphone 15 в москве
Наши мастера оперативно устранят неисправности вашего устройства в сервисе или с выездом на дом!
Canl? Casino Siteleri Deneme Bonusu Veren Siteler Canl? Casino Siteleri
tk999 com tk999 com .
https://casinositeleri25.com/# canl? casino siteleri
рейтинги процессоров для пк https://topcpu.ru/ .
Возможно ли купить диплом стоматолога, и как это происходит
That is a very good tip particularly to those fresh to the blogosphere. Brief but very precise info… Thanks for sharing this one. A must read article!
deneme bonusu veren yeni siteler: deneme bonusu veren siteler yeni – deneme bonusu veren siteler yeni
This is the perfect webpage for anyone who wants to find out about this topic. You understand a whole lot its almost tough to argue with you (not that I really would want to…HaHa). You definitely put a fresh spin on a topic that’s been written about for decades. Wonderful stuff, just wonderful.
en cok kazand?ran slot oyunlar?: guvenilir slot siteleri – slot oyunlar? puf noktalar?
Next time I read a blog, Hopefully it doesn’t disappoint me as much as this particular one. After all, Yes, it was my choice to read, but I genuinely thought you would have something interesting to say. All I hear is a bunch of complaining about something you could possibly fix if you were not too busy looking for attention.
gГјvenilir illegal bahis siteleri bedbo casino bahis siteleri
May I simply say what a relief to uncover a person that truly knows what they are talking about on the net. You actually know how to bring an issue to light and make it important. More people really need to read this and understand this side of your story. I was surprised you’re not more popular since you definitely have the gift.
Предлагаем услуги профессиональных инженеров офицальной мастерской.
Еслли вы искали ремонт iphone 15, можете посмотреть на сайте: ремонт iphone 15 в москве
Наши мастера оперативно устранят неисправности вашего устройства в сервисе или с выездом на дом!
срочно сделать загранпаспорт в москве срочно сделать загранпаспорт в москве .
вывод из запоя сочи вывод из запоя сочи .
вывод из запоя стационар вывод из запоя стационар .
Greetings! Very helpful advice in this particular post! It is the little changes that will make the most important changes. Many thanks for sharing!
az parayla cok kazandiran slot oyunlar?: slot siteleri – slot siteleri
https://denemebonusuverensiteler25.com/# denemebonusuverensiteler25
Good post. I learn something totally new and challenging on sites I stumbleupon everyday. It will always be interesting to read through articles from other authors and practice a little something from their web sites.
denemebonusuverensiteler25 yeni deneme bonusu veren siteler denemebonusuverensiteler25
deneme bonusu veren yeni siteler: deneme bonusu veren siteler yeni – deneme bonusu veren siteler
An intriguing discussion is worth comment. I do think that you should publish more about this subject, it may not be a taboo matter but generally people do not discuss such subjects. To the next! Many thanks.
sweet bonanza demo oyna: sweet bonanza – sweet bonanza guncel
bookmarked!!, I love your website.
запой стационар запой стационар .
Предлагаем услуги профессиональных инженеров офицальной мастерской.
Еслли вы искали ремонт iphone 14 pro max адреса, можете посмотреть на сайте: ремонт iphone 14 pro max сервис
Наши мастера оперативно устранят неисправности вашего устройства в сервисе или с выездом на дом!
Предлагаем услуги профессиональных инженеров офицальной мастерской.
Еслли вы искали ремонт iphone 14 pro рядом, можете посмотреть на сайте: ремонт iphone 14 pro рядом
Наши мастера оперативно устранят неисправности вашего устройства в сервисе или с выездом на дом!
Casino Siteleri Deneme Bonusu Veren Siteler canl? casino siteleri
https://sweetbonanza25.com/# sweet bonanza kazanma saatleri
I blog quite often and I truly thank you for your content. The article has really peaked my interest. I’m going to take a note of your website and keep checking for new information about once per week. I opted in for your RSS feed too.
Howdy, I do think your blog may be having browser compatibility problems. When I look at your site in Safari, it looks fine however when opening in Internet Explorer, it’s got some overlapping issues. I simply wanted to give you a quick heads up! Apart from that, fantastic website!
Your style is unique in comparison to other folks I have read stuff from. Thank you for posting when you’ve got the opportunity, Guess I will just bookmark this blog.
en cok kazand?ran slot oyunlar?: az parayla cok kazandiran slot oyunlar? – slot oyunlar? puf noktalar?
sweet bonanza guncel: sweet bonanza – sweet bonanza demo oyna
капельница от похмелья на дому цена капельница от похмелья на дому цена .
After going over a handful of the blog posts on your web page, I seriously appreciate your technique of blogging. I bookmarked it to my bookmark website list and will be checking back soon. Please check out my website too and tell me what you think.
аттестат школьный купить
Предлагаем услуги профессиональных инженеров офицальной мастерской.
Еслли вы искали ремонт iphone 14 pro max, можете посмотреть на сайте: ремонт iphone 14 pro max
Наши мастера оперативно устранят неисправности вашего устройства в сервисе или с выездом на дом!
A fascinating discussion is definitely worth comment. I do think that you should publish more on this subject, it might not be a taboo subject but usually people do not speak about these issues. To the next! Cheers.
sweet bonanza yorumlar sweet bonanza kazanma saatleri sweet bonanza yorumlar
Предлагаем услуги профессиональных инженеров офицальной мастерской.
Еслли вы искали срочный ремонт iphone 14 pro, можете посмотреть на сайте: ремонт iphone 14 pro адреса
Наши мастера оперативно устранят неисправности вашего устройства в сервисе или с выездом на дом!
After looking into a handful of the blog posts on your site, I seriously appreciate your technique of blogging. I book marked it to my bookmark website list and will be checking back soon. Take a look at my website as well and let me know what you think.
This website certainly has all the info I wanted concerning this subject and didn’t know who to ask.
капельница от запоя на дому нижний новгород капельница от запоя на дому нижний новгород .
SportyBet Zambia SportyBet Zambia .
капельница от запоя вызов https://vyvod-iz-zapoya-nizhnij-novgorod13.ru .
Very good article. I definitely love this website. Keep it up!
рейтинги процессоров для пк topcpu.ru .
guvenilir casino siteleri: Casino Siteleri – Casino Siteleri
https://casinositeleri25.com/# guvenilir casino siteleri
Way cool! Some very valid points! I appreciate you writing this post plus the rest of the site is extremely good.
Good information. Lucky me I came across your site by accident (stumbleupon). I have bookmarked it for later!
Indian pharmacy international shipping: Online pharmacy – IndianCertPharm
Предлагаем услуги профессиональных инженеров офицальной мастерской.
Еслли вы искали ремонт iphone xs max, можете посмотреть на сайте: ремонт iphone xs max адреса
Наши мастера оперативно устранят неисправности вашего устройства в сервисе или с выездом на дом!
You’re so interesting! I do not believe I’ve truly read a single thing like that before. So great to find another person with a few original thoughts on this subject matter. Seriously.. thanks for starting this up. This website is something that is required on the web, someone with some originality.
Предлагаем услуги профессиональных инженеров офицальной мастерской.
Еслли вы искали ремонт iphone se 2020 в москве, можете посмотреть на сайте: ремонт iphone se 2020 цены
Наши мастера оперативно устранят неисправности вашего устройства в сервисе или с выездом на дом!
Having read this I thought it was extremely informative. I appreciate you spending some time and energy to put this informative article together. I once again find myself spending a significant amount of time both reading and commenting. But so what, it was still worth it!
https://canadianmdpharm.com/# cheapest pharmacy canada
online canadian pharmacy reviews
safe online pharmacies in canada https://canadianmdpharm.shop/# onlinepharmaciescanada com
india pharmacy
Предлагаем услуги профессиональных инженеров офицальной мастерской.
Еслли вы искали срочный ремонт iphone 13 pro, можете посмотреть на сайте: ремонт iphone 13 pro сервис
Наши мастера оперативно устранят неисправности вашего устройства в сервисе или с выездом на дом!
Предлагаем услуги профессиональных инженеров офицальной мастерской.
Еслли вы искали ремонт iphone 13 цены, можете посмотреть на сайте: ремонт iphone 13
Наши мастера оперативно устранят неисправности вашего устройства в сервисе или с выездом на дом!
pharmacy canadian: CanadianMdPharm – canadadrugpharmacy com
Your style is so unique in comparison to other folks I have read stuff from. I appreciate you for posting when you’ve got the opportunity, Guess I will just book mark this site.
indian pharmacy: Indian Cert Pharm – Best online Indian pharmacy
Hi there, constantly i used to check web site posts here early in the morning, since i love to find out more and more.
https://tyres.com.ua/yak-led-linzi-pokrashchuyut-vidimist-na-dorozi
You have made some decent points there. I checked on the internet for additional information about the issue and found most people will go along with your views on this web site.
Oh my goodness! Amazing article dude! Many thanks, However I am encountering difficulties with your RSS. I don’t understand the reason why I am unable to join it. Is there anyone else having similar RSS issues? Anyone that knows the solution will you kindly respond? Thanks.
online canadian pharmacy https://indiancertpharm.com/# Online pharmacy
buy medicines online in india
I used to be able to find good information from your blog articles.
Предлагаем услуги профессиональных инженеров офицальной мастерской.
Еслли вы искали ремонт iphone xs max в москве, можете посмотреть на сайте: ремонт iphone xs max рядом
Наши мастера оперативно устранят неисправности вашего устройства в сервисе или с выездом на дом!
indian pharmacy: IndianCertPharm – Online pharmacy
Pretty! This has been an incredibly wonderful post. Thank you for providing this info.
какой процессор лучше https://topcpu.ru/ .
https://canadianmdpharm.shop/# canada rx pharmacy world
canadian discount pharmacy
canadian pharmacy ltd: Canadian Md Pharm – canada pharmacy 24h
I was able to find good advice from your blog posts.
Предлагаем услуги профессиональных инженеров офицальной мастерской.
Еслли вы искали ремонт iphone se 2020 адреса, можете посмотреть на сайте: ремонт iphone se 2020
Наши мастера оперативно устранят неисправности вашего устройства в сервисе или с выездом на дом!
canadian pharmacy cheap https://canadianmdpharm.shop/# canada drugs online
pharmacy website india
купить диплом екатеринбург
Good article. I’m experiencing a few of these issues as well..
Next time I read a blog, Hopefully it won’t disappoint me just as much as this particular one. I mean, Yes, it was my choice to read, however I actually thought you’d have something interesting to say. All I hear is a bunch of moaning about something that you could fix if you weren’t too busy looking for attention.
Online medicine order: Best Indian pharmacy – Best Indian pharmacy
I could not refrain from commenting. Very well written!
I’m impressed, I have to admit. Seldom do I encounter a blog that’s both educative and entertaining, and let me tell you, you’ve hit the nail on the head. The problem is something not enough men and women are speaking intelligently about. I am very happy I stumbled across this in my search for something regarding this.
my canadian pharmacy review https://indiancertpharm.com/# IndianCertPharm
best india pharmacy
п»їbest mexican online pharmacies: Mexican Easy Pharm – Mexican Easy Pharm
I blog quite often and I truly thank you for your information. Your article has really peaked my interest. I’m going to take a note of your site and keep checking for new details about once a week. I subscribed to your RSS feed as well.
Предлагаем услуги профессиональных инженеров офицальной мастерской.
Еслли вы искали ремонт iphone 13 pro, можете посмотреть на сайте: ремонт iphone 13 pro цены
Наши мастера оперативно устранят неисправности вашего устройства в сервисе или с выездом на дом!
Introducing to you the most prestigious online entertainment address today. Visit now to experience now!
Легальные способы покупки диплома о среднем полном образовании
Предлагаем услуги профессиональных инженеров офицальной мастерской.
Еслли вы искали ремонт iphone 13 в москве, можете посмотреть на сайте: ремонт iphone 13 адреса
Наши мастера оперативно устранят неисправности вашего устройства в сервисе или с выездом на дом!
I blog quite often and I really thank you for your content. Your article has really peaked my interest. I am going to bookmark your blog and keep checking for new information about once per week. I subscribed to your RSS feed too.
Howdy! This post could not be written any better! Going through this post reminds me of my previous roommate! He continually kept talking about this. I will forward this information to him. Pretty sure he will have a very good read. Many thanks for sharing!
Appreciate you sharing, great post.Much thanks again.
my canadian pharmacy rx https://indiancertpharm.shop/# Indian Cert Pharm
buy prescription drugs from india
Very good article! We will be linking to this particularly great content on our site. Keep up the great writing.
сделать капельницу на дому от алкоголя сделать капельницу на дому от алкоголя .
выведение из запоя воронеж стационар выведение из запоя воронеж стационар .
Way cool! Some very valid points! I appreciate you writing this article and the rest of the website is extremely good.
Indian Cert Pharm: Best Indian pharmacy – Online medicine
medicine in mexico pharmacies: mexico drug stores pharmacies – best online pharmacies in mexico
Way cool! Some very valid points! I appreciate you writing this post and also the rest of the site is also very good.
A big thank you for your blog article.Much thanks again. Cool.
buying drugs from canada https://indiancertpharm.com/# Indian pharmacy international shipping
indianpharmacy com
Best online Indian pharmacy: Indian pharmacy international shipping – mail order pharmacy india
Major thankies for the blog. Much obliged.
Indian Cert Pharm: indian pharmacy – Indian pharmacy that ships to usa
May I just say what a relief to uncover a person that really knows what they’re discussing on the internet. You definitely realize how to bring a problem to light and make it important. More people really need to check this out and understand this side of the story. I was surprised you are not more popular because you surely have the gift.
canadian drugstore online: Canadian Md Pharm – canadian drug
I’m extremely pleased to find this web site. I need to to thank you for ones time due to this fantastic read!! I definitely appreciated every part of it and i also have you bookmarked to check out new information on your blog.
vipps canadian pharmacy https://mexicaneasypharm.com/# Mexican Easy Pharm
Online medicine home delivery
Oh my goodness! Incredible article dude! Thank you, However I am encountering troubles with your RSS. I don’t understand the reason why I cannot subscribe to it. Is there anybody else having similar RSS problems? Anybody who knows the answer can you kindly respond? Thanks.
indian pharmacy: Indian Cert Pharm – IndianCertPharm
canadian pharmacy 24h com safe: Canadian Md Pharm – canadian pharmacy online reviews
You are so interesting! I do not believe I have read through anything like that before. So great to discover another person with a few original thoughts on this subject matter. Really.. many thanks for starting this up. This site is one thing that is needed on the web, someone with some originality.
best canadian pharmacy: CanadianMdPharm – canadian pharmacy com
Mexican Easy Pharm: mexico drug stores pharmacies – mexican mail order pharmacies
canadian pharmacy no scripts https://mexicaneasypharm.com/# pharmacies in mexico that ship to usa
online shopping pharmacy india
trusted canadian pharmacy CanadianMdPharm canadian online pharmacy reviews
Very good article! We are linking to this particularly great post on our site. Keep up the good writing.
Этот увлекательный информационный материал подарит вам массу новых знаний и ярких эмоций. Мы собрали для вас интересные факты и сведения, которые обогатят ваш опыт. Откройте для себя увлекательный мир информации и насладитесь процессом изучения!
Изучить вопрос глубже – https://nakroklinikatest.ru/
indian pharmacy: Best Indian pharmacy – Online pharmacy
The very next time I read a blog, I hope that it won’t disappoint me just as much as this particular one. After all, I know it was my choice to read through, nonetheless I truly thought you’d have something interesting to say. All I hear is a bunch of complaining about something that you can fix if you were not too busy seeking attention.
дом престарелых крым дом престарелых крым .
дом престарелых в симферополе дом престарелых в симферополе .
Say, you got a nice blog post. Fantastic.
Эта статья для ознакомления предлагает читателям общее представление об актуальной теме. Мы стремимся представить ключевые факты и идеи, которые помогут читателям получить представление о предмете и решить, стоит ли углубляться в изучение.
Подробнее – https://nakroklinikatest.ru/
https://mexicaneasypharm.com/# Mexican Easy Pharm
canada drugstore pharmacy rx
buy canadian drugs: canada drugstore pharmacy rx – best canadian online pharmacy reviews
buying from canadian pharmacies https://canadianmdpharm.online/# canada pharmacy reviews
best india pharmacy
Предлагаем услуги профессиональных инженеров офицальной мастерской.
Еслли вы искали ремонт iphone 12 pro max адреса, можете посмотреть на сайте: ремонт iphone 12 pro max
Наши мастера оперативно устранят неисправности вашего устройства в сервисе или с выездом на дом!
Предлагаем услуги профессиональных инженеров офицальной мастерской.
Еслли вы искали ремонт iphone 11, можете посмотреть на сайте: срочный ремонт iphone 11
Наши мастера оперативно устранят неисправности вашего устройства в сервисе или с выездом на дом!
mexico pharmacies prescription drugs: Mexican Easy Pharm – mexican drugstore online
Retrieved December 13, 2010, from .
Online medicine: Best Indian pharmacy – Indian pharmacy that ships to usa
I think this is a real great article post.Really thank you! Great.
It’s difficult to find educated people about this subject, however, you sound like you know what you’re talking about! Thanks
You will just need to enter the range of these parameters, and the stock market would be easily managed.
Mexican Easy Pharm: п»їbest mexican online pharmacies – mexican mail order pharmacies
Online pharmacy: Online medicine – Best Indian pharmacy
Предлагаем услуги профессиональных инженеров офицальной мастерской.
Еслли вы искали ремонт iphone se 2020, можете посмотреть на сайте: ремонт iphone se 2020 в москве
Наши мастера оперативно устранят неисправности вашего устройства в сервисе или с выездом на дом!
Thanks-a-mundo for the article post.Really thank you! Want more.
Online medicine: Indian pharmacy that ships to usa – Indian Cert Pharm
canadian pharmacy uk delivery: Canadian Md Pharm – canadian medications
Though the financial liberalisation course of within the country took off with nice floor success, but within the nineties, the targets weren’t efficiently achieved because of the certain monetary obstacles and monetary anomalies, despite the nice expectation of Prime minister Nawaz Sharif.
There is definately a great deal to know about this issue. I really like all of the points you’ve made.
IndianCertPharm: india pharmacy mail order – Best Indian pharmacy
Assist groups: Help the individual discover native support teams or on-line communities the place they will join with others who perceive their experiences.
вывод из запоя воронеж вывод из запоя воронеж .
Having read this I thought it was very enlightening. I appreciate you spending some time and energy to put this article together. I once again find myself spending way too much time both reading and posting comments. But so what, it was still worthwhile!
Mexican Easy Pharm: Mexican Easy Pharm – medication from mexico pharmacy
купить аттестат в архангельске
купить программу 1с бухгалтерия купить программу 1с бухгалтерия .
indian pharmacy: Indian pharmacy international shipping – online pharmacy india
программы фирмы 1с https://svstrazh.forum24.ru/?1-3-0-00000323-000-0-0-1737110513/ .
Предлагаем услуги профессиональных инженеров офицальной мастерской.
Еслли вы искали ремонт iphone 11, можете посмотреть на сайте: ремонт iphone 11 в москве
Наши мастера оперативно устранят неисправности вашего устройства в сервисе или с выездом на дом!
Предлагаем услуги профессиональных инженеров офицальной мастерской.
Еслли вы искали ремонт iphone 12 pro max адреса, можете посмотреть на сайте: ремонт iphone 12 pro max
Наши мастера оперативно устранят неисправности вашего устройства в сервисе или с выездом на дом!
Предлагаем услуги профессиональных инженеров офицальной мастерской.
Еслли вы искали срочный ремонт iphone se 2020, можете посмотреть на сайте: ремонт iphone se 2020
Наши мастера оперативно устранят неисправности вашего устройства в сервисе или с выездом на дом!
best online pharmacy india: Indian pharmacy international shipping – Indian pharmacy that ships to usa
Once risks have been identified, they must then be assessed as to their potential severity of impact (generally a negative impact, such as damage or loss) and to the probability of occurrence.
Following the 2011 Tōhoku earthquake and tsunami, Kawashima made an impressed display for the following two matches in opposition to Lokeren and Membership Brugge, which saw Lierse secure its standing within the league for the subsequent season.
Indian Cert Pharm: Online pharmacy – Best Indian pharmacy
https://mexicaneasypharm.com/# Mexican Easy Pharm
canadian online pharmacy
sex nhật hiếp dâm trẻ em ấu dâm buôn bán vũ khí ma túy bán súng sextoy chơi đĩ sex bạo lực sex học đường tội phạm tình dục chơi les đĩ đực người mẫu bán dâm
Online pharmacy: Indian Cert Pharm – Indian Cert Pharm
Hi, I do believe this is an excellent website. I stumbledupon it 😉 I will revisit once again since I saved as a favorite it. Money and freedom is the greatest way to change, may you be rich and continue to help other people.
certified canadian international pharmacy https://indiancertpharm.shop/# Indian Cert Pharm
top 10 online pharmacy in india
Indian Cert Pharm: Indian pharmacy that ships to usa – IndianCertPharm
Mexican Easy Pharm: mexican mail order pharmacies – Mexican Easy Pharm
Having read this I believed it was really informative. I appreciate you spending some time and energy to put this content together. I once again find myself spending a significant amount of time both reading and leaving comments. But so what, it was still worthwhile.
You ought to be a part of a contest for one of the best websites on the net. I’m going to recommend this website!
Mexican Easy Pharm: Mexican Easy Pharm – mexican border pharmacies shipping to usa
Mexican Easy Pharm: Mexican Easy Pharm – mexican drugstore online
“Unfortunately it’s increased my inheritance tax bill to an almighty stage.
Online pharmacy: Indian Cert Pharm – IndianCertPharm
mexican online pharmacies prescription drugs: buying from online mexican pharmacy – buying prescription drugs in mexico
buying prescription drugs in mexico: buying prescription drugs in mexico – mexican drugstore online
mexican rx online: mexican mail order pharmacies – Mexican Easy Pharm
Mexican Easy Pharm: Mexican Easy Pharm – Mexican Easy Pharm
It is essential to note that they have demonstrated the ability to survive and thrive through market downturns and recessions.
Предлагаем услуги профессиональных инженеров офицальной мастерской.
Еслли вы искали срочный ремонт ipad mini 3, можете посмотреть на сайте: срочный ремонт ipad mini 3
Наши мастера оперативно устранят неисправности вашего устройства в сервисе или с выездом на дом!
диплом в нижнем новгороде купить
https://indiancertpharm.shop/# IndianCertPharm
canadian drugs online
online canadian pharmacy review: canadian pharmacy 24h com safe – safe canadian pharmacies
Предлагаем услуги профессиональных инженеров офицальной мастерской.
Еслли вы искали ремонт ipad mini 4 рядом, можете посмотреть на сайте: ремонт ipad mini 4
Наши мастера оперативно устранят неисправности вашего устройства в сервисе или с выездом на дом!
Предлагаем услуги профессиональных инженеров офицальной мастерской.
Еслли вы искали ремонт ipad pro 12.9 в москве, можете посмотреть на сайте: ремонт ipad pro 12.9 в москве
Наши мастера оперативно устранят неисправности вашего устройства в сервисе или с выездом на дом!
reputable mexican pharmacies online: mexico drug stores pharmacies – purple pharmacy mexico price list
вывод из запоя воронеж вывод из запоя воронеж .
капельница от запоя нижний новгород капельница от запоя нижний новгород .
Hello there, I believe your website might be having internet browser compatibility issues. When I look at your website in Safari, it looks fine however, if opening in I.E., it has some overlapping issues. I simply wanted to provide you with a quick heads up! Aside from that, great website.
They lived full-time within the house on South Third Avenue in the course of the formation of the United States: the Constitutional Convention; the Congress of the Confederation; and in 1792, the official adoption of the Bill of Rights by the primary United States Congress.
Best online Indian pharmacy: Online medicine – indian pharmacies safe
Insurance firms can deny protection due to a fatal disease, a manageable chronic illness, and even the frequency of routine check-ups.
This is the reason these investments are called non-profit investments.
вывод из запоя стационарно вывод из запоя стационарно .
вывод из запоя в наркологическом стационаре самары https://vyvod-iz-zapoya-v-stacionare-samara23.ru/ .
выведение из запоя нижний новгород выведение из запоя нижний новгород .
Предлагаем услуги профессиональных инженеров офицальной мастерской.
Еслли вы искали ремонт ipad mini 3 адреса, можете посмотреть на сайте: срочный ремонт ipad mini 3
Наши мастера оперативно устранят неисправности вашего устройства в сервисе или с выездом на дом!
A tax levy that includes wage garnishment can be financially devastating for households and individuals.
Indian Cert Pharm: indian pharmacy – IndianCertPharm
Sooner or later years, there might be a mass recruitment course of for recruiting 1000’s of employees for different divisions and branches.
Сколько стоит диплом высшего и среднего образования и как его получить?
Clients are so keen to find out how to enjoy returns of up to 17 NET over a 7 year period that we are holding an exclusive FREE SEMINAR tomorrow evening at the Hilton Park Lane in London.
Indian Cert Pharm: Indian Cert Pharm – Online medicine home delivery
Indian Cert Pharm: indian pharmacy – Online pharmacy
See our customer evaluations.
With their fastidiously curated number of clothes, footwear, jewellery, and accessories, RebelsMarket offers every thing you must create a one-of-a-form look that displays your individuality.
my canadian pharmacy reviews Canadian Md Pharm canadian pharmacy price checker
Mexican Easy Pharm: buying prescription drugs in mexico online – Mexican Easy Pharm
Amount of U.S. debt owned: $316.S.
Online pharmacy: Indian pharmacy international shipping – Indian Cert Pharm
However how do you navigate the sea of models, sorts, and features to find the right one?
Предлагаем услуги профессиональных инженеров офицальной мастерской.
Еслли вы искали срочный ремонт ipad mini 4, можете посмотреть на сайте: ремонт ipad mini 4
Наши мастера оперативно устранят неисправности вашего устройства в сервисе или с выездом на дом!
Предлагаем услуги профессиональных инженеров офицальной мастерской.
Еслли вы искали ремонт ipad pro 12.9 цены, можете посмотреть на сайте: ремонт ipad pro 12.9 адреса
Наши мастера оперативно устранят неисправности вашего устройства в сервисе или с выездом на дом!
purple pharmacy mexico price list https://mexicaneasypharm.shop/# mexican drugstore online
mexico drug stores pharmacies
Online medicine: Indian pharmacy international shipping – indian pharmacy
Undoubtedly, monetary risk can be daunting, but minimum investment amounts tend to be extremely small within most platforms.
Mexican Easy Pharm: Mexican Easy Pharm – Mexican Easy Pharm
medicine in mexico pharmacies https://mexicaneasypharm.com/# reputable mexican pharmacies online
buying prescription drugs in mexico
Indian pharmacy that ships to usa indian pharmacy Best Indian pharmacy
pharmacy in canada: best canadian online pharmacy reviews – canadian pharmacy king reviews
12, 1897, at Lockesburg, Ark.
This performs a huge half within the local weather, as a result of it signifies that oceans take a long time to heat up.
Hello! I just wish to offer you a big thumbs up for your great information you have right here on this post. I will be coming back to your site for more soon.
When Vos was revealed to have been spying on Dooku, Skorr and Asajj Ventress had been sent to kill Vos.
An International Securities Identification Number (ISIN) is a code that uniquely identifies a security globally for the purposes of facilitating clearing, reporting and settlement of trades.
The protests have additionally led to an escalation of tensions, with the French authorities deploying armoured automobiles to guard a wholesale meals market in Paris and demonstrations spreading across multiple European nations.
She is best friends with Fang Yu and offers her recommendation about emotions and dealing with Ming Tian, she also has a frenemy relationship with Tune Xiaomi whereas they get alongside they still argue and fight with one another when it includes Ming Tian.
Cloak of Deception describes the political background surrounding the Republic within the time interval before The Phantom Menace, as well as Darth Sidious’ plans to rule the galaxy, beginning with the blockade of Naboo.
Then once more, she or he may journey with a sales group representing his company, and make a several-days-long visit to a client to do onsite research, take the client out to golf or dinner, make a presentation and shut the deal.
I blog often and I really appreciate your information. The article has really peaked my interest. I am going to take a note of your blog and keep checking for new information about once a week. I subscribed to your Feed as well.
To avoid this, the Allies argued that the foremost struggle criminals had been captured after the top of the conflict, in order that they weren’t prisoners of struggle and the Geneva Conventions didn’t cowl them.
I love it when people come together and share ideas. Great blog, keep it up.
Предлагаем услуги профессиональных инженеров офицальной мастерской.
Еслли вы искали ремонт iphone 12 в москве, можете посмотреть на сайте: срочный ремонт iphone 12
Наши мастера оперативно устранят неисправности вашего устройства в сервисе или с выездом на дом!
вывод из запоя в стационаре самара вывод из запоя в стационаре самара .
Having read this I thought it was very enlightening. I appreciate you taking the time and effort to put this information together. I once again find myself spending way too much time both reading and posting comments. But so what, it was still worthwhile!
https://canadianmdpharm.online/# vipps approved canadian online pharmacy
canadian mail order pharmacy
Hi, I do believe this is an excellent web site. I stumbledupon it 😉 I will revisit yet again since i have bookmarked it. Money and freedom is the greatest way to change, may you be rich and continue to help others.
mexico pharmacies prescription drugs https://mexicaneasypharm.com/# mexico drug stores pharmacies
pharmacies in mexico that ship to usa
вывод из запоя самара стационар вывод из запоя самара стационар .
mexico pharmacies prescription drugs: purple pharmacy mexico price list – mexican online pharmacies prescription drugs
пропуск для грузовиков в москву http://www.24mts.ru .
пропуска для грузового транспорта в москве http://www.extremeguide.ru/ .
Hello! I could have sworn I’ve visited this website before but after browsing through many of the posts I realized it’s new to me. Anyways, I’m definitely happy I discovered it and I’ll be bookmarking it and checking back regularly!
Best online Indian pharmacy Indian Cert Pharm Indian pharmacy international shipping
https://indiancertpharm.shop/# Online medicine
canadian 24 hour pharmacy
That is a really good tip particularly to those fresh to the blogosphere. Short but very accurate information… Thanks for sharing this one. A must read post.
пропуск в москву для грузовых автомобилей пропуск в москву для грузовых автомобилей .
купить диплом в магадане
PredPharm: PredPharm – prednisone
Hi, I do think this is a great site. I stumbledupon it 😉 I am going to return once again since I saved as a favorite it. Money and freedom is the best way to change, may you be rich and continue to guide other people.
https://kamapharm.com/# Kama Pharm
buy Kamagra
Эта информационная публикация освещает широкий спектр тем из мира медицины. Мы предлагаем читателям ясные и понятные объяснения современных заболеваний, методов профилактики и лечения. Информация будет полезна как пациентам, так и медицинским работникам, желающим поддержать уровень своих знаний.
Разобраться лучше – https://nakroklinikatest.ru/
buy cytotec online fast delivery: Misoprostol 200 mg buy online – buy cytotec in usa
rybelsus semaglutide tablets Sema Pharm 24 SemaPharm24
https://kamapharm.shop/# buy Kamagra
prednisone brand name canada
buy priligy: Priligy tablets – priligy
Предлагаем услуги профессиональных инженеров офицальной мастерской.
Еслли вы искали ремонт iphone 12 адреса, можете посмотреть на сайте: ремонт iphone 12 цены
Наши мастера оперативно устранят неисправности вашего устройства в сервисе или с выездом на дом!
https://semapharm24.shop/# semaglutide tablets for weight loss
cheap kamagra
An impressive share! I’ve just forwarded this onto a friend who had been doing a little research on this. And he in fact bought me breakfast due to the fact that I discovered it for him… lol. So let me reword this…. Thank YOU for the meal!! But yeah, thanx for spending time to discuss this issue here on your site.
Good blog you have here.. It’s difficult to find quality writing like yours nowadays. I truly appreciate people like you! Take care!!
Kama Pharm: Kama Pharm – Kamagra 100mg
dapoxetine online: priligy – dap pharm
This may sound backwards; one might think that taking off at a heavy weight would essentially be tougher than touchdown with that very same weight.
https://dappharm.shop/# priligy
prednisone tablets
buy dapoxetine online buy priligy cheap priligy
https://kamapharm.com/# Kamagra tablets
Kamagra 100mg price
DapPharm: priligy – buy dapoxetine online
Great web site you have here.. It’s hard to find high quality writing like yours these days. I honestly appreciate individuals like you! Take care!!
rybelsus semaglutide tablets: SemaPharm24 – semaglutide best price
Hello! I could have sworn I’ve been to this web site before but after looking at some of the articles I realized it’s new to me. Anyhow, I’m definitely delighted I stumbled upon it and I’ll be book-marking it and checking back regularly!
https://kamapharm.com/# buy kamagra online usa
prednisone price canada
https://semapharm24.com/# SemaPharm24
п»їkamagra
can you buy prednisone over the counter in usa: prednisone price australia – prednisone 2.5 tablet
I really like reading through an article that will make men and women think. Also, thank you for allowing me to comment.
In honor of this particular particular person, 2nd March can be celebrated as World E-book Day and is a good way for teenagers (and mother and father) to get back to a reading behavior.
Cyt Pharm CytPharm CytPharm
You have made some decent points there. I looked on the web for more information about the issue and found most people will go along with your views on this site.
PredPharm: prednisone 5 mg brand name – PredPharm
Купите современную коляску-трость для вашего малыша, с прочными колесами и удобной ручкой.
Эргономичная коляска-трость с эффектным дизайном, и удобным выдвижным козырьком.
Модная коляска-трость для маленького модника, которая станет вашим незаменимым помощником.
Компактная коляска-трость для активных мам и пап, с прочными колесами и удобной спинкой.
cosatto трость cosatto трость .
Needless to say if traders notice that there are the resident “experts” who like to post deep answers to the simplest of questions.
Everyone loves it when people come together and share ideas. Great site, continue the good work!
http://cytpharm.com/# buy cytotec online
buy Kamagra
Kamagra tablets: Kama Pharm – п»їkamagra
Easy methods to import Cheap Brand New Laptops from the consolation of your property (this is one other enterprise alternative for good Nigerians).
Supplies: Cotton and polyester.
Everything is very open with a precise clarification of the issues. It was really informative. Your site is useful. Many thanks for sharing!
http://kamapharm.com/# Kama Pharm
buy cheap prednisone
buy cytotec online: buy cytotec – purchase cytotec
cost of prednisone 10mg tablets cost of prednisone in canada prednisone 2.5 mg daily
http://dappharm.com/# dapoxetine price
п»їkamagra
priligy: dap pharm – Priligy tablets
I would like to thank you for the efforts you’ve put in penning this site. I’m hoping to see the same high-grade content from you later on as well. In fact, your creative writing abilities has inspired me to get my own, personal website now 😉
диплом купить в ижевске
buy cytotec online fast delivery: Cyt Pharm – buy cytotec online
There are a whole lot of investment options, in which you may have the chance to speculate from just a few weeks to several years.
You need to take part in a contest for one of the highest quality sites on the internet. I’m going to recommend this blog!
buy cytotec in usa: cytotec abortion pill – buy cytotec online
http://predpharm.com/# order prednisone online canada
Kamagra 100mg
https://semapharm24.com/# buy semaglutide
prednisone 5 mg brand name
насос педролло насос педролло .
пропуск в москву для грузовиков пропуск в москву для грузовиков .
buy Kamagra: buy Kamagra – Kama Pharm
What other name did it go by and who made it?
Aw, this was an incredibly nice post. Taking a few minutes and actual effort to create a good article… but what can I say… I procrastinate a whole lot and don’t seem to get anything done.
Cyt Pharm: Misoprostol 200 mg buy online – CytPharm
https://semapharm24.com/# buy rybelsus online
Kamagra 100mg
анонимный вывод из запоя ростов vyvod-iz-zapoya-rostov227.ru .
купить программу 1с бухгалтерия купить программу 1с бухгалтерия .
A hundred and one Epigraphia Indica 1905-6: 61; cf.
Ищете свадебного фотографа для идеальной свадебной фотосессии?
Я помогу запечатлеть самые трогательные моменты вашего дня! Эмоции, искренность и индивидуальность в каждом кадре.
заказать услугу и узнать подробнее – свадебная фотосессия.
Ваша история любви — в моих фотографиях!
sildenafil oral jelly 100mg kamagra: Kama Pharm – Kamagra 100mg price
There is certainly a lot to know about this topic. I love all of the points you’ve made.
http://predpharm.com/# PredPharm
prednisone 50 mg canada
Kamagra 100mg price: Kamagra 100mg price – sildenafil oral jelly 100mg kamagra
http://dappharm.com/# cheap priligy
sildenafil oral jelly 100mg kamagra
CytPharm buy cytotec over the counter buy cytotec online
Spicer, Jonathan (October 15, 2010).
Everything is very open with a very clear explanation of the issues. It was definitely informative. Your site is useful. Many thanks for sharing.
I have to thank you for the efforts you’ve put in penning this blog. I am hoping to see the same high-grade content by you in the future as well. In fact, your creative writing abilities has encouraged me to get my very own website now 😉
I blog often and I truly appreciate your information. The article has truly peaked my interest. I am going to book mark your website and keep checking for new details about once per week. I opted in for your Feed as well.
Kama Pharm: Kama Pharm – Kama Pharm
https://kamapharm.com/# Kamagra 100mg price
Kamagra 100mg price
Всё о покупке аттестата о среднем образовании: полезные советы
https://dappharm.com/# cheap priligy
prednisone 20mg online without prescription
Kama Pharm: Kama Pharm – cheap kamagra
semaglutide tablets: rybelsus semaglutide tablets – Sema Pharm 24
http://cytpharm.com/# CytPharm
Kamagra 100mg price
Agile improvement is not only a strategy; it’s a transformative approach to software program growth that has revolutionized the trade.
On the dawn of the ultimate month of campaigning, Barr appeared on National Public Radio, and mentioned his political positions, including these on health care, a topic that had not often been mentioned by Barr over the course of his marketing campaign.
Ищете свадебного фотографа для идеальной свадебной фотосессии?
Я помогу запечатлеть самые трогательные моменты вашего дня! Эмоции, искренность и индивидуальность в каждом кадре.
заказать услугу и узнать подробнее – фотограф.
Ваша история любви — в моих фотографиях!
buy rybelsus online: semaglutide tablets store – Sema Pharm 24
moving company moving company .
Pred Pharm: PredPharm – prednisone 5mg cost
https://predpharm.com/# canine prednisone 5mg no prescription
Kamagra 100mg
There is no perfect spread position but a good trader will learn to spread risk in as many different ways as possible to minimize the affects of short term volatility.
https://semapharm24.com/# semaglutide tablets price
prednisone 50mg cost
sildenafil oral jelly 100mg kamagra Kama Pharm Kamagra Oral Jelly
prednisone in india: PredPharm – prednisone
buy dapoxetine online: dapoxetine price – DapPharm
https://semapharm24.com/# Sema Pharm 24
buy Kamagra
Here’s every part you ever wanted to learn about Lördagsgodis.
Twelve classical games had been scheduled, every beginning at three pm local time (09:30 UTC).
When I initially left a comment I appear to have clicked the -Notify me when new comments are added- checkbox and from now on every time a comment is added I get 4 emails with the exact same comment. There has to be a means you are able to remove me from that service? Cheers.
buy cytotec online: Cyt Pharm – buy cytotec online
https://predpharm.shop/# buy prednisone online paypal
prednisone for sale no prescription
http://kamapharm.com/# Kamagra 100mg price
Kamagra tablets
Order travelers checks or cash before you leave the country, or use an ATM while you’re abroad.
Your style is so unique compared to other folks I have read stuff from. Thank you for posting when you’ve got the opportunity, Guess I’ll just bookmark this web site.
We walked over the face of the earth not knowing the precise spot.
Tax refunds can really feel like Christmas in springtime.
Предлагаем услуги профессиональных инженеров офицальной мастерской.
Еслли вы искали ремонт imac 27 цены, можете посмотреть на сайте: срочный ремонт imac 27
Наши мастера оперативно устранят неисправности вашего устройства в сервисе или с выездом на дом!
Good post. I definitely love this website. Continue the good work!
Kamagra 100mg: Kama Pharm – buy Kamagra
Kama Pharm: Kama Pharm – Kama Pharm
http://semapharm24.com/# Sema Pharm 24
Kamagra tablets
Предлагаем услуги профессиональных инженеров офицальной мастерской.
Еслли вы искали ремонт ipad air 2 цены, можете посмотреть на сайте: ремонт ipad air 2 цены
Наши мастера оперативно устранят неисправности вашего устройства в сервисе или с выездом на дом!
Предлагаем услуги профессиональных инженеров офицальной мастерской.
Еслли вы искали ремонт imac 21 в москве, можете посмотреть на сайте: срочный ремонт imac 21
Наши мастера оперативно устранят неисправности вашего устройства в сервисе или с выездом на дом!
In 1991, he was in a position to raise $3.6 million from his former DLJ colleagues and started York Capital.
Oh my goodness! Amazing article dude! Thank you so much, However I am encountering issues with your RSS. I don’t understand why I can’t subscribe to it. Is there anyone else getting identical RSS issues? Anyone who knows the solution can you kindly respond? Thanks!!
Предлагаем услуги профессиональных инженеров офицальной мастерской.
Еслли вы искали ремонт фотоаппаратов canon сервис, можете посмотреть на сайте: ремонт фотоаппаратов canon адреса
Наши мастера оперативно устранят неисправности вашего устройства в сервисе или с выездом на дом!
https://cytpharm.com/# Abortion pills online
prednisone brand name
buy cytotec pills: buy cytotec pills – Cyt Pharm
5 mg prednisone daily: prednisone generic brand name – Pred Pharm
купить школьный аттестат
https://predpharm.com/# PredPharm
Kamagra 100mg
Nevertheless, after FIDE did not agree to the terms of the contract within the timeframe agreed upon, the option expired on 28 January 2011, and Chess Promotions Limited withdrew their bid to organise the occasion in London, citing the lack of time left to successfully organise the event.
purchase cytotec buy cytotec online Cyt Pharm
Hello there! I simply wish to give you a big thumbs up for the excellent information you have right here on this post. I’ll be coming back to your website for more soon.
semaglutide best price: semaglutide tablets – Sema Pharm 24
cheap priligy: dapoxetine online – buy priligy
Subsequently, a credit score report from Experian will include slightly different info than a credit report from TransUnion, which can differ barely from Equifax.
https://cytpharm.com/# CytPharm
how can i get prednisone online without a prescription
Whereas in idea it’s a good idea, in execution the automotive is woefully short of anything they’ve any proper to advertise as a critical fanatics’ automotive.” One other analyst dismissed the Marauder as “only a half-hearted try at nostalgia.
Right here is the perfect site for everyone who would like to understand this topic. You realize a whole lot its almost hard to argue with you (not that I actually would want to…HaHa). You definitely put a brand new spin on a subject that has been discussed for years. Great stuff, just excellent.
Kama Pharm: Kamagra 100mg price – Kamagra 100mg
The star is undoubtedly the ’77 Pontiac Trans Am driven by Reynolds, however.
super kamagra: Kama Pharm – Kamagra 100mg price
Commentators GM Sam Shankland and GM Fabiano Caruana felt that Nepomniachtchi was the ethical victor of the game, having efficiently reached a clean draw even when confronted with a new concept.
http://semapharm24.com/# buy semaglutide
Kamagra tablets
Предлагаем услуги профессиональных инженеров офицальной мастерской.
Еслли вы искали ремонт ipad air 2 цены, можете посмотреть на сайте: ремонт ipad air 2 в москве
Наши мастера оперативно устранят неисправности вашего устройства в сервисе или с выездом на дом!
пропуска на грузовые машины в москве пропуска на грузовые машины в москве .
пропуск для грузового транспорта в москву пропуск для грузового транспорта в москву .
Learning how to market restaurants in today’s financial times will offer a variety of choices.
Abortion pills online Cyt Pharm buy cytotec online
PredPharm: can you buy prednisone over the counter uk – Pred Pharm
Предлагаем услуги профессиональных инженеров офицальной мастерской.
Еслли вы искали ремонт imac 21, можете посмотреть на сайте: ремонт imac 21 адреса
Наши мастера оперативно устранят неисправности вашего устройства в сервисе или с выездом на дом!
http://cytpharm.com/# CytPharm
prednisone 20 mg tablets coupon
CytPharm: buy cytotec online – order cytotec online
With this scene, the companies like capital gold group aims to create the precise steadiness between customer support and investment security planning to assist build a diversified portfolio with gold.
semaglutide tablets for weight loss: semaglutide tablets store – semaglutide tablets store
Pretty! This was an incredibly wonderful article. Thank you for supplying these details.
https://semapharm24.shop/# Sema Pharm 24
Kamagra 100mg price
SemaPharm24: buy rybelsus online – cheap semaglutide pills
промокод для продамус https://promokod-pro.ru .
https://predpharm.com/# PredPharm
prednisone 10 mg price
купить аттестат об окончании 11 классов
Kama Pharm: Kama Pharm – Kama Pharm
sildenafil oral jelly 100mg kamagra Kama Pharm Kamagra 100mg price
200 mg prednisone daily: average cost of prednisone 20 mg – PredPharm
I am staying away from them this 12 months.
purchase cytotec: Cyt Pharm – Cyt Pharm
https://cytpharm.com/# buy cytotec over the counter
where to get prednisone
http://dappharm.com/# dap pharm
buy kamagra online usa
Kamagra tablets: Kama Pharm – Kama Pharm
Farmacia online miglior prezzo: farmaci senza ricetta elenco – migliori farmacie online 2024
The corporate has years of expertise allow them to deliver one of the best providers to people.
farmacie online affidabili: BRUFEN 600 acquisto online – п»їFarmacia online migliore
Farmacie on line spedizione gratuita
He forgot what day it was and forgot he had to pitch the following day, which led to him having to pitch underneath the influence.
http://farmaprodotti.com/# farmacie online autorizzate elenco
top farmacia online
Very good information. Lucky me I came across your site by chance (stumbleupon). I’ve book marked it for later.
https://farmaprodotti.shop/# comprare farmaci online con ricetta
farmacie online affidabili
comprare farmaci online con ricetta: Cialis senza ricetta – Farmacia online miglior prezzo
farmacie online sicure: top farmacia online – farmacie online sicure
farmacie online affidabili
To make things more fascinating, in contrast to traditional actual estate the place a seller might count on to pay a normal 6 p.c commission to an agent, on the planet of island gross sales, the broker’s fee is commonly tacked on to the sale worth for the purchaser to absorb, with no clear manner to find out the distinction between the precise asking worth and the broker’s payment.
http://farmabrufen.com/# BRUFEN prezzo
farmaci senza ricetta elenco
Pretty! This was an incredibly wonderful post. Thank you for providing these details.
Spring time (March by Could) is lovely in most elements of North America, however you will discover awesome things to do at any time of year.
viagra cosa serve: Viagra – pillole per erezione immediata
kamagra senza ricetta in farmacia: Viagra – pillole per erezione in farmacia senza ricetta
acquisto farmaci con ricetta
Kylo Ren (Ben Solo) was a former Jedi and powerful dark aspect wielder, and the secondary antagonist of the Star Wars sequel trilogy.
Established full-service broadcasters (who signed on before the start of transition) had (with rare exception) been required to operate existing digital simulcasts on another channel for several years, so their digital equipment was therefore already in place long before the 2008 recession and the 2009 analog TV shutdown.
https://farmatadalitaly.com/# migliori farmacie online 2024
Farmacia online miglior prezzo
viagra online in 2 giorni viagra generico siti sicuri per comprare viagra online
http://farmatadalitaly.com/# comprare farmaci online all’estero
comprare farmaci online all’estero
Farmacie online sicure: Farma Prodotti – farmaci senza ricetta elenco
acquisto farmaci con ricetta
Farmacia online piГ№ conveniente: FarmaBrufen – comprare farmaci online all’estero
Gunther, Marc (October 3, 2013).
http://farmaprodotti.com/# top farmacia online
acquisto farmaci con ricetta
https://farmasilditaly.shop/# viagra online spedizione gratuita
Farmacia online miglior prezzo
farmacie online autorizzate elenco: Cialis generico prezzo – top farmacia online
Farmacie online sicure
dove acquistare viagra in modo sicuro viagra farmacia viagra acquisto in contrassegno in italia
Farmacia online piГ№ conveniente: FarmTadalItaly – farmacie online autorizzate elenco
http://farmasilditaly.com/# viagra pfizer 25mg prezzo
farmacie online autorizzate elenco
http://farmabrufen.com/# BRUFEN 600 acquisto online
top farmacia online
Покупка диплома о среднем полном образовании: как избежать мошенничества?
comprare farmaci online con ricetta: BRUFEN prezzo – comprare farmaci online con ricetta
farmaci senza ricetta elenco
pillole per erezione immediata: viagra naturale – viagra originale in 24 ore contrassegno
https://farmasilditaly.com/# viagra acquisto in contrassegno in italia
Farmacia online piГ№ conveniente
промокод продамус скидка https://www.promokod-pro.ru .
migliori farmacie online 2024: Cialis generico farmacia – farmacia online
farmacie online affidabili
comprare farmaci online con ricetta: Cialis senza ricetta – farmaci senza ricetta elenco
https://farmaprodotti.shop/# acquisto farmaci con ricetta
Farmacia online piГ№ conveniente
I dugg some of you post as I cerebrated they were invaluable very helpful
viagra consegna in 24 ore pagamento alla consegna: Farma Sild Italy – alternativa al viagra senza ricetta in farmacia
acquisto farmaci con ricetta
comprare farmaci online con ricetta: Farma Brufen – acquisto farmaci con ricetta
http://farmasilditaly.com/# viagra originale recensioni
top farmacia online
comprare farmaci online con ricetta: Farma Prodotti – farmacia online senza ricetta
top farmacia online
miglior sito dove acquistare viagra: FarmaSildItaly – gel per erezione in farmacia
http://farmasilditaly.com/# viagra online spedizione gratuita
comprare farmaci online con ricetta
An outstanding share! I’ve just forwarded this onto a colleague who has been doing a little research on this. And he actually bought me lunch due to the fact that I stumbled upon it for him… lol. So let me reword this…. Thanks for the meal!! But yeah, thanks for spending some time to talk about this issue here on your internet site.
Spot on with this write-up, I absolutely feel this website needs far more attention. I’ll probably be returning to read more, thanks for the advice.
viagra consegna in 24 ore pagamento alla consegna: Viagra – dove acquistare viagra in modo sicuro
top farmacia online
dove acquistare viagra in modo sicuro: FarmaSildItaly – pillole per erezione immediata
I could not refrain from commenting. Well written.
http://farmasilditaly.com/# viagra generico recensioni
farmacia online senza ricetta
Having read this I believed it was really informative. I appreciate you finding the time and effort to put this information together. I once again find myself personally spending a significant amount of time both reading and commenting. But so what, it was still worth it.
farmacia online piГ№ conveniente: BRUFEN prezzo – comprare farmaci online con ricetta
п»їFarmacia online migliore
Farmacie on line spedizione gratuita: FarmaBrufen – п»їFarmacia online migliore
bookmarked!!, I love your site.
https://farmabrufen.shop/# Ibuprofene 600 prezzo senza ricetta
farmacia online senza ricetta
top farmacia online: Cialis senza ricetta – farmacie online sicure
farmacie online affidabili
top farmacia online: Farma Brufen – acquistare farmaci senza ricetta