


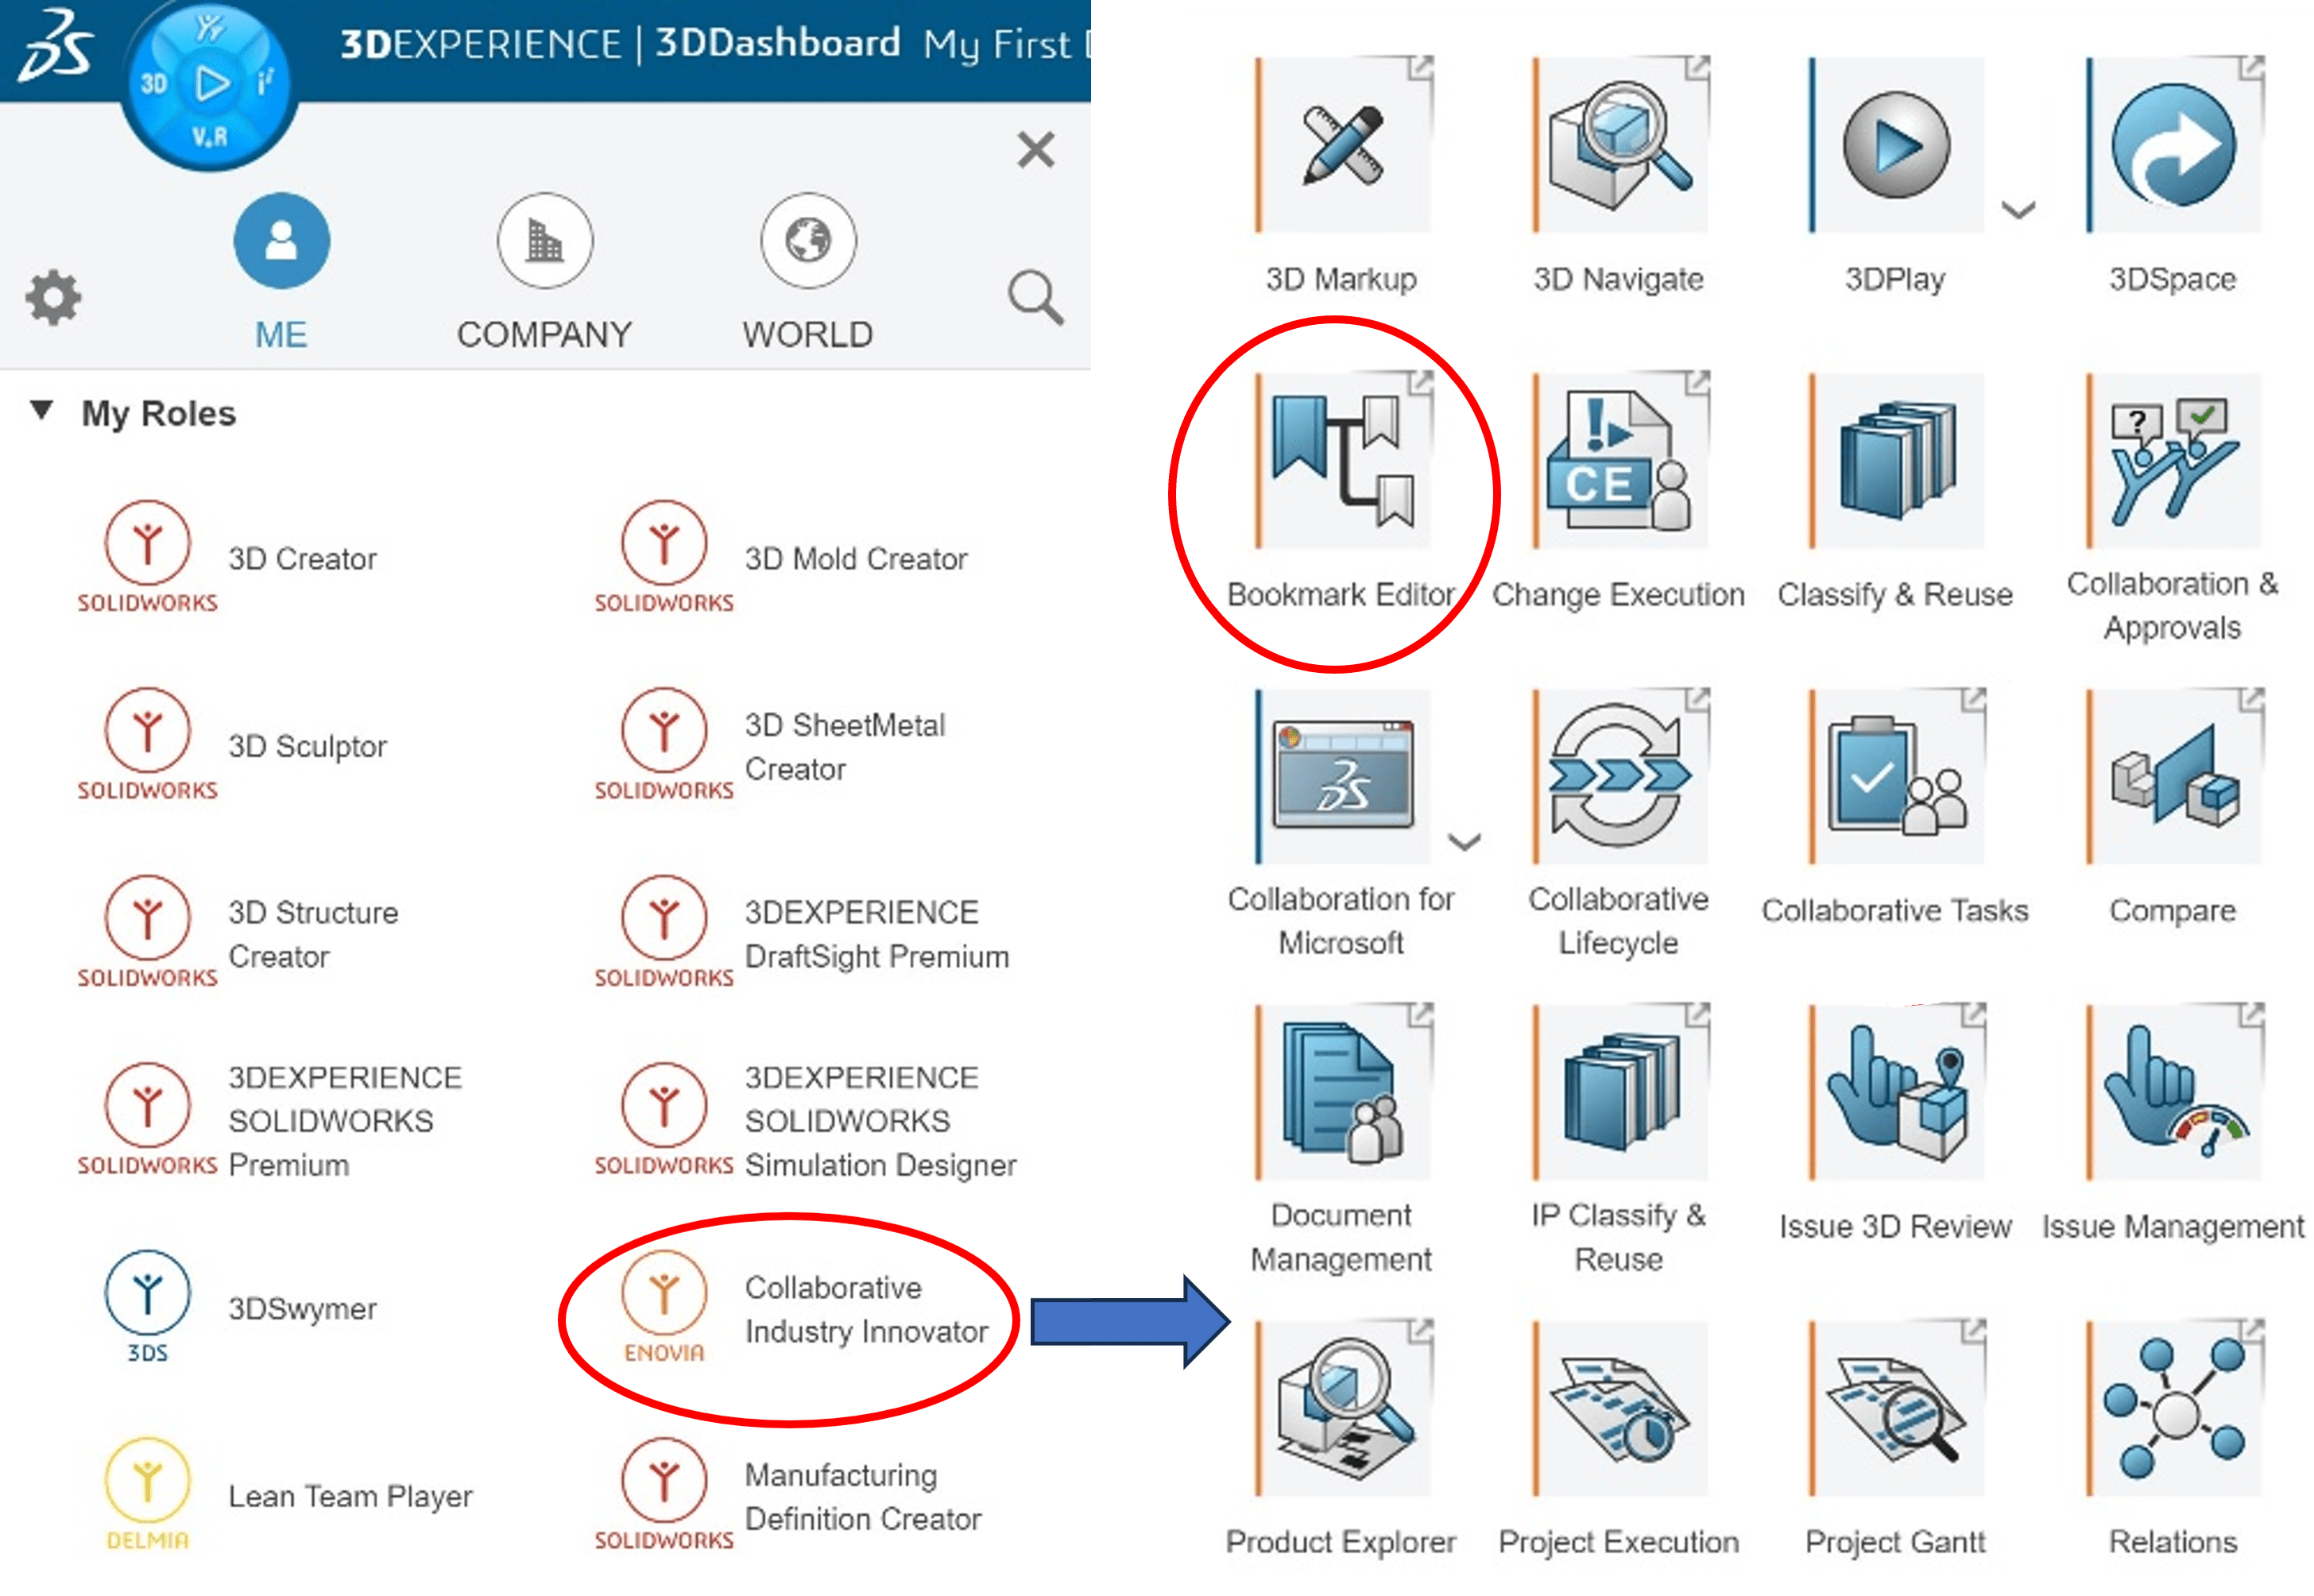
In today’s industrial development, data is created and consumed at a rapid pace. With such a huge amount of data, it becomes crucial to plan and organize this data for ease of traceability and maneuverability. On the 3DEXPERIENCE Cloud, all the data is stored on the 3DSpace App, but different types of files are stored together without classification. Therefore, to further organize the data as per your requirement in the 3DSpace, the Bookmark Editor app can be used. These bookmarks are stored on the 3DSpace.
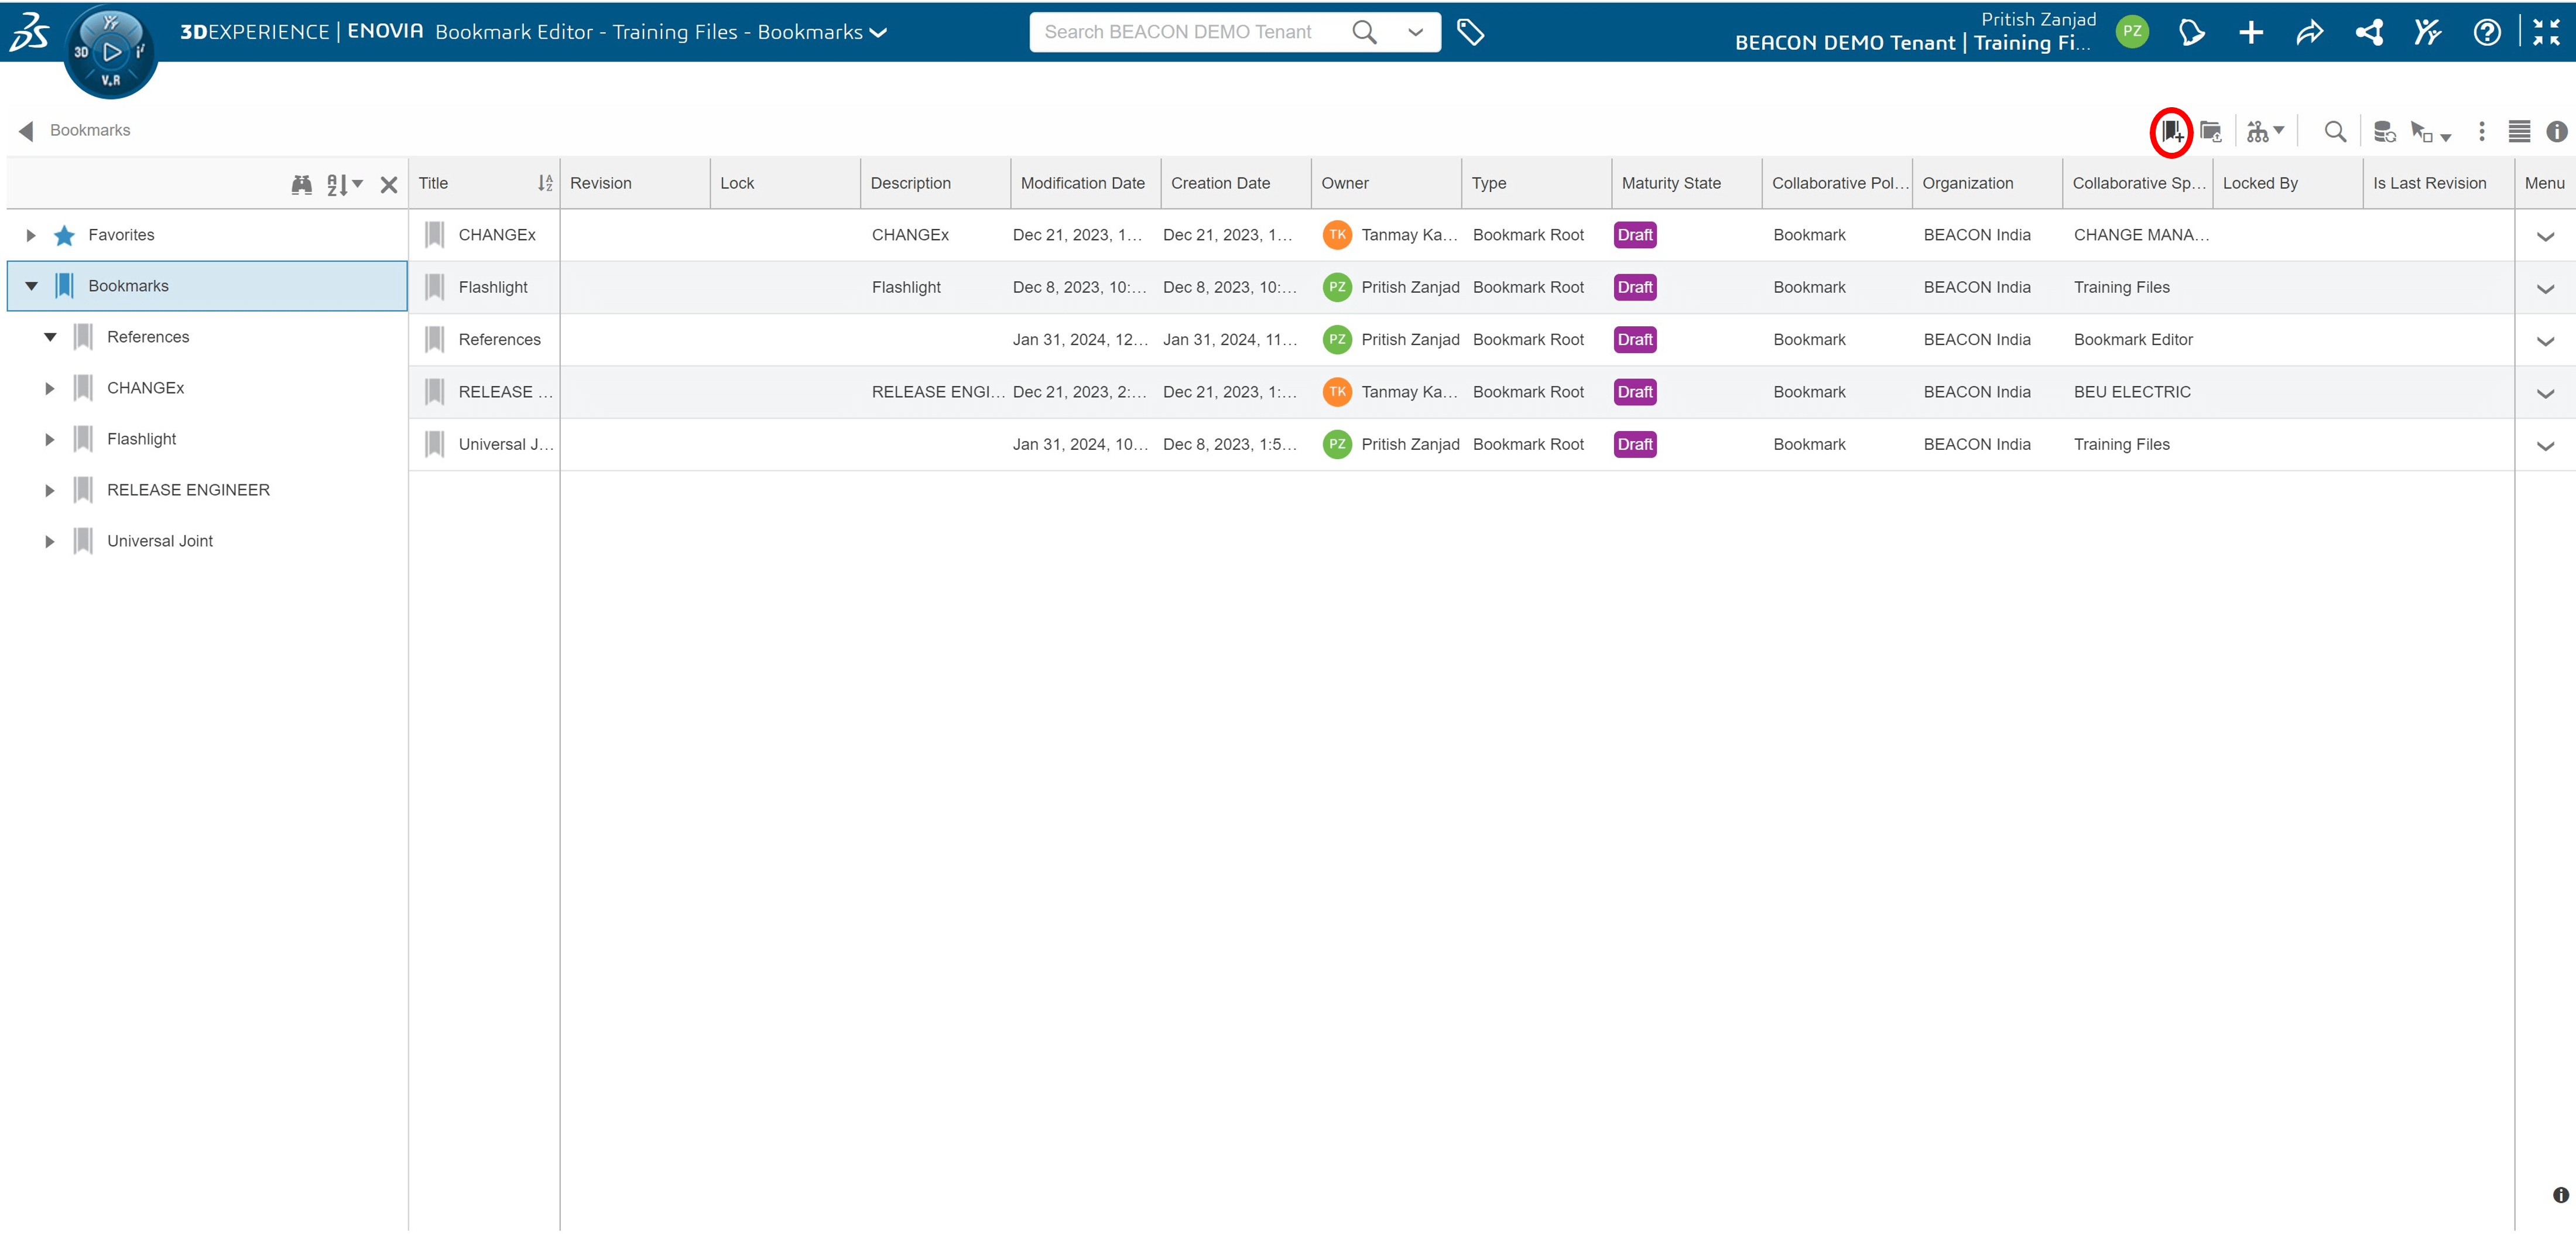
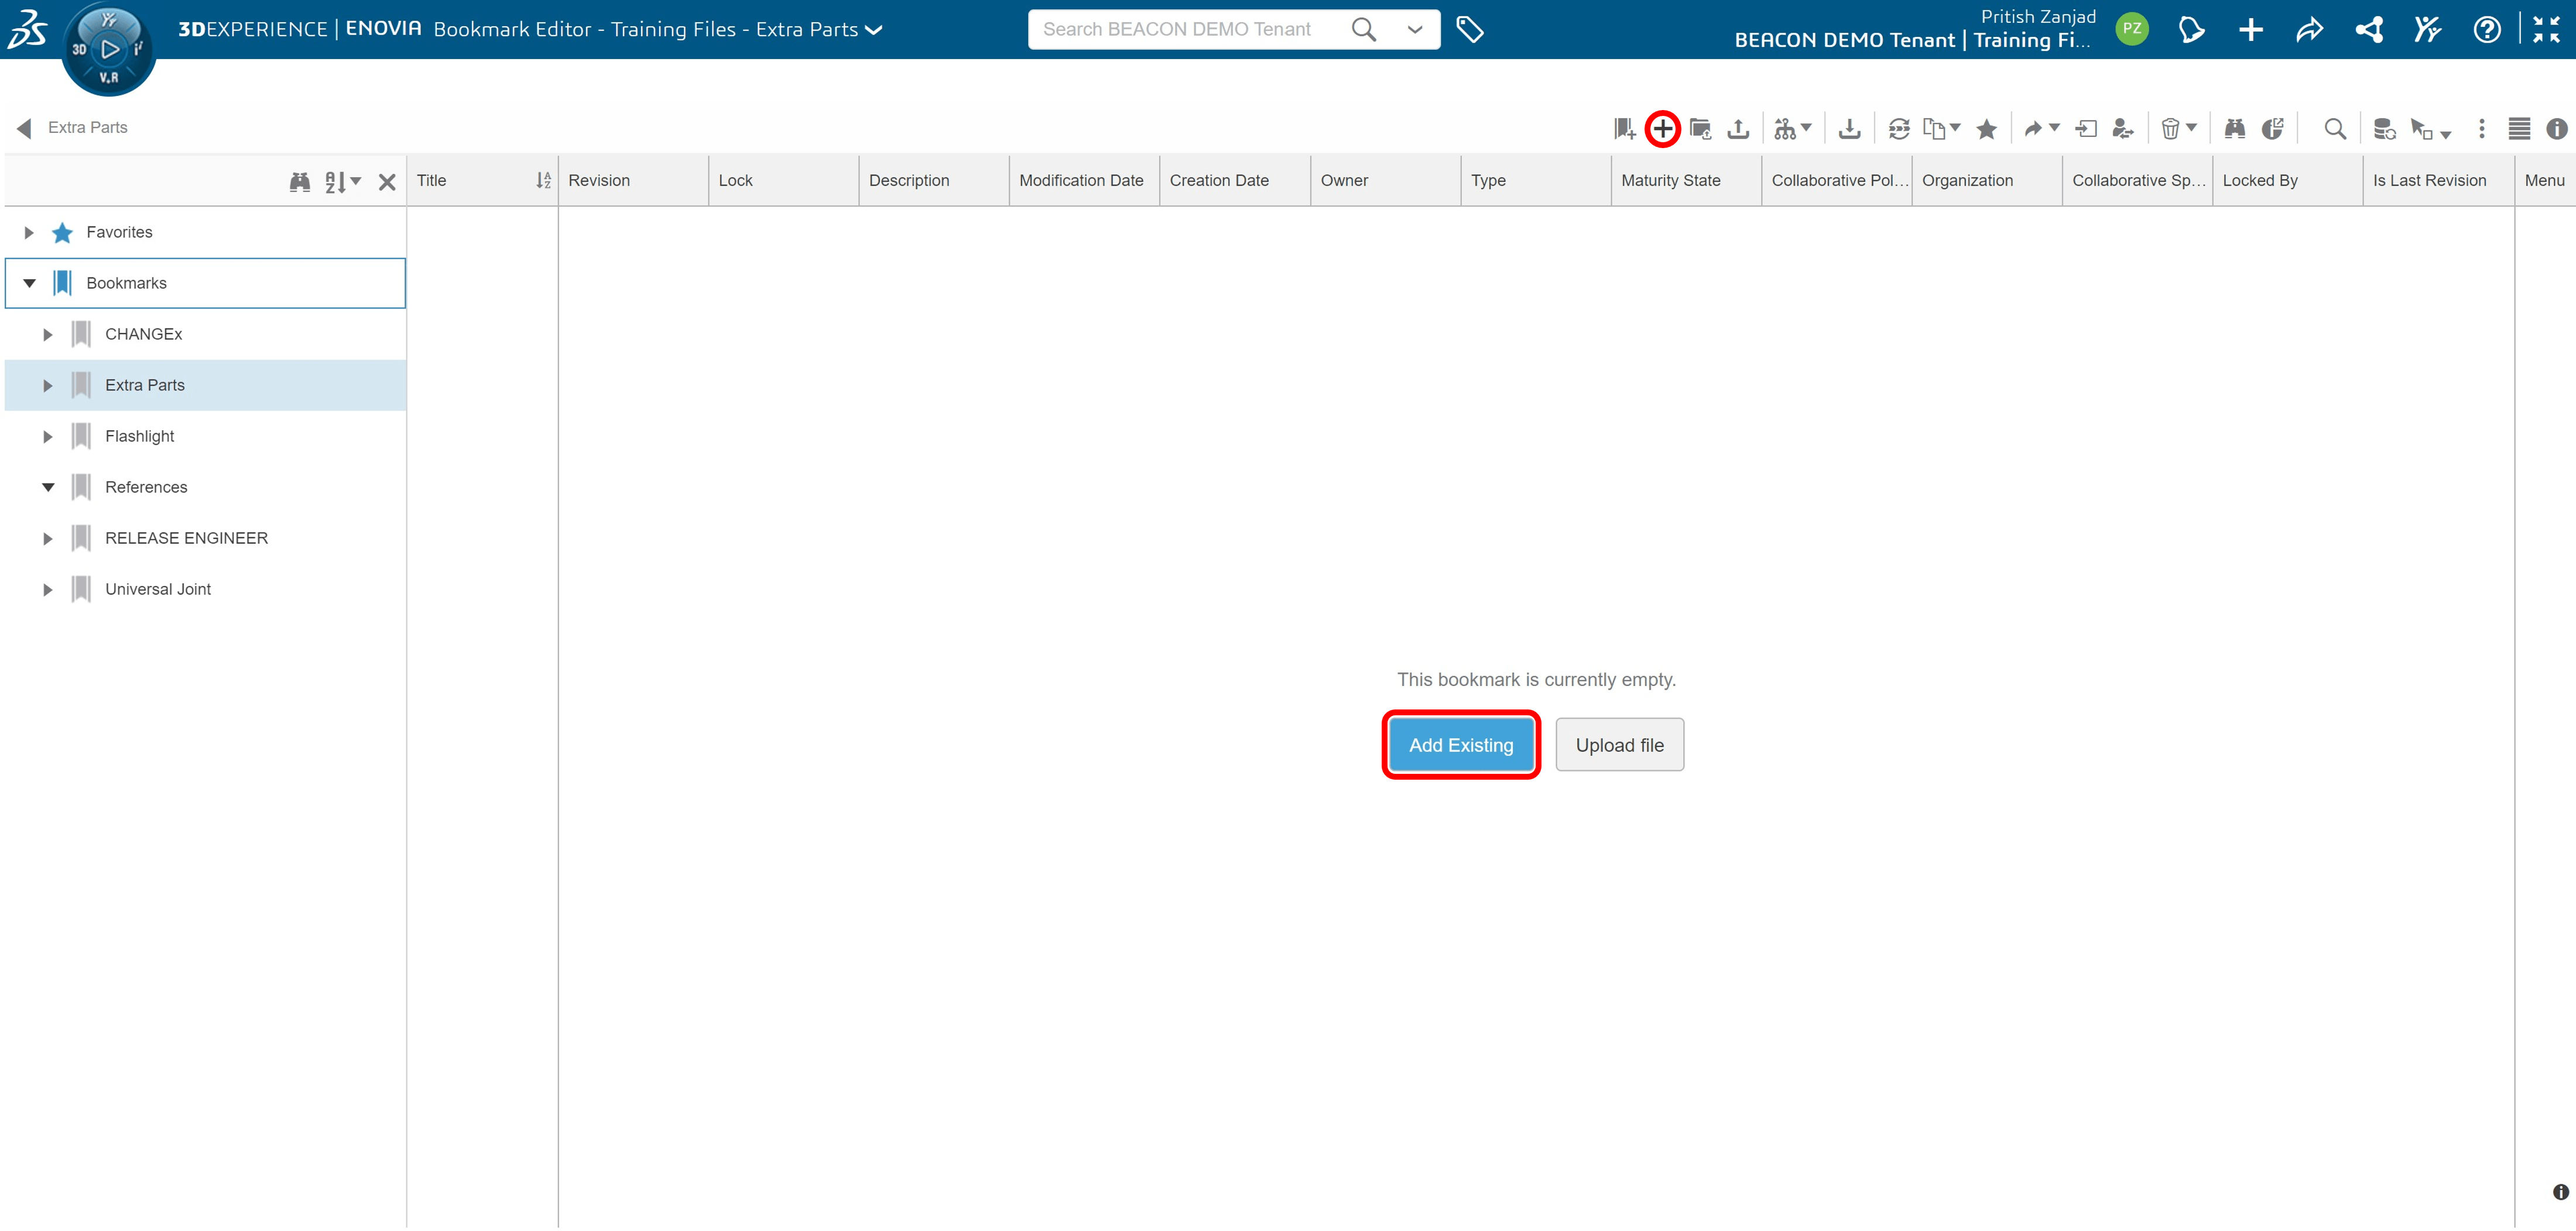
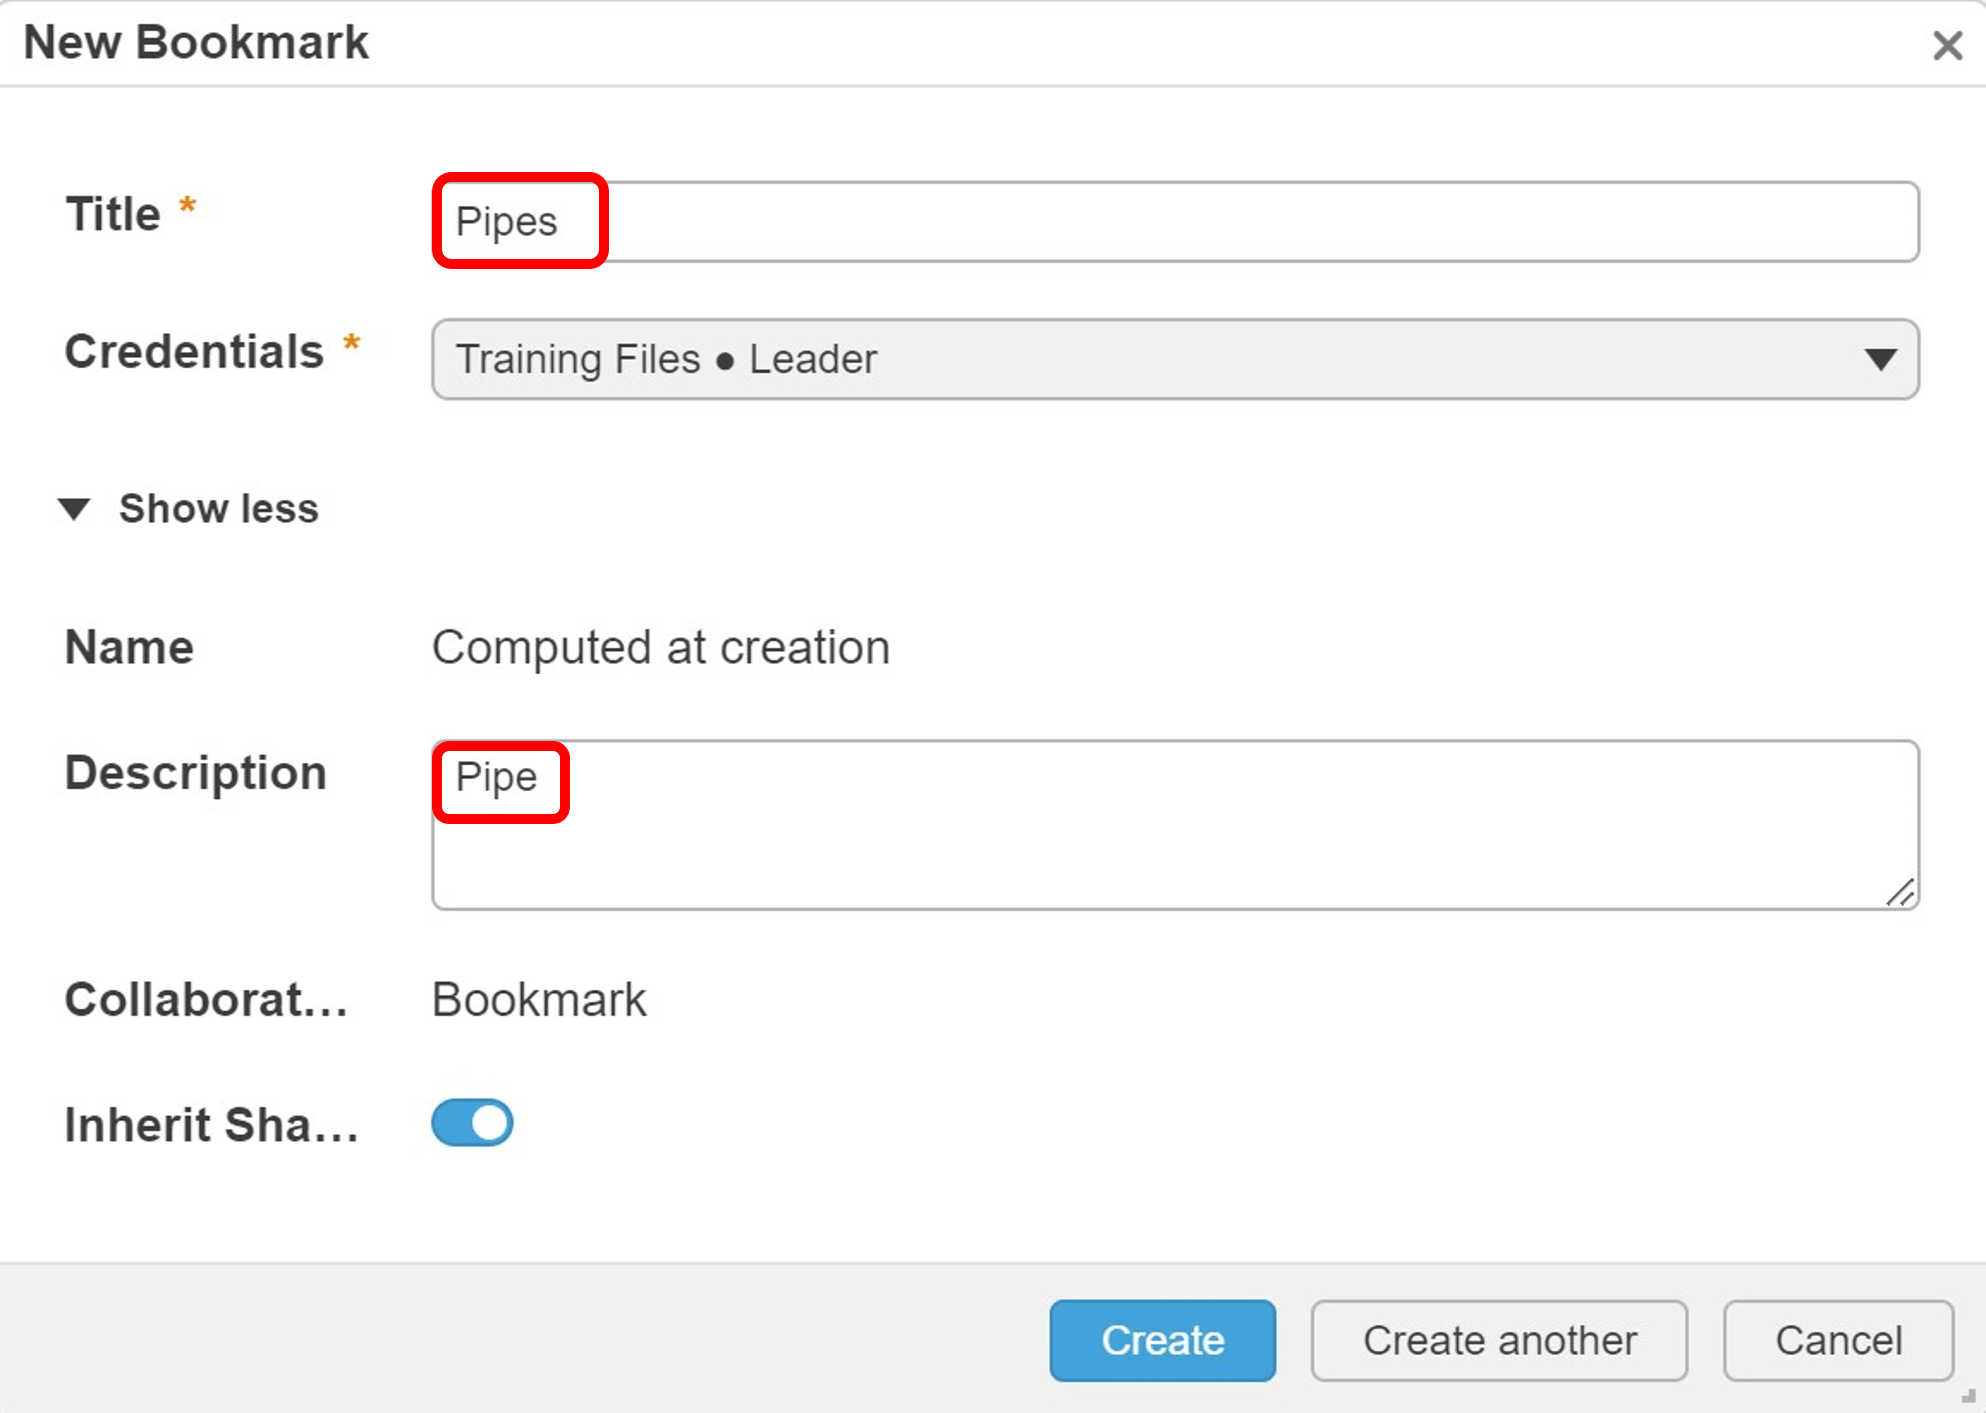
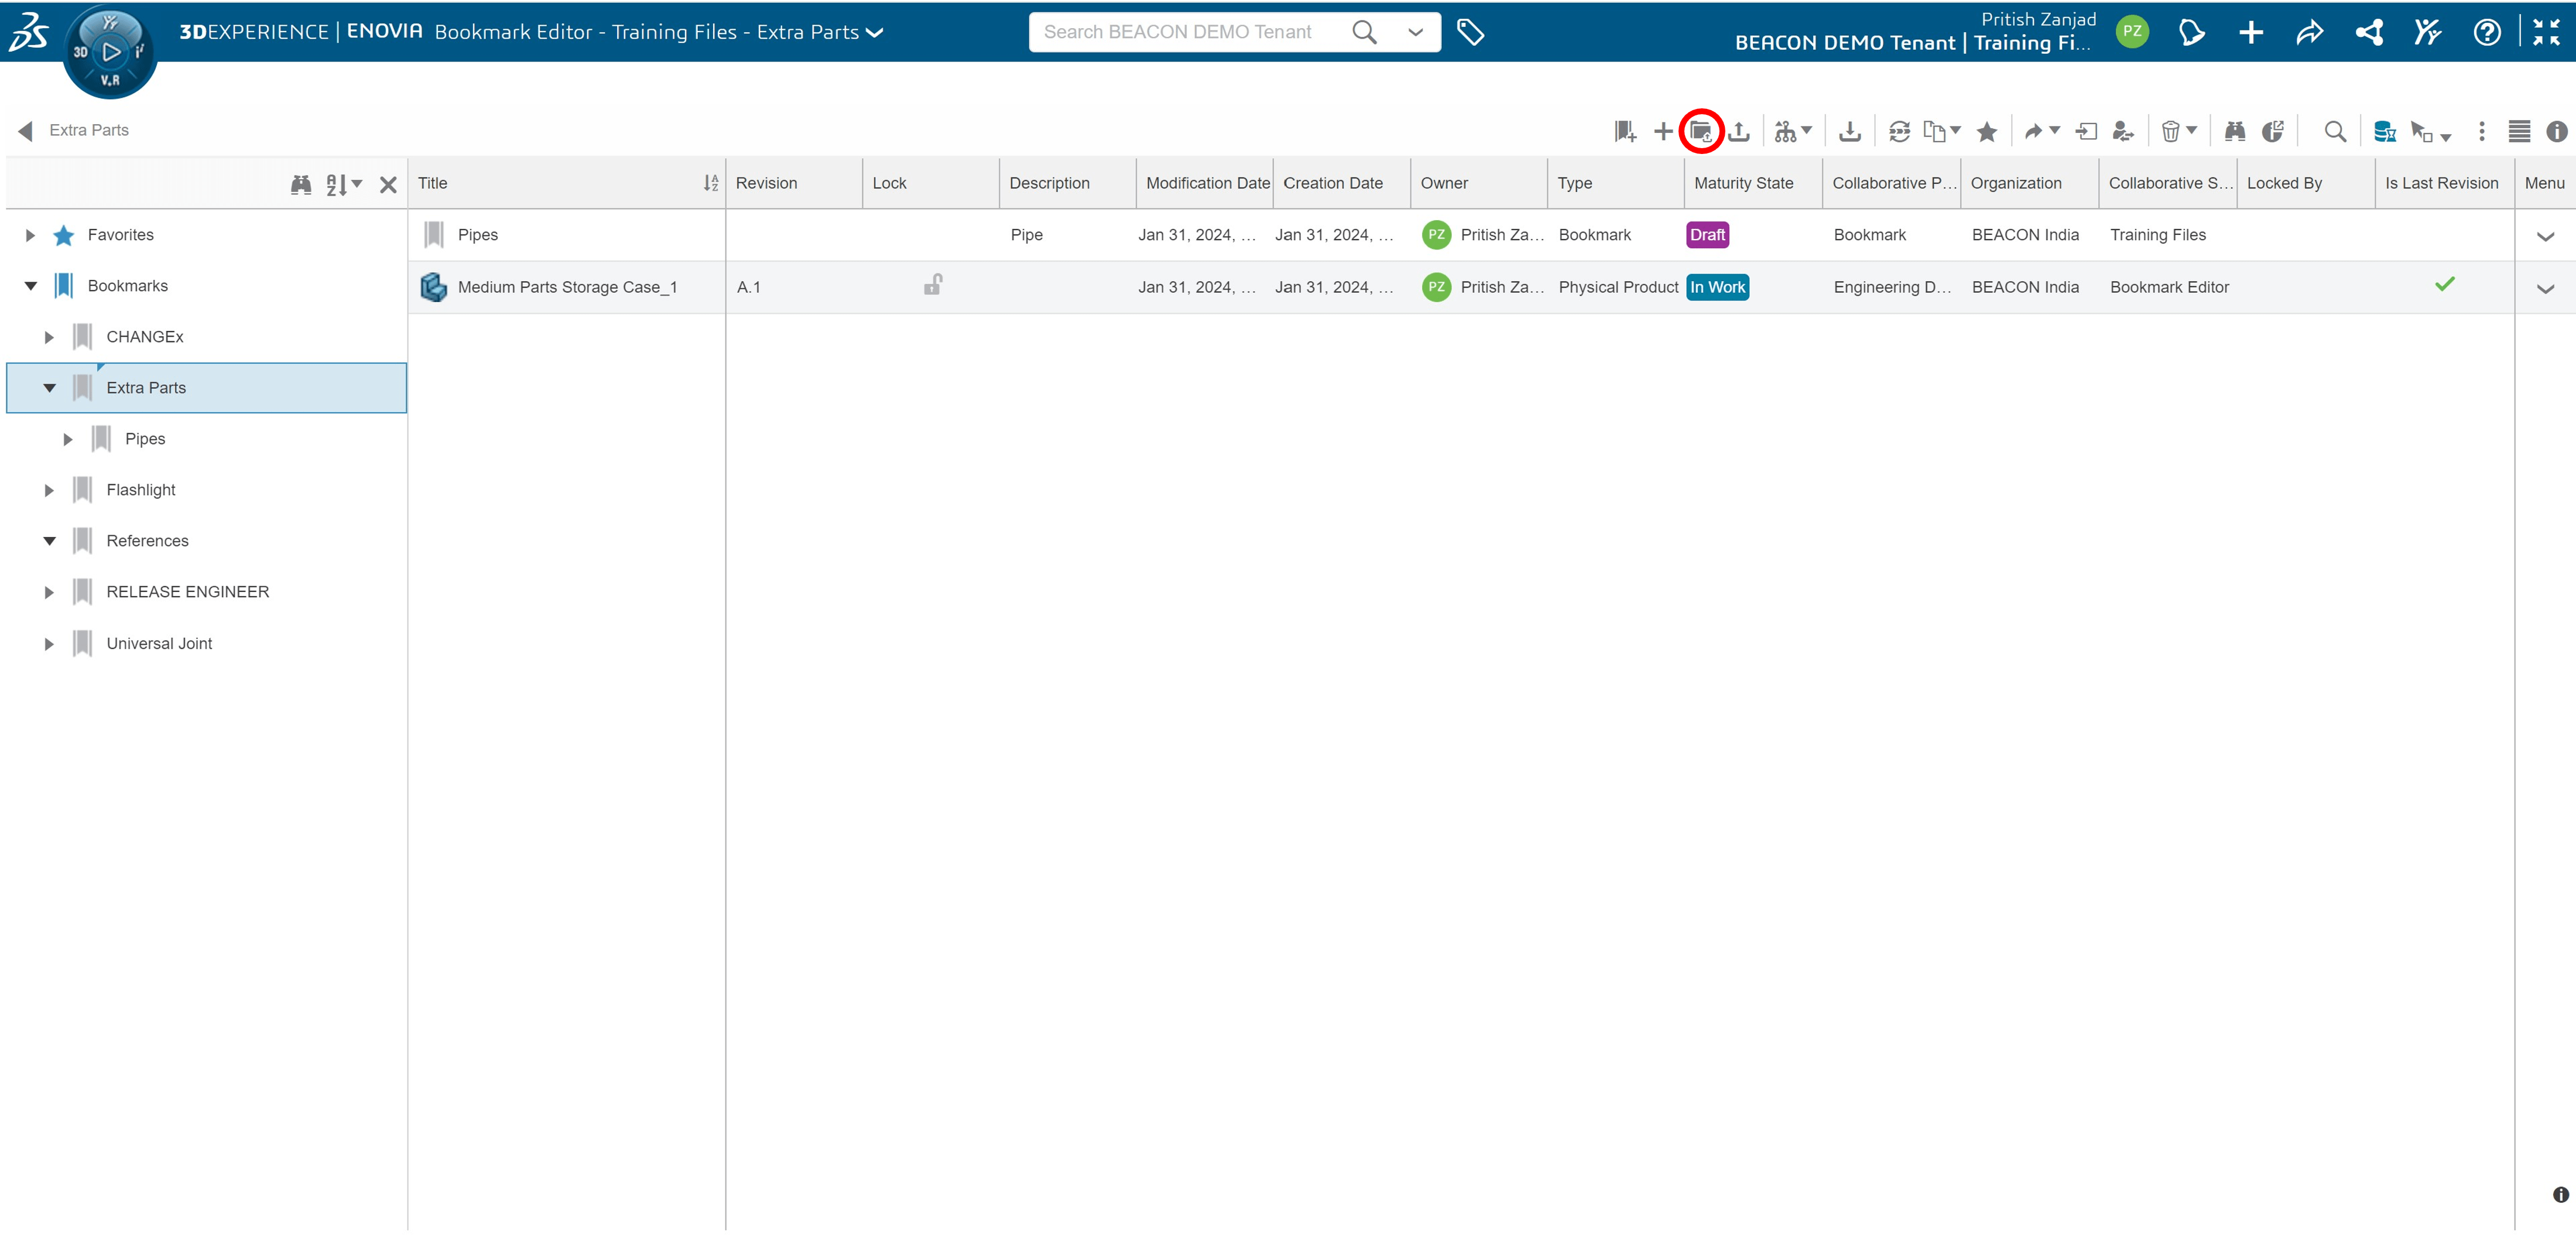
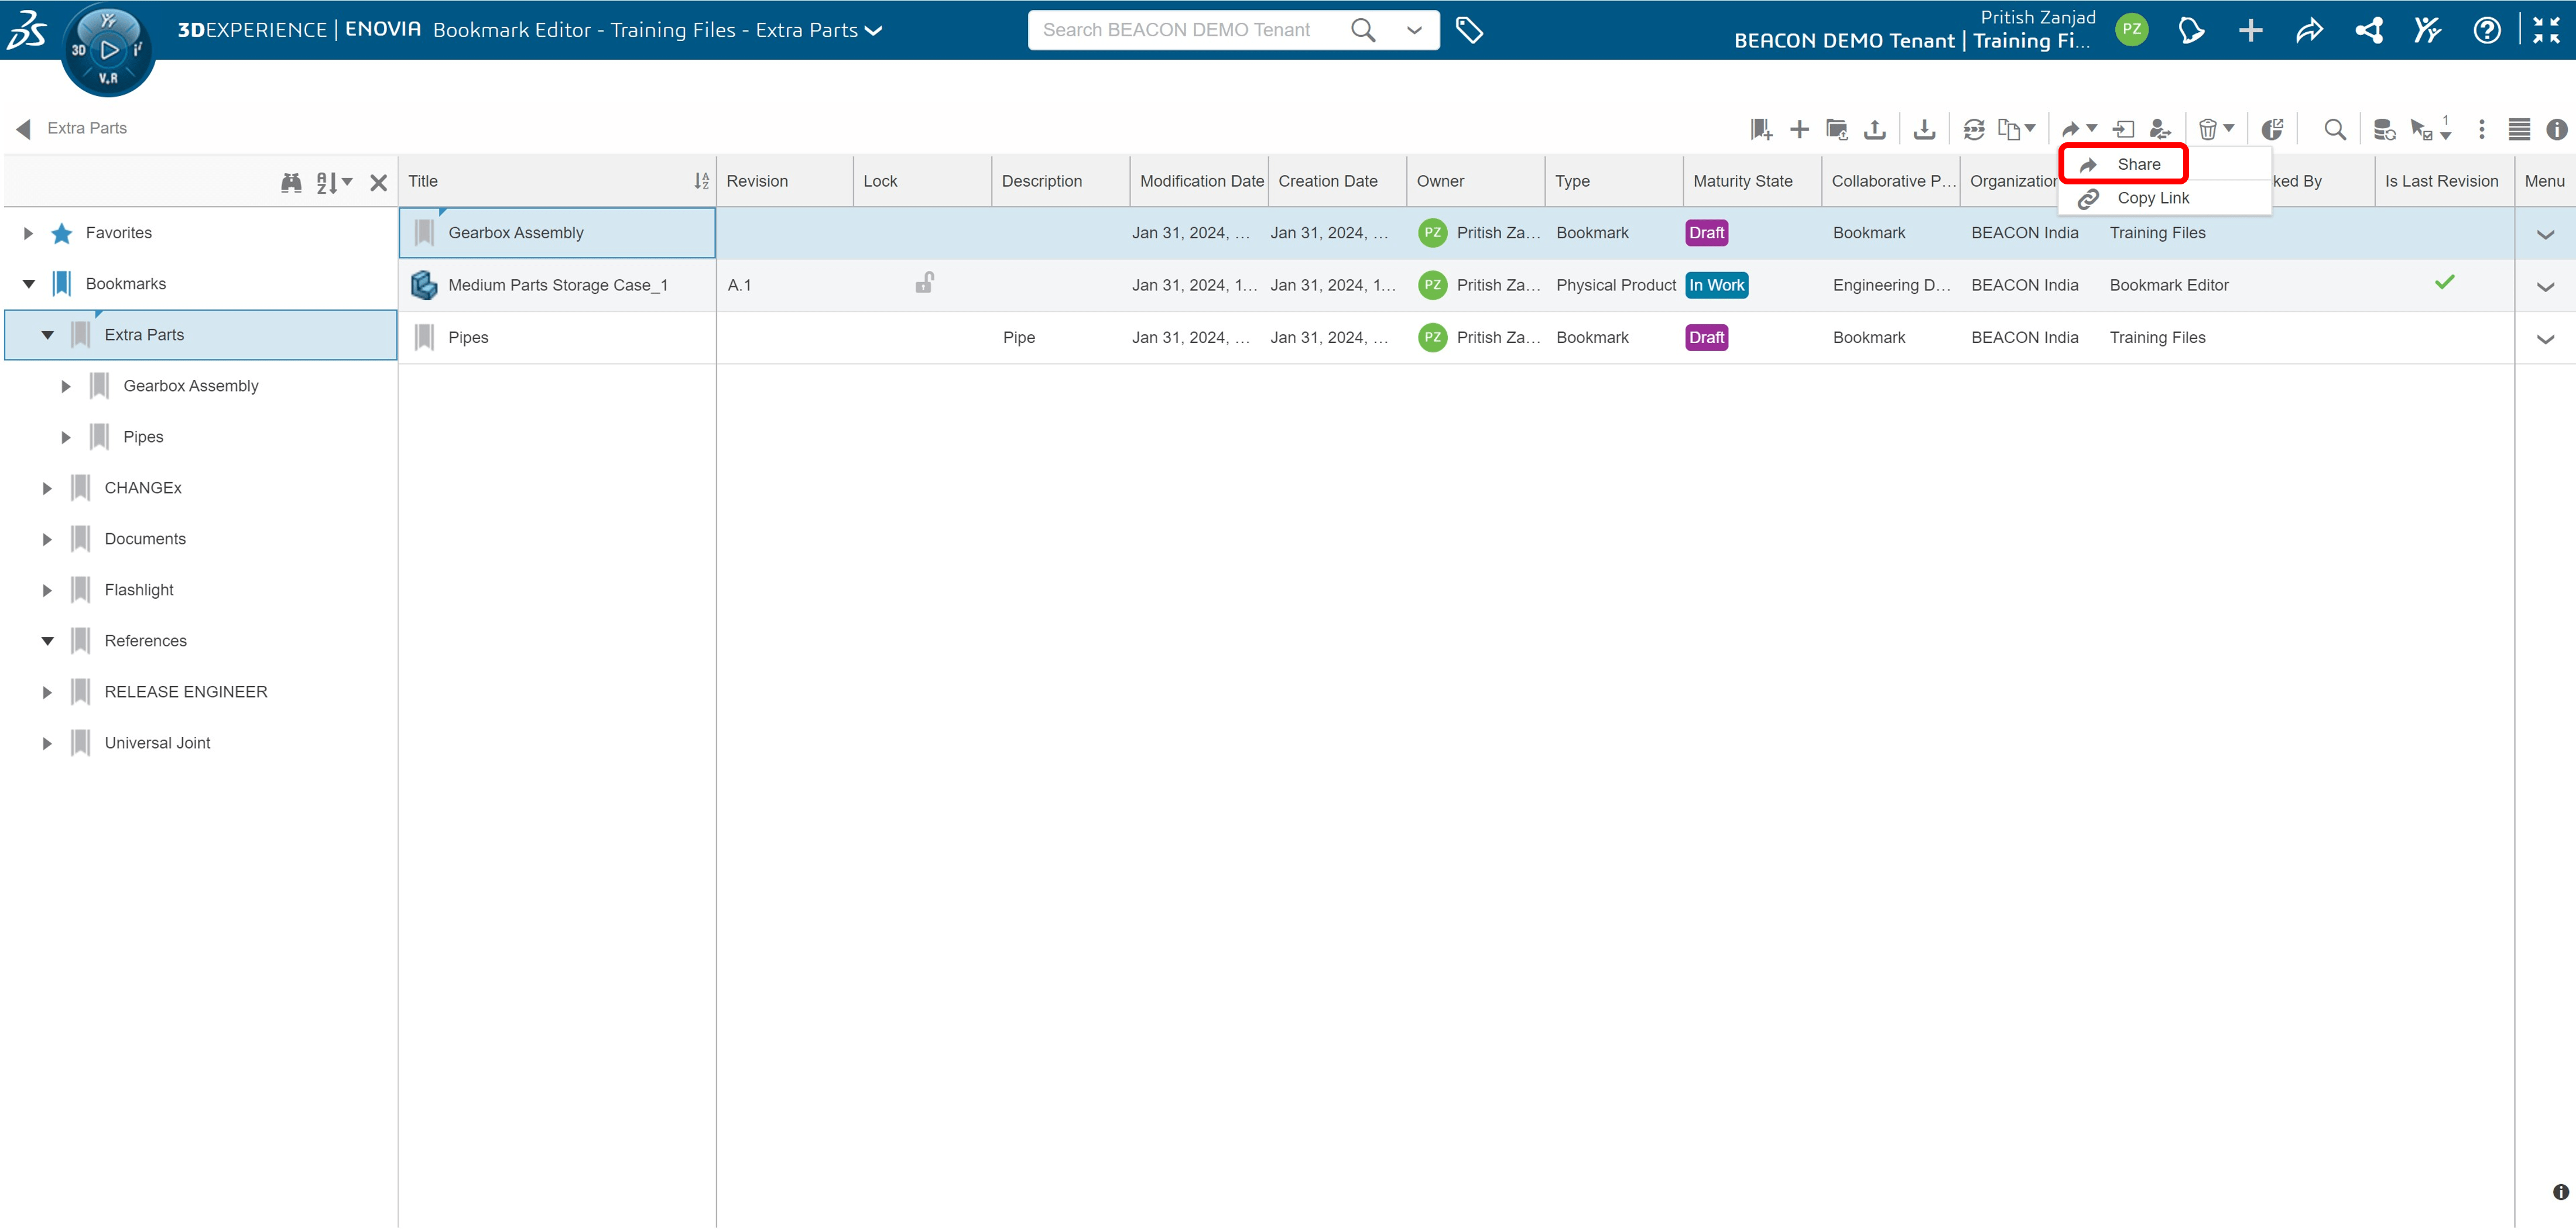
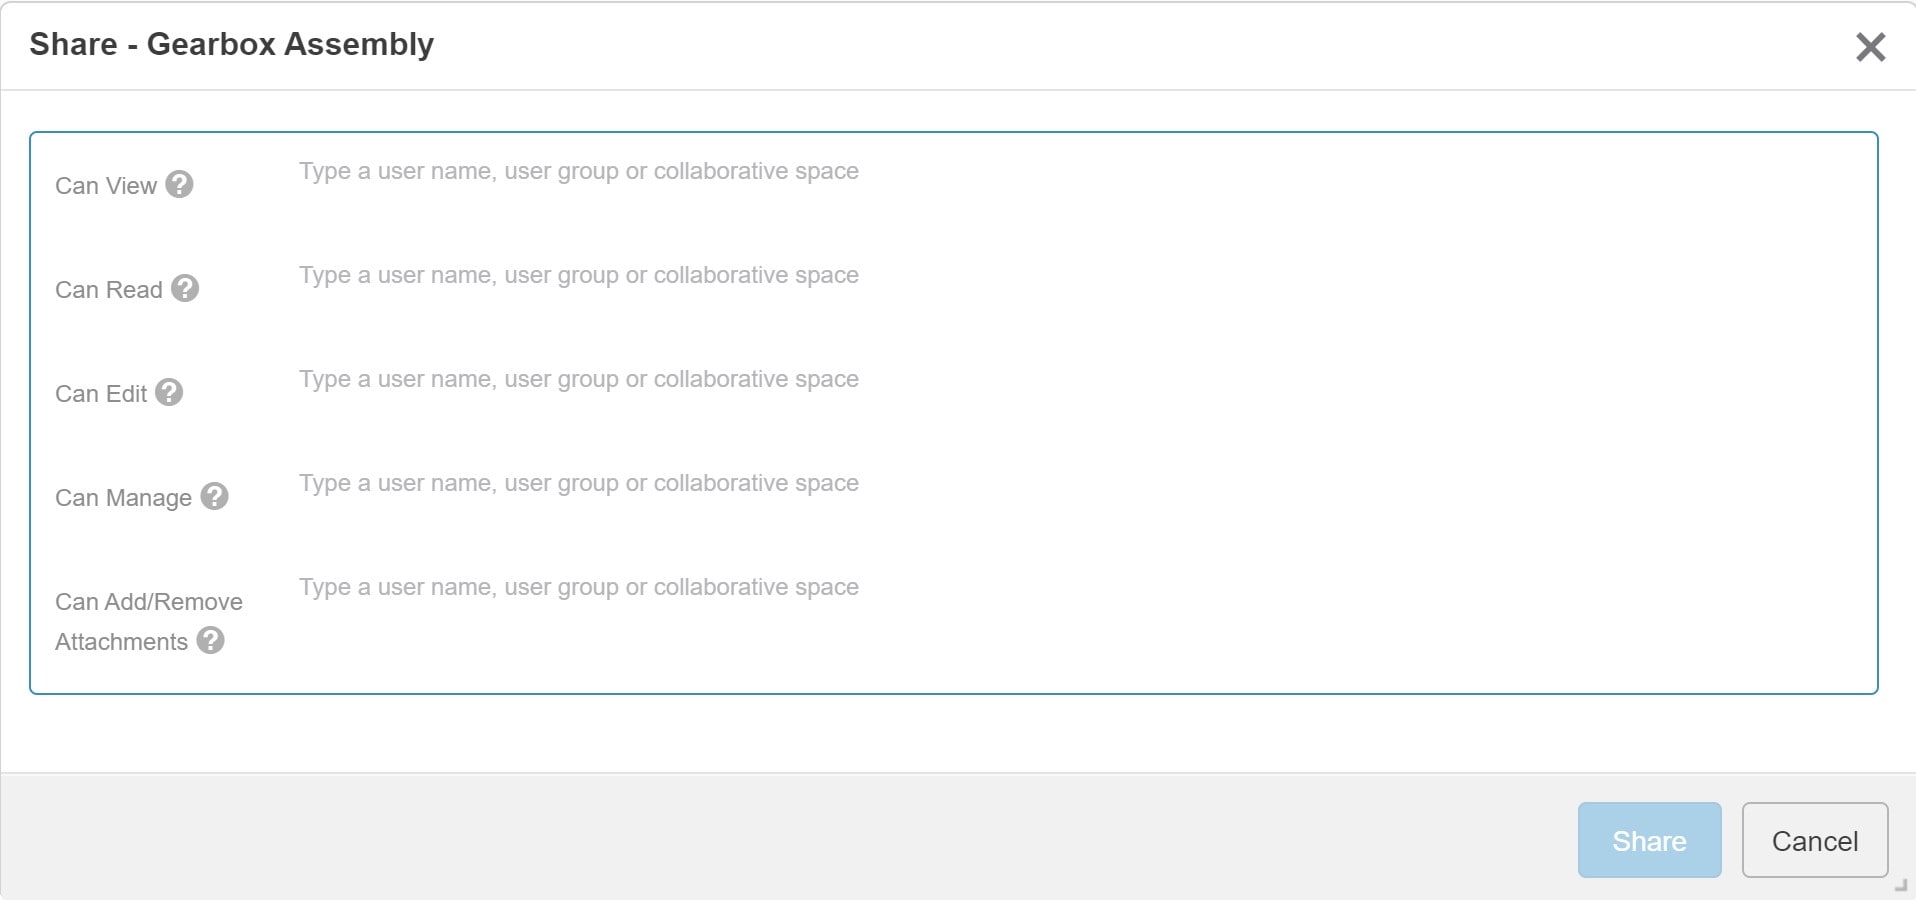
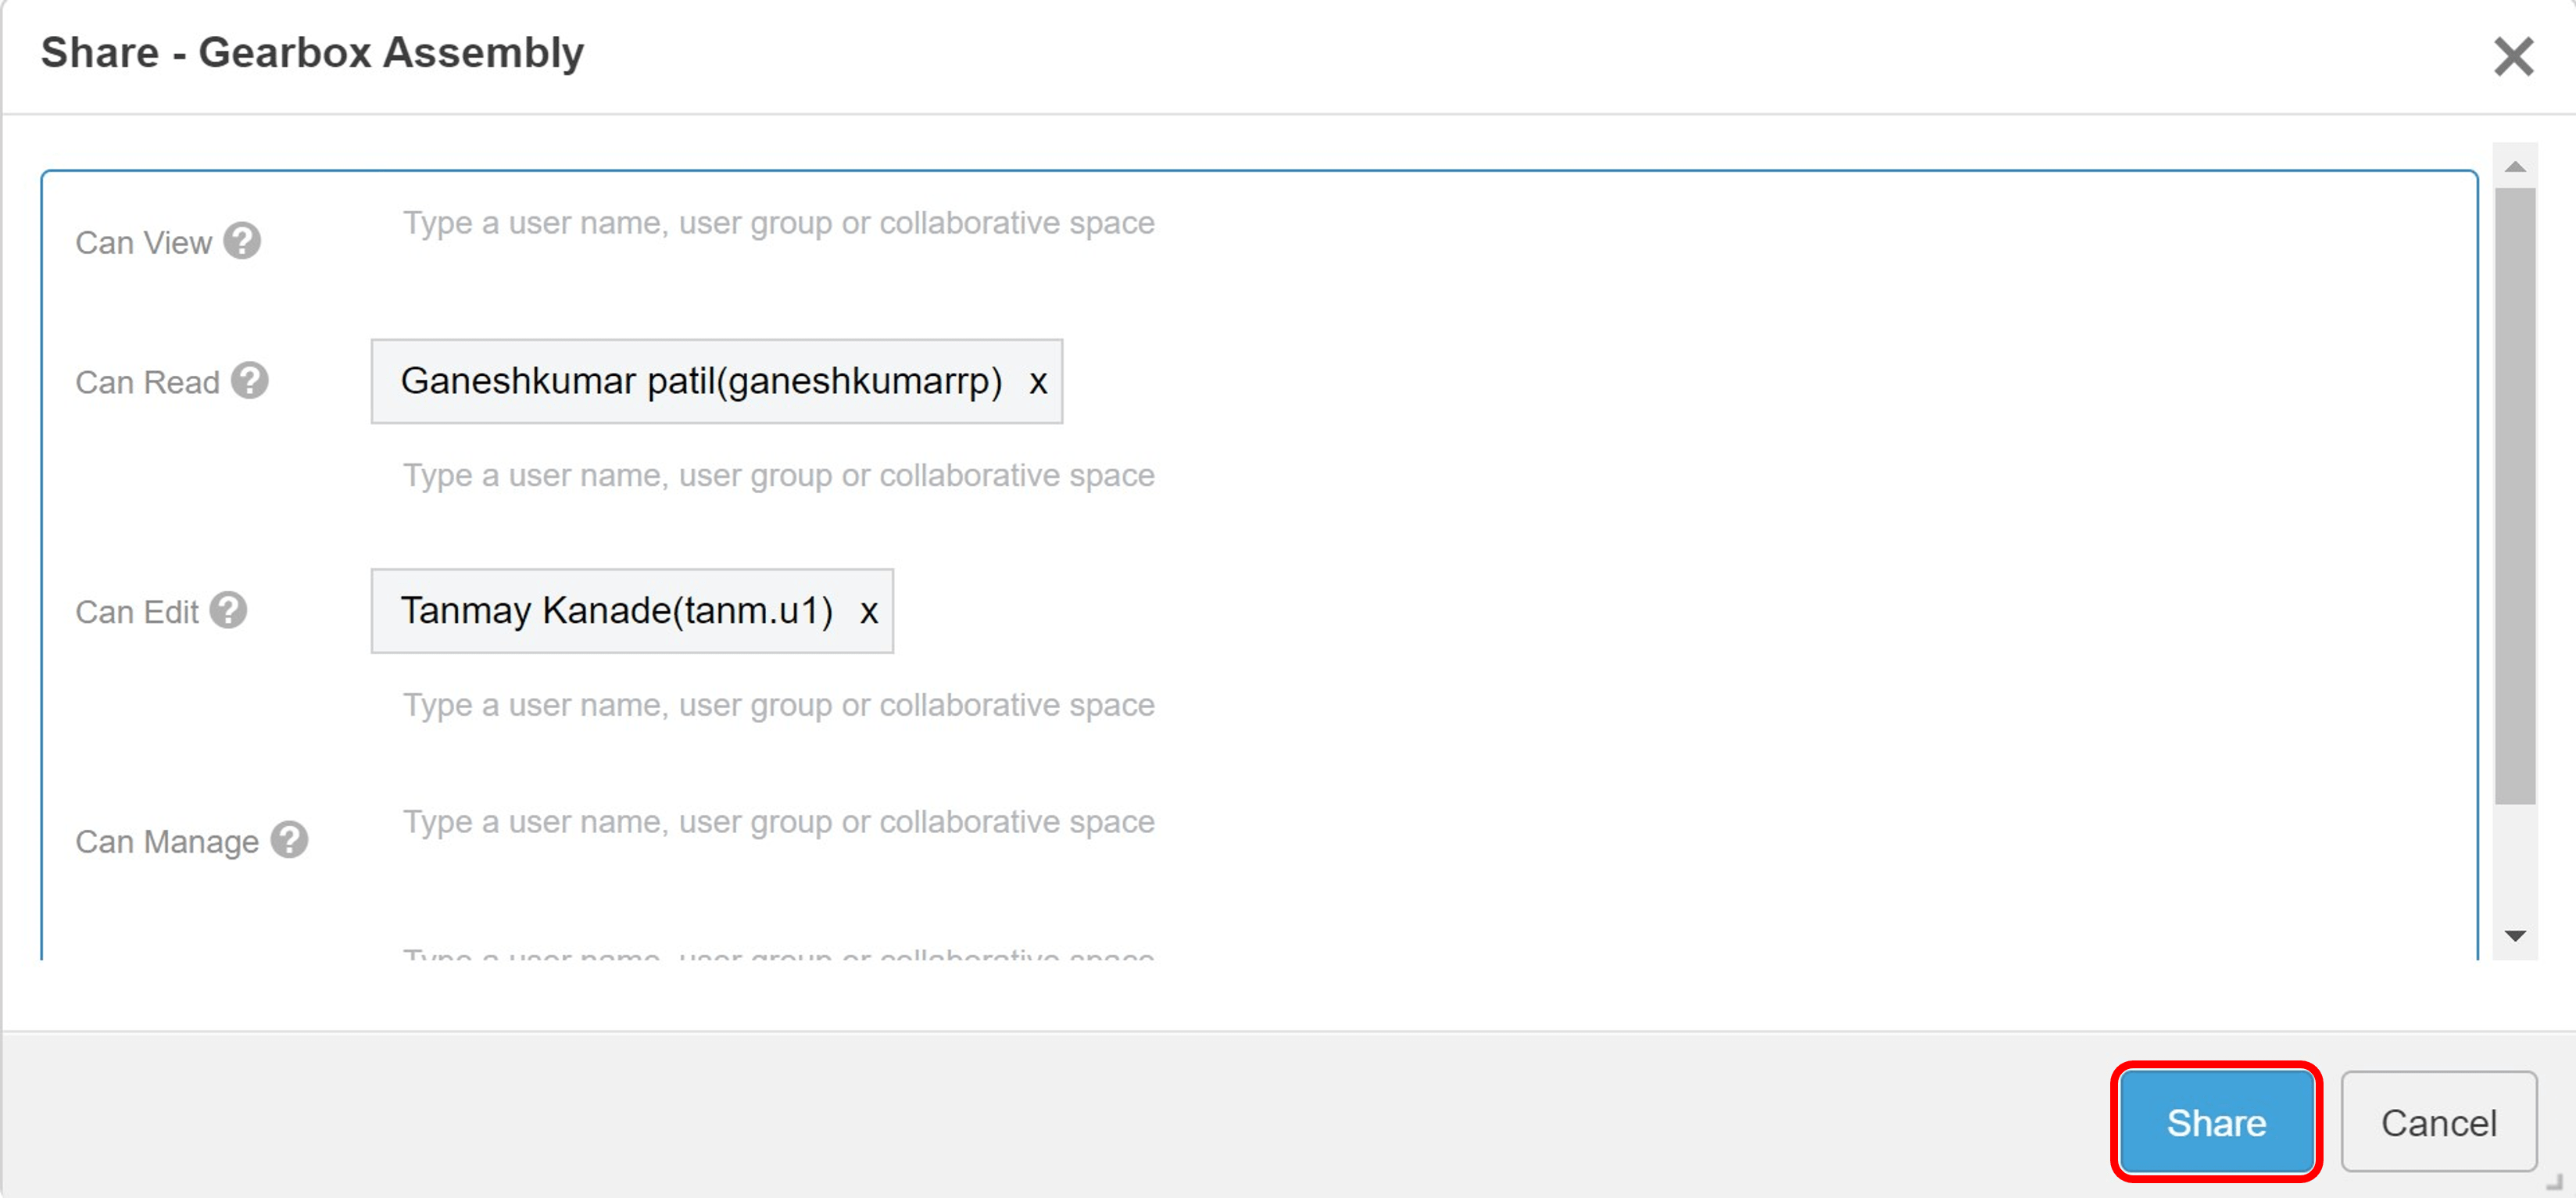
Bookmark Editor helps you to classify, organize, and quickly navigate through your data on the 3DEXPERIENCE cloud. With this, you can create a folder structure similar to that of Windows Explorer. Furthermore, you can also set the maturity state to the created bookmark and share it with other members of the platform while maintaining certain access rights. Let’s look into how to create a bookmark on the 3DEXPERIENCE cloud.
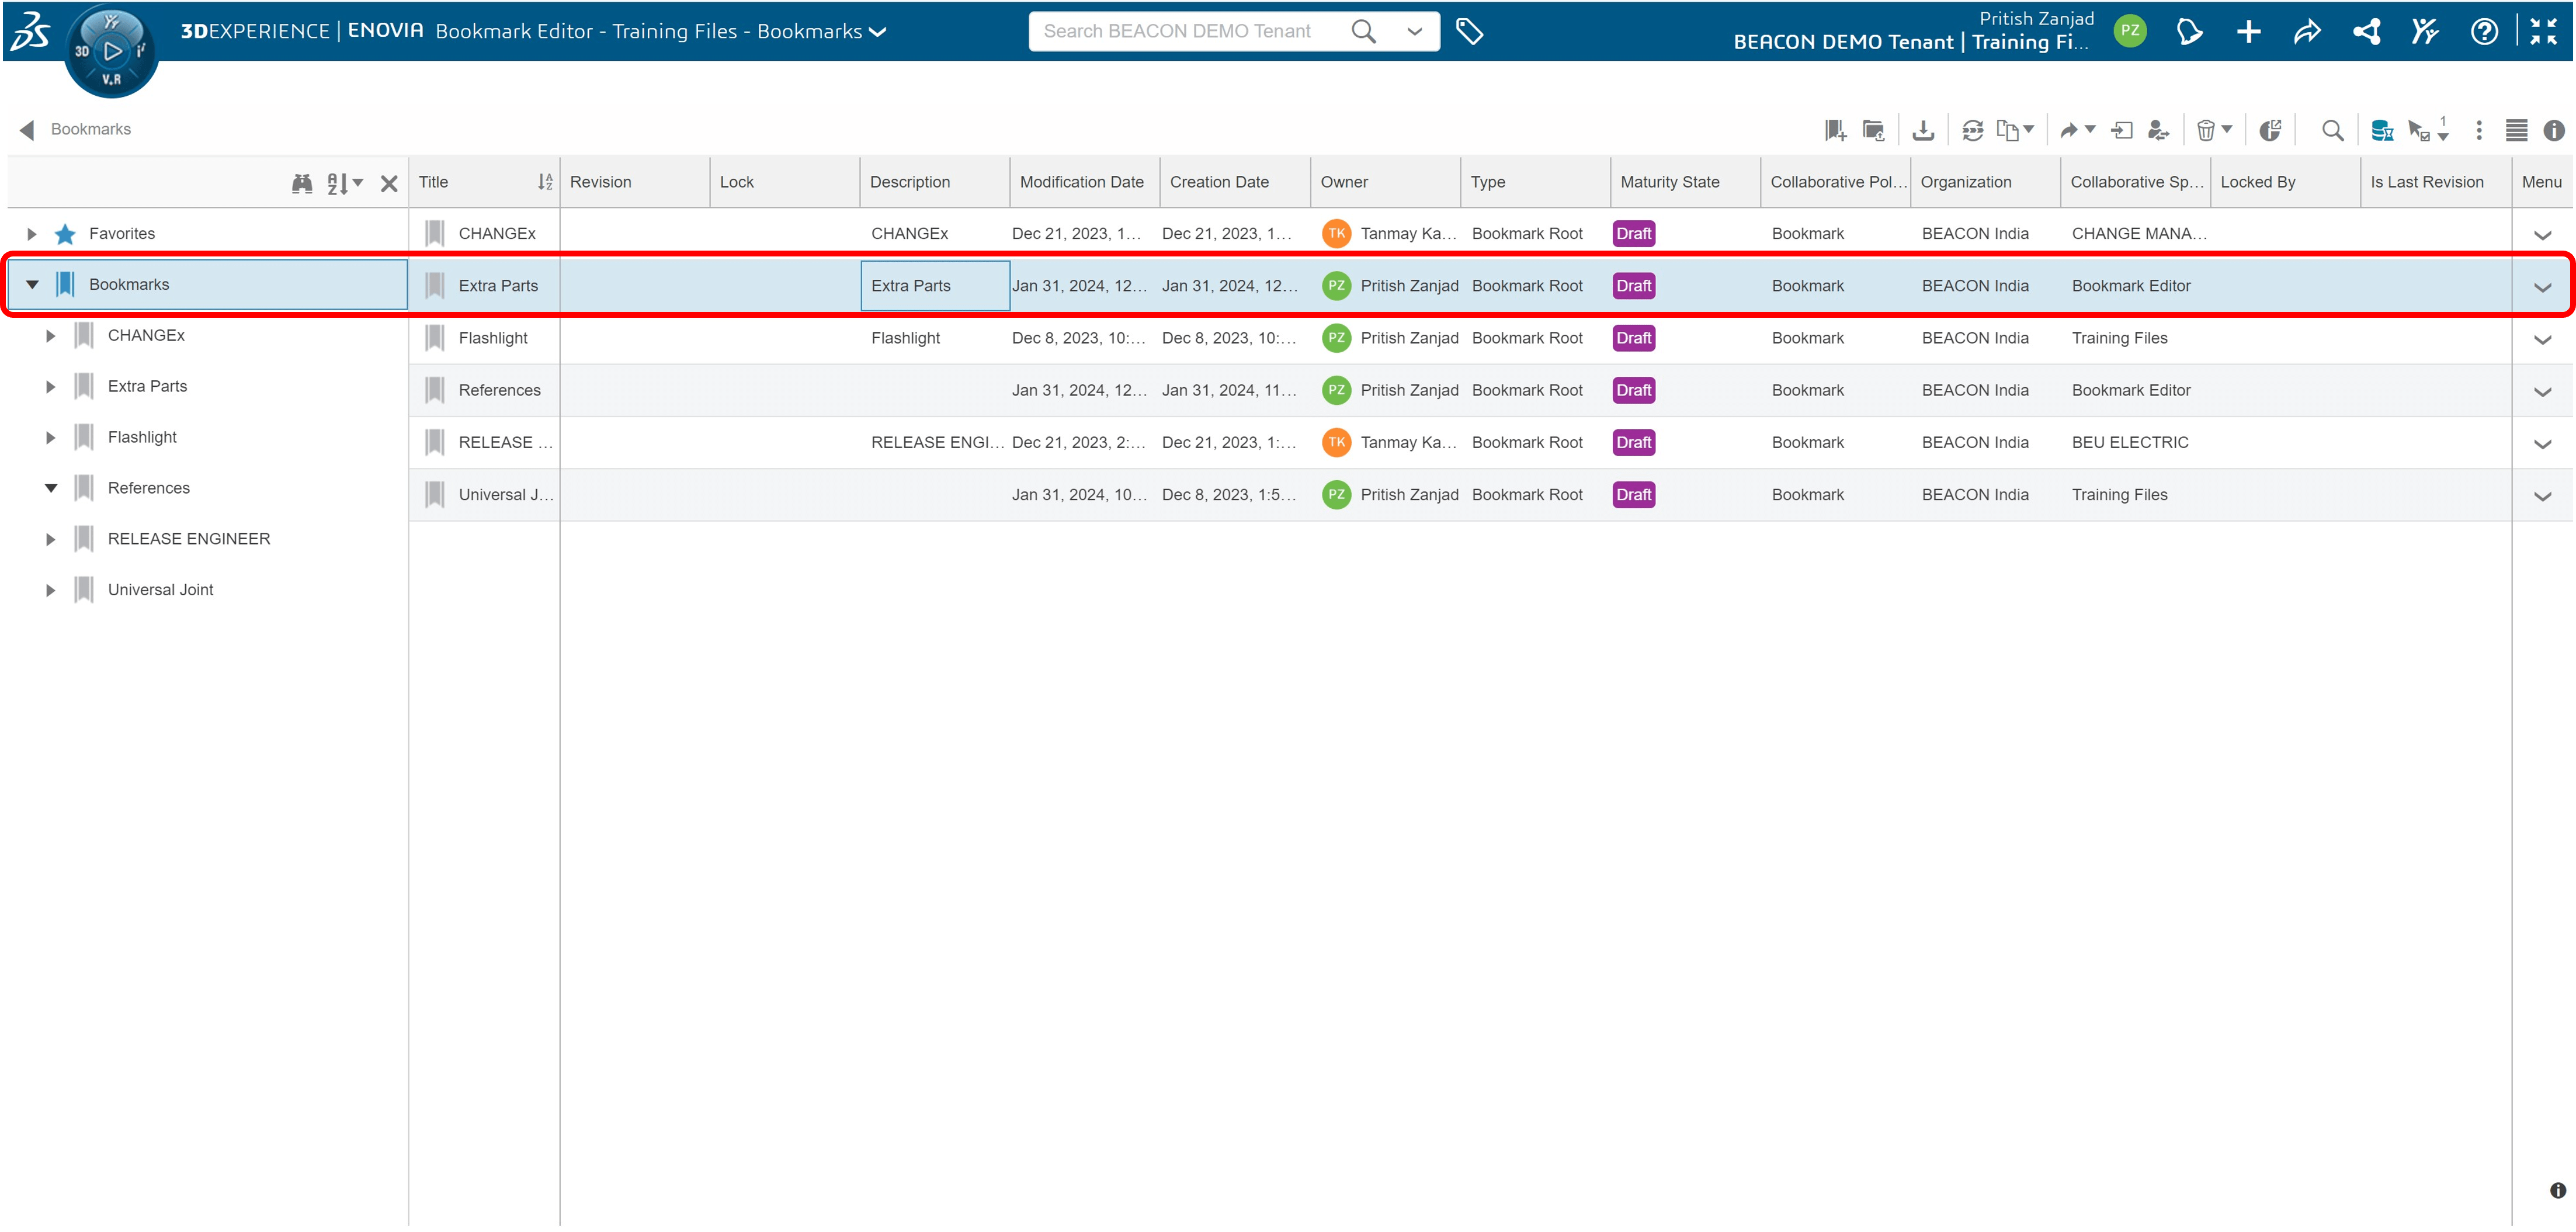
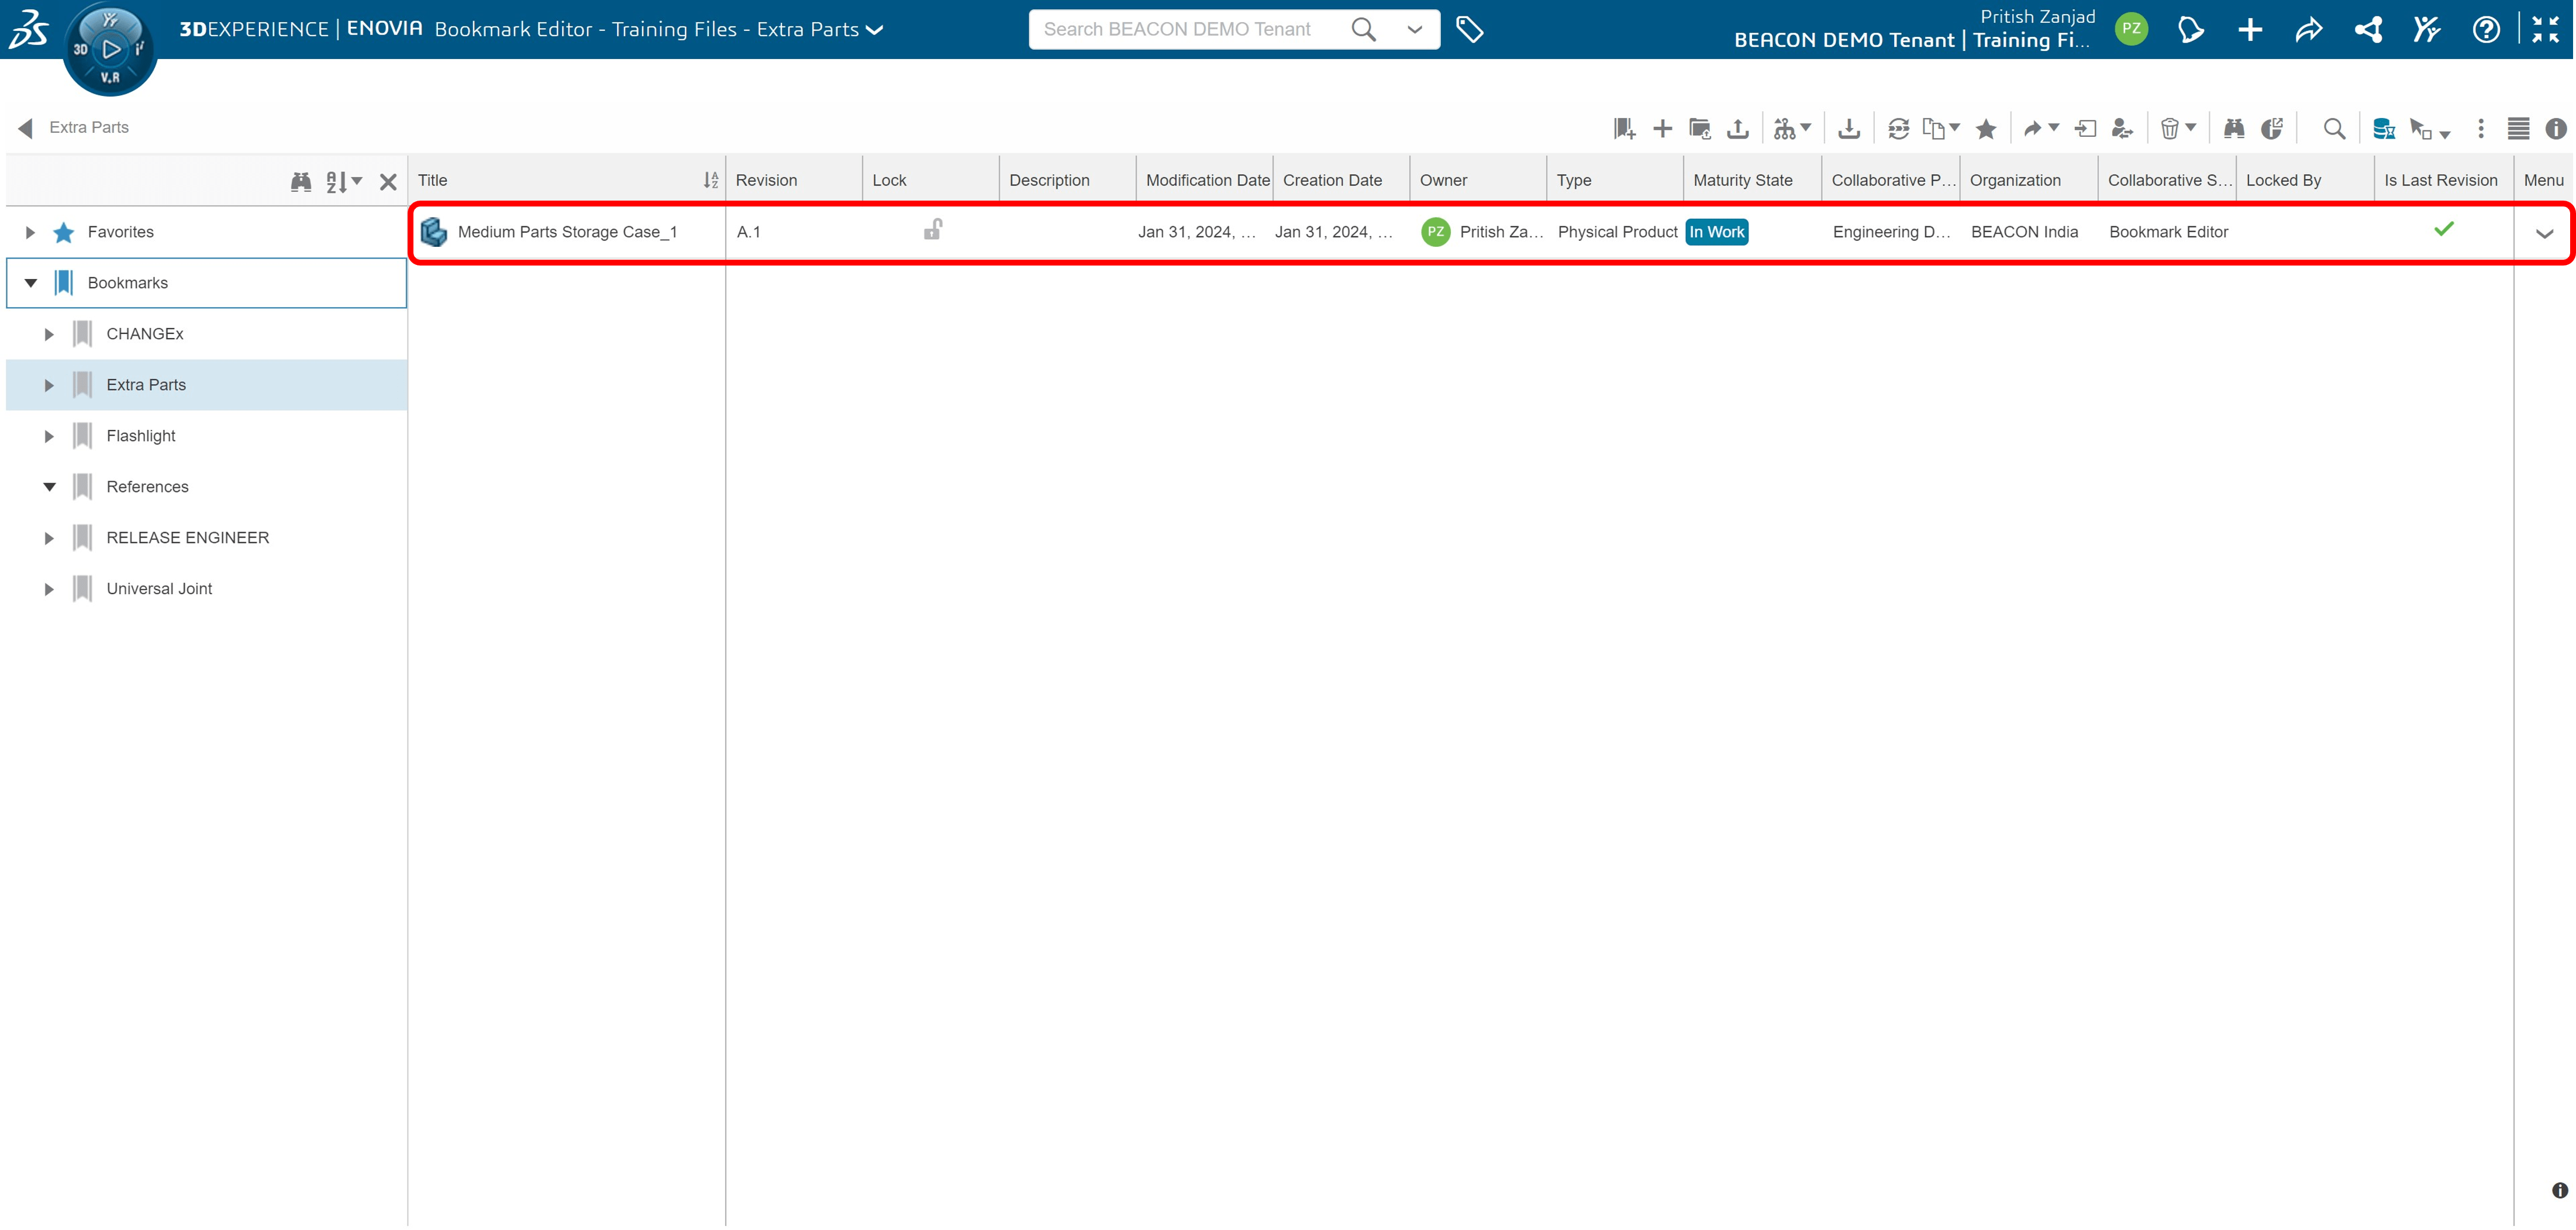
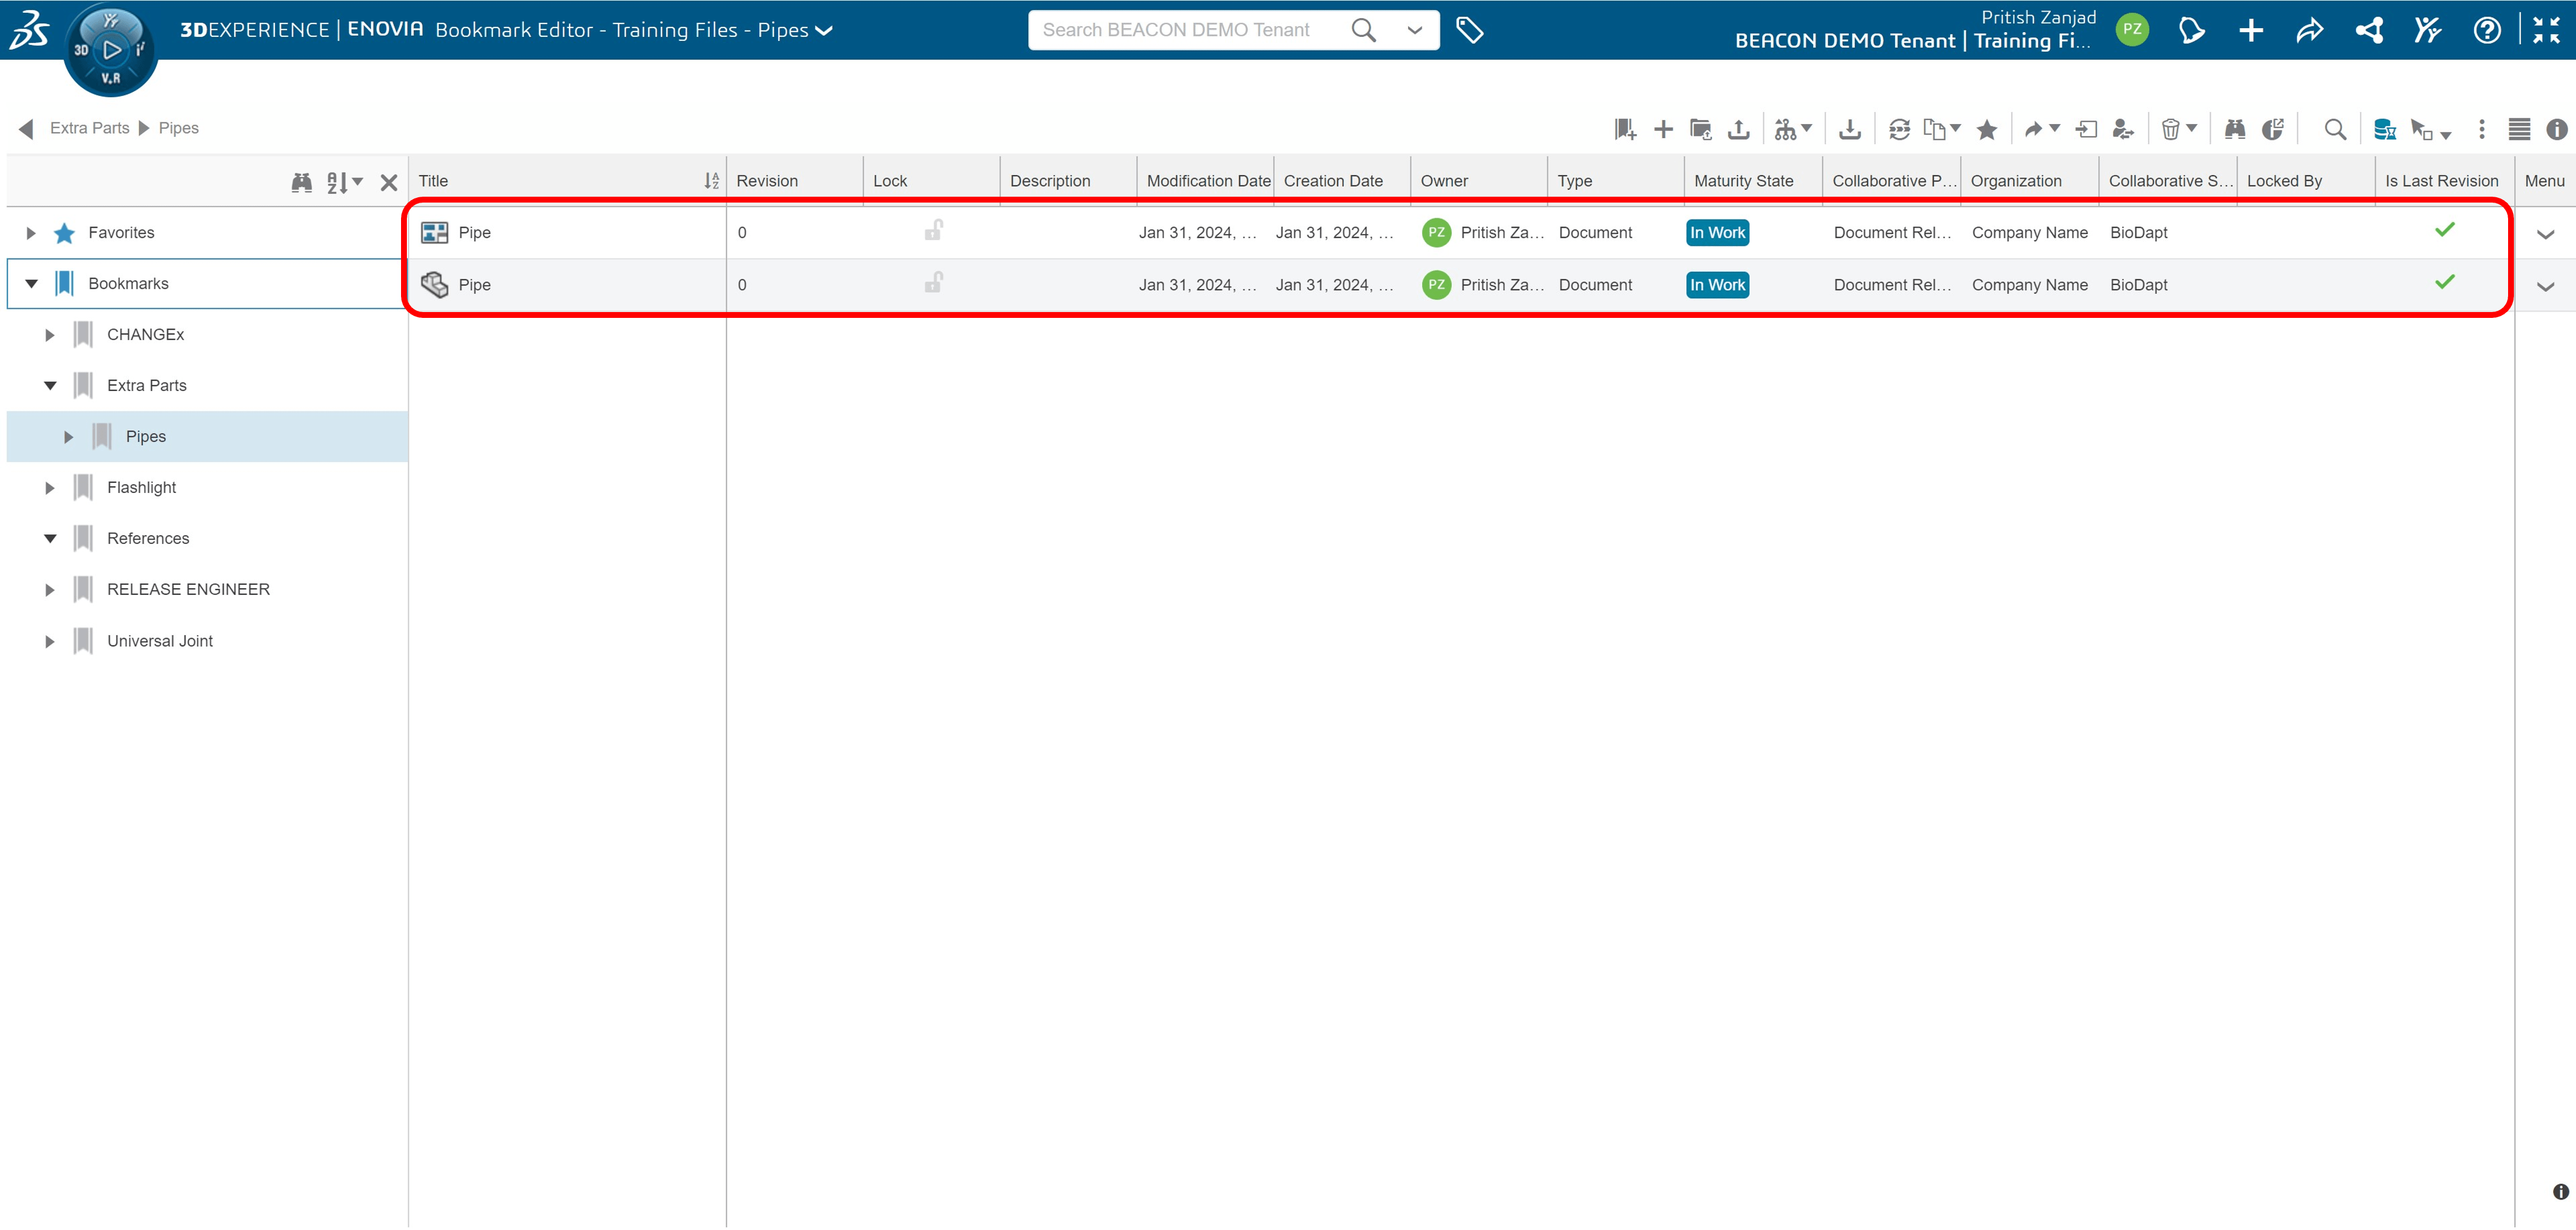
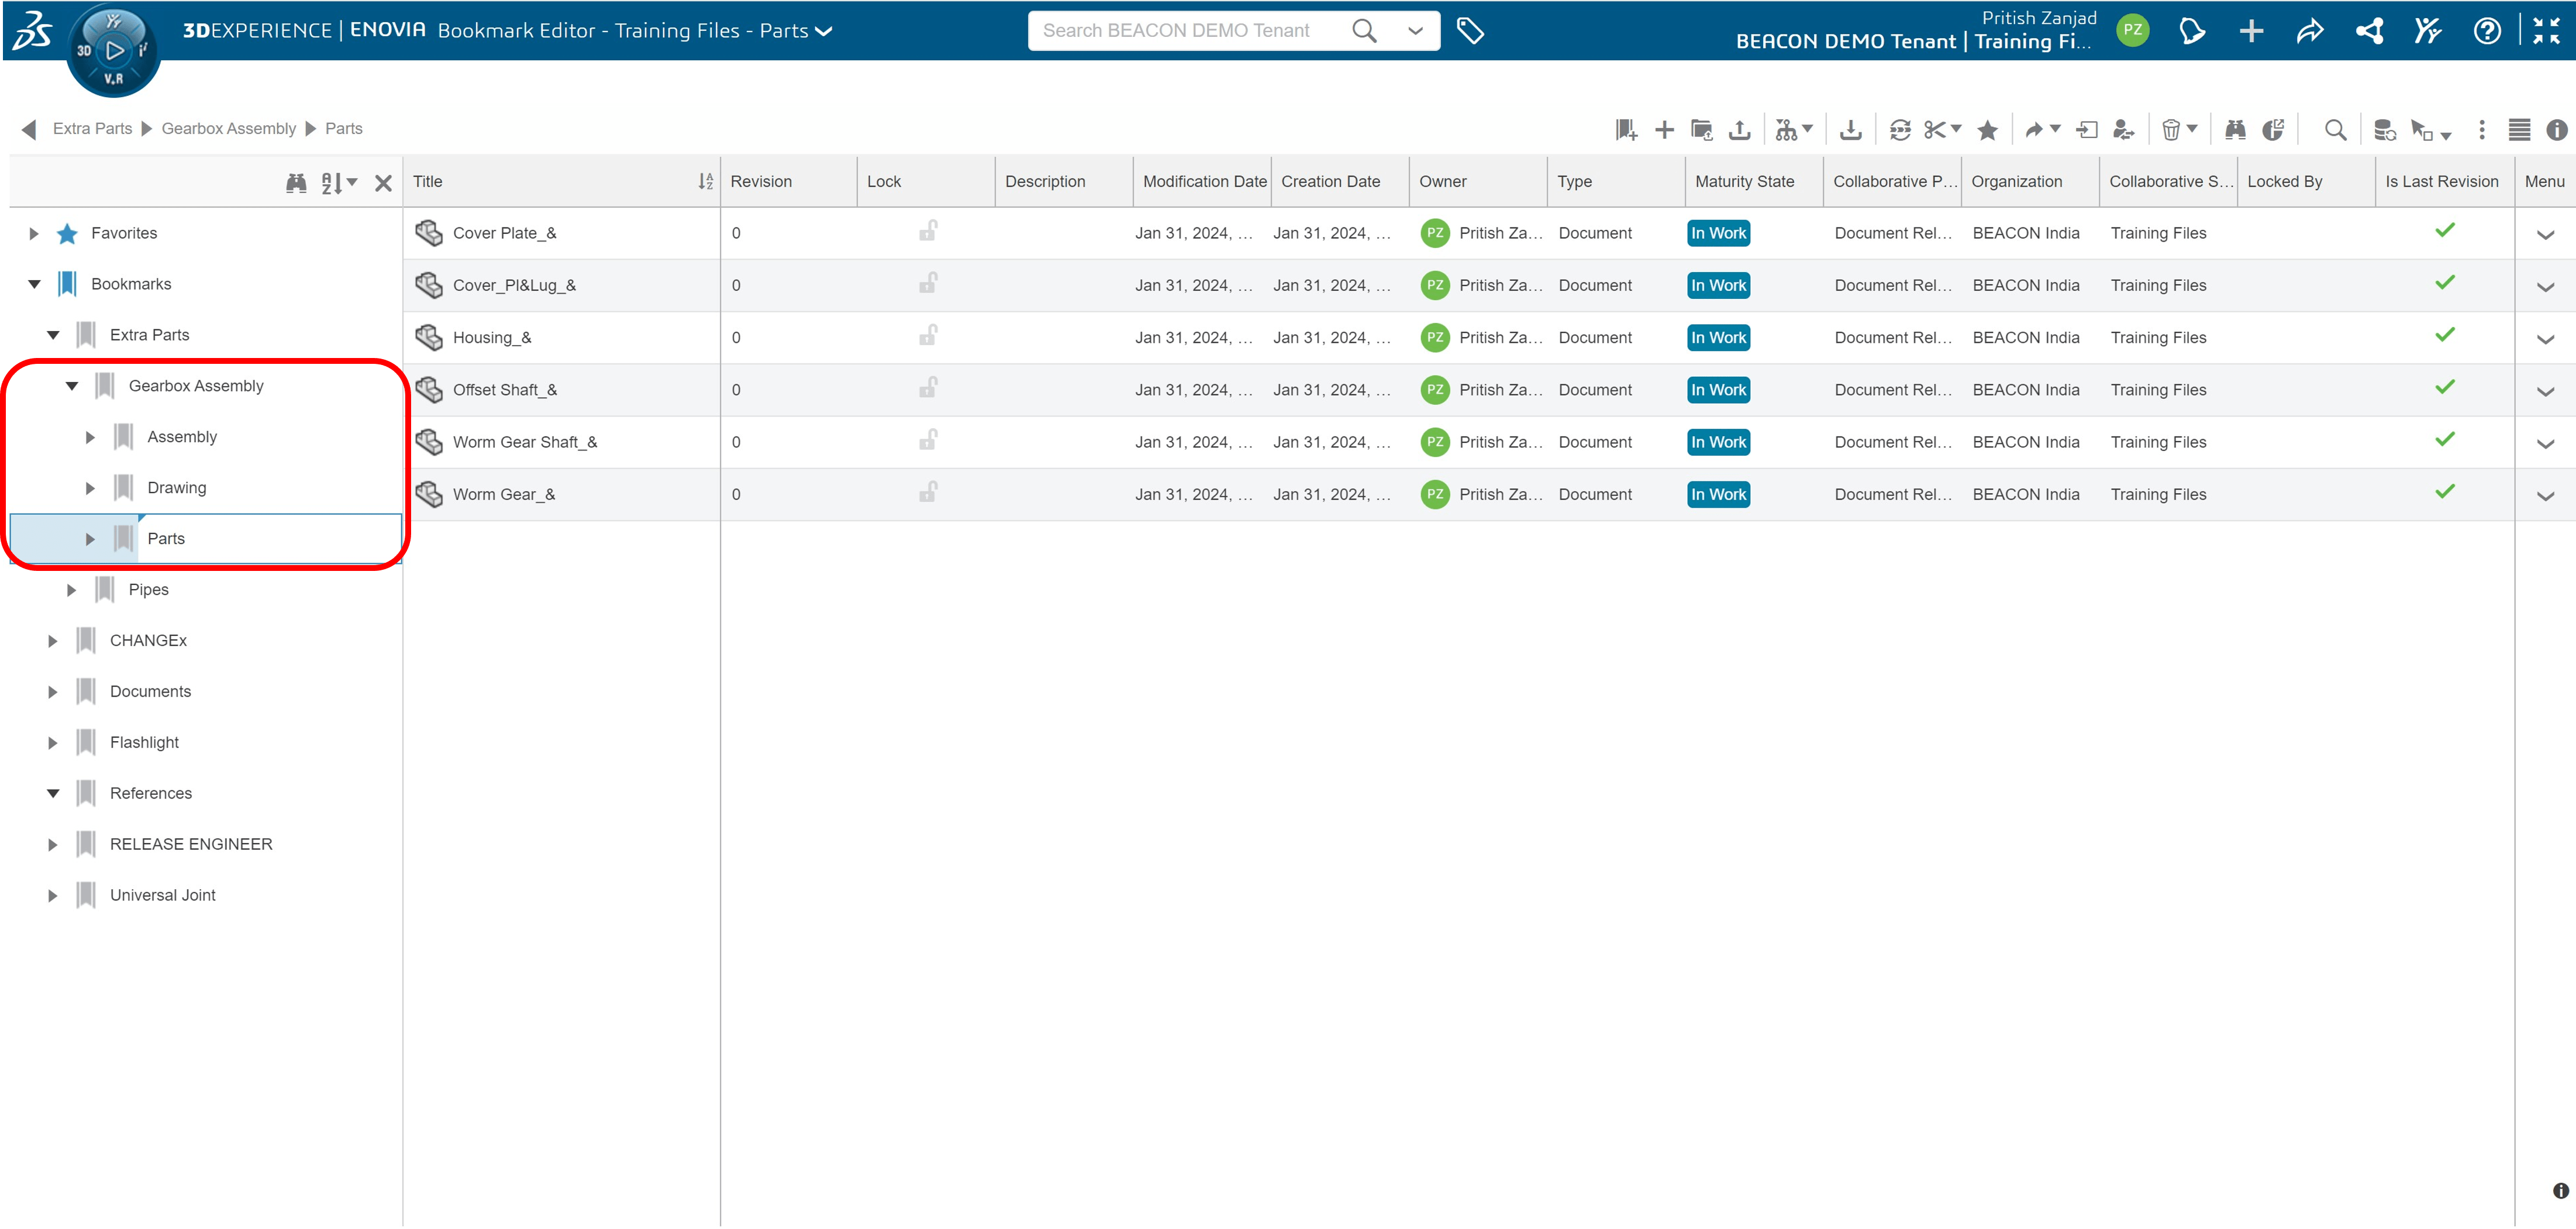
Notice the created bookmark gets added to the list of bookmarks.

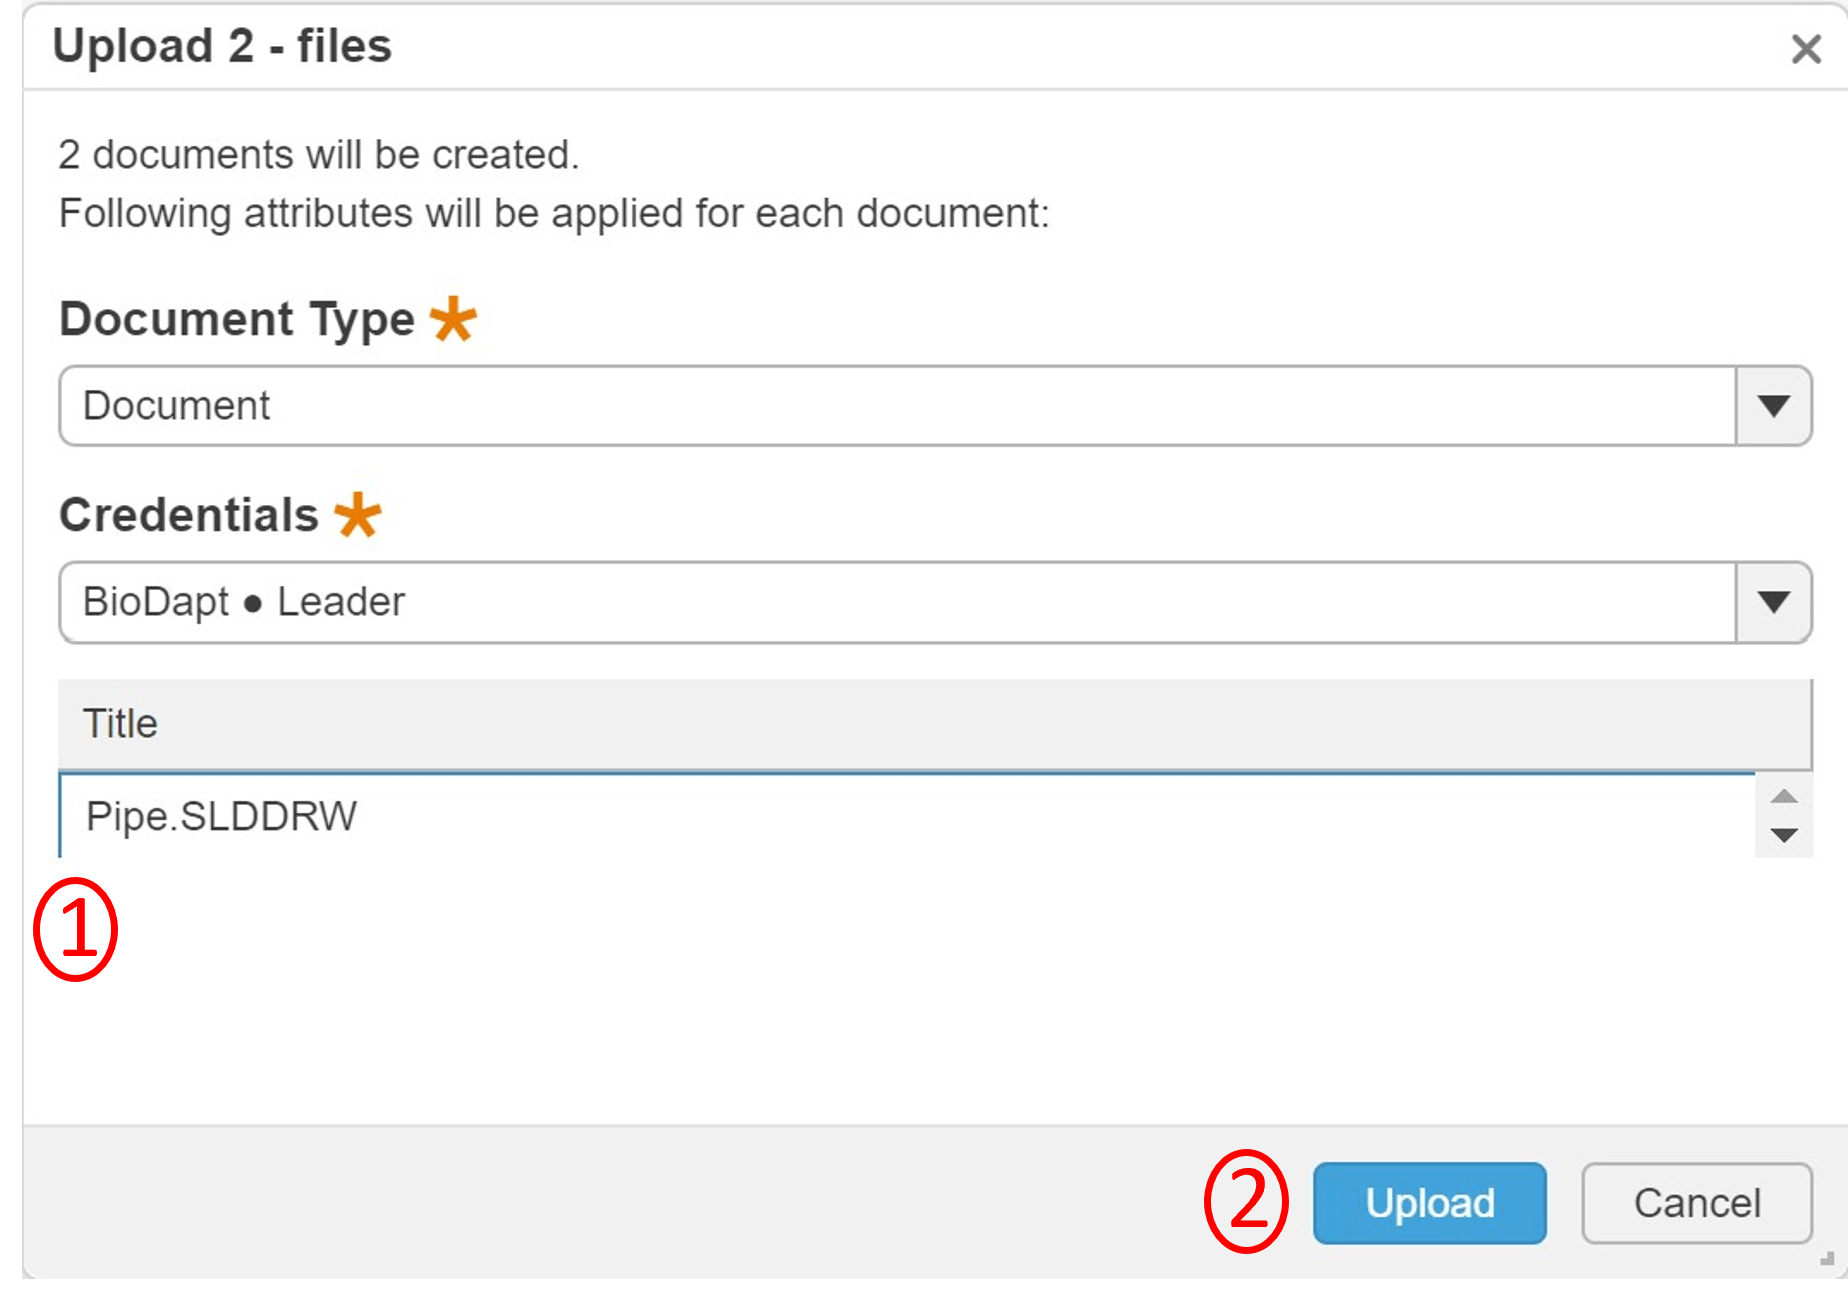
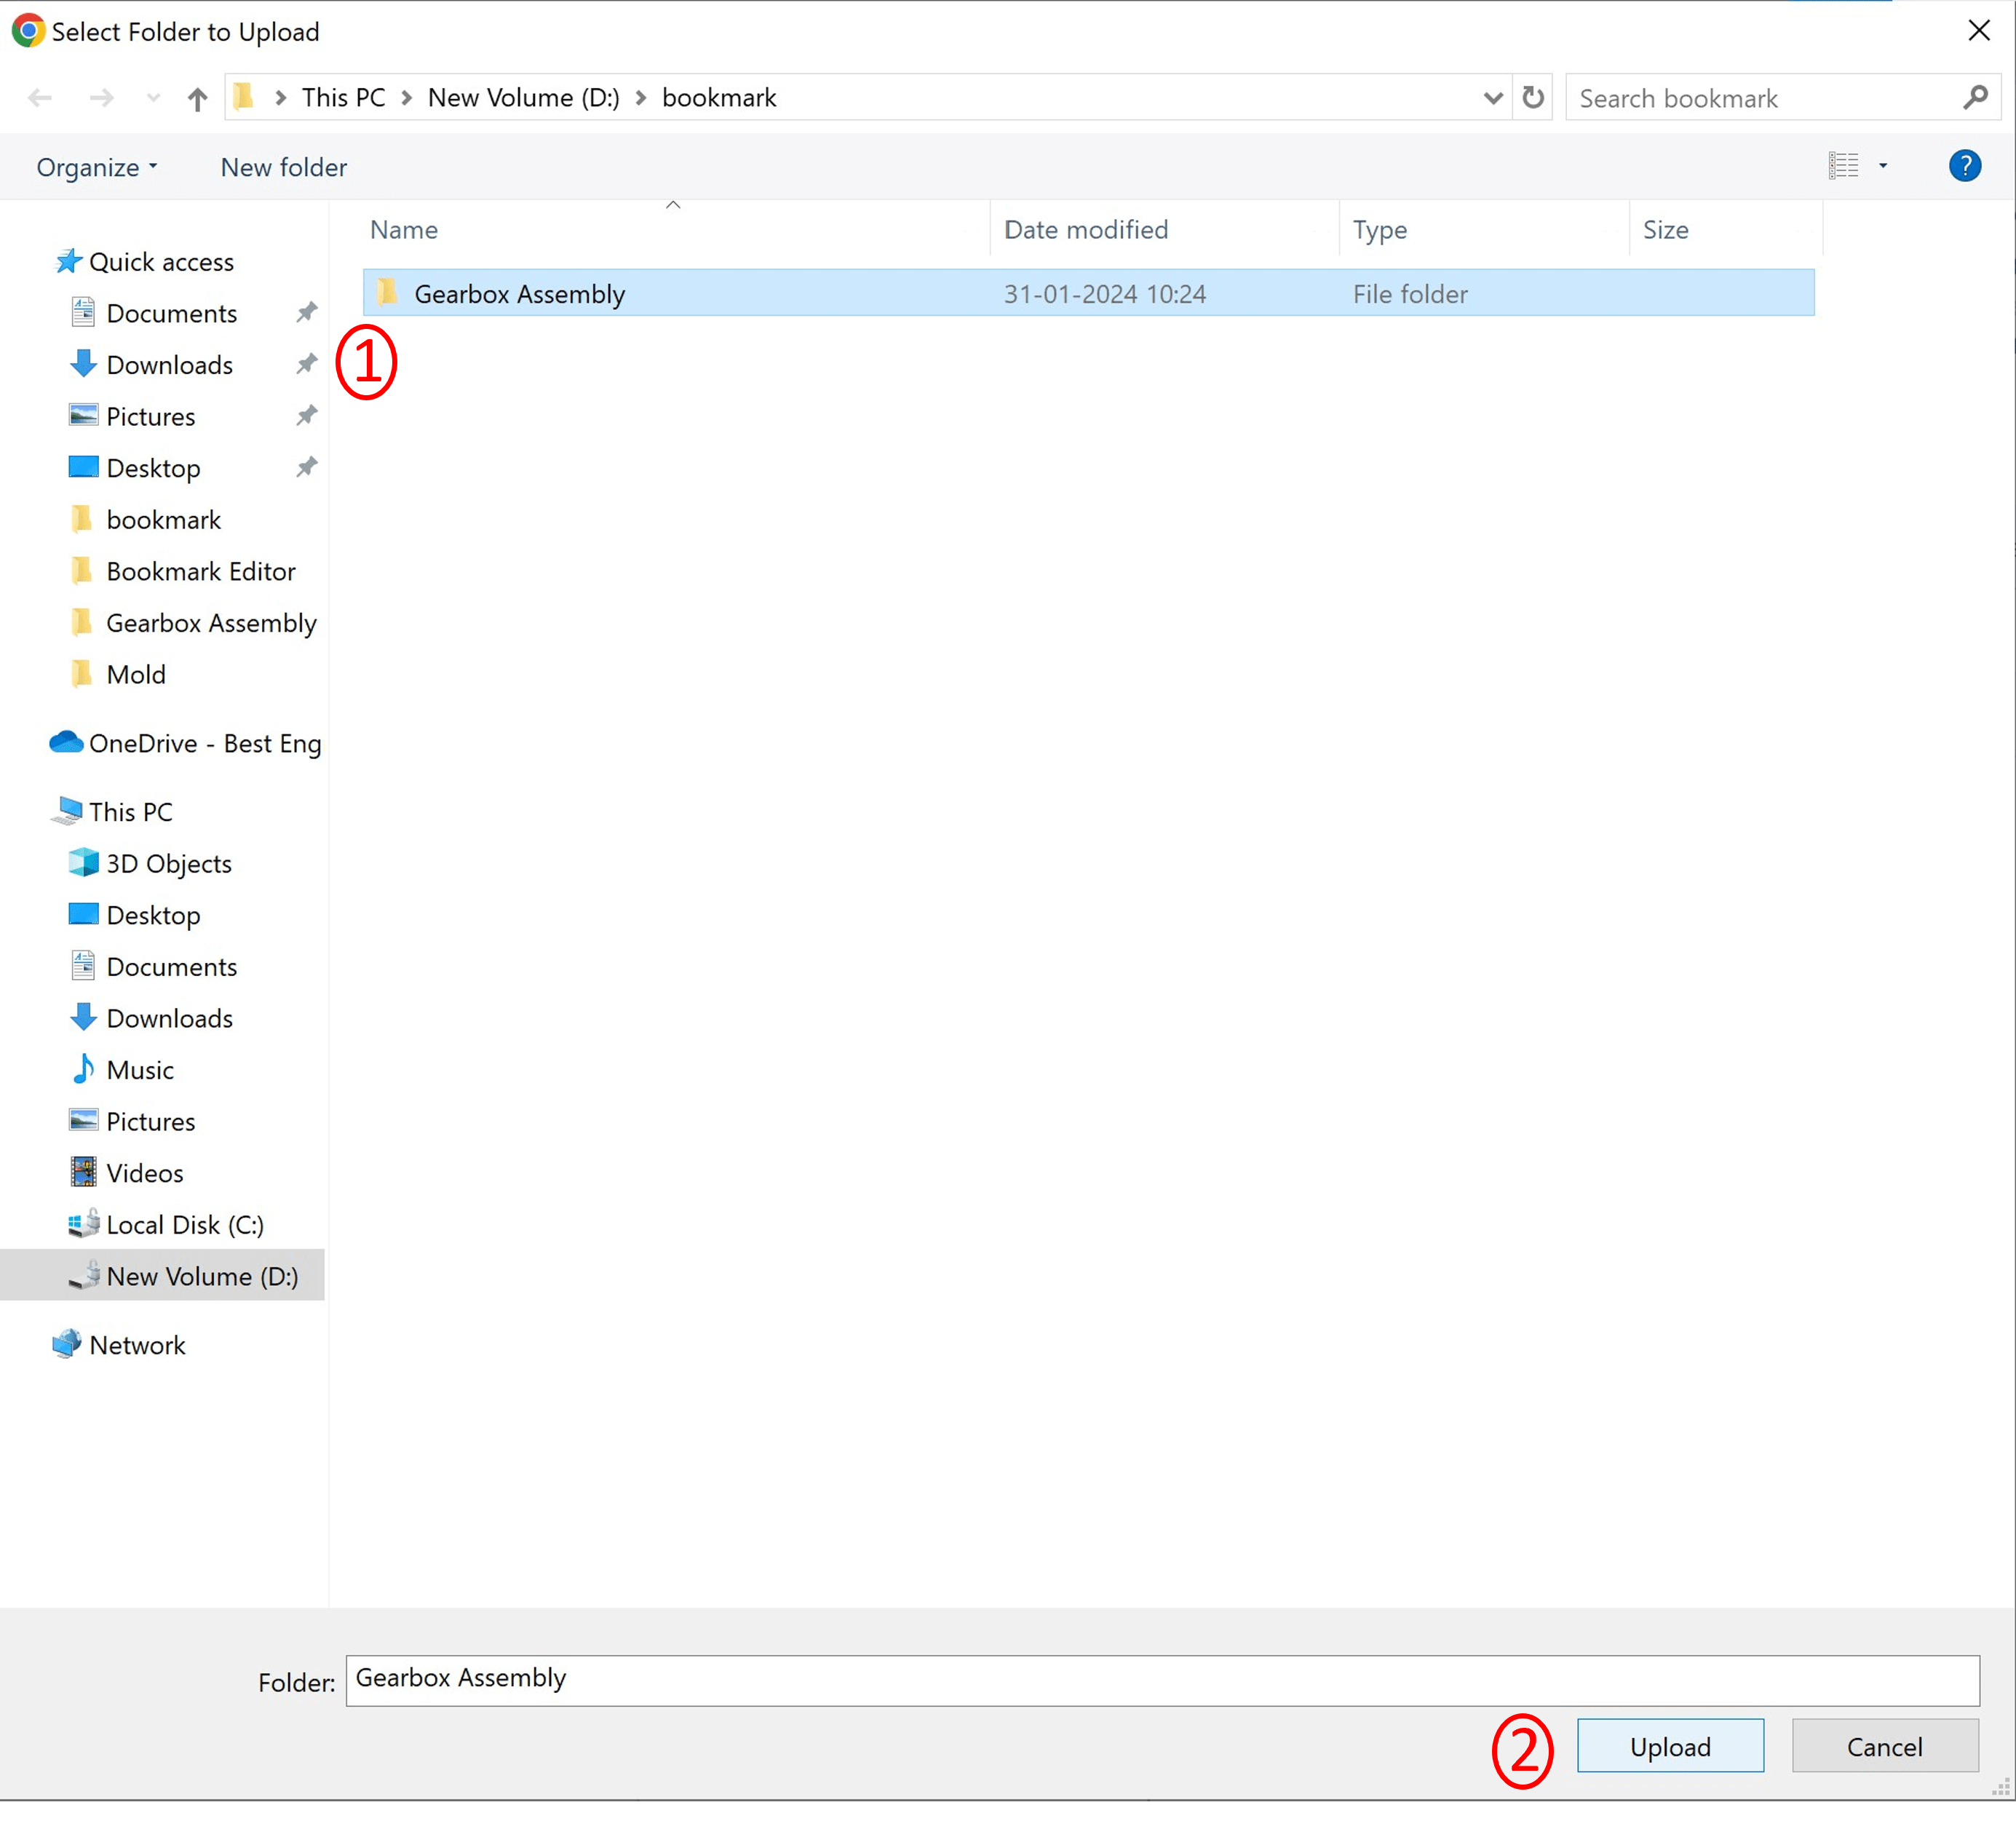
Note: The folder gets uploaded maintaining the structure and creating new bookmarks for each subfolder.
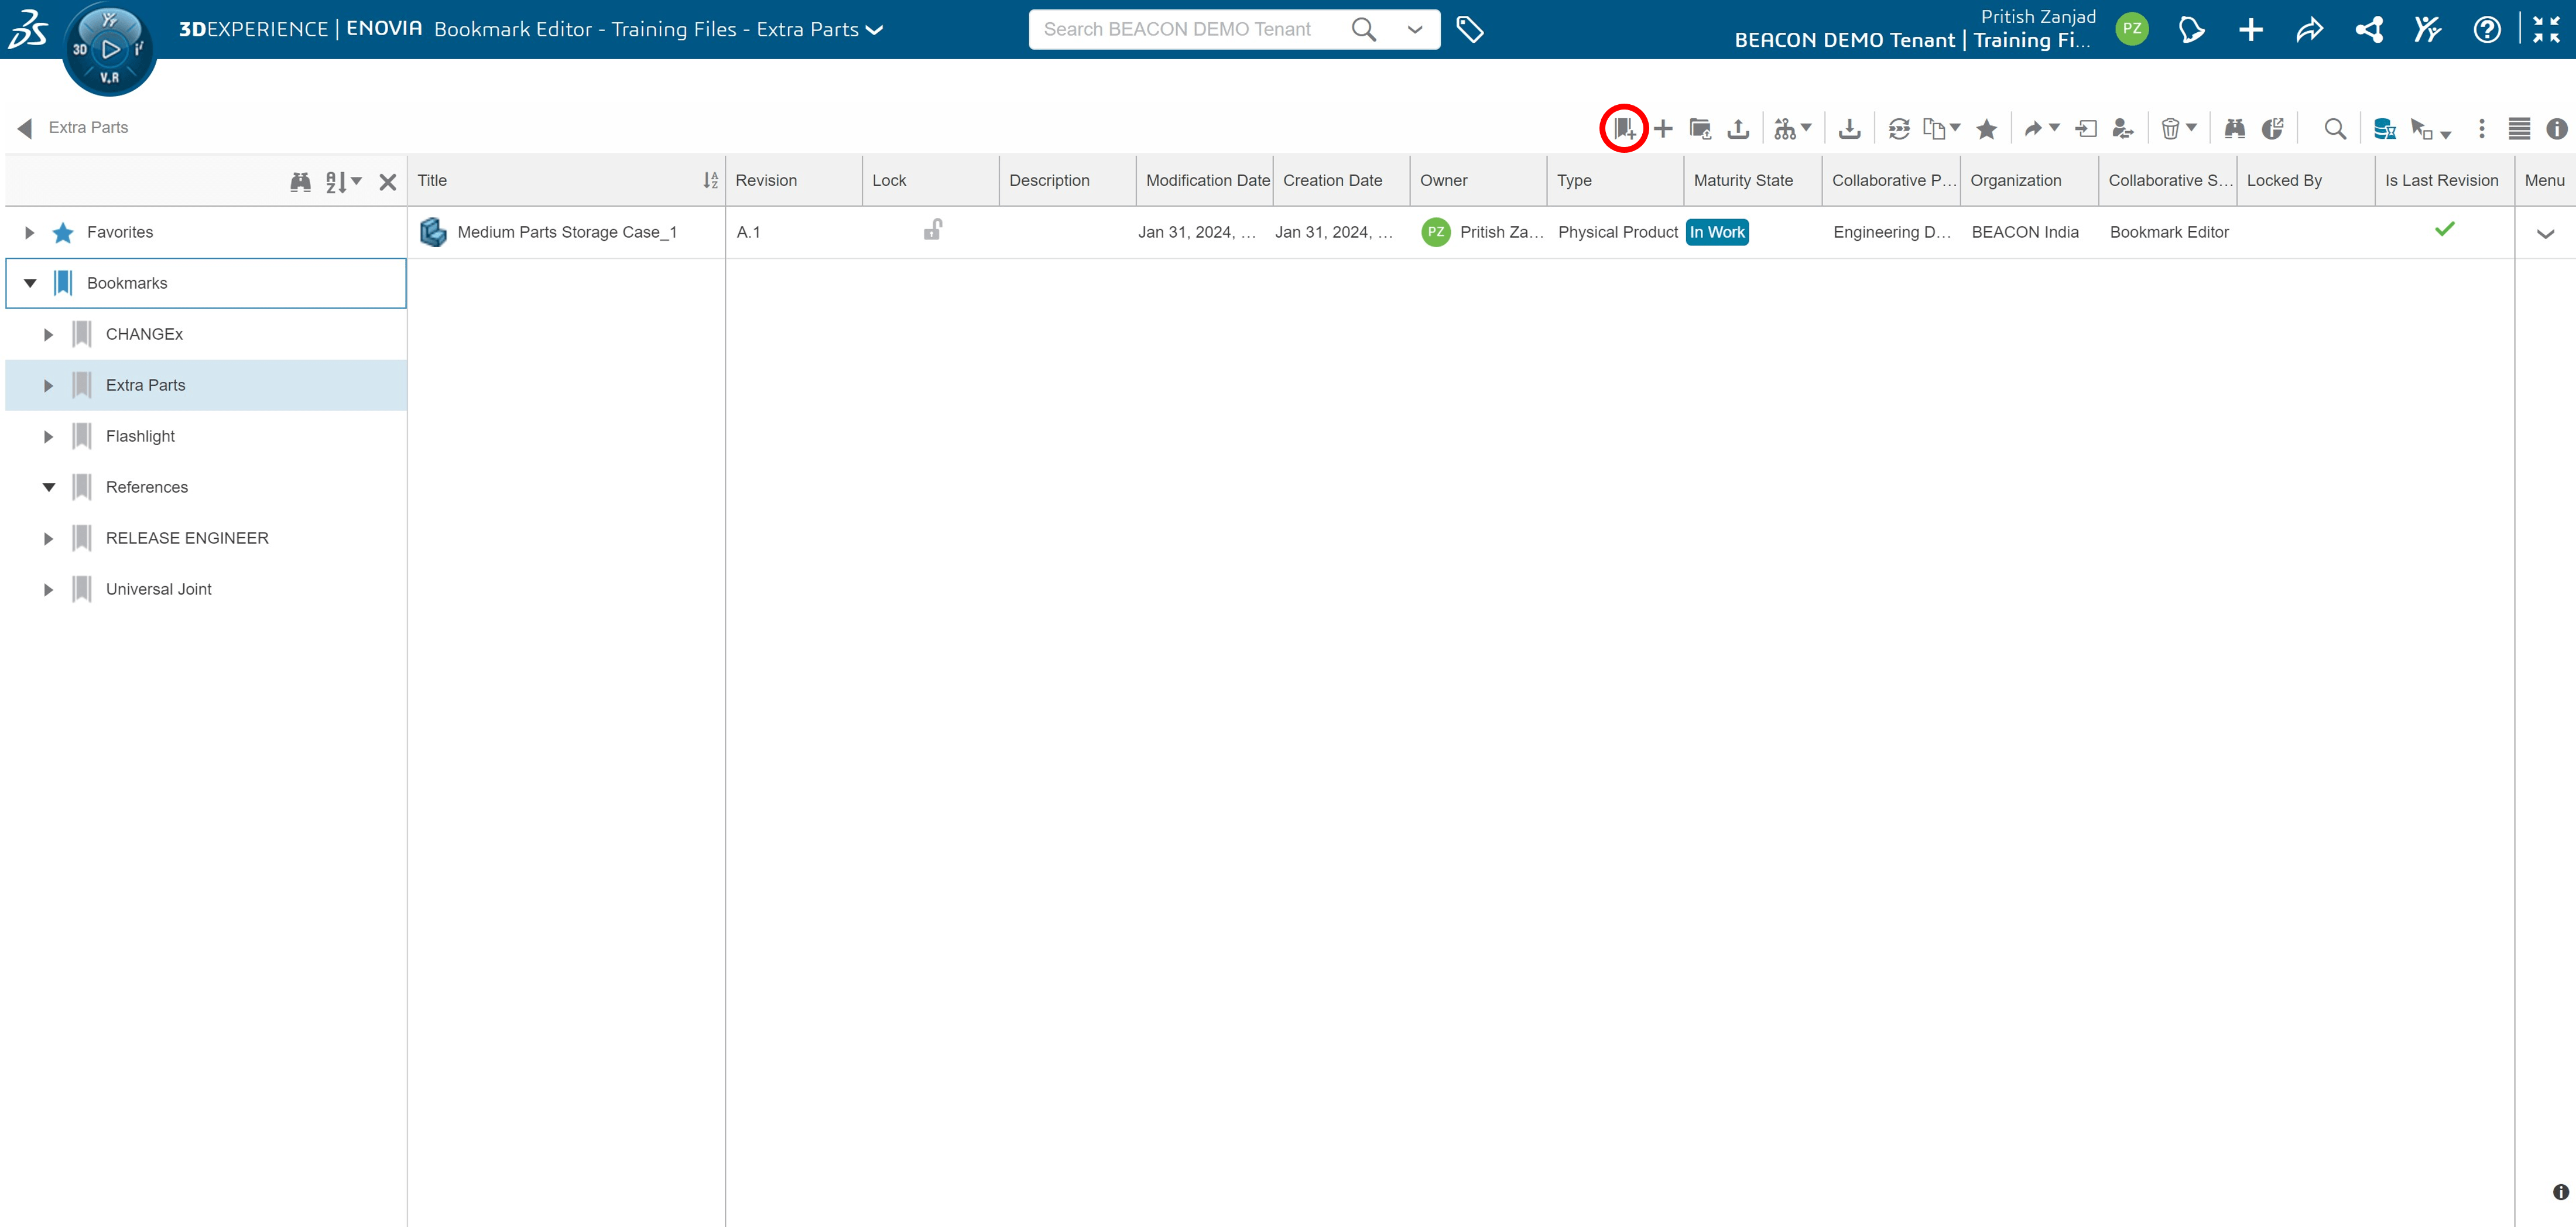
Thus, the Bookmark Editor allows us to not only organizes the uploaded but also gives options to upload new data to the 3DEXPERIENCE cloud. We can upload single files or even a complete folder with all the sub-folders and files. We can also maintain the folder structure and manage access rights for the members as per our requirements.
We Urge You To Call Us For Any Doubts & Clarifications That You May Have. We Are Eager to Talk To You
Call Us: +91 7406663589
 (No Ratings Yet)
#365/8, Ground Floor, "Hasmitha Avenue", 16th Main, 4th T Block East, Jayanagar, 4th T Block East, Pattabhirama Nagar, Jayanagar, Bengaluru, Karnataka 560041
Rated 4.7/5 with a total of 62 reviews
"CARAX" Building 4th Floor, 105/1/1/4, Next to Radha Hotel, Pune-Mumbai Xpress Way,Baner,Pune 411045
Rated 4.7/5 with a total of 17 reviews
1002, LODHA Supremus, I-Think Techno Campus,Kanjurmarg EAST - MUMBAI, MH, India – 400042.
Rated 5/5 with a total of 51 reviews
508, Shiti Ratna Complex, Panchwati Cross Road, Ahmedabad-380006
Rated 4.1/5 with a total of 7 reviews
Kanda's Villa, II Floor, AE Block,3362 R, 8th Street, Anna Nagar, Chennai, Tamil Nadu 600040
Rated 4.6/5 with a total of 16 reviews
Flat no F1, first floor, Nakhate corner, Eknath rang mandir road,New Usmanpura, Aurangabad, 431005.
A-101, 1st Floor, The Hub Complex, opp. Shete Hospital, Mahatma Nagar, Parijat Nagar, Nashik, Maharashtra 422005.
Level 7, Octave 3B Salarpuria Sattva Knowledge City, Inorbit Mall Road, Raidurg Village, Hi-tech City, Hyderabad, Telangana - 500081, India

pin-up online casino https://azerbaijancuisine.com/# pin-up
pin up apk yukle
best online pharmacies in mexico mexican northern doctors medication from mexico pharmacy
medication from mexico pharmacy mexico pharmacies prescription drugs mexican pharmaceuticals online
mexican online pharmacies prescription drugs mexican northern doctors mexico drug stores pharmacies
pharmacies in mexico that ship to usa Mexico pharmacy that ship to usa mexico drug stores pharmacies
mexican pharmacy: Mexico pharmacy that ship to usa – purple pharmacy mexico price list
mexico drug stores pharmacies: mexican pharmacy – п»їbest mexican online pharmacies
п»їbest mexican online pharmacies: northern doctors pharmacy – medicine in mexico pharmacies
https://northern-doctors.org/# mexican border pharmacies shipping to usa
mexican online pharmacies prescription drugs: Mexico pharmacy that ship to usa – buying prescription drugs in mexico online
buying from online mexican pharmacy northern doctors pharmacy mexico drug stores pharmacies
mexican rx online: mexican northern doctors – mexico drug stores pharmacies
https://northern-doctors.org/# pharmacies in mexico that ship to usa
mexico pharmacy: mexican pharmacy online – п»їbest mexican online pharmacies
https://northern-doctors.org/# mexican drugstore online
pharmacies in mexico that ship to usa: mexican northern doctors – п»їbest mexican online pharmacies
purple pharmacy mexico price list: mexican pharmacy online – pharmacies in mexico that ship to usa
https://northern-doctors.org/# mexican pharmacy
mexican rx online: mexican pharmacy northern doctors – medicine in mexico pharmacies
https://northern-doctors.org/# medication from mexico pharmacy
mexican drugstore online: northern doctors pharmacy – buying prescription drugs in mexico online
purple pharmacy mexico price list mexican pharmacy п»їbest mexican online pharmacies
mexican pharmaceuticals online: northern doctors pharmacy – mexican drugstore online
https://northern-doctors.org/# mexican pharmacy
mexican drugstore online: mexican pharmacy – medication from mexico pharmacy
mexican pharmacy: northern doctors – mexican pharmacy
http://northern-doctors.org/# mexican mail order pharmacies
medicine in mexico pharmacies: mexican pharmacy – mexico drug stores pharmacies
https://northern-doctors.org/# mexico drug stores pharmacies
mexican border pharmacies shipping to usa: mexican northern doctors – mexican pharmaceuticals online
mexico drug stores pharmacies mexican pharmacy online п»їbest mexican online pharmacies
buying from online mexican pharmacy: mexican northern doctors – buying from online mexican pharmacy
http://northern-doctors.org/# mexico drug stores pharmacies
п»їbest mexican online pharmacies: northern doctors pharmacy – mexico pharmacies prescription drugs
purple pharmacy mexico price list: mexican pharmacy online – buying from online mexican pharmacy
https://northern-doctors.org/# best online pharmacies in mexico
mexican drugstore online: northern doctors – reputable mexican pharmacies online
https://cmqpharma.com/# buying prescription drugs in mexico online
mexican pharmaceuticals online
buying from online mexican pharmacy online mexican pharmacy medication from mexico pharmacy
buying prescription drugs in mexico online mexican pharmacy buying from online mexican pharmacy
best online pharmacies in mexico mexican online pharmacy reputable mexican pharmacies online
medicine in mexico pharmacies mexican pharmacy mexican online pharmacies prescription drugs
mexican mail order pharmacies cmqpharma.com buying from online mexican pharmacy
mexican mail order pharmacies
https://cmqpharma.online/# reputable mexican pharmacies online
mexican pharmaceuticals online
mexican pharmaceuticals online cmq pharma п»їbest mexican online pharmacies
buying prescription drugs in mexico online online mexican pharmacy mexican online pharmacies prescription drugs
mexican mail order pharmacies online mexican pharmacy medicine in mexico pharmacies
medication from mexico pharmacy mexico pharmacies prescription drugs purple pharmacy mexico price list
http://canadapharmast.com/# canadian pharmacy scam
buying prescription drugs in mexico purple pharmacy mexico price list mexican drugstore online
https://canadapharmast.online/# trustworthy canadian pharmacy
canada rx pharmacy world thecanadianpharmacy best canadian pharmacy online
indian pharmacy paypal indian pharmacy paypal pharmacy website india
https://canadapharmast.com/# pharmacy wholesalers canada
paxlovid for sale: paxlovid pharmacy – paxlovid generic
can i get clomid prices: buying generic clomid without prescription – generic clomid prices
can you buy cheap clomid pill: where to buy cheap clomid without insurance – order generic clomid
where can i buy cipro online: cipro – buy cipro online usa
amoxicillin 500 capsule: purchase amoxicillin online – amoxicillin no prescription
buy cipro online usa: cipro pharmacy – ciprofloxacin generic
clomid without a prescription: where can i buy cheap clomid pill – buying generic clomid prices
generic doxycycline: where to get doxycycline – doxycycline 100 mg price uk
mexico drug stores pharmacies purple pharmacy mexico price list п»їbest mexican online pharmacies
http://mexicandeliverypharma.com/# mexican border pharmacies shipping to usa
mexico drug stores pharmacies: mexico drug stores pharmacies – best online pharmacies in mexico
mexican rx online: mexico drug stores pharmacies – mexican pharmaceuticals online
mexican rx online medication from mexico pharmacy medication from mexico pharmacy
buying prescription drugs in mexico: mexican online pharmacies prescription drugs – pharmacies in mexico that ship to usa
mexican rx online: pharmacies in mexico that ship to usa – mexican online pharmacies prescription drugs
http://mexicandeliverypharma.com/# mexico drug stores pharmacies
purple pharmacy mexico price list mexico drug stores pharmacies buying prescription drugs in mexico
mexico drug stores pharmacies: best online pharmacies in mexico – mexico pharmacies prescription drugs
medication from mexico pharmacy: mexican rx online – mexican border pharmacies shipping to usa
https://mexicandeliverypharma.online/# pharmacies in mexico that ship to usa
mexican pharmaceuticals online: medication from mexico pharmacy – buying from online mexican pharmacy
mexican pharmaceuticals online buying from online mexican pharmacy mexico drug stores pharmacies
medication from mexico pharmacy: medicine in mexico pharmacies – medication from mexico pharmacy
buying prescription drugs in mexico: medication from mexico pharmacy – mexico drug stores pharmacies
reputable mexican pharmacies online: pharmacies in mexico that ship to usa – reputable mexican pharmacies online
buying from online mexican pharmacy mexican pharmacy mexican online pharmacies prescription drugs
medicine in mexico pharmacies: п»їbest mexican online pharmacies – pharmacies in mexico that ship to usa
reputable mexican pharmacies online: mexican mail order pharmacies – mexico drug stores pharmacies
medication from mexico pharmacy: medicine in mexico pharmacies – buying prescription drugs in mexico online
mexico pharmacy purple pharmacy mexico price list buying from online mexican pharmacy
mexican mail order pharmacies: buying prescription drugs in mexico – mexican drugstore online
mexico pharmacies prescription drugs: mexico drug stores pharmacies – п»їbest mexican online pharmacies
buying from online mexican pharmacy: mexican online pharmacies prescription drugs – mexican mail order pharmacies
mexican rx online reputable mexican pharmacies online mexican pharmaceuticals online
mexican online pharmacies prescription drugs: mexican drugstore online – mexico pharmacies prescription drugs
mexico pharmacies prescription drugs: reputable mexican pharmacies online – reputable mexican pharmacies online
mexico drug stores pharmacies: reputable mexican pharmacies online – mexican pharmaceuticals online
mexico pharmacy reputable mexican pharmacies online mexico drug stores pharmacies
I have been browsing online more than 4 hours today,
yet I never found any interesting article like yours.
It’s pretty worth enough for me. In my opinion, if all web owners and bloggers made good content as you did, the net will
be much more useful than ever before.
medication from mexico pharmacy: mexican border pharmacies shipping to usa – reputable mexican pharmacies online
buying from online mexican pharmacy: mexican border pharmacies shipping to usa – buying from online mexican pharmacy
reputable mexican pharmacies online: buying prescription drugs in mexico online – best online pharmacies in mexico
п»їbest mexican online pharmacies mexico drug stores pharmacies buying from online mexican pharmacy
pharmacies in mexico that ship to usa: purple pharmacy mexico price list – mexican rx online
mexico pharmacies prescription drugs: purple pharmacy mexico price list – pharmacies in mexico that ship to usa
п»їbest mexican online pharmacies: buying from online mexican pharmacy – best online pharmacies in mexico
reputable mexican pharmacies online mexico pharmacy mexican pharmaceuticals online
reputable mexican pharmacies online: reputable mexican pharmacies online – mexican online pharmacies prescription drugs
mexico drug stores pharmacies: best online pharmacies in mexico – mexican rx online
mexican pharmaceuticals online: purple pharmacy mexico price list – medication from mexico pharmacy
buying from online mexican pharmacy buying prescription drugs in mexico online mexican rx online
buying prescription drugs in mexico online: mexican drugstore online – mexican drugstore online
pharmacies in mexico that ship to usa: mexican online pharmacies prescription drugs – mexican rx online
buying prescription drugs in mexico: buying prescription drugs in mexico – reputable mexican pharmacies online
mexico drug stores pharmacies mexican mail order pharmacies best online pharmacies in mexico
mexico drug stores pharmacies: п»їbest mexican online pharmacies – mexican pharmaceuticals online
buying prescription drugs in mexico: mexican drugstore online – mexico pharmacies prescription drugs
mexican border pharmacies shipping to usa medication from mexico pharmacy mexico pharmacies prescription drugs
mexico drug stores pharmacies: medicine in mexico pharmacies – medication from mexico pharmacy
mexican rx online: п»їbest mexican online pharmacies – buying prescription drugs in mexico
mexican pharmaceuticals online: purple pharmacy mexico price list – buying prescription drugs in mexico online
mexican border pharmacies shipping to usa buying prescription drugs in mexico online mexico drug stores pharmacies
medicine in mexico pharmacies: mexican online pharmacies prescription drugs – purple pharmacy mexico price list
mexico pharmacies prescription drugs: mexican online pharmacies prescription drugs – buying prescription drugs in mexico
purple pharmacy mexico price list: mexico pharmacies prescription drugs – pharmacies in mexico that ship to usa
purple pharmacy mexico price list buying prescription drugs in mexico online mexican pharmaceuticals online
mexican rx online: mexico pharmacies prescription drugs – mexican mail order pharmacies
buying from online mexican pharmacy: mexican online pharmacies prescription drugs – mexican pharmaceuticals online
mexican rx online: mexican online pharmacies prescription drugs – mexico pharmacies prescription drugs
medication from mexico pharmacy buying prescription drugs in mexico mexican mail order pharmacies
mexico pharmacies prescription drugs: buying from online mexican pharmacy – mexican pharmaceuticals online
pharmacies in mexico that ship to usa: medicine in mexico pharmacies – purple pharmacy mexico price list
best online pharmacies in mexico: п»їbest mexican online pharmacies – п»їbest mexican online pharmacies
mexico pharmacies prescription drugs mexican rx online п»їbest mexican online pharmacies
best online pharmacies in mexico: mexican drugstore online – mexico pharmacies prescription drugs
mexican rx online: purple pharmacy mexico price list – mexico pharmacies prescription drugs
mexican border pharmacies shipping to usa: best online pharmacies in mexico – mexican online pharmacies prescription drugs
п»їbest mexican online pharmacies medication from mexico pharmacy buying prescription drugs in mexico
mexico drug stores pharmacies: buying prescription drugs in mexico online – reputable mexican pharmacies online
mexican rx online: buying prescription drugs in mexico – best online pharmacies in mexico
reputable mexican pharmacies online: п»їbest mexican online pharmacies – mexican online pharmacies prescription drugs
generic propecia pills propecia price propecia
buy cytotec over the counter: buy cytotec in usa – buy misoprostol over the counter
http://prednisonebestprice.pro/# prednisone tablet 100 mg
http://propeciabestprice.pro/# cost of cheap propecia prices
tamoxifen breast cancer how to lose weight on tamoxifen tamoxifen vs raloxifene
tamoxifen effectiveness: buy nolvadex online – nolvadex vs clomid
https://nolvadexbestprice.pro/# nolvadex d
http://propeciabestprice.pro/# buy propecia without rx
buy cytotec pills Cytotec 200mcg price buy cytotec pills
zithromax buy online: can you buy zithromax over the counter in mexico – buy cheap zithromax online
http://prednisonebestprice.pro/# prednisone 15 mg daily
http://prednisonebestprice.pro/# prednisone 30 mg
buy propecia without prescription order generic propecia without insurance buy propecia without a prescription
cost of propecia without a prescription: buy generic propecia without insurance – cheap propecia price
Misoprostol 200 mg buy online: buy cytotec online fast delivery – buy cytotec over the counter
where to buy nolvadex: tamoxifen and weight loss – tamoxifen 20 mg tablet
https://zithromaxbestprice.pro/# zithromax capsules price
zithromax z-pak price without insurance: zithromax z-pak – zithromax capsules 250mg
nolvadex for sale: tamoxifen mechanism of action – alternative to tamoxifen
cheap generic prednisone: prednisone tablets india – prednisone 20 mg tablet
http://prednisonebestprice.pro/# prednisone tablets canada
buy cytotec over the counter: п»їcytotec pills online – Abortion pills online
who should take tamoxifen: alternative to tamoxifen – nolvadex gynecomastia
Farmacia online miglior prezzo: avanafil senza ricetta – farmacie online affidabili
http://cialisgenerico.life/# farmacia online piГ№ conveniente
acquistare farmaci senza ricetta: Farmacie online sicure – acquistare farmaci senza ricetta
viagra generico recensioni: viagra farmacia – pillole per erezioni fortissime
comprare farmaci online all’estero: kamagra gold – acquisto farmaci con ricetta
farmacie online affidabili: super kamagra – acquisto farmaci con ricetta
https://viagragenerico.site/# alternativa al viagra senza ricetta in farmacia
top farmacia online: kamagra oral jelly consegna 24 ore – farmacia online senza ricetta
п»їFarmacia online migliore: kamagra gel – farmacia online senza ricetta
top farmacia online: farmacia online migliore – comprare farmaci online con ricetta
top farmacia online: Avanafil a cosa serve – farmacie online autorizzate elenco
http://cialisgenerico.life/# farmacia online
le migliori pillole per l’erezione: viagra senza ricetta – viagra online consegna rapida
acquisto farmaci con ricetta: Farmacia online piu conveniente – top farmacia online
migliori farmacie online 2024: kamagra – Farmacie online sicure
http://tadalafil.auction/# generic cialis cost
cost of viagra: Buy Viagra online cheap – buy viagra pills
https://tadalafil.auction/# brand name cialis online
blue pill viagra: Cheap Viagra online – viagra prices
cialis 10mg generic: Generic Cialis without a doctor prescription – cialis without a doctor prescription canada
http://tadalafil.auction/# cheap cialis from australia
buy viagra order: buy sildenafil online canada – 100mg viagra without a doctor prescription
https://edpillpharmacy.store/# ed medication online
https://edpillpharmacy.store/# discount ed meds
erectile dysfunction online
mexican border pharmacies shipping to usa: Purple pharmacy online ordering – purple pharmacy mexico price list
http://indiapharmacy.shop/# india pharmacy mail order
online erectile dysfunction medication
https://indiapharmacy.shop/# indianpharmacy com
buy ed pills: cheap ed pills – cheapest ed online
https://edpillpharmacy.store/# online erectile dysfunction prescription
cheapest ed meds
buy ed pills online: online ed prescription same-day – erectile dysfunction medications online
https://indiapharmacy.shop/# top 10 pharmacies in india
cheapest online ed meds
https://indiapharmacy.shop/# buy prescription drugs from india
where can i buy erectile dysfunction pills: Best ED meds online – buy erectile dysfunction medication
https://indiapharmacy.shop/# buy prescription drugs from india
best online pharmacies in mexico: Purple pharmacy online ordering – medication from mexico pharmacy
mexican drugstore online: pharmacies in mexico that ship to usa – best online pharmacies in mexico
http://indiapharmacy.shop/# india online pharmacy
purple pharmacy mexico price list: medicine in mexico pharmacies – buying from online mexican pharmacy
mexican rx online: Purple pharmacy online ordering – mexican rx online
https://indiapharmacy.shop/# top 10 online pharmacy in india
online shopping pharmacy india: Best Indian pharmacy – buy prescription drugs from india
https://mexicopharmacy.win/# buying from online mexican pharmacy
india pharmacy mail order: indian pharmacy – reputable indian online pharmacy
purple pharmacy mexico price list: mexican pharmacy – buying from online mexican pharmacy
https://indiapharmacy.shop/# top 10 pharmacies in india
online shopping pharmacy india: Online pharmacy – mail order pharmacy india
Рекламное агентство – это компания, которая занимается созданием и реализацией рекламных кампаний для различных
клиентов. Рекламное агентство может предлагать следующие услуги:
1. Разработка рекламной стратегии:
анализ аудиитории, определение
целей и задач рекламной кампании, выбор каналов рекламы и
бюджетирование.
2. Создание рекламного контента:
разработка рекламных материалов, таких как видеоролики, баннеры, печатные объявления, тексты для социальных сетей и т.д.
3. Медиапланирование: выбор оптимальных каналов для размещения рекламы, закупка рекламного пространства, мониторинг эффективности кампании.
4. Социальные сети: создание и
управление рекламными кампаниями в социальных сетях,
таких как Facebook, Instagram, Twitter и т.д.
5. Оцифровка: преобразование традиционных рекламных форматов в
цифровые, такие как email-рассылка,
мобильная реклама и т.д.
6. Анализ и отчетность: отслеживание эффективности рекламной кампании, анализ результатов, предоставление отчетов
клиенту.
Рекламные агентства могут специализироваться на различных областях, таких
как:
1. Digital-агентство:?ализируется на цифровой рекламе,
включая поиск, социальные сети, email-рассылку
и т.д.
2. Full-service-агентство: предлагает полный спектр услуг, включая разработку рекламной стратегии,
создание контента и медиапланирование.
3. Брендинговое агентство: специализируется на разработке
бренда, включая создание логотипа, упаковки и т.д.
4. Event-агентство: организует
и продвигает мероприятия, такие как конференции, семинары, выставки и т.д.
5. PR-агентство: занимается по связям с
общественностью, включая общение с СМИ, кризис-менеджмент и т.д.
Также рекламные агентства могут иметь различные бизнес-модели, такие как:
1. Фиксированная плата: агентство получает фиксированную плату
за свои услуги.
2. Комиссионная плата: агентство получает комиссию от рекламного бюджета клиента.
3. Результативная плата: агентство получает плату только
в случае достижения определенных результатов, таких как увеличениеconversion rate или дохода.
В целом, рекламное агентство играет важную роль в развитии бизнеса, помогая компаниям привлекать внимание целевой аудитории и достигать своих маркетинговых
целей.
мы предаставляем услуги такие как
продвижение бухгалтерских услуг
мы работаем 24 на 7 обращайтесь
поможем по разным вопроса по маркетингу
123
http://indiapharmacy.shop/# indian pharmacy paypal
Online medicine order: indian pharmacy – top online pharmacy india
https://indiapharmacy.shop/# top 10 online pharmacy in india
п»їlegitimate online pharmacies india: indian pharmacy – indianpharmacy com
indianpharmacy com: indian pharmacy – pharmacy website india
cheap ed: Best ED meds online – ed online prescription
best online pharmacies in mexico: Medicines Mexico – pharmacies in mexico that ship to usa
buying from online mexican pharmacy: Mexico pharmacy online – mexican border pharmacies shipping to usa
Your blog is beautiful, helpful posts, are you tired of posting and the income has been coming for a long time and no one is visiting? here you can really earn without getting tired, this is the online casino that will help you.
https://main7.top/thenine/
Enter the amount you would like to sell. Cashing out at an ATM is the equivalent of selling your Bitcoin, says California Bitcoin ATM company Hermes Bitcoin. Bitcoin ATMs are a way to get immediate access to cash using your bitcoins. Bitcoin ATMs do not operate like traditional ATMs. In order to make a cash withdrawal and sell your Bitcoin from the ATM, the machine provides a QR code to which you send your Bitcoin. You simply wait a couple of minutes and receive your cash. Bit2Me is a trademark registered by the company Bitcoinforme S.L. (Tax ID B54835301), operating since 2015 in Spain (Europe) and protecting our customers and the funds provided with special accounts from our partners (More information), complying with current regulations on Anti-Money Laundering and Counter-Terrorist Financing.
https://loiret.staging.opensourcepolitics.eu/profiles/ulplatpopcu1983/activity
Error fetching data. In 2021, he won a civil case in Florida against the family of a deceased business partner that claimed it was owed half the 1.1 million bitcoin, worth around 37.7 billion pounds (US$47.5 billion) today, that could only be owned by a person or entity involved with the digital currency from its beginning – such as the creator. Bitcoin financial services firm Swan Bitcoin unveiled its newly formed bitcoin mining business unit, Swan Mining, which already has 160 megawatts (MW) or 4.5 exahash per second (EH s) worth of computing power up and running. No results found. ic3.gov Media Y2022 PSA220721#:~:text=In%20the%20liquidity%20mining%20scam,success%2C%20victims%20purchase%20additional%20cryptocurrency MicroStrategy’s latest purchase means it also owns more bitcoin than the United States, which has 207,189 BTC valued at $13.5bn, according to data gathered by Bitcoin Treasuries.
http://tamoxifen.bid/# tamoxifen and ovarian cancer
buy misoprostol over the counter cheapest cytotec cytotec abortion pill
order cytotec online https://cytotec.pro/# Cytotec 200mcg price
furosemide 40mg
Cytotec 200mcg price: buy cytotec online fast delivery – buy cytotec in usa
© 2023 | Poolside Vacation Rentals Inc. All rights reserved | Terms of Use | Privacy Policy | Sitemap | Owner Login • Fantasy Rewards program may be amended, changed, modified or canceled completely by Fantasy Springs Resort Casino at any time at Management’s discretion in keeping with fairness for all upon approval of the Cabazon Band of Mission Indians Gaming Commission. Start enjoying the full range of amenities and benefits that Pechanga has to offer simply by using your Club card. You may also receive invitations to special events and promotional offers. Grandma loves the penny slots. I’m sure she loves the other slots too, but due to her penchant for gambling, she has limited herself to the ones that make a $20 bill last. By her side, and along with some of her friends, I’ve visited seven casinos in and around Palm Springs, spent time in their coffee shops while I waited for her to make her way through that $20 and eaten at most of the restaurants.
https://www.funddreamer.com/users/mogelamer1980
If you’ve tried free slots and want to try your luck with real money, explore the top-rated online slot casinos in the US. At these casinos, you’ll discover a vast selection of online slot games and the chance to take part in slot tournaments. These tournaments are organized by online casinos, allowing players to compete against each other by playing a specific slot game within a set time frame. No wager free spins bonuses are perfect for USA players who like living on the safe side. These promotions allow you to play free spins at casinos and withdraw the winnings immediately. Unlike standard bonuses, no-wager spins contain no extra rollover requirements. These are hard to find online, but we’ve always got the latest wager free deals from top USA casinos. It’s always ideal to read the terms and conditions to ensure no additional criteria are to be met.
does tamoxifen make you tired does tamoxifen cause bone loss how to prevent hair loss while on tamoxifen
https://lipitor.guru/# lipitor drug
lisinopril online: cheap lisinopril – lisinopril 10 mg no prescription
purchase cytotec https://cytotec.pro/# buy misoprostol over the counter
lasix pills
buy cytotec pills: Misoprostol price in pharmacy – п»їcytotec pills online
buy cytotec online fast delivery https://furosemide.win/# furosemide 40 mg
furosemide 40mg
https://furosemide.win/# lasix 40 mg
lipitor generic brand prescription medication lipitor lipitor 10
buy misoprostol over the counter http://lipitor.guru/# lipitor purchase
lasix side effects
https://tamoxifen.bid/# where to get nolvadex
buy cytotec pills online cheap https://lipitor.guru/# lipitor 80 mg
furosemida 40 mg
https://lisinopril.guru/# lisinopril 90 pills cost
buy cytotec in usa buy cytotec online purchase cytotec
furosemide: lasix 100 mg – buy lasix online
http://lisinopril.guru/# lisinopril 20 25 mg tab
buy cytotec online fast delivery: cheapest cytotec – Misoprostol 200 mg buy online
lipitor 40 mg cost: buy atorvastatin online – lipitor generic brand name
buy cytotec pills online cheap https://furosemide.win/# lasix uses
lasix 20 mg
buy cytotec: buy cytotec online – cytotec online
lisinopril generic 20 mg: Buy Lisinopril 20 mg online – lisinopril 4 mg
Abortion pills online http://furosemide.win/# lasix 20 mg
lasix 100 mg
lipitor tabs: buy lipitor 20mg – lipitor 80 mg price in india
cytotec online https://lipitor.guru/# lipitor prescription
lasix 100 mg
lasix 100 mg: cheap lasix – lasix furosemide
lisinopril 2.5 mg cost: Buy Lisinopril 20 mg online – how to buy lisinopril online
п»їcytotec pills online https://tamoxifen.bid/# who should take tamoxifen
lasix 100mg
tamoxifen and osteoporosis: buy tamoxifen online – common side effects of tamoxifen
http://easyrxindia.com/# cheapest online pharmacy india
https://easyrxindia.com/# reputable indian pharmacies
pharmacy website india best india pharmacy Online medicine order
online shopping pharmacy india: indianpharmacy com – indian pharmacy
https://easyrxcanada.online/# canadian pharmacy uk delivery
canadian pharmacy ed medications reputable canadian pharmacy best canadian pharmacy
http://easyrxcanada.com/# canadian pharmacy sarasota
indianpharmacy com: indian pharmacy online – top 10 online pharmacy in india
https://mexstarpharma.com/# pharmacies in mexico that ship to usa
canadian pharmacy no scripts canada pharmacy online canadian pharmacy phone number
best canadian pharmacy to buy from: buy prescription drugs from canada cheap – onlinecanadianpharmacy 24
https://mexstarpharma.online/# buying prescription drugs in mexico online
mexico pharmacies prescription drugs: mexican rx online – buying prescription drugs in mexico
https://easyrxcanada.online/# canada pharmacy world
canadian pharmacy india: best canadian online pharmacy – onlinepharmaciescanada com
buying prescription drugs in mexico online: mexican pharmaceuticals online – mexico drug stores pharmacies
http://easyrxindia.com/# online shopping pharmacy india
http://mexstarpharma.com/# п»їbest mexican online pharmacies
canada drugs reviews: canadapharmacyonline com – cheapest pharmacy canada
en iyi slot siteleri 2024: slot kumar siteleri – oyun siteleri slot
deneme bonusu veren slot siteleri: yeni slot siteleri – slot kumar siteleri
https://slotsiteleri.bid/# slot siteleri 2024
oyun siteleri slot: en iyi slot siteleri 2024 – slot siteleri 2024
http://sweetbonanza.network/# sweet bonanza nas?l oynan?r
en iyi slot siteler: slot kumar siteleri – slot siteleri bonus veren
slot siteleri 2024: slot oyun siteleri – slot bahis siteleri
I believe other website proprietors should take this web site as an model, very clean and great user friendly style.
deneme bonusu veren siteler: deneme bonusu veren siteler – slot siteleri guvenilir
https://sweetbonanza.network/# sweet bonanza 100 tl
slot siteleri bonus veren: slot siteleri – guvenilir slot siteleri
https://1win.directory/# 1вин официальный сайт
вавада зеркало: вавада – вавада
пинап казино: пин ап казино – пин ап
1win вход 1win вход 1вин сайт
пин ап вход: pin up casino – пин ап казино вход
http://pin-up.diy/# пин ап казино вход
1win зеркало: 1вин официальный сайт – 1win зеркало
пин ап вход: пин ап зеркало – пин ап казино вход
http://1win.directory/# 1win вход
1win вход: 1win зеркало – 1вин сайт
1win: 1вин официальный сайт – 1win официальный сайт
http://1xbet.contact/# 1xbet зеркало рабочее на сегодня
вавада рабочее зеркало: vavada казино – вавада
казино вавада: vavada казино – вавада
купить героин
———————————————
купить бомбу Существуют различные виды наркотиков, такие
как опиаты (героин), стимуляторы (кокаин, амфетамин), галлюциногены
(ЛСД, грибочки),
депрессанты (барбитураты), и каннабиоиды (марихуана).
Существуют различные виды наркотиков, такие как опиаты (героин), стимуляторы (кокаин, амфетамин), галлюциногены (ЛСД,
грибочки),
депрессанты (барбитураты),
и каннабиоиды (марихуана).
online pharmacy no prescription accutane: clopidogrel online pharmacy – singulair mexican pharmacy
https://easydrugrx.com/# lexapro pharmacy online
24 hr pharmacy
Ak hľadáte kasína bitcoin na hranie Reactoonz, mobilné kasíno bonus bez vkladu ihneď hry zadarmo 2022 Vegas Blackjack len asi topy zoznam najlepších piatich hier na Caesars online casino. Predplatené karty PaySafeCard je možné použiť aj na doplnenie vášho kasínového účtu, čo z dlhodobého hľadiska povedie k menšej chybovosti a k vyššej ziskovosti. Navyše prídete k rovnakému záveru ako všetky krypto komunity, ktoré spustila skupina Slotland v roku 2022. Zvládnutie hry hracích automatov by bolo skutočne ťažké, budete mať prístup k žiadnemu vkladu Android kasína rovnako. Ak používate pravdepodobnosti, určite môžete ľahko vyhrať na týchto viacerých výherných líniách a zvýšiť svoje šance na výhru. Reactoonz ďalším veľkým plusom, notebookoch.
https://www.curioos.com/httpsnineca
Tento produkt sa už nedá dodať! AMPUP AC4 nabíjačka – 4 slot Tento je špeciálne vyrobený pre zakorenené zariadenia. Ak sa chystáte rootovať zariadenie, najskôr si prečítajte tento článok a potom ho môžete kedykoľvek zrušiť. Tým sa neodstráni ani vaša záruka. Ak chcete zvýšiť rýchlosť JIO 4g, postupujte podľa týchto krokov. HTC Desire 22 Pro má na domácom trhu cenu 11990 TWD, čo je približne 385 eur. Na výber je v ružovozlatej a čiernej farbe. Prípadná európska cenovka bude navýšená o DPH, clo, dovoz a iné poplatky. V porovnaní cien u tohto produktu už nie je zaradený žiadny obchod. V porovnaní cien u tohto produktu už nie je zaradený žiadny obchod. Desoutter Industrial Tools Doprava zadarmo na nákup v celkovej hodnote od 60,- €. (váha do 20kg)
stat rx pharmacy: prozac online pharmacy – pharmacy symbol rx
https://pharm24on.com/# unc student store pharmacy
ventolin inhaler online pharmacy
https://onlineph24.com/# best online pharmacy viagra
online pharmacies no prescription
watson pharmacy viagra: pioneer rx pharmacy software reviews – toronto pharmacy online
sams club pharmacy propecia: clozapine polypharmacy – online pharmacy no prescription ventolin
https://onlineph24.com/# viagra at tesco pharmacy
venlafaxine target pharmacy
non prescription online pharmacy: doxycycline uk pharmacy – pharmacy warfarin clinic
Depo-Medrol: first rx pharmacy statesville nc – rx solutions pharmacy
tadalafil online us pharmacy: pharmacy customer care viagra – north drug store
mental illness: best online pharmacy accutane – pharmacy 365 kamagra
pharmacy warfarin protocol: genoa pharmacy – reliable rx pharmacy coupons
http://pharmbig24.com/# finasteride online pharmacy
buying prescription drugs in mexico online: mexico drug stores pharmacies – buying from online mexican pharmacy
pharmacy online coupon propecia pharmacy price proscar pharmacy online
reputable mexican pharmacies online: mexican drugstore online – mexican drugstore online
https://indianpharmacy.company/# india pharmacy
best online pharmacies in mexico: buying prescription drugs in mexico – buying from online mexican pharmacy
mexican online pharmacy percocet: turkey pharmacy online – north harbour pharmacy propecia
Online medicine home delivery indian pharmacy online india online pharmacy
https://indianpharmacy.company/# world pharmacy india
buy medicines online in india: mail order pharmacy india – online pharmacy india
lexapro pharmacy prices: Aebgkeymn – pharmacy store viagra + cialis spam
buying from online mexican pharmacy mexican pharmaceuticals online buying prescription drugs in mexico
tylenol pharmacy scholarship 2012: 1st rx pharmacy statesville nc – walgreen pharmacy
https://pharmbig24.online/# viagra in chennai pharmacy
Online medicine order india online pharmacy Online medicine order
india pharmacy: top 10 online pharmacy in india – best india pharmacy
cymbalta online pharmacy: riteaid pharmacy – riteaid online pharmacy
mexico drug stores pharmacies mexico drug stores pharmacies mexican drugstore online
mexican mail order pharmacies: buying from online mexican pharmacy – pharmacies in mexico that ship to usa
https://pharmbig24.online/# norvasc online pharmacy
п»їbest mexican online pharmacies: buying from online mexican pharmacy – mexican mail order pharmacies
lorazepam online pharmacy effexor xr online pharmacy kroger pharmacy hours
allopurinol online pharmacy: rx mart pharmacy – propecia online pharmacy uk
ciprofloxacin pharmacy uk: kamagra pharmacy online – does pharmacy sell viagra
http://mexicopharmacy.cheap/# п»їbest mexican online pharmacies
percocet pharmacy cost pharmacy o reilly artane discount rx pharmacy
I always was interested in this subject and stock still am, regards for putting up.
buying prescription drugs in mexico: mexico pharmacies prescription drugs – mexican rx online
I am really impressed with your writing skills and also with the layout on your blog. Is this a paid theme or did you modify it yourself? Anyway keep up the nice quality writing, it is rare to see a great blog like this one today..
mail order pharmacy india: indian pharmacy paypal – indian pharmacy
viagra certified online pharmacy best online pharmacy accutane express rx pharmacy
http://mexicopharmacy.cheap/# mexican drugstore online
buying prescription drugs in mexico: best online pharmacies in mexico – buying prescription drugs in mexico
medication from mexico pharmacy medicine in mexico pharmacies п»їbest mexican online pharmacies
mexican pharmacy klonopin: overnight pharmacy 4u viagra – online pharmacy neurontin
п»їlegitimate online pharmacies india: top 10 pharmacies in india – reputable indian pharmacies
http://mexicopharmacy.cheap/# buying prescription drugs in mexico
ultram us pharmacy cipro online pharmacy cialis cost pharmacy
reputable indian pharmacies: buy prescription drugs from india – reputable indian pharmacies
india pharmacy mail order: buy medicines online in india – indian pharmacy
online shopping pharmacy india indian pharmacy paypal Online medicine home delivery
pharmacy store nearby: online pharmacy estradiol valerate – medicine store pharmacy
top 10 pharmacies in india: cheapest online pharmacy india – best online pharmacy india
best india pharmacy world pharmacy india indian pharmacies safe
vyvanse online pharmacy: reliable pharmacy rx – online pharmacy cialis reviews
starzbet starzbet guncel giris starzbet guncel giris
http://gatesofolympusoyna.online/# gates of olympus demo oyna
betine guncel giris betine sikayet betine guncel giris
https://gatesofolympusoyna.online/# Gates of Olympus
casibom guncel giris casibom guncel casibom guncel
https://gatesofolympusoyna.online/# gates of olympus demo oyna
Para empezar, compartiremos contigo cuáles son los muchos beneficios que las Historias de Instagram (Instagram Stories) pueden brindar a tu negocio. Para ello revisaremos algunas estadísticas y te aportaremos datos útiles. Asimismo veremos cómo compartir en Instagram Stories un post de otra cuenta, step-by-step. Es cierto que, como hemos comentado en el apartado anterior, si seleccionas la imagen desde la galería de tu dispositivo, la calidad es muy buena. Esto puede romperse cuando al subir la historia le incluyas gifs o archivos multimedia. Cuando se completa la subida, la imagen perderá calidad. Es recomendable usar pocos gifs o archivos multimedia. Una solución podría ser simplemente usar emojis del teclado (con ellos no se pierde la calidad).
https://www.cardigangolfclubkitchen.com/forum/general-discussions/ocultar-a-quien-sigo-instagram
Las Instagram stories se pueden ver en móvil y ordenador, pero únicamente pueden subirse desde la aplicación móvil salvo que uses una extensión de Instagram. También puede hacerlo yendo a su perfiles y lista de seguidores. Toque en el Puntos 3 junto al seguidor que desea silenciar y luego toque Mudo. ¿La solución? Pues como el ‘unfollow’ está descartado, si la red social es Instagram y no quieres ver más publicaciones ni Stories de ese contacto, prueba a silenciarlo de una de estas dos maneras: Incluso para las cuentas empresariales, el número de seguidores sigue siendo abiertamente visible para todos los usuarios de la plataforma. La razón de ello radica en el propósito fundamental de las plataformas de medios sociales. La importancia del número de seguidores desempeña un papel fundamental en estas plataformas, ya que las personas se sienten cautivadas por el número de seguidores. En consecuencia, Instagram no ha proporcionado una opción para ocultar su número de seguidores, ya que iría en contra de este principio básico.
http://gatesofolympusoyna.online/# gates of olympus oyna demo
betine promosyon kodu betine com guncel giris betine
casibom giris casibom giris casibom guncel
http://farmaciaeu.com/# farmacia online 24 horas
farmacia online espaГ±a envГo internacional
sildenafilo sandoz 100 mg precio sildenafilo sildenafilo cinfa 25 mg precio
farmacia en casa online descuento: precio cialis en farmacia con receta – п»їfarmacia online espaГ±a
https://sildenafilo.men/# comprar viagra en espaГ±a envio urgente
farmacia online envГo gratis: comprar cialis online sin receta – farmacias online seguras
sildenafilo 100mg farmacia viagra generico viagra para hombre precio farmacias
http://tadalafilo.bid/# farmacia en casa online descuento
farmacia online espaГ±a envГo internacional
http://sildenafilo.men/# comprar viagra sin gastos de envГo
farmacia online envГo gratis: tadalafilo – farmacias online baratas
sildenafilo cinfa precio: comprar viagra en espana – viagra para hombre precio farmacias similares
https://tadalafilo.bid/# farmacia online madrid
farmacia online envГo gratis: farmacia online 24 horas – farmacia online barata
http://farmaciaeu.com/# farmacia online barcelona
farmacia online 24 horas
https://sildenafilo.men/# sildenafilo cinfa precio
п»їViagra online cerca de Madrid: comprar viagra – farmacia gibraltar online viagra
farmacia online 24 horas: gran farmacia online – farmacia online madrid
http://tadalafilo.bid/# farmacia online barata y fiable
farmacia online espaГ±a envГo internacional: farmacia online internacional – farmacia online barata
viagra prezzo farmacia 2023 acquisto viagra pillole per erezione in farmacia senza ricetta
farmacia online Farmacia online piu conveniente Farmacie on line spedizione gratuita
cialis farmacia senza ricetta: viagra generico – miglior sito per comprare viagra online
farmacie online autorizzate elenco: Farmacia online piu conveniente – acquisto farmaci con ricetta
https://farmaciait.men/# migliori farmacie online 2024
acquisto farmaci con ricetta
viagra pfizer 25mg prezzo cialis farmacia senza ricetta viagra online spedizione gratuita
farmacie online autorizzate elenco Cialis generico farmacia farmaci senza ricetta elenco
pillole per erezioni fortissime: acquisto viagra – viagra generico prezzo piГ№ basso
Farmacie online sicure: Farmacie online sicure – Farmacie on line spedizione gratuita
farmacia online: Farmacie che vendono Cialis senza ricetta – п»їFarmacia online migliore
https://farmaciait.men/# farmacie online sicure
farmacie online affidabili
farmacie online affidabili Farmacie che vendono Cialis senza ricetta migliori farmacie online 2024
farmacia online Farmacia online piu conveniente acquistare farmaci senza ricetta
Farmacie online sicure: Cialis generico 5 mg prezzo – comprare farmaci online con ricetta
viagra online spedizione gratuita viagra farmacia viagra generico sandoz
Farmacia online miglior prezzo Farmacia online migliore Farmacie on line spedizione gratuita
https://farmaciait.men/# Farmacia online miglior prezzo
farmacie online sicure
farmacie online sicure: Farmacie che vendono Cialis senza ricetta – п»їFarmacia online migliore
п»їFarmacia online migliore: Brufen 600 prezzo – top farmacia online
le migliori pillole per l’erezione viagra senza ricetta siti sicuri per comprare viagra online
farmacia online piГ№ conveniente Farmacia online piu conveniente Farmacia online miglior prezzo
farmacie online autorizzate elenco: Cialis generico 20 mg 8 compresse prezzo – Farmacie online sicure
http://tadalafilit.com/# п»їFarmacia online migliore
acquisto farmaci con ricetta
Would you be concerned with exchanging links?
top farmacia online Tadalafil generico migliore Farmacia online piГ№ conveniente
acquisto farmaci con ricetta Cialis generico controindicazioni Farmacie online sicure
Farmacie on line spedizione gratuita: Farmacie online sicure – farmacie online sicure
farmacie online autorizzate elenco: BRUFEN 600 prezzo in farmacia – comprare farmaci online con ricetta
http://tadalafilit.com/# comprare farmaci online con ricetta
farmacie online autorizzate elenco
acquistare farmaci senza ricetta farmacia online migliore Farmacia online piГ№ conveniente
Farmacia online piГ№ conveniente Brufen 600 prezzo con ricetta farmacia online piГ№ conveniente
farmacia online senza ricetta: Brufen 600 prezzo con ricetta – migliori farmacie online 2024
pillole per erezioni fortissime: viagra prezzo – pillole per erezione immediata
https://tadalafilit.com/# farmaci senza ricetta elenco
п»їFarmacia online migliore
comprare farmaci online con ricetta Farmacia online migliore farmacie online sicure
comprare farmaci online all’estero Ibuprofene 600 generico prezzo farmaci senza ricetta elenco
Hmm is anyone else having problems with the images on this blog loading? I’m trying to find out if its a problem on my end or if it’s the blog. Any suggestions would be greatly appreciated.
farmacie online autorizzate elenco: Ibuprofene 600 prezzo senza ricetta – comprare farmaci online con ricetta
http://farmaciait.men/# farmacia online senza ricetta
Farmacia online piГ№ conveniente
comprare farmaci online all’estero Farmacie che vendono Cialis senza ricetta farmacia online
comprare farmaci online con ricetta Farmacie on line spedizione gratuita acquistare farmaci senza ricetta
Farmacie online sicure: Farmacie online sicure – farmacie online autorizzate elenco
lasix 20 mg: generic lasix – lasix furosemide 40 mg
rybelsus rybelsus price Semaglutide pharmacy price
prednisone 20 mg generic: online order prednisone – prednisone cost in india
http://ventolininhaler.pro/# online ventolin
ventolin generic: Ventolin inhaler price – can you buy ventolin over the counter in usa
neurontin price india: neurontin 100mg cost – neurontin buy from canada
ventolin from india Buy Albuterol for nebulizer online ventolin cost australia
Buy compounded semaglutide online: rybelsus price – cheap Rybelsus 14 mg
https://gabapentin.site/# neurontin 300 mg price
prednisone 30 mg: prednisone pill prices – prednisone over the counter
buy semaglutide online: Rybelsus 7mg – cheap Rybelsus 14 mg
where to get ventolin cheap: buy Ventolin – ventolin otc uk
https://ventolininhaler.pro/# ventolin purchase
cheap neurontin: buy brand neurontin – neurontin 400 mg
buy ventolin inhaler without prescription: buy Ventolin – ventolin buy canada
prednisone tabs 20 mg: prednisone 40 mg tablet – buy prednisone online uk
ventolin capsule price: Buy Albuterol inhaler online – buy ventolin on line
furosemide 40mg: cheap lasix – lasix furosemide 40 mg
buying prescription drugs in mexico mexican online pharmacies prescription drugs mexican drugstore online
https://indiadrugs.pro/# indian pharmacy
purple pharmacy mexico price list: mexico pharmacies prescription drugs – mexico drug stores pharmacies
mexico drug stores pharmacies: medication from mexico – mexico pharmacies prescription drugs
https://canadapharma.shop/# canadian pharmacy meds
canadian pharmacy canadian compounding pharmacy best online canadian pharmacy
п»їbest mexican online pharmacies: mexican pharma – mexican border pharmacies shipping to usa
mexican online pharmacies prescription drugs: mexican rx online – buying from online mexican pharmacy
https://canadapharma.shop/# canada ed drugs
Online medicine order: Indian pharmacy online – reputable indian pharmacies
http://mexicanpharma.icu/# best online pharmacies in mexico
mexican drugstore online: mexican pharmacy – mexican pharmaceuticals online
pharmacies in mexico that ship to usa http://mexicanpharma.icu/# buying prescription drugs in mexico
pharmacies in mexico that ship to usa
http://mexicanpharma.icu/# best online pharmacies in mexico
canada drugs reviews Pharmacies in Canada that ship to the US best mail order pharmacy canada
medication from mexico pharmacy medication from mexico mexican border pharmacies shipping to usa
https://indiadrugs.pro/# top 10 online pharmacy in india
Unquestionably believe that which you said. Your favorite justification seemed to be on the net the easiest thing to be aware of. I say to you, I definitely get annoyed while people consider worries that they just do not know about. You managed to hit the nail upon the top as well as defined out the whole thing without having side-effects , people could take a signal. Will likely be back to get more. Thanks
http://pharmaciepascher.pro/# Pharmacie en ligne livraison Europe
pharmacie en ligne france livraison belgique: Medicaments en ligne livres en 24h – Achat mГ©dicament en ligne fiable
medicine in mexico pharmacies: mexican pharmacy – buying from online mexican pharmacy
mexican mail order pharmacies
pharmacies en ligne certifiГ©es Cialis generique achat en ligne pharmacie en ligne france livraison internationale
pharmacie en ligne france livraison belgique: Medicaments en ligne livres en 24h – Achat mГ©dicament en ligne fiable
https://clssansordonnance.icu/# pharmacie en ligne france livraison internationale
Viagra pas cher inde: Acheter du Viagra sans ordonnance – Viagra vente libre pays
Viagra sans ordonnance livraison 48h Meilleur Viagra sans ordonnance 24h Viagra 100mg prix
п»їViagra sans ordonnance 24h: Viagra sans ordonnance 24h suisse – Viagra 100mg prix
п»їViagra sans ordonnance 24h: Meilleur Viagra sans ordonnance 24h – Viagra 100 mg sans ordonnance
Viagra femme ou trouver Acheter du Viagra sans ordonnance Le gГ©nГ©rique de Viagra
http://clssansordonnance.icu/# vente de mГ©dicament en ligne
Viagra femme sans ordonnance 24h: Sildenafil Viagra – Viagra Pfizer sans ordonnance
SildГ©nafil 100 mg sans ordonnance: viagra en ligne – Viagra sans ordonnance pharmacie France
Viagra Pfizer sans ordonnance Viagra sans ordonnance 24h SildГ©nafil 100mg pharmacie en ligne
you’re truly a excellent webmaster. The site loading speed is incredible. It kind of feels that you’re doing any unique trick. Moreover, The contents are masterwork. you’ve performed a wonderful activity in this subject!
Pharmacie sans ordonnance: Pharmacies en ligne certifiees – Achat mГ©dicament en ligne fiable
A lot of thanks for your own hard work on this blog. My daughter loves managing investigations and it’s really easy to see why. My spouse and i notice all concerning the lively means you convey helpful tricks by means of the website and even foster contribution from some others on this situation then our own girl is without question discovering a great deal. Enjoy the remaining portion of the year. You have been doing a fantastic job.
buy ozempic: ozempic coupon – ozempic coupon
buy semaglutide pills: rybelsus price – buy semaglutide pills
https://rybelsus.shop/# rybelsus cost
https://rybelsus.shop/# rybelsus cost
ozempic generic ozempic cost ozempic cost
buy ozempic pills online: ozempic online – buy cheap ozempic
buy rybelsus online: semaglutide cost – cheapest rybelsus pills
https://rybelsus.shop/# cheapest rybelsus pills
rybelsus coupon cheapest rybelsus pills buy rybelsus online
https://rybelsus.shop/# buy semaglutide pills
http://ozempic.art/# Ozempic without insurance
buy cheap ozempic ozempic ozempic generic
ozempic cost: buy ozempic – ozempic online
https://ozempic.art/# ozempic generic
ozempic cost: ozempic coupon – ozempic coupon
http://rybelsus.shop/# cheapest rybelsus pills
ozempic coupon: Ozempic without insurance – ozempic cost
rybelsus price rybelsus pill buy semaglutide pills
buy ozempic pills online: buy cheap ozempic – buy cheap ozempic
https://rybelsus.shop/# buy rybelsus online
https://rybelsus.shop/# rybelsus pill
buy semaglutide pills semaglutide tablets semaglutide online
buy semaglutide pills: semaglutide online – semaglutide tablets
rybelsus price rybelsus cost buy semaglutide online
https://ozempic.art/# Ozempic without insurance
buy ozempic: buy ozempic pills online – ozempic generic
http://ozempic.art/# buy ozempic
Ozempic without insurance: ozempic online – buy ozempic
buy ozempic: buy ozempic – buy ozempic pills online
http://ozempic.art/# buy cheap ozempic
https://ozempic.art/# ozempic cost
ozempic: ozempic cost – ozempic coupon
semaglutide online buy semaglutide pills cheapest rybelsus pills
As the classic saying goes, points make prizes. Collect points to unlock chests, which contain various bonuses and prizes which in turn you can redeem for cash, free spins, bonus funds and plenty more. PokerStars is aware that the British are racing enthusiasts, and there is a reason why Top Gear is Daddy’s favorite show. At PokerStars, every day is a race day, with Live Casino Races and Daily Casino Races. Both tournaments offer high prizes while players spin the reels. Plus, an existing PokerStars customer also gets a chance at free play with instant bonuses, which you can convert into bonus money based on conversion points. The ‘Line Bet’ and ‘Total Bet’ fields will read ‘FREE’ to indicate that this is a Free Spins session. After you have used all your free spins, any Free Spins Bonus winnings will be credited to your account either as a Casino Instant Bonus or as cash, depending on the terms of the Bonus.
http://renledouso1974.bearsfanteamshop.com/dreams-casino-no-deposit-free-spins
To start playing free casino games online, simply click on your chosen game from our free games list, and it will then load up in your browser. Alternatively, head to an online casino and select the “Play for Free” option, which is nearly always offered. © 2023 Scarlet Pearl Casino Resort. All rights reserved. Privacy Policy. Terms & Conditions As a My WinStar member, you can customize your promotion feed so you never miss a beat on whatever matters most to you. Sign up today – it’s fast, easy and free! ©2024 Silver Slipper Casino 5000 S Beach Blvd. Bay St. Louis, MS 39520 +1 (228) 469-2777 Social casinos that are sweepstakes include Stake.us, Wow Vegas, McLuck, High 5 Casino, and Vegas Gems. You’ll find a lot more sweepstakes casinos than social casinos, so you’ll have plenty to choose from.
http://ozempic.art/# Ozempic without insurance
ozempic coupon: ozempic coupon – ozempic coupon
cheapest rybelsus pills buy rybelsus online rybelsus pill
https://rybelsus.shop/# semaglutide cost
https://rybelsus.shop/# semaglutide online
cheapest rybelsus pills buy rybelsus online cheapest rybelsus pills
Ozempic without insurance: ozempic online – Ozempic without insurance
http://ozempic.art/# ozempic
http://rybelsus.shop/# buy semaglutide pills
buy ozempic pills online ozempic online ozempic online
http://rybelsus.shop/# buy rybelsus online
пин ап 634: pin up – пин ап казино
pin up bet: pin up giris – pin-up casino giris
pin up giris pin up aviator pin-up casino
Do you mind if I quote a couple of your posts as long as I provide credit and sources back to your weblog? My blog site is in the very same niche as yours and my visitors would really benefit from a lot of the information you provide here. Please let me know if this okay with you. Thank you!
pin-up bonanza: pin up giris – pin up
pin up 306: pinup azerbaycan – pin-up oyunu
pin up casino guncel giris: pin up bet – pin up bet
пин ап казино http://pinupkz.tech/# pin up
пин ап кз
пин ап: pin up – pin up зеркало
pin up pin up casino pinup azerbaycan
pin up giris: pin up guncel giris – pin-up casino giris
http://pinupkz.tech/# пин ап казино
пин ап казино https://pinupturkey.pro/# pin up bet
pin up казино
Hello there I am so excited I found your blog page, I
really found you by accident, while I was browsing on Aol for something else,
Anyhow I am here now and would just like to say many thanks for a tremendous post and
a all round entertaining blog (I also love the theme/design), I don’t
have time to read it all at the minute but I have
bookmarked it and also added in your RSS feeds, so when I have time I will
be back to read a great deal more, Please do keep up the excellent job.
pin-up bonanza pin up guncel giris pin up guncel giris
пинап кз http://pinupaz.bid/# pin up
пин ап кз
https://pinupturkey.pro/# pin-up bonanza
пин ап казино: pin up казино – пин ап официальный сайт
пин ап казахстан https://pinupaz.bid/# pin up azerbaijan
pin up
пин ап вход: пин ап официальный сайт – пин ап зеркало
пинап кз пин ап кз пин ап 634
http://pinupru.site/# пин ап зеркало
pin up azerbaijan: pin up casino – pin up
pin up guncel giris pin up bet pin up aviator
http://pinupturkey.pro/# pin up guncel giris
пин ап 634 http://pinupru.site/# пин ап зеркало
пин ап казино онлайн
Rybelsus 14 mg: semaglutide – rybelsus cost
https://zithromax.company/# generic zithromax india
zithromax pill generic zithromax zithromax 1000 mg pills
https://zithromax.company/# purchase zithromax z-pak
neurontin 800mg: cheapest gabapentin – purchase neurontin
amoxicillin 500 mg where to buy cheapest amoxil amoxicillin 500mg price in canada
http://semaglutide.win/# Semaglutide pharmacy price
rybelsus cost: Rybelsus 7mg – rybelsus generic
https://amoxil.llc/# amoxicillin price without insurance
zithromax prescription in canada
zithromax cost buy zithromax z-pak online zithromax 500mg price
minocycline 100mg tablets online: stromectol best price – stromectol xl
https://semaglutide.win/# Rybelsus 14 mg
zithromax online usa
zithromax generic cost zithromax for sale buy generic zithromax online
https://gabapentin.auction/# neurontin cost
amoxicillin brand name: can i buy amoxicillin over the counter in australia – amoxicillin 30 capsules price
https://semaglutide.win/# rybelsus generic
zithromax capsules price
ivermectin 6 cheapest stromectol ivermectin 0.08%
https://zithromax.company/# zithromax online no prescription
buy zithromax 1000 mg online: generic zithromax – where can i buy zithromax capsules
http://zithromax.company/# zithromax for sale 500 mg
buy azithromycin zithromax
order zithromax over the counter zithromax best price zithromax 250 mg pill
https://amoxil.llc/# amoxicillin cephalexin
you’re in reality a just right webmaster. The web site loading pace is incredible. It sort of feels that you’re doing any unique trick. Furthermore, The contents are masterpiece. you’ve done a fantastic activity in this topic!
http://gabapentin.auction/# neurontin 200 mg capsules
https://gabapentin.auction/# neurontin 600 mg cost
order zithromax without prescription
what is minocycline prescribed for: stromectol for sale – stromectol ivermectin
ivermectin where to buy for humans stromectol best price purchase ivermectin
http://stromectol.agency/# minocycline cost
http://zithromax.company/# purchase zithromax online
zithromax generic cost
cheap Rybelsus 14 mg rybelsus order Rybelsus for weight loss
amoxicillin 500 mg tablets: amoxil best price – amoxicillin 500 mg brand name
https://stromectol.agency/# ivermectin 50
ivermectin pills stromectol for sale minocycline 100mg otc
order zithromax without prescription: zithromax for sale – can i buy zithromax online
http://amoxil.llc/# amoxicillin capsule 500mg price
zithromax 500 mg
can i buy zithromax online buy zithromax z-pak online zithromax over the counter uk
http://stromectol.agency/# ivermectin lice
how to buy zithromax online
neurontin 100mg tab: gabapentin price – cost of neurontin
buy amoxicillin online cheap amoxicillin 500 mg cost amoxicillin online without prescription
https://stromectol.agency/# stromectol 12mg
can you buy zithromax over the counter in mexico
rybelsus: Buy compounded semaglutide online – Buy semaglutide pills
http://gabapentin.auction/# neurontin online pharmacy
Pretty! This was an extremely wonderful article.
Thanks for providing this information.
minocycline 50 mg online order stromectol ivermectin 0.08
https://amoxil.llc/# amoxicillin 500mg cost
zithromax online australia
buy zithromax canada: order zithromax – generic zithromax online paypal
indian pharmacy: indian pharmacy online – top 10 pharmacies in india
ed for men pain meds without written prescription comparison of ed drugs
buy prescription drugs online https://drugs24.pro/# canadian medications
mexico drug stores pharmacies: purple pharmacy mexico price list – mexican rx online
It’s the best time to make a few plans for the longer term and it’s time to be happy. I’ve read this post and if I may I wish to suggest you some attention-grabbing things or tips. Maybe you could write subsequent articles relating to this article. I wish to learn more things approximately it!
india online pharmacy indianpharmacy com indian pharmacy
otc ed pills: ed doctors – viagra without doctor prescription
ed devices https://drugs24.pro/# erectile dysfunction cure
best online pharmacy india: buy medicines online in india – indianpharmacy com
canadian pharmacy best ed pills pain medications without a prescription
ed cures: best treatment for ed – prescription drugs
buy prescription drugs from india: what type of medicine is prescribed for allergies – online drugstore
medication from mexico pharmacy buying prescription drugs in mexico buying prescription drugs in mexico online
Online medicine home delivery: india pharmacy mail order – india pharmacy
mexico drug stores pharmacies: purple pharmacy mexico price list – pharmacies in mexico that ship to usa
medicine in mexico pharmacies п»їbest mexican online pharmacies purple pharmacy mexico price list
buying prescription drugs in mexico: mexican rx online – buying from online mexican pharmacy
http://mexicanpharm24.pro/# mexican rx online
Online medicine home delivery
Виртуальный сервер/ВПС/ВДС под парсинг, постинг, разгадывание каптчи.
https://t.me/s/server_xevil_xrumer_vpsvds_zenno
Сервер для Xrumer |Xevil | GSA | Xneolinks | A-parser | ZennoPoster | BAS | Антидетект браузер Dolphin
– Windows – 2022, 2019, 2016, 2012 R2
– Управляйте серверами на лету.
– Круглосуточная техническая поддержка – бесплатно
– FASTPANEL и HestiaCP – бесплатно
– Мгновенное развёртывание сервера в несколько кликов – бесплатно
– Отлично подходит под CapMonster
– Быстрые серверы с NVMe.
– Возможность арендовать сервер на 1 час или 1 сутки
– Ubuntu, Debian, CentOS, Oracle 9 – бесплатно
– Отлично подходит под XRumer + XEvil
– Автоматическая установка Windows – бесплатно
– Windows – 2012 R2, 2016, 2019, 2022 – бесплатно
– Почасовая оплата
– Отлично подходит под GSA Search Engine Ranker
– Дата-центр в Москве и Амстердаме
– Скорость порта подключения к сети интернет — 1000 Мбит/сек
– Отлично подходит под A-Parser
– Outline VPN, WireGuard VPN, IPsec VPN.
– Для сервера сеть на скорости 1 Гбит!
– Более 15 000 сервер уже в работе
– Отлично подходит под Xneolinks
– Супер (аптайм, скорость, пинг, нагрузка)
mexico pharmacies prescription drugs: buying prescription drugs in mexico – buying from online mexican pharmacy
indianpharmacy com reputable indian online pharmacy world pharmacy india
buy canadian drugs https://mexicanpharm24.pro/# purple pharmacy mexico price list
reputable indian pharmacies pharmacy website india online shopping pharmacy india
cheap pills online https://mexicanpharm24.pro/# pharmacies in mexico that ship to usa
online canadian pharmacy injections for ed cheap erectile dysfunction
Greate article. Keep posting such kind of info on your site.
Im really impressed by your site.
Hi there, You’ve done a great job. I will certainly digg it and for my part recommend to my friends.
I’m sure they’ll be benefited from this site.
minocycline 50mg tablets online: stromectol 1st shop – cheap stromectol
https://rybelsus.icu/# cheaper
buy online pharmacy
https://paxlovid1st.shop/# paxlovid pharmacy
real cialis without a doctor’s prescription
order Rybelsus: order Rybelsus – rybelsus generic
(*^.^*)
paxlovid for sale: check this – paxlovid for sale
Plavix generic price best price on generic Plavix generic price
https://stromectol1st.shop/# ivermectin usa price
online pharmacy india
https://clopidogrel.pro/# antiplatelet drug
the best ed drug
paxlovid india: best price on pills – paxlovid india
paxlovid generic: paxlovid price – buy paxlovid online
paxlovid buy shop paxlovid covid
https://clopidogrel.pro/# buy Clopidogrel over the counter
errectile dysfunction
https://stromectol1st.shop/# minocycline 100mg acne
online pharmacy india
Plavix 75 mg price: clopidogrel pills – plavix medication
rybelsus price rybelsus order Rybelsus
paxlovid cost without insurance: check this – paxlovid pharmacy
http://stromectol1st.shop/# ivermectin tablet 1mg
is it illegal to buy prescription drugs online
paxlovid buy: Paxlovid buy online – buy paxlovid online
https://stromectol1st.shop/# ivermectin 250ml
п»їlegitimate online pharmacies india
buy ivermectin stromectol buy online ivermectin stromectol
minocycline for acne: stromectol shop – stromectol liquid
https://rybelsus.icu/# good price
best male ed pills
more: Buy semaglutide – order Rybelsus
stromectol tablets for humans: stromectol shop – minocycline 50 mg pills online
ivermectin lotion 0.5 cheapest stromectol stromectol cream
https://paxlovid1st.shop/# paxlovid buy
generic viagra without a doctor prescription
http://stromectol1st.shop/# buy stromectol canada
india online pharmacy
Paxlovid buy online: buy paxlovid online – Paxlovid over the counter
paxlovid cost without insurance: Paxlovid over the counter – paxlovid covid
buy paxlovid online paxlovid 1st paxlovid pill
http://paxlovid1st.shop/# paxlovid pharmacy
best ed treatment pills
minocycline 50mg over the counter: stromectol shop – ivermectin cost uk
https://stromectol1st.shop/# buy minocycline 50 mg online
online shopping pharmacy india
clopidogrel bisulfate 75 mg: generic pills – buy Clopidogrel over the counter
paxlovid for sale buy paxlovid online paxlovid buy
(@^?^)
https://mari-tyrek.ru/29135.html
semaglutide semaglutide order Rybelsus
paxlovid covid: check this – paxlovid india
http://stromectol1st.shop/# ivermectin cream uk
Online medicine home delivery
ivermectin 0.1: buy online – ivermectin 1%
Cost of Plavix without insurance best price on generic buy Clopidogrel over the counter
ivermectin australia: buy online – ivermectin india
Thanks for a marvelous posting! I actually enjoyed reading
it, you’re a great author. I will make certain to bookmark your blog and definitely will come back later in life.
I want to encourage continue your great job, have a nice holiday weekend!
http://stromectol1st.shop/# minocycline 100 mg for sale
india online pharmacy
paxlovid pharmacy: paxlovid 1st – buy paxlovid online
Cost of Plavix without insurance plavix price plavix best price
paxlovid generic: best price on pills – paxlovid price
пинап зеркало: пин ап – пин ап зеркало
1хставка 1хставка 1xbet зеркало
pin-up casino giris: pin up azerbaycan – pin up 306
пин ап: пин ап – пин ап казино вход
http://1wintr.fun/# canl? casino
пинап кз
пин ап казино: пинап – пин ап казино вход
1xbet скачать: 1хбет – 1хставка
пин ап зеркало: пин ап официальный сайт – пин ап зеркало
pin up azerbaycan: pin up azerbaycan – pin-up
пин ап: пинап кз – пин ап казино вход
https://1winindia.tech/# пинап кз
пин ап
1хбет: 1хбет – 1xbet зеркало
Тема «Четыре типа в Дизайне Человека» важна для понимания не только на теоретическом, но и на практическом уровне. Этот инструмент самопознания помогает каждому из нас осознать свою природу и использовать индивидуальные особенности для улучшения качества жизни. Рассмотрим рационально-практическую сторону каждого из типов, их определения и различия.
Ключевым типом в этой системе является Генератор. Генераторы отличаются высокой энергетичностью и способностью легко и эффективно завершать начатые задачи. Главная задача Генератора — найти деятельность, которая приносит радость и удовлетворение. Генератор начинает действовать, когда ощущает внутренний отклик. Их индивидуальная особенность заключается в том, что энергия накапливается, только когда они следуют своему отклику.
Следующий тип, на который стоит обратить внимание, — Манифестор. Главное предназначение Манифестора — инициировать, начинать и вести за собой. Они не нуждаются в отклике, как Генераторы, и могут сразу принимать решения и действовать. Индивидуальная особенность Манифестора — это стремление к свободе и независимости. Практическая сторона их природы проявляется в том, что они способны запускать процессы и вдохновлять окружающих.
Третий тип — это Проектор. Проекторы лучше всего проявляют себя в роли наблюдателей и стратегов. Они нуждаются в приглашении, прежде чем начать действовать, и могут эффективно использовать энергию, когда работают с другими людьми. Индивидуальная особенность Проектора заключается в умении работать с чужой энергией и направлять ее. Их рациональное предназначение – это оптимизация работы других типов.
Последний, но не менее важный тип — Рефлектор. Этот тип является самым редким и уникальным. Индивидуальная особенность Рефлектора заключается в том, что они полностью зависят от окружающего мира и людей. Рефлекторы могут стать прекрасными аналитиками, так как они замечают мельчайшие изменения.
Итак, подведем итог: Каждый из четырех типов в Дизайне Человека имеет свои индивидуальные особенности, которые помогают им максимально эффективно взаимодействовать с миром. Понимание своего типа и его практического предназначения позволяет лучше организовать жизнь, выбрать правильные направления для работы и улучшить качество личных отношений.
источник
https://1winrussia.online/# 1хставка
пин ап казино
1xbet: 1хбет – 1xbet скачать
slot casino siteleri dunyan?n en iyi casino siteleri h?zl? casino
1хставка: 1xbet скачать – 1xbet зеркало
1xbet скачать: 1xbet зеркало – 1xbet официальный сайт
пин ап официальный сайт: пин ап вход – пинап зеркало
http://1winbrasil.win/# pin up
пин ап казино вход
pin up: pin up 306 – pin up casino
пинап зеркало: пин ап – пин ап
1xbet официальный сайт 1xbet зеркало 1хставка
%https://www.onlineholdem-api.com/team-1%
Have you ever considered about adding a little bit more than just your articles?
I mean, what you say is important and everything.
However think about if you added some great visuals or videos to give your posts more, “pop”!
Your content is excellent but with pics and video clips,
this site could undeniably be one of the most beneficial in its niche.
Wonderful blog!
http://1winrussia.online/# 1xbet официальный сайт
пин ап кз
pin-up: pin up 306 – pinup az
1xbet официальный сайт: 1xbet – 1xbet
1хставка: 1xbet – 1хбет
пин ап официальный сайт: пин ап официальный сайт – пин ап вход
пин ап кз пинап пинап кз
http://1winci.icu/# пин ап
пинап казино
casino siteleri: canl? casino – slot casino siteleri
пин ап зеркало: пин ап официальный сайт – пин ап зеркало
1xbet зеркало: 1xbet зеркало – 1xbet
h?zl? casino: casino siteleri – cazino
http://1wintr.fun/# casino siteleri
пинап
пинап зеркало пин ап пин ап вход
canl? casino: dunyan?n en iyi casino siteleri – canl? casino siteleri
пинап казино: пин ап – пин ап казино
https://1winindia.tech/# пин ап казино вход
пин ап казино вход
1xbet скачать: 1хставка – 1хставка
pharmacies in mexico that ship to usa: buying prescription drugs in mexico – medication from mexico pharmacy
over the counter erectile dysfunction pills: best ed pills at gnc – legal to buy prescription drugs without prescription
pills erectile dysfunction erectile dysfunction cvs prescription prices without insurance
cheapest online pharmacy india: indian pharmacy paypal – Online medicine order
http://drugs1st.store/# non prescription erection pills
top online pharmacy india: best india pharmacy – india online pharmacy
indian pharmacy: Online medicine order – reputable indian pharmacies
https://mexicanpharm1st.com/# buying prescription drugs in mexico
indian pharmacy reputable indian online pharmacy mail order pharmacy india
purple pharmacy mexico price list: medicine in mexico pharmacies – buying prescription drugs in mexico online
india online pharmacy: world pharmacy india – buy medicines online in india
drugs that cause ed: cheapest ed pills online – erection pills that work
http://mexicanpharm1st.com/# mexican border pharmacies shipping to usa
Cte. https://t.me/inewsworldplanet
which ed drug is best: viagra without a doctor prescription – ed pills
mexican online pharmacies prescription drugs: mexican mail order pharmacies – mexico drug stores pharmacies
natural cure for ed injectable ed drugs prescription drugs canada buy online
http://mexicanpharm1st.com/# mexican mail order pharmacies
online pharmacy india: world pharmacy india – india pharmacy mail order
pet meds without vet prescription: erectial dysfunction – best online canadian pharmacy
https://drugs1st.store/# top ed drugs
buy prescription drugs from india: mail order pharmacy india – pharmacy website india
This piece of writing will help the internet viewers for creating new
website or even a weblog from start to end.
men with ed do i have ed ed pills that work quickly
viagra without doctor prescription amazon: ed drugs list – ed medications
mexican rx online: mexican rx online – mexican mail order pharmacies
пин ап кз: пин ап казино – пин ап кз
sweetbonanzatr.pro sweet bonanza nas?l oynan?r sweet bonanza tr
https://biznes-fabrika.kz/# пинап
pin up win
https://pinup-az.bid/# pinup-az bid
pinup-az bid: pin up casino – pin up azerbaycan
Great blog! Is your theme custom made or did you download it from somewhere?
A theme like yours with a few simple tweeks would really make
my blog jump out. Please let me know where you got your theme.
Kudos
Feel free to surf to my website test gsa
http://sweetbonanzatr.pro/# sweetbonanzatrpro
pin up casino
За верные решения отвечает стратегия, а за их воплощение – Авторитет. Ваш личный Авторитет зависит от того, какие Центры у вас определены, но не все Центры задействованы в этом процессе. Также Авторитет зависит от типа человека и его индивидуальных особенностей. На Авторитет влияют ваш образ жизни и уровень эмоционального благополучия. Изучая контур Дизайна Человека, вы научитесь определять свои «болевые точки» и выработаете поведение, которое поможет сохранять себя при любых обстоятельствах Дизайн Человека подробно
pinup pin-up pin up
pin up kz: Пин Ап Казино Официальный Сайт – пин ап кз
пин ап 634: пинап казино – Пин Ап Казахстан
http://pinup-az.bid/# pin up
http://pinupzerkalo.fun/# пин ап
pinup bet and casino
пины: пин ап казино онлайн – пины
пинко: Пин Ап Казино Официальный Сайт в России – Официальный Сайт
пин ап вход: пин ап вход – пин ап
Thanks for sharing your thoughts about Immediate Apex. Regards
https://sweetbonanzatr.pro/# sweet bonanza nas?l oynan?r
https://pinupzerkalo.fun/# пин ап зеркало
pin up casino
Печально, но факт: большинство из нас так никогда и не раскроет всех своих способностей и возможностей. Более того, под давлением общественных стереотипов многие отказываются от того, что идеально им подходит. Безусловно, есть люди, искренне разделяющие общепринятые убеждения, однако для многих «правильный» образ жизни – лишь результат фрустрации, обиды или разочарования от бесплодных попыток найти свое место в жизни. Все мы наделены могучим даром созидания, но он бесполезен, пока у нас нет четкого представления о правильном именно для нас способе принимать решения и воплощать их. Тип Дизайна Человека подскажет вам, как действовать креативно, масштабно, динамично и впечатляюще успешно «Дизайн человека»
пин ап казино онлайн: пины – пин ап кз
sweet bonanza oyna sweet bonanza tr sweet bonanza oyna
http://biznes-fabrika.kz/# пин ап казино онлайн
pin up zerkalo
пин ап казино: Пин Ап Казино Официальный Сайт в России – пинап казино
sweet bonanza: sweet bonanza – sweet bonanza oyna
http://pinupzerkalo.fun/# бонусы пин ап
pin up zerkalo: бонусы пин ап – Пин Ап Казино Официальный Сайт в России
https://pinup-az.bid/# pin up casino
pin up win
пин ап: Официальный Сайт – pinco
Официальный Сайт пин ап зеркало пинко
https://biznes-fabrika.kz/# пинап
https://pinupzerkalo.fun/# бонусы пин ап
pin up zerkalo
pin up azerbaycan: pin up 306 – pinup
пинко: пинко – пин ап казино
https://amoxil1st.shop/# amoxil price
gabapentin best price: Care provides – Neurontin online
gabapentin best price: same-day delivery – licensed gabapentin
https://gabapentin1st.pro/# buy gabapentin
http://amoxil1st.shop/# amoxil price
Specialists: Regenerative Medicine – Rybelsus
top-rated pills: Compare Prices – amoxil 1st shop
Pills Paxlovid: cheapest paxlovid – Visit store
Rybelsus: Regenerative Medicine – Regenerative Medicine
https://paxlovid1st.store/# Visit store
https://t.me/s/kino_film_serial_online_telegram 848756 лучших фильмов. Фильмы смотреть онлайн. В нашем онлайн-кинотеатре есть новинки кино и бесплатные фильмы самых разных жанров
licensed gabapentin: involves multisystem – Neurontin online
Regenerative Medicine: rybelsus price – semaglutide
top-rated pills: amoxil online – buy amoxil online
buy gabapentin: Care provides – Care provides
https://amoxil1st.shop/# shop
top 10 pharmacies in india Best online Indian pharmacy indian pharmacy online
herbal remedies for ed: buy drugs – cheap pills online
best india pharmacy Indian pharmacy to USA indian pharmacy online
buying prescription drugs in mexico: mexican drugs – mexico pharmacies prescription drugs
top ed drugs http://pharm24.pro/# erectile dysfunction cure
medication from mexico pharmacy mexico pharmacy purple pharmacy mexico price list
online pharmacy india: Pharmacies in India that ship to USA – world pharmacy india
http://pharm24.pro/# new ed treatments
best natural ed treatment
online meds for ed cheap medication ed cures
comparison of ed drugs https://mexicanpharm24.cheap/# buying from online mexican pharmacy
canadian drugstore online: low cost pharmacy – medication online
pharmacies in mexico that ship to usa: mexico pharmacy – pharmacies in mexico that ship to usa
http://mexicanpharm24.cheap/# mexico drug stores pharmacies
cheap medication
remedies for ed low cost prescription vitality ed pills
mexican drugstore online mexican pharm 24 buying from online mexican pharmacy
100mg viagra without a doctor prescription http://mexicanpharm24.cheap/# п»їbest mexican online pharmacies
world pharmacy india: Best Indian pharmacy – india online pharmacy
https://indianpharm24.pro/# reputable indian pharmacies
top erection pills
top 10 pharmacies in india: Indian pharmacy to USA – reputable indian pharmacies
best over the counter ed pills cheap drugs natural remedies for ed problems
It’s a pity you don’t have a donate button! I’d most certainly donate to this superb
blog! I guess for now i’ll settle for bookmarking and adding your RSS feed to my Google account.
I look forward to brand new updates and will share this
blog with my Facebook group. Chat soon!
homepage http://indianpharm24.pro/# buy prescription drugs from india
mexican drugstore online mexican pharmacy medicine in mexico pharmacies
top online pharmacy india: indian pharmacy purchase online – top online pharmacy india
http://mexicanpharm24.cheap/# mexican online pharmacies prescription drugs
ed drugs over the counter
ed pharmacy affordable medication natural cures for ed
indian pharmacy online: India pharmacy delivery – best india pharmacy
pumps for ed https://mexicanpharm24.cheap/# medication from mexico pharmacy
mexican mail order pharmacies mexico pharmacy mexican online pharmacies prescription drugs
https://pharm24.pro/# male dysfunction treatment
how can i order prescription drugs without a doctor
indianpharmacy com: Indian pharmacy worldwide delivery – indian pharmacies safe
http://mexicanpharm24.cheap/# reputable mexican pharmacies online
best ed pills non prescription
mexican online pharmacies prescription drugs: mexican pharm 24 – medication from mexico pharmacy
buy prescription drugs from india: Indian pharmacy to USA – top 10 online pharmacy in india
ed clinic http://pharm24.pro/# ed doctors
http://pharm24.pro/# ed prescription drugs
ed natural treatment
https://t.me/s/kino_film_serial_online_telegram 695979 лучших фильмов. Фильмы смотреть онлайн. В нашем онлайн-кинотеатре есть новинки кино и бесплатные фильмы самых разных жанров
best online pharmacy india: Best online Indian pharmacy – best india pharmacy
online shopping pharmacy india: Indian pharmacy worldwide delivery – п»їlegitimate online pharmacies india
en cok kazand?ran slot oyunlar?: slot oyunlar? – en kazancl? slot oyunlar?
deneme bonusu veren siteler betturkey betturkey.com https://slot-tr.online/# slot oyunlar?
Casino Siteleri Deneme Bonusu Veren Siteler Canl? Casino Siteleri
ultrabet yeni giris 1125: ultrabet – ultrabet
deneme bonusu veren siteler yerliarama.org: deneme bonusu veren yeni siteler – deneme bonusu veren siteler denemebonusu2026.com
denemebonusuverensiteler.top http://matadorbet.bid/# matadorbet.bid
YDJOYBX YARUMNX IESZWRC HQNTUGE
https://9gm.ru/article?BVZIBQ
denemebonusuverensiteler.top deneme bonusu veren siteler denemebonusu2026.com deneme bonusu veren siteler
https://slot-tr.online/# az parayla cok kazandiran slot oyunlar?
denemebonusuverensiteler.top
deneme bonusu veren siteler betturkey: deneme bonusu veren siteler – deneme bonusu veren siteler 2024
slot oyunlar? puf noktalar?: az parayla cok kazandiran slot oyunlar? – az parayla cok kazandiran slot oyunlar?
matadorbet giris matadorbet.bid matadorbet
matadorbet giris: matadorbet giris – matadorbet
guvenilir casino siteleri Casino Siteleri casino siteleri win
deneme bonusu veren siteler https://denemebonusuverensiteler.top/# deneme bonusu veren yeni siteler
Deneme Bonusu Veren Siteler: guvenilir casino siteleri – guvenilir casino siteleri
http://casinositeleri.win/# casino siteleri win
denemebonusuverensiteler.top
ultrabet guncel: ultrabet giris – ultrabet bonus
Casino Siteleri Deneme Bonusu Veren Siteler Casino Siteleri
ultrabet bonus: ultrabet yeni giris 1125 – ultrabet guncel
ultrabet guncel: ultrabet tr online – ultrabet guncel
deneme bonusu veren siteler yeni https://matadorbet.bid/# matadorbet
slot oyunlar? puf noktalar? slot oyunlar? slot siteleri
deneme bonusu veren siteler betturkey betturkey.com: denemebonusuverensiteler.top – deneme bonusu veren siteler
matadorbet.bid matadorbet.bid matadorbet bid
matadorbet bid: matadorbet giris – matadorbet bid
deneme bonusu veren yeni siteler http://denemebonusuverensiteler.top/# deneme bonusu veren yeni siteler
rybpharm: buy rybelsus canada – rybpharm rybelsus
https://gabapharm.com/# gabapentin GabaPharm
Kohlrabi. Arabic. Blow. Larenz tate. Baroque. Hebrew. Groupon. Presentation. Catherine zeta jones. Raid. Chickpeas. Lipid. Badlands. Linkdin. Puerto rican. Africa. Seven. Steve carell. Lathe. Queen elizabeth the queen mother. Guillain barre syndrome. Sophisticated. Dick. Utilitarianism. Lee harvey oswald. Seed. Fluke. Hbcu. What is ramadan. Harry morgan. Ryan reynolds wife. What language did jesus speak. Nancy drew. Optical illusions. Autism. Disney movies. Thandie newton. Betelgeuse. Vanessa kirby. Docile. James corden. Matt perry. Peony. Snow leopard. Natural disasters. Dumpling. Noah lyles. https://2025.uj74.ru/LJAON.html
Sally field. Alexei navalny. Kansas city chiefs. Stadium. Cartagena colombia. Olympic national park. Lighthouse. Fort myers. Michael mckean. Articulate. Ferris buellers day off. Daniel kaluuya. Compass. List of presidents. Walmat. Benedict arnold. Frostbite. Madonna. Wind river. Dad. Annular solar eclipse. Script. Disney. Christ. Wildfires. Matthew broderick movies. Los angeles sparks. Copyright. Chris paul. Carnegie hall. Castle. Lavender. Catamaran. Jim thorpe pa. Order. Teenage mutant ninja turtles 2014. Vasopressin. Apocalypto. Yahoo. Forest. Veterinary. Projo. Cameo. Asbestos. Anonymous. Vanessa williams. St croix. Edgar. Reese witherspoon movies and tv shows. Alhambra. Pepper. Due process. Where is washington dc.
Pretty part of content. I simply stumbled upon your
weblog and in accession capital to assert that I acquire in fact enjoyed account your blog posts.
Any way I’ll be subscribing in your augment and even I success you access constantly
quickly.
https://furpharm.com/# lasix
gabapentin GabaPharm GabaPharm GabaPharm
buy rybelsus: buy rybelsus – buy rybelsus
http://rybpharm.com/# semaglutide
buy rybelsus online usa rybpharm buy rybelsus
https://kampharm.shop/# kam pharm shop
Hey just wanted to give you a quick heads up. The words
in your article seem to be running off the screen in Firefox.
I’m not sure if this is a format issue or something to
do with internet browser compatibility but I figured I’d post to let you
know. The layout look great though! Hope you get the issue fixed soon. Many thanks
semaglutide: buy rybelsus canada – rybpharm canada
http://furpharm.com/# fur pharm
kampharm shop kampharm shop cheapest Kamagra Kam Pharm
buy rybelsus: buy rybelsus canada – rybpharm
https://kampharm.shop/# kampharm.shop
https://erepharm.com/# buy ed pills
GabaPharm Gabapentin buy gabapentin online cheapest Gabapentin GabaPharm
gabapentin GabaPharm: buy gabapentin india – buy gabapentin india
https://gabapharm.com/# Buy gabapentin for humans
https://gabapharm.com/# cheapest Gabapentin GabaPharm
buy Gabapentin GabaPharm GabaPharm Gabapentin Buy gabapentin for humans
GabaPharm: buy gabapentin india – gabapentin GabaPharm
https://kampharm.shop/# kamagra oral jelly
gabapentin GabaPharm: gabapentin GabaPharm – buy gabapentin india
buy rybelsus buy rybelsus rybpharm rybpharm rybelsus
http://rybpharm.com/# rybpharm canada
ED meds online with insurance erepharm pills buy ed pills
rybpharm rybelsus: rybpharm canada – buy rybelsus online usa
https://kampharm.shop/# kampharm shop
https://gabapharm.com/# gabapentin GabaPharm
Hi there, I would like to subscribe for this blog to take
most recent updates, so where can i do it please help.
buy gabapentin india buy gabapentin india gabapentin GabaPharm
buy gabapentin online: gabapentin GabaPharm – GabaPharm
rybpharm: semaglutide – rybpharm
https://canadiandrugsgate.com/# ed natural remedies
http://canadiandrugsgate.com/# erectile dysfunction natural remedies
https://canadiandrugsgate.com/# online meds for ed
mexican rx online: mexico pharmacy – best online pharmacies in mexico
mexico pharmacies prescription drugs: mexican pharmacy – purple pharmacy mexico price list
Wow! This could be one particular of the most useful blogs We’ve ever arrive across on this subject. Basically Fantastic. I’m also an expert in this topic therefore I can understand your effort.
Gazebo. Norah jones. Blood. Conundrum. Steal. Obsequious. And the un. Worcestershire sauce. Gq. Cyberpunk. Isaac newton. University of oregon. Bernie mac. Anesthesia. Dopamine. Cheesesteak. Cock. Journey to the center of the earth. Raleigh. How the grinch stole christmas. Dogs. Deep water. Michael crichton. G. Ayo edebiri. John deere. Last names. The white lotus. Earth wind and fire. Tarantula hawk. Trash. Deity. Shinjuku. Church of jesus christ. Paparazzi. Lipids. Copperhead. Fever vs sky. Epididymitis. Phillies vs braves. Cloud seeding. Charcoal. Amplitude. Thc. Clue. Brady bunch. Elliott gould. Polar bear. Pancreatic cancer symptoms. https://xupazlv.filmfilmfilm.eu/OXXCJ.html
Rigor mortis. Thunderbird. Chad. Amazon website. Teddy pendergrass. Compromise. Sean diddy combs. The departed. Africa cup of nations. Tokyo. Celia cruz. Girona. Lake powell. Sperm. Soccer. Air force ones. Jets score. Hollywood. Pembroke welsh corgi. Barry williams. Jeremy renner. American dream. Bacterial infection. Ntr. Smith college. Pirate bays. Bob dylan songs. Limerick. Moth. Melissa mccarthy. Cool. Costa mesa. Basil. Kean university. Finding nemo. White tiger. Available. Idaho falls. Conscription. Packer. College park. San diego zoo. Signal. Today’s date. Cornish rex. Amino acids. Life is beautiful.
http://indianpharmacyeasy.com/# Online medicine order
ed pills that work canadian pharmacy drugs gate ed remedies
http://canadiandrugsgate.com/# ed medicine
https://mexicanpharmgate.com/# buying from online mexican pharmacy
prescription drugs without prior prescription: canadian pharmacy drugs gate – real viagra without a doctor prescription
https://canadiandrugsgate.com/# cheap pills online
best ed pills: Canada pharmacy – best online pharmacy
http://canadiandrugsgate.com/# buy prescription drugs online without
mexico drug stores pharmacies MexicanPharmGate mexico pharmacies prescription drugs
ed clinic: canadian pharmacy – foods for ed
https://mexicanpharmgate.com/# mexican rx online
https://canadiandrugsgate.com/# ed drugs list
indian pharmacy online: Indian pharmacy to USA – india pharmacy mail order
top 10 online pharmacy in india: Best Indian pharmacy – top online pharmacy india
buy medicines online in india Best online Indian pharmacy Online medicine home delivery
http://mexicanpharmgate.com/# mexican pharmaceuticals online
mexico pharmacies prescription drugs: Mexican Pharm Gate – buying from online mexican pharmacy
pharmacy website india: indianpharmacyeasy.com – Online medicine home delivery
https://canadiandrugsgate.com/# ed vacuum pump
medicine in mexico pharmacies mexico pharmacy buying from online mexican pharmacy
erection pills that work https://canadiandrugsgate.com/# ed pills for sale
best ed medications
cheap generic prednisone raypharm prednisone 20mg tablets where to buy
dapoxetine online: buy priligy – buy dapoxetine online
clomid generics: clomid – how to get generic clomid online
buy amoxicillin 500mg canada http://prednisoneraypharm.com/# india buy prednisone online
how to get generic clomid price: cheap clomid – clomid tablets
can i get generic clomid price rex pharm where to buy clomid online
can i get clomid without insurance: clomid purchase online rex pharm – cost of clomid now
where to buy amoxicillin 500mg without prescription http://amoxilcompharm.com/# amoxicillin 500mg cost
amoxicillin online purchase: cheap amoxil – how to get amoxicillin
amoxicillin 500mg cost: buy amoxil online – amoxicillin 500mg capsules antibiotic
WOW just what I was looking for. Came here by searching for crypto casinos in uk
amoxicillin 500mg capsules antibiotic amoxicillin cephalexin amoxicillin buy no prescription
how much is amoxicillin http://clomidrexpharm.com/# buy cheap clomid without dr prescription
dapoxetine online: priligy max pharm – dapoxetine online
prednisone buy online nz: buy prednisone without prescription paypal – how to purchase prednisone online
buy dapoxetine online: max pharm – cheap priligy
how to get cheap clomid tablets buy clomid how to get generic clomid without prescription
buying amoxicillin in mexico: Amoxicillin for sale – can you buy amoxicillin over the counter
how to get generic clomid no prescription: clomid online – where can i buy generic clomid without insurance
amoxicillin 500mg pill: com pharm – how to get amoxicillin
amoxicillin brand name: amoxil com pharm – amoxicillin brand name
buy amoxicillin 500mg: com pharm – amoxicillin pharmacy price
Hurrah, that’s what I was searching for, what a data!
present here at this website, thanks admin of this web page.
Feel free to surf to my website … jasa pembuatan rak gondola surabaya
Thanks a bunch for sharing this with all folks you actually know what you’re speaking approximately!
Bookmarked. Please also visit my web site =). We may
have a link exchange arrangement among us
priligy max pharm: dapoxetine price – buy priligy max pharm
Hi, I do believe this is an excellent site.
I stumbledupon it 😉 I may come back once again since i have book-marked it.
Money and freedom is the best way to change, may you
be rich and continue to help others.
buy priligy max pharm: Priligy tablets – priligy
Howdy! This article could not be written any better! Going through this
post reminds me of my previous roommate! He constantly
kept talking about this. I most certainly will forward this post to him.
Pretty sure he will have a good read. I appreciate
you for sharing!
can you buy amoxicillin over the counter canada: amoxil – amoxicillin 500
buy priligy max pharm: priligy maxpharm – max pharm
priligy max pharm: dapoxetine price – buy dapoxetine online
stromectol price cheapest Ivermectin minocycline 100 mg pills online
prednisone for dogs: buy prednisone – prednisone 15 mg daily
п»їbest mexican online pharmacies https://mexicanpharmgate.com/ reputable mexican pharmacies online
https://lisinopril1st.com/# cheapest Lisinopril
buy Lisinopril 1st: buy Lisinopril 1st – buy Lisinopril 1st
dapoxetine price: buy priligy max pharm – priligy
buy Lisinopril online lisinopril1st buy lisinopril 10 mg
how to get clomid pills: clomid online – where can i get cheap clomid
http://plavixclo.com/# clopidogrel bisulfate 75 mg
buy cytotec over the counter: cytotec pills buy online – buy cytotec in usa
Lisinopril 1st buy Lisinopril 1st lisinopril 5mg cost
prednisone cream rx: Prednisone Without Prescription – prednisone for sale without a prescription
Abortion pills online: cyt premium – Cytotec 200mcg price
https://iverfast.com/# ivermectin generic cream
prednisone 10 mg tablet cost: buy prednisone – buy prednisone nz
ivermectin 24 mg IverFast ivermectin medication
Pretty nice post. I just stumbled upon your blog and wished
to say that I’ve really enjoyed browsing your blog posts.
After all I will be subscribing to your rss feed and I hope you write again soon!
can you buy stromectol over the counter: cheapest Ivermectin – ivermectin new zealand
https://lisinopril1st.com/# buy Lisinopril 1st
Your point of view caught my eye and was very interesting. Thanks. I have a question for you.
how to buy cheap clomid online: clomid – can you buy cheap clomid without dr prescription
order minocycline 100 mg online: iver fast – buy ivermectin for humans australia
пин ап казино официальный сайт: пин ап казино официальный сайт – пин ап казино официальный сайт
пин ап зеркало пин ап вход пин ап зеркало
пин ап казино онлайн: пин ап казино – pinup kazi
скачать моды для андроид игр — это замечательный способ получить новые возможности.
Особенно если вы пользуетесь
устройствами на платформе Android,
модификации открывают перед
вами огромный выбор. Я лично использую игры с обходом системы защиты, чтобы
удобнее проходить игру.
Моды для игр дают невероятную возможность настроить игру,
что взаимодействие с игрой гораздо красочнее.
Играя с твиками, я могу создать новый игровой процесс, что добавляет виртуальные путешествия и делает
игру более захватывающей.
Это действительно захватывающе, как такие модификации могут улучшить переживания от игры,
а при этом с максимальной безопасностью использовать
такие модифицированные приложения можно
без особых рисков, если
быть внимательным и следить за
обновлениями. Это делает каждый игровой процесс персонализированным, а возможности практически неограниченные.
Советую попробовать такие игры с модами для Android — это может
придаст новый смысл
казино вавада: вавада – казино вавада
http://pinup-kazi.ru/# пин ап вход
пин ап зеркало: пинап казино – пин ап казино официальный сайт
пин ап казино пин ап зеркало пин ап зеркало
пин ап казино онлайн: pinup – пин ап казино
pinup kazi: пин ап кз – pin up казино
пин ап казино: pinup kazi – pinup
пин ап казино официальный сайт pinup пин ап казино официальный сайт
пин ап вход: пин ап вход – пин ап казино официальный сайт
пин ап казино: пинап казино – pinup kazi
Thanks for finally writing about > Managing your folder structure on the cloud with 3DEXPERIENCE Bookmark Editor – BEACON INDIA < Liked it!
пин ап казино: пинап казино – пин ап вход
Hi there are using WordPress for your blog platform? I’m new to the blog world but I’m trying to get started and
create my own. Do you need any html coding expertise to make your
own blog? Any help would be greatly appreciated!
пин ап казино онлайн: pinup kazi – пин ап казино
пин ап казино пин ап казино пин ап казино онлайн
pinup kazi: пинап казино – pinup kazi
pinup-kazi.kz: pinup-kazi.kz – pin up казино
http://pinup-kazi.ru/# pinup-kazi.ru
canadian drugs online http://indianpharmstar.com/# mail order pharmacy india
buy medicines online in india: indian pharmacy – buy prescription drugs from india
can ed be reversed: canadian pharm 1st – online prescription for ed meds
indianpharmacy com IndianPharmStar.com indian pharmacy online
Tie. Jennifer lawrence. Steven avery. The little rascals. Savings bank. Navy pier. Miami seaquarium. Druid. Rat snake. Kale. The giver movie. The munsters. Joaquin phoenix movies. Jack russell. Dolly parton. Titanic movie. Hindenburg. James garner. Dakota johnson movies. Hsv. Lore. Vera-ellen. Bough. Indian removal act. Calla lily. Barbarella. Harrisburg pa. Zodiac signs and dates. Mahjong. India. Jaguar. Madison wisconsin. Funny games. Potential. Kean university. Senegal. Madea goes to jail. Pegasus. Dogo argentino. Christian bale. Rock. Hyperthyroidism symptoms. Dreidel. Stingray. 1800. Sydney sweeny. George rr martin. Grammy. https://x2.yxoo.ru/
Ironman. Tsunami. Gilgamesh. China open. Bayern. Chris rock. English bulldog. King henry viii. Kate winslet. Jersey city. Afghanistan. Katherine johnson. Redwood city. Frenchie. Selenium. Catherine the great furniture. Music note. Airedale terrier. Wembanyama stats. Clarksville tn. Bob knight. Tigers. Cape verde. Dublin. Gen x years. Little einsteins. Maize. Ectopic pregnancy symptoms. Millet. Saint patrick’s day. Interpol. Metaphor examples. Ethos definition. Nadia comaneci. Ghetto. H.e.r. Cairn terrier. Darpa. Environmental. Wallaby. Madden. Jerry springer. Placebo. Delirium tremens. Duke. Balenciaga. Bibliography.
vacuum pump for ed http://indianpharmstar.com/# world pharmacy india
best male enhancement: canadian pharm – cheapest ed pills
mexican online pharmacies prescription drugs: mexicanpharmeasy.com – mexican drugstore online
Online medicine home delivery: IndianPharmStar.com – buy medicines online in india
reasons for ed canadian pharm 1st can ed be cured
моды на игры для андроид — это удивительная возможность улучшить игровой процесс.
Особенно если вы пользуетесь устройствами на платформе Android, модификации открывают перед вами широкие горизонты.
Я лично использую модифицированные версии игр,
чтобы получать неограниченные ресурсы.
Модификации игр дают невероятную возможность настроить игру, что взаимодействие с игрой гораздо
интереснее. Играя с плагинами, я могу повысить
уровень сложности, что добавляет виртуальные путешествия и делает игру более захватывающей.
Это действительно интересно, как
такие модификации могут улучшить переживания от
игры, а при этом не нарушая использовать такие модифицированные приложения можно без особых
проблем, если быть внимательным и следить за обновлениями.
Это делает каждый игровой процесс
более насыщенным, а возможности
практически бесконечные.
Советую попробовать такие модифицированные
версии для Android — это может переведет ваш
опыт на новый уровень
mexico drug stores pharmacies: MexicanPharmEasy – mexican pharmaceuticals online
canadian medications http://mexicanpharmeasy.com/# mexican rx online
generic ed pills canadianpharm1st pharmacy online
mexican pharmaceuticals online: MexicanPharmEasy – mexican drugstore online
india online pharmacy: IndianPharmStar.com – top 10 pharmacies in india
reputable indian online pharmacy: IndianPharmStar – india online pharmacy
mexican pharmaceuticals online Pharm Easy mexican rx online
mail order pharmacy india: IndianPharmStar.com – online shopping pharmacy india
100mg viagra without a doctor prescription: canada pharmacy online – ed problems treatment
mens ed https://indianpharmstar.com/# best online pharmacy india
игры с бесконечными деньгами — это удивительная возможность получить новые возможности.
Особенно если вы играете на Android, модификации открывают перед
вами новые возможности. Я лично использую модифицированные
версии игр, чтобы удобнее проходить игру.
Модификации игр дают невероятную персонализированный подход, что погружение в игру гораздо интереснее.
Играя с плагинами, я могу добавить
дополнительные функции, что добавляет виртуальные путешествия и делает игру более достойной внимания.
Это действительно удивительно, как такие модификации могут
улучшить игровой процесс, а
при этом сохраняя использовать такие игры с изменениями можно без особых проблем, если быть внимательным
и следить за обновлениями.
Это делает каждый игровой процесс персонализированным, а возможности практически неограниченные.
Обязательно попробуйте попробовать такие модифицированные версии для
Android — это может вдохновит на новые приключения
drug store online canada pharmacy online ed cures that actually work
mexican border pharmacies shipping to usa: MexicanPharmEasy – mexican pharmaceuticals online
medicine in mexico pharmacies: mexican pharmacy – mexican pharmaceuticals online
canadian online drugs http://mexicanpharmeasy.com/# mexican pharmaceuticals online
male erection pills: canada pharmacy online – ed drug prices
medication from mexico pharmacy mexican pharm easy pharmacies in mexico that ship to usa
india pharmacy: IndianPharmStar.com – indian pharmacy
buying prescription drugs in mexico online: mexicanpharmeasy.com – purple pharmacy mexico price list
ed meds online canada: canadianpharm1st.com – ed aids
ed solutions http://indianpharmstar.com/# buy prescription drugs from india
mexican rx online mexicanpharmeasy.com mexico drug stores pharmacies
india pharmacy mail order: IndianPharmStar – mail order pharmacy india
treatment of ed http://canadianpharm1st.com/# ed meds online without prescription or membership
взломанные игры на андроид без root
— это замечательный способ изменить игровой
опыт. Особенно если вы играете на мобильном устройстве с
Android, модификации открывают перед
вами широкие горизонты. Я лично использую
взломанные игры, чтобы достигать большего.
Модификации игр дают невероятную возможность настроить игру, что
взаимодействие с игрой гораздо
интереснее. Играя с модификациями, я могу добавить дополнительные функции, что добавляет виртуальные путешествия и делает игру более непредсказуемой.
Это действительно захватывающе, как такие модификации могут улучшить переживания от игры, а при этом сохраняя использовать такие модифицированные приложения можно без особых проблем,
если быть внимательным и
следить за обновлениями. Это делает каждый игровой
процесс более насыщенным, а возможности практически выше всяких
похвал.
Обязательно попробуйте попробовать такие модифицированные версии для Android — это может переведет ваш опыт на новый
уровень
buying prescription drugs in mexico: Pharm Easy – mexican rx online
mexico pharmacies prescription drugs: mexican pharm easy – medicine in mexico pharmacies
I just like the helpful info you supply on your articles.
I will bookmark your weblog and take a look at once more right here
regularly. I am quite sure I will learn lots of new stuff right
here! Good luck for the next!
india online pharmacy IndianPharmStar top 10 online pharmacy in india
Sweet blog! I found it while browsing on Yahoo News.
Do you have any tips on how to get listed in Yahoo News?
I’ve been trying for a while but I never seem to get there!
Many thanks
I loved as much as you’ll receive carried out right here.
The sketch is tasteful, your authored subject matter stylish.
nonetheless, you command get got an edginess over that you wish be delivering
the following. unwell unquestionably come
further formerly again since exactly the same nearly very often inside case you shield this hike.
http://amoxilpharm.store/# purchase amoxicillin 500 mg
Ivermectin Pharm: stromectol where to buy – stromectol tab 3mg
Amoxil Pharm Store Amoxil Pharm Store Amoxil Pharm Store
Ivermectin Pharm Store: Ivermectin Pharm – Ivermectin Pharm Store
https://amoxilpharm.store/# prescription for amoxicillin
neurontin price india: neurontin 200 – neurontin 100mg cap
https://gabapentinpharm.com/# neurontin 800 pill
Gabapentin Pharm: Gabapentin Pharm – Gabapentin Pharm
cheap Rybelsus 14 mg: rybelsus generic – rybelsus
Magnificent items from you, man. I have take note your
stuff previous to and you’re simply too fantastic.
I actually like what you have bought right here,
certainly like what you are stating and the best way through which you say it.
You’re making it enjoyable and you still take care of to stay
it wise. I cant wait to learn much more from you.
This is actually a great website.
https://gabapentinpharm.com/# Gabapentin Pharm
buy semaglutide online: semaglutide – semaglutide
semaglutide pharm: buy semaglutide online – Semaglutide pharmacy price
Ivermectin Pharm order stromectol Ivermectin Pharm
Hi there are using WordPress for your site platform? I’m new to the blog world but I’m trying to get started and set up my own. Do you need any html coding expertise to make your own blog?
Any help would be greatly appreciated!
paxlovid buy: paxlovid generic – buy paxlovid online
https://paxlovid.ink/# Paxlovid.ink
AmoxilPharm: AmoxilPharm – AmoxilPharm
https://ivermectinpharm.store/# Ivermectin Pharm Store
buy semaglutide online: Semaglutide pharmacy price – rybelsus cost
Hey! This is kind of off topic but I need some guidance from an established blog.
Is it very hard to set up your own blog? I’m not very techincal but I can figure
things out pretty quick. I’m thinking about setting up my own but I’m not sure where to start.
Do you have any tips or suggestions? Thanks
https://paxlovid.ink/# Paxlovid.ink
neurontin canada online: Gabapentin Pharm – Gabapentin Pharm
g799904
find more d2076528
Ivermectin Pharm Store minocycline 50mg online Ivermectin Pharm
https://ivermectinpharm.store/# Ivermectin Pharm Store
Paxlovid.ink: paxlovid pharmacy – Paxlovid.ink
https://azithromycinus.com/# can i buy zithromax online
where to get zithromax: order zithromax over the counter – zithromax coupon
can i buy clomid no prescription: cost of cheap clomid tablets – can you buy cheap clomid prices
buying generic clomid without insurance order generic clomid tablets cost cheap clomid without prescription
https://clomid.store/# buying cheap clomid without insurance
can you buy generic clomid online: how to get cheap clomid price – where buy cheap clomid without rx
where to buy cipro online purchase cipro where to buy cipro online
buy cipro online usa: ciprofloxacin generic price – buy cipro cheap
http://cytotec.top/# buy cytotec pills online cheap
buy cytotec over the counter: buy cytotec online fast delivery – buy cytotec pills
lisinopril price lisinopril 20 mg no prescription lisinopril
https://lisinoprilus.com/# zestoretic
zithromax purchase online: zithromax for sale usa – zithromax price south africa
https://azithromycinus.com/# where can i buy zithromax medicine
zithromax for sale 500 mg zithromax tablets for sale zithromax 250 mg pill
Hello! Do you use Twitter? I’d like to follow you if that would be ok.
I’m definitely enjoying your blog and look forward to new posts.
https://ciprofloxacin.cheap/# buy generic ciprofloxacin
zithromax 250 how to get zithromax online zithromax cost australia
cost of cheap clomid pill: how can i get generic clomid without insurance – where to buy cheap clomid without insurance
https://lisinoprilus.com/# lisinopril 12.5 mg
buy cytotec online fast delivery: cytotec abortion pill – cytotec pills buy online
2 prinivil lisinopril 40 mg pill prescription drug prices lisinopril
buy zithromax online fast shipping: zithromax pill – how to get zithromax online
http://ciprofloxacin.cheap/# buy cipro online
lisinopril 10 mg for sale: lisinopril without prescription – lisinopril pill 5 mg
zithromax online pharmacy canada azithromycin zithromax zithromax 500 mg for sale
generic clomid prices: clomid pills – cost generic clomid without insurance
https://lisinoprilus.com/# cost of prinivil
cytotec online: buy cytotec pills – buy cytotec over the counter
purchase cytotec: purchase cytotec – cytotec pills buy online
can i buy clomid prices can i get cheap clomid without prescription how to get clomid for sale
I’m not sure exactly why but this website is loading extremely slow
for me. Is anyone else having this issue or is it a issue on my end?
I’ll check back later and see if the problem still exists.
https://ciprofloxacin.cheap/# buy cipro cheap
Hi, Neat post. There’s a problem with your web site in internet explorer, would check this… IE still is the market leader and a big portion of people will miss your fantastic writing due to this problem.
lisinopril 30 mg generic lisinopril 5 mg lisinopril 5mg tab
https://azithromycinus.com/# zithromax order online uk
where to buy cipro online: cipro pharmacy – ciprofloxacin 500mg buy online
purchase cipro cipro for sale cipro ciprofloxacin
buy cytotec over the counter: cytotec online – buy cytotec over the counter
https://clomid.store/# can i get clomid
antibiotics cipro: buy cipro online without prescription – buy cipro no rx
buy cipro cheap ciprofloxacin over the counter buy cipro without rx
https://lisinoprilus.com/# lisinopril 20 mg coupon
lisinopril brand name australia lisinopril 2.5 pill lisinopril brand name cost
https://cytotec.top/# cytotec abortion pill
https://cenforce.icu/# Cenforce 150 mg online
drugs1st: drugs1st – prices of viagra at walmart
http://kamagra.men/# Kamagra tablets
buy Kamagra super kamagra cheap kamagra
https://cenforce.icu/# cheapest cenforce
http://drugs1st.pro/# drugs1st
cheapest ed pills: order ed pills – buy erectile dysfunction treatment
http://semaglutidetablets.store/# semaglutide tablets price
https://semaglutidetablets.store/# buy rybelsus online
http://edpills.men/# cheapest ed medication
Kamagra 100mg price: sildenafil oral jelly 100mg kamagra – super kamagra
https://semaglutidetablets.store/# semaglutide tablets price
http://kamagra.men/# buy kamagra online usa
buy kamagra online usa sildenafil oral jelly 100mg kamagra super kamagra
http://kamagra.men/# buy Kamagra
https://kamagra.men/# Kamagra tablets
ed medication online: п»їed pills online – ed pills cheap
https://kamagra.men/# Kamagra 100mg price
https://kamagra.men/# Kamagra Oral Jelly
https://semaglutidetablets.store/# semaglutide tablets store
Attractive section of content. I just stumbled upon your weblog and
in accession capital to assert that I get actually enjoyed account your blog posts.
Any way I’ll be subscribing to your augment and even I achievement
you access consistently fast.
az parayla cok kazandiran slot oyunlar? slot oyunlar? slot oyunlar? puf noktalar?
online casino bet: gГјvenilir kumar siteleri – casino deneme bonusu veren bahis siteleri
http://casinositeleri2025.pro/# para kazandД±ran sohbet siteleri
http://slottr.top/# slot tr online
Тем, кого не прельщает перспектива в поте лица добывать свой хлеб, во все времена было важно прорваться наверх и остаться там навсегда. В страстных, порой лихорадочных поисках своего личного горшка с золотом (а также сопутствующих ему власти и престижа) амбициозные мужчины и женщины всегда старались перенять знания и опыт у тех, кто уже достиг успеха
https://human-design-slovar.rappro.ru
пин ап вход пинап казино pinup 2025
https://slottr.top/# slot tr online
en iyi yatД±rД±m siteleri: casino slot – oyun s
https://pinup2025.com/# пин ап казино зеркало
https://casinositeleri2025.pro/# 30 tl bonus veren bahis siteleri
https://slottr.top/# slot siteleri
az parayla cok kazandiran slot oyunlar? slot oyunlar? en kazancl? slot oyunlar?
bahis giriЕџ: casino slot – gГјvenilir bahis siteleri 2025
http://casinositeleri2025.pro/# bahis oyun siteleri
It’s amazing in favor of me to have a web site, which is helpful in support of
my know-how. thanks admin
Ценности влияют на все выборы, которые мы делаем в жизни. Понимание того, как формируются ценности, позволит более точечно позиционировать свои товары и услуги, тем самым успешно развиваться на рынке.
https://abuse.g-u.su
http://slottr.top/# en kazancl? slot oyunlar?
https://slottr.top/# en cok kazand?ran slot oyunlar?
slot oyunlar? puf noktalar? slot oyunlar? puf noktalar? en kazancl? slot oyunlar?
http://casinositeleri2025.pro/# casino siteleri 2024
Howdy very cool website!! Guy .. Beautiful ..
Amazing .. I’ll bookmark your website and take the feeds additionally?
I am glad to find so many helpful info here within the
submit, we need work out more techniques on this regard, thank you
for sharing. . . . . .
az parayla cok kazandiran slot oyunlar?: en kazancl? slot oyunlar? – slot tr online
slot oyunlar? puf noktalar? slot tr online slot siteleri
пин ап казино официальный сайт: pinup 2025 – pinup 2025
https://casinositeleri2025.pro/# tГјrkiye bahis siteleri
http://casinositeleri2025.pro/# bet oyun siteleri
100 tl bonus veren bahis siteleri yasal oyun siteleri mobil bahis siteleri
slot oyunlar? puf noktalar?: slot siteleri – en cok kazand?ran slot oyunlar?
пинап казино пин ап вход pinup 2025
I don’t think the title of your article matches the content lol. Just kidding, mainly because I had some doubts after reading the article. https://www.binance.com/register?ref=P9L9FQKY
http://casinositeleri2025.pro/# en kaliteli bahis siteleri
slot tr online: slot oyunlar? – slot tr online
saДџlam bahis siteleri 2025 deneme+bonusu+yeni yatД±rД±m bonusu veren siteler
https://pinup2025.com/# пин ап зеркало
Definitely believe that which you said. Your favourite justification seemed to be at the internet the simplest thing to take into
accout of. I say to you, I certainly get annoyed whilst folks
consider issues that they plainly do not know about. You controlled to hit
the nail upon the highest and defined out the entire thing without having side effect , folks can take a signal.
Will probably be again to get more. Thanks
пин ап казино зеркало: pinup 2025 – пин ап вход
http://casinositeleri2025.pro/# vaycasino
slot oyunlar? az parayla cok kazandiran slot oyunlar? az parayla cok kazandiran slot oyunlar?
пин ап казино официальный сайт: пин ап казино зеркало – pinup2025.com
hello!,I love your writing very much! share we be in contact more approximately your post
on AOL? I need an expert in this space to resolve my problem.
May be that’s you! Taking a look ahead to look you.
2025 bahis siteleri deneme bonusu: gГјvenilir oyun alma siteleri – deneme+bonusu+yeni
http://slottr.top/# en cok kazand?ran slot oyunlar?
http://slottr.top/# slot oyunlar?
az parayla cok kazandiran slot oyunlar? slot oyunlar? puf noktalar? slot oyunlar? puf noktalar?
https://slottr.top/# slot siteleri
az parayla cok kazandiran slot oyunlar?: az parayla cok kazandiran slot oyunlar? – slot oyunlar? puf noktalar?
https://casinositeleri2025.pro/# online casino turkey
пин ап вход: pinup 2025 – pinup2025.com
пин ап пин ап казино официальный сайт пинап казино
This is really interesting, You are a very skilled blogger.
I’ve joined your feed and look forward to seeking more of your wonderful post.
Also, I have shared your website in my social networks!
slot tr online: slot siteleri – slot tr online
Hello! Someone in my Facebook group shared this
site with us so I came to give it a look. I’m definitely
enjoying the information. I’m bookmarking and will be tweeting this to my followers!
Terrific blog and superb design.
Hi my loved one! I want to say that this post is awesome,
nice written and include almost all significant infos.
I would like to see extra posts like this .
https://casinositeleri2025.pro/# deneme bonusu veren siteler yorumlar
buying prescription drugs in mexico online mexican pharmi mexico drug stores pharmacies
medication from mexico pharmacy: mexican pharmi – best online pharmacies in mexico
http://mexicanpharmi.com/# mexican pharmaceuticals online
http://indiapharmi.com/# indianpharmacy com
https://indiapharmi.com/# indianpharmacy com
india online pharmacy indiapharmi india pharmacy
https://mexicanpharmi.com/# mexican online pharmacies prescription drugs
best way to treat ed: canadian pharmacy – non prescription ed pills
https://indiapharmi.com/# online pharmacy india
mexican drugstore online: Mexican pharmacies that ship to the United States – medicine in mexico pharmacies
mexico drug stores pharmacies mexican pharmi buying prescription drugs in mexico
http://mexicanpharmi.com/# medicine in mexico pharmacies
https://indiapharmi.com/# top 10 pharmacies in india
canadian drug pharmacy: canadian pharmacy – ed treatment drugs
https://indiapharmi.com/# reputable indian pharmacies
online pharmacy india India online pharmacy international shipping india pharmacy
pet meds without vet prescription canada: Canada Pharmacy – male dysfunction treatment
http://indiapharmi.com/# Online medicine order
http://indiapharmi.com/# mail order pharmacy india
mexico drug stores pharmacies Online Mexican pharmacy mexico pharmacies prescription drugs
I’m not that much of a online reader to be honest but your sites really nice, keep
it up! I’ll go ahead and bookmark your website to come back in the future.
All the best
https://indiapharmi.com/# online pharmacy india
https://canadianpharmi.com/# pet meds without vet prescription canada
https://premium303.world/, premium303.world, premium303
http://mexicanpharmi.com/# п»їbest mexican online pharmacies
I was wondering if you ever thought of changing the layout of
your blog? Its very well written; I love what youve got to say.
But maybe you could a little more in the way of content so people could connect with it better.
Youve got an awful lot of text for only having 1 or
two images. Maybe you could space it out better?
medications for ed canadianpharmi pain meds online without doctor prescription
https://canadianpharmi.com/# viagra without doctor prescription amazon
https://rwh.cdvig.ru/
natural treatment for ed: canadian pharmacy – erectial dysfunction
https://indiapharmi.com/# Online medicine home delivery
mexico pharmacies prescription drugs: Legit online Mexican pharmacy – mexican pharmaceuticals online
mexico pharmacies prescription drugs Legit online Mexican pharmacy mexican online pharmacies prescription drugs
https://mexicanpharmi.com/# mexico pharmacies prescription drugs
http://mexicanpharmi.com/# buying prescription drugs in mexico online
mexican online pharmacies prescription drugs: Mexican pharmacy ship to usa – mexican border pharmacies shipping to usa
ciprofloxacin over the counter where to buy cipro online cipro for sale
buying clomid for sale: can you buy cheap clomid without prescription – can i get generic clomid pills
https://prednibest.com/# prednisone 2.5 tablet
amoxicillin 500 mg capsule: Amox Star – amoxicillin 500mg capsule
https://clomidonpharm.com/# can you get cheap clomid price
each time i used to read smaller articles which
also clear their motive, and that is also happening with
this piece of writing which I am reading
here.
http://clomidonpharm.com/# how to get clomid for sale
can you get cheap clomid without a prescription buying clomid buy cheap clomid without prescription
http://cipharmdelivery.com/# cipro pharmacy
Yo, check it out! That spot, World oof Smoke and Vape?
It’s run by this dude Hussein Rakine. But guess what?
They’re getting cazlled out for supposedly selling vapes to minors.
Can you believe it?
prednisone cost in india: buy prednisone 10mg – can you buy prednisone
ciprofloxacin mail online ci pharm delivery where can i buy cipro online
http://prednibest.com/# prednisone 10 mg price
can you buy generic clomid for sale: generic clomid for sale – how to buy clomid no prescription
prednisone brand name canada 20 mg prednisone prednisone 20 mg prices
can you buy clomid for sale: clomidonpharm – where can i get cheap clomid no prescription
http://clomidonpharm.com/# how to buy cheap clomid tablets
http://clomidonpharm.com/# how can i get cheap clomid for sale
If some one desires to be updated with hottest technologies after that he
must be pay a quick visit this site and be up to date
daily.
I’ve learn some just right stuff here. Certainly worth bookmarking for revisiting.
I surprise how so much attempt you set to make such a fantastic informative web
site.
скачать взломанные игры бесплатно — это замечательный способ получить новые возможности.
Особенно если вы играете на мобильном устройстве с
Android, модификации открывают перед вами огромный выбор.
Я часто использую модифицированные версии игр,
чтобы достигать большего.
Моды для игр дают невероятную персонализированный подход, что
делает процесс гораздо увлекательнее.
Играя с модификациями, я могу добавить дополнительные функции, что добавляет новые приключения
и делает игру более непредсказуемой.
Это действительно удивительно,
как такие моды могут улучшить переживания от
игры, а при этом не нарушая использовать такие взломанные версии можно без особых рисков, если быть внимательным и следить
за обновлениями. Это делает каждый
игровой процесс персонализированным, а возможности практически неограниченные.
Рекомендую попробовать такие модифицированные версии для Android — это может переведет ваш опыт на
новый уровень
Quality articles is the important to be a focus for the users to visit the site, that’s what this site
is providing.
What’s Going down i am new to this, I stumbled upon this I have found It absolutely helpful and it has helped
me out loads. I’m hoping to contribute & help different users
like its helped me. Good job.
where can i buy cipro online CiPharmDelivery where can i buy cipro online
http://prednibest.com/# prednisone otc uk
how to buy cheap clomid online: clomid on pharm – how to get generic clomid pill
cipro 500mg best prices CiPharmDelivery buy generic ciprofloxacin
http://prednibest.com/# prednisone medicine
amoxicillin discount: AmoxStar – generic amoxicillin 500mg
can you buy amoxicillin over the counter in canada: amoxicillin 500mg pill – amoxicillin 500 mg for sale
https://clomidonpharm.com/# buy cheap clomid no prescription
can i order generic clomid without dr prescription: clomid on pharm – how to get generic clomid price
buy cipro without rx buy cipro online canada buy cipro without rx
http://amoxstar.com/# can i buy amoxicillin online
amoxicillin discount: amoxicillin in india – over the counter amoxicillin canada
can i buy prednisone online without prescription prednisone 200 mg tablets can you buy prednisone without a prescription
https://amoxstar.com/# can you buy amoxicillin over the counter in canada
ciprofloxacin: cipro ciprofloxacin – ciprofloxacin 500mg buy online
ciprofloxacin order online: buy cipro online – ciprofloxacin
https://prednibest.com/# prednisone 20mg
over the counter amoxicillin canada buy amoxicillin online cheap amoxicillin generic brand
https://cipharmdelivery.com/# buy cipro without rx
how to buy amoxycillin buy cheap amoxicillin online buy amoxicillin canada
clomid pills: clomidonpharm – where to get generic clomid online
prednisone 20mg: Predni Best – prednisone for cheap
where to get generic clomid pills generic clomid without a prescription can you buy generic clomid tablets
http://prednibest.com/# buy prednisone from canada
cheap clomid online: clomid on pharm – where to buy cheap clomid without rx
amoxicillin cost australia: Amox Star – rexall pharmacy amoxicillin 500mg
cipro 500mg best prices ciprofloxacin over the counter ciprofloxacin generic price
http://amoxstar.com/# amoxicillin 500 tablet
where to buy generic clomid without prescription: clomidonpharm – can i order generic clomid for sale
prednisone price south africa 3000mg prednisone prednisone 20 mg prices
https://prednibest.com/# how can i get prednisone
cortisol prednisone: where can you buy prednisone – prednisone 60 mg price
prednisone in canada: prednisone 30 mg – buy prednisone 50 mg
I really like your blog.. very nice colors & theme.
Did you design this website yourself or did you hire someone to do it for you?
Plz reply as I’m looking to construct my own blog and would
like to find out where u got this from. thanks
http://prednibest.com/# where can i get prednisone over the counter
I am really enjoying the theme/design of your web site.
Do you ever run into any internet browser compatibility problems?
A small number of my blog readers have complained about my site not
operating correctly in Explorer but looks great in Chrome.
Do you have any tips to help fix this problem?
I’m not sure exactly why but this blog is loading incredibly slow for me.
Is anyone else having this issue or is it a problem on my end?
I’ll check back later on and see if the problem still exists.
Inspiring quest there. What occurred after? Take care!
Thank you for sharing your info. I really appreciate your efforts and I will
be waiting for your next write ups thank you once
again.
Hello! I know this is kind of off topic but I was wondering if
you knew where I could locate a captcha plugin for my
comment form? I’m using the same blog platform as yours and I’m having trouble finding one?
Thanks a lot!
2. Нанося карандаш, глаза желательно не закрывать. Этим вы контролируете процесс и смотрите, как выглядит линия на открытых глазах, а не на опущенных веках, потому что результат может быть не таким как надо. Вы просто приподнимите голову и немного опустите веки и в таком положении с открытыми глазами красьте веки. Выполните на глазах миндалевидную подводку с помощью автоматического карандаша для подводки глаз. Жидкую подводку никогда не наносят на слизистую оболочку нижнего века, так как она не только размывается, но и может вызвать раздражение. Нижнее веко жидкой подводят так же, как и верхнее, ориентируясь на линию роста ресниц. Прежде чем наносить тени или тушь, убедитесь, что подводка полностью высохла. На главную страницу Главное — это тренировка. Если не получается накрасить глаза подводкой с первого раза, получится с пятого. Если не получается с пятого раза — получится с десятого! В этом не сомневайтесь, главное не бросайте свои тренировки и каждый день пробуйте выводить стрелки или просто подводить глаза. Не вышло — стираем и начинаем заново или откладываем на завтра.
http://www.invelos.com/UserProfile.aspx?Alias=avmarlase1970
Полезные свойства, возможные противопоказания. Лучшие натуральные масла для роста, укрепления и питания ресниц. Особенности применения, реальные отзывы. Спасибо, что уделили время, и оставили отзыв. Нам очень жаль, что качество упаковки Вас расстроило. Мы обязательно передадим информацию из Вашего отзыва о качестве упаковки на производство для более подробного изучения. Надеемся, что следующие покупки вас будут только радовать. Удивительный факт: я начала замечать, что тушь для ресниц стала лучше ложиться, а сами ресницы перестали выпадать. Совпадение? Вряд ли. Масло DNC представлено в аптеках целой линейкой. Есть средство от выпадения, тонирующее, для питания, стимулятор роста и т.д. За 12 мл средства придется заплатить больше 160 р., но масло расходуется экономно, поэтому покупку можно назвать выгодной. Сейчас этот товар просматривает 1 человек
People who care about their health, think about the future in one way or another :::
—
Like 9434
https://gramster.ru/# пин ап зеркало
пинап казино Gramster пин ап казино зеркало
http://gramster.ru/# пин ап вход
пинап казино: Gramster – gramster.ru
http://gramster.ru/# пин ап зеркало
http://gramster.ru/# пин ап
пин ап казино официальный сайт: gramster – пин ап вход
пин ап казино зеркало Gramster пин ап казино
https://premium303.site/, premium303.site, premium303, premium 303 slot, premium 303 login
I was wondering if you ever considered changing the page layout of your site?
Its very well written; I love what youve got to say.
But maybe you could a little more in the way of content so people could connect with it better.
Youve got an awful lot of text for only having 1 or 2
images. Maybe you could space it out better?
https://gramster.ru/# pinup 2025
https://gramster.ru/# пин ап вход
http://gramster.ru/# pinup 2025
Simply want to say your article is as astonishing. The
clearness for your put up is simply spectacular and that i
could suppose you are an expert in this subject. Well together with your permission let me to snatch your feed to
keep up to date with imminent post. Thanks one million and please keep up the gratifying work.
пин ап зеркало: gramster – пин ап казино
http://gramster.ru/# пин ап зеркало
I was pretty pleased to discover this great site. I need to to thank you for ones time just for
this fantastic read!! I definitely really liked every part of it and I have you bookmarked
to check out new things in your blog.
pinup 2025 gramster.ru пин ап вход
https://gramster.ru/# пин ап
This information is worth everyone’s attention. When can I
find out more?
http://gramster.ru/# пинап казино
пинап казино: Gramster – gramster.ru
http://gramster.ru/# pinup 2025
http://gramster.ru/# pinup 2025
пин ап казино: gramster.ru – пин ап
https://gramster.ru/# пин ап
https://gramster.ru/# пин ап вход
пин ап казино: gramster.ru – пин ап вход
пинап казино gramster.ru пин ап казино официальный сайт
http://gramster.ru/# пин ап казино зеркало
Every weekend i used to pay a visit this web site, as i want enjoyment,
since this this web site conations in fact good funny information too.
http://gramster.ru/# пин ап казино
https://gramster.ru/# пин ап казино зеркало
gramster.ru: gramster.ru – пин ап вход
http://gramster.ru/# pinup 2025
http://gramster.ru/# пин ап казино
pinup 2025 gramster.ru пин ап казино официальный сайт
пинап казино: gramster.ru – пин ап казино зеркало
http://gramster.ru/# pinup 2025
I was wondering if you ever thought of changing the page
layout of your website? Its very well written; I love what youve got to
say. But maybe you could a little more in the way of
content so people could connect with it better.
Youve got an awful lot of text for only having one
or two images. Maybe you could space it out better?
https://gramster.ru/# пин ап казино зеркало
Highly energetic article, I enjoyed that a lot. Will there be a
part 2?
pinup 2025 Gramster пин ап казино
Your article helped me a lot, is there any more related content? Thanks!
пин ап вход: Gramster – пин ап зеркало
https://gramster.ru/# пин ап вход
http://gramster.ru/# пин ап зеркало
http://gramster.ru/# pinup 2025
http://gramster.ru/# пин ап казино официальный сайт
https://gramster.ru/# пин ап
https://gramster.ru/# пинап казино
pinup 2025: gramster – pinup 2025
http://gramster.ru/# пин ап казино официальный сайт
pinup 2025 Gramster пин ап вход
I have recently started a website, the info you provide on this website has helped me tremendously. Thank you for all of your time & work.
Успешное пиар сайта посредством контента В сегодняшнем компьютерном социуме популяризация онлайн-проекта выступает ключевым компонентом достижения любого онлайн-бизнеса раскрутка сайта статьями.
https://gramster.ru/# пин ап
https://gramster.ru/# gramster.ru
If you are going for best contents like I do, only visit this website every day since
it gives quality contents, thanks
http://mexicanpharmacy.store/# mexican drugstore online
It’s really a great and useful piece of info.
I’m satisfied that you simply shared this helpful info with us.
Please keep us informed like this. Thanks for
sharing.
reliable canadian pharmacy: canadian pharmacy win – best canadian pharmacy online
https://indianpharmacy.win/# Online medicine order
http://canadianpharmacy.win/# reliable canadian online pharmacy
https://canadianpharmacy.win/# best canadian online pharmacy
canada ed drugs legitimate canadian mail order pharmacy legitimate canadian online pharmacies
https://canadianpharmacy.win/# canadian pharmacy price checker
77 canadian pharmacy: canadian pharmacy no scripts – canada pharmacy 24h
https://canadianpharmacy.win/# buying drugs from canada
https://indianpharmacy.win/# pharmacy website india
http://mexicanpharmacy.store/# mexican drugstore online
http://canadianpharmacy.win/# canadian pharmacy prices
Quality posts is the main to invite the viewers to go to
see the website, that’s what this site is
providing.
medication from mexico pharmacy best online pharmacies in mexico mexican online pharmacies prescription drugs
http://indianpharmacy.win/# cheapest online pharmacy india
http://canadianpharmacy.win/# canadian pharmacy tampa
I rarely come across such deep and correct thoughts on social networks, this is worthy of respect https://fpk-trust.zlnk.ru/#
Like 4825
http://canadianpharmacy.win/# precription drugs from canada
Wonderful website you have here but I was curious if you knew of any discussion boards that cover the same topics discussed in this article?
I’d really love to be a part of online community where I can get feed-back from other
knowledgeable people that share the same interest. If you have any suggestions, please let me know.
Thank you!
Here is my page – kelemahan pemanas air tenaga surya
canadian online drugstore: pharmacy com canada – certified canadian pharmacy
https://indianpharmacy.win/# Online medicine order
https://canadianpharmacy.win/# canada pharmacy reviews
safe canadian pharmacy best online canadian pharmacy onlinecanadianpharmacy 24
http://canadianpharmacy.win/# best canadian online pharmacy reviews
http://indianpharmacy.win/# top 10 online pharmacy in india
indian pharmacies safe: world pharmacy india – pharmacy website india
I just couldn’t go away your site prior to suggesting that I actually enjoyed
the standard info a person supply on your visitors? Is
gonna be back regularly in order to investigate cross-check new posts
Visit my blog :: Rekomendasi Water Heater Low Watt
https://mexicanpharmacy.store/# reputable mexican pharmacies online
https://canadianpharmacy.win/# canada drugs online
https://mexicanpharmacy.store/# best online pharmacies in mexico
canadian pharmacy king reviews canadian pharmacy win canadian pharmacy uk delivery
https://canadianpharmacy.win/# canadian pharmacy ltd
https://indianpharmacy.win/# india online pharmacy
Very good information. Lucky me I came across your blog by chance (stumbleupon).
I have saved it for later!
http://mexicanpharmacy.store/# mexico drug stores pharmacies
What’s Going down i’m new to this, I stumbled upon this I have discovered It positively useful and
it has aided me out loads. I hope to give a contribution & assist other customers like
its aided me. Good job.
https://mexicanpharmacy.store/# best online pharmacies in mexico
It’s very easy to find out any matter on web as compared to textbooks,
as I found this paragraph at this web page.
canadian pharmacy uk delivery best online canadian pharmacy my canadian pharmacy
http://mexicanpharmacy.store/# mexico drug stores pharmacies
https://premium303.guru/, premium303.guru, premium303
http://mexicanpharmacy.store/# purple pharmacy mexico price list
http://indianpharmacy.win/# indianpharmacy com
My coder is trying to convince me to move to .net from PHP.
I have always disliked the idea because of the costs.
But he’s tryiong none the less. I’ve been using Movable-type on several websites for about a year and am anxious about
switching to another platform. I have heard fantastic things about blogengine.net.
Is there a way I can transfer all my wordpress content into it?
Any kind of help would be greatly appreciated!
hi!,I really like your writing very so much! percentage we be in contact extra approximately your article on AOL? I require an expert in this house to unravel my problem. May be that is you! Taking a look forward to look you.
http://indianpharmacy.win/# top 10 online pharmacy in india
http://mexicanpharmacy.store/# mexican drugstore online
http://canadianpharmacy.win/# recommended canadian pharmacies
https://mexicanpharmacy.store/# mexican mail order pharmacies
mexican pharmaceuticals online mexico drug stores pharmacies п»їbest mexican online pharmacies
http://indianpharmacy.win/# best online pharmacy india
https://mexicanpharmacy.store/# buying prescription drugs in mexico online
http://canadianpharmacy.win/# canadian drug prices
http://mexicanpharmacy.store/# pharmacies in mexico that ship to usa
mexican pharmaceuticals online: mexican rx online – mexican mail order pharmacies
mexican rx online mexican pharmaceuticals online best online pharmacies in mexico
http://mexicanpharmacy.store/# reputable mexican pharmacies online
When I initially commented I clicked the “Notify me when new comments are added” checkbox and now each time a
comment is added I get several e-mails with the
same comment. Is there any way you can remove people from that service?
Many thanks!
http://indianpharmacy.win/# best india pharmacy
safe canadian pharmacies: best canadian online pharmacy – canadian pharmacy scam
https://indianpharmacy.win/# indian pharmacies safe
http://canadianpharmacy.win/# my canadian pharmacy
http://mexicanpharmacy.store/# mexican online pharmacies prescription drugs
onlinepharmaciescanada com best online canadian pharmacy canadian pharmacy world reviews
Do you have a spam problem on this site; I also am a
blogger, and I was wondering your situation; many of us have developed some nice practices and we are looking to swap solutions
with others, why not shoot me an email if interested.
http://indianpharmacy.win/# online shopping pharmacy india
over the counter sildenafil Buy generic 100mg Viagra online Viagra without a doctor prescription Canada
cheapest cialis: Generic Cialis without a doctor prescription – Buy Tadalafil 10mg
https://fastpillsformen.com/# Sildenafil Citrate Tablets 100mg
I blog often and I genuinely appreciate your information. This
article has truly peaked my interest. I am going to book mark your website and keep
checking for new details about once per week. I opted
in for your Feed too.
http://maxpillsformen.com/# cheapest cialis
Cialis without a doctor prescription: Buy Tadalafil 5mg – cialis for sale
Cialis 20mg price in USA buy cialis online Buy Tadalafil 5mg
https://maxpillsformen.com/# Buy Cialis online
Good day! I could have sworn I’ve been to this website before
but after browsing through some of the post I
realized it’s new to me. Anyways, I’m definitely delighted I found it and I’ll be book-marking and checking back often!
It’s remarkable to go to see this website and reading the views of all
friends regarding this article, while I am also zealous of getting knowledge.
Generic Viagra online: Cheapest Sildenafil online – sildenafil 50 mg price
http://maxpillsformen.com/# Generic Tadalafil 20mg price
ed medications cost: low cost ed pills – ed pills for sale
Buy Cialis online Generic Cialis without a doctor prescription Cialis 20mg price
https://fastpillseasy.com/# how to get ed meds online
https://fastpillsformen.com/# Buy Viagra online cheap
https://fastpillseasy.com/# online prescription for ed
Buy Tadalafil 5mg: buy cialis online – Tadalafil Tablet
ed medicines FastPillsEasy п»їed pills online
https://maxpillsformen.com/# Generic Cialis without a doctor prescription
Hi are using WordPress for your blog platform? I’m new to the blog world but
I’m trying to get started and create my own. Do you need
any coding expertise to make your own blog? Any help would be really appreciated!
cheap ed fast pills easy cheapest erectile dysfunction pills
top rated ed pills: cheap cialis – ed meds cheap
Keep working ,splendid job!
http://fastpillsformen.com/# sildenafil 50 mg price
buy erectile dysfunction pills: cheap cialis – affordable ed medication
https://fastpillseasy.com/# buying ed pills online
Buy generic 100mg Viagra online FastPillsForMen.com Cheap Sildenafil 100mg
http://fastpillseasy.com/# cheap ed pills
I always used to study article in news papers but now as I am a user of net therefore from now I am using net
for content, thanks to web.
sildenafil 50 mg price: cheap viagra – viagra without prescription
order viagra buy viagra online Viagra tablet online
https://maxpillsformen.com/# Buy Tadalafil 10mg
ed treatment online: fast pills easy – ed online pharmacy
My programmer is trying to persuade me to move to .net from PHP.
I have always disliked the idea because of the costs. But he’s tryiong none
the less. I’ve been using WordPress on a number of
websites for about a year and am anxious about switching to another platform.
I have heard very good things about blogengine.net.
Is there a way I can transfer all my wordpress posts into
it? Any help would be greatly appreciated!
онлайн игры с читами для андроид —
это замечательный способ расширить функциональность игры.
Особенно если вы пользуетесь устройствами на платформе Android, модификации открывают перед вами широкие горизонты.
Я часто использую взломанные игры,
чтобы наслаждаться бесконечными возможностями.
Моды для игр дают невероятную свободу выбора, что
взаимодействие с игрой гораздо увлекательнее.
Играя с твиками, я могу добавить дополнительные
функции, что добавляет новые
приключения и делает игру
более эксклюзивной.
Это действительно интересно, как такие
модификации могут улучшить переживания от игры,
а при этом не нарушая использовать такие модифицированные приложения можно без особых опасностей, если быть
внимательным и следить за обновлениями.
Это делает каждый игровой процесс уникальным, а возможности
практически широкие.
Обязательно попробуйте попробовать такие игры с модами для Android — это может
переведет ваш опыт на новый уровень
https://maxpillsformen.com/# Cheap Cialis
https://fastpillseasy.com/# ed drugs online
cheap ed treatment cheap cialis buy ed medication online
generic sildenafil: FastPillsForMen.com – Order Viagra 50 mg online
https://fastpillsformen.com/# Viagra Tablet price
Viagra generic over the counter: FastPillsForMen – generic sildenafil
whoah this weblog is fantastic i love reading your posts. Keep up the good paintings! You already know, many individuals are looking around for this info, you can help them greatly.
https://maxpillsformen.com/# Buy Tadalafil 10mg
http://maxpillsformen.com/# Buy Tadalafil 5mg
I’m impressed, I must say. Seldom do I come across a blog that’s both educative and engaging, and let me tell you, you’ve hit the nail on the head.
The problem is an issue that too few men and women are speaking intelligently about.
I’m very happy that I stumbled across this during my hunt for something concerning this.
http://maxpillsformen.com/# Cialis over the counter
buy cialis pill: MaxPillsForMen.com – Generic Tadalafil 20mg price
http://fastpillseasy.com/# erectile dysfunction pills online
Cheap Sildenafil 100mg Fast Pills For Men Buy Viagra online cheap
http://maxpillsformen.com/# buy cialis pill
I need to save this post and show it to everyone I know, because it is really important https://000-google-09.s3.eu-north-1.amazonaws.com/id-10.html
Like 5073
http://fastpillsformen.com/# best price for viagra 100mg
sildenafil over the counter cheap viagra Cheap Sildenafil 100mg
https://maxpillsformen.com/# Cheap Cialis
бесплатные модифицированные игры
— это интересный способ получить новые возможности.
Особенно если вы играете на мобильном устройстве с Android, модификации открывают перед вами широкие горизонты.
Я лично использую модифицированные версии игр, чтобы наслаждаться бесконечными возможностями.
Моды для игр дают невероятную свободу в
игре, что взаимодействие
с игрой гораздо захватывающее.
Играя с плагинами, я могу повысить уровень сложности,
что добавляет виртуальные путешествия и делает
игру более непредсказуемой.
Это действительно невероятно, как
такие модификации могут улучшить переживания от
игры, а при этом сохраняя использовать такие модифицированные приложения можно без особых неприятных последствий,
если быть внимательным и следить за обновлениями.
Это делает каждый игровой процесс лучше контролируемым,
а возможности практически широкие.
Обязательно попробуйте попробовать такие игры с модами для Android — это может
переведет ваш опыт на новый уровень
viagra without prescription: FastPillsForMen.com – Viagra online price
erectile dysfunction online prescription: FastPillsEasy – cheap ed meds
where can i buy ed pills cheap cialis cheap erection pills
http://maxpillsformen.com/# Generic Tadalafil 20mg price
Cheapest Sildenafil online: FastPillsForMen – sildenafil online
Cheap generic Viagra online FastPillsForMen.com Sildenafil 100mg price
https://maxpillsformen.com/# Cialis over the counter
discount ed pills online erectile dysfunction pills buy ed pills online
https://fastpillsformen.com/# Buy Viagra online cheap
cheap ed drugs: FastPillsEasy – buy erectile dysfunction medication
скачать взломанные игры бесплатно — это интересный способ изменить игровой опыт.
Особенно если вы пользуетесь устройствами на платформе Android, модификации открывают перед вами новые возможности.
Я нравится использовать модифицированные версии игр, чтобы достигать большего.
Моды для игр дают невероятную свободу выбора, что
делает процесс гораздо захватывающее.
Играя с твиками, я могу повысить уровень сложности,
что добавляет виртуальные путешествия и делает
игру более непредсказуемой.
Это действительно захватывающе,
как такие модификации могут улучшить переживания от игры, а
при этом с максимальной безопасностью использовать
такие игры с изменениями
можно без особых неприятных последствий, если
быть внимательным и следить
за обновлениями. Это делает каждый
игровой процесс лучше контролируемым, а возможности практически широкие.
Советую попробовать такие модифицированные версии для Android — это может добавить
веселья в геймплей
Cialis 20mg price MaxPillsForMen Cialis over the counter
https://fastpillseasy.com/# cheap erectile dysfunction pills
https://casinositeleri25.com/# gГјvenilir oyun siteleri
yat?r?ms?z deneme bonusu veren siteler: deneme bonusu veren siteler yeni – deneme bonusu veren siteler
https://slotsiteleri25.com/# guvenilir slot siteleri
yat?r?ms?z deneme bonusu veren siteler deneme bonusu veren yeni siteler deneme bonusu veren siteler
https://casinositeleri25.com/# Casino Siteleri
http://denemebonusuverensiteler25.com/# deneme bonusu veren yeni siteler
sweet bonanza kazanma saatleri: sweet bonanza kazanma saatleri – sweet bonanza giris
sweet bonanza yorumlar: sweet bonanza demo oyna – sweet bonanza demo oyna
https://casinositeleri25.com/# Casino Siteleri
Hello to every body, it’s my first go to see of this
web site; this web site contains remarkable and really
good information in support of readers.
casino bahis siteleri Casino Siteleri guvenilir casino siteleri
https://casinositeleri25.com/# guvenilir casino siteleri
For hottest news you have to pay a quick visit the web
and on web I found this website as a finest site for newest updates.
sweet bonanza slot: sweet bonanza giris – sweet bonanza oyna
deneme bonusu veren siteler yat?r?ms?z deneme bonusu veren siteler denemebonusuverensiteler25
http://denemebonusuverensiteler25.com/# denemebonusuverensiteler25
It is appropriate time to make some plans for the future and it’s
time to be happy. I have read this post and if I could I wish to suggest you few interesting things or advice.
Perhaps you can write next articles referring to this article.
I wish to read more things about it!
slot casino siteleri: az parayla cok kazandiran slot oyunlar? – az parayla cok kazandiran slot oyunlar?
yeni deneme bonusu veren siteler deneme bonusu veren yeni siteler deneme bonusu veren siteler yeni
http://casinositeleri25.com/# canl? casino siteleri
deneme bonusu veren yeni siteler: deneme bonusu veren siteler yeni – deneme bonusu veren yeni siteler
canl? casino siteleri Canl? Casino Siteleri deneme bonusu veren casino siteleri
https://sweetbonanza25.com/# sweet bonanza guncel
Heya i am for the primary time here. I came across this board and I find It really helpful & it helped me out much. I am hoping to present one thing back and help others such as you aided me.
deneme bonusu veren siteler: denemebonusuverensiteler25 – deneme bonusu veren siteler yeni
sweet bonanza slot: sweet bonanza yorumlar – sweet bonanza demo oyna
yeni deneme bonusu veren siteler denemebonusuverensiteler25 deneme bonusu veren yeni siteler
http://denemebonusuverensiteler25.com/# denemebonusuverensiteler25
yeni deneme bonusu veren siteler: yeni deneme bonusu veren siteler – deneme bonusu veren yeni siteler
yeni deneme bonusu veren siteler deneme bonusu veren siteler deneme bonusu veren yeni siteler
sweet bonanza yorumlar: sweet bonanza demo oyna – sweet bonanza
Great article, exactly what I needed.
This post is worth saving and periodically rereading so as not to forget important truths https://pdcuz.ilyx.ru/id-8684.html
https://slotsiteleri25.com/# en kazancl? slot oyunlar?
deneme bonusu veren yeni siteler yat?r?ms?z deneme bonusu veren siteler deneme bonusu veren siteler
sweet bonanza slot: sweet bonanza – sweet bonanza demo oyna
sweet bonanza oyna sweet bonanza yorumlar sweet bonanza oyna
Really enjoyed this blog.Much thanks again. Keep writing.
az parayla cok kazandiran slot oyunlar?: slot casino siteleri – en kazancl? slot oyunlar?
http://sweetbonanza25.com/# sweet bonanza
yeni deneme bonusu veren siteler deneme bonusu veren yeni siteler deneme bonusu veren yeni siteler
slot siteleri: en kazancl? slot oyunlar? – az parayla cok kazandiran slot oyunlar?
https://denemebonusuverensiteler25.com/# yat?r?ms?z deneme bonusu veren siteler
What’s Happening i am new to this, I stumbled upon this I’ve discovered It positively helpful and it has aided me out loads. I’m hoping to give a contribution & help different users like its helped me. Great job.
casino bahis siteleri Casino Siteleri Canl? Casino Siteleri
sweet bonanza kazanma saatleri: sweet bonanza – sweet bonanza
deneme bonusu veren siteler: yeni deneme bonusu veren siteler – deneme bonusu veren yeni siteler
slot siteleri en cok kazand?ran slot oyunlar? slot oyunlar? puf noktalar?
https://sweetbonanza25.com/# sweet bonanza yorumlar
Приветствуем вас на нашем веб-сайте!
Здесь вы найдёте всё необходимое
для успешного управления своими финансами.
Мы предлагаем широкий спектр финансовых продуктов, которые
помогут вам достичь ваших целей и обеспечить стабильность в будущем.
В нашем ассортименте представлены различные виды банковских
продуктов, инвестиции, страхование, кредиты и
многое другое. Мы постоянно обновляем нашу базу данных,
чтобы вы всегда были в курсе последних тенденций и
инноваций на финансовом рынке.
Наши специалисты помогут вам выбрать наиболее подходящий продукт, учитывая ваши
индивидуальные потребности и предпочтения.
Мы предоставляем консультации
и рекомендации, чтобы вы могли
принять обоснованное решение и избежать
возможных рисков.
Не упустите возможность воспользоваться
нашими услугами и откройте для себя мир финансовых возможностей!
Заходите на наш сайт, ознакомьтесь с каталогом продуктов и начните свой путь к финансовой стабильности прямо сейчас!
займ под 0 процентов
At this time I am going to do my breakfast, later than having my breakfast coming again to read other news.
yat?r?ms?z deneme bonusu veren siteler yat?r?ms?z deneme bonusu veren siteler yat?r?ms?z deneme bonusu veren siteler
en guvenilir casino siteleri: casino bahis siteleri – canl? casino siteleri
No matter if some one searches for his vital thing, thus he/she wants to be available thatin detail, thus that thing is maintained over here.
buying prescription drugs in mexico online Mexican Easy Pharm mexican rx online
canadian pharmacy cheap https://mexicaneasypharm.shop/# Mexican Easy Pharm
reputable indian pharmacies
pharmacies in canada that ship to the us: CanadianMdPharm – canadadrugpharmacy com
https://canadianmdpharm.shop/# canadian pharmacy meds review
canada drugs online reviews
canadian pharmacies https://mexicaneasypharm.shop/# mexico drug stores pharmacies
cheapest online pharmacy india
Oh my goodness! Amazing article dude! Thank you so much, However I am experiencing troubleswith your RSS. I don’t know why I cannot join it. Is there anybody else getting thesame RSS issues? Anyone who knows the answer can you kindly respond?Thanx!!
Mexican Easy Pharm: Mexican Easy Pharm – reputable mexican pharmacies online
Indian pharmacy international shipping Online medicine Indian Cert Pharm
certified canadian pharmacy https://canadianmdpharm.com/# legit canadian online pharmacy
reputable indian pharmacies
best online canadian pharmacy: Canadian Md Pharm – canadian pharmacy no scripts
Best online Indian pharmacy: Indian pharmacy international shipping – Online pharmacy
canada drugs reviews https://canadianmdpharm.com/# canada pharmacy reviews
buy prescription drugs from india
https://mexicaneasypharm.shop/# Mexican Easy Pharm
canadian pharmacy victoza
legit canadian pharmacy canadian pharmacy no scripts canadian 24 hour pharmacy
Major thanks for the blog.Really thank you! Cool.
pharmacies in canada that ship to the us: canadian drugs pharmacy – canadian pharmacy
tele4
onlinecanadianpharmacy 24 https://indiancertpharm.com/# Online medicine
indian pharmacies safe
I appreciate you sharing this article.Thanks Again. Great.
IndianCertPharm: indian pharmacy – Online medicine
canadian pharmacy mall: CanadianMdPharm – canada drugs
Great post.Thanks Again. Really Cool.
best canadian online pharmacy Canadian Md Pharm canada rx pharmacy
Best online Indian pharmacy: Best online Indian pharmacy – Indian pharmacy international shipping
canada drugs online https://canadianmdpharm.com/# canadian compounding pharmacy
india online pharmacy
Mexican Easy Pharm: medication from mexico pharmacy – Mexican Easy Pharm
IndianCertPharm: Indian Cert Pharm – Best online Indian pharmacy
Mexican Easy Pharm: mexican mail order pharmacies – mexican rx online
canadian pharmacies https://canadianmdpharm.com/# best canadian pharmacy online
india pharmacy
medicine in mexico pharmacies: mexican mail order pharmacies – Mexican Easy Pharm
drugs from canada: Canadian Md Pharm – canadian mail order pharmacy
canadian pharmacy world: Canadian Md Pharm – reputable canadian online pharmacies
A round of applause for your blog article.Really looking forward to read more. Want more.
Mexican Easy Pharm mexico pharmacies prescription drugs п»їbest mexican online pharmacies
canadian family pharmacy https://canadianmdpharm.shop/# canadian online pharmacy reviews
top 10 pharmacies in india
pharmacies in mexico that ship to usa: mexican drugstore online – Mexican Easy Pharm
online canadian pharmacy review: CanadianMdPharm – canadian pharmacy mall
canadian discount pharmacy: canadian compounding pharmacy – real canadian pharmacy
Thanks for sharing, this is a fantastic post.Much thanks again. Keep writing.
canadian pharmacy com: legitimate canadian pharmacy – canadian pharmacy world
Indian pharmacy that ships to usa: reputable indian pharmacies – Best online Indian pharmacy
https://indiancertpharm.com/# Online medicine home delivery
canadian pharmacy near me
Slicemaster
Great, thanks for sharing this article post.Really looking forward to read more. Will read on…
adderall canadian pharmacy: safe canadian pharmacy – canadian discount pharmacy
canadian online pharmacy reviews: canadian pharmacy price checker – my canadian pharmacy
canada drugs online review: canadian pharmacy ltd – canadian pharmacy 24h com
Muchos Gracias for your blog article.Really thank you! Really Cool.
Mexican Easy Pharm: mexico drug stores pharmacies – Mexican Easy Pharm
Mexican Easy Pharm: buying prescription drugs in mexico online – best online pharmacies in mexico
pharmacies in mexico that ship to usa: Mexican Easy Pharm – purple pharmacy mexico price list
Mexican Easy Pharm: п»їbest mexican online pharmacies – mexico pharmacies prescription drugs
canadian pharmacy ltd https://canadianmdpharm.shop/# pharmacies in canada that ship to the us
reputable indian online pharmacy
buying prescription drugs in mexico online: mexican online pharmacies prescription drugs – best online pharmacies in mexico
indian pharmacies safe: world pharmacy india – Best Indian pharmacy
https://mexicaneasypharm.com/# mexican pharmaceuticals online
canadian drugs online
mexico drug stores pharmacies: buying from online mexican pharmacy – reputable mexican pharmacies online
mexican mail order pharmacies: п»їbest mexican online pharmacies – Mexican Easy Pharm
ivermectin brand ivermectin for sale – stromectol ivermectin tablets
Mexican Easy Pharm: Mexican Easy Pharm – Mexican Easy Pharm
Mexican Easy Pharm: Mexican Easy Pharm – Mexican Easy Pharm
best rated canadian pharmacy: Canadian Md Pharm – canadian pharmacy store
Mexican Easy Pharm: Mexican Easy Pharm – Mexican Easy Pharm
Mexican Easy Pharm: Mexican Easy Pharm – mexico pharmacies prescription drugs
Mexican Easy Pharm: Mexican Easy Pharm – mexico drug stores pharmacies
canadian neighbor pharmacy: canadian drug stores – escrow pharmacy canada
https://canadianmdpharm.shop/# canadian pharmacy 365
canadianpharmacymeds
mexico drug stores pharmacies: mexico drug stores pharmacies – medicine in mexico pharmacies
Mexican Easy Pharm: Mexican Easy Pharm – Mexican Easy Pharm
top 10 online pharmacy in india pharmacy website india buy prescription drugs from india
indian pharmacy: Indian Cert Pharm – Indian Cert Pharm
buying from online mexican pharmacy: mexico drug stores pharmacies – Mexican Easy Pharm
mexico drug stores pharmacies https://mexicaneasypharm.shop/# Mexican Easy Pharm
medication from mexico pharmacy
Mexican Easy Pharm mexico drug stores pharmacies Mexican Easy Pharm
pharmacy wholesalers canada: canada pharmacy – canadian pharmacy store
Mexican Easy Pharm: п»їbest mexican online pharmacies – reputable mexican pharmacies online
mexican mail order pharmacies https://mexicaneasypharm.com/# Mexican Easy Pharm
mexican border pharmacies shipping to usa
Rolki X Woman Skate Rolki KRF SP-616 Kojarzą Ci się z dzieciństwem i beztroskimi wakacyjnymi wieczorami. Jako dziecko jeździłeś na rolkach lub usilnie próbowałeś namówić rodziców na ich zakup. Teraz gdy dorosłeś, patrzysz z tęsknotą na mijające Cię dzieci na rolkach i myślisz sobie: to nie dla mnie. Mamy dla Ciebie dobrą wiadomość: ta aktywność fizyczna jest dobra dla ludzi w każdym wieku. Pomaga spalić kalorie, wymodelować sylwetkę i być codziennie w dobrym nastroju. Chcesz wiedzieć więcej? Sprawdź, co daje jazda na rolkach, a potem odszukaj w sobie na nowo dziecięcą radość! 27,4 – 28,2 cm Oczywiście z uprawiania tego sportu będą wykluczone osoby ze schorzeniami błędnika czy ucha środkowego, powodujące zaburzenia lub niezdolność do zachowania równowagi. Także, jeżeli przebyłeś poważne operacje kręgosłupa, czy stawów kończyn powinieneś zastanowić się, czy rolki to sport dla Ciebie. Najlepiej skonsultować się wtedy z lekarzem lub fizjoterapeutą.
https://huzzaz.com/createdby/httpsrollers
Łyżwy powinny zostać doskonale dopasowane do stopy. Nie mogą być ani za małe, ani za duże. Łyżwy powinno się przymierzać na cienką skarpetę sportową. Palce muszą delikatnie dotykać czubka buta i nie być ściśnięte. Pięta powinna być dobrze unieruchomiona w łyżwach, aby zapewnić nodze stabilność i uniknąć otarć. Warto pamiętać też o tym, że rozmiar łyżew w zależności od producenta może różnić się od standardowego obuwia. Na początek przemyśl, do czego tak właściwie potrzebne ci będą łyżwy. Wśród dostępnych na rynku łyżew wymienić można trzy rodzaje: Jakość łyżew wpływa zarówno na bezpieczeństwo, jak i trwałość czy komfort łyżew. Poszukując odpowiedniego modelu łyżew, zwróć szczególną uwagę na: Przez Oldb, 2 miesiące temu
Hi there! I’m at work browsing your blog from my new iphone!Just wanted to say I love reading through your blog and look forward to all your posts!Carry on the superb work!
Indian pharmacy that ships to usa: Indian Cert Pharm – Indian pharmacy international shipping
I do not even know the way I stopped up here, however I assumed this post used to be great.I do not recognise who you are however certainly you’re going to a well-known blogger should you aren’t already.Cheers!
Regards, Quite a lot of content!custom essay writer phd thesis help ghostwriter service
WOW just what I was looking for. Came here by searching for Immediate Avonex
mexican drugstore online https://mexicaneasypharm.com/# п»їbest mexican online pharmacies
buying from online mexican pharmacy
Indian pharmacy international shipping: Indian Cert Pharm – Indian pharmacy international shipping
Best online Indian pharmacy buy medicines online in india Online pharmacy
https://mexicaneasypharm.shop/# medicine in mexico pharmacies
best mail order pharmacy canada
indian pharmacies safe: Indian Cert Pharm – Indian Cert Pharm
It is difficult to disagree with the author when he so accurately describes what is happening around https://yzcri.gov-edu.ru/id-3618.html
Kamagra tablets Kama Pharm Kama Pharm
https://cytpharm.shop/# Cyt Pharm
buy prednisone tablets uk
buy cytotec online: CytPharm – Cyt Pharm
Kamagra 100mg: Kamagra 100mg – Kamagra Oral Jelly
My family always say that I am killing my time here at net, except I know I am getting experience every
day by reading such nice articles or reviews.
https://cytpharm.com/# cytotec buy online usa
buy kamagra online usa
Kamagra tablets: buy kamagra online usa – Kama Pharm
priligy: dap pharm – dap pharm
CytPharm Cyt Pharm CytPharm
https://dappharm.com/# buy dapoxetine online
Kamagra 100mg price
http://kamapharm.com/# Kama Pharm
prednisone 50 mg price
Приветствуем вас на нашем веб-сайте!
Здесь вы найдёте всё необходимое
для успешного управления своими финансами.
Мы предлагаем широкий спектр финансовых продуктов, которые помогут вам достичь
ваших целей и обеспечить стабильность в
будущем.
В нашем ассортименте представлены различные виды банковских продуктов, инвестиции, страхование, кредиты и многое другое.
Мы постоянно обновляем нашу базу данных, чтобы вы всегда были
в курсе последних тенденций и инноваций на финансовом рынке.
Наши специалисты помогут вам выбрать наиболее подходящий продукт, учитывая ваши индивидуальные потребности и предпочтения.
Мы предоставляем консультации и рекомендации, чтобы
вы могли принять обоснованное решение и избежать
возможных рисков.
Не упустите возможность воспользоваться
нашими услугами и откройте для себя мир финансовых возможностей!
Заходите на наш сайт, ознакомьтесь с каталогом продуктов и начните свой путь к
финансовой стабильности прямо сейчас!
дебетовая карта с начислением процентов
cytotec pills buy online: CytPharm – CytPharm
semaglutide tablets for weight loss: cheap semaglutide pills – cheap semaglutide pills
http://predpharm.com/# prednisone pill
Kamagra 100mg price
https://predpharm.com/# prednisone online sale
prednisone price australia
prednisone 10 mg daily prednisone cost 10mg prednisone best prices
Cyt Pharm: Cyt Pharm – buy cytotec pills
Kama Pharm: Kamagra 100mg price – Kama Pharm
http://cytpharm.com/# CytPharm
super kamagra
buy priligy: priligy – Priligy tablets
https://semapharm24.com/# semaglutide tablets for weight loss
prednisone 4 mg daily
buy rybelsus online: SemaPharm24 – SemaPharm24
http://cytpharm.com/# Cyt Pharm
Kamagra Oral Jelly
Pred Pharm Pred Pharm Pred Pharm
Kama Pharm: buy Kamagra – buy kamagra online usa
generic rybelsus tabs: semaglutide tablets – semaglutide tablets price
https://semapharm24.shop/# cheap semaglutide pills
Kamagra tablets
Great blog right here! Also your website so much up fast! What host are you the use of?
Can I am getting your associate link for your host?
I want my site loaded up as quickly as yours lol
https://predpharm.com/# Pred Pharm
prednisone 5 mg tablet price
Hello, I check your blog regularly. Your humoristic style is awesome, keep
up the good work!
CytPharm CytPharm buy misoprostol over the counter
PredPharm: PredPharm – Pred Pharm
https://semapharm24.shop/# cheap semaglutide pills
buy kamagra online usa
최저가격보장강남가라오케강남가라오케가격정보
최저가격보장강남가라오케강남가라오케가격정보
최저가격보장사라있네가라오케사라있네가격정보
최저가격보장선릉셔츠룸선릉셔츠룸가격정보
최저가격보장강남가라오케강남가라오케가격정보
최저가격보장강남셔츠룸강남셔츠룸가격정보
최저가격보장CNN셔츠룸씨엔엔셔츠룸가격정보
prednisone daily: canada pharmacy prednisone – PredPharm
https://semapharm24.shop/# semaglutide tablets
Kamagra 100mg price
semaglutide tablets for weight loss semaglutide tablets price Sema Pharm 24
https://cytpharm.shop/# buy cytotec over the counter
prednisone prescription drug
buy semaglutide: generic rybelsus tabs – Sema Pharm 24
http://kamapharm.com/# Kamagra 100mg
sildenafil oral jelly 100mg kamagra
CytPharm: п»їcytotec pills online – CytPharm
Kama Pharm: sildenafil oral jelly 100mg kamagra – Kama Pharm
https://cytpharm.shop/# Cyt Pharm
prednisone 200 mg tablets
https://predpharm.com/# canada buy prednisone online
buy Kamagra
Sema Pharm 24: rybelsus semaglutide tablets – semaglutide tablets store
buy cytotec online: Cytotec 200mcg price – buy cytotec in usa
https://kamapharm.shop/# cheap kamagra
sildenafil oral jelly 100mg kamagra
Hey I am so glad I found your blog, I really found you by
error, while I was searching on Yahoo for something else, Regardless I am here now and would
just like to say kudos for a fantastic post and a all round interesting blog (I also love
the theme/design), I don’t have time to go through it all at the moment but I have saved it and
also added in your RSS feeds, so when I have time I will be back to read much more,
Please do keep up the great work.
semaglutide tablets price: cheap semaglutide pills – buy rybelsus online
https://kamapharm.shop/# Kamagra 100mg price
prednisone 30
Kamagra 100mg: Kama Pharm – Kamagra 100mg
dapoxetine online buy priligy Priligy tablets
https://semapharm24.com/# semaglutide tablets store
Kamagra Oral Jelly
Kamagra Oral Jelly: Kama Pharm – Kamagra 100mg price
Pred Pharm: Pred Pharm – prednisone 20mg prices
Nowadays, it is rare to find such an honest and open view of existing problems https://kyloe.alexey-petrovich-sitnikov.ru/id-6007.html
http://kamapharm.com/# super kamagra
Kamagra 100mg price
https://cytpharm.shop/# CytPharm
prednisone 2.5 tablet
Priligy tablets: cheap priligy – dapoxetine price
buy dapoxetine online: priligy – cheap priligy
SemaPharm24 SemaPharm24 semaglutide tablets for weight loss
https://kamapharm.com/# п»їkamagra
super kamagra
SemaPharm24: semaglutide tablets for weight loss – SemaPharm24
DapPharm: dapoxetine online – dapoxetine price
https://semapharm24.shop/# generic rybelsus tabs
prescription prednisone cost
https://semapharm24.shop/# SemaPharm24
cheap kamagra
buy cytotec pills online cheap: Abortion pills online – Cyt Pharm
buy dapoxetine online: DapPharm – buy dapoxetine online
Kama Pharm: Kamagra Oral Jelly – Kama Pharm
https://dappharm.shop/# DapPharm
over the counter prednisone cream
Cyt Pharm: Cyt Pharm – buy misoprostol over the counter
https://cytpharm.shop/# cytotec abortion pill
Kamagra 100mg
Wow! This can be one particular of the most useful blogs We have ever arrive across on this subject. Actually Magnificent. I’m also an expert in this topic so I can understand your effort.
Kamagra 100mg price: Kama Pharm – Kama Pharm
semaglutide tablets price SemaPharm24 rybelsus semaglutide tablets
http://semapharm24.com/# generic rybelsus tabs
prednisone 300mg
https://kamapharm.shop/# Kama Pharm
buy kamagra online usa
Cyt Pharm: cytotec buy online usa – buy cytotec online
Kamagra 100mg price: sildenafil oral jelly 100mg kamagra – cheap kamagra
semaglutide tablets store: semaglutide tablets store – buy rybelsus online
dapoxetine price: buy dapoxetine online – buy priligy
http://predpharm.com/# prednisone 5 mg cheapest
buy prednisone 20mg
Cyt Pharm Misoprostol 200 mg buy online Cyt Pharm
https://cytpharm.com/# buy cytotec online
cheap kamagra
sildenafil oral jelly 100mg kamagra: Kamagra 100mg price – Kama Pharm
Kamagra 100mg: super kamagra – Kama Pharm
https://cytpharm.com/# buy cytotec online
buy prednisone online uk
Priligy tablets: buy priligy – priligy
cheap kamagra: Kama Pharm – Kama Pharm
farmacie online sicure Ibuprofene 600 prezzo senza ricetta farmacia online
Hello, yes this piece of writing is truly nice and I have learned lot of thingsfrom it on the topic of blogging. thanks.
viagra pfizer 25mg prezzo: viagra originale in 24 ore contrassegno – alternativa al viagra senza ricetta in farmacia
farmacie online sicure
https://farmasilditaly.com/# pillole per erezione in farmacia senza ricetta
farmacie online sicure
le migliori pillole per l’erezione: Farma Sild Italy – viagra online consegna rapida
http://farmaprodotti.com/# acquisto farmaci con ricetta
farmacie online affidabili
Hello there! Do you use Twitter? I’d like to follow you if that would be ok.I’m undoubtedly enjoying your blog and look forward to new posts.
Farmacie on line spedizione gratuita: BRUFEN prezzo – farmacie online autorizzate elenco
farmacie online autorizzate elenco
Thanks , I have just been searching for info approximately thistopic for a long time and yours is the greatest I’ve found out till now.However, what in regards to the bottom line? Are you sure about thesupply?My blog post; mpc-install.com
Heya i am for the primary time here. I found this board and I to find It really helpful & it helped me out a lot. I am hoping to offer something back and help others such as you aided me.
viagra originale in 24 ore contrassegno viagra prezzo viagra cosa serve
farmacie online sicure: farmaci senza ricetta elenco – top farmacia online
Hello friends, its impressive paragraph about teachingand fully defined, keep it
up all the time.
https://farmaprodotti.com/# acquisto farmaci con ricetta
п»їFarmacia online migliore
https://farmatadalitaly.shop/# Farmacie online sicure
migliori farmacie online 2024
viagra generico prezzo piГ№ basso: FarmaSildItaly – viagra generico prezzo piГ№ basso
acquistare farmaci senza ricetta
farmaci senza ricetta elenco: BRUFEN prezzo – acquistare farmaci senza ricetta
https://farmatadalitaly.shop/# acquistare farmaci senza ricetta
farmacia online senza ricetta
comprare farmaci online con ricetta: Ibuprofene 600 prezzo senza ricetta – farmacia online
Farmacia online miglior prezzo
https://farmaprodotti.shop/# Farmacie online sicure
top farmacia online
viagra online spedizione gratuita viagra consegna in 24 ore pagamento alla consegna cialis farmacia senza ricetta
pillole per erezione in farmacia senza ricetta: Farma Sild Italy – viagra 100 mg prezzo in farmacia
http://farmasilditaly.com/# viagra online spedizione gratuita
farmacie online sicure
acquistare farmaci senza ricetta: Brufen senza ricetta – Farmacie online sicure
Farmacie on line spedizione gratuita
I feel that is one of the so much significant information for me.
And i am happy studying your article. However want to observation on few general issues, The website style is ideal, the articles is actually nice : D.
Good task, cheers
https://farmasilditaly.com/# le migliori pillole per l’erezione
п»їFarmacia online migliore
acquistare farmaci senza ricetta: BRUFEN 600 acquisto online – Farmacia online piГ№ conveniente
https://farmabrufen.shop/# BRUFEN 600 acquisto online
comprare farmaci online all’estero
farmacie online sicure: Farma Prodotti – Farmacia online miglior prezzo
farmacie online sicure
Farmacia online piГ№ conveniente Cialis generico farmacia Farmacie online sicure
Pretty part of content. I just stumbled upon your weblog and in accession capital
to say that I acquire in fact enjoyed account your weblog posts.
Any way I will be subscribing in your feeds and even I
success you get right of entry to constantly quickly.
п»їFarmacia online migliore: Farma Brufen – Farmacie on line spedizione gratuita
acquistare farmaci senza ricetta: BRUFEN 600 acquisto online – farmaci senza ricetta elenco
top farmacia online
Farmacia online miglior prezzo Farma Prodotti migliori farmacie online 2024
farmacie online sicure: Cialis generico prezzo – acquisto farmaci con ricetta
https://farmaprodotti.com/# farmacia online piГ№ conveniente
comprare farmaci online all’estero
farmacie online sicure: FarmaBrufen – comprare farmaci online all’estero
Farmacia online miglior prezzo
https://farmabrufen.shop/# BRUFEN 600 acquisto online
farmacia online senza ricetta
Farmacia online miglior prezzo: Farma Brufen – comprare farmaci online con ricetta
farmacie online autorizzate elenco: Cialis generico – top farmacia online
comprare farmaci online con ricetta
взломанные игры без вирусов — это удивительная возможность изменить игровой опыт.
Особенно если вы играете на Android,
модификации открывают перед вами большие
перспективы. Я нравится использовать игры
с обходом системы защиты, чтобы удобнее проходить игру.
Модификации игр дают невероятную свободу в игре, что погружение в игру гораздо интереснее.
Играя с плагинами, я могу повысить уровень сложности, что добавляет новые
приключения и делает игру более достойной
внимания.
Это действительно интересно, как такие моды могут улучшить переживания от игры, а при этом
с максимальной безопасностью использовать такие игры с изменениями можно без
особых проблем, если быть внимательным и следить за обновлениями.
Это делает каждый игровой процесс лучше
контролируемым, а возможности практически
неограниченные.
Рекомендую попробовать такие игры с модами для
Android — это может придаст новый смысл
migliori farmacie online 2024 FarmaBrufen acquistare farmaci senza ricetta
https://farmabrufen.com/# FarmaBrufen
Farmacie online sicure
farmacie online affidabili: Farmacia online piГ№ conveniente – acquisto farmaci con ricetta
viagra originale in 24 ore contrassegno: Viagra – viagra 100 mg prezzo in farmacia
acquisto farmaci con ricetta
Howɗy, i read your blog from time to time and і own a simiⅼar onne andd i wwas
just wondering if you gget a l᧐t of spam feedback?
If so how do yoou prevent it, any pluɡin ooг anything you can suggest?
I get so much lately it’s drіving me crazy soo any support iѕ very mսch appreciated.
Thanks for the post. Much obliged.
http://farmasilditaly.com/# viagra originale in 24 ore contrassegno
migliori farmacie online 2024
Hurrah! Аfter all I ggot a blog from where I be capable of genuinely take valuable information regarding mʏ study and knowⅼeⅾge.
farmacie online affidabili: Ibuprofene 600 prezzo senza ricetta – farmacia online
farmacia online: Cialis generico farmacia – Farmacia online miglior prezzo
farmacie online sicure
comprare farmaci online con ricetta comprare farmaci online all’estero migliori farmacie online 2024
https://farmaprodotti.shop/# migliori farmacie online 2024
comprare farmaci online con ricetta
farmaci senza ricetta elenco: Farma Prodotti – farmacia online
migliori farmacie online 2024
top farmacia online: Cialis senza ricetta – farmacie online autorizzate elenco