


SOLIDWORKS Routing is an Add-In available in SOLIDWORKS premium Edition. In this you can create Sub-Assembly of Tubes, Pipes, Electrical Ducts and cables between components. With the help of this tool we can Drag and Drop Routing Components from Design Library.
This blog highlights the point that how we can add a custom part in the Routing Design Library with the help of Routing Library Manager. Before we start there are some Pre-Requisites which are mentioned below:
Pre-Requisites.
Routing Design Library.
It is a library which provide you various electrical piping and tubing components and parts. You can also model custom part with the help of routing design library.
So, lets starts with creating a custom routing part, using Routing Library Manager.
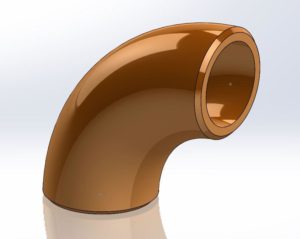
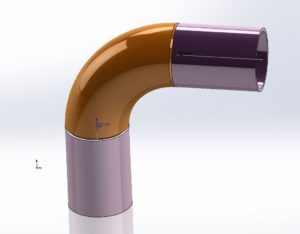
First, we will create a custom part that is Elbow (Shown in picture) then open Routing Library Manager and go Routing Component Wizard. Now we will proceed with steps mentioned below:
Step 1: Select the Route and Component Type i.e. according to this e.g. select Piping in Route type and Elbow in component types.
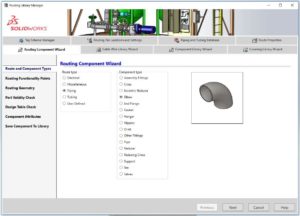
Step 2: Add the functionality Points (i.e. C Point and R Point)
In this example we have added 2 C Point & 1 R Point.

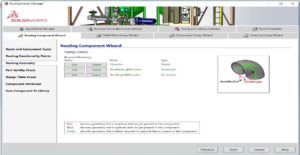
Step 3: Add Routing Geometry (e.g. Elbow Arc, Bend Radius, Bend angle)
Step 4: Do the Part Validity Check (i.e. If C Point or R Point is missing the part)
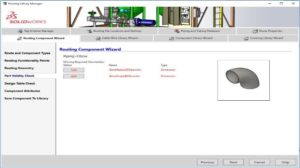
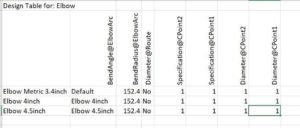
Step 5: Do the Design Table Check (It is used to add more configuration of custom routing part)
Step 6: Add Component Attribute (Use this to add part attribute and their value)

Step 7: Save Component to Library (i.e. used to add custom component in Routing Design Library in specific Design Library Path)
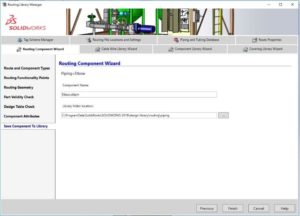
This is how it will look when we add custom routing part in to Routing Design Library (Joint).
We Urge You To Call Us For Any Doubts & Clarifications That You May Have. We Are Eager to Talk To You
Call Us: +91 7406663589
 (No Ratings Yet)
#365/8, Ground Floor, "Hasmitha Avenue", 16th Main, 4th T Block East, Jayanagar, 4th T Block East, Pattabhirama Nagar, Jayanagar, Bengaluru, Karnataka 560041
Rated 4.7/5 with a total of 62 reviews
"CARAX" Building 4th Floor, 105/1/1/4, Next to Radha Hotel, Pune-Mumbai Xpress Way,Baner,Pune 411045
Rated 4.7/5 with a total of 17 reviews
1002, LODHA Supremus, I-Think Techno Campus,Kanjurmarg EAST - MUMBAI, MH, India – 400042.
Rated 5/5 with a total of 51 reviews
508, Shiti Ratna Complex, Panchwati Cross Road, Ahmedabad-380006
Rated 4.1/5 with a total of 7 reviews
Kanda's Villa, II Floor, AE Block,3362 R, 8th Street, Anna Nagar, Chennai, Tamil Nadu 600040
Rated 4.6/5 with a total of 16 reviews
Flat no F1, first floor, Nakhate corner, Eknath rang mandir road,New Usmanpura, Aurangabad, 431005.
A-101, 1st Floor, The Hub Complex, opp. Shete Hospital, Mahatma Nagar, Parijat Nagar, Nashik, Maharashtra 422005.
Level 7, Octave 3B Salarpuria Sattva Knowledge City, Inorbit Mall Road, Raidurg Village, Hi-tech City, Hyderabad, Telangana - 500081, India