


Welcome to BEACON’s Blog section. Today we will be looking at one of the PDM features called “Branch and Merge”. Before we dig deeper into this feature and understand what is this feature? And how is it useful to anyone working with PDM and Design? Let’s answer the question what is a concept?
Design and Engineering are all about finding innovative ways to refine existing designs or solve the problems in the world and make life simpler and easy. And the path to innovation begins with an idea or a concept. Now with the new Branch and Merge capability of SOLIDWORKS PDM this task is a breeze.
Concept Design
Concept designs are the initial design that has been developed from an idea, and during this, we all know that there are many iterations the concept goes through, with every stage bringing in new constraints and design improvements.
We all can agree that the conventional method of working with Concepts, is making multiple copies for all the variations we want to try out. But commonly we will face these challenges with this method, firstly all those duplicates that have been scraped become junk data, and secondly, there is no reference to the parent data. Thus, requiring us the users, to keep track of all those duplicate files and spend our valuable time of design and innovation on keeping track of the various concepts and letting others know of the parent file and the validated concept design.
These challenges can be solved with ease using the Branch and Merge function of the PDM.

Fig 1: This image shows the conventional method of storing concepts in various files & folders and tracking using excel
What’s Branch and Merge?
The branch is the feature in PDM that allows us to make copies of the design but still holds the reference to the parent file, from which it was extracted. Regardless of its release state, parts, assemblies, or drawings can be branched, and their structure is recognized. The destination folder can be defined, as well as a prefix or suffix for the filename, and individual files can be included or excluded from the branch.
The branched file is identical to its source. Here 4 branches have been created and refined. When you decide on the preferred design, it can be easily merged back. SOLIDWORKS PDM recognizes the source file and merges it as a new version, even if the source file was renamed or moved. When the assembly is opened, we can see that the refined design is in place. Now, with the new branch and merge tool, error- prone copy, change and overwrite techniques are no longer needed.
Here we have a cupboard assembly design, in which we will be taking the door part file and developing the concepts, and see-through how the branch and merge can help us to develop and finalize our design.
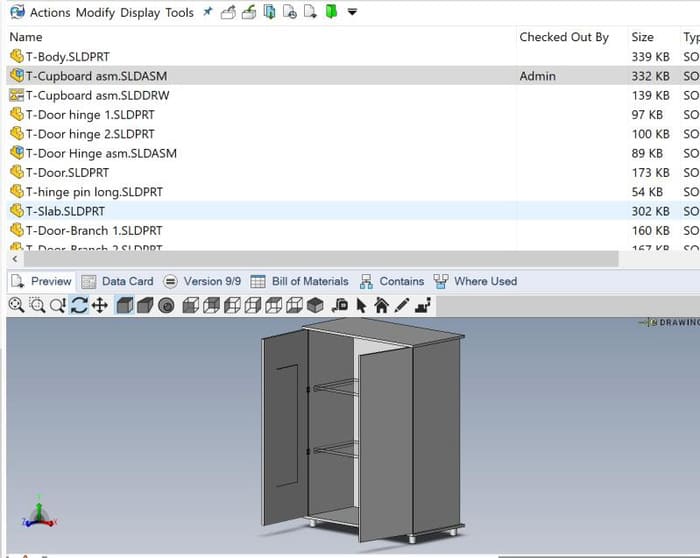
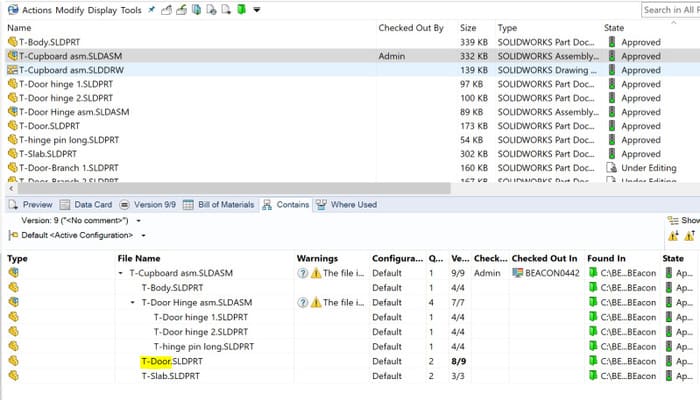
Fig 2: The assembly file and its references
To branch the “T-Door” part, we select the part>Tools>Branch.
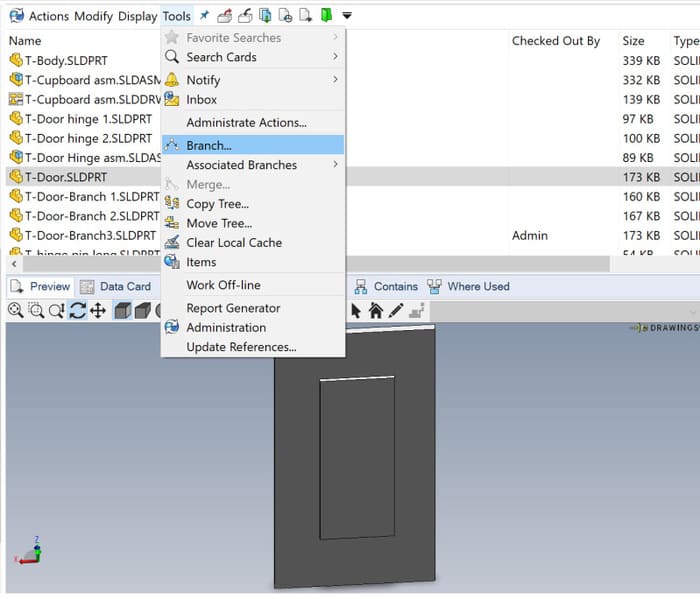
Fig 3: The Branch command
This brings up the Branch window, there is multiple Info to capture like the Copy tree operation. Let’s go over the details in the window.
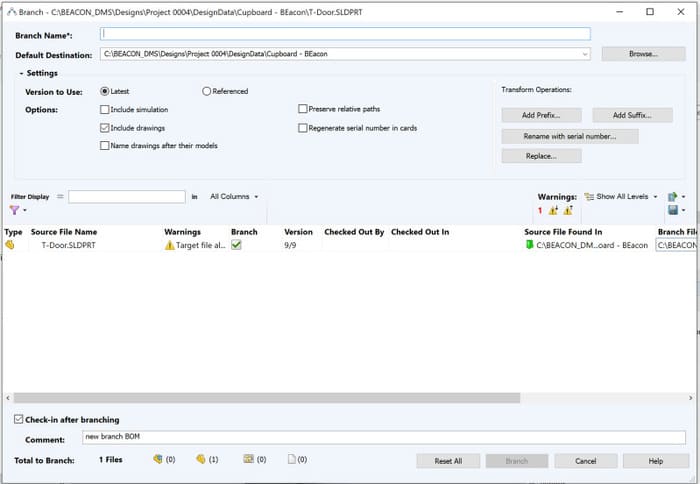
Fig 4: Branch dialog box
1. Branch Name: Provide a name to the branch that you are building to allow ease of traceability in
later stages.
2. Default Destination: This allows us to select the location where the branch will be stored.
3. Settings:
4. Filter: This can be used to filter the list on a filename basis if the list is huge.
5. Export to CSV: This can be used to export the branch list to EXCEL CSV format.
6. Branch column in the body: Selecting the “Branch” column checkbox will allow that file to be branched.
7. Check-In after branch: This checkbox will check-in the file automatically after the branch.
8. Branch Push Button: This will initiate the branch operation.
Here we have branched the “T-Door” part into 4 branches as shown in the image below.
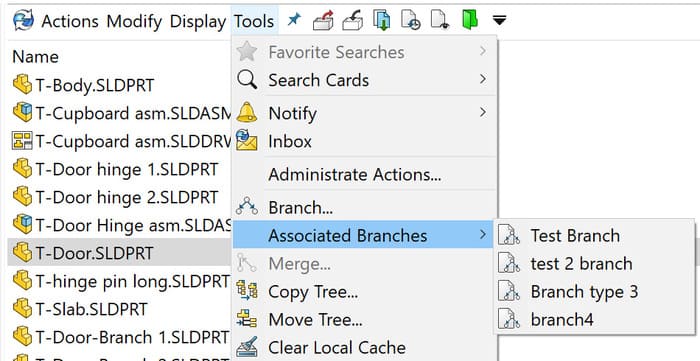
Fig 5: Associated Branches
Selecting the branch will show the details of the source file and the branch file as shown in the image below.

Fig 6: Branch and Source file dialog box
After branching the part, we have refined the designs of all the 3 branches and now let’s look at the design changes in the branches. We have left one of the branches as the original file if we need to come back to it in the future.
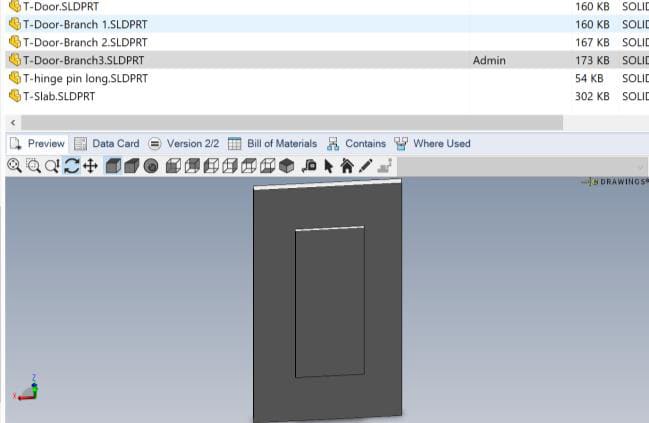
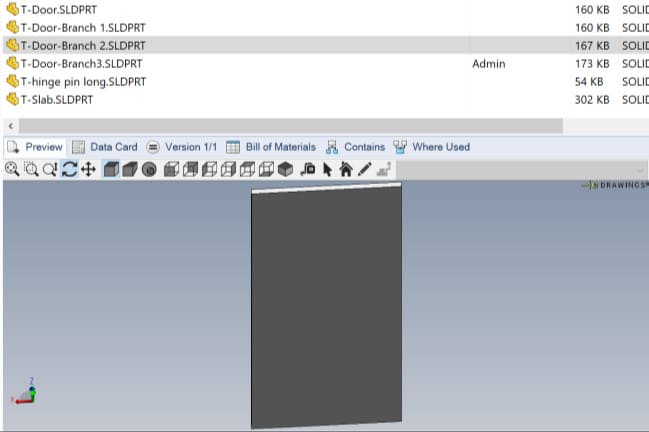
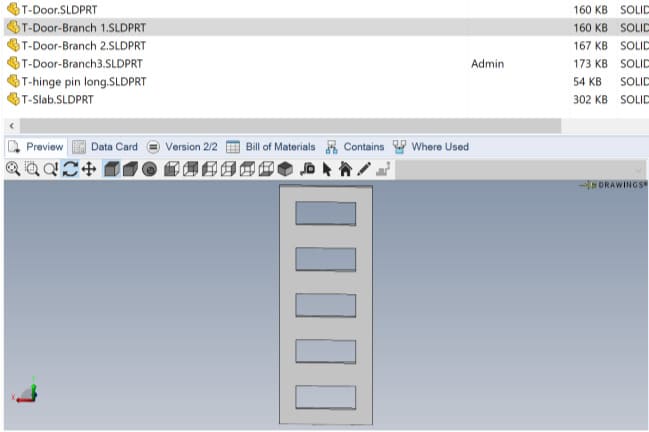
Fig 7: Branched designs preview
Now we will merge the “T-Door-Branch 1” as I want to go forward with this design for my door. To Merge select T-Door-Branch>Tools>Merge.
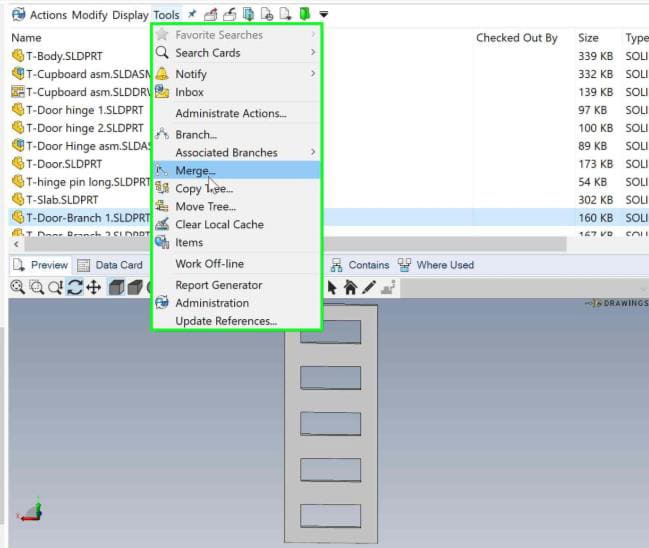
Fig 8: Merge option
Here we see the “Merge” Dialogue box which is similar to the branch dialogue box. By performing the merge we will be able to overwrite the parent file which is “T-Door”.
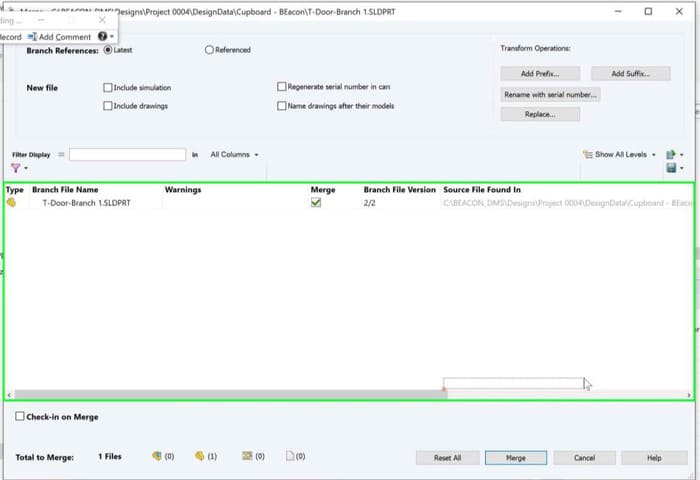
Fig 9: Merge dialog box
After the merge operation, we can see that the “T-Door” file has been updated and the same can be seen in the assembly as well, once we check out the file in the SOLIDWORKS.
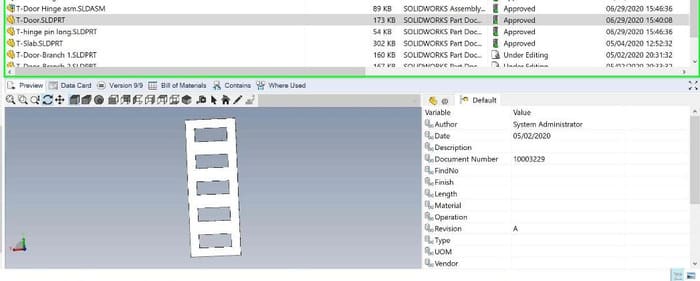
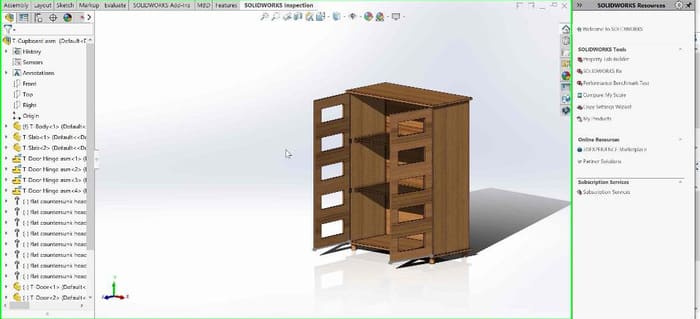
Fig 10: Merged file preview
As we saw, the branch and merge functionality helped us to make concept designing very easy and we don’t have to worry about duplicate files and their references to the parent file, while we work on the developments.
For more content on SOLIDWORKS and other SOLIDWORKS portfolios please stay tuned and check our blog section.
We Urge You To Call Us For Any Doubts & Clarifications That You May Have. We Are Eager to Talk To You
Call Us: +91 7406663589
 (No Ratings Yet)
#365/8, Ground Floor, "Hasmitha Avenue", 16th Main, 4th T Block East, Jayanagar, 4th T Block East, Pattabhirama Nagar, Jayanagar, Bengaluru, Karnataka 560041
Rated 4.7/5 with a total of 62 reviews
"CARAX" Building 4th Floor, 105/1/1/4, Next to Radha Hotel, Pune-Mumbai Xpress Way,Baner,Pune 411045
Rated 4.7/5 with a total of 17 reviews
1002, LODHA Supremus, I-Think Techno Campus,Kanjurmarg EAST - MUMBAI, MH, India – 400042.
Rated 5/5 with a total of 51 reviews
508, Shiti Ratna Complex, Panchwati Cross Road, Ahmedabad-380006
Rated 4.1/5 with a total of 7 reviews
Kanda's Villa, II Floor, AE Block,3362 R, 8th Street, Anna Nagar, Chennai, Tamil Nadu 600040
Rated 4.6/5 with a total of 16 reviews
Flat no F1, first floor, Nakhate corner, Eknath rang mandir road,New Usmanpura, Aurangabad, 431005.
A-101, 1st Floor, The Hub Complex, opp. Shete Hospital, Mahatma Nagar, Parijat Nagar, Nashik, Maharashtra 422005.
Level 7, Octave 3B Salarpuria Sattva Knowledge City, Inorbit Mall Road, Raidurg Village, Hi-tech City, Hyderabad, Telangana - 500081, India

pin-up casino giris https://azerbaijancuisine.com/# pin-up kazino
pin-up kazino
mexican drugstore online mexican pharmacy northern doctors mexico pharmacies prescription drugs
mexican border pharmacies shipping to usa mexican pharmacy mexico drug stores pharmacies
purple pharmacy mexico price list northern doctors reputable mexican pharmacies online
п»їbest mexican online pharmacies: northern doctors pharmacy – pharmacies in mexico that ship to usa
pharmacies in mexico that ship to usa: northern doctors pharmacy – mexican pharmacy
http://northern-doctors.org/# п»їbest mexican online pharmacies
mexican pharmaceuticals online mexican northern doctors medicine in mexico pharmacies
mexican mail order pharmacies: mexican northern doctors – mexican pharmacy
buying from online mexican pharmacy: northern doctors pharmacy – mexican pharmaceuticals online
https://northern-doctors.org/# mexican online pharmacies prescription drugs
mexican online pharmacies prescription drugs: mexican pharmacy – buying prescription drugs in mexico online
mexico drug stores pharmacies mexican pharmacy mexican online pharmacies prescription drugs
https://northern-doctors.org/# mexican border pharmacies shipping to usa
mexico pharmacies prescription drugs: northern doctors pharmacy – mexican pharmaceuticals online
mexican border pharmacies shipping to usa: mexican pharmacy – mexican rx online
http://northern-doctors.org/# п»їbest mexican online pharmacies
best online pharmacies in mexico: Mexico pharmacy that ship to usa – mexico pharmacies prescription drugs
http://northern-doctors.org/# mexican drugstore online
pharmacies in mexico that ship to usa: mexican pharmacy – buying from online mexican pharmacy
mexican online pharmacies prescription drugs: northern doctors pharmacy – buying prescription drugs in mexico
https://northern-doctors.org/# purple pharmacy mexico price list
п»їbest mexican online pharmacies northern doctors pharmacy п»їbest mexican online pharmacies
medication from mexico pharmacy: mexican northern doctors – medication from mexico pharmacy
buying prescription drugs in mexico: mexican pharmacy northern doctors – purple pharmacy mexico price list
https://northern-doctors.org/# п»їbest mexican online pharmacies
mexico drug stores pharmacies mexico pharmacy pharmacies in mexico that ship to usa
mexico pharmacy online mexican pharmacy mexican online pharmacies prescription drugs
purple pharmacy mexico price list cmq pharma mexican pharmacy mexico drug stores pharmacies
medicine in mexico pharmacies: cmq mexican pharmacy online – buying prescription drugs in mexico
mexican border pharmacies shipping to usa cmq mexican pharmacy online п»їbest mexican online pharmacies
best online pharmacies in mexico
http://cmqpharma.com/# mexico drug stores pharmacies
pharmacies in mexico that ship to usa
buying prescription drugs in mexico online cmq pharma purple pharmacy mexico price list
purple pharmacy mexico price list online mexican pharmacy mexican pharmaceuticals online
buying prescription drugs in mexico online mexican pharmacy best online pharmacies in mexico
pharmacies in mexico that ship to usa cmqpharma.com medicine in mexico pharmacies
https://foruspharma.com/# mexican pharmaceuticals online
medication from mexico pharmacy medication from mexico pharmacy medication from mexico pharmacy
mexican mail order pharmacies buying prescription drugs in mexico medicine in mexico pharmacies
http://foruspharma.com/# mexican drugstore online
canadian compounding pharmacy canadian pharmacy service canada pharmacy online legit
http://canadapharmast.com/# pet meds without vet prescription canada
cheapest online pharmacy india Online medicine home delivery Online medicine home delivery
cost of amoxicillin 875 mg: amoxicillin for sale online – cost of amoxicillin 875 mg
buy generic ciprofloxacin: where to buy cipro online – ciprofloxacin order online
buy cipro online: ciprofloxacin – ciprofloxacin 500 mg tablet price
paxlovid india: paxlovid buy – paxlovid india
purchase cipro: cipro pharmacy – cipro
paxlovid pill: Paxlovid buy online – paxlovid buy
paxlovid generic: paxlovid generic – paxlovid generic
doxycycline 100 capsules: doxycycline nz – doxycycline 50 mg price uk
cost of clomid no prescription: can you buy cheap clomid without rx – can you buy generic clomid tablets
cipro pharmacy: antibiotics cipro – cipro online no prescription in the usa
mexico drug stores pharmacies: mexico pharmacies prescription drugs – mexican rx online
pharmacies in mexico that ship to usa: medication from mexico pharmacy – mexican rx online
medicine in mexico pharmacies buying prescription drugs in mexico online mexican online pharmacies prescription drugs
mexico pharmacies prescription drugs: mexican rx online – buying prescription drugs in mexico
medication from mexico pharmacy: mexico drug stores pharmacies – medicine in mexico pharmacies
https://mexicandeliverypharma.online/# buying prescription drugs in mexico online
п»їbest mexican online pharmacies mexico drug stores pharmacies mexican online pharmacies prescription drugs
medicine in mexico pharmacies: buying prescription drugs in mexico – best online pharmacies in mexico
mexican border pharmacies shipping to usa: mexico drug stores pharmacies – buying prescription drugs in mexico
buying from online mexican pharmacy medicine in mexico pharmacies pharmacies in mexico that ship to usa
http://mexicandeliverypharma.com/# reputable mexican pharmacies online
mexican online pharmacies prescription drugs: mexican pharmaceuticals online – medication from mexico pharmacy
mexican border pharmacies shipping to usa: medication from mexico pharmacy – mexican drugstore online
mexican border pharmacies shipping to usa: mexico drug stores pharmacies – mexican drugstore online
medication from mexico pharmacy mexico pharmacy buying from online mexican pharmacy
mexican border pharmacies shipping to usa: mexican online pharmacies prescription drugs – buying prescription drugs in mexico online
https://mexicandeliverypharma.com/# best online pharmacies in mexico
mexican drugstore online: buying prescription drugs in mexico online – mexico drug stores pharmacies
pharmacies in mexico that ship to usa: reputable mexican pharmacies online – medication from mexico pharmacy
mexican pharmacy mexico drug stores pharmacies mexico pharmacy
medication from mexico pharmacy: best online pharmacies in mexico – mexican border pharmacies shipping to usa
pharmacies in mexico that ship to usa: mexican pharmaceuticals online – mexican rx online
mexican mail order pharmacies: mexico pharmacies prescription drugs – medicine in mexico pharmacies
medicine in mexico pharmacies mexican mail order pharmacies mexican rx online
mexico drug stores pharmacies: mexican online pharmacies prescription drugs – п»їbest mexican online pharmacies
medicine in mexico pharmacies: medicine in mexico pharmacies – buying from online mexican pharmacy
mexico drug stores pharmacies: mexican border pharmacies shipping to usa – medication from mexico pharmacy
medication from mexico pharmacy mexican border pharmacies shipping to usa mexican mail order pharmacies
mexican rx online: mexican online pharmacies prescription drugs – purple pharmacy mexico price list
buying from online mexican pharmacy: mexican mail order pharmacies – medication from mexico pharmacy
reputable mexican pharmacies online: buying from online mexican pharmacy – п»їbest mexican online pharmacies
п»їbest mexican online pharmacies mexico drug stores pharmacies mexican online pharmacies prescription drugs
buying prescription drugs in mexico: medicine in mexico pharmacies – buying from online mexican pharmacy
buying prescription drugs in mexico online: mexico pharmacies prescription drugs – medication from mexico pharmacy
mexican mail order pharmacies: reputable mexican pharmacies online – п»їbest mexican online pharmacies
mexican drugstore online п»їbest mexican online pharmacies mexican rx online
buying prescription drugs in mexico: medicine in mexico pharmacies – medicine in mexico pharmacies
medication from mexico pharmacy: mexican border pharmacies shipping to usa – mexican drugstore online
mexico pharmacies prescription drugs: pharmacies in mexico that ship to usa – mexican rx online
reputable mexican pharmacies online medicine in mexico pharmacies mexican pharmacy
mexican rx online: best online pharmacies in mexico – buying from online mexican pharmacy
medication from mexico pharmacy: buying prescription drugs in mexico – mexican online pharmacies prescription drugs
п»їbest mexican online pharmacies: mexican drugstore online – buying from online mexican pharmacy
reputable mexican pharmacies online mexico drug stores pharmacies п»їbest mexican online pharmacies
buying prescription drugs in mexico online: mexico drug stores pharmacies – medication from mexico pharmacy
п»їbest mexican online pharmacies: medication from mexico pharmacy – pharmacies in mexico that ship to usa
buying prescription drugs in mexico online: mexican rx online – mexico drug stores pharmacies
mexican online pharmacies prescription drugs mexico drug stores pharmacies mexican online pharmacies prescription drugs
mexican mail order pharmacies: pharmacies in mexico that ship to usa – buying from online mexican pharmacy
mexico drug stores pharmacies: mexican online pharmacies prescription drugs – mexico drug stores pharmacies
mexican mail order pharmacies best online pharmacies in mexico medication from mexico pharmacy
п»їbest mexican online pharmacies: medication from mexico pharmacy – mexico drug stores pharmacies
medication from mexico pharmacy: purple pharmacy mexico price list – п»їbest mexican online pharmacies
buying from online mexican pharmacy: mexican rx online – reputable mexican pharmacies online
mexican rx online best online pharmacies in mexico purple pharmacy mexico price list
mexico drug stores pharmacies: buying prescription drugs in mexico online – buying from online mexican pharmacy
purple pharmacy mexico price list: buying from online mexican pharmacy – buying prescription drugs in mexico online
buying from online mexican pharmacy: mexican online pharmacies prescription drugs – purple pharmacy mexico price list
mexican online pharmacies prescription drugs mexican mail order pharmacies mexican rx online
medicine in mexico pharmacies: reputable mexican pharmacies online – medication from mexico pharmacy
medicine in mexico pharmacies: mexican online pharmacies prescription drugs – mexican online pharmacies prescription drugs
mexican drugstore online: mexican online pharmacies prescription drugs – mexican pharmaceuticals online
mexican pharmacy mexican pharmacy medicine in mexico pharmacies
mexico drug stores pharmacies: purple pharmacy mexico price list – reputable mexican pharmacies online
medication from mexico pharmacy: best online pharmacies in mexico – best online pharmacies in mexico
mexican pharmaceuticals online reputable mexican pharmacies online mexican rx online
mexican rx online: purple pharmacy mexico price list – mexico drug stores pharmacies
mexican online pharmacies prescription drugs: buying prescription drugs in mexico online – medicine in mexico pharmacies
buying prescription drugs in mexico: mexico drug stores pharmacies – best online pharmacies in mexico
mexican rx online medication from mexico pharmacy mexican rx online
buying prescription drugs in mexico: mexican rx online – buying prescription drugs in mexico
pharmacies in mexico that ship to usa: buying prescription drugs in mexico online – mexico drug stores pharmacies
mexican mail order pharmacies: mexican mail order pharmacies – buying from online mexican pharmacy
buying from online mexican pharmacy mexican mail order pharmacies best online pharmacies in mexico
cytotec online cytotec online buy cytotec in usa
zithromax for sale online: zithromax purchase online – zithromax 600 mg tablets
http://nolvadexbestprice.pro/# buy tamoxifen
https://nolvadexbestprice.pro/# tamoxifen for men
zithromax drug generic zithromax india buy zithromax 1000 mg online
zithromax 1000 mg pills: where can i buy zithromax in canada – zithromax tablets
https://zithromaxbestprice.pro/# where can i purchase zithromax online
https://nolvadexbestprice.pro/# common side effects of tamoxifen
cheap zithromax pills zithromax cost australia zithromax online
cost of cheap propecia pill: buying cheap propecia price – buy propecia
http://zithromaxbestprice.pro/# buy zithromax 1000 mg online
http://zithromaxbestprice.pro/# can you buy zithromax over the counter
zithromax for sale usa zithromax pill zithromax for sale 500 mg
generic propecia without a prescription: cost generic propecia without insurance – buying propecia
prednisone pill: where can i get prednisone – buying prednisone on line
prednisone 20mg online without prescription: prednisone 10 mg price – prednisone best prices
http://zithromaxbestprice.pro/# zithromax canadian pharmacy
prednisone 40 mg price: prednisone pill – prednisone without prescription 10mg
prednisone ordering online: prednisone tablets – prednisone buy cheap
http://zithromaxbestprice.pro/# zithromax tablets
prednisone 5mg coupon: pharmacy cost of prednisone – 5mg prednisone
where can i buy zithromax medicine: generic zithromax india – zithromax cost uk
http://prednisonebestprice.pro/# prednisone 10 mg brand name
cheap zithromax pills: buy zithromax canada – zithromax 250 mg australia
https://avanafil.pro/# п»їFarmacia online migliore
Farmacie on line spedizione gratuita: Cialis generico 20 mg 8 compresse prezzo – farmacie online affidabili
farmacia online: avanafil 100 mg prezzo – farmacia online
Farmacia online piГ№ conveniente: comprare farmaci online all’estero – farmacie online autorizzate elenco
farmaci senza ricetta elenco: avanafil in farmacia – top farmacia online
https://farmait.store/# comprare farmaci online all’estero
Farmacie online sicure: Farmacia online piu conveniente – acquistare farmaci senza ricetta
farmacie online sicure: Avanafil prezzo – farmacie online affidabili
Farmacie online sicure: sildenafil oral jelly 100mg kamagra – farmacia online piГ№ conveniente
п»їFarmacia online migliore: Farmacia online miglior prezzo – Farmacia online piГ№ conveniente
https://farmait.store/# acquistare farmaci senza ricetta
top farmacia online: Farmacia online migliore – Farmacia online piГ№ conveniente
farmaci senza ricetta elenco: Cialis generico 20 mg 8 compresse prezzo – top farmacia online
miglior sito per comprare viagra online: viagra cosa serve – cerco viagra a buon prezzo
Farmacie on line spedizione gratuita: Cialis generico 5 mg prezzo – farmacie online affidabili
https://sildenafil.llc/# generic viagra without a doctor prescription
viagra canada: Cheap generic Viagra – how long does viagra last
viagra 100mg: Buy Viagra online in USA – viagra price
https://tadalafil.auction/# buy generic cialis online
viagra coupon: Buy Viagra online cheap – generic viagra without a doctor prescription
http://tadalafil.auction/# genaric cialis with dapoxetine
buy generic viagra online: buy sildenafil online usa – viagra without a doctor prescription
https://edpillpharmacy.store/# where to buy ed pills
http://indiapharmacy.shop/# online pharmacy india
online erectile dysfunction
indianpharmacy com: Top mail order pharmacies – top 10 pharmacies in india
http://edpillpharmacy.store/# cheap ed
online ed pharmacy
https://indiapharmacy.shop/# top online pharmacy india
cheap ed pills online: Best ED pills non prescription – online erectile dysfunction prescription
https://indiapharmacy.shop/# world pharmacy india
reputable indian online pharmacy: Top mail order pharmacies – online shopping pharmacy india
online ed medications: cheap ed pills online – where can i buy erectile dysfunction pills
https://mexicopharmacy.win/# buying prescription drugs in mexico online
ed online treatment: cheap ed pills online – buying ed pills online
cheap ed meds online: online ed prescription same-day – cheap ed medication
https://edpillpharmacy.store/# where to buy ed pills
buying from online mexican pharmacy: Best online Mexican pharmacy – buying prescription drugs in mexico online
https://indiapharmacy.shop/# reputable indian online pharmacy
buy ed pills online: Best ED meds online – erectile dysfunction pills online
best india pharmacy: Online medicine home delivery – indian pharmacy
http://indiapharmacy.shop/# indianpharmacy com
http://mexicopharmacy.win/# mexican border pharmacies shipping to usa
india pharmacy: top 10 pharmacies in india – best india pharmacy
п»їbest mexican online pharmacies: pharmacies in mexico that ship to usa – best online pharmacies in mexico
http://indiapharmacy.shop/# Online medicine order
generic ed meds online: ed pills online – cheapest online ed meds
п»їbest mexican online pharmacies: mexican pharmacy – mexican drugstore online
medication from mexico pharmacy: mexico pharmacy win – mexican border pharmacies shipping to usa
reputable mexican pharmacies online: Best pharmacy in Mexico – п»їbest mexican online pharmacies
Cardano was developed in 2017 as an alternative to Ethereum, but it has never managed to challenge it. Nevertheless, the native coin, ADA, has made the top 10 largest crypto assets for years, being valued at over $17 billion as of today. Crypto boasts several noteworthy features, including a non-custodial DeFi wallet, prepaid Visa cards to spend crypto, margin trading and over 250 supported crypto assets. Crypto also employs various security measures such as multi-factor identification, offline cold storage and a regulated custodian bank account for traditional currency. There are a lot of digital currencies on the market, and it can be hard to choose what crypto to buy. While it may be tempting to chase the highest — or lowest — crypto price or the latest trendy token, that does not always guarantee you good profit or profit at all. The best crypto to buy now (or at any time) will always be one that can become a fitting part of a balanced portfolio.
https://app.scholasticahq.com/scholars/299342-bonnie-smith
Ethereum is not just a cryptocurrency; it’s a platform for decentralized applications (dApps), smart contracts, and decentralized finance (DeFi) projects. The recent transition to Ethereum 2.0, moving from proof-of-work (PoW) to proof-of-stake (PoS), aims to improve scalability, security, and sustainability – key factors that could boost Ethereum’s adoption and value. This project is on presale, having so far raised over $4.6 million. Experts agree $YPRED will reach $10 in 5 years because of its unique features. So if you want to own an altcoin that could see 20x gains, earn passive income, and terrific ROI, choose yPredict. Ethereum’s recognition as an SEC-approved commodity, akin to Bitcoin, reinforces its credibility. Moreover, the potential introduction of an Ethereum-related fund by BlackRock underscores growing institutional interest.
buy medicines online in india: Top online pharmacy in India – best india pharmacy
reputable mexican pharmacies online: Best online Mexican pharmacy – reputable mexican pharmacies online
Ole Gunnar Solskjær team made a great comeback after premier league restarted. Bruno Fernandes presence completely change the atmosphere in the United squad. The 25 year old scored 7 goals in 10 matches made 5 assist in the matches. After the loan deal of (Odion Ighalo) ended, Manchester United extended loan transfer until 2021 from (Shanghai Shenhua). Manchester United XI: De Gea; Wan-Bissaka, Varane, Lindelöf, Shaw; Casemiro, Eriksen; Antony, Bruno Fernandes, Sancho; Martial. Manchester United defeated Newcastle United 2-0 at Wembley to end their six-year trophy drought. UK: The match will not be broadcast live in the UK due to the Saturday 3 p.m. kickoff broadcast embargo. You can follow live radio coverage instead via talkSPORT 2.
https://wiki-legion.win/index.php?title=Ohio_state_football_news_now
Open from Monday to Wednesday from 10:00 to 20:00 Anfield paid tribute to Jurgen Klopp on a highly-emotional afternoon as the curtain came down on this incredible era with a 2-0 win over Wolves.TLW Editor Dave Usher and Chris Smith reflect on a farewell that brought smiles through the tears, as the boss rode off into the sunset with one more rallying call and a fist pump into the future. Since the inception of the Premier League, no team with a less than double-digit positive goal differential (GD) has ever won the league title. Seeing where some of our immediate rivals are situated at on the GD front at this stage of the season, to say that we’ve got our work cut out for us would be putting it mildly. At the current rate, Liverpool are poised to end the season with a goal differential of +5.
buy cytotec https://lisinopril.guru/# lisinopril 5mg pill
lasix furosemide
buy lipitor with mastercard Atorvastatin 20 mg buy online atorvastatin lipitor
http://furosemide.win/# lasix generic
lipitor 10mg price: Atorvastatin 20 mg buy online – generic lipitor 10 mg
pfizer lipitor lipitor 40 mg price in india lipitor for sale
buy misoprostol over the counter https://lisinopril.guru/# lisinopril hct
lasix 20 mg
tamoxifen effectiveness: should i take tamoxifen – tamoxifen benefits
https://furosemide.win/# lasix side effects
buy cytotec https://furosemide.win/# furosemide 40mg
lasix 20 mg
purchase cytotec buy misoprostol over the counter Misoprostol 200 mg buy online
https://tamoxifen.bid/# tamoxifen depression
buy cytotec online https://tamoxifen.bid/# tamoxifen and antidepressants
lasix 40mg
buy lisinopril 5mg: Lisinopril online prescription – lisinopril 500 mg
https://cytotec.pro/# Misoprostol 200 mg buy online
Misoprostol 200 mg buy online http://cytotec.pro/# cytotec pills buy online
lasix 100 mg tablet
zestril 5 mg prices: Buy Lisinopril 20 mg online – lisinopril 10 mg order online
tamoxifen for gynecomastia reviews buy tamoxifen online how to prevent hair loss while on tamoxifen
https://tamoxifen.bid/# tamoxifen rash
tamoxifen dosage: buy tamoxifen citrate – tamoxifen dosage
Misoprostol 200 mg buy online http://furosemide.win/# lasix 40 mg
furosemide 40mg
tamoxifen endometriosis: tamoxifen breast cancer – where can i buy nolvadex
http://furosemide.win/# lasix 100mg
buy cytotec pills https://tamoxifen.bid/# how does tamoxifen work
lasix
buy cytotec pills online cheap: buy misoprostol tablet – Cytotec 200mcg price
buy cytotec in usa https://furosemide.win/# lasix dosage
lasix uses
can i buy lipitor online: buy lipitor 20mg – where to buy lipitor
nolvadex gynecomastia: Purchase Nolvadex Online – tamoxifen 20 mg
cytotec abortion pill http://lisinopril.guru/# prinivil 2.5 mg
lasix dosage
raloxifene vs tamoxifen: tamoxifen brand name – tamoxifen buy
nolvadex half life: pct nolvadex – nolvadex generic
buy cytotec online fast delivery https://furosemide.win/# buy furosemide online
lasix 20 mg
п»їcytotec pills online: buy cytotec online fast delivery – Misoprostol 200 mg buy online
cheapest online pharmacy india: top online pharmacy india – buy prescription drugs from india
pharmacies in mexico that ship to usa mexican border pharmacies shipping to usa buying prescription drugs in mexico online
https://mexstarpharma.online/# pharmacies in mexico that ship to usa
http://mexstarpharma.com/# reputable mexican pharmacies online
reputable indian online pharmacy indian pharmacies safe cheapest online pharmacy india
https://mexstarpharma.online/# mexican drugstore online
https://easyrxindia.com/# indian pharmacy
legit canadian online pharmacy: canadian neighbor pharmacy – canadian pharmacy service
http://easyrxindia.com/# top online pharmacy india
top 10 online pharmacy in india india pharmacy indian pharmacies safe
best india pharmacy: п»їlegitimate online pharmacies india – best online pharmacy india
https://easyrxindia.shop/# india pharmacy
https://easyrxindia.shop/# buy medicines online in india
mexican rx online: mexican border pharmacies shipping to usa – mexico pharmacy
mexican pharmaceuticals online: mexican drugstore online – mexican drugstore online
https://mexstarpharma.com/# mexican mail order pharmacies
buying prescription drugs in mexico online: mexican rx online – buying prescription drugs in mexico online
http://mexstarpharma.com/# reputable mexican pharmacies online
http://slotsiteleri.bid/# slot casino siteleri
guvenilir slot siteleri: en iyi slot siteleri 2024 – slot siteleri guvenilir
sweet bonanza slot demo: pragmatic play sweet bonanza – sweet bonanza yasal site
2024 en iyi slot siteleri: yasal slot siteleri – 2024 en iyi slot siteleri
http://sweetbonanza.network/# sweet bonanza nas?l oynan?r
en guvenilir slot siteleri: canl? slot siteleri – deneme bonusu veren siteler
casino slot siteleri: deneme bonusu veren siteler – slot siteleri guvenilir
https://slotsiteleri.bid/# slot casino siteleri
slot siteleri: en iyi slot siteleri 2024 – yeni slot siteleri
http://sweetbonanza.network/# sweet bonanza mostbet
bonus veren slot siteleri: en cok kazandiran slot siteleri – yasal slot siteleri
I keep listening to the news bulletin speak about receiving boundless online grant applications so I have been looking around for the most excellent site to get one. Could you tell me please, where could i acquire some?
en iyi slot siteler: yasal slot siteleri – en iyi slot siteleri 2024
https://slotsiteleri.bid/# oyun siteleri slot
en yeni slot siteleri: yasal slot siteleri – bonus veren slot siteleri
http://denemebonusuverensiteler.win/# bonus veren siteler
пин ап казино вход пин ап казино вход pin up казино
пин ап вход: пин ап – pin up casino
пинап казино: pin up casino – пин ап вход
https://1xbet.contact/# 1хбет официальный сайт
1win вход: 1win официальный сайт – 1win официальный сайт
пин ап зеркало: пинап казино – pin up
http://1win.directory/# 1вин сайт
1xbet: 1хбет зеркало – 1xbet скачать
пин ап казино: пин ап зеркало – пин ап казино
пинап казино: pin up казино – пин ап вход
http://1xbet.contact/# 1xbet
казино вавада: вавада рабочее зеркало – vavada
http://1xbet.contact/# 1xbet скачать
vavada casino: вавада зеркало – vavada казино
1хбет: 1xbet скачать – 1хбет зеркало
https://vavada.auction/# казино вавада
https://drstore24.com/# rx solutions pharmacy
web pharmacy
With the launch of potentially more Bitcoin-related financial services and the global adoption spark of Bitcoin, BTC prices will maintain a bullish trend in 2025. The cryptocurrency is expected to create a high of $140,449 with a low of $61,357. Therefore, the average Bitcoin price prediction for 2025 will potentially be $95,903. With the bullish trend gaining momentum at the start of 2024, the GRT price may soon reach the $0.20 mark in 2024. Tone Vays, Bitcoin specialist and trader in his conversation to ChainTalk: “I can see Bitcoin rising to as high as $8,500-9,000 on this run up over the next month or two, after that I think it will pull back down but I don’t see Bitcoin falling under $5,000 again. If the economy continues to be poor, Bitcoin will probably not go up much because people will just not risk the money they have left on Bitcoin. As for end of 2020, I think Bitcoin will be around $10,000.”
https://list-wiki.win/index.php?title=Hoge_crypto_where_to_buy
Disclaimer: The information provided in this article should not be considered as financial or investment advice. The decision to invest in any cryptocurrency, including SHIB, should be made after conducting thorough research and consulting with a qualified financial advisor. The cryptocurrency market carries inherent risks, and investing in cryptocurrencies involves the possibility of financial loss. As with any investment, individuals interested in Shiba Inu Coin must conduct thorough research and analysis before making any decisions. This includes studying the coin’s price history, understanding its market dynamics, and assessing its potential for growth and adoption. It is crucial to consider both the opportunities and risks associated with investing in Shiba Inu Coin and develop a well-informed investment strategy that aligns with one’s risk tolerance and goals.
diplomat pharmacy: medicine online order – vibramycin online pharmacy
https://drstore24.com/# clozapine pharmacy registry
flomax pharmacy
pain relief: simvastatin people’s pharmacy – clomid indian pharmacy
https://onlineph24.com/# navarro pharmacy
viagra from vipps pharmacy
adderall online pharmacy: united healthcare online pharmacy – real pharmacy rx generic viagra
https://easydrugrx.com/# cheapest pharmacy cialis
cialis pharmacy rx one
mail order pharmacy cialis: india pharmacy viagra – best online indian pharmacy
mtf hormones online pharmacy: pharmacy dispensing clozaril – opti rx pharmacy
empower rx pharmacy: pharmacy discount card – online pharmacy cialis no prescription
liberty pharmacy avandia: Eskalith – prozac online pharmacy
buy naltrexone from trusted pharmacy: bactrim online pharmacy – nps online pharmacy
total rx pharmacy: ivermectin scabies pharmacy – legitimate online pharmacy uk
https://mexicopharmacy.cheap/# buying prescription drugs in mexico
buy prescription drugs from india india online pharmacy indian pharmacy online
п»їbest mexican online pharmacies: buying prescription drugs in mexico online – medicine in mexico pharmacies
Online medicine home delivery: reputable indian pharmacies – Online medicine home delivery
https://indianpharmacy.company/# top online pharmacy india
online pharmacy in india: pharmacy cost of cialis – cialis european pharmacy
amazon online pharmacy: good value pharmacy – one click pharmacy propecia
buying prescription drugs in mexico best online pharmacies in mexico mexico drug stores pharmacies
pharmacies in mexico that ship to usa: best online pharmacies in mexico – buying prescription drugs in mexico
п»їlegitimate online pharmacies india: Online medicine order – buy medicines online in india
https://pharmbig24.online/# zyprexa pharmacy
mexican mail order pharmacies pharmacies in mexico that ship to usa mexican pharmaceuticals online
indian pharmacy online: cheapest online pharmacy india – reputable indian pharmacies
pharmacies in mexico that ship to usa mexican mail order pharmacies mexican drugstore online
mexican online pharmacies prescription drugs: purple pharmacy mexico price list – buying prescription drugs in mexico online
https://mexicopharmacy.cheap/# mexican mail order pharmacies
reputable indian online pharmacy: Online medicine order – Online medicine order
mexican rx online mexico drug stores pharmacies mexico drug stores pharmacies
pharmacy stuff store: Super Avana – erectile dysfunction
cheapest online pharmacy india: world pharmacy india – india online pharmacy
http://mexicopharmacy.cheap/# mexican border pharmacies shipping to usa
mexican pharmaceuticals online medicine in mexico pharmacies pharmacies in mexico that ship to usa
pharmacy website india: Online medicine order – best india pharmacy
paxil pharmacy: isotretinoin pharmacy – brand levitra online pharmacy
Greetings from California! I’m bored to tears at work so I decided to check out your website on my iphone during lunch break. I really like the information you present here and can’t wait to take a look when I get home. I’m shocked at how fast your blog loaded on my mobile .. I’m not even using WIFI, just 3G .. Anyways, superb blog!
pharmacy website india Online medicine order top online pharmacy india
I’d have to examine with you here. Which is not one thing I usually do! I take pleasure in reading a post that may make folks think. Additionally, thanks for permitting me to comment!
https://pharmbig24.com/# viagra online pharmacy australia
triamcinolone acetonide cream pharmacy: levitra online pharmacy – inhouse pharmacy finasteride
pharmacy website india: best india pharmacy – buy medicines online in india
cialis online american pharmacy provigil pharmacy minocycline pharmacy
reputable indian online pharmacy: world pharmacy india – п»їlegitimate online pharmacies india
http://indianpharmacy.company/# buy prescription drugs from india
rx online Celexa mexitil online pharmacy
claritin d pharmacy: birth control – celebrex target pharmacy
ranitidine online pharmacy: dutasteride india pharmacy – Ginette-35
safe online pharmacy reviews percocet online pharmacy reviews tegretol online pharmacy
http://pharmbig24.com/# advair pharmacy assistance
online pharmacy viagra generic: 1st rx pharmacy statesville nc – target pharmacy gabapentin
what to consider as budget when running pharmacy store: viagra at guardian pharmacy – one rx pharmacy
purchase adipex from an online pharmacy uk pharmacy nolvadex singulair mexican pharmacy
top 10 pharmacies in india: Online medicine home delivery – india pharmacy mail order
mexican rx online: mexican rx online – medicine in mexico pharmacies
mexican online pharmacies prescription drugs mexican online pharmacies prescription drugs best online pharmacies in mexico
top 10 online pharmacy in india: Online medicine home delivery – india online pharmacy
Hot Hot Fruit is a typical five by three slot machine. It has fifteen win lines, of which you must play all fifteen every spin. Online casinos also may offer such massive bonuses as part of their promotional campaigns dedicated to the most popular holidays, therefore make sure to visit us regularly – the roster of special days and celebrations goes far beyond Christmas, Halloween, and Father’s Day! Lucky Nugget casino offers an array of casino games, ranging from classic table titles to modern online slots, providing players with a diverse and engaging gaming experience. The online casino’s game selection includes the following popular genres: One of the headline slots at Apollo Slots casino is The Mariachi 5. The game has 5 reels and offers you 243 different ways to win! The cartoon-style graphics are a big hit and reflect the theme of the game completely – the Mariachis on Dios de Los Muertos or the Day of the Dead.
https://www.pling.com/u/httpstogelca
If you prefer live games, make sure you choose a casino that offers your preferred games on mobile, and make sure they’re from high quality providers like Evolution Gaming. This will guarantee you a realistic live casino experience with immersive live streams. It’s worth noting that usually any mobile casino no deposit bonus won’t be eligible for live games as they’re usually restricted to specific slot games. But we want users to find no deposit bonuses that also point them in the best direction for their real money casino needs too so choose the one that is going to meet your expectations. Grand Casino De Dinant No Deposit Bonus Codes For Free Spins 2024 88 Free Spins No Deposit Offer If you want to try out a brand-new online casino or slots site, then the first thing you need to check out is whether the site has a cool free spins bonus offer. It’s even better if the winnings from those free spins are paid in cash with no wagering. While rare, there are a few of these offers around. You’ll be able to try out the very best slots using the free spins and who knows, you might just win a little bit of cash of your own as a bonus! Playing slots with no wagering free spins mean that any winnings are added to your withdrawable balance. Put simply, you get to keep what you win, without the worry of having to play it through again.
gates of olympus demo oyna gates of olympus oyna gates of olympus demo turkce
http://casibom.auction/# casibom guncel giris adresi
casibom casibom guncel casibom
http://casibom.auction/# casibom guncel
http://gatesofolympusoyna.online/# gates of olympus demo oyna
betine com guncel giris betine com guncel giris betine guncel giris
betine sikayet betine promosyon kodu 2024 betine
https://betine.online/# betine
gates of olympus slot gates of olympus oyna gates of olympus demo turkce oyna
farmacia online envГo gratis farmacia online internacional farmacia online envГo gratis
http://sildenafilo.men/# comprar viagra online en andorra
farmacias online seguras
http://sildenafilo.men/# viagra online rГЎpida
farmacias online seguras: Comprar Cialis sin receta – farmacias online seguras
sildenafilo 100mg precio espaГ±a comprar viagra sildenafilo 100mg precio farmacia
http://tadalafilo.bid/# farmacia online madrid
farmacias online seguras: comprar cialis original – farmacias online seguras en espaГ±a
http://tadalafilo.bid/# farmacia online 24 horas
farmacia barata
farmacias online seguras: Cialis precio – п»їfarmacia online espaГ±a
https://farmaciaeu.com/# farmacias online seguras en espaГ±a
п»їfarmacia online espaГ±a: farmacias baratas online envio gratis – farmacia en casa online descuento
https://sildenafilo.men/# comprar viagra contrareembolso 48 horas
farmacia online barata y fiable
farmacia online barata y fiable: Cialis precio – farmacia online 24 horas
https://sildenafilo.men/# sildenafilo 100mg precio espaГ±a
farmacia barata: Cialis sin receta – farmacia online barcelona
https://farmaciaeu.com/# farmacia online barata
farmacia en casa online descuento: farmacia online 24 horas – farmacia online 24 horas
farmacias online seguras en espaГ±a: precio cialis en farmacia con receta – farmacia online barcelona
https://farmaciait.men/# Farmacie on line spedizione gratuita
farmacie online sicure
farmacie online affidabili Farmacie online sicure Farmacia online miglior prezzo
comprare farmaci online all’estero farmacia online migliore Farmacia online miglior prezzo
acquisto farmaci con ricetta: Farmacie che vendono Cialis senza ricetta – top farmacia online
comprare farmaci online con ricetta: comprare farmaci online con ricetta – acquisto farmaci con ricetta
migliori farmacie online 2024: Farmacie on line spedizione gratuita – farmacie online sicure
http://farmaciait.men/# Farmacie online sicure
Farmacia online miglior prezzo
viagra originale in 24 ore contrassegno viagra senza ricetta kamagra senza ricetta in farmacia
farmacia online senza ricetta Tadalafil generico migliore comprare farmaci online all’estero
top farmacia online: farmacie online affidabili – Farmacie on line spedizione gratuita
viagra naturale in farmacia senza ricetta: viagra online siti sicuri – viagra pfizer 25mg prezzo
migliori farmacie online 2024 Tadalafil generico migliore farmacie online affidabili
farmaci senza ricetta elenco Tadalafil generico migliore acquisto farmaci con ricetta
http://farmaciait.men/# migliori farmacie online 2024
farmacia online piГ№ conveniente
viagra subito: viagra online siti sicuri – viagra consegna in 24 ore pagamento alla consegna
Farmacie on line spedizione gratuita: Ibuprofene 600 generico prezzo – top farmacia online
miglior sito per comprare viagra online viagra senza prescrizione viagra subito
viagra online spedizione gratuita viagra prezzo viagra acquisto in contrassegno in italia
Farmacia online miglior prezzo: Farmacia online piu conveniente – farmacia online
https://brufen.pro/# BRUFEN 600 acquisto online
farmacia online senza ricetta
Farmacia online piГ№ conveniente Ibuprofene 600 prezzo senza ricetta acquistare farmaci senza ricetta
farmacia online Cialis generico farmacia farmacia online
top farmacia online: Farmacia online migliore – Farmacia online piГ№ conveniente
comprare farmaci online con ricetta: Cialis generico 20 mg 8 compresse prezzo – migliori farmacie online 2024
http://brufen.pro/# BRUFEN 600 acquisto online
top farmacia online
I like what you guys are up also. Such smart work and reporting! Keep up the superb works guys I have incorporated you guys to my blogroll. I think it’ll improve the value of my site :).
farmacie online affidabili Cialis generico 20 mg 8 compresse prezzo top farmacia online
acquisto farmaci con ricetta Cialis generico recensioni comprare farmaci online con ricetta
farmaci senza ricetta elenco: Farmacie on line spedizione gratuita – Farmacia online miglior prezzo
farmacia online piГ№ conveniente BRUFEN 600 prezzo in farmacia farmacia online senza ricetta
http://farmaciait.men/# comprare farmaci online all’estero
Farmacia online miglior prezzo
top farmacia online BRUFEN 600 mg 30 compresse prezzo farmacie online sicure
comprare farmaci online all’estero: BRUFEN 600 bustine prezzo – Farmacia online miglior prezzo
comprare farmaci online all’estero: Ibuprofene 600 generico prezzo – farmacie online affidabili
comprare farmaci online con ricetta Farmacie on line spedizione gratuita farmaci senza ricetta elenco
viagra prezzo farmacia 2023 viagra farmacia viagra online spedizione gratuita
https://sildenafilit.pro/# viagra generico sandoz
acquisto farmaci con ricetta
Farmacie online sicure: Farmacia online migliore – top farmacia online
viagra 100 mg prezzo in farmacia viagra senza prescrizione alternativa al viagra senza ricetta in farmacia
Farmacia online miglior prezzo Ibuprofene 600 prezzo senza ricetta farmacia online senza ricetta
lasix 20 mg: buy furosemide – buy lasix online
http://gabapentin.site/# where can i buy neurontin from canada
buy rybelsus: Buy compounded semaglutide online – rybelsus generic
neurontin 300 mg price cost of neurontin 600 mg how much is generic neurontin
Semaglutide pharmacy price: Buy compounded semaglutide online – Buy compounded semaglutide online
neurontin cream: neurontin brand coupon – neurontin 100mg cap
order neurontin: neurontin 300 mg price – neurontin sale
http://furosemide.men/# lasix dosage
rybelsus generic buy semaglutide online rybelsus
buy semaglutide online: semaglutide – rybelsus price
neurontin prescription online: neurontin 200 mg – order neurontin
prednisone price: prednisone 100 mg – prednisone 0.5 mg
https://rybelsus.tech/# rybelsus generic
neurontin singapore: neurontin 1000 mg – gabapentin medication
furosemide 40 mg: buy furosemide – lasix uses
ventolin 100 mcg: Ventolin inhaler best price – cheapest ventolin online uk
100 mg prednisone daily: prednisone 30 mg – prednisone 20mg price in india
rybelsus generic: rybelsus generic – cheap Rybelsus 14 mg
https://prednisolone.pro/# prednisone 5 mg tablet rx
rybelsus: rybelsus price – buy semaglutide online
ventolin uk price: Ventolin inhaler best price – ventolin tabs 4mg
https://indiadrugs.pro/# cheapest online pharmacy india
india online pharmacy reputable indian pharmacies indian pharmacy paypal
buying from online mexican pharmacy: mexican mail order pharmacies – reputable mexican pharmacies online
reputable indian online pharmacy: Indian pharmacy international shipping – Online medicine order
http://mexicanpharma.icu/# mexico drug stores pharmacies
canada rx pharmacy: canadian pharmacy prices – canadian pharmacy scam
world pharmacy india Indian pharmacy online indian pharmacy
http://canadapharma.shop/# canadian pharmacy drugs online
reputable mexican pharmacies online: pharmacies in mexico that ship to usa – п»їbest mexican online pharmacies
legitimate canadian online pharmacies: Cheapest online pharmacy – buy prescription drugs from canada cheap
https://mexicanpharma.icu/# mexican rx online
purple pharmacy mexico price list medicine in mexico pharmacies purple pharmacy mexico price list
п»їlegitimate online pharmacies india: online Indian pharmacy – indian pharmacies safe
pharmacies in mexico that ship to usa https://mexicanpharma.icu/# reputable mexican pharmacies online
mexico pharmacies prescription drugs
http://indiadrugs.pro/# world pharmacy india
http://canadapharma.shop/# my canadian pharmacy
https://canadapharma.shop/# canadian pharmacy antibiotics
canadian online drugs Online medication home delivery best canadian online pharmacy
http://vgrsansordonnance.com/# Viagra pas cher livraison rapide france
п»їpharmacie en ligne france: Cialis generique prix – pharmacie en ligne fiable
medication from mexico pharmacy: mexican pharma – pharmacies in mexico that ship to usa
medication from mexico pharmacy
SildГ©nafil 100 mg prix en pharmacie en France Viagra prix Viagra sans ordonnance livraison 24h
Viagra homme prix en pharmacie sans ordonnance: Viagra generique en pharmacie – Viagra homme prix en pharmacie sans ordonnance
http://clssansordonnance.icu/# pharmacie en ligne avec ordonnance
Viagra sans ordonnance livraison 48h: Meilleur Viagra sans ordonnance 24h – Viagra homme prix en pharmacie
Pharmacie sans ordonnance Medicaments en ligne livres en 24h pharmacie en ligne sans ordonnance
Viagra homme prix en pharmacie sans ordonnance: Viagra sans ordonnance 24h – Viagra sans ordonnance livraison 24h
pharmacie en ligne avec ordonnance: pharmacie en ligne pas cher – pharmacie en ligne pas cher
http://clssansordonnance.icu/# pharmacies en ligne certifiГ©es
Prix du Viagra en pharmacie en France viagra en ligne Acheter Sildenafil 100mg sans ordonnance
п»їpharmacie en ligne france: pharmacie en ligne – pharmacie en ligne sans ordonnance
pharmacie en ligne france livraison belgique: pharmacie en ligne – Pharmacie Internationale en ligne
Viagra sans ordonnance livraison 48h viagra en ligne Viagra sans ordonnance livraison 48h
You are my breathing in, I possess few web logs and infrequently run out from to post : (.
pharmacie en ligne france pas cher: Medicaments en ligne livres en 24h – pharmacies en ligne certifiГ©es
buy semaglutide online: buy semaglutide online – buy rybelsus online
https://rybelsus.shop/# cheapest rybelsus pills
ozempic cost ozempic ozempic coupon
rybelsus pill: rybelsus coupon – semaglutide online
https://ozempic.art/# buy cheap ozempic
https://rybelsus.shop/# semaglutide online
ozempic: buy cheap ozempic – buy cheap ozempic
cheapest rybelsus pills rybelsus price buy semaglutide online
semaglutide tablets buy semaglutide online semaglutide cost
buy ozempic pills online: buy ozempic – buy ozempic pills online
buy semaglutide pills: buy semaglutide online – buy rybelsus online
http://rybelsus.shop/# buy rybelsus online
buy ozempic pills online: buy cheap ozempic – buy ozempic pills online
buy ozempic pills online ozempic coupon ozempic coupon
Ozempic without insurance: ozempic – Ozempic without insurance
semaglutide tablets: rybelsus coupon – rybelsus pill
Expert Analysis, Winning Strategies, and In-Depth Match Insights. Our accuracy and thorough match recaps demonstrate why fans trust us to provide the best match predictions today. Virat Kohli continues to remain at the top with 661 runs in 13 matches so far. He scored 27 against DC to give his side a decent start. Also Read: Today’s IPL Match: PBKS vs CSK – who’ll win Punjab vs Chennai clash? Fantasy team, pitch report and moreApart from them, none of the players could put forward an impressive game. Will Jacks was dismissed at 1, Rajat Patidhar scored 2 off 3 balls, Glenn Maxwell scored 4 off 3 balls and Cameron Green was dismissed at 1. In the end, Dinesh Karthik and Swapnil Singh were unbeaten at 21 off 12 balls and 15 off 9 balls respectively. RR vs KKR | What has been the record of the Barsapara Stadium in IPL?
https://www.soundclick.com/member/default.cfm?memberID=7255262
You play only for fun without deposits, awards. Slot will be hoping for a winning start in Suffolk, with the omens in his favour as Liverpool have never lost at Portman Road (P5 W3 D2), playing more games there without losing than any other ground in the Premier League. Since their second league defeat of the season at Arsenal a month ago, Liverpool have won five successive matches – one of them being the Carabao Cup final and another an FA Cup fifth-round tie – with a depleted team. Every month all users start free bets with same stack 200 FC (FcTables Coins) Liverpool fixtures tab is showing the last 100 football matches with statistics and win draw lose icons. And while Ipswich finally ended their 22-year wait for a return to the Premier League, they will want to get one over their opponents. Their most recent top-flight fixture was against Liverpool in May 2002, losing 5-0 to confirm their relegation to the second tier.
http://rybelsus.shop/# rybelsus coupon
buy ozempic pills online ozempic cost buy ozempic pills online
semaglutide tablets: rybelsus cost – semaglutide cost
rybelsus price buy semaglutide pills buy semaglutide online
buy ozempic: Ozempic without insurance – buy cheap ozempic
rybelsus cost: semaglutide cost – semaglutide online
https://rybelsus.shop/# semaglutide online
buy rybelsus online cheapest rybelsus pills rybelsus cost
semaglutide cost: buy semaglutide online – buy semaglutide online
ozempic generic: ozempic online – ozempic online
http://rybelsus.shop/# semaglutide tablets
buy ozempic pills online: buy cheap ozempic – ozempic generic
ozempic cost ozempic ozempic
http://ozempic.art/# ozempic online
rybelsus pill rybelsus price buy rybelsus online
http://ozempic.art/# Ozempic without insurance
Ozempic without insurance: ozempic generic – buy ozempic pills online
http://ozempic.art/# buy ozempic
rybelsus coupon buy semaglutide pills rybelsus pill
https://ozempic.art/# Ozempic without insurance
https://ozempic.art/# buy ozempic pills online
buy ozempic pills online buy ozempic ozempic cost
rybelsus price: rybelsus price – buy semaglutide online
https://rybelsus.shop/# rybelsus cost
buy cheap ozempic ozempic coupon ozempic coupon
http://rybelsus.shop/# rybelsus cost
пин ап вход: пин ап вход – пин ап
pin up bet pin-up bonanza pin up bet
pin up kz: пин ап казахстан – пин ап казино онлайн
пин ап официальный сайт: пин ап – пин ап казино
pin up kz http://pinupaz.bid/# pinup azerbaycan
пинап казино
https://pinupkz.tech/# pin up казино
pinup az: pinup azerbaycan – pin up az
pin up casino pinup azerbaycan pin up az
пин ап кз https://pinupkz.tech/# пин ап казахстан
пин ап казино
pinup azerbaycan: pin-up kazino – pin-up kazino
pin up зеркало: пин ап казино зеркало – пинап казино
пинап кз pin up пин ап кз
пин ап зеркало: пин ап зеркало – пин ап вход
пин ап казахстан пинап казино pin up
http://pinupaz.bid/# pinup az
pin up kz https://pinupru.site/# пин ап вход
пин ап 634
pin up 306: pin up azerbaijan – pin up azerbaijan
pin up bet pin-up casino pin-up casino
https://pinupturkey.pro/# pin up bet
pin up http://pinupturkey.pro/# pin up bet
pin up kz
pin up pin up azerbaijan pin up azerbaijan
пинап кз https://pinupru.site/# pin up казино
pin up
pin up: пинап казино – пин ап
buy amoxicillin 500mg usa: Amoxicillin For sale – amoxicillin 500 coupon
http://gabapentin.auction/# neurontin pills for sale
https://stromectol.agency/# cost of ivermectin medicine
ivermectin cost cheapest stromectol stromectol online pharmacy
buy zithromax 1000mg online: generic zithromax – zithromax prescription online
http://stromectol.agency/# ivermectin 2mg
https://semaglutide.win/# Rybelsus 14 mg
Rybelsus 14 mg price buy semaglutide online rybelsus
ivermectin tablets uk: stromectol price – order minocycline 50mg online
http://semaglutide.win/# Rybelsus 7mg
stromectol 3mg order stromectol generic name for ivermectin
amoxicillin 825 mg: amoxicillin cheapest price – can we buy amoxcillin 500mg on ebay without prescription
https://semaglutide.win/# Rybelsus 14 mg
zithromax antibiotic zithromax over the counter canada zithromax azithromycin
https://gabapentin.auction/# neurontin tablets 300 mg
cheap Rybelsus 14 mg: Buy semaglutide pills – order Rybelsus for weight loss
https://gabapentin.auction/# canada neurontin 100mg lowest price
buy zithromax 1000mg online
http://stromectol.agency/# ivermectin 3mg tablets
antibiotic amoxicillin buy amoxil amoxicillin 500 tablet
https://amoxil.llc/# amoxicillin 500 mg
zithromax online usa: generic zithromax – order zithromax without prescription
https://stromectol.agency/# ivermectin gel
I like what you guys are up too. Such clever work and reporting! Keep up the superb works guys I have incorporated you guys to my blogroll. I think it will improve the value of my site :).
cheap amoxicillin 500mg Amoxicillin For sale generic amoxicillin cost
amoxicillin 500 mg online: buy amoxil – buying amoxicillin online
https://stromectol.agency/# oral ivermectin cost
https://stromectol.agency/# minocycline interactions
zithromax order online uk
I was looking through some of your content on this site and I conceive this site is real instructive! Keep on putting up.
amoxicillin tablets in india amoxicillin cheapest price generic amoxicillin online
https://gabapentin.auction/# neurontin price india
neurontin 200 mg tablets: gabapentin best price – buy cheap neurontin online
https://zithromax.company/# can i buy zithromax over the counter in canada
where can i buy zithromax uk
https://amoxil.llc/# can you purchase amoxicillin online
zithromax order zithromax zithromax 250
http://semaglutide.win/# Buy compounded semaglutide online
buy zithromax without presc: order zithromax – zithromax 600 mg tablets
http://semaglutide.win/# rybelsus generic
zithromax generic price zithromax for sale buy azithromycin zithromax
amoxicillin 500mg for sale uk: Amoxicillin For sale – amoxicillin 500mg capsule buy online
ivermectin tablets ivermectin 1 topical cream ivermectin 6mg
rybelsus generic: rybelsus generic – cheap Rybelsus 14 mg
https://zithromax.company/# zithromax purchase online
neurontin 600 mg pill gabapentin for sale 2000 mg neurontin
https://gabapentin.auction/# neurontin prescription medication
buy neurontin 100 mg canada: neurontin 1000 mg – neurontin 100mg cost
http://semaglutide.win/# rybelsus price
buy zithromax 1000mg online
minocycline 50 mg acne buy stromectol online minocycline 50mg pills online
best price for generic viagra on the internet: drug medication – ed medications comparison
top 10 online pharmacy in india: online shopping pharmacy india – indian pharmacy paypal
natural ed https://drugs24.pro/# best canadian pharmacy online
india pharmacy mail order india pharmacy mail order top online pharmacy india
buying prescription drugs in mexico: mexican online pharmacies prescription drugs – reputable mexican pharmacies online
medication drugs https://drugs24.pro/# top erection pills
top 10 pharmacies in india best india pharmacy online shopping pharmacy india
pills for erection: ed meds online canada – prescription drugs online without doctor
top 10 online pharmacy in india: best online pharmacy india – cheapest online pharmacy india
Online medicine home delivery online pharmacy india Online medicine home delivery
mexican border pharmacies shipping to usa: mexican rx online – reputable mexican pharmacies online
https://drugs24.pro/# prescription drugs without doctor approval
best india pharmacy
buying prescription drugs in mexico online purple pharmacy mexico price list mexican drugstore online
pharmacies in mexico that ship to usa: mexican drugstore online – reputable mexican pharmacies online
indian pharmacies safe: Online medicine home delivery – indian pharmacy paypal
viagra vs cialis bodybuilding generic ed pills ed meds online pharmacy
http://drugs24.pro/# best online drugstore
online shopping pharmacy india
Online medicine home delivery: online pharmacy india – indian pharmacy
buying prescription drugs in mexico buying prescription drugs in mexico buying prescription drugs in mexico online
reasons for ed http://indianpharmdelivery.com/# mail order pharmacy india
https://mexicanpharm24.pro/# medication from mexico pharmacy
top 10 online pharmacy in india
reputable indian pharmacies indian pharmacy paypal п»їlegitimate online pharmacies india
canadian drugs online http://drugs24.pro/# buy erection pills
ed dysfunction ed drugs online from canada doctors for erectile dysfunction
real viagra without a doctor prescription usa http://mexicanpharm24.pro/# medicine in mexico pharmacies
https://drugs24.pro/# natural ed cures
top online pharmacy india
https://rybelsus.icu/# buy semaglutide online
natural ed medications
ivermectin cream cost: best price shop – stromectol tablet 3 mg
http://clopidogrel.pro/# buy clopidogrel online
mens erections
order Rybelsus: rybelsus.icu – rybelsus.icu
generic plavix clopidogrel Plavix generic price
buy clopidogrel bisulfate: clopidogrel pills – plavix best price
https://paxlovid1st.shop/# Paxlovid buy online
best natural ed treatment
Paxlovid buy online: shop – Paxlovid buy online
Paxlovid over the counter best price on pills paxlovid price
ivermectin 4000: cheapest stromectol – stromectol covid 19
http://clopidogrel.pro/# generic plavix
male dysfunction treatment
https://stromectol1st.shop/# minocycline for acne 100mg
best online pharmacy india
buy plavix: generic pills – plavix best price
Paxlovid over the counter paxlovid covid Paxlovid over the counter
buy rybelsus: good price – rybelsus
http://clopidogrel.pro/# Clopidogrel 75 MG price
viagra without a doctor prescription walmart
paxlovid for sale: paxlovid shop – paxlovid covid
stromectol sales stromectol 1st shop ivermectin generic name
rybelsus.icu: order Rybelsus – buy rybelsus
https://rybelsus.icu/# cheaper
ed pills
Cost of Plavix on Medicare plavix price plavix medication
http://clopidogrel.pro/# Plavix 75 mg price
cheap ed pills
buy plavix: Clopidogrel 75 MG price – buy clopidogrel bisulfate
buy clopidogrel bisulfate: here – generic plavix
paxlovid buy: best price on pills – paxlovid india
http://clopidogrel.pro/# Plavix generic price
canadian drugstore online
paxlovid cost without insurance: shop – paxlovid covid
rybelsus.icu rybelsus.icu more
https://paxlovid1st.shop/# Paxlovid over the counter
pet antibiotics without vet prescription
semaglutide: buy rybelsus – rybelsus
rybelsus price: rybelsus generic – rybelsus.icu
buy rybelsus order Rybelsus rybelsus.icu
paxlovid generic: paxlovid pill – п»їpaxlovid
buy ivermectin for humans uk: cheapest stromectol – ivermectin generic name
It is the best time to make a few plans for the longer term and it is time to be happy. I have read this put up and if I may I wish to suggest you few fascinating issues or advice. Perhaps you could write next articles regarding this article. I wish to learn even more things about it!
Plavix 75 mg price check clopidogrel pro plavix best price
clopidogrel bisulfate 75 mg: check clopidogrel pro – Cost of Plavix without insurance
paxlovid india: shop – paxlovid generic
ivermectin new zealand stromectol shop minocycline pills
пинап: pin up – пин ап казино
en iyi casino siteleri en iyi casino siteleri h?zl? casino
https://1winindia.tech/# пин ап кз
пинап казино
1xbet зеркало: 1xbet официальный сайт – 1хставка
пин ап вход: пин ап вход – пинап зеркало
pin-up pin up 306 pin-up
пин ап вход: пин ап официальный сайт – пин ап зеркало
пин ап: pin up kz – пинап
https://1winci.icu/# пин ап официальный сайт
пинап кз
1xbet зеркало: 1xbet официальный сайт – 1хставка
pin-up: pin up 306 – pin up 306
https://1wintr.fun/# canl? casino siteleri
пин ап
пин ап вход: пин ап официальный сайт – пинап зеркало
пин ап официальный сайт: пин ап официальный сайт – пин ап
cazino: slot casino siteleri – canl? casino siteleri
https://1wintr.fun/# canl? casino
пин ап кз
пин ап: пин ап – пин ап
пин ап кз пинап кз пинап
slot casino siteleri: guvenilir casino siteleri – slot casino siteleri
пинап зеркало: пин ап – пин ап вход
пин ап: пинап зеркало – пинап зеркало
пин ап казино: пин ап казино – pin up kz
pin up пинап казино пин ап
1хбет: 1xbet зеркало – 1xbet зеркало
casino sitesi: casino oyunlar? – slot casino siteleri
pin up kz пин ап казино вход пин ап кз
пин ап зеркало: пин ап вход – пин ап официальный сайт
http://1wintr.fun/# canl? casino
пинап кз
https://1winci.icu/# пин ап
пин ап казино
пин ап официальный сайт пин ап пин ап вход
canl? casino siteleri: canl? casino siteleri – casino oyunlar?
online canadian drugstore prescription drugs online prescription for ed meds
pharmacies in mexico that ship to usa: best online pharmacies in mexico – mexican mail order pharmacies
best online pharmacies in mexico: mexican rx online – medication from mexico pharmacy
http://indianpharm1st.com/# п»їlegitimate online pharmacies india
pharmacy drugs: erectyle dysfunction – ed meds
best online pharmacies in mexico: reputable mexican pharmacies online – mexican drugstore online
http://mexicanpharm1st.com/# mexican online pharmacies prescription drugs
cheapest online pharmacy india: indian pharmacy – top online pharmacy india
pain meds online without doctor prescription cheap medications online natural help for ed
best online pharmacy india: mail order pharmacy india – best india pharmacy
india pharmacy mail order: top 10 pharmacies in india – best online pharmacy india
http://indianpharm1st.com/# pharmacy website india
top online pharmacy india: reputable indian pharmacies – indian pharmacy
mexican rx online mexican online pharmacies prescription drugs mexican online pharmacies prescription drugs
best online pharmacies in mexico: medication from mexico pharmacy – mexico drug stores pharmacies
http://indianpharm1st.com/# indian pharmacy online
purple pharmacy mexico price list: best online pharmacies in mexico – buying prescription drugs in mexico online
https://mexicanpharm1st.com/# mexican online pharmacies prescription drugs
mexico drug stores pharmacies: mexican drugstore online – mexican pharmaceuticals online
best india pharmacy: india online pharmacy – indian pharmacy paypal
http://mexicanpharm1st.com/# medication from mexico pharmacy
mexico drug stores pharmacies: best online pharmacies in mexico – mexico drug stores pharmacies
best online pharmacy india: top online pharmacy india – reputable indian pharmacies
sweet bonanza oyna sweetbonanzatr.pro sweet bonanza oyna
пин ап: Официальный Сайт – пинап казино
http://pinup-az.bid/# pin up azerbaycan
https://pinupzerkalo.fun/# Официальный Сайт
pinup bet and casino
Пин Ап Казино Официальный Сайт: пин ап кз – пинап казино
sweet bonanza sweet bonanza sweetbonanzatr.pro
http://biznes-fabrika.kz/# пинап казино
pin up zerkalo
http://sweetbonanzatr.pro/# sweetbonanzatrpro
pinup az: pinup az – pin-up casino giris
sweet bonanza oyna: sweet bonanza tr – sweet bonanza nas?l oynan?r
pin-up: pin-up casino giris – pin-up casino giris
pin up 306 pin-up casino giris pin up casino
пинап казино: пин ап зеркало – пин ап зеркало
pin-up casino giris: pin up casino – pin up casino
sweet bonanza nas?l oynan?r: sweet bonanza oyna – sweetbonanzatrpro
Пин Ап Казино Официальный Сайт: pin up kz – пин ап кз
https://pinup-az.bid/# pin up casino
pin up 306 pin up casino pinup-az bid
Пин Ап Казахстан: pin up kz – пин ап 634
sweet bonanza: sweet bonanza tr – sweetbonanzatr.pro
пин ап: бонусы пин ап – Пин Ап Казино Официальный Сайт в России
http://sweetbonanzatr.pro/# sweet bonanza tr
пинко pinco пин ап зеркало
sweet bonanza tr: sweetbonanzatr.pro – sweetbonanzatrpro
пин ап 634: pin up kz – пинап казино
http://biznes-fabrika.kz/# пин ап 634
pinup bet and casino
Пин Ап Казино Официальный Сайт в России: пинап казино – Пин Ап Казино Официальный Сайт в России
пин ап казино: бонусы пин ап – пинко
https://sweetbonanzatr.pro/# sweetbonanzatrpro
pinup-az bid pin-up pinup az
pin up 306: pinup-az bid – pin up casino
involves multisystem: Neurontin online – involves multisystem
https://amoxil1st.shop/# amoxil 1st shop
stromectol store: stromectol – stromectol delivery usa
https://paxlovid1st.store/# Visit store
Specialists: semaglutide online – Patient Portal
https://gabapentin1st.pro/# buy gabapentin
Pills Paxlovid: See risks – see a healthcare provider
rybelsus price: Regenerative Medicine – Specialists
http://semaglutide.ink/# rybelsus price
http://paxlovid1st.store/# cheapest paxlovid
semaglutide online: Regenerative Medicine – Patient Portal
see a healthcare provider: paxlovid price – See risks
I’ve been browsing on-line more than 3 hours lately, but I by no means discovered any interesting article like yours. It’s beautiful price enough for me. In my view, if all website owners and bloggers made excellent content material as you probably did, the web will be a lot more useful than ever before. “Perfection of moral virtue does not wholly take away the passions, but regulates them.” by Saint Thomas Aquinas.
top-rated pills: amoxil – amoxil
https://amoxil1st.shop/# buy amoxil online
best ed pills that work cheap pharmacy canadian drugstore online
Online medicine order: Indian pharmacy online – best online pharmacy india
indian pharmacy paypal: indian pharmacy purchase online – online pharmacy india
mexican online pharmacies prescription drugs mexico pharmacy cheap best online pharmacies in mexico
ed cure http://mexicanpharm24.cheap/# mexican online pharmacies prescription drugs
natural treatments for ed cheap drugs online ed clinics
ed natural remedies: affordable medication – best canadian pharmacy online
ed meds http://mexicanpharm24.cheap/# pharmacies in mexico that ship to usa
mexican mail order pharmacies: Legit online Mexican pharmacy – best online pharmacies in mexico
best ed treatment pills buy drugs ed pills cheap
top 10 online pharmacy in india: Indian pharmacy online – top online pharmacy india
top online pharmacy india Indian pharmacy online indian pharmacy online
top erection pills http://indianpharm24.pro/# п»їlegitimate online pharmacies india
mexican pharmaceuticals online mexican pharm 24 buying prescription drugs in mexico online
drug pharmacy: cheap meds – what is the best ed drug
indian pharmacy online: medicines from India – buy prescription drugs from india
male ed drugs low cost prescription ed medication
canadian online drugstore http://pharm24.pro/# cheapest ed pills
indian pharmacy online Best online Indian pharmacy indian pharmacy
online pharmacy india: Indian pharmacy to USA – Online medicine order
viagra without a doctor prescription walmart https://pharm24.pro/# ed prescription drugs
indian pharmacies safe: indian pharmacy purchase online – online pharmacy india
reputable mexican pharmacies online mexico pharmacy mexico drug stores pharmacies
mexican mail order pharmacies mexican pharm 24 medication from mexico pharmacy
https://indianpharm24.pro/# indianpharmacy com
ed meds online
india pharmacy: indian pharmacy purchase online – reputable indian pharmacies
dog antibiotics without vet prescription http://indianpharm24.pro/# Online medicine home delivery
ed medications over the counter: cheap pharmacy – prescription drugs online without
new erectile dysfunction treatment http://pharm24.pro/# best otc ed pills
online shopping pharmacy india: indian pharm 24 – india online pharmacy
http://indianpharm24.pro/# top 10 online pharmacy in india
ed symptoms
ed help: cheaper medications – best pills for ed
website https://pharm24.pro/# ed pills for sale
best drugs for erectile dysfunction: cheap pharmacy online – pills for erection
ultrabet yeni giris 1125: ultrabet tr online – ultrabet guncel
ultrabet: ultrabet giris – ultrabet bonus
ultrabet yeni giris 1125 ultrabet ultrabet yeni giris 1125
deneme bonusu veren yeni siteler https://slot-tr.online/# en kazancl? slot oyunlar?
https://ultrabet-tr.online/# ultrabet bonus
deneme bonusu veren siteler mycbet.com
deneme bonusu veren siteler mycbet.com: deneme bonusu veren siteler yeni – deneme bonusu veren siteler 2024
deneme bonusu veren yeni siteler http://casinositeleri.win/# Casino Siteleri
deneme bonusu veren siteler betturkey deneme bonusu veren siteler 2024 deneme bonusu veren siteler betturkey betturkey.com
ultrabet bonus: ultrabet bonus – ultrabet guncel
Canl? Casino Siteleri: Casino Siteleri – Deneme Bonusu Veren Siteler
https://matadorbet.bid/# matadorbet.bid
deneme bonusu veren siteler yeni
slot tr online: slot tr online – en kazancl? slot oyunlar?
deneme bonusu veren siteler yeni https://slot-tr.online/# slot oyunlar? puf noktalar?
deneme bonusu veren yeni siteler: deneme bonusu veren siteler mycbet.com – deneme bonusu veren siteler yeni
matadorbet giris matadorbet giris matadorbet.bid
deneme bonusu veren siteler betturkey https://matadorbet.bid/# matadorbet giris
slot siteleri: en cok kazand?ran slot oyunlar? – en kazancl? slot oyunlar?
deneme bonusu veren siteler betturkey betturkey.com deneme bonusu veren siteler deneme bonusu veren siteler yeni
deneme bonusu veren siteler denemebonusu2026.com: deneme bonusu veren yeni siteler – denemebonusuverensiteler.top
deneme bonusu veren yeni siteler http://denemebonusuverensiteler.top/# deneme bonusu veren siteler yeni
https://furpharm.com/# cheapest lasix
buy lasix fur pharm furosemide buy furosemide online
ere pharm best ed pill ere pharm erepharm pills
https://kampharm.shop/# kampharm.shop
http://furpharm.com/# lasix
buy rybelsus rybpharm: buy rybelsus online usa – buy rybelsus
cheapest Kamagra Kam Pharm buy kamagra oral jelly Kam Pharm cheapest Kamagra Kam Pharm
http://furpharm.com/# buy lasix fur pharm
https://gabapharm.com/# cheapest Gabapentin GabaPharm
kam pharm shop: kampharm shop – kamagra
buy rybelsus buy rybelsus canada buy rybelsus online usa
http://kampharm.shop/# Kam Pharm
kam pharm shop: cheapest Kamagra Kam Pharm – Kamagra Kam Pharm
https://kampharm.shop/# kampharm shop
furosemide furpharm.com: buy lasix fur pharm – lasix
buy rybelsus online usa rybpharm rybelsus buy rybelsus
http://gabapharm.com/# gabapentin GabaPharm
furosemide: buy furosemide online – cheapest lasix
https://rybpharm.com/# rybpharm
kamagra oral jelly: cheapest Kamagra Kam Pharm – kampharm.shop
buy gabapentin buy Gabapentin GabaPharm gabapentin
kampharm shop: kam pharm shop – cheapest Kamagra Kam Pharm
https://kampharm.shop/# Kamagra Kam Pharm
https://gabapharm.com/# GabaPharm
I am impressed with this web site, real I am a fan.
Buy gabapentin for humans gabapentin Buy gabapentin for humans
buy gabapentin: buy gabapentin india – buy gabapentin
https://gabapharm.com/# buy gabapentin india
kamagra: kampharm.shop – kamagra oral jelly
http://canadiandrugsgate.com/# ed in men
indian pharmacy online indianpharmacyeasy pharmacy website india
п»їbest mexican online pharmacies: mexican pharmacy online – medicine in mexico pharmacies
https://indianpharmacyeasy.com/# online shopping pharmacy india
how to overcome ed naturally: Canadian pharmacy best prices – online meds for ed
http://canadiandrugsgate.com/# viagra without a doctor prescription
http://indianpharmacyeasy.com/# cheapest online pharmacy india
best online pharmacies in mexico: mexicanpharmgate.com – purple pharmacy mexico price list
mail order pharmacy india Best Indian pharmacy Online medicine home delivery
https://indianpharmacyeasy.com/# world pharmacy india
buying prescription drugs in mexico: MexicanPharmGate – mexico pharmacies prescription drugs
Online medicine home delivery: Online Indian pharmacy – top online pharmacy india
Some truly nice stuff on this website , I like it.
https://indianpharmacyeasy.com/# online shopping pharmacy india
purple pharmacy mexico price list mexican drugstore online reputable mexican pharmacies online
cheap pet meds without vet prescription: Best Canadian pharmacy – ed pills otc
india online pharmacy: Indian pharmacy international shipping – top 10 online pharmacy in india
http://indianpharmacyeasy.com/# buy medicines online in india
over the counter ed remedies: Canada pharmacy online – ed for men
best india pharmacy indian pharmacy reputable indian online pharmacy
http://canadiandrugsgate.com/# canadian drugs
best drugs for ed: canadian pharmacy drugs gate – ed men
indian pharmacy online Indian online pharmacy ship to usa india pharmacy mail order
amoxacillian without a percription: com pharm – amoxicillin medicine over the counter
400 mg prednisone: prednisone – prednisone 2.5 mg
can you buy amoxicillin uk https://prednisoneraypharm.com/# prednisone 7.5 mg
buy priligy max pharm priligy priligy max pharm
how to get clomid for sale: clomid purchase online rex pharm – how can i get cheap clomid online
prednisone 5 mg tablet price: cheap prednisone – 40 mg prednisone pill
where can i get amoxicillin 500 mg http://prednisoneraypharm.com/# 6 prednisone
get cheap clomid: clomid online – how to get generic clomid online
price for amoxicillin 875 mg amoxil com pharm amoxicillin 750 mg price
can i order cheap clomid without a prescription: generic clomid – can i purchase generic clomid without dr prescription
amoxil generic https://priligymaxpharm.com/# Priligy tablets
price for amoxicillin 875 mg: Amoxicillin Com Pharm – generic amoxicillin online
amoxicillin 875 125 mg tab where to buy amoxicillin pharmacy amoxicillin for sale online
prednisone 5 mg tablet rx: prednisone ray pharm – prednisone tablets canada
dapoxetine online: cheap priligy – buy dapoxetine online
prednisone 20 mg prices: prednisone – prednisone canada pharmacy
cheap priligy Priligy tablets buy dapoxetine online
prednisone 20mg for sale: order Prednisone – prednisone 5 mg cheapest
amoxicillin medicine over the counter: buy amoxicillin online without prescription – amoxicillin online without prescription
dapoxetine online: priligy maxpharm – max pharm
how can i get cheap clomid for sale: can i get clomid without prescription – can you get clomid tablets
amoxicillin 500mg capsule buy online: Com Pharm – buy amoxicillin 500mg online
prednisone 40 mg: raypharm – prednisone pills for sale
buy amoxicillin online mexico: buy amoxil online – amoxicillin 500 mg price
can you buy clomid no prescription: where can i get clomid now – where to buy cheap clomid without insurance
40 mg prednisone pill: ray pharm – prednisone 54899
https://cytpremium.com/# Abortion pills online
cost of lisinopril 40 mg cheapest Lisinopril buy Lisinopril online
п»їbest mexican online pharmacies https://mexicanpharmgate.com/ mexico pharmacies prescription drugs
amoxicillin 500 mg brand name: Amoxicillin buy online – amoxicillin 1000 mg capsule
mexican drugstore online https://mexicanpharmgate.com/ mexican online pharmacies prescription drugs
purchase cytotec: cytotec pills buy online – cytotec abortion pill
buy clopidogrel online buy plavix Plavix generic price
amoxicillin without a doctors prescription: Amoxicillin Com Pharm – amoxicillin order online no prescription
https://cytpremium.com/# cytotec abortion pill
buy misoprostol over the counter: cyt premium – cytotec online
amoxicillin order online: com pharm – amoxicillin 500 mg price
benicar lisinopril: buy Lisinopril 1st – lisinopril1st
antiplatelet drug Plavix Clo Cost of Plavix without insurance
http://cytpremium.com/# buy cytotec pills
dapoxetine online: cheap priligy – Priligy tablets
minocycline 100mg without doctor: iver fast – minocycline 100 mg tablets online
https://plavixclo.com/# buy clopidogrel bisulfate
stromectol coronavirus inverfast.com ivermectin oral solution
prednisone in mexico: ray pharm – prednisone 10mg tablets
Lisinopril 1st: cheapest Lisinopril – buy Lisinopril 1st
http://lisinopril1st.com/# cheapest Lisinopril
buy 10 mg prednisone: Prednisone Without Prescription – prednisone 10 mg brand name
stromectol for head lice: buy Stromectol – stromectol for head lice
ivermectin 90 mg Ivermectin iver fast buy minocycline 50mg
pinup-kazi.ru: pinup – pinup
пин ап казино официальный сайт пин ап казино пин ап казино
пин ап казино онлайн: pinup kazi – pin up казино
пин ап казино онлайн: пин ап кз – пинап казино
пин ап казино: пинап казино – пинап казино
пин ап кз: пинап казино – пинап казино
pinup kazi: пин ап казино официальный сайт – pinup
пин ап казино официальный сайт пин ап вход пин ап зеркало
pinup: пинап казино – пин ап казино онлайн
вавада: vavada kazi – вавада казино онлайн
http://pinup-kazi.ru/# пин ап зеркало
pinup-kazi.ru: пинап казино – пинап казино
пин ап казино: пин ап зеркало – пин ап вход
pinup pinup kazi pinup
пинап казино: пин ап казино онлайн – пин ап кз
пин ап зеркало: пин ап казино – pinup-kazi.ru
пин ап казино: пин ап казино – пинап казино
пин ап вход: пин ап казино официальный сайт – пин ап зеркало
https://vavada-kazi.ru/# вавада
пинап казино: pinup-kazi.ru – пин ап вход
pinup kazi: pinup-kazi.kz – пинап казино
пин ап казино: pinup kazi – pinup-kazi.ru
best online pharmacy india: indian pharm – cheapest online pharmacy india
buying prescription drugs in mexico mexican pharm easy buying prescription drugs in mexico online
best online pharmacy india: indian pharm – indianpharmacy com
pharmacy website india: indian pharm star – world pharmacy india
how can i order prescription drugs without a doctor: canadian pharm – over the counter ed
online prescription for ed meds canadian pharmacy ed and diabetes
website: canadian pharm 1st – erectile dysfunction medication
best ed drug: canadianpharm1st – ed meds online pharmacy
buying prescription drugs in mexico online: MexicanPharmEasy – mexican rx online
injectable ed drugs: canadian pharm – best ed pill
indianpharmacy com indian pharm п»їlegitimate online pharmacies india
ed meds online without doctor prescription http://indianpharmstar.com/# buy prescription drugs from india
buy medicines online in india: indian pharm – buy medicines online in india
online pharmacy india: IndianPharmStar.com – buy medicines online in india
best pharmacy online: canadianpharm1st.com – medications for ed
buy medicines online in india indian pharm star reputable indian pharmacies
mexico drug stores pharmacies: mexican pharm easy – mexico pharmacies prescription drugs
pet meds without vet prescription canada: canadian pharmacy – erectile dysfunction cure
reputable mexican pharmacies online: MexicanPharmEasy – mexican drugstore online
purple pharmacy mexico price list mexican pharmacy medicine in mexico pharmacies
ed treatments: canadianpharm1st – cheap medication
reputable mexican pharmacies online: Mexican Pharm – buying from online mexican pharmacy
best online pharmacy india: indian pharm star – indian pharmacy online
reputable indian pharmacies IndianPharmStar indian pharmacies safe
top 10 pharmacies in india: indian pharm – online shopping pharmacy india
buying prescription drugs in mexico: Pharm Easy – reputable mexican pharmacies online
buying from online mexican pharmacy: mexican pharmacy – mexican pharmaceuticals online
best india pharmacy: indian pharm star – india pharmacy
mexican drugstore online: mexican pharmacy – mexican border pharmacies shipping to usa
buy medicines online in india: indian pharm – buy medicines online in india
ed medication online canadianpharm1st men with ed
buying prescription drugs in mexico: mexican pharmacy – buying prescription drugs in mexico online
mexican drugstore online: mexican pharmacy – mexico drug stores pharmacies
ed meds online without doctor prescription: canadian pharmacy – prescription drugs online
AmoxilPharm Amoxil Pharm Store Amoxil Pharm Store
buy rybelsus: Semaglutide pharmacy price – rybelsus price
Semaglutide pharmacy price: Buy semaglutide pills – semaglutide
minocycline 100mg for acne: Ivermectin Pharm Store – Ivermectin Pharm
order stromectol online: ivermectin ebay – Ivermectin Pharm Store
Gabapentin Pharm Gabapentin Pharm drug neurontin
ivermectin cost uk: Ivermectin Pharm – Ivermectin Pharm Store
Paxlovid.ink: paxlovid generic – paxlovid india
paxlovid for sale: Paxlovid.ink – Paxlovid.ink
Paxlovid.ink: Paxlovid.ink – Paxlovid.ink
neurontin 400 mg tablets: neurontin 30 mg – Gabapentin Pharm
https://gabapentinpharm.com/# drug neurontin
amoxicillin without rx: Amoxil Pharm Store – AmoxilPharm
paxlovid price: Paxlovid.ink – paxlovid india
amoxicillin 500 mg brand name Amoxil Pharm Store Amoxil Pharm Store
Amoxil Pharm Store: amoxicillin 200 mg tablet – amoxicillin 875 mg tablet
Amoxil Pharm Store: buy amoxicillin online no prescription – amoxicillin cephalexin
Ivermectin Pharm Store: Ivermectin Pharm Store – Ivermectin Pharm
Ivermectin Pharm: stromectol price usa – buy minocycline 50mg
https://paxlovid.ink/# Paxlovid.ink
buy cipro: buy ciprofloxacin – cipro 500mg best prices
buy cytotec online fast delivery: cytotec abortion pill – buy cytotec
can i order generic clomid no prescription: order cheap clomid pills – can i purchase generic clomid without dr prescription
buy generic zithromax no prescription zithromax 500mg price in india zithromax canadian pharmacy
cost of lisinopril 30 mg: lisinopril 40mg – lisinopril 250 mg
It?¦s really a great and helpful piece of info. I am glad that you shared this useful information with us. Please keep us informed like this. Thanks for sharing.
clomid without dr prescription where to get cheap clomid for sale how can i get cheap clomid
zithromax antibiotic: zithromax buy online no prescription – buy zithromax
cost generic clomid without a prescription: can i order generic clomid no prescription – can you get clomid no prescription
can i buy zithromax online can you buy zithromax over the counter in australia zithromax online usa no prescription
lisinopril brand name canada: medication lisinopril 10 mg – cost of prinivil
buy cipro online canada buy cipro cheap ciprofloxacin 500mg buy online
buy cytotec pills: buy cytotec online fast delivery – buy cytotec online
http://ciprofloxacin.cheap/# cipro for sale
clomid order where to get clomid without insurance can you get cheap clomid online
buy cipro online usa: ciprofloxacin mail online – buy cipro
can i order generic clomid pills: clomid brand name – how to get cheap clomid online
If you wish for to obtain a good deal from
this piece of writing then you have to apply these strategies to your won webpage.
ciprofloxacin 500 mg tablet price: buy cipro cheap – purchase cipro
lisinopril 2mg tablet where can i buy lisinopril 50 mg lisinopril
where buy generic clomid: can i buy clomid without prescription – get cheap clomid no prescription
I believe that is among the most significant information for me.
And i am satisfied reading your article. But should
statement on some general issues, The web site style is ideal, the articles is actually excellent : D.
Just right job, cheers
Hi, after reading this amazing post i am as well glad to
share my familiarity here with friends.
purchase cytotec: buy cytotec in usa – п»їcytotec pills online
Very good info. Lucky me I found your site by chance
(stumbleupon). I have saved it for later!
Heya great blog! Does running a blog similar to this
require a massive amount work? I’ve very little knowledge of programming but I was hoping to start my own blog
in the near future. Anyway, should you have any recommendations or tips
for new blog owners please share. I understand this is off topic nevertheless I just wanted to ask.
Cheers!
buy cytotec over the counter: buy cytotec pills online cheap – buy cytotec in usa
buy cytotec pills: cytotec abortion pill – buy cytotec over the counter
zestril 10 mg: medication zestoretic – lisinopril 25 mg cost
ciprofloxacin cipro cipro pharmacy
п»їcipro generic: cipro 500mg best prices – where can i buy cipro online
I pay a visit day-to-day some web sites and websites to read articles, but this
blog gives feature based writing.
cipro pharmacy: ciprofloxacin generic – cipro ciprofloxacin
azithromycin zithromax zithromax price south africa zithromax 500 mg
zithromax prescription: order zithromax without prescription – order zithromax over the counter
can you buy lisinopril: lisinopril drug – lisinopril online without a prescription
Howdy! I could have sworn I’ve visited this web site before but after going through many of
the posts I realized it’s new to me. Regardless, I’m definitely delighted I stumbled
upon it and I’ll be book-marking it and checking back regularly!
https://ciprofloxacin.cheap/# purchase cipro
buy prinivil online lisinopril 5 mg brand name lisinopril 40 mg no prescription
lisinopril 20mg tablets cost: lisinopril 10mg daily – lisinopril 20mg prices
http://cytotec.top/# buy cytotec pills online cheap
I relish, cause I found exactly what I was looking for. You’ve ended
my 4 day lengthy hunt! God Bless you man. Have a great day.
Bye
buy cipro without rx cipro online no prescription in the usa ciprofloxacin generic
Just desire to say your article is as astonishing.
The clearness on your submit is just excellent and that i could
assume you’re a professional on this subject. Fine with your permission let
me to grasp your feed to keep up to date with impending post.
Thank you one million and please keep up the enjoyable work.
buy cytotec over the counter: purchase cytotec – cytotec online
Hi there! This is my first visit to your blog! We are
a group of volunteers and starting a new initiative in a community
in the same niche. Your blog provided us valuable information to work on. You have done a wonderful job!
п»їcytotec pills online cytotec abortion pill cytotec abortion pill
You can certainly see your enthusiasm in the work you write.
The world hopes for more passionate writers like you who
are not afraid to mention how they believe.
At all times go after your heart.
Purchase Cenforce Online Cenforce 100mg tablets for sale cenforce.icu
discount ed pills: how to get ed pills – cheapest online ed meds
http://semaglutidetablets.store/# rybelsus semaglutide tablets
What’s up to all, how is everything, I think every one is getting more from this
site, and your views are fastidious in favor of new viewers.
Undeniably imagine that that you said. Your favorite justification appeared to be at the net the
simplest thing to understand of. I say to you, I certainly get irked even as folks consider
concerns that they just do not understand about. You managed to hit
the nail upon the top as smartly as outlined out the entire thing
with no need side-effects , other folks can take a signal.
Will probably be back to get more. Thanks
I really like it whenever people come together and share thoughts.
Great website, continue the good work!
Pretty nice post. I just stumbled upon your blog and wished to say that I’ve really enjoyed browsing your blog posts.
In any case I’ll be subscribing to your feed and I hope you write again very soon!
semaglutide tablets price: generic rybelsus tabs – semaglutide tablets store
https://kamagra.men/# Kamagra 100mg price
Heya i’m for the primary time here. I came across this board and I in finding It really useful &
it helped me out much. I am hoping to give one thing again and help
others such as you aided me.
https://kamagra.men/# Kamagra Oral Jelly
Hello to every body, it’s my first pay a visit of this webpage; this weblog
carries awesome and genuinely fine material in support of
visitors.
Woah! I’m really loving the template/theme of this blog.
It’s simple, yet effective. A lot of times it’s very hard
to get that “perfect balance” between user friendliness and appearance.
I must say you’ve done a excellent job with this. Also, the blog loads super fast for me on Internet explorer.
Superb Blog!
I am truly delighted to glance at this website posts which consists of lots of helpful facts,
thanks for providing these kinds of data.
ed symptoms: online ed pills – shots for ed
https://semaglutidetablets.store/# buy semaglutide
cheapest ed meds: online ed medications – cheap erection pills
impotence treatment drugs1st erectile dysfunction pills
https://drugs1st.pro/# drugs1st
cenforce.icu: cenforce for sale – cenforce
https://cenforce.icu/# Buy Cenforce 100mg Online
semaglutide tablets price: buy rybelsus online – rybelsus semaglutide tablets
http://kamagra.men/# Kamagra Oral Jelly
Your means of explaining all in this piece of writing is
genuinely good, every one be capable of without difficulty be aware of it, Thanks a lot.
My brother suggested I might like this blog. He was entirely right.
This post actually made my day. You can not imagine
simply how much time I had spent for this info! Thanks!
https://semaglutidetablets.store/# semaglutide tablets store
Cenforce 100mg tablets for sale: Cenforce 150 mg online – Buy Cenforce 100mg Online
Awesome! Its genuinely awesome article, I have got much clear idea regarding from
this post.
This post is really a nice one it helps new web people, who are wishing for blogging.
https://drugs1st.pro/# drugs1st
cenforce: cheapest cenforce – cenforce
You can definitely see your expertise in the work you write.
The world hopes for even more passionate writers such as you who aren’t afraid to mention how they believe.
Always follow your heart.
Kamagra tablets buy Kamagra Kamagra 100mg price
cheapest cenforce: Cenforce 100mg tablets for sale – cenforce.icu
https://cenforce.icu/# Buy Cenforce 100mg Online
Hello I am so grateful I found your blog page, I
really found you by accident, while I was looking on Digg for something else,
Regardless I am here now and would just like to say cheers for a incredible post and
a all round interesting blog (I also love the theme/design), I don’t
have time to read through it all at the moment but
I have saved it and also included your RSS feeds, so when I have time I will
be back to read more, Please do keep up the fantastic b.
https://drugs1st.pro/# drugs1st
2025 deneme bonusu veren bahis siteleri bahis siteleri deneme bonusu veren tГјm bet siteleri
пин ап казино официальный сайт: пин ап казино зеркало – пин ап вход
What’s up colleagues, nice post and fastidious urging commented at this
place, I am actually enjoying by these.
https://pinup2025.com/# пин ап казино
canli oyun: bonus veren siteler – deneme bonus veren siteler
After exploring a handful of the articles on your web page,
I seriously like your technique of blogging. I saved it to my bookmark webpage list and will
be checking back in the near future. Please visit my web
site as well and tell me how you feel.
I’ll right away grab your rss as I can’t find your e-mail subscription hyperlink or
newsletter service. Do you’ve any? Please let me understand in order that I may just subscribe.
Thanks.
http://slottr.top/# slot tr online
http://casinositeleri2025.pro/# gГјvenilir kumar siteleri
пин ап казино зеркало: пин ап казино зеркало – pinup 2025
oyun inceleme siteleri: gГјvenilir siteler – en Г§ok freespin veren slot 2025
Marvelous, what a website it is! This website provides useful facts to us, keep it up.
https://casinositeleri2025.pro/# bet siteler
Hurrah! At last I got a website from where I can genuinely get useful
facts concerning my study and knowledge.
I think what you said made a bunch of sense. But, what about
this? what if you added a little content?
I ain’t saying your information is not solid, but what if
you added a post title that grabbed folk’s attention? I mean Design concepts made
easy with SOLIDWORKS PDM is kinda boring. You
might peek at Yahoo’s home page and see how they
create post titles to grab viewers interested.
You might add a video or a related pic or two to grab readers excited about everything’ve written. In my opinion, it might bring your blog
a little bit more interesting.
пин ап зеркало: пин ап – pinup2025.com
http://slottr.top/# az parayla cok kazandiran slot oyunlar?
Have you ever considered creating an e-book or guest authoring
on other blogs? I have a blog based upon on the same subjects you
discuss and would really like to have you share some
stories/information. I know my viewers would appreciate your work.
If you are even remotely interested, feel free to send me an email.
Way cool! Some very valid points! I appreciate you writing this post and also the rest of the
website is extremely good.
Hi, I think your website might be having browser compatibility issues.
When I look at your blog site in Chrome, it looks fine but when opening in Internet Explorer, it has some overlapping.
I just wanted to give you a quick heads up! Other then that, awesome blog!
pinup2025.com: пин ап казино официальный сайт – пин ап казино зеркало
https://slottr.top/# az parayla cok kazandiran slot oyunlar?
Pretty nice post. I just stumbled upon your weblog and wanted to say that I have really enjoyed surfing
around your blog posts. After all I’ll be subscribing to your
rss feed and I hope you write again soon!
http://pinup2025.com/# pinup2025.com
slot oyunlar? puf noktalar?: slot tr online – az parayla cok kazandiran slot oyunlar?
http://casinositeleri2025.pro/# curacao lisans siteleri
пин ап зеркало pinup2025.com пин ап казино
en gГјvenilir bahis: casД±no – oyun sitesi oyun sitesi oyun sitesi
http://slottr.top/# az parayla cok kazandiran slot oyunlar?
Ahaa, its fastidious dialogue regarding this piece of writing here at this
blog, I have read all that, so at this time me also commenting
at this place.
pinup2025.com: пин ап зеркало – пин ап зеркало
slot oyunlarД±nda en Г§ok kazandД±ran oyun en az para yatД±rД±lan bahis siteleri gГјvenilir oyun alma siteleri
http://slottr.top/# slot oyunlar?
пинап казино: пин ап – pinup 2025
https://pinup2025.com/# pinup2025.com
slot oyunlar?: en cok kazand?ran slot oyunlar? – en cok kazand?ran slot oyunlar?
http://pinup2025.com/# пин ап вход
en cok kazand?ran slot oyunlar?: slot siteleri – slot oyunlar?
I like what you guys are up too. This sort of clever work and exposure!
Keep up the excellent works guys I’ve you guys to my
personal blogroll.
You are so interesting! I don’t suppose I have read through anything like
this before. So wonderful to find someone with original thoughts on this subject.
Really.. thanks for starting this up. This website is something that is needed on the
web, someone with some originality!
http://pinup2025.com/# пин ап казино официальный сайт
bahis oyun siteleri: gore siteler – canlД± casino oyna
kazino online: kaГ§ak siteler – bahis siteleri deneme bonusu
http://slottr.top/# slot oyunlar?
http://pinup2025.com/# pinup 2025
casinombet deneme bonusu beren siteler bet siteler
Thanks to my father who informed me regarding this webpage, this web site is really awesome.
slot tr online: slot tr online – slot siteleri
https://pinup2025.com/# пинап казино
I read this piece of writing completely regarding the comparison of latest and previous technologies, it’s remarkable
article.
https://slottr.top/# slot oyunlar?
http://pinup2025.com/# pinup 2025
пин ап казино зеркало: пин ап казино официальный сайт – пинап казино
free spin casino: en gГјvenilir casino siteleri – deneme bonusu veren siteler yorumlar
What’s up to every , as I am in fact eager of reading
this website’s post to be updated daily. It contains fastidious stuff.
https://slottr.top/# az parayla cok kazandiran slot oyunlar?
gГјvenilir bahis siteleri 2025: canlД± oyunlar – son bahis giriЕџ
This is a very good tip especially to those fresh to
the blogosphere. Short but very precise info… Thank you
for sharing this one. A must read article!
http://slottr.top/# slot siteleri
https://casinositeleri2025.pro/# casino gГјvenilir siteler
casino tГјrkiye: glГјcksspiel internet – deneme bonus siteler
Greetings! I know this is somewhat off topic but I was wondering which blog platform are you using for this site?
I’m getting tired of WordPress because I’ve had problems with hackers and I’m looking at options for another platform.
I would be fantastic if you could point me in the direction of a good platform.
en kazancl? slot oyunlar? slot tr online slot siteleri
Hmm is anyone else experiencing problems with the images on this blog loading?
I’m trying to figure out if its a problem on my end or if it’s the blog.
Any feed-back would be greatly appreciated.
http://slottr.top/# slot oyunlar? puf noktalar?
bedbo: bet oyun siteleri – deneme bonus veren siteler
It’s nearly impossible to find educated people for this subject, however, you sound like you
know what you’re talking about! Thanks
non prescription ed drugs Best Canadian online pharmacy ed pills that work
best otc ed pills: Canada pharmacy online – natural remedies for ed
http://indiapharmi.com/# best online pharmacy india
cure for ed: canadian pharmacy – canadian medications
http://mexicanpharmi.com/# mexican drugstore online
I’m gone to inform my little brother, that he should also go
to see this blog on regular basis to get updated from newest gossip.
http://canadianpharmi.com/# prescription drugs without doctor approval
https://mexicanpharmi.com/# purple pharmacy mexico price list
Have you ever thought about publishing an ebook or guest authoring on other blogs?
I have a blog based upon on the same information you discuss and would really like
to have you share some stories/information. I know my subscribers would enjoy your work.
If you’re even remotely interested, feel free
to shoot me an email.
cheapest online pharmacy india: Online medicine home delivery – online pharmacy india
bookmarked!!, I really like your web site!
top 10 online pharmacy in india: indiapharmi – indian pharmacy
http://canadianpharmi.com/# amoxicillin without a doctor’s prescription
http://indiapharmi.com/# reputable indian pharmacies
Having read this I believed it was very enlightening.
I appreciate you finding the time and effort to put this informative article together.
I once again find myself spending a lot of time both reading and posting comments.
But so what, it was still worth it!
https://canadianpharmi.com/# erectile dysfunction cure
mexico drug stores pharmacies: Purple pharmacy online ordering – buying prescription drugs in mexico
https://canadianpharmi.com/# best ed treatment pills
best online pharmacies in mexico: mexican pharmacy – medication from mexico pharmacy
the best ed pills Cheapest drug prices Canada ed remedies
http://canadianpharmi.com/# ed devices
erectile dysfunction medication: canadian pharmacy – medication drugs
http://mexicanpharmi.com/# best online pharmacies in mexico
best online pharmacies in mexico Online pharmacy mexican mail order pharmacies
reputable indian online pharmacy: india pharmi – pharmacy website india
https://mexicanpharmi.com/# п»їbest mexican online pharmacies
http://mexicanpharmi.com/# buying prescription drugs in mexico online
mexican drugstore online: mexican pharmacy – mexico pharmacies prescription drugs
http://canadianpharmi.com/# ed treatment review
https://canadianpharmi.com/# ed drug prices
buying prescription drugs in mexico: mexican pharmacy – mexico pharmacies prescription drugs
best online canadian pharmacy: canadianpharmi – errection problem cure
buying prescription drugs in mexico online Purple pharmacy online ordering mexico drug stores pharmacies
https://canadianpharmi.com/# herbal remedies for ed
Hi, everything is going fine here and ofcourse every one is sharing data, that’s
genuinely fine, keep up writing.
http://mexicanpharmi.com/# mexican pharmaceuticals online
I think the admin of this web page is truly working
hard in favor of his site, since here every material is
quality based material.
buy ciprofloxacin: CiPharmDelivery – ciprofloxacin order online
http://amoxstar.com/# amoxicillin generic
can i get generic clomid without prescription: can you get cheap clomid prices – where to buy cheap clomid
https://prednibest.com/# prednisone 20mg online pharmacy
http://clomidonpharm.com/# can i order generic clomid for sale
how to buy cheap clomid: where to get clomid without insurance – order generic clomid
Does your website have a contact page? I’m having a tough time locating it but, I’d like to shoot you an e-mail.
I’ve got some ideas for your blog you might be interested in hearing.
Either way, great site and I look forward to seeing it develop over time.
https://prednibest.com/# prednisone in canada
buying generic clomid price clomidonpharm how to get clomid no prescription
I got this web site from my buddy who told me about this
website and at the moment this time I am visiting this web page
and reading very informative content at this time.
https://amoxstar.com/# buy cheap amoxicillin
cipro 500mg best prices: cipro – cipro ciprofloxacin
https://cipharmdelivery.com/# buy ciprofloxacin over the counter
This article is truly a pleasant one it assists new web
users, who are wishing for blogging.
amoxicillin 500mg for sale uk: cost of amoxicillin 875 mg – where to get amoxicillin over the counter
http://cipharmdelivery.com/# cipro for sale
I love what you guys are usually up too. This sort of clever work and coverage!
Keep up the good works guys I’ve added you guys to my own blogroll.
Do you have a spam problem on this blog; I also am a blogger, and I was wondering your situation; many of us have developed some nice procedures and we are looking to exchange solutions with other folks,
why not shoot me an e-mail if interested.
amoxicillin 500mg prescription: AmoxStar – price for amoxicillin 875 mg
prednisone tablets: PredniBest – how to get prednisone without a prescription
When I initially commented I clicked the “Notify me when new comments are added” checkbox and now each time a comment is added I get three e-mails with the same comment.
Is there any way you can remove me from that service?
Thank you!
prednisone 20 mg without prescription prednisone purchase online buy prednisone 5mg canada
An outstanding share! I have just forwarded this onto a coworker who has been doing a little
research on this. And he in fact bought me dinner simply because I discovered it for him…
lol. So allow me to reword this…. Thank YOU for the meal!!
But yeah, thanx for spending some time to talk about this topic here on your internet site.
prednisone 1 mg daily: PredniBest – prednisone pills cost
http://prednibest.com/# how to buy prednisone online
order prednisone 100g online without prescription: PredniBest – order prednisone 10 mg tablet
get cheap clomid no prescription where can i get clomid now how to get generic clomid tablets
It’s really a great and helpful piece of information. I am glad that you just shared this useful info with us.
Please stay us up to date like this. Thank you for
sharing.
http://amoxstar.com/# where to buy amoxicillin
prednisone 20 tablet: prednisone 10mg for sale – buy prednisone online without a prescription
Hey there! I’ve been reading your web site for
some time now and finally got the bravery to go ahead and give you a
shout out from Dallas Texas! Just wanted to say keep up
the fantastic work!
Hi! Would you mind if I share your blog with my facebook group?
There’s a lot of folks that I think would really appreciate your content.
Please let me know. Thank you
prednisone buy no prescription: ordering prednisone – prednisone 10 mg canada
https://prednibest.com/# over the counter prednisone cheap
https://cipharmdelivery.com/# where to buy cipro online
ciprofloxacin mail online: ci pharm delivery – buy cipro online
prednisone daily use prednisone 10 mg tablet cost medicine prednisone 10mg
buying generic clomid tablets: clomidonpharm – can you buy generic clomid online
purchase cipro: CiPharmDelivery – where to buy cipro online
Thanks , I’ve just been searching for info about this subject for ages and
yours is the best I’ve discovered till now. However, what concerning the bottom line?
Are you certain about the source?
My relatives always say that I am killing my time here at web, except
I know I am getting experience all the time by reading thes pleasant articles or reviews.
http://prednibest.com/# prednisone canada prices
how much is prednisone 10 mg: PredniBest – prednisone 2.5 mg price
prednisone generic brand name buy prednisone online uk best pharmacy prednisone
where can i get amoxicillin 500 mg: amoxicillin 500 mg without prescription – amoxicillin 500mg no prescription
http://cipharmdelivery.com/# ciprofloxacin generic price
Hi, i believe that i saw you visited my site
so i got here to return the want?.I am attempting
to to find issues to enhance my web site!I guess its ok to use a few
of your concepts!!
generic clomid without insurance: where can i get cheap clomid pill – how can i get generic clomid online
http://clomidonpharm.com/# how to buy generic clomid online
Admiring the commitment you put into your site and detailed
information you provide. It’s great to come across a blog every once in a
while that isn’t the same unwanted rehashed information. Great read!
I’ve saved your site and I’m adding your RSS feeds
to my Google account.
where to buy prednisone without prescription: prednisone 10mg cost – can you buy prednisone over the counter
buy prednisone 20mg: Predni Best – 200 mg prednisone daily
https://prednibest.com/# can i buy prednisone online without prescription
prednisone brand name canada: Predni Best – 200 mg prednisone daily
where to buy cipro online: ciprofloxacin mail online – buy cipro no rx
http://prednibest.com/# prednisone 7.5 mg
generic prednisone pills: Predni Best – canada pharmacy prednisone
Thanks for finally writing about > Design concepts
made easy with SOLIDWORKS PDM < Liked it!
you’re in point of fact a good webmaster. The website loading speed is amazing.
It sort of feels that you’re doing any distinctive trick.
Moreover, The contents are masterwork. you have done a fantastic
activity in this topic!
Howdy! Would you mind if I share your blog with my myspace
group? There’s a lot of people that I think would really enjoy your content.
Please let me know. Cheers
Hi there, I read your blogs like every week. Your humoristic style is witty,
keep it up!
Every weekend i used to visit this web page, as i want enjoyment,
since this this web site conations actually good funny material too.
Valuable information. Lucky me I found your website accidentally, and I’m shocked why
this coincidence did not happened in advance! I
bookmarked it.
It’s really very difficult in this full of activity life to listen news on TV, so I just use
web for that reason, and get the latest information.
Article writing is also a fun, if you be familiar with then you can write if
not it is complex to write.
I know this website provides quality based articles
and extra data, is there any other web page which presents
these kinds of things in quality?
HOBOKEN, N.J. (AP) — A water main break that has left most residents of a small New Jersey city across the Hudson River from Manhattan with no water service or low water pressure will likely not be repaired until at least Wednesday. The problems in Hoboken began around noon Monday when a construction crew accidentally struck a water main. A spokesman for Veolia, the company that provides the city’s water, said the force of the rupture penetrated two mains or an interconnection of two mains. The Best for: Those who want a massage gun with an ergonomic bent, an exceptionally long battery life (eight hours), and a notably strong warranty (lifetime). It’s also a good choice for anyone looking for a solid massage gun at a decent price. According to a small 2018 study, people who had a 5-minute facial with a massage roller had increased blood flow to the area for at least 10 minutes after the massage. After 5 weeks of massage, blood flow response to heat was significantly improved.
https://www.easyfie.com/maybellinefitme
New Liquid Liner – $18 Estée Lauder Double Wear Infinite Waterproof Eyeliner When it comes to colorful eye makeup, Halsey’s About-Face hit the ground running when it launched in early 2021 and hasn’t stopped releasing hits since. The brand’s Matte Fluid Eye Paints, which picked up a Best of Beauty Award in 2021 apply beautifully as liquid eyeliners, but the About-Face Line Artist gel eyeliners were literally made for the task. These 2022 Best of Beauty winners go on bold and stay put all day long, and the color selection is so elevated and well-curated that you could pick completely one at random and start churning out editorial look after look with no problem. The available color selection is stunning. Each is opaque enough to wear on its own, but also looks beautiful layered over lipstick.
Heya! I understand this is sort of off-topic however I needed to ask.
Does running a well-established website like yours require a
large amount of work? I’m completely new to blogging however I do write in my diary daily.
I’d like to start a blog so I can share my
own experience and views online. Please let me know if you have any ideas
or tips for new aspiring blog owners. Thankyou!
Hey! Someone in my Myspace group shared this site with us so I came to give
it a look. I’m definitely enjoying the information. I’m bookmarking and
will be tweeting this to my followers! Outstanding blog and superb design and style.
https://gramster.ru/# пин ап казино зеркало
gramster.ru gramster.ru пин ап зеркало
пин ап вход: gramster.ru – пин ап казино зеркало
https://gramster.ru/# gramster.ru
http://gramster.ru/# pinup 2025
https://gramster.ru/# пин ап
пин ап казино официальный сайт gramster.ru пин ап казино зеркало
Keep on working, great job!
Attractive component of content. I just stumbled upon your weblog and
in accession capital to claim that I acquire in fact enjoyed account your blog posts.
Anyway I’ll be subscribing for your augment and even I
fulfillment you get right of entry to consistently quickly.
pinup 2025: gramster.ru – пин ап казино
пин ап казино: gramster – пинап казино
пин ап казино официальный сайт gramster пин ап вход
http://gramster.ru/# пин ап вход
https://gramster.ru/# пин ап казино
http://gramster.ru/# пин ап казино
пин ап вход: gramster.ru – pinup 2025
http://gramster.ru/# pinup 2025
https://gramster.ru/# пин ап вход
https://gramster.ru/# пин ап казино официальный сайт
http://gramster.ru/# пин ап казино официальный сайт
http://gramster.ru/# пин ап зеркало
пин ап вход: Gramster – пин ап зеркало
http://gramster.ru/# пин ап
https://gramster.ru/# пин ап вход
Hey! I know this is kinda off topic but I was wondering
if you knew where I could get a captcha plugin for my comment form?
I’m using the same blog platform as yours and I’m having problems finding one?
Thanks a lot!
https://gramster.ru/# pinup 2025
http://gramster.ru/# пин ап казино официальный сайт
пин ап зеркало: Gramster – пин ап казино
http://gramster.ru/# pinup 2025
http://gramster.ru/# пин ап казино
пин ап вход gramster pinup 2025
http://gramster.ru/# pinup 2025
https://gramster.ru/# пинап казино
https://gramster.ru/# пин ап зеркало
пин ап казино зеркало: Gramster – пинап казино
I am really impressed together with your writing skills and also with the structure on your weblog. Is that this a paid theme or did you customize it your self? Either way stay up the excellent high quality writing, it is uncommon to look a nice weblog like this one today..
https://gramster.ru/# пин ап казино официальный сайт
http://canadianpharmacy.win/# onlinecanadianpharmacy 24
http://mexicanpharmacy.store/# purple pharmacy mexico price list
the canadian pharmacy: best online canadian pharmacy – best online canadian pharmacy
https://mexicanpharmacy.store/# medicine in mexico pharmacies
Today, I went to the beachfront with my kids. I found a sea shell and gave it to
my 4 year old daughter and said “You can hear the ocean if you put this to your ear.”
She placed the shell to her ear and screamed. There was a hermit crab inside
and it pinched her ear. She never wants to go back! LoL I know this is entirely off topic but I had to tell someone!
top 10 pharmacies in india mail order pharmacy india online pharmacy india
This is the right blog for anybody who wants to find out
about this topic. You know a whole lot its almost hard to argue
with you (not that I really would want to…HaHa). You certainly put
a fresh spin on a subject that’s been written about for a long time.
Wonderful stuff, just wonderful!
Wow! This blog looks exactly like my old one! It’s on a totally different subject
but it has pretty much the same layout and design. Wonderful choice of
colors!
https://indianpharmacy.win/# reputable indian online pharmacy
canadian pharmacy: best online canadian pharmacy – canadian pharmacy victoza
http://indianpharmacy.win/# world pharmacy india
https://canadianpharmacy.win/# canadian pharmacy victoza
http://indianpharmacy.win/# п»їlegitimate online pharmacies india
mexico drug stores pharmacies mexican mail order pharmacies reputable mexican pharmacies online
canadian pharmacy king: best online canadian pharmacy – canadian world pharmacy
http://canadianpharmacy.win/# safe canadian pharmacies
http://indianpharmacy.win/# online shopping pharmacy india
http://indianpharmacy.win/# indianpharmacy com
http://mexicanpharmacy.store/# mexico drug stores pharmacies
best canadian online pharmacy: canadian pharmacy win – canadian drug prices
п»їbest mexican online pharmacies pharmacies in mexico that ship to usa buying prescription drugs in mexico online
http://mexicanpharmacy.store/# best online pharmacies in mexico
http://canadianpharmacy.win/# canadian pharmacy sarasota
canadian pharmacy com: best canadian online pharmacy – canadian pharmacy no rx needed
Fine way of telling, and good post to take information concerning my presentation subject, which
i am going to deliver in academy.
http://mexicanpharmacy.store/# mexican online pharmacies prescription drugs
http://indianpharmacy.win/# buy prescription drugs from india
Attractive section of content. I just stumbled upon your web site and in accession capital to
assert that I acquire in fact enjoyed account your weblog
posts. Any way I will be subscribing to your feeds or even I achievement
you access constantly fast.
mexican mail order pharmacies п»їbest mexican online pharmacies mexican mail order pharmacies
http://indianpharmacy.win/# top 10 pharmacies in india
https://indianpharmacy.win/# online shopping pharmacy india
buy prescription drugs from india: world pharmacy india – indian pharmacy
An intriguing discussion is worth comment. I do believe that you need to write more on this issue, it may not be a
taboo subject but usually people do not speak about such subjects.
To the next! Best wishes!!
https://indianpharmacy.win/# online shopping pharmacy india
https://canadianpharmacy.win/# canada drugstore pharmacy rx
india pharmacy mail order top 10 pharmacies in india reputable indian pharmacies
https://indianpharmacy.win/# cheapest online pharmacy india
best online pharmacies in mexico: mexico pharmacies prescription drugs – buying prescription drugs in mexico
I’ve been exploring for a little for any high-quality articles or blog posts on this kind of area
. Exploring in Yahoo I finally stumbled upon this website.
Reading this information So i am glad to express that I’ve a very just right uncanny feeling I discovered just what I needed.
I so much definitely will make certain to do not put out of your mind this site
and provides it a glance on a constant basis.
http://canadianpharmacy.win/# canadian pharmacy victoza
http://mexicanpharmacy.store/# best online pharmacies in mexico
pharmacy in canada: best canadian online pharmacy – legal canadian pharmacy online
http://indianpharmacy.win/# top online pharmacy india
mexican border pharmacies shipping to usa mexican online pharmacies prescription drugs medicine in mexico pharmacies
https://canadianpharmacy.win/# canadian pharmacy 365
http://canadianpharmacy.win/# canadian discount pharmacy
world pharmacy india: indianpharmacy com – online shopping pharmacy india
Link exchange is nothing else however it is only placing the other person’s weblog link on your page at suitable
place and other person will also do similar for you.
https://indianpharmacy.win/# indian pharmacies safe
http://indianpharmacy.win/# Online medicine order
buying from online mexican pharmacy pharmacies in mexico that ship to usa mexican rx online
canada online pharmacy: canadian pharmacy meds – canadapharmacyonline legit
http://indianpharmacy.win/# indian pharmacy online
http://mexicanpharmacy.store/# medicine in mexico pharmacies
https://mexicanpharmacy.store/# mexican border pharmacies shipping to usa
canadian pharmacy ed medications: best canadian pharmacy – best canadian pharmacy
http://mexicanpharmacy.store/# buying prescription drugs in mexico
reputable mexican pharmacies online mexico pharmacies prescription drugs best online pharmacies in mexico
https://mexicanpharmacy.store/# mexican pharmaceuticals online
http://mexicanpharmacy.store/# mexican mail order pharmacies
Hey very nice blog!
Hey! I’m at work surfing around your blog from my new iphone!
Just wanted to say I love reading through your blog and look forward to all your
posts! Carry on the superb work!
It’s very simple to find out any matter on net as compared to
books, as I found this article at this site.
Tadalafil Tablet MaxPillsForMen.com Buy Cialis online
best online ed pills: erectile dysfunction pills for sale – online erectile dysfunction
Viagra online price: Fast Pills For Men – Viagra online price
https://fastpillsformen.com/# Sildenafil 100mg price
https://maxpillsformen.com/# Buy Tadalafil 5mg
http://fastpillseasy.com/# buy erectile dysfunction pills
ed online pharmacy: FastPillsEasy – order ed pills
Cheap Cialis: buy cialis online – Buy Tadalafil 10mg
Great delivery. Sound arguments. Keep up the
amazing work.
http://maxpillsformen.com/# cialis for sale
http://fastpillseasy.com/# ed rx online
Tadalafil Tablet: MaxPillsForMen – buy cialis pill
Wow, amazing blog format! How long have you been blogging for?
you make running a blog look easy. The total glance of your website is wonderful, let alone the content!
http://fastpillseasy.com/# ed pills for sale
Cialis 20mg price: MaxPillsForMen.com – Tadalafil Tablet
Someone necessarily help to make seriously articles I might state.
This is the first time I frequented your web page and to this point?
I amazed with the analysis you made to create this actual submit incredible.
Fantastic process!
This site was… how do I say it? Relevant!! Finally I’ve found something that helped me.
Many thanks!
cheap erectile dysfunction pills: cheap ed – discount ed pills
What’s up everybody, here every one is sharing such know-how,
so it’s nice to read this blog, and I used to pay a quick visit this web site everyday.
http://fastpillseasy.com/# buy erectile dysfunction treatment
Cialis over the counter MaxPillsForMen buy cialis pill
http://fastpillseasy.com/# online erectile dysfunction
Buy generic 100mg Viagra online: buy viagra online – cheapest viagra
Tadalafil Tablet: Buy Tadalafil 5mg – Buy Tadalafil 5mg
https://fastpillseasy.com/# what is the cheapest ed medication
This is really interesting, You are a very skilled blogger.
I have joined your rss feed and look forward to seeking more of
your fantastic post. Also, I have shared your website
in my social networks!
best ed pills online online ed medicine generic ed meds online
http://fastpillsformen.com/# cheap viagra
https://fastpillseasy.com/# pills for erectile dysfunction online
Viagra without a doctor prescription Canada: Fast Pills For Men – Generic Viagra online
where to buy ed pills: FastPillsEasy – online prescription for ed
https://fastpillseasy.com/# online ed pills
Cheap Sildenafil 100mg Fast Pills For Men buy Viagra over the counter
boner pills online: best online ed meds – cheapest ed pills
https://fastpillsformen.com/# cheapest viagra
https://maxpillsformen.com/# Generic Cialis price
http://fastpillsformen.com/# Cheap Sildenafil 100mg
Cialis 20mg price: Generic Cialis without a doctor prescription – Buy Cialis online
ed online treatment: cheap cialis – cheapest online ed meds
http://maxpillsformen.com/# Generic Cialis price
Sildenafil Citrate Tablets 100mg sildenafil online sildenafil 50 mg price
Be the first to write a review. 4.6 from 357 Reviews Hear about exclusive offers, get early access to collabs & quicker checkout Read & Shop NowThe top 5 products from NécessaireNécessaire isn’t just about body care with a skincare state of mind — they’re a brand setting the standard for considered beauty. Learn more about their ethos and lineup of simple, effective body care. How to use:Brush gel into brows with short upward strokes. “I prefer the Anastasia Beverly Hills Brow Definer to the Brow Wiz because the shape of the pencil makes it really, really easy for me to get the brow shape I want,” says Allure staff editor Jihan Forbes. “Plus, it's so quick to sharpen. I gently run the edges along a piece of paper.” Melanie Rud is a Chicago-based writer with 10 years of experience covering beauty. She covers all things skincare for Byrdie, from ingredients to acne advice.
http://www.gothicpast.com/myomeka/posters/show/78940
CLEAN. VEGAN. CRUELTY-FREE. NO SLS, SLES, PARABENS, PHTHALATES, SYNTHETIC COLORS. CLEAN. VEGAN. CRUELTY-FREE. NO SLS, SLES, PARABENS, PHTHALATES, SYNTHETIC COLORS. CLEAN. VEGAN. CRUELTY-FREE. NO SLS, SLES, PARABENS, PHTHALATES, SYNTHETIC COLORS. CLEAN. VEGAN. CRUELTY-FREE. NO SLS, SLES, PARABENS, PHTHALATES, SYNTHETIC COLORS. CLEAN. VEGAN. CRUELTY-FREE. NO SLES, SLES, PARABENS, PHTHALATES, SYNTHETIC COLORS. CLEAN. VEGAN. CRUELTY-FREE. NO SLS, SLES, PARABENS, PHTHALATES, SYNTHETIC COLORS. The perfect serum duo for day and night. Cleanse, tone, hydrate, and depuff your eyes! Transformative formulas with buildable impact. From everyday nudes to radiant finishing touches, meet the makeup bag must-haves inspired by Kim’s most iconic beauty moments. We are deeply inspired by Mother Earth and dedicate ourselves to practices that minimize our environmental impact.
What's more, the latest formulas now feature skincare ingredients, such as niacinamide for oily skin, glycerin and vitamin E for moisture, and antioxidants to address damage from sun and pollutants. Others have a built-in tint or color-correcting properties, so you might not even need makeup once you're done. With that in mind, if you want to give primer a try, we already did all the testing for you. Here are the best primers, according to Glamour editors. If your skin tends to err on the side of normal to dry, Jaikaran says water- and gel-based primers will work well for you. On the other hand, if your skin is oily, gel-based primers may work even better, as they tend to better grip makeup. ELF is one of the most famous drugstore makeup brands out there. They offer many primers, such as ones that hydrate the skin and create a dewy look, while others absorb excess oil and leave you with a matte complexion. Their most famous primer is the Poreless Putty Primer, which also reduces the look of pores.
https://www.fitundgesund.at/profil/nazbubestsi1972
L’Oreal’s directions state to let this primer base dry before applying mascara, but we found this is bad advice, as doing so causes mascara applied afterward to drag over lashes, resulting in a slightly messy-looking application. Goes on clumpy therefore makes your mascara clumpy. It does definitely give some volume and length to your lashes though. If you’re willing to spend a ton of time with a lash brush to unclump them… Delivery Within Ireland Not only does this allow your mascara to last much longer, but it helps to condition them over time. This helps to leave them soft and nourished. If you want even more conditioning (and help to grow your lashes) check out my favorite lash serum here. So I tried this primer after curling my lashes and it makes my eyelashes straight! I use it with the voluminous mascara carbon black so it’s not the mascara. How do I keep my eyelashes curled using this primer? I don’t have the problem with other mascaras without the primer
https://fastpillseasy.com/# cheap ed pills
buy Viagra online: cheap viagra – over the counter sildenafil
https://fastpillseasy.com/# boner pills online
ed meds on line: erectile dysfunction online – ed prescription online
https://fastpillseasy.com/# cheap ed medicine
http://fastpillsformen.com/# best price for viagra 100mg
cheap ed medication: FastPillsEasy – buy ed pills
We are a group of volunteers and starting a new scheme in our community.
Your web site offered us with valuable info to work on. You have done an impressive job and
our whole community will be grateful to you.
best online ed pills: FastPillsEasy – cheap boner pills
https://fastpillseasy.com/# best online ed pills
http://fastpillseasy.com/# best online ed meds
Viagra online price: FastPillsForMen.com – Cheap generic Viagra online
Nice answers in return of this question with firm arguments and telling
the whole thing concerning that.
https://maxpillsformen.com/# Generic Cialis price
Sildenafil 100mg price: FastPillsForMen.com – sildenafil online
cheapest ed online: FastPillsEasy – erection pills online
It is perfect time to make some plans for the longer term and it’s time to be happy.
I have learn this post and if I may just I desire to recommend
you some interesting things or tips. Perhaps you could write
subsequent articles regarding this article. I wish to learn more
issues approximately it!
where to buy erectile dysfunction pills: discount ed meds – where to get ed pills
Generic Cialis without a doctor prescription buy cialis pill Generic Tadalafil 20mg price
top rated ed pills: fast pills easy – get ed meds today
https://fastpillseasy.com/# buy ed pills
ed meds on line: cheap cialis – ed treatment online
naturally like your web site but you need to take a look at the spelling on several
of your posts. Many of them are rife with spelling issues and I
find it very troublesome to tell the reality nevertheless I
will certainly come again again.
http://slotsiteleri25.com/# slot casino siteleri
https://sweetbonanza25.com/# sweet bonanza demo oyna
https://slotsiteleri25.com/# guvenilir slot siteleri
sweet bonanza: sweet bonanza oyna – sweet bonanza demo oyna
Right here is the perfect blog for anybody who wishes to find out about this topic.
You understand so much its almost hard to argue with you (not that I actually
would want to…HaHa). You definitely put a new spin on a topic that has been written about
for many years. Wonderful stuff, just wonderful!
Hi there to every one, the contents present at this web site
are really remarkable for people experience, well, keep
up the nice work fellows.
https://slotsiteleri25.com/# en cok kazand?ran slot oyunlar?
sweet bonanza: sweet bonanza kazanma saatleri – sweet bonanza slot
http://denemebonusuverensiteler25.com/# yat?r?ms?z deneme bonusu veren siteler
http://casinositeleri25.com/# Casino Siteleri
Casino Siteleri: orisbet – Casino Siteleri
sweet bonanza giris sweet bonanza sweet bonanza kazanma saatleri
http://denemebonusuverensiteler25.com/# yat?r?ms?z deneme bonusu veren siteler
Simply desire to say your article is as surprising. The clarity in your put up is just spectacular and that i can think you’re a professional on this subject.
Well together with your permission allow me to seize your RSS
feed to keep up to date with impending post. Thanks 1,000,000 and please carry
on the gratifying work.
https://sweetbonanza25.com/# sweet bonanza oyna
Hey! This is kind of off topic but I need some guidance from an established blog.
Is it difficult to set up your own blog? I’m not very techincal but I can figure things out pretty quick.
I’m thinking about setting up my own but I’m not sure where to start.
Do you have any tips or suggestions? Thank you
sweet bonanza oyna: sweet bonanza giris – sweet bonanza demo oyna
slot oyunlar? puf noktalar?: slot casino siteleri – guvenilir slot siteleri
Casino Siteleri deneme veren siteler guvenilir casino siteleri
http://slotsiteleri25.com/# slot oyunlar?
sweet bonanza giris: sweet bonanza giris – sweet bonanza demo oyna
Casino Siteleri: Deneme Bonusu Veren Siteler – canl? casino siteleri
https://slotsiteleri25.com/# slot oyunlar? puf noktalar?
yeni deneme bonusu veren siteler denemebonusuverensiteler25 deneme bonusu veren yeni siteler
slot casino siteleri: slot siteleri – slot siteleri
Amazing! This blog looks just like my old one! It’s on a totally different subject
but it has pretty much the same layout and design. Excellent choice
of colors!
Deneme Bonusu Veren Siteler: Deneme Bonusu Veren Siteler – en guvenilir casino siteleri
guvenilir slot siteleri guvenilir slot siteleri en kazancl? slot oyunlar?
This is very interesting, You are a very skilled blogger.
I’ve joined your rss feed and look forward to seeking more of your excellent post.
Also, I’ve shared your website in my social networks!
sweet bonanza guncel: sweet bonanza oyna – sweet bonanza oyna
slot oyunlar?: slot oyunlar? – guvenilir slot siteleri
bonus veren bahis siteleri yasal
I am so grateful for your article.Really looking forward to read more. Keep writing.
en cok kazand?ran slot oyunlar? en cok kazand?ran slot oyunlar? slot oyunlar?
denemebonusuverensiteler25: yeni deneme bonusu veren siteler – deneme bonusu veren siteler yeni
https://sweetbonanza25.com/# sweet bonanza demo oyna
deneme bonusu veren siteler: deneme bonusu veren siteler – yat?r?ms?z deneme bonusu veren siteler
Hi there, I enjoy reading all of your article. I wanted to write a little comment to support you.
If you are going for most excellent contents like I do,
simply go to see this site all the time because it
offers quality contents, thanks
deneme bonusu veren casino siteleri en guvenilir casino siteleri Casino Siteleri
It’s really a nice and useful piece of info. I’m happy that
you just shared this helpful information with us. Please
keep us informed like this. Thank you for sharing.
canl? casino siteleri: casino bahis siteleri – deneme bonusu veren casino siteleri
guvenilir slot siteleri: slot oyunlar? – slot siteleri
https://sweetbonanza25.com/# sweet bonanza
Casino Siteleri casino bahis siteleri Casino Siteleri
I always used to study article in news papers but now as I am a user of web thus from
now I am using net for content, thanks to web.
It is actually a great and useful piece ofinfo. I’m glad that you just shared this helpful information with us.Please keep us up to date like this. Thanks for sharing.
sweet bonanza slot: sweet bonanza yorumlar – sweet bonanza yorumlar
deneme bonusu veren casino siteleri deneme bonusu veren casino siteleri deneme bonusu veren casino siteleri
https://slotsiteleri25.com/# en cok kazand?ran slot oyunlar?
slot oyunlar?: en kazancl? slot oyunlar? – slot siteleri
deneme bonusu veren yeni siteler: denemebonusuverensiteler25 – yeni deneme bonusu veren siteler
guvenilir slot siteleri slot oyunlar? puf noktalar? guvenilir slot siteleri
I always emailed this webpage post page to all my contacts,
for the reason that if like to read it afterward my friends will too.
sweet bonanza: sweet bonanza slot – sweet bonanza kazanma saatleri
https://slotsiteleri25.com/# en cok kazand?ran slot oyunlar?
denemebonusuverensiteler25: deneme bonusu veren siteler – deneme bonusu veren yeni siteler
you’re really a excellent webmaster. The site loading pace is incredible.
It sort of feels that you’re doing any unique trick.
Also, The contents are masterwork. you’ve done a great process
on this topic!
Casino Siteleri: deneme bonusu veren casino siteleri – en guvenilir casino siteleri
sweet bonanza guncel: sweet bonanza demo oyna – sweet bonanza guncel
Thank you, I’ve just been looking for information about this topic for a while and yours is the greatest I’ve came upon so far. However, what about the bottom line? Are you certain concerning the supply?
slot oyunlar? puf noktalar? az parayla cok kazandiran slot oyunlar? slot oyunlar? puf noktalar?
https://denemebonusuverensiteler25.com/# deneme bonusu veren siteler yeni
mexico pharmacies prescription drugs: mexican pharmaceuticals online – Mexican Easy Pharm
Truly many of superb tips.how to write a good college admissions essay dissertation writing professional resume writing services
canadapharmacyonline legit: CanadianMdPharm – canadian pharmacy prices
Excellent post. I was checking continuously this
blog and I’m impressed! Very helpful info specially the
last part 🙂 I care for such info much. I was seeking this certain information for a very
long time. Thank you and best of luck.
canadian pharmacy scam https://indiancertpharm.shop/# Indian Cert Pharm
pharmacy website india
mexican drugstore online Mexican Easy Pharm buying prescription drugs in mexico
https://canadianmdpharm.shop/# canadian pharmacy meds reviews
onlinepharmaciescanada com
best online pharmacy india: Indian pharmacy that ships to usa – Indian pharmacy international shipping
cheap canadian pharmacy online https://canadianmdpharm.com/# buy canadian drugs
Online medicine home delivery
These are in fact enormous ideas in concerning blogging. You have touched some nice things here. Any way keep up wrinting.
canada pharmacy online legit: Canadian Md Pharm – pharmacy canadian superstore
canadian valley pharmacy https://mexicaneasypharm.shop/# mexican online pharmacies prescription drugs
top 10 online pharmacy in india
reliable canadian online pharmacy Canadian Md Pharm canadian pharmacy price checker
Very good post. I will be experiencing a few of these issues
as well..
I’ve been browsing online more than 2 hours today, yet I
never found any interesting article like yours.
It is pretty worth enough for me. In my view, if all webmasters and bloggers made good content as you did, the net will be a lot more useful than ever before.
certified canadian international pharmacy https://indiancertpharm.com/# Best online Indian pharmacy
п»їlegitimate online pharmacies india
https://mexicaneasypharm.com/# Mexican Easy Pharm
cheap canadian pharmacy online
reputable canadian online pharmacies https://canadianmdpharm.shop/# canadian pharmacy checker
india pharmacy
I think this is a real great blog article.Much thanks again.
best canadian online pharmacy best canadian pharmacy online best mail order pharmacy canada
canadian pharmacy 24 https://mexicaneasypharm.com/# mexican pharmaceuticals online
reputable indian online pharmacy
Thanks-a-mundo for the blog post.Really looking forward to read more. Will read on…
Mexican Easy Pharm: Mexican Easy Pharm – Mexican Easy Pharm
Awesome article post. Will read on…
canada online pharmacy https://mexicaneasypharm.shop/# Mexican Easy Pharm
india online pharmacy
Mexican Easy Pharm medication from mexico pharmacy medicine in mexico pharmacies
canadian pharmacy cheap https://canadianmdpharm.com/# canadian pharmacy in canada
top online pharmacy india
Mexican Easy Pharm mexico drug stores pharmacies Mexican Easy Pharm
canadian pharmacy reviews https://indiancertpharm.shop/# indian pharmacy
best india pharmacy
A big thank you for your article post.Thanks Again. Keep writing.
Indian pharmacy that ships to usa Best Indian pharmacy Online medicine
I really enjoy the post.Thanks Again. Will read on…
mexican drugstore online: Mexican Easy Pharm – buying from online mexican pharmacy
pharmacies in mexico that ship to usa: п»їbest mexican online pharmacies – Mexican Easy Pharm
https://indiancertpharm.com/# Best online Indian pharmacy
canada pharmacy reviews
canadian pharmacy scam: canadian pharmacy king reviews – canadian pharmacies
I truly appreciate this blog article.Much thanks again. Cool.
canadian pharmacy 24h com safe: reputable canadian online pharmacies – reliable canadian pharmacy
indian pharmacy: indian pharmacy – Online medicine
canadian pharmacy 24h com: Canadian Md Pharm – escrow pharmacy canada
It’s awesome for me to have a web page, which is helpful in support of my experience.
thanks admin
canadapharmacyonline com: canadianpharmacymeds – canadian pharmacy 24h com safe
mexican pharmaceuticals online: mexico pharmacies prescription drugs – medicine in mexico pharmacies
Indian Cert Pharm: Indian pharmacy international shipping – Indian pharmacy that ships to usa
canadian online pharmacy https://indiancertpharm.com/# IndianCertPharm
world pharmacy india
п»їbest mexican online pharmacies: mexican mail order pharmacies – п»їbest mexican online pharmacies
Mexican Easy Pharm: Mexican Easy Pharm – Mexican Easy Pharm
https://mexicaneasypharm.com/# Mexican Easy Pharm
canadian pharmacy online store
Do you have any video of that? I’d care to find out more details.
Online pharmacy: Best Indian pharmacy – Best online Indian pharmacy
Mexican Easy Pharm: Mexican Easy Pharm – п»їbest mexican online pharmacies
It’s great that you are getting ideas from this article as well as from our dialogue made here.
Mexican Easy Pharm: Mexican Easy Pharm – medication from mexico pharmacy
certified canadian pharmacy: canadian drug stores – buy drugs from canada
Indian pharmacy international shipping: Online medicine – indian pharmacy
Greetings! I know this is kinda off topic but I was wondering if you knew where I could locate a captcha plugin for my comment form?
I’m using the same blog platform as yours and I’m having trouble finding one?
Thanks a lot!
Indian pharmacy that ships to usa: Indian pharmacy international shipping – Indian pharmacy that ships to usa
What i don’t understood is if truth be told how you are now not really
much more neatly-liked than you may be now. You’re very intelligent.
You already know thus considerably with regards to this matter, produced me for
my part consider it from a lot of various angles. Its like women and men are not
fascinated until it is one thing to do with Girl gaga!
Your own stuffs excellent. All the time care for it up!
https://mexicaneasypharm.com/# medicine in mexico pharmacies
pharmacy in canada
best canadian pharmacy online: CanadianMdPharm – canadian pharmacy victoza
An interesting discussion is definitely worth comment.
I believe that you need to write more about this subject matter, it might not be a taboo subject
but typically people don’t speak about these topics.
To the next! Best wishes!!
Online medicine: Online medicine – Indian Cert Pharm
Best online Indian pharmacy Best Indian pharmacy Indian pharmacy international shipping
Mexican Easy Pharm: Mexican Easy Pharm – Mexican Easy Pharm
indian pharmacy: indian pharmacy – Best online Indian pharmacy
Online medicine: Best Indian pharmacy – Indian pharmacy international shipping
Mexican Easy Pharm: medication from mexico pharmacy – buying prescription drugs in mexico online
Mexican Easy Pharm: medication from mexico pharmacy – purple pharmacy mexico price list
This was an excellent blog post. I really liked it. I’ll be back to see some more. Thank you .
IndianCertPharm: Indian Cert Pharm – IndianCertPharm
I will immediately clutch your rss as I can’t in finding your e-mail subscription link or newsletter service. Do you’ve any? Kindly allow me understand in order that I could subscribe. Thanks.
You made some good points there. I looked on the internet for the subject and found most persons will approve with your blog.
https://mexicaneasypharm.shop/# mexican mail order pharmacies
canadian pharmacy reviews
Indian Cert Pharm indian pharmacy Indian Cert Pharm
Kama Pharm: Kama Pharm – Kama Pharm
prednisone 10mg price in india 50mg prednisone tablet Pred Pharm
https://semapharm24.shop/# semaglutide tablets store
prednisone 20mg cheap
https://semapharm24.com/# semaglutide tablets store
super kamagra
Kamagra tablets: Kamagra Oral Jelly – cheap kamagra
Hello, i feel that i noticed you visited my blog so i got here to
go back the desire?.I’m trying to in finding issues to improve my
website!I guess its adequate to use a few of your ideas!!
https://cytpharm.shop/# buy cytotec online
buy Kamagra
rybelsus semaglutide tablets: SemaPharm24 – rybelsus semaglutide tablets
Your method of describing everything in this paragraph is actually good, every one be able to easily be aware of it, Thanks a lot.
prednisone tablets india prednisone 5 50mg tablet price order prednisone with mastercard debit
PredPharm: cost of prednisone 5mg tablets – prednisone 15 mg tablet
https://kamapharm.shop/# Kama Pharm
buy Kamagra
http://semapharm24.com/# cheap semaglutide pills
1 mg prednisone cost
PredPharm prednisone 50 mg for sale 10 mg prednisone
Excellent blog! Do you have any tips for aspiring writers?
I’m planning to start my own blog soon but I’m a little lost
on everything. Would you suggest starting with a free platform like
Wordpress or go for a paid option? There are so many options out
there that I’m completely confused .. Any suggestions?
Bless you!
PredPharm: PredPharm – prednisone uk price
http://kamapharm.com/# Kama Pharm
cheap kamagra
https://kamapharm.com/# sildenafil oral jelly 100mg kamagra
400 mg prednisone
SemaPharm24: buy rybelsus online – semaglutide tablets for weight loss
https://semapharm24.com/# Sema Pharm 24
cheap kamagra
Kamagra Oral Jelly Kama Pharm cheap kamagra
Wonderful blog! I found it while browsing on Yahoo News. Do you have any tips
on how to get listed in Yahoo News? I’ve been trying for a while but I never seem to get there!
Thank you
http://kamapharm.com/# cheap kamagra
Kamagra 100mg price
prednisone 10 mg tablet: PredPharm – prednisone 30 mg coupon
Hi there, every time i used to check weblog posts here early in the break of day, for the reason that i like to learn more and more.
Hi there! I’m at work browsing your blog from my new iphone 3gs!
Just wanted to say I love reading through your
blog and look forward to all your posts! Carry on the fantastic work!
PredPharm: prednisone canada prescription – PredPharm
http://predpharm.com/# prednisone 20 mg purchase
Kamagra 100mg price
semaglutide tablets SemaPharm24 buy semaglutide
priligy: Priligy tablets – buy dapoxetine online
Very shortly this web site will be famous amid all blogging and site-building people,
due to it’s pleasant articles or reviews
Kama Pharm: Kama Pharm – Kama Pharm
https://cytpharm.shop/# CytPharm
Kamagra tablets
http://semapharm24.com/# Sema Pharm 24
prednisone 40 mg rx
generic rybelsus tabs semaglutide tablets Sema Pharm 24
prednisone 250 mg: Pred Pharm – prednisone without prescription 10mg
https://predpharm.com/# PredPharm
cheap kamagra
Sema Pharm 24: generic rybelsus tabs – rybelsus semaglutide tablets
https://predpharm.shop/# Pred Pharm
prednisone 10mg buy online
https://cytpharm.shop/# buy cytotec online
Kamagra Oral Jelly
buy Kamagra: super kamagra – buy Kamagra
Kama Pharm Kama Pharm Kama Pharm
http://cytpharm.com/# cytotec online
cheap kamagra
generic rybelsus tabs: semaglutide tablets price – SemaPharm24
http://kamapharm.com/# п»їkamagra
prednisone for sale in canada
buy rybelsus online: cheap semaglutide pills – semaglutide tablets for weight loss
https://predpharm.shop/# prednisone 1mg purchase
Kamagra 100mg price
super kamagra Kama Pharm Kama Pharm
https://cytpharm.shop/# buy cytotec online
Kamagra 100mg price
http://predpharm.com/# prednisone cream rx
prednisone over the counter south africa
https://kamapharm.com/# Kama Pharm
Kamagra 100mg
dapoxetine online buy priligy Priligy tablets
Sema Pharm 24: SemaPharm24 – semaglutide tablets for weight loss
http://kamapharm.com/# buy kamagra online usa
prednisone 5 mg cheapest
https://semapharm24.com/# SemaPharm24
Kamagra 100mg price
This web site definitely has all the information I needed
about this subject and didn’t know who to ask.
Which part of this tutorial is the most challenging for beginners?Visit us IT Telkom
purchase cytotec: Cyt Pharm – buy cytotec over the counter
Hello to all, it’s in fact a nice for me to pay a quick visit this
site, it includes helpful Information.
http://cytpharm.com/# buy cytotec online
buy kamagra online usa
Kama Pharm: Kamagra 100mg price – Kama Pharm
When someone writes an paragraph he/she keeps the image of a user in his/her mind that how a user can know it. Therefore that’s why this piece of writing is amazing. Thanks!
Priligy tablets: priligy – buy dapoxetine online
We’re a bunch of volunteers and starting a brand new scheme in our community.
Your site offered us with useful information to work on. You’ve performed a formidable process and our whole community can be grateful to
you.
PredPharm over the counter prednisone pills PredPharm
http://cytpharm.com/# buy cytotec
where to buy prednisone in canada
Hey there! Do you know if they make any plugins to help with
Search Engine Optimization? I’m trying to get my blog
to rank for some targeted keywords but I’m not seeing very good gains.
If you know of any please share. Thanks!
https://dappharm.shop/# cheap priligy
Kamagra 100mg price
Kamagra 100mg: cheap kamagra – cheap kamagra
Kamagra Oral Jelly: Kama Pharm – Kama Pharm
http://semapharm24.com/# buy rybelsus online
prednisone 10 mg tablet
Pretty section of content. I just stumbled upon your website and in accession capital
to assert that I get in fact enjoyed account your blog posts.
Anyway I’ll be subscribing to your feeds and even I achievement you access consistently rapidly.
https://dappharm.shop/# dapoxetine online
Kamagra Oral Jelly
sildenafil oral jelly 100mg kamagra Kama Pharm Kamagra 100mg
п»їkamagra: buy Kamagra – cheap kamagra
buy priligy: priligy – dapoxetine online
Pred Pharm: cost of prednisone 10mg tablets – PredPharm
https://kamapharm.shop/# Kama Pharm
Kamagra tablets
Farmacie online sicure: farmacie online sicure – farmacie online affidabili
Really all kinds of helpful tips! retin-a cream
farmacia senza ricetta recensioni: viagra generico sandoz – viagra online spedizione gratuita
acquisto farmaci con ricetta
farmacie online autorizzate elenco Farma Brufen Farmacie online sicure
http://farmatadalitaly.com/# migliori farmacie online 2024
farmacie online affidabili
Hi, all is going sound here and ofcourse every one is sharing facts, that’s truly excellent, keep up writing.
Howdy this is kinda of off topic but I was wondering if blogs use WYSIWYG editors
or if you have to manually code with HTML.
I’m starting a blog soon but have no coding expertise so I wanted
to get advice from someone with experience. Any help would be
greatly appreciated!
miglior sito per comprare viagra online: Viagra – viagra online spedizione gratuita
Farmacia online miglior prezzo: Farma Prodotti – farmacia online piГ№ conveniente
acquisto farmaci con ricetta
Hello! Do you use Twitter? I’d like to follow you if that would be ok.I’m definitely enjoying your blog and look forward to newposts.
I cannot thank you enough for the article.Really looking forward to read more. Awesome.
https://farmaprodotti.shop/# farmacie online autorizzate elenco
farmacia online piГ№ conveniente
farmacie online sicure: FarmTadalItaly – acquisto farmaci con ricetta
top farmacia online Ibuprofene 600 prezzo senza ricetta farmacie online affidabili
acquisto farmaci con ricetta: farmacia online piГ№ conveniente – Farmacie online sicure
migliori farmacie online 2024
https://farmaprodotti.com/# comprare farmaci online all’estero
farmacie online sicure
Hello There. I found your blog using msn. This is a
really well written article. I’ll be sure to bookmark it and come back to read more of your
useful information. Thanks for the post. I’ll certainly
comeback.
https://farmasilditaly.com/# le migliori pillole per l’erezione
comprare farmaci online con ricetta
comprare farmaci online con ricetta Tadalafil generico migliore acquistare farmaci senza ricetta
acquisto farmaci con ricetta: BRUFEN prezzo – comprare farmaci online con ricetta
farmacia online piГ№ conveniente: comprare farmaci online con ricetta – farmacie online affidabili
farmacia online senza ricetta
https://farmatadalitaly.shop/# п»їFarmacia online migliore
farmacie online autorizzate elenco
http://farmasilditaly.com/# viagra prezzo farmacia 2023
farmacie online autorizzate elenco
Superb blog you have here but I was curious about if you
knew of any message boards that cover the same topics talked about in this article?
I’d really love to be a part of online community where I can get advice from other knowledgeable individuals that share the same
interest. If you have any suggestions, please let me know.
Cheers!
acquisto farmaci con ricetta: Cialis senza ricetta – п»їFarmacia online migliore
Farmacie online sicure
farmacia online Brufen senza ricetta п»їFarmacia online migliore
https://farmaprodotti.shop/# farmacia online piГ№ conveniente
acquistare farmaci senza ricetta
farmacie online affidabili: BRUFEN prezzo – farmacie online autorizzate elenco
comprare farmaci online con ricetta: FarmTadalItaly – comprare farmaci online all’estero
top farmacia online
http://farmatadalitaly.com/# farmacie online sicure
Farmacie on line spedizione gratuita
Farmacie on line spedizione gratuita Farma Prodotti migliori farmacie online 2024
Farmacia online miglior prezzo: BRUFEN 600 acquisto online – farmacia online piГ№ conveniente
comprare farmaci online con ricetta
http://farmabrufen.com/# BRUFEN 600 acquisto online
п»їFarmacia online migliore
Farmacie online sicure: acquistare farmaci senza ricetta – Farmacie on line spedizione gratuita
Farmacia online miglior prezzo
http://farmasilditaly.com/# viagra pfizer 25mg prezzo
acquistare farmaci senza ricetta
farmacie online sicure FarmaBrufen comprare farmaci online con ricetta
Really enjoyed this blog post.Thanks Again. Want more.
http://farmabrufen.com/# Farma Brufen
farmacia online
miglior sito dove acquistare viagra: Farma Sild Italy – miglior sito dove acquistare viagra
comprare farmaci online all’estero
acquisto farmaci con ricetta: Farma Prodotti – farmacia online senza ricetta
farmaci senza ricetta elenco: Farmacia online miglior prezzo – farmacia online
farmacie online sicure
viagra naturale viagra farmacia cerco viagra a buon prezzo
cialis farmacia senza ricetta: Viagra – viagra naturale in farmacia senza ricetta